Author

Avery Collins

Browsing

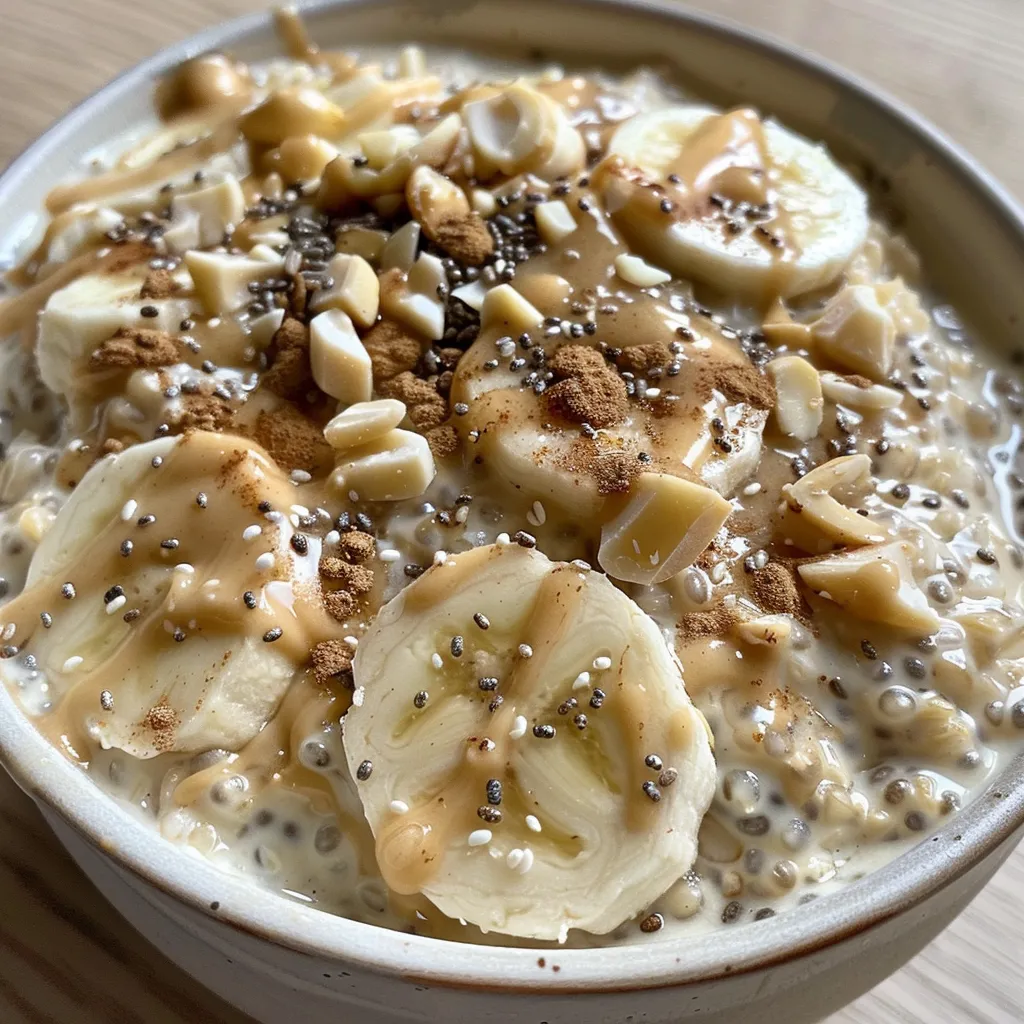
Unleash Your Morning Adventure with the Ultimate Breakfast Smoothie Bowl

Welcome to a culinary journey that will ignite your mornings with flavor and fun! This Breakfast Smoothie Bowl is not just a meal; it’s an experience that combines creamy bananas, vibrant mixed berries, and crunchy toppings. Perfect for those who crave a deliciously adventurous start to their day, this smoothie bowl is packed with nutrients and bursting with flavor. Let’s dive in and uncover the secrets to creating the perfect smoothie bowl that will have you jumping out of bed!

Why You’ll Love This Recipe

There are countless reasons to embrace this Breakfast Smoothie Bowl, but here are five that stand out:

  • Nutritious Fuel: Packed with vitamins, minerals, and antioxidants from fresh fruits, this bowl is a fantastic way to kick-start your day with health in mind.
  • Creamy and Delicious: The frozen banana and yogurt create a rich, creamy base that will make every spoonful a delight.
  • Customizable: This recipe is incredibly versatile! You can mix and match ingredients according to your taste or dietary needs.
  • Quick and Easy: With just a few minutes of prep, you can whip up a wholesome breakfast that feels indulgent.
  • Family-Friendly: This smoothie bowl is a hit with both kids and adults, making it a perfect option for the whole family.

Ingredient Breakdown: What You Need for the Perfect Smoothie Bowl

Let’s get into the heart of the matter: the ingredients. Each component serves a purpose, creating a harmonious blend of flavors and textures.

  • 1 frozen banana: Adds creaminess and natural sweetness. If you don’t have a frozen banana, slice a fresh one and freeze it for at least 2 hours before blending.
  • ½ cup frozen mixed berries: Choose any combination of strawberries, blueberries, or raspberries for a burst of flavor and antioxidants.
  • ½ cup Greek yogurt or plant-based yogurt: Provides a rich texture and a protein boost. For a dairy-free option, use coconut or almond yogurt.
  • ¼ cup milk of choice: Almond, oat, or dairy milk all work—start with less and add more if needed for your desired thickness.
  • 1 tablespoon nut butter: Peanut, almond, or cashew for depth of flavor and healthy fats.
  • ½ teaspoon vanilla extract: Optional, but this elevates the flavor profile beautifully.
  • 1 teaspoon honey or maple syrup: Optional sweetness that you can adjust based on your taste preferences.
  • ¼ cup granola: Adds crunch and texture—look for a low-sugar variety for a healthier option.
  • Sliced fresh fruit: Banana, kiwi, mango, or berries for topping and visual appeal.
  • 1 teaspoon chia seeds or flaxseeds: Packed with fiber and omega-3s, these tiny seeds add a nutritional boost.
  • 1 tablespoon coconut flakes: For a tropical touch that enhances flavor and texture.
  • Drizzle of nut butter: Because who doesn’t love extra nutty goodness?

Step-by-Step Guide: How to Create Your Smoothie Bowl Masterpiece

A colorful breakfast smoothie bowl filled with mixed berries and banana, garnished with coconut flakes and chia seeds.
  1. Make sure your banana is frozen for the best texture. If not, slice a fresh banana and freeze it for at least 2 hours before blending.
  2. In a high-speed blender, combine: 1 frozen banana, ½ cup frozen mixed berries, ½ cup Greek yogurt, ¼ cup milk of choice, 1 tablespoon nut butter, and ½ teaspoon vanilla extract. Optional: Add 1 teaspoon honey or maple syrup for sweetness.
  3. Blend on low speed, gradually increasing to medium. If the mixture is too thick to blend, add a tiny bit more milk, but keep it as thick as possible for a spoonable consistency.
  4. The smoothie should be thick and creamy (not runny). If it’s too thin, add a few more frozen berries or a couple of ice cubes and blend again.
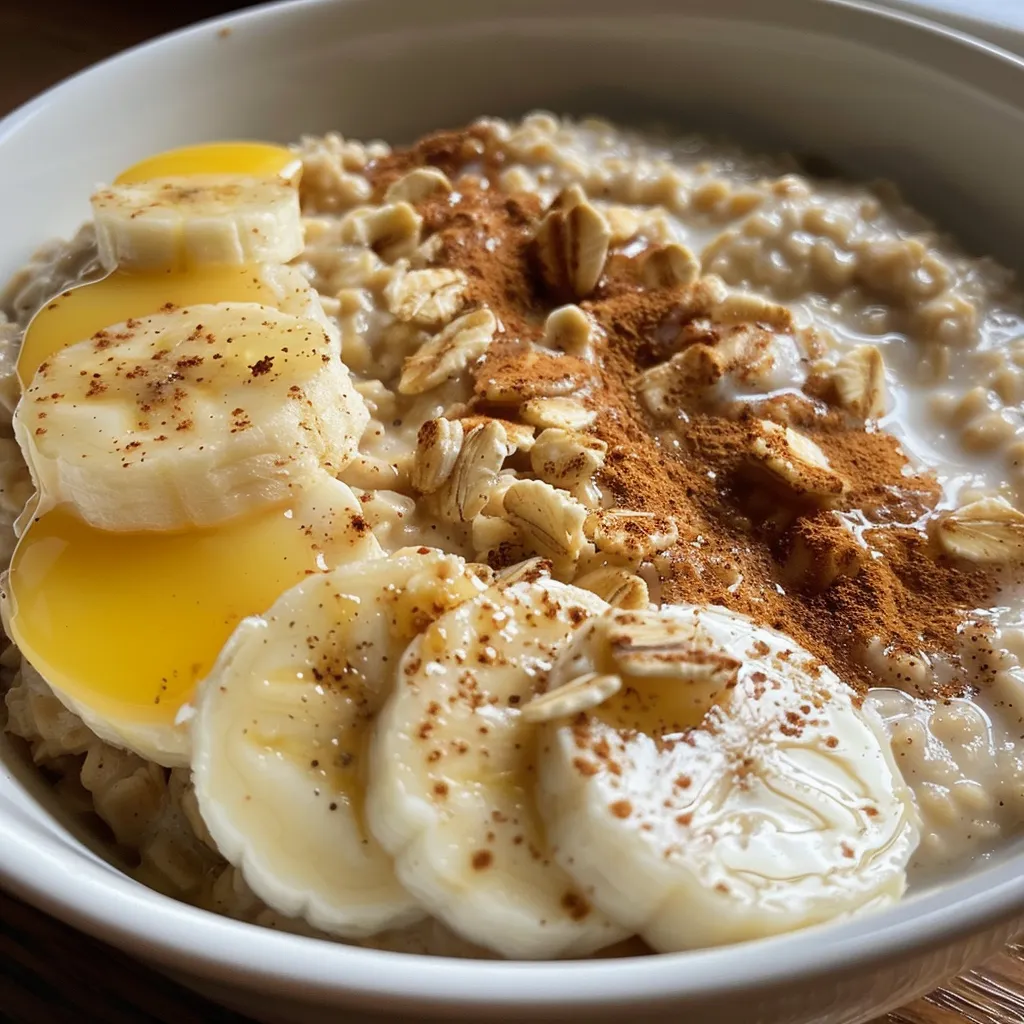
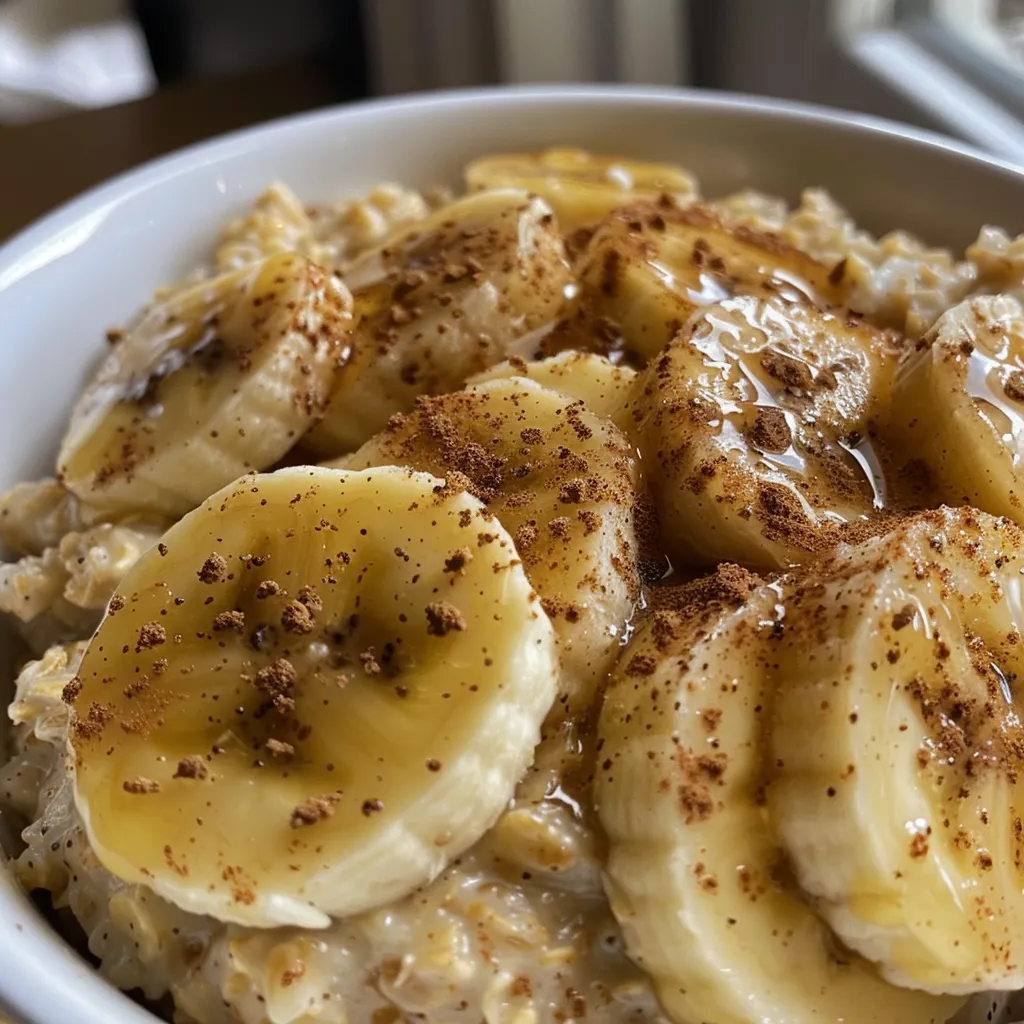
  5. Spoon the smoothie mixture into a bowl, using the back of the spoon to spread it out evenly.
  6. Now for the fun part! Top with: granola for crunch, sliced fruit for freshness, chia or flaxseeds for added nutrition, coconut flakes for texture, or nut butter drizzle for extra richness.
  7. Smoothie bowls are best enjoyed right away while they’re thick and cold. Grab a spoon and dig in!

Pro Tips for the Perfect Smoothie Bowl

Want your smoothie bowl to stand out? Here are some expert tips:

  • Choose the right banana: A ripe banana is naturally sweeter, so opt for one that has a few brown spots for maximum flavor.
  • Blend in stages: Start with the liquids, then add the frozen fruits to avoid any unwanted chunks.
  • Adjust the thickness: If you prefer a thicker smoothie, reduce the amount of liquid. For a thinner smoothie, increase the liquid gradually.
  • Layer your toppings: Be creative with your toppings! Use a variety of colors and textures to make your bowl visually appealing.
  • Experiment with flavors: Try adding spices like cinnamon or nutmeg for an extra kick of flavor.
  • Use ice when needed: If you want a colder smoothie, add a few ice cubes while blending.
  • Make it a meal: Add protein powder to your blend for a more filling breakfast.
  • Get creative with toppings: Use seeds, nuts, or even a dollop of yogurt to elevate your bowl.
  • Don’t skip the nut butter drizzle: This adds a creamy texture and rich flavor that ties everything together.
  • Enjoy immediately: For the best experience, eat your smoothie bowl right after making it for maximum freshness.

Common Mistakes and Troubleshooting

Even seasoned cooks can run into hiccups! Here’s how to avoid common mistakes:

  • Too runny? Add more frozen fruit or a handful of ice to thicken it up.
  • Too thick? Slowly add a little more milk until it reaches your desired consistency.
  • Not sweet enough? Blend in a little more honey or maple syrup, or consider using sweeter fruits like mango.
  • Texture issues? Ensure your banana is fully frozen before blending for a smooth finish.
  • Toppings falling off? Consider blending some of your toppings into the smoothie for a more cohesive experience.

Variations: Take Your Smoothie Bowl to the Next Level

Looking to mix things up? Here are four tasty variations:

  • Pineapple Paradise Bowl: Substitute mixed berries with frozen pineapple and coconut yogurt for a tropical twist.
  • Chocolate Lover’s Delight: Add 1 tablespoon of cocoa powder or chocolate protein powder for a rich flavor.
  • Green Goddess Bowl: Toss in a handful of spinach or kale to up your greens without losing flavor.
  • Nutty Banana Bowl: Use almond butter instead of peanut butter and top with sliced almonds for a nutty crunch.

Storage and Make-Ahead Instructions

Want to prepare your smoothie bowl in advance? Here’s how:

  • Make-Ahead: You can prepare the smoothie base a day in advance and store it in the fridge. Just give it a good stir before serving.
  • Storage: If you have leftovers, store them in an airtight container in the refrigerator for up to 24 hours. Note that the texture may change slightly.
  • Freezing Toppings: Pre-portion your toppings and store them in the freezer for quick access any morning!

Comprehensive FAQ

Still have questions? Let’s address some common inquiries:

  • Can I use fresh fruits instead of frozen? Yes, but the texture will be different. Frozen fruits create a creamier consistency.
  • How can I make this smoothie bowl vegan? Use plant-based yogurt and a dairy-free milk.
  • Can I meal prep smoothie bowls? Absolutely! You can prepare the base a day ahead and add toppings just before enjoying.
  • What can I add for protein? Consider adding protein powder, Greek yogurt, or nut butter.
  • Can I use other liquids? Yes! Coconut water or fruit juice can be used for different flavors.
  • What if I don’t have a blender? A food processor can work, but ensure your ingredients are cut into smaller pieces for easier blending.
  • Can I add superfoods? Certainly! Add chia seeds, hemp seeds, or spirulina for an extra nutritional punch.
  • How can I make it lower in sugar? Opt for unsweetened yogurt and avoid adding sweeteners.

Nutrition Tips and Dietary Adaptations

This smoothie bowl is not only delicious but also adaptable to fit various dietary needs:

  • Low-Calorie Option: Use unsweetened yogurt and limit the amount of nut butter.
  • Protein-Packed: Incorporate protein powder or more Greek yogurt.
  • Gluten-Free: Ensure your granola is certified gluten-free.
  • Dairy-Free: Opt for non-dairy yogurt and milk alternatives.

Equipment Recommendations

To achieve smoothie bowl perfection, here’s what you’ll need:

  • High-Speed Blender: A powerful blender is key for a smooth, creamy texture.
  • Measuring Cups and Spoons: Accuracy makes a difference in flavor and consistency.
  • Bowl and Spoon: Choose a wide bowl for easy mixing and serving.
  • Spatula: For scraping down the sides of the blender to ensure everything is blended evenly.

Serving Suggestions: Make It a Meal

Want to turn your smoothie bowl into a more substantial meal? Here are a few ideas:

  • Pair with Whole Grain Toast: Add a slice of whole-grain toast topped with avocado for a balanced breakfast.
  • Serve with Hard-Boiled Eggs: For added protein, enjoy your smoothie bowl alongside a couple of hard-boiled eggs.
  • Mix with Oatmeal: Combine your smoothie bowl with a warm bowl of oatmeal for a filling start.
  • Add a Side of Nuts: A small handful of almonds or walnuts can complement everything beautifully.

Final Thoughts

And there you have it! Your ultimate guide to creating a Breakfast Smoothie Bowl that’s not just a meal but an adventure in flavor, texture, and nutrition. Remember, cooking is all about experimentation, so don’t hesitate to make this recipe your own. Grab your blender, channel your inner chef, and let the flavors ignite your mornings! With every spoonful, you’re not just nourishing your body; you’re celebrating the art of cooking boldly. Now go forth and embrace the magic of smoothie bowls!

Breakfast Smoothie Bowl

Prep Time 10 minutes
Total Time 10 minutes
Servings 2 servings
Calories 350
A delicious and nutritious smoothie bowl perfect for a quick breakfast or snack, packed with fresh fruit, yogurt, and toppings.

Ingredients

Fruits and Dairy

  • 1 piece frozen banana (for creaminess and natural sweetness)
  • 0.5 cup frozen mixed berries (strawberries, blueberries, raspberries, or a blend)
  • 0.5 cup Greek yogurt (or plant-based yogurt for protein and richness)
  • 0.25 cup milk of choice (almond, oat, dairy—start with less, add more if needed)
  • 1 tablespoon nut butter (peanut, almond, or cashew for depth of flavor)
  • 0.5 teaspoon vanilla extract (optional but recommended for extra flavor)
  • 1 teaspoon honey or maple syrup (optional, for extra sweetness)
  • 0.25 cup granola (for crunch)
  • sliced fresh fruit fruit toppings (banana, kiwi, mango, or berries)
  • 1 teaspoon chia seeds or flaxseeds (for fiber and omega-3s)
  • 1 tablespoon coconut flakes (for a tropical touch)
  • Drizzle nut butter (because it's delicious!)

Instructions 

  • Freeze a banana for best texture; if fresh, slice and freeze for 2 hours.
  • Combine frozen banana, berries, yogurt, milk, nut butter, vanilla, and honey in a blender. Blend until thick and smooth.
  • If too thick, add a little more milk; if too thin, add more berries or ice and blend again.
  • Spoon into a bowl and top with granola, sliced fruit, seeds, coconut flakes, and a drizzle of nut butter.
  • Enjoy immediately while thick and cold with a spoon!

Notes

Use frozen fruit for the best texture and flavor. Feel free to customize toppings!
Calories: 350kcal
Cost: $10
Course: Breakfast
Cuisine: Healthy
Keyword: Fruit, Smoothie

Nutrition

Calories: 350kcal | Carbohydrates: 60g | Protein: 12g | Fat: 10g | Sodium: 80mg

Awaken Your Senses with Classic Overnight Oats

Welcome to a breakfast revolution! If you’re looking for a quick, nutritious, and delicious way to kickstart your mornings, look no further than classic overnight oats. This simple yet versatile dish is perfect for busy lives, allowing you to grab and go while still enjoying a satisfying meal. Dive into this article to explore the depths of flavor, texture, and creativity that overnight oats can offer.

Why You’ll Love This Recipe

  • Effortless Meal Prep: Prepare multiple servings in advance, ensuring your breakfast is ready when you are.
  • Customizable: Create endless flavor combinations with your choice of toppings and ingredients.
  • Nutritious: Packed with fiber, protein, and healthy fats, these oats fuel your day right.
  • Time-Saving: With minimal prep time, you can enjoy a hearty breakfast without the hassle.
  • Gluten-Free Option: Easily swap in gluten-free oats to accommodate dietary needs.

Ingredient Breakdown

To create the perfect classic overnight oats, you’ll need a few simple ingredients. Let’s break them down:

  • 1/2 cup gluten-free rolled oats: The base of your oats. Rolled oats provide the best texture and soak up the liquid beautifully.
  • 3/4 cup milk of choice: Any milk works, whether it’s dairy, almond, oat, or coconut. Experiment to find your favorite!
  • 1 tablespoon chia seeds: These tiny seeds add fiber and a delightful creamy texture.
  • 1/2 teaspoon cinnamon: A warm spice that elevates the flavor profile.
  • Splash of vanilla extract: Optional but adds a layer of sweetness and depth.
  • Topping ideas: Nut butter, granola, coconut flakes, fresh fruit—get creative!

Pro Tips for Overnight Success

Side view of creamy overnight oats in a glass jar with toppings spilling out.

Here are some expert insights to elevate your overnight oats game:

  • Choose the Right Oats: Stick with rolled oats for the perfect balance of chewiness and creaminess. Quick oats can turn mushy.
  • Soaking Time Matters: For optimal texture, let your oats soak for at least 2-3 hours, but overnight is ideal.
  • Mix It Up: Experiment with different types of milk and sweeteners to find your perfect blend.
  • Layer Your Ingredients: For added flavor, layer your oats and toppings in a jar rather than mixing everything together.
  • Keep It Cool: Store your overnight oats in the fridge to maintain freshness and flavor.
  • Add Freshness: Top your oats with fresh fruits right before eating for a burst of flavor.
  • Seasonal Flavors: Incorporate seasonal fruits and spices to keep your breakfast exciting all year round.
  • Try Different Containers: Mason jars, glass containers, or even bowls can work—find what suits your style!

Avoiding Common Mistakes

Even the best chefs have their off days! Here are a few common pitfalls to watch out for:

  • Too Much Liquid: If you find your oats runny, reduce the milk slightly next time.
  • Forgetting the Chia Seeds: They help absorb moisture and create a creamy texture—don’t skip them!
  • Not Enough Time to Soak: Rushing the soak time can lead to crunchy oats. Let them sit long enough.
  • Skipping the Flavor Enhancers: Don’t underestimate the power of vanilla and spices—these add a punch!

Delicious Variations to Try

Once you master the classic recipe, it’s time to get adventurous! Here are some exciting variations:

  • Chocolate Peanut Butter Delight: Mix in cocoa powder and top with peanut butter and banana.
  • Berry Bliss: Stir in mixed berries and a touch of honey for a refreshing summer treat.
  • Apple Cinnamon Crunch: Add chopped apples and a sprinkle of nutmeg for a fall-inspired dish.
  • Matcha Green Tea Oats: Incorporate matcha powder for a unique flavor and a boost of energy.

Storage and Make-Ahead Instructions

Overnight oats are perfect for meal prep. Here’s how to store them:

  • Refrigeration: Keep your oats in the fridge for up to 5 days. Just remember to add fresh toppings before serving!
  • Batch Preparation: Make several jars at once for a no-fuss breakfast throughout the week.
  • Freezing: While not recommended for raw oats, cooked oatmeal can be frozen for quick reheating.

FAQs About Classic Overnight Oats

Got questions? We’ve got answers! Here are some frequently asked questions:

  • How long do classic overnight oats last in the fridge? They can last up to 5 days when stored properly in an airtight container.
  • Can I heat up classic overnight oats? Absolutely! Warm them in the microwave for a comforting breakfast.
  • Can I use quick oats instead of rolled oats? While possible, they may become too mushy. Rolled oats provide a better texture.
  • What are some good toppings for overnight oats? Try nut butter, fruits, granola, or seeds for added texture and flavor.
  • Can I make overnight oats vegan? Yes! Use plant-based milk and yogurt for a delicious vegan option.
  • How do I make my overnight oats sweeter? Add honey, maple syrup, or a mashed banana to sweeten your oats.
  • Can I add protein powder? Yes! Stir in protein powder for an extra boost of nutrition.
  • What if I forget to soak my oats? If you’re in a pinch, you can cook them on the stove, but the texture will differ.

Nutrition Tips and Dietary Adaptations

Overnight oats can be tailored to fit various dietary needs:

  • Protein-Packed: Add Greek yogurt or protein powder to boost your breakfast.
  • Low-Carb Option: Use chia seeds or flaxseeds instead of oats for a keto-friendly alternative.
  • Dairy-Free: Opt for almond, coconut, or soy milk for a dairy-free option.

Essential Equipment for Success

Here’s what you’ll need to whip up these overnight oats:

  • Mason Jars: Ideal for mixing and storing your oats.
  • Mixing Spoon: A sturdy spoon for combining ingredients.
  • Measuring Cups: Precision is key for the perfect balance.

Serving Suggestions

How you serve your overnight oats can elevate the experience:

  • Layering: Create visually appealing layers in a clear jar for an Instagram-worthy breakfast.
  • Pairing: Enjoy with a side of fresh fruit or a smoothie for a balanced meal.
  • Garnishing: Add a sprinkle of nuts or seeds right before serving for a delightful crunch.

Conclusion: Your Breakfast Adventure Awaits!

Classic overnight oats are more than just a meal; they are an invitation to explore flavors, textures, and creativity. With endless possibilities, you can easily make this dish your own, celebrating the art of the kick in every bite. So grab your oats, unleash your culinary curiosity, and let each breakfast be a delicious adventure!

Classic Overnight Oats: The Breakfast Staple

Prep Time 5 minutes
Total Time 5 minutes
Servings 1 serving
Calories 250
A quick and nutritious breakfast option that you prepare the night before, perfect for busy mornings.

Ingredients

Base

  • 0.5 cup gluten-free rolled oats
  • 0.75 cup milk of choice
  • 1 tablespoon chia seeds
  • 0.5 teaspoon cinnamon
  • Splash optional vanilla extract (optional)

Toppings

  • as desired nut butter, granola, coconut flakes, fruit (optional toppings)

Instructions 

  • Mix all base ingredients in a jar or container.
  • Stir well to combine everything evenly.
  • Refrigerate for at least 2-3 hours or overnight.
  • Top with your favorite toppings before serving.

Notes

Feel free to customize toppings for variety.
Calories: 250kcal
Cost: $5
Course: Breakfast
Keyword: oats

Nutrition

Calories: 250kcal | Carbohydrates: 40g | Protein: 8g | Fat: 7g | Sodium: 50mg

Transform Your Salad Game with a Low Carb Caesar Salad

Buckle up, spice lovers! If you’re ready to elevate your plate with a dish that’s as bold as your culinary adventures, then you’re in the right place. Welcome to the world of the Low Carb Caesar Salad with Chicken — a dish that promises crunch, flavor, and a satisfying kick without the carb overload. This isn’t just another salad; it’s a vibrant tapestry of textures and tastes, combining the crispness of romaine lettuce, the savory goodness of homemade dressing, and the delightful crunch of parmesan crisps. Let’s dive into this exciting recipe that will not only keep your carb count low but will also ignite your taste buds!

Why You’ll Love This Recipe

What makes this Low Carb Caesar Salad a must-try? Here are five compelling reasons:

  • Health-Conscious Delight: This salad is a low carb powerhouse, perfect for keto and health-focused diets, allowing you to indulge without guilt.
  • Flavor Explosion: The homemade Caesar dressing, infused with anchovies and garlic, means you’ll enjoy a flavor punch that store-bought options just can’t match.
  • Versatile Options: Whether you want it as a light lunch, a side dish, or a main course, this salad adapts beautifully to your meal needs.
  • Quick and Easy: With straightforward steps, you can whip this salad up in under 30 minutes, making it a perfect choice for busy weeknights.
  • Impressive Presentation: Serve this salad in a big bowl or on individual plates, and watch your guests’ faces light up at the sight of those golden parmesan crisps!

Ingredients Breakdown

Before we get cooking, let’s look at what you need to create this masterpiece. Here’s a detailed list of ingredients along with some handy substitutions:

  • 1 pound Chicken Breasts: Choose boneless, skinless for quick cooking and maximum flavor. You can substitute with grilled shrimp or tofu for a vegetarian option.
  • 6 cups Romaine Lettuce: Crisp, cool, and hearty – the perfect base. If you prefer, you can mix in some kale or spinach for a nutrient boost.
  • 1/4 cup Parmesan Cheese: Freshly grated is best for flavor. If you’re dairy-free, nutritional yeast can provide a cheesy flavor.
  • 1/2 cup Parmesan Crisps: These are your secret weapon for crunch; you can also use store-bought low-carb croutons.
  • 3/4 cup Mayonnaise: For the dressing’s creamy base. Opt for homemade or a vegan mayo if you prefer.
  • 1/2 cup Grated Parmesan Cheese: Adds richness to your dressing. Feel free to use pecorino for a sharper taste.
  • 4 Anchovy Fillets: Packed with umami, these are essential for authentic flavor. You can skip them for a vegetarian version or replace them with capers.
  • 2 tablespoons Lemon Juice: Freshly squeezed for the best taste. Lime juice works well too!
  • 4 cloves Fresh Garlic: Minced for that aromatic kick; garlic powder can be used in a pinch.
  • 1 teaspoon Dijon Mustard: For a hint of tang; you can replace it with yellow mustard if needed.
  • 1/4 teaspoon Black Pepper: Freshly ground for maximum flavor. Adjust to your liking!
  • Pinch of Salt: Always essential for seasoning.

How to Make Low Carb Caesar Salad Dressing

A vibrant Low Carb Caesar Salad featuring sliced chicken breast, romaine lettuce, and parmesan cheese, captured in natural light.

Let’s get that dressing ready to rock your salad!

  1. Place all the ingredients for the low carb Caesar dressing into a blender.
  2. Pulse until smooth, ensuring all flavors are well blended.
  3. Pour the dressing into a salad dressing container and refrigerate until ready to use.

How to Assemble Your Low Carb Chicken Caesar Salad

Now that you have your dressing, let’s put it all together!

  1. First, prepare your chicken: Slice it thinly and season with salt and pepper.
  2. Heat a medium pan over medium heat and cook the chicken until golden brown and the internal temperature reaches 165°F (about 5-7 minutes per side).
  3. While the chicken cooks, place the romaine lettuce, parmesan cheese, and parmesan crisps into a large mixing bowl.
  4. Once the chicken is done, let it rest for a few minutes before slicing it into bite-sized pieces.
  5. Drizzle the homemade dressing over the salad and toss until the lettuce is well coated.
  6. Divide the salad into serving bowls and top with the sliced chicken.

Pro Tips for Perfecting Your Salad

Want to take your salad to the next level? Here are some expert insights:

  • Marinate the Chicken: For extra flavor, marinate your chicken in lemon juice, garlic, and olive oil for an hour before cooking.
  • Fresh Ingredients: Always opt for fresh herbs and vegetables; they make a world of difference in flavor and nutrition.
  • Dress Just Before Serving: To keep your salad crisp, add the dressing right before serving.
  • Experiment with Textures: Consider adding nuts or seeds for additional crunch.
  • Balance Your Flavors: Don’t shy away from adjusting salt, pepper, or lemon juice to taste.
  • Use a Food Processor: If you want a chunkier dressing, pulse the ingredients in a food processor instead of blending.
  • Chill Your Bowls: For a refreshing touch, chill your serving bowls in the refrigerator before plating your salad.
  • Garnish with Fresh Herbs: A sprinkle of fresh parsley or basil can elevate the presentation.

Common Mistakes and Troubleshooting

Even the best can have off days; here’s how to avoid common pitfalls:

  • Overcooked Chicken: Ensure your chicken is cooked right. Use a meat thermometer to get it perfect every time!
  • Watery Dressing: If your dressing is too thin, add more mayonnaise or parmesan until you reach your desired consistency.
  • Too Much Salt: Start with less salt in your dressing and adjust to taste after blending.
  • Not Enough Crunch: If your salad lacks texture, consider adding some toasted pine nuts or sunflower seeds.

Variations to Spice Up Your Caesar Salad

Love experimenting? Here are some exciting variations to try:

  • Spicy Caesar Salad: Add a teaspoon of sriracha or crushed red pepper flakes to the dressing for a fiery kick.
  • Caesar Salad with Bacon: Crumble crispy bacon on top for a smoky flavor boost.
  • Vegan Caesar Salad: Replace chicken with chickpeas and use a plant-based mayo for a delicious vegan twist.
  • Grilled Vegetable Caesar: Toss in grilled zucchini or asparagus for an extra layer of flavor.

Storage and Make-Ahead Instructions

Want to prep ahead? Here’s how to store your salad:

  • Make the Dressing Ahead: Store your homemade dressing in the refrigerator for up to a week in an airtight container.
  • Cooked Chicken Storage: Cooked chicken can be stored in the fridge for up to three days. Just reheat before serving.
  • Assemble Just Before Serving: To maintain freshness, assemble the salad just before you’re ready to serve.

Frequently Asked Questions

Got questions? We’ve got answers!

  • Can I use store-bought dressing?: Absolutely! But homemade dressing packs more flavor and health benefits.
  • How many carbs are in this Caesar salad?: This salad is low carb, making it ideal for keto diets; the total carbs will depend on the specific ingredients you use.
  • Can I make this salad vegetarian?: Yes! Simply omit the chicken and anchovies and load up on your favorite veggies.
  • What can I substitute for Parmesan cheese?: Nutritional yeast is a fantastic dairy-free alternative that gives a cheesy flavor.
  • How long does this salad last in the fridge?: For the best flavor and texture, eat it within 2 days.
  • Can I freeze the dressing?: Yes, but the texture may change upon thawing. It’s best used fresh!
  • What side dishes pair well?: Pair it with grilled vegetables, a light soup, or even some crusty low-carb bread.
  • Can I add more protein?: Absolutely! Grilled shrimp, steak, or chickpeas can all elevate your salad.

Nutrition Tips and Dietary Adaptations

When it comes to health, this salad is versatile! Here are some tips:

  • Keep It Balanced: Add a variety of colored vegetables for added nutrients.
  • Monitor Portions: While low in carbs, keep an eye on the portion size of high-calorie toppings like cheese and dressing.
  • Focus on Whole Foods: Incorporate whole, unprocessed ingredients to maximize health benefits.
  • Adapt for Allergies: Substitute ingredients as needed for gluten-free or dairy-free diets.

Equipment Recommendations

Here’s what you’ll need to make this dish:

  • Blender or Food Processor: Essential for whipping up that creamy homemade dressing.
  • Non-stick Skillet: Makes cooking the chicken a breeze and ensures perfect browning.
  • Salad Bowl: A large bowl for mixing all those vibrant ingredients together.
  • Meat Thermometer: To ensure your chicken is cooked perfectly every time.

Serving Suggestions

Presentation matters! Here are some creative serving ideas:

  • Layered Salad Bowl: Serve in clear bowls to showcase the vibrant layers of the salad.
  • Garnish with Fresh Herbs: A sprinkle of parsley or basil adds a pop of color and freshness.
  • Serve with Lemon Wedges: A squeeze of fresh lemon right before eating brightens up the flavors.
  • Pair with a Light White Wine: A chilled Sauvignon Blanc complements the flavors beautifully.

In conclusion, the Low Carb Caesar Salad with Chicken is not just a meal; it’s an experience. An experience that invites you to dance with flavors, experiment with textures, and savor each bite. So grab those ingredients, channel your inner chef, and let the adventure begin! Remember, cooking is all about embracing the heat and letting your creativity shine — because every dish tells a story, and yours is just waiting to be written. Don’t forget to share your culinary triumphs with friends and family, and most importantly, enjoy every delicious moment!

Low Carb Caesar Salad with Chicken

Prep Time 15 minutes
Cook Time 15 minutes
Total Time 30 minutes
Servings 4 servings
Calories 550
A delicious low carb Caesar salad topped with tender chicken, perfect for a healthy and satisfying meal.

Ingredients

Dressing

  • 3/4 cup mayonnaise
  • 1/2 cup grated parmesan cheese
  • 1 ounce Anchovies in olive oil (4 Anchovy filets)
  • 4 cloves fresh garlic
  • 2 tablespoons lemon juice
  • 1 teaspoon Dijon mustard
  • 1/4 teaspoon black pepper

Chicken

  • 1 pound Chicken Breasts

Salad

  • 6 cups Romaine Lettuce
  • 1/4 cup parmesan cheese
  • 1/2 cup parmesan crisps

Additional

  • salt salt
  • pepper pepper

Instructions 

  • Blend all dressing ingredients until smooth, then refrigerate.
  • Cook seasoned chicken slices until golden and internal temp reaches 165°F, then slice.
  • Combine lettuce, parmesan, and crisps in a large bowl.
  • Pour dressing over salad and toss to coat.
  • Divide salad into bowls and top with sliced chicken.

Notes

Use fresh ingredients for best flavor and texture.
Calories: 550kcal
Cost: $15
Course: Salad
Cuisine: American
Keyword: Caesar, chicken, Low Carb

Nutrition

Calories: 550kcal | Carbohydrates: 12g | Protein: 45g | Fat: 35g | Sodium: 900mg

Ignite Your Culinary Passion with Sticky Chicken Bowls

Welcome to a flavor adventure that will set your kitchen ablaze! If you’re ready to awaken your taste buds, dive into my Sticky Chicken Bowls. This dish is not just a meal; it’s an experience where tender chicken meets vibrant broccoli, all enveloped in a sticky, spicy sauce that invites you closer to the table. Ideal for those who crave a little fire in their meals, this recipe balances heat and sweetness with every bite. So, let’s embark on this culinary journey together, where spice is your ally and flavor is your destination!

Why You’ll Love This Recipe

Get ready to fall head over heels for these Sticky Chicken Bowls! Here are five reasons why this dish deserves a spot in your weekly meal rotation:

  • Versatile Ingredients: The beauty of this recipe lies in its embrace of everyday pantry staples. You can easily swap ingredients based on what you have on hand!
  • Quick and Easy Preparation: With straightforward cooking instructions, you’ll whip this up in under 30 minutes, making it perfect for busy weeknights.
  • Health Boost: Packed with protein from the chicken and nutrients from the broccoli, this dish is as nutritious as it is delicious.
  • Flavor Explosion: The combination of soy sauce, honey, and spices creates a sticky sauce that elevates every ingredient, making each bite a flavor bomb!
  • Meal Prep Friendly: These chicken rice bowls store well, allowing you to enjoy them throughout the week. They reheat beautifully!

Ingredient Breakdown

Let’s take a closer look at the ingredients that make this dish sing. Here’s what you’ll need:

  • 2 cups uncooked rice: This serves as the base, soaking up all the juicy flavors from the sticky sauce. You can use jasmine or brown rice for added nutrition.
  • 2 small heads broccoli (chopped): Fresh and vibrant, broccoli adds color and crunch. If you want to get creative, feel free to substitute with bell peppers or snap peas.
  • 3 large chicken breasts: Lean and protein-rich, chicken breast is the star of this bowl. For a twist, try using thighs for a juicier texture!
  • 2 tbsp olive oil: Essential for cooking the chicken to golden perfection.
  • 1 tsp salt & 1/2 tsp pepper: Basic seasonings that enhance flavor.
  • 1 tsp chili powder & 1 tsp smoked paprika: These provide a warm, smoky flavor that dances on your palate.
  • 1 tsp onion powder & 1 tsp oregano: Aromatic additions that deepen the flavor profile.
  • 1/2 cup soy sauce: The backbone of the sticky sauce, offering umami richness.
  • 1/2 cup honey: Sweetness that balances the savory elements perfectly.
  • 1/4 cup rice vinegar: This adds acidity and brightness to the sauce.
  • 3 cloves garlic (minced): A must for aromatic depth!
  • 2 tbsp sriracha: For those who crave heat, this sriracha packs a punch!
  • 2 tsp sesame oil: Adds a nutty flavor that rounds out the sauce beautifully.
  • 1 tsp ground ginger: Fresh and zesty, ginger adds a zing that complements the other flavors.
  • 2 tsp arrowroot powder mixed with 2 tbsp water (for slurry): This thickens the sauce, giving it that coveted sticky texture.
  • 1/2 cup mayo: The base for your spicy mayo.
  • 1 tbsp sriracha (for spicy mayo): Adjust to your heat preference!
  • 2-3 tbsp water (for spicy mayo): To achieve your desired consistency.
  • Sesame seeds for topping: Toasted sesame seeds add a lovely crunch and nutty flavor.

Step-by-Step Cooking Instructions

Vibrant Sticky Chicken Bowl featuring juicy chicken, bright green broccoli, and rice.

Time to get cooking! Follow these easy steps to create your Sticky Chicken Bowls:

  1. Cook the rice according to package instructions and set aside, fluffing it with a fork for perfect texture.
  2. Chop the broccoli into small florets and set aside, ready to bring a pop of color to your bowl.
  3. Slice the chicken breasts into strips, then season generously with salt, pepper, smoked paprika, chili powder, onion powder, and oregano.
  4. Heat olive oil in a skillet over medium heat. Add the seasoned chicken strips and cook until they’re golden brown and fully cooked, about 6-8 minutes.
  5. Steam or sauté the broccoli until it’s tender and vibrant green. You want it to maintain a little crunch!
  6. In a separate bowl, whisk together soy sauce, honey, rice vinegar, minced garlic, sriracha, sesame oil, ground ginger, and the arrowroot slurry until well combined.
  7. Pour the sticky sauce into the skillet with the chicken and simmer until the sauce thickens, about 2-3 minutes.
  8. For the spicy mayo, mix mayonnaise, sriracha, and water until you reach your desired consistency, adjusting with more water if necessary.
  9. Assemble your bowls: Start with rice as the base, layer on the chicken, top with broccoli, drizzle with spicy mayo, and finish with a sprinkle of sesame seeds.

Pro Tips for Perfect Sticky Chicken Bowls

Want to take your Sticky Chicken Bowls to the next level? Here are some expert tips:

  • Don’t Overcrowd the Pan: Cook the chicken in batches if necessary to ensure it sears properly and doesn’t steam.
  • Adjust the Heat: Control the spice level by varying the amount of sriracha or using a milder sauce if you prefer.
  • Experiment with Vegetables: Feel free to throw in other veggies like carrots, snap peas, or bell peppers to mix things up.
  • Let the Sauce Thicken: Allowing the sauce to simmer longer enhances its flavor and gives it that sticky consistency.
  • Make it a Meal Prep Star: Prepare extra servings and store them in airtight containers for quick lunches throughout the week.
  • Garnish Boldly: Get creative with toppings like green onions, crushed peanuts, or fresh cilantro for added flavor and texture.
  • Use Leftover Chicken: If you have leftover rotisserie chicken, you can easily repurpose it in this recipe!
  • Feel Free to Reduce Sugar: If you’re watching your sugar intake, you can reduce the honey and still achieve a delicious flavor.

Common Mistakes & Troubleshooting

Even the best chefs can hit a snag. Here’s how to avoid common pitfalls:

  • Too Much Sauce: If your sauce is too runny, let it simmer longer to thicken up.
  • Overcooked Chicken: Avoid dry chicken by monitoring cooking time and checking for doneness with a meat thermometer.
  • Underseasoned Rice: Don’t forget to season the rice while cooking for extra flavor!
  • Burning Garlic: Add garlic towards the end of cooking the chicken to prevent it from burning and becoming bitter.

Delicious Variations

Want to switch things up? Here are some tempting variations on this classic recipe:

  • Spicy Pineapple Sticky Chicken: Add fresh pineapple chunks to the sauce for a sweet and tangy twist!
  • Teriyaki Chicken Bowls: Substitute the sticky sauce with teriyaki sauce for a different flavor experience.
  • Vegan Sticky Tofu Bowls: Swap chicken for tofu, marinating it in the sticky sauce before frying until crispy.
  • Cauliflower Rice Variation: For a low-carb option, serve your sticky chicken over cauliflower rice instead of traditional rice.

Storage and Make-Ahead Instructions

These Sticky Chicken Bowls are perfect for meal prep! Here’s how to store them:

  • Refrigeration: Store any leftovers in an airtight container in the fridge for up to 3 days.
  • Freezing: You can freeze the chicken and sauce separately for up to 2 months. Thaw overnight in the fridge before reheating.
  • Make-Ahead: Prepare the sauce and chop veggies in advance to speed up your cooking time on busy nights.

Comprehensive FAQ

Got questions? Let’s tackle some of the most common ones about these Sticky Chicken Bowls:

  • Can I use brown rice instead of white? Absolutely! Brown rice adds more fiber and nutrients.
  • Is the sauce gluten-free? Use tamari or a gluten-free soy sauce alternative to make it gluten-free.
  • How can I make this dish spicier? Increase the sriracha or add red pepper flakes to the sauce!
  • Can I use other proteins? Yes! This recipe works well with shrimp, pork, or even tempeh.
  • What can I substitute for honey? Maple syrup or agave nectar can be used as a sweetener alternative.
  • Can I add more vegetables? Definitely! Feel free to include any veggies you love.
  • How do I prevent the chicken from drying out? Monitor cooking time closely and remove from heat as soon as it’s cooked through.
  • What’s the best way to reheat leftovers? Reheat in the microwave or on the stovetop with a splash of water to keep it moist.

Nutrition Tips and Dietary Adaptations

For those mindful of dietary needs, here are some helpful tips:

  • For a Low-Carb Option: Serve over cauliflower rice or spiralized zucchini.
  • For a High-Protein Meal: Increase the amount of chicken or add edamame for extra protein.
  • For a Dairy-Free Version: Ensure your mayo is dairy-free, or substitute with a vegan version.
  • Heart-Healthy Options: Use less honey and opt for low-sodium soy sauce to reduce sodium intake.

Equipment Recommendations

To make your cooking experience seamless, here are a few kitchen essentials you might find helpful:

  • Non-stick skillet: Perfect for cooking chicken and ensuring easy cleanup.
  • Rice cooker: Makes cooking rice a breeze and ensures perfect results every time.
  • Measuring cups and spoons: Essential for precise measurements of ingredients.
  • Mixing bowls: Ideal for preparing sauces and mixing ingredients together.

Serving Suggestions

How to plate your Sticky Chicken Bowls can make all the difference:

  • Create Layers: Start with a generous base of rice, then artfully arrange chicken and broccoli on top.
  • Garnish Generously: Top with sesame seeds, sliced green onions, or a drizzle of extra sriracha for a pop of color and flavor.
  • Pair with Sides: Consider serving these bowls with a side of pickled vegetables or a light salad for a complete meal.

So there you have it! A comprehensive guide to making my Sticky Chicken Bowls that are sure to ignite your culinary passion. Embrace the adventure of cooking with spice and let your taste buds dance with joy. Remember, cooking is not just about following a recipe; it’s about exploring, experimenting, and bringing your unique flavor to the table. Now, grab your skillet and get ready to create something unforgettable!

Sticky Chicken Bowls

Prep Time 10 minutes
Cook Time 20 minutes
Total Time 30 minutes
Servings 4 servings
Calories 650
A flavorful and easy-to-make rice bowl featuring tender chicken, vibrant broccoli, and a sweet-savory sauce, topped with spicy mayo and sesame seeds.

Ingredients

Grains

  • 2 cups uncooked rice

Vegetables

  • 2 small heads broccoli (chopped)

Protein

  • 3 large chicken breasts

Oils & Condiments

  • 2 tbsp olive oil
  • 1 tsp salt
  • 1/2 tsp pepper
  • 1 tsp chili powder
  • 1 tsp smoked paprika
  • 1 tsp onion powder
  • 1 tsp oregano

Sauces & Liquids

  • 1/2 cup soy sauce
  • 1/2 cup honey
  • 1/4 cup rice vinegar
  • 3 cloves garlic (minced)
  • 2 tbsp sriracha
  • 2 tsp sesame oil
  • 1 tsp ground ginger
  • 2 tsp arrowroot powder mixed with water (for slurry)

Spicy Mayo

  • 1 half cup mayo
  • 1 tbsp sriracha (for spicy mayo)
  • 2-3 tbsp water (for spicy mayo) (adjust as needed)

Toppings

  • to taste sesame seeds for topping

Instructions 

  • Cook rice and set aside.
  • Chop broccoli and set aside.
  • Season chicken with salt, pepper, paprika, chili powder, onion powder, and oregano. Cook in olive oil until golden and cooked through.
  • Steam or sauté broccoli until tender. Mix soy sauce, honey, rice vinegar, garlic, sriracha, sesame oil, ginger, and slurry. Add to chicken and simmer until thickened.
  • Prepare spicy mayo by mixing mayo, sriracha, and water. Assemble bowls with rice, chicken, broccoli, spicy mayo, and sesame seeds.

Notes

Adjust spice levels and toppings to taste.
Calories: 650kcal
Cost: $15
Course: Main Course
Cuisine: Asian
Keyword: Broccoli, chicken, Rice

Nutrition

Calories: 650kcal | Carbohydrates: 85g | Protein: 45g | Fat: 20g | Sodium: 1500mg

Welcome to a culinary adventure that celebrates the vibrant, refreshing flavors of my Cucumber Yogurt Salad! This dish is not just about cooling down on a hot day; it’s a celebration of balance, texture, and zing that can elevate any meal. With crisp cucumbers, creamy Greek yogurt, and a hint of dill, each bite is a symphony of flavors that dances on the palate. Let’s dive into why this salad is a must-try and how you can make it your own!

Why You’ll Love This Recipe

  • Perfect for Any Occasion: Whether it’s a backyard barbecue, a potluck, or a casual weeknight dinner, this salad is a showstopper. It complements grilled meats beautifully and adds a refreshing contrast to richer dishes.
  • Healthier Choice: Packed with vitamins and minerals, cucumbers are hydrating and low in calories. Paired with Greek yogurt, you get a protein boost that keeps you feeling full and satisfied.
  • Quick and Easy: This salad comes together in under 15 minutes, making it a perfect option for when you’re short on time but still want something delicious.
  • Versatile Flavors: The dressing can be easily customized. Want a zesty kick? Add more lemon juice! Prefer a creamier texture? Use full-fat yogurt!
  • Great for Meal Prep: This salad stays fresh in the fridge for a few days, making it ideal for meal prep. Just give it a quick stir before serving!

Ingredients You’ll Need

Before we get cooking, let’s gather our ingredients. Here’s what you’ll need to create this refreshing cucumber yogurt salad:

  • 2 English cucumbers: Their thin skin and lack of seeds make them perfect for this salad.
  • 1/2 cup Greek yogurt (or plain yogurt): Adds creaminess and a slight tang. Try full-fat for richness or low-fat for a lighter option.
  • 2 tablespoons finely chopped fresh dill: Fresh dill elevates the flavor profile, providing a bright, herbal note.
  • 1 tablespoon extra virgin olive oil: A drizzle of quality olive oil enhances the richness of the yogurt.
  • 1 clove garlic, minced: Adds depth and a savory kick.
  • 1/2 lemon, zested and juiced: Fresh lemon juice brightens the dish and balances the creaminess.
  • 1 teaspoon salt, or to taste: I recommend pink Himalayan or sea salt for a touch of flavor.
  • Freshly ground pepper: Adds a finishing touch of warmth.

How To Make Cucumber Yogurt Salad

Ready to whip this up? Follow these simple steps:

  1. Slice the Cucumbers: Thinly slice the cucumbers using a mandoline, box grater, food processor, or a sharp knife. If you prefer a bit of crunch, leave the skin on!
  2. Make the Dressing: In a small bowl, whisk together the Greek yogurt, minced garlic, olive oil, lemon zest, lemon juice, salt, and pepper until smooth.
  3. Combine: In a mixing bowl, toss the cucumber slices with the dressing until they’re thoroughly coated.
  4. Chill: For the best flavor, let the salad chill in the fridge for up to 30 minutes before serving. This allows the flavors to meld beautifully!

Pro Tips for the Best Cucumber Yogurt Salad

Side view of a bowl filled with creamy cucumber yogurt salad, garnished with dill.
  • Use Fresh Ingredients: Fresh cucumbers and herbs make all the difference in flavor. Look for firm cucumbers and vibrant dill!
  • Adjust Consistency: If you prefer a thinner dressing, add a splash of water or more lemon juice until you reach your desired consistency.
  • Experiment with Yogurt Types: Full-fat Greek yogurt provides a creamy richness, but feel free to substitute with low-fat or non-dairy yogurt alternatives for different dietary needs.
  • Make Ahead: The salad tastes even better the next day! Make it ahead of time and let the flavors develop.
  • Spruce It Up: Add a pinch of smoked paprika or red pepper flakes for an unexpected kick!
  • Garnish: Top with extra dill or a sprinkle of feta cheese for added flavor.
  • Variations: Feel free to add other vegetables like radishes or bell peppers for extra crunch and color.
  • Serving Temperature: This salad is best served chilled, so keep it in the fridge until you’re ready to enjoy!

Possible Variations

Get creative! Here are some delightful variations you can try:

  • Minty Fresh: Substitute fresh dill with fresh mint for a different herbal flavor that pairs wonderfully with yogurt.
  • Spicy Kick: Add finely chopped jalapeño or a dash of hot sauce to the dressing for a spicy twist.
  • Mediterranean Style: Toss in diced tomatoes, olives, and feta cheese for a heartier, Mediterranean-inspired salad.
  • Asian Infusion: Add sesame oil and a sprinkle of sesame seeds to create an Asian-inspired version of this refreshing salad.

Common Mistakes and Troubleshooting

Even the best of us can have a hiccup in the kitchen! Here are some common pitfalls and how to avoid them:

  • Watery Salad: If your salad turns out watery, it’s likely due to excess moisture in the cucumbers. To prevent this, sprinkle the sliced cucumbers with salt and let them sit for 10 minutes before rinsing and patting dry.
  • Too Tangy: If you find the salad too tangy, balance it out with a little more yogurt or a teaspoon of honey.
  • Overpowering Garlic: If raw garlic is too strong for your palate, try roasting the garlic first for a milder, sweeter flavor.
  • Not Enough Flavor: Taste and adjust! If the salad needs more punch, add more lemon juice, salt, or herbs until it’s just right.

Storage and Make-Ahead Instructions

This salad is perfect for meal prep! Here’s how to store and prepare it in advance:

  • Storage: Store in an airtight container in the refrigerator for up to 3 days. The flavors will continue to develop as it sits!
  • Make-Ahead: You can prepare the salad up to 24 hours in advance. Just keep the dressing separate until you’re ready to serve to maintain the crunchiness of the cucumbers.

Frequently Asked Questions (FAQs)

  • Can I use regular cucumbers instead of English cucumbers?
    Yes, but be sure to peel them as they tend to be waxy and have more seeds.
  • Is this salad suitable for vegan diets?
    Absolutely! Substitute Greek yogurt with a plant-based yogurt alternative.
  • Can I add protein to this salad?
    Definitely! Grilled chicken, shrimp, or chickpeas can turn this salad into a complete meal.
  • What can I serve this salad with?
    This salad pairs well with grilled meats, falafel, or as a side for any Mediterranean dish.
  • What if I don’t like dill?
    No problem! Use any fresh herb you prefer, such as parsley or cilantro.
  • How can I make this salad spicier?
    Add diced jalapeños or a splash of your favorite hot sauce for a kick!
  • Can I freeze this salad?
    It’s not recommended to freeze cucumber salad as cucumbers lose their texture once thawed.
  • How do I know when the salad is ready to eat?
    It’s best served chilled, and allow at least 30 minutes in the fridge before serving for optimal flavor!

Nutrition Tips and Dietary Adaptations

This Cucumber Yogurt Salad is not only delicious but also nutritious! Here’s how to adapt it based on dietary needs:

  • Low-Carb: This salad is naturally low in carbs, making it an excellent choice for low-carb diets.
  • Gluten-Free: All ingredients are gluten-free, so enjoy without worry!
  • Low-Calorie: With minimal ingredients, this salad is a light option that won’t weigh you down.
  • High-Protein: Greek yogurt provides a boost of protein, which is great for muscle recovery and satiety.

Equipment Recommendations

Having the right tools can make all the difference! Here are some kitchen gadgets that will help you prepare this salad:

  • Mandoline Slicer: For perfectly thin cucumber slices.
  • Mixing Bowls: Use a large bowl for mixing the salad and a smaller one for the dressing.
  • Whisk: Essential for combining the dressing ingredients smoothly.
  • Storage Containers: Airtight containers are ideal for storing your salad in the fridge.

Serving Suggestions

Looking for ideas on how to serve this salad? Here are a few mouthwatering suggestions:

  • As a Side Dish: Serve alongside grilled chicken, lamb, or fish for a refreshing contrast.
  • In a Wrap: Use this salad as a filling for pita wraps along with your choice of protein.
  • With a Grain Bowl: Add the salad to a grain bowl, layered with quinoa or brown rice for a nutritious meal.
  • On Its Own: Enjoy as a light lunch or snack, perfect for hot summer days!

With its vibrant flavors and refreshing ingredients, my Cucumber Yogurt Salad is more than just a dish; it’s an experience waiting to happen! So grab your knife, roll up your sleeves, and let’s make cooking an adventure. Embrace the spice, the zest, and the joy of creating something extraordinary right in your kitchen. Let’s kick it up a notch!

Cucumber Yogurt Salad

Prep Time 10 minutes
Total Time 10 minutes
Servings 4 servings
Calories 120
A refreshing and light salad combining crisp cucumbers with creamy yogurt and fresh dill, perfect for a quick snack or side dish.

Ingredients

Vegetables

  • 2 pieces English cucumbers (Thinly sliced)
  • 1/2 cup Greek yogurt (or plain yogurt)
  • 2 tablespoons finely chopped fresh dill
  • 1 tablespoon extra virgin olive oil
  • 1 clove garlic, minced
  • 1 half lemon lemon, zested and juiced (approx. 1 tablespoon lemon juice)
  • 1 teaspoon salt (or to taste)
  • to taste freshly ground pepper

Instructions 

  • Thinly slice the cucumbers.
  • Whisk together yogurt, dill, olive oil, garlic, lemon juice, salt, and pepper.
  • Combine cucumber slices with the dressing.
  • Serve immediately or chill for up to 30 minutes.

Notes

This salad is best enjoyed fresh but can be refrigerated for up to 30 minutes before serving.
Calories: 120kcal
Cost: $8
Course: Side Dish
Cuisine: Mediterranean
Keyword: Cucumber, yogurt

Nutrition

Calories: 120kcal | Carbohydrates: 10g | Protein: 6g | Fat: 7g | Sodium: 350mg

Awaken Your Morning with Scrambled Oats: A Breakfast Adventure

Welcome to a breakfast revolution! If you’re tired of the same old boring oatmeal, it’s time to shake things up with my Scrambled Oats Recipe. This dish is not just a meal; it’s a flavorful experience that combines the creamy goodness of banana, the protein punch of an egg, and a warm hug of spices. You’ll learn how to transform your mornings into a culinary adventure that fuels your day and tantalizes your taste buds. Ready to dive in? Let’s get cooking!

Why You’ll Love This Recipe

This isn’t just another oats recipe; it’s a ticket to flavor town! Here are some reasons why you’ll adore this breakfast:

  • Quick & Easy: Whip this up in just 10 minutes, perfect for those busy mornings when you need something delicious and nutritious.
  • Nutritious Powerhouse: Packed with protein and fiber, this dish will keep you satisfied and energized until lunchtime.
  • Customizable: Whether you prefer it sweet or savory, you can easily tailor this recipe to your taste with various toppings and spices.
  • Unique Texture: The combination of scrambled eggs and oats creates a creamy, custardy delight that will make you rethink breakfast.
  • Great for Meal Prep: Make a big batch ahead of time and have breakfast ready for the week. Just reheat and enjoy!

Essential Ingredients & Flavor Variations

Let’s break down the ingredients you’ll need to create this scrumptious dish:

  • 1 Banana: Adds natural sweetness and creaminess.
  • 1 Egg: Provides protein and a fluffy texture.
  • 1/3 Cup Quick Oats: The star of the show, giving your breakfast body and heartiness.
  • 1/2 Tsp Vanilla Extract: For a hint of warmth and flavor depth.
  • 1/2 Tsp Cinnamon: Spices it up, perfect for a cozy morning vibe.
  • Pinch of Salt: Enhances all the flavors beautifully.

Feel free to switch things up! Here are some delicious variations:

  • Nutty Delight: Add a tablespoon of almond or peanut butter for a nutty twist.
  • Berry Bliss: Top with fresh berries for a burst of color and freshness.
  • Spiced Up: Mix in a pinch of cayenne or chili powder for a kick that wakes up your senses!
  • Chocolate Indulgence: Stir in a tablespoon of cocoa powder or top with dark chocolate chips for a dessert-like treat.

Step-by-Step Instructions

Delicious scrambled oats topped with banana slices, served in a bowl.

Ready to get cooking? Follow these simple steps to create your scrambled oats masterpiece:

  1. In a small bowl, mash the ripe banana until smooth. Add in the vanilla extract and mix well.
  2. Crack the egg into the bowl with the mashed banana and beat them together until fully combined.
  3. Stir in the oats, cinnamon, and salt until everything is well mixed.
  4. Pour the mixture into a non-stick frying pan over medium heat.
  5. Using a heat-safe spatula, cook the mixture, breaking it apart as it cooks, until it reaches a scrambled egg consistency (about 2-3 minutes).
  6. Serve your scrambled oats in bowls and top with your favorite goodies—fresh fruit, Greek yogurt, nuts, or a drizzle of honey. Go wild!

Pro Tips for Scrambled Oats Success

Want to ensure your scrambled oats turn out perfect every time? Here are some expert tips:

  • Use Ripe Bananas: The riper the banana, the sweeter and creamier your oats will be.
  • Don’t Rush the Cooking: Take your time cooking the oats to achieve that ideal texture.
  • Experiment with Heat: Adjust the heat to avoid burning; medium-low works best.
  • Mix-In Ideas: Try adding protein powder for an extra boost or chia seeds for added nutrition.
  • Topping Choices: Mix and match your toppings to keep breakfast exciting!

Common Mistakes and Troubleshooting

Even the best chefs have off days! Here’s how to avoid some common pitfalls:

  • Too Runny?: If your mixture is too wet, cook it a little longer to evaporate excess moisture.
  • Burnt Bottom?: Use a non-stick pan and keep the heat low to prevent sticking and burning.
  • Not Fluffy Enough?: Make sure to beat the egg thoroughly before mixing it with the banana.

Storage and Make-Ahead Instructions

If you want to prepare your scrambled oats in advance, here’s how:

  • Refrigerate: Store any leftovers in an airtight container in the fridge for up to 3 days.
  • Reheat: Warm them up in the microwave or on the stove with a splash of milk or water to bring back creaminess.
  • Make Ahead: You can prepare the mixture (without cooking) and store it in the fridge for up to 24 hours. Just cook when you’re ready!

Frequently Asked Questions

Got questions? I’ve got answers! Here are some common inquiries about scrambled oats:

  • Can I use rolled oats instead of quick oats? Yes, but you may need to adjust the cooking time as rolled oats take longer to cook.
  • Is this recipe gluten-free? If you use gluten-free oats, then absolutely!
  • Can I make this vegan? You can substitute the egg with a flax egg or silken tofu.
  • How can I add more protein? Consider adding protein powder or topping with nut butter.
  • What if I don’t like bananas? Try using applesauce or yogurt for a different flavor and texture!
  • Can I freeze scrambled oats? It’s best to eat them fresh, but you can freeze the raw mixture and cook it later.
  • How do I know when they’re done? They should look fluffy and resemble scrambled eggs.
  • Any suggestions for toppings? Fresh fruits, nuts, seeds, honey, or even a drizzle of maple syrup work beautifully!

Nutritional Benefits & Dietary Adaptations

This dish isn’t just delicious; it’s packed with nutritional benefits:

  • High in Fiber: Keeps you full and aids digestion.
  • Rich in Protein: Helps build and repair tissues, perfect for a post-workout meal.
  • Vitamins & Minerals: Bananas provide potassium, while eggs offer essential vitamins.

For dietary adaptations, consider swapping ingredients as needed, like using dairy-free yogurt for a non-dairy option or adjusting spices to suit your palate.

Essential Equipment

Before you embark on this breakfast journey, gather these kitchen essentials:

  • Non-stick frying pan: Ensures your oats don’t stick and burn.
  • Mixing bowls: For preparing your ingredients easily.
  • Heat-safe spatula: For scrambling and serving your oats without damage.

Serving Suggestions

Serve your scrambled oats in style! Here are a few ideas:

  • Breakfast Bowls: Layer with yogurt and your choice of toppings for a hearty breakfast bowl.
  • On-the-go: Pack it in a thermos for a nutritious breakfast at work or school.
  • Brunch Delight: Serve alongside fresh fruit, pastries, or smoothies for a complete brunch spread.

Now that you’re armed with everything you need, it’s time to embrace the adventure of cooking scrambled oats! Remember, cooking is about exploration and flavor; don’t be afraid to experiment and make this dish your own. Happy cooking!

Scrambled Oats Recipe (Viral Easy Breakfast)

Prep Time 5 minutes
Cook Time 3 minutes
Total Time 8 minutes
Servings 1 serving
Calories 250
A quick and healthy breakfast combining bananas, oats, and spices for a creamy, scrambled texture.

Ingredients

Main

  • 1 piece banana
  • 1/2 tsp vanilla extract
  • 1 piece egg
  • 1/3 cup quick oats
  • 1/2 tsp cinnamon
  • pinch salt

Instructions 

  • Mash the banana and mix with vanilla extract.
  • Add the egg and beat until combined, then mix in oats, cinnamon, and salt.
  • Cook the mixture in a non-stick pan over medium heat, stirring until scrambled and creamy, about 2-3 minutes.
  • Serve hot with your favorite toppings like fruit, yogurt, or nuts.

Notes

Feel free to add toppings for extra flavor and nutrition.
Calories: 250kcal
Cost: $3
Course: Breakfast
Keyword: Banana, healthy, oats

Nutrition

Calories: 250kcal | Carbohydrates: 45g | Protein: 8g | Fat: 4g | Sodium: 150mg

Ignite Your Culinary Adventure with Broccoli Tots!

Welcome to a flavorful journey where health meets excitement! Today, we’re diving into the world of Broccoli Tots that are not just a side dish but a celebration of taste and texture. In less than 30 minutes, you can unleash a crispy, golden delight that your whole family will adore. Let’s transform humble broccoli into a crispy treat that’s sure to spark joy on your dinner table!

Why You’ll Love This Recipe

These Broccoli Tots are more than just a healthy snack; they’re a culinary triumph packed with flavor and nutritional benefits. Here’s why you’ll fall head over heels:

  • Kid-Approved Flavor: Even the pickiest eaters can’t resist the irresistible crunch and cheesy goodness.
  • Quick and Easy: With just a handful of ingredients and minimal prep time, you can whip these up in no time!
  • Versatile Ingredients: Adjust the recipe with ingredients you have on hand, making it a fantastic go-to for busy nights.
  • Healthy Snacking: Packed with fiber and nutrients, these tots make for a guilt-free indulgence.
  • Meal Prep Friendly: They freeze beautifully, allowing you to have a healthy snack ready whenever you need it.

Ingredient Breakdown

Let’s explore the key ingredients that make up these delicious Broccoli Tots, along with some substitution suggestions for those rare moments when you’re missing something:

  • Broccoli: 2 medium heads (about 550g) – Fresh is best, but frozen can work in a pinch.
  • Eggs: 2 large eggs – Bind everything together. Substitute with flaxseed meal mixed with water for a vegan option.
  • Almond Meal/Flour: ¾ cup (60g) – A gluten-free alternative to breadcrumbs. You can use oat flour or regular flour if you prefer.
  • Sharp Cheddar Cheese: ¾ packed cup (75g) – Adds richness. Try mozzarella or a dairy-free cheese for a different twist.
  • Garlic: 2 cloves, minced – For a punchy flavor. Garlic powder can be used as an alternative.
  • Salt: ½ tsp (optional for babies) – Enhances flavor, but feel free to omit for little ones.

Step-by-Step Instructions

Side view of Broccoli Tots, highlighting their vibrant green interior and crunchy coating.

Ready to get cooking? Follow these straightforward steps to create your Broccoli Tots:

  1. Preheat your oven to 375℉ (190℃) and line a baking sheet with parchment paper.
  2. Cut the florets off the broccoli and break them into medium-sized pieces. Don’t forget to peel the tough outer skin of the stem and chop it into 1-2 cm pieces.
  3. Steam (or boil) the stems for 1 minute, then add the florets and steam for an additional 3-4 minutes until tender. Remember, overcooking is a no-go!
  4. Drain the broccoli thoroughly, then chop it finely and transfer to a large mixing bowl.
  5. Add the cheese, eggs, almond meal, and minced garlic to the bowl. Mix well, ensuring any larger pieces are mashed up.
  6. Using a heaped tablespoon of the mixture, form it into a tot shape and place it on the prepared tray. Repeat until all the mixture is used; you should have around 23-25 tots.
  7. For an extra crispy finish, spray with a light coating of oil and bake for 20 minutes, or until golden brown.
  8. Serve these delightful tots with your favorite dipping sauce and watch them disappear!

Pro Tips for the Perfect Broccoli Tots

Want to elevate your Broccoli Tots game? Here are some expert insights:

  • Don’t Overcook the Broccoli: Keep it tender but not mushy to maintain the perfect texture.
  • Mix and Match Cheeses: Experiment with different cheeses like gouda or pepper jack for a flavor boost.
  • Adjust the Seasoning: Feel free to add spices like paprika or cayenne for an extra kick.
  • Use an Ice Cream Scoop: This tool makes shaping the tots effortless and uniform.
  • Try Different Cooking Methods: These tots can be air-fried for a quicker option that still delivers crunch.
  • Chill Before Baking: If you have time, chilling the formed tots for 15 minutes helps them hold their shape better.
  • Double the Batch: Make a larger batch and freeze for an easy meal prep solution.
  • Serve with Dips: Pair with ranch, guacamole, or a spicy sriracha mayo to enhance the experience.

Common Mistakes and Troubleshooting

Even the best chefs make mistakes, so here’s how to avoid common pitfalls when making Broccoli Tots:

  • Too Much Liquid: If your mixture is too wet, add more almond flour until the desired consistency is reached.
  • Tots Falling Apart: Ensure your broccoli is well-drained and consider adding an extra egg for better binding.
  • Underbaked Tots: If they’re not golden brown after 20 minutes, give them a few more minutes in the oven.
  • Overly Soft Texture: Make sure to chop the broccoli finely to avoid large chunks that can affect the final product.

Variations to Try

Get adventurous! Here are some variations to keep things exciting:

  • Spicy Broccoli Tots: Add finely chopped jalapeños or a sprinkle of red pepper flakes for heat.
  • Herbed Tots: Mix in fresh herbs like parsley or cilantro for a burst of fresh flavor.
  • Cheesy Spinach Tots: Incorporate chopped spinach along with the broccoli for added nutrients.
  • Sweet Potato Broccoli Tots: Replace half of the broccoli with mashed sweet potato for a different texture and sweetness.

Storage and Make-Ahead Instructions

Want to make these Broccoli Tots in advance? Here’s how:

  • Refrigerate: Store leftovers in an airtight container in the fridge for up to 3 days.
  • Freeze: Freeze uncooked tots on a baking sheet, then transfer to a freezer bag for up to 3 months. Bake from frozen, adding a few extra minutes to the cooking time.
  • Reheat: To reheat, place in a preheated oven at 375℉ (190℃) for 10-15 minutes until warmed through.

Frequently Asked Questions

Here are answers to some common questions about Broccoli Tots:

  • Can I use frozen broccoli? Yes! Just make sure to thaw and drain it well before using.
  • Are these tots gluten-free? Absolutely! Made with almond flour, they are safe for gluten-sensitive diets.
  • What dipping sauces pair well? Ranch, ketchup, or hummus all make excellent partners for these tots.
  • Can I make these vegan? Yes! Substitute eggs with flaxseed meal mixed with water and use a dairy-free cheese.
  • How do I know when they’re done? Look for a golden brown color and a crispy exterior.
  • Can I air fry these? Yes! Air fry at 375℉ (190℃) for about 10-12 minutes, flipping halfway.
  • What’s the best way to chop broccoli? Use a sharp knife and cut into small, uniform pieces for even cooking.
  • Can I add other vegetables? Certainly! Carrots or cauliflower can be added for a twist.

Nutritional Tips and Dietary Adaptations

To make these tots fit your dietary needs, consider the following:

  • Low Carb: Use crushed pork rinds instead of almond flour for a keto-friendly option.
  • High Protein: Add cooked quinoa or chickpeas to increase the protein content.
  • Allergen-Friendly: Omit cheese for a dairy-free version, and ensure you use certified gluten-free ingredients.

Essential Equipment

To make your cooking experience smooth, here’s what you’ll need:

  • Baking Sheet: Essential for roasting those tots to perfection.
  • Parchment Paper: Keeps the tots from sticking and makes cleanup a breeze.
  • Mixing Bowl: For combining all your ingredients effortlessly.
  • Steamer Basket: Helps to cook the broccoli evenly and maintain flavor.

Serving Suggestions

These Broccoli Tots shine on their own, but here are some serving ideas:

  • As an Appetizer: Serve warm with a variety of dips for a party-ready snack.
  • In a Meal: Pair with grilled chicken or fish and a side salad for a complete dinner.
  • For Kids: Make dinner fun by allowing children to create their own dipping sauce combos.

Conclusion

Broccoli Tots are not just a recipe; they’re an invitation to explore the vibrant world of cooking with spice and creativity! With their crispy texture and cheesy goodness, these tots are bound to become a beloved staple in your household. So grab your ingredients, fire up that oven, and let’s make some culinary magic together. Remember, cooking is about adventure — and every bite of these Broccoli Tots tells a delicious story. Happy cooking!

Broccoli Tots

Prep Time 10 minutes
Cook Time 20 minutes
Total Time 30 minutes
Servings 4 servings
Calories 150
These crispy broccoli tots are a healthy and delicious snack or side dish, packed with flavor and easy to make.

Ingredients

Vegetables

  • 550 g broccoli (cut into florets and stems)
  • 2 pcs eggs
  • 60 g almond meal/flour
  • 75 g sharp cheddar cheese (packed cup)
  • 2 cloves garlic (minced)
  • 0.5 tsp salt (optional - do not add for baby)

Instructions 

  • Preheat oven to 375℉/190℃ and line a baking sheet with parchment paper.
  • Steam broccoli stems and florets until soft, then chop and transfer to a bowl.
  • Add cheese, eggs, almond meal, and garlic; mix well and form into tots.
  • Place tots on tray, optionally spray with oil, and bake for 20 minutes until golden.
  • Serve with your favorite dip.

Notes

For a crispier texture, spray tots lightly with oil before baking.
Calories: 150kcal
Cost: $10
Course: Appetizer, Snack
Cuisine: American
Keyword: Broccoli

Nutrition

Calories: 150kcal | Carbohydrates: 10g | Protein: 8g | Fat: 10g | Sodium: 150mg

Ignite Your Morning with a Flavor Explosion

Welcome to a culinary adventure that will transform your breakfast routine! With just ten minutes, you can create a dish that’s not only quick but also bursting with flavor: Mushroom Spinach Scrambled Eggs. This vibrant recipe is perfect for those who crave a hearty, high-protein meal that fuels your day and excites your taste buds. Let’s dive into the world of flavors and textures as we whip up this delightful dish!

Why You’ll Love This Recipe

This isn’t just any breakfast; this is a celebration of taste and nutrition. Here are five compelling reasons why this Mushroom Spinach Scrambled Eggs recipe will become a staple in your kitchen:

  • Quick to Prepare: In just 10 minutes, you can whip up this dish, making it ideal for busy mornings.
  • Protein-Packed: With four large eggs, this recipe provides a solid protein boost to kickstart your day.
  • Rich in Nutrients: The mushrooms and spinach add essential vitamins and minerals, making this meal both healthy and satisfying.
  • Customizable: Feel free to customize with your favorite ingredients, spices, or cheese to make it uniquely yours.
  • One-Pan Wonder: Less cleanup means more time to enjoy your delicious breakfast!

Ingredients You’ll Need

Let’s gather the stars of our show. Here’s what you’ll need to create these delicious scrambled eggs:

  • 4 large eggs: Rich in protein and essential nutrients, these eggs are the base of your scramble.
  • 1/2 cup mushrooms, sliced: Adds savory umami flavor and a delightful texture.
  • 1 cup fresh spinach: Packed with vitamins and minerals, it adds a fresh taste to the dish.
  • 2 tablespoons milk or cream: Optional, but it makes the eggs fluffy and creamy.
  • 1 tablespoon butter or olive oil: Prevents sticking and enhances flavor.
  • 1 garlic clove, minced: Boosts flavor with a hint of aromatic goodness.
  • Salt and pepper to taste: Essential for enhancing overall taste.
  • 1/4 cup shredded cheese (optional): Adds creaminess and extra protein. Try cheddar, feta, or goat cheese!

How to Make Mushroom Spinach Scrambled Eggs

Ready to get cooking? Follow these simple steps for a breakfast that tastes like a gourmet meal:

  • Step 1: Prepare the Egg Mixture: In a bowl, crack the eggs and whisk them until the yolks and whites are fully blended. Stir in the milk or cream for creaminess.
  • Step 2: Sauté the Mushrooms: In a skillet over medium heat, melt the butter or olive oil. Add the sliced mushrooms and cook until they’re golden brown and fragrant, about 3-4 minutes.
  • Step 3: Wilt the Spinach: Add the minced garlic and fresh spinach to the skillet. Sauté until the spinach is wilted, around 1-2 minutes.
  • Step 4: Cook the Eggs: Pour the egg mixture into the skillet. Stir gently with a spatula, allowing the eggs to cook slowly until they’re just set but still soft and creamy.
  • Step 5: Add Cheese and Serve: If you’re using cheese, sprinkle it on top just before removing the skillet from the heat. Serve immediately for the best flavor!

Pro Tips for the Perfect Scramble

Want to elevate your scrambled eggs game? Here are some expert insights:

  • Low and Slow: Cook your eggs over low heat for a creamier texture. High heat can make them rubbery!
  • Don’t Overcrowd the Pan: If you’re making multiple servings, use a larger skillet or cook in batches to ensure even cooking.
  • Fresh Ingredients: Use fresh mushrooms and spinach for the best flavor and texture. Frozen options can be watery.
  • Season Wisely: Add salt and pepper only after the eggs begin to set for a more balanced flavor.
  • Experiment with Spices: A pinch of paprika or a dash of hot sauce can take your scramble to the next level!
  • Garnish for Presentation: Fresh herbs like chives or parsley not only add flavor but also make your dish look beautiful.
  • Keep it Covered: If you prefer a fluffier texture, cover the skillet with a lid for a minute while cooking.
  • Use the Right Pan: A non-stick skillet works best for easy cooking and cleanup.

Common Mistakes and Troubleshooting

Even the best chefs have off days. Here’s how to avoid common pitfalls:

  • Rubbery Eggs: Cooking too quickly or at too high a temperature can lead to rubbery results. Remember, low heat is your friend!
  • Too Runny: If your eggs are too runny, you may need to cook them a bit longer, but be careful not to overcook.
  • Lack of Flavor: Always taste and adjust seasoning. Fresh herbs and spices can make a huge difference!
  • Sticky Eggs: If your eggs stick to the pan, it’s likely that the pan wasn’t adequately greased or heated.

Variations & Flavor Twists

Want to keep things exciting? Here are some variations to try:

  • Southwestern Twist: Add diced tomatoes, green chilies, and a sprinkle of cumin for a zesty flavor.
  • Italian Style: Incorporate sun-dried tomatoes, basil, and mozzarella cheese for an Italian flair.
  • Vegan Option: Substitute eggs with a tofu scramble and use nutritional yeast for cheesy flavor.
  • Spicy Kick: Add jalapeños or a dash of hot sauce to heat things up!

Storage and Make-Ahead Instructions

If you want to prepare ahead of time, here’s how to store your scrambled eggs effectively:

  • Make Ahead: You can prepare the veggie mixture in advance. Just store it in the fridge for up to 2 days.
  • Reheating: Gently reheat in a skillet over low heat, adding a splash of milk to maintain creaminess.
  • Storage: Store leftovers in an airtight container in the fridge for up to 3 days. Reheat before serving.

Comprehensive FAQ

Got questions? We’ve got answers! Here are some frequently asked questions about Mushroom Spinach Scrambled Eggs:

  • Can I use different vegetables?: Absolutely! Bell peppers, onions, or zucchini are great additions.
  • How can I make it dairy-free?: Use plant-based milk and skip the cheese or use a dairy-free alternative.
  • Can I freeze scrambled eggs?: It’s not recommended, as the texture can change. Fresh is always best!
  • What’s the best way to serve them?: Serve with whole grain toast, on a breakfast burrito, or over a bed of greens.
  • How do I know when the eggs are done?: They should be softly set and slightly runny; they’ll continue to cook off the heat.
  • What can I do with leftover eggs?: Mix them with cooked pasta or grains for a quick lunch or dinner!
  • Can I add meat?: Yes! Cooked bacon, sausage, or ham can be sautéed with the veggies for extra protein.
  • What type of skillet is best?: A non-stick skillet is ideal for easy cooking and cleanup.

Nutrition Tips and Dietary Adaptations

Want to ensure your breakfast is as healthy as possible? Here are some nutrition tips:

  • Fiber Boost: Serve your scrambled eggs with whole grain toast or avocado for added fiber.
  • Low-Calorie Option: Use egg whites or a mix of whole eggs and egg whites to reduce calories while still enjoying flavor.
  • Healthy Fats: Choose olive oil over butter for a heart-healthy fat option.
  • Portion Control: If you’re watching your caloric intake, stick to one or two eggs and add more veggies!

Equipment Recommendations

Here’s what you need for this recipe:

  • Non-Stick Skillet: The key to perfectly cooked scrambled eggs.
  • Spatula: A silicone or wooden spatula is best for gentle stirring.
  • Mixing Bowl: For whisking the eggs and mixing ingredients.
  • Knife and Cutting Board: Essential for slicing your veggies.

Serving Suggestions

Let’s make your breakfast even more exciting! Here are some serving ideas:

  • Toast It Up: Serve your scrambled eggs on a slice of toasted whole grain bread or an English muffin.
  • Wrap It: Fill a tortilla with scrambled eggs for a delicious breakfast burrito.
  • Top with Avocado: A few slices of creamy avocado add healthy fats and richness.
  • Fresh Salsa: A dollop of fresh salsa or pico de gallo adds a zesty kick.

So there you have it! A comprehensive guide to creating the best Mushroom Spinach Scrambled Eggs that will not only fuel your morning but also inspire your culinary creativity. Remember, cooking is an adventure, and every dish tells a story. Enjoy every bite, embrace the spice, and make your breakfast a masterpiece!

10-Minute Mushroom Spinach Scrambled Eggs (High-Protein)

Prep Time 3 minutes
Cook Time 7 minutes
Total Time 10 minutes
Servings 2 servings
Calories 250
This quick and nutritious scramble combines eggs, mushrooms, and spinach for a high-protein breakfast in just 10 minutes.

Ingredients

Eggs

  • 4 large eggs (rich in protein and essential nutrients)

Mushrooms

  • 1/2 cup mushrooms, sliced (adds savory umami flavor)

Spinach

  • 1 cup fresh spinach (packed with vitamins and minerals)

Milk or Cream

  • 2 tablespoons milk or cream (makes the eggs fluffy)

Butter or Olive Oil

  • 1 tablespoon butter or olive oil (prevents sticking and enhances flavor)

Garlic

  • 1 clove garlic, minced (boosts flavor)

Salt and Pepper

  • to taste salt and pepper (enhances overall taste)

Shredded Cheese

  • 1/4 cup shredded cheese (optional) (adds creaminess and extra protein)

Instructions 

  • Whisk eggs with milk or cream, salt, and pepper.
  • Heat butter or oil in a pan over medium heat, then sauté garlic and mushrooms until tender.
  • Add spinach and cook until wilted.
  • Pour in the egg mixture and gently scramble until cooked through, about 2-3 minutes.
  • Sprinkle with shredded cheese if desired, then serve hot.

Notes

For extra flavor, add herbs like parsley or chives.
Calories: 250kcal
Cost: $8
Course: Breakfast
Cuisine: American
Keyword: Eggs, Mushrooms, Spinach

Nutrition

Calories: 250kcal | Carbohydrates: 8g | Protein: 18g | Fat: 17g | Sodium: 300mg

Ignite Your Taste Buds with the Sweet Chili Salmon Bowl

Welcome to a culinary adventure that will set your taste buds on fire! My Healthy Sweet Chili Salmon Bowl blends the vibrancy of fresh ingredients with the kick of sweet chili sauce, creating a dish that’s perfect for anyone looking to add a little excitement to their meal. It’s not just about satisfying hunger; it’s about creating a moment of joy and exploration with every bite. This bowl is not only delicious but also versatile, making it a favorite in my kitchen.

Why You’ll Love This Recipe

This isn’t just any salmon bowl; it’s a celebration of flavor, nutrition, and culinary creativity. Here’s why you’ll be reaching for this recipe time and again:

  • Quick & Easy Preparation: With simple steps and minimal cooking time, you can whip up this bowl in under 30 minutes, perfect for busy weeknights.
  • Flavor Explosion: The combination of sweet chili sauce and fresh ingredients creates a harmonious balance of flavors that will keep you coming back for more.
  • Nutrient-Dense: Packed with protein from salmon and fiber from fresh veggies, this bowl is a powerhouse of nutrition that supports a healthy lifestyle.
  • Customizable: Whether you want to swap the salmon for tofu or add extra veggies, this recipe adapts to your dietary preferences.
  • Visually Stunning: The vibrant colors of the ingredients make this dish as beautiful as it is delicious, perfect for impressing guests or just indulging yourself.

Ingredients Needed for Your Sweet Chili Salmon Bowl

Gather these fresh ingredients for a bowl bursting with flavor:

  • 4 salmon fillets (4-6 oz each, skinless): Choose wild-caught for a richer flavor and health benefits.
  • 1/4 cup sweet chili sauce: Opt for a brand using natural ingredients or make your own for a personal touch.
  • 1 tablespoon olive oil: For pan-searing, extra virgin olive oil adds depth to the dish.
  • 2 cups cooked jasmine rice or quinoa: This serves as the hearty base of your bowl.
  • 1 small cucumber (sliced): Adds a refreshing crunch.
  • 1/2 cup shredded carrots: For a touch of sweetness and color.
  • 1/2 red bell pepper (thinly sliced): Adds a beautiful pop of color and sweetness.
  • 1/2 cup edamame (shelled and steamed): A great source of plant-based protein.
  • 1 avocado (sliced, optional): Creamy and rich, it complements the spices beautifully.
  • 2 green onions (thinly sliced): For a mild onion flavor and garnish.
  • 1 tablespoon sesame seeds: Sprinkle for a nutty finish.
  • Lime wedges for serving: A squeeze of lime brightens the entire dish.
  • Pickled ginger or sliced jalapeños: Optional for those who like an extra kick.

How to Prepare the Perfect Sweet Chili Salmon Bowl

A vibrant salmon bowl featuring sweet chili sauce and fresh toppings.

Now that you have all the vibrant ingredients, let’s dive into the preparation process!

Step 1: Marinate the Salmon

Start by marinating the salmon. In a shallow dish, combine the salmon fillets and sweet chili sauce, ensuring they’re evenly coated. Let them sit for at least 15 minutes.

Step 2: Cook the Salmon

Heat olive oil in a skillet over medium-high heat. Once hot, add the marinated salmon fillets. Cook for about 4-5 minutes per side or until cooked through and flaky. Avoid overcooking to keep the salmon juicy.

Step 3: Prepare the Bowl Base

While the salmon cooks, prepare your base. If using rice, make sure it’s fluffy and warm. Quinoa should be cooked according to package instructions, then fluffed with a fork.

Step 4: Assemble the Bowl

In a large bowl, place a generous scoop of rice or quinoa. Top with the cooked salmon, sliced cucumber, shredded carrots, bell pepper, edamame, and avocado. Drizzle with additional sweet chili sauce if desired, and sprinkle with green onions and sesame seeds.

Pro Tips for a Perfect Bowl

  • Marination Time: For deeper flavor, marinate the salmon for up to 1 hour.
  • Cooking Temperature: Ensure your skillet is hot before adding the salmon to achieve a nice sear.
  • Don’t Overcook: Salmon is best when it’s just cooked through; it should flake easily.
  • Serving Temperature: Serve the bowl warm for the best flavor experience.
  • Experiment with Veggies: Feel free to add other fresh veggies like spinach, radishes, or snap peas.
  • Rice Alternatives: Swap the rice for cauliflower rice for a low-carb option.
  • Storage Tips: Store leftovers in an airtight container in the fridge for up to 3 days.
  • Meal Prep: You can marinate the salmon and chop the veggies ahead of time for quick assembly later.

Common Mistakes and Troubleshooting

Even the most seasoned chef can run into hiccups. Here are some common mistakes and how to avoid them:

  • Overcooking the Salmon: Use a meat thermometer; salmon should reach an internal temperature of 145°F.
  • Skipping Marination: Don’t rush this step; it’s crucial for flavor.
  • Using Old Ingredients: Freshness matters! Always check the expiration dates on your sauces and ingredients.
  • Not Adjusting Spice Level: If you’re sensitive to heat, start with less chili sauce and add more to taste.

Variations to Spice Up Your Bowl

Your Sweet Chili Salmon Bowl can be even more exciting with these variations:

  • Tropical Twist: Add pineapple chunks and swap sweet chili sauce for a mango salsa.
  • Spicy Lovers: Incorporate sriracha or chili flakes for an extra kick.
  • Vegan Delight: Replace salmon with marinated tofu or tempeh for a plant-based option.
  • Asian Fusion: Top with kimchi instead of avocado for a tangy twist.

Storage and Make-Ahead Instructions

This bowl is perfect for meal prep! Here’s how to ensure it stays fresh:

  • Refrigeration: Store leftovers in an airtight container for up to 3 days.
  • Freezing: While cooked salmon can be frozen, it’s best to keep the ingredients separate until ready to eat.
  • Make-Ahead: Prepare the sauce and chop the veggies a day in advance to save time.

Comprehensive FAQ

Here are answers to some common questions about this recipe:

  • Can I use frozen salmon? Yes! Just make sure to thaw it completely before marinating.
  • What if I don’t like sweet chili sauce? You can substitute with teriyaki sauce or a homemade glaze.
  • Is this recipe gluten-free? Yes, as long as your sweet chili sauce is gluten-free.
  • Can I make this bowl low-carb? Absolutely! Use cauliflower rice instead of traditional rice.
  • How spicy is this dish? The spice level depends on the sweet chili sauce you choose; taste before adding more.
  • What sides pair well with this dish? A light salad or steamed veggies complement the bowl beautifully.
  • Can I prepare this bowl in advance? Yes, you can prep the ingredients and assemble when ready to eat.
  • How do I know when the salmon is done? Salmon should flake easily with a fork and be opaque in the center.

Nutritional Tips and Dietary Adaptations

This bowl is not only tasty but also caters to various dietary needs:

  • High Protein: Salmon provides an excellent source of protein, making it a great post-workout meal.
  • Heart-Healthy Fats: Avocado and olive oil add healthy fats to support cardiovascular health.
  • Low-Carb Option: Substitute rice with cauliflower rice for a low-carb meal.
  • Vegan-Friendly: Replace salmon with plant-based proteins like chickpeas or lentils.

Equipment Recommendations

To make this recipe, you’ll need a few essential kitchen tools:

  • Skillet: A non-stick skillet works best for cooking salmon without sticking.
  • Meat Thermometer: This is crucial for checking the doneness of the salmon.
  • Sharp Knife: For slicing vegetables and fish with ease.
  • Mixing Bowls: Use these for marinating and assembling your ingredients.

Serving Suggestions

When it comes to serving, presentation is key! Here are a few ideas to elevate your dish:

  • Garnish: Fresh herbs like cilantro or basil can add a burst of flavor.
  • Serve with Lime: A wedge of lime not only brightens the flavors but also adds a fresh zest.
  • Pair with Wine: A chilled white wine pairs beautifully with the rich salmon.
  • Decorative Bowls: Serve in vibrant bowls to make the dish visually appealing.

Conclusion: Your Culinary Adventure Awaits

Cooking should be an adventure, an opportunity to explore flavors, textures, and aromas that awaken your senses. My Sweet Chili Salmon Bowl is not just a meal; it’s a journey into the heart of bold cooking. So grab your ingredients, unleash your inner chef, and let the flavors ignite your passion for cooking. Remember, every dish is a story waiting to be told, and with the right spice, your culinary tales can be unforgettable. Happy cooking!

Healthy Sweet Chili Salmon Bowl Recipe

Prep Time 10 minutes
Cook Time 15 minutes
Total Time 25 minutes
Servings 4 servings
Calories 520
A vibrant and nutritious bowl featuring tender salmon glazed with sweet chili sauce, served over jasmine rice with fresh vegetables and flavorful toppings.

Ingredients

Protein

  • 4 fillets salmon fillets (4-6 oz each, skinless)

Sauces

  • 1/4 cup sweet chili sauce
  • 1 tablespoon olive oil (for pan-searing)

Base

  • 2 cups cooked jasmine rice or quinoa (for the base)

Vegetables

  • 1 small cucumber (sliced)
  • 1/2 cup shredded carrots
  • 1/2 red bell pepper red bell pepper (thinly sliced)
  • 1/2 cup edamame (shelled and steamed)
  • 1 avocado avocado (sliced, optional)
  • 2 green onions green onions (thinly sliced)
  • 1 tablespoon sesame seeds

Extras

  • to taste Lime wedges for serving
  • to taste Pickled ginger (sliced jalapeños, or extra sweet chili sauce for added flavor)

Instructions 

  • Pan-sear the salmon fillets in olive oil until cooked through, about 4-5 minutes per side.
  • Warm the sweet chili sauce and brush it over the cooked salmon.
  • Assemble bowls with rice, sliced vegetables, edamame, and salmon.
  • Top with sliced avocado, green onions, sesame seeds, and serve with lime wedges and pickled ginger.

Notes

Feel free to customize with your favorite vegetables or additional toppings for extra flavor.
Calories: 520kcal
Cost: $15
Course: Main Course
Cuisine: Fusion
Keyword: Bowl, healthy, Salmon

Nutrition

Calories: 520kcal | Carbohydrates: 65g | Protein: 35g | Fat: 15g | Sodium: 700mg

Unleash Your Culinary Creativity with Keto Philly Cheesesteak Roll Ups

Welcome to a flavor-packed adventure where we transform the classic Philly cheesesteak into a keto-friendly sensation! With thinly sliced ribeye, gooey provolone cheese, and vibrant bell peppers, these Keto Philly Cheesesteak Roll Ups are not just a meal; they are an experience waiting to unfold on your taste buds. Whether you’re diving into a cozy family dinner or hosting game night, this dish is designed to ignite your passion for cooking and spice up your culinary repertoire. So, roll up your sleeves and let’s get cooking!

Why You’ll Love This Recipe

  • Low Carb Delight: This recipe is a low-carb dream, allowing you to indulge in rich flavors without the guilt. Perfect for those on a keto diet!
  • Quick and Easy: With just a handful of ingredients and 30 minutes of your time, you can whip up a delicious dish that will impress your family and friends.
  • Customizable: Tailor the flavors to your liking! Add extra spices, different cheese varieties, or even veggies to make it your own.
  • Kid-Friendly: The fun of rolling up their own cheesesteak is sure to excite kids and encourage them to join in the kitchen!
  • Meal Prep Friendly: Perfect for make-ahead meals, these roll ups can be prepared in advance and stored for a quick and satisfying dinner.

Ingredients Breakdown

Here’s what you’ll need to bring this delicious Keto Philly Cheesesteak Roll Up to life:

  • 1 lb thinly sliced ribeye or sirloin beef: The star of the show; choose high-quality meat for the best flavor.
  • 8 oz provolone cheese, sliced: Gooey and melty, this cheese ties all the flavors together.
  • 1 cup mixed bell peppers, chopped: Adds a pop of color and sweetness; feel free to mix colors for visual appeal!
  • 1 medium sweet onion, chopped: For that savory depth that complements the beef beautifully.
  • 2 tbsp extra virgin olive oil: A healthy fat choice for sautéing your veggies and beef.
  • 4 low-carb tortillas: These hold everything together while keeping the carb count low.

Step-by-Step Instructions

Side view of rolled philly cheesesteak wraps filled with beef and cheese.

Now, let’s bring these flavors together in a few simple steps:

  1. Gather and prep your ingredients: Slice the beef into thin strips and chop the bell peppers and onion.
  2. Heat olive oil: In a skillet over medium heat, sauté the onions and bell peppers until softened (about 5-7 minutes).
  3. Add the beef: Increase heat to medium-high, add sliced beef, season with salt and pepper, and cook until browned (3-5 minutes).
  4. Melt the cheese: Reduce heat to low; place provolone slices over the beef mixture to melt completely.
  5. Assemble the roll ups: Spoon the beef-cheese mixture onto each tortilla and roll tightly.
  6. Final touch: Return roll-ups seam-side down to the skillet; cook until golden brown on all sides (about 3-4 minutes total).

Pro Tips for Perfection

  • Slice against the grain: This ensures your beef remains tender and easy to chew.
  • Experiment with cheese: Try using gouda or cheddar for a different flavor profile.
  • Don’t skimp on seasoning: A pinch of smoked paprika or cayenne can elevate the flavors.
  • Use fresh ingredients: Fresh bell peppers and onions enhance the overall taste and texture.
  • Let the cheese melt thoroughly: This creates that ooey-gooey texture we crave in a cheesesteak.
  • Don’t overcrowd the skillet: Cook in batches if necessary to ensure even browning.
  • Serve immediately: Enjoy while hot for the best flavor experience.
  • Pair with a low-carb dip: A creamy ranch or spicy salsa can take these roll ups to the next level.

Common Mistakes and Troubleshooting

Even the most seasoned chefs have hiccups in the kitchen. Here are some common mistakes and how to avoid them:

  • Overcooking the beef: Keep an eye on your cooking time; beef cooks quickly!
  • Choosing the wrong tortillas: Make sure they are truly low-carb to keep this dish keto-friendly.
  • Skipping the seasoning: Without seasoning, even the best ingredients can fall flat.
  • Not allowing the cheese to melt: Patience is key; let that cheese create a luscious layer over the beef.

Delicious Variations

Feel free to play around with these variations to suit your taste:

  • Spicy Kick: Add sliced jalapeños or a drizzle of sriracha for a fiery twist.
  • Veggie Loaded: Include mushrooms, spinach, or zucchini for extra nutrition and flavor.
  • BBQ Style: Mix in your favorite low-carb BBQ sauce for a tangy flavor explosion.
  • Breakfast Roll Ups: Scramble some eggs and add them to the mix for a hearty breakfast option.

Storage and Make-Ahead Instructions

These roll ups are perfect for meal prep! Here’s how to store and reheat them:

  • Refrigerate: Store in an airtight container for up to 3 days.
  • Freeze: Wrap tightly in foil and freeze for up to 2 months. Thaw in the fridge overnight before reheating.
  • Reheat in the oven: For best results, reheat in a preheated oven at 350°F (175°C) for about 10-15 minutes, or until heated through.

Frequently Asked Questions

Here are some common questions about making Keto Philly Cheesesteak Roll Ups:

  • Can I use chicken instead of beef? Absolutely! Thinly sliced chicken breast works well for a lighter option.
  • How do I make these dairy-free? Substitute provolone cheese with a dairy-free cheese alternative or omit it entirely.
  • What can I serve with these roll ups? Pair with a simple salad or a side of roasted veggies for a complete meal.
  • Can I use different low-carb tortillas? Yes! Just ensure they are low-carb and fit your dietary needs.
  • How can I make this recipe spicier? Add more chili peppers or a dash of cayenne pepper to the beef mixture.
  • Is this recipe suitable for meal prep? Yes! They are perfect for make-ahead meals and easy to reheat.
  • Can I grill these instead of pan-frying? Yes! Grilling adds a nice char and flavor to the roll ups.
  • What is the best way to store leftovers? Store in an airtight container in the fridge for up to 3 days.

Nutritional Tips and Dietary Adaptations

This recipe supports a low-carb lifestyle, making it suitable for keto dieters. Here are some additional tips:

  • High Protein: With beef and cheese, these roll ups are packed with protein, making them a filling meal.
  • Low Calorie: Keep the portion sizes in check to maintain a low-calorie intake.
  • Gluten-Free Option: Ensure your tortillas are certified gluten-free if that’s a concern for you.

Essential Equipment Recommendations

To make these Keto Philly Cheesesteak Roll Ups, you’ll need:

  • Skillet: A quality non-stick skillet will help prevent sticking and burning.
  • Sharp Knife: For slicing the beef and vegetables with precision.
  • Cutting Board: A sturdy surface for all your prep work.
  • Spatula: Essential for flipping those roll ups to golden perfection.

Serving Suggestions

Make your dining experience even more delightful with these serving ideas:

  • Garnish with fresh herbs: Chopped parsley or cilantro adds freshness and color.
  • Serve with dipping sauces: A spicy aioli or creamy ranch can elevate the dish.
  • Pair with a refreshing drink: A sparkling water with lemon or a light beer complements the flavors beautifully.

Conclusion

With these Keto Philly Cheesesteak Roll Ups, you’re not just making dinner; you’re crafting a culinary masterpiece that brings joy and flavor to the table. Remember, cooking is all about experimentation and having fun. So embrace the heat, indulge in the flavors, and enjoy every bite with friends and family. Let the adventure begin!

Delicious Keto Philly Cheesesteak Roll Ups

Prep Time 10 minutes
Cook Time 15 minutes
Total Time 25 minutes
Servings 4 servings
Calories 650
Enjoy these savory, low-carb roll-ups filled with tender beef and melted provolone, perfect for a quick and satisfying meal.

Ingredients

Meat

  • 1 lb thinly sliced ribeye or sirloin beef

Cheese

  • 8 oz provolone cheese, sliced

Vegetables

  • 1 cup mixed bell peppers, chopped
  • 1 medium sweet onion, chopped

Other

  • 2 tbsp extra virgin olive oil

Instructions 

  • Slice beef into thin strips and chop bell peppers and onion.
  • Sauté onions and peppers in olive oil until softened (5-7 min).
  • Add beef, season, and cook until browned (3-5 min).
  • Reduce heat, add provolone slices to melt over beef.
  • Spread mixture on tortillas, roll up, and cook until golden (3-4 min).

Notes

For extra flavor, add a dash of hot sauce or herbs.
Calories: 650kcal
Cost: $15
Course: Main Course
Cuisine: American
Keyword: beef, Keto, Low Carb

Nutrition

Calories: 650kcal | Carbohydrates: 12g | Protein: 50g | Fat: 45g | Sodium: 1200mg