Author

Avery Collins

Browsing

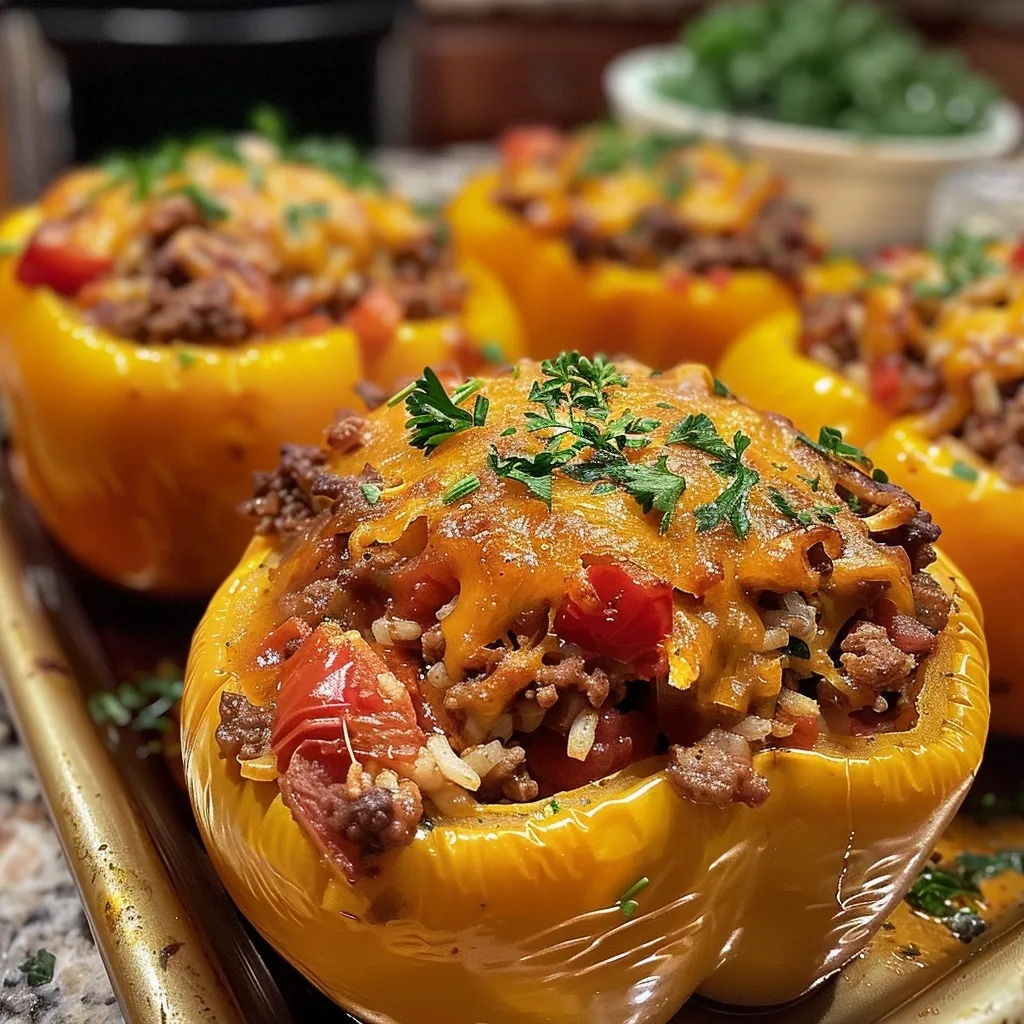
Discover the Magic of Stuffed Peppers

Welcome to your next culinary adventure! Stuffed peppers are not just a meal; they’re a canvas for creativity and flavor. In this article, we’ll explore how to make stuffed peppers that are bursting with flavor, filled with hearty ingredients, and perfectly spiced to ignite your taste buds. With my ultimate stuffed peppers recipe, you’ll not only learn how to create a dish that dazzles but also why this dish has become a favorite in kitchens around the world.

Whether you’re cooking for a family dinner, a cozy gathering, or just for yourself, these stuffed peppers will never disappoint. Let’s dive into the delicious details!

Why You’ll Love This Recipe

This stuffed peppers recipe is more than just a dinner option; it’s a celebration of flavors and textures. Here are five reasons why this dish will steal the show:

  • Versatile Filling: Customize the stuffing with your favorite proteins and grains. From ground beef to quinoa, the options are endless!
  • Healthy and Nutritious: Packed with vegetables and lean protein, these peppers are a wholesome meal that satisfies.
  • Make-Ahead Friendly: Prepare them in advance and reheat for a quick weeknight dinner. Perfect for meal prep!
  • Kid-Approved: With their vibrant colors and delicious flavors, stuffed peppers are a hit with kids and adults alike.
  • Great for Leftovers: The flavors deepen as they sit, making them even tastier the next day!

Ingredient Breakdown

Let’s talk about what goes into these stuffed peppers and how you can switch things up to suit your taste!

  • Ground Beef (1 lb): The classic choice, but feel free to substitute with ground turkey, chicken, or a plant-based alternative for a vegetarian option.
  • Bell Peppers (6): Choose a mix of colors—red, yellow, and green—for a vibrant dish. If you’re feeling adventurous, try poblano or banana peppers for a different twist!
  • Garlic (3 cloves): Fresh garlic adds depth; however, garlic powder can work in a pinch.
  • Oregano (1 1/2 tsp, dried): A staple herb that complements the filling beautifully. Fresh oregano can elevate the flavor even more!
  • Fresh Parsley: Adds freshness and color. You can also use cilantro for a different flavor profile.
  • Canned Tomatoes (14.5 oz): Opt for fire-roasted for a smoky flavor. You can also substitute with fresh chopped tomatoes, especially in summer.
  • Yellow Onion (1 medium): This is essential for a flavor base. Red onions can add a nice sweetness.
  • Tomato Paste (2 tbsp): Intensifies the tomato flavor. If you don’t have any, you can use a bit more canned tomatoes.
  • Cooked Rice (1 1/2 cups): White or brown rice works here, or try quinoa for a gluten-free alternative.
  • Black Pepper: Freshly ground for the best flavor.
  • Kosher Salt: Essential for seasoning. Sea salt can be used as well.
  • Extra-Virgin Olive Oil (2 tbsp): For sautéing and flavor. Avocado oil is another great option.
  • Monterey Jack Cheese (1 cup): Melts beautifully, but feel free to use cheddar or a dairy-free alternative!

Pro Tips for Perfect Stuffed Peppers

Side view of juicy stuffed peppers with vibrant colors and visible ingredients.

Let’s take your stuffed peppers to the next level with these expert insights:

  • Pre-cook the Peppers: Blanching the peppers for a few minutes before stuffing allows them to soften and ensures even cooking.
  • Season Your Filling: Don’t be shy with the spices. A little cumin or smoked paprika can add an extra layer of flavor!
  • Don’t Overfill: Leave a little space at the top for the cheese and to avoid spilling while cooking.
  • Cheesy Goodness: Add cheese on the top during the last 10 minutes of baking for that perfect golden crust.
  • Experiment with Toppings: A dollop of sour cream, fresh avocado, or a sprinkle of lime juice can elevate your dish.
  • Cook in a Sauce: Baking the peppers in a layer of tomato sauce keeps them moist and adds flavor.
  • Use a Meat Thermometer: Ensure your filling reaches 160°F (70°C) for ground beef or poultry to guarantee food safety.
  • Let Them Rest: Allow the stuffed peppers to sit for a few minutes after baking to help them set and make serving easier.

Common Mistakes and Troubleshooting

Even the best chefs can make mistakes! Here’s how to avoid some common pitfalls:

  • Overcooking the Peppers: Keep an eye on them to avoid mushiness. They should be tender but still hold their shape.
  • Bland Filling: Always taste your filling before stuffing. Adjust the seasoning as needed!
  • Not Enough Liquid: If the filling seems dry, add a splash of broth or more canned tomatoes to moisten it up.
  • Burnt Cheese: If your cheese is browning too quickly, cover the peppers with foil until the last few minutes of baking.

Flavor Variations

Why stick to just one style? Here are some exciting variations to try:

  • Mexican Fiesta: Use taco seasoning in the filling and top with salsa and avocado.
  • Italian Inspired: Substitute Italian sausage for the beef, add basil, and top with marinara sauce.
  • Mediterranean Twist: Add feta cheese, olives, and spices like za’atar for a fresh flavor.
  • Vegetarian Delight: Replace meat with lentils or chickpeas and load up on veggies like zucchini and spinach.

Storage and Make-Ahead Instructions

These stuffed peppers are perfect for meal prep! Here’s how to store and reheat:

  • Refrigerate: Store cooked peppers in an airtight container in the fridge for up to 5 days.
  • Freeze: Freeze before baking for up to 3 months. Thaw in the fridge overnight before baking.
  • Reheat: Microwave leftovers or bake at 350°F (175°C) until heated through.

Frequently Asked Questions

Let’s tackle some common queries about stuffed peppers:

  • Can I use frozen bell peppers? Yes, frozen peppers work well, but they may be softer after cooking.
  • What’s the best rice to use? Both white and brown rice are great; brown rice adds a nutty flavor.
  • How do I know when they’re done? The peppers should be tender and the filling hot throughout.
  • Can I make them spicy? Absolutely! Add jalapeños or crushed red pepper to the filling.
  • Are stuffed peppers keto-friendly? Yes, just replace rice with cauliflower rice or omit it altogether.
  • How do I prevent sogginess? Make sure to drain canned tomatoes and avoid excessive moisture in your filling.
  • Can I prepare the filling in advance? Yes! You can prepare the filling a day ahead and stuff the peppers just before baking.
  • What sides go well with stuffed peppers? A fresh salad or crusty bread pairs perfectly with stuffed peppers.

Nutritional Tips and Dietary Adaptations

These stuffed peppers can fit into various dietary preferences:

  • Gluten-Free: Ensure all ingredients are certified gluten-free, especially sauces.
  • Dairy-Free: Skip the cheese or use a dairy-free alternative.
  • Low-Carb: Use cauliflower rice instead of traditional rice for a low-carb option.

Essential Equipment

To make your stuffed peppers, you’ll need:

  • Large Baking Dish: To hold the peppers while they bake.
  • Skillet: For sautéing the filling ingredients.
  • Knife and Cutting Board: Essential for chopping and prepping your veggies.

Serving Suggestions

Presentation is key! Serve your stuffed peppers with:

  • Fresh Herbs: A sprinkle of parsley or cilantro adds a vibrant touch.
  • Sour Cream or Greek Yogurt: For a creamy contrast to the spice.
  • Lime Wedges: A squeeze of lime brightens the flavors.

Conclusion

Stuffed peppers are more than a dish; they’re a celebration of flavor, creativity, and culinary adventure. With this ultimate recipe, you’re not just preparing a meal; you’re crafting an experience that will have everyone coming back for seconds. So grab those peppers, unleash your inner chef, and let the cooking begin! Remember, the kitchen is your playground, and with a little spice and a lot of heart, you can create something extraordinary. Happy cooking!

Stuffed Peppers

Prep Time 15 minutes
Cook Time 30 minutes
Total Time 45 minutes
Servings 4 servings
Calories 450
Delicious stuffed peppers filled with savory ground beef, rice, and fresh herbs, perfect for a hearty meal.

Ingredients

Meat and Vegetables

  • 1 lb Ground beef
  • 6 Bell peppers Bell peppers
  • 3 cloves Garlic
  • 1.5 tsp Oregano, dried
  • 1 parsley Parsley, fresh
  • 1 14.5-oz. Tomatoes
  • 1 medium Yellow onion
  • 2 tbsp Tomato paste
  • 1.5 cup White or brown rice, cooked
  • 1 Black pepper, freshly ground Black pepper, Freshly ground
  • 1 Kosher salt Kosher salt
  • 2 tbsp Olive oil, extra-virgin
  • 1 cup Monterey jack

Instructions 

  • Preheat oven to 375°F (190°C). Sauté chopped onion and garlic in olive oil until translucent.
  • Cook ground beef until browned; add tomatoes, tomato paste, oregano, salt, and pepper. Simmer for 10 minutes.
  • Mix cooked rice, chopped parsley, and beef mixture. Stuff the mixture into halved bell peppers.
  • Place stuffed peppers in a baking dish, top with shredded Monterey Jack cheese, and bake for 20 minutes.

Notes

You can substitute ground turkey or chicken for a leaner option.
Calories: 450kcal
Cost: $15
Course: Main Course
Cuisine: American
Keyword: Stuffed Peppers

Nutrition

Calories: 450kcal | Carbohydrates: 45g | Protein: 30g | Fat: 18g | Sodium: 900mg

Indulge in the Sweet Adventure of Raspberry Chia Pudding

Welcome to a culinary journey that tantalizes your taste buds and nourishes your body! My Raspberry Chia Pudding is not just a dessert; it’s an adventure that sparks joy and ignites your passion for cooking. With its vibrant colors and delightful textures, this dish marries the sweetness of fresh raspberries with the rich nutritional benefits of chia seeds. Whether you’re craving a healthy breakfast or a satisfying snack, this recipe brings a burst of flavor and excitement to your table. So, buckle up as we dive into the world of raspberry chia pudding!

Why You’ll Love This Recipe

There are countless reasons to fall in love with this recipe, and here are just a few:

  • Nutritious Delight: Chia seeds are a powerhouse of nutrients, packed with omega-3 fatty acids, fiber, and protein, making them a fantastic addition to your diet.
  • Versatile and Adaptable: This pudding can be customized with various toppings and flavorings, allowing you to make it your own.
  • Quick and Easy: You can whip up this recipe in under 15 minutes, plus chilling time! Perfect for busy mornings or spontaneous cravings.
  • Make-Ahead Convenience: This pudding stores well in the fridge, making it an ideal option for meal prep or last-minute desserts.
  • Vegan and Gluten-Free: Suitable for various dietary preferences, this recipe can accommodate everyone at your table!

Ingredients You’ll Need

Let’s gather the essentials for this delightful raspberry chia pudding. Here’s what you’ll need:

  • 1/2 cup fresh or frozen raspberries: Opt for ripe raspberries for the best flavor, or use frozen ones for convenience.
  • 3/4 cup almond milk or coconut milk: Both options lend a creamy texture; coconut milk enhances the tropical vibe.
  • 1 tbsp maple syrup: Sweeten naturally! Adjust the amount to suit your taste preferences.
  • 1/2 tsp vanilla extract: A touch of vanilla elevates the flavor profile.
  • 1/4 cup chia seeds: The star of the show! These tiny seeds expand and gel, creating that delicious pudding texture.

Steps to Crafting Your Raspberry Chia Pudding

Now, let’s make some magic! Follow these simple steps to create your own raspberry chia pudding:

  1. Blend the raspberries, almond milk, maple syrup, and vanilla extract together in a blender until smooth.
  2. Pour the mixture into a bowl, then add the chia seeds and whisk together until well combined.
  3. Place the pudding in the fridge to set for at least 1 hour, or overnight for the best results.
  4. Serve chilled, topped with your favorite fruits, nuts, or granola.

Pro Tips for Perfect Pudding

Want to elevate your pudding game? Here are some expert insights:

  • Chill time is key: Allowing the pudding to set overnight will yield the best texture and flavor.
  • Experiment with textures: Add toppings like granola or sliced bananas for a delightful crunch.
  • Use a whisk: Ensure the chia seeds are evenly distributed by whisking them thoroughly into the mixture.
  • Don’t skip the sweetener: Adjust sweetness to your preference, as the tartness of raspberries can vary.
  • Store wisely: Keep your pudding in airtight containers to maintain freshness.
  • Layer it up: For a stunning presentation, layer your pudding in a glass with additional fruits.
  • Go wild with flavors: Infuse your pudding with spices like cinnamon or nutmeg for an exciting twist.
  • Try different milks: Experiment with cashew or oat milk for unique flavor profiles.

Common Mistakes and Troubleshooting

Even the best of us can make a few missteps in the kitchen. Here’s how to avoid common pitfalls:

  • Too runny? If your pudding is too thin, it likely hasn’t set long enough. Give it more time in the fridge or add a bit more chia seeds.
  • Too thick? Simply stir in a splash of almond or coconut milk until you reach your desired consistency.
  • Grainy texture? Make sure to blend the mixture thoroughly before adding chia seeds to avoid clumps.
  • Not sweet enough? Adjust sweetness by adding more maple syrup or a pinch of stevia.

Delicious Variations to Try

Why not shake things up? Here are some variations to keep your taste buds dancing:

  • Chocolate Raspberry Chia Pudding: Mix in 1 tablespoon of cocoa powder for a decadent twist.
  • Matcha Chia Pudding: Substitute half of the almond milk with brewed matcha for a vibrant green treat.
  • Tropical Mango Chia Pudding: Swap raspberries for ripe mango and add a splash of lime juice for a fresh zing.
  • Peanut Butter Banana Chia Pudding: Stir in a tablespoon of peanut butter and top with sliced bananas for a filling breakfast.

Storage and Make-Ahead Instructions

Planning ahead? Here’s how to keep your pudding fresh:

  • Refrigeration: Store in airtight containers in the fridge for up to 5 days.
  • Freezing: You can freeze for up to 3 months; however, the texture may change slightly upon thawing.
  • Meal prep: Make a big batch at the start of the week to have quick breakfasts ready to go!

Frequently Asked Questions

Got questions? I’ve got answers! Here are some common queries about raspberry chia pudding:

  • Can I use other fruits? Yes! Feel free to swap in strawberries, blueberries, or even peaches.
  • Is it healthy? Absolutely! Packed with nutrients, this pudding is a guilt-free indulgence.
  • How can I make it sweeter? Adjust the maple syrup to your liking or top with sweet fruit.
  • Can I use honey instead of maple syrup? Yes, honey works well if you’re not vegan.
  • What if I don’t have chia seeds? You can substitute with flaxseeds, but the texture will differ.
  • Can I make this pudding vegan? Yes, this recipe is naturally vegan as written!
  • How long does it take to set? Allow at least one hour in the fridge, but overnight is best.
  • What can I serve it with? Pair with nuts, granola, or yogurt for a full experience.

Nutritional Tips and Dietary Adaptations

Want to make your pudding even healthier? Here are some tips:

  • Boost protein: Add a scoop of protein powder for a post-workout snack.
  • Reduce sugars: Use unsweetened almond milk or skip the syrup for a lower-calorie option.
  • Increase fiber: Pair with high-fiber toppings like chia seed granola or shredded coconut.

Equipment Recommendations

Ready to dive in? Here’s what you’ll need:

  • Blender: For a smooth and creamy base.
  • Mixing bowl: To combine all ingredients effectively.
  • Whisk: For thorough mixing and ensuring chia seeds are evenly distributed.
  • Airtight containers: For storing your delicious pudding.

Serving Suggestions

How to enjoy your creation? Here are some serving ideas:

  • Breakfast bowl: Top with sliced fruits, nuts, and a drizzle of maple syrup.
  • Snack time: Serve in a small cup for a quick, healthy treat.
  • Party pleaser: Layer in a glass with whipped coconut cream for a stunning dessert.

Conclusion

Your Raspberry Chia Pudding is more than just a recipe; it’s a celebration of flavor, health, and creativity in the kitchen. You’ve learned how to craft this delightful dish, and now it’s time to embrace your culinary adventure. Remember, cooking is all about exploring and having fun. So, grab your ingredients, unleash your inner chef, and let the world of raspberry chia pudding ignite your passion for cooking!

Raspberry Chia Pudding

Prep Time 10 minutes
Total Time 1 hour 10 minutes
Servings 2 servings
Calories 250
A delicious and healthy chia pudding infused with fresh raspberries and vanilla, perfect for a quick breakfast or snack.

Ingredients

Fruits

  • 0.5 cup fresh or frozen raspberries
  • 0.75 cup almond milk or coconut milk
  • 1 tbsp maple syrup
  • 0.5 tsp vanilla extract
  • 0.25 cup chia seeds

Instructions 

  • Blend raspberries, almond milk, maple syrup, and vanilla until smooth.
  • Pour mixture into a bowl, add chia seeds, and whisk well.
  • Refrigerate for at least 1 hour or overnight to set.
  • Serve topped with your favorite toppings.

Notes

Use fresh raspberries for the best flavor, and customize toppings as desired.
Calories: 250kcal
Cost: $8
Course: Breakfast
Cuisine: American
Keyword: Chia Seeds

Nutrition

Calories: 250kcal | Carbohydrates: 35g | Protein: 6g | Fat: 10g | Sodium: 20mg

Embark on a Culinary Adventure with Crockpot Honey Garlic Soy Spareribs

Welcome to a delicious journey where flavor reigns supreme! If you’ve ever craved a tender, fall-off-the-bone rib experience, you’re in for a treat. My **Crockpot Honey Garlic Soy Spareribs** are not just a meal; they’re an adventure waiting to unfold in your kitchen. This dish combines the sweetness of honey, the umami of soy sauce, and the aromatic kick of garlic to create a symphony of flavors that dance on your palate. Let’s dive into the magic of this **dump and go** recipe that promises to elevate your mealtime to new heights.

Why You’ll Love This Recipe

Here are five reasons why this recipe should be your go-to for effortless, mouthwatering ribs:

  • Easy Prep: With just a few ingredients and minimal effort, you can create a stunning dish that looks like you slaved over it for hours.
  • Flavor Bomb: The combination of honey, soy sauce, and garlic creates a rich, complex flavor profile that will have your taste buds singing.
  • Fall-off-the-Bone Tenderness: Cooking low and slow in the crockpot ensures that the ribs become incredibly tender and juicy.
  • Versatile Serving Options: Serve these ribs alongside your favorite sides, or shred them for tacos or sandwiches — the possibilities are endless!
  • Perfect for Any Occasion: Whether it’s a casual family dinner, a game day gathering, or a celebration, these ribs will impress everyone at the table.

Ingredients Breakdown

Let’s prepare for this flavor-packed adventure! Here’s what you’ll need:

  • 1 rack of baby back ribs: Opt for high-quality ribs for the best flavor and texture.
  • 4 cloves of garlic: Fresh garlic brings a bold aroma; feel free to adjust based on your preference.
  • ¼ cup dark soy sauce: Adds depth and color to the dish.
  • ¼ cup sweet soy sauce: This enhances the sweetness and balances the flavors beautifully.
  • ¼ cup raw honey: Nature’s sweetness that caramelizes beautifully during cooking.
  • ½ tsp onion powder: For a hint of savory depth.
  • ½ tsp paprika powder: Adds a subtle warmth and smokiness.
  • ½ tsp cumin: A touch of earthiness to round out the flavor profile.

Substitutions: Don’t have all the ingredients? Here are some alternatives:

  • Use brown sugar instead of honey for a different sweetness.
  • Swap out garlic powder for fresh garlic in a pinch.
  • For a gluten-free option, choose tamari instead of soy sauce.

Pro Tips for Perfect Spareribs

Close-up view of tender, glazed baby back ribs with a rich sauce.

Before we get cooking, here are some expert insights to elevate your rib game:

  • Remove the membrane: For the best texture, peel off the silver skin from the back of the ribs.
  • Let the ribs marinate: If time permits, let the rub sit on the ribs for a few hours or overnight for deeper flavor.
  • Brush with marinade: Don’t forget to brush the ribs with the reserved marinade every hour for maximum flavor and moisture.
  • Adjust cooking time: If your crockpot runs hot, check the ribs earlier to avoid overcooking.
  • Finish under the broiler: For a caramelized finish, broil the ribs for 3-5 minutes after slow cooking.
  • Use a meat thermometer: Ensure the internal temperature reaches 145°F for perfectly cooked ribs.
  • Pair with sides: These ribs shine alongside coleslaw, cornbread, or roasted veggies.
  • Experiment with spices: Feel free to add your favorite spices to the rub for a personal twist!

Common Mistakes and Troubleshooting

Even the best chefs can encounter issues. Here are some common pitfalls and how to avoid them:

  • Ribs are tough: This likely means they weren’t cooked long enough. Ensure you’re cooking low and slow.
  • Too much sauce: If the ribs are swimming in liquid, reduce the amount of soy or honey next time.
  • Not enough flavor: Make sure you’re seasoning generously and consider marinating longer.
  • Burnt edges: If using a broiler, keep a close eye to prevent burning.

Variations to Spice Up Your Ribs

Feeling adventurous? Here are four exciting variations to try:

  • Spicy Honey Garlic Ribs: Add crushed red pepper flakes or sriracha to the marinade for a fiery twist.
  • Asian BBQ Ribs: Mix in hoisin sauce and sesame oil for an Asian flair.
  • Sweet and Tangy Ribs: Incorporate pineapple juice for a tropical sweetness.
  • Herb-Infused Ribs: Add fresh herbs like rosemary or thyme for an aromatic kick.

Storage and Make-Ahead Instructions

Want to enjoy these ribs later? Here’s how to store and prepare ahead:

  • Refrigerate: Store leftovers in an airtight container for up to 3 days.
  • Freeze: For longer storage, freeze the ribs in a heavy-duty freezer bag for up to 3 months.
  • Reheat: To retain tenderness, reheat in the oven or microwave with a splash of water.
  • Make Ahead: Prepare the ribs and marinade the night before. Just pop them in the crockpot the next day!

Frequently Asked Questions

Got questions? I’ve got answers! Here are some FAQs about this recipe:

  • Can I use other cuts of meat? Yes! Try pork shoulder or beef short ribs if you prefer.
  • What’s the best way to serve these ribs? Pair with rice, steamed veggies, or on their own with a side of dipping sauce.
  • Can I cook these ribs on high heat? Yes, but for best results, cook low and slow to achieve maximum tenderness.
  • How do I know when the ribs are done? The meat should be tender and easily pull away from the bone.
  • Can I double the recipe? Absolutely! Just make sure your crockpot is large enough to accommodate the extra ribs.
  • How spicy is this recipe? It’s mild but can be adjusted based on your taste preferences by adding spices.
  • Can I add vegetables to the crockpot? Yes! Carrots and potatoes work wonderfully with the ribs.
  • What should I do if the ribs are too salty? Serve them with a side of unsalted rice to balance the flavors.

Nutritional Tips and Dietary Adaptations

Looking to tailor this dish to your dietary needs? Here are some suggestions:

  • Low-sugar option: Substitute honey with a sugar-free alternative like erythritol.
  • Gluten-free adaptation: Use tamari instead of soy sauce for a gluten-free version.
  • Keto-friendly: Replace honey with a low-carb sweetener and reduce soy sauce for lower sodium content.
  • Paleo-friendly: Use fresh juice instead of soy sauce and honey for natural sweetness.

Essential Equipment for Success

To make this recipe, you’ll need:

  • Crockpot: A reliable slow cooker is essential for even cooking.
  • Meat thermometer: To check the doneness of your ribs.
  • Cutting board and sharp knife: For preparing and cutting the ribs.
  • Mixing bowl: To combine your dry rub and marinade ingredients.

Serving Suggestions

Here are some creative ideas for serving your delicious honey garlic soy spareribs:

  • Classic coleslaw: The crisp freshness complements the rich flavors of the ribs.
  • Garlic bread: Perfect for soaking up any extra sauce!
  • Grilled corn: Adds a touch of smokiness to your meal.
  • Rice or quinoa: A great base to soak up that savory goodness.

As you prepare to unleash the flavors of my **Crockpot Honey Garlic Soy Spareribs**, remember that cooking is about exploration and joy. Each bite tells a story, and every meal is an opportunity to share love and laughter with those around you. So grab your apron, turn on that slow cooker, and let’s make magic happen in the kitchen!

Dump and Go Crockpot Honey Garlic Soy Spareribs

Prep Time 10 minutes
Cook Time 4 hours
Total Time 4 hours 10 minutes
Servings 4 servings
Calories 650
Enjoy tender, flavorful spareribs cooked effortlessly in your slow cooker with a sweet and savory honey garlic soy glaze.

Ingredients

Meat

  • 1 rack baby back ribs
  • 4 cloves garlic (minced)
  • 0.25 cup dark soy sauce
  • 0.25 cup sweet soy sauce
  • 0.25 cup raw honey
  • 0.5 tsp onion powder
  • 0.5 tsp paprika powder
  • 0.5 tsp cumin

Instructions 

  • Mix onion powder, paprika, and cumin; rub over ribs.
  • Mince garlic and combine with soy sauces and honey; brush over ribs, reserving some marinade.
  • Cut ribs in half and place in slow cooker; cook on low for 7-8 hours.
  • Brush ribs with reserved marinade every hour during cooking.

Notes

For extra flavor, baste the ribs with the marinade more frequently if desired.
Calories: 650kcal
Cost: $15
Course: Main Course
Cuisine: American
Keyword: Spareribs

Nutrition

Calories: 650kcal | Carbohydrates: 70g | Protein: 50g | Fat: 25g | Sodium: 2500mg

Unlocking Flavor: The Ultimate Guide to Sautéed Vegetables

Welcome to a vibrant world where every bite bursts with flavor! Sautéed vegetables are not just a side dish; they’re a culinary canvas waiting for your artistic touch. With a splash of olive oil and a sprinkle of herbs, you can elevate any meal and tickle your taste buds. In this guide, we’ll explore the ins and outs of sautéing vegetables, revealing tips, tricks, and secrets to help you master this essential cooking technique. Let’s dive into the colorful medley that will transform your plate and awaken your senses!

Why You’ll Love This Recipe

This sautéed vegetables recipe is more than just a collection of ingredients; it’s a celebration of flavor, health, and creativity. Here are five reasons to embrace this dish:

  • Quick and Easy: With just a few ingredients and minimal prep time, you can whip this up in under 20 minutes!
  • Nutritious: Packed with vitamins and minerals, this dish supports a healthy lifestyle while keeping your palate happy.
  • Versatile: Customize this recipe with your favorite vegetables or whatever’s in season to create endless variations.
  • Flavorful: The combination of garlic, onions, and fresh herbs delivers a depth of flavor that will make your taste buds dance.
  • Meal Prep Friendly: Perfect for meal prep! Make a big batch and store it for quick lunches or dinners throughout the week.

Ingredient Breakdown

Let’s explore the key players in our sautéed vegetable extravaganza:

  • Olive Oil: The base for cooking; it enhances flavor and aids in even cooking.
  • Garlic: Adds aromatic depth; feel free to experiment with roasted garlic for a sweeter profile.
  • Onion: Sliced thin for a tender, sweet flavor that mellows beautifully when sautéed.
  • Bell Pepper: Choose from red, yellow, or green to add color and sweetness.
  • Zucchini: Slice into half-moons; its soft texture absorbs flavors well.
  • Broccoli: Adds crunch; cut into small florets for quick cooking.
  • Carrot: Julienned or sliced thin, bringing natural sweetness.
  • Snap Peas: For a pop of sweetness; they cook quickly and retain their crispness.
  • Mushrooms: Sliced for an earthy flavor that complements the other veggies beautifully.
  • Seasonings: Salt, black pepper, and optional flavorings like lemon juice or balsamic vinegar round out the dish.

Pro Tips for Perfect Sautéed Vegetables

Freshly cooked sautéed vegetables featuring vibrant bell peppers, zucchini, snap peas, and mushrooms on a plate.

Ready to elevate your sauté game? Here are some expert tips to ensure you achieve that perfect medley every time:

  • Prep Ahead: Chop all vegetables before cooking for efficient, even cooking.
  • High Heat: Use medium-high heat to achieve a nice sear and maintain crispness.
  • Don’t Crowd the Pan: Sauté in batches if necessary. Overcrowding steams vegetables instead of sautéing them.
  • Order of Cooking: Start with harder vegetables like carrots and broccoli, adding softer ones later.
  • Season at Each Stage: Layer flavors by seasoning during cooking, not just at the end.
  • Finish with Freshness: A sprinkle of fresh herbs or a squeeze of lemon juice brightens the dish just before serving.
  • Tweak Texture: For a bit of crunch, add nuts or seeds as a topping.
  • Experiment: Try different combinations of vegetables and seasonings to find your perfect blend!

Common Mistakes and Troubleshooting

Even the best chefs have faced a sauté mishap or two. Here’s how to troubleshoot common mistakes:

  • Too Soft: If your veggies turn mushy, reduce the heat or cook them for a shorter time.
  • Bland Flavor: If your dish lacks flavor, try adding more seasoning gradually. Taste as you go!
  • Uneven Cooking: Ensure all pieces are cut uniformly to promote even cooking.
  • Sticking to the Pan: Ensure your pan is hot enough and that you’ve used sufficient oil.

Variations to Spice Things Up

Your imagination is the limit when it comes to sautéed vegetables! Here are four delicious variations to inspire your culinary adventures:

  • Spicy Sauté: Add crushed red pepper flakes or a dash of hot sauce for a kick that invigorates!
  • Asian Twist: Incorporate soy sauce, ginger, and sesame oil for a delightful umami flavor.
  • Mediterranean Medley: Toss in olives, artichokes, and feta cheese for a Mediterranean flair.
  • Herb Infusion: Experiment with fresh herbs such as basil, thyme, or cilantro for a garden-fresh taste.

Storage and Make-Ahead Instructions

Planning ahead? Here’s how to store your sautéed vegetables:

  • Refrigeration: Store in an airtight container in the fridge for up to 4 days.
  • Freezing: Cool completely before transferring to freezer-safe bags; they can last up to 3 months.
  • Reheating: Warm gently in a skillet over low heat, adding a splash of water or oil if needed.

FAQ: Your Sauté Questions Answered

Got questions? Here are some common inquiries about sautéing vegetables:

  • Can I use frozen vegetables? Yes! Thaw and pat dry before sautéing to avoid excess moisture.
  • What’s the best oil for sautéing? Olive oil is excellent, but avocado oil and butter are great alternatives.
  • How do I know when the vegetables are done? Look for vibrant colors and a tender-crisp texture.
  • Can I sauté fruits? Absolutely! Fruits like peaches and apples can add sweetness and complexity.
  • What spices work well? Experiment with cumin, smoked paprika, or Italian seasoning for added depth.
  • Is sautéing healthy? Yes! It retains nutrients while adding healthy fats and flavor.
  • Can I make this vegan? Yes! All ingredients are plant-based, just ensure any toppings are vegan-friendly.
  • How can I enhance flavor? Consider adding a splash of vinegar or a sprinkle of cheese before serving.

Nutritional Tips and Dietary Adaptations

Here’s how to adapt this recipe for various dietary needs:

  • Low Sodium: Use herbs and spices instead of salt for flavor.
  • Gluten-Free: This recipe is naturally gluten-free; just check any additional ingredients.
  • Vegan: As mentioned, this dish is already vegan-friendly!
  • Low-Carb: Stick with non-starchy veggies like broccoli, zucchini, and bell peppers for a low-carb option.

Equipment Recommendations

Having the right tools can make all the difference. Here’s what you’ll need:

  • Skillet: A good-quality non-stick or cast-iron skillet is essential for even cooking.
  • Spatula: A sturdy spatula helps in flipping and stirring without damaging your vegetables.
  • Knife Set: A sharp chef’s knife ensures precise cuts for uniform cooking.
  • Cutting Board: A large, sturdy cutting board provides a safe space for your prep work.

Serving Suggestions

How to plate your sautéed vegetables can enhance the dining experience. Here are some serving ideas:

  • As a Side: Pair with grilled chicken or fish for a colorful dinner plate.
  • Over Rice or Quinoa: Serve atop rice or quinoa for a hearty, nutritious meal.
  • In Tacos: Use as a filling for tacos topped with avocado and salsa.
  • As a Salad: Toss with greens and a light vinaigrette for a refreshing salad option.

Now that you’ve got the tools, tips, and techniques, it’s time to unleash your inner chef! Sautéing vegetables is not just about cooking; it’s about crafting a dish that excites the palate and nourishes the soul. Grab your skillet, turn up the heat, and let the flavors dance on your tongue. Remember, every dish is an opportunity to explore, experiment, and enjoy the art of cooking. Happy sautéing!

Healthy Sautéed Vegetables – Quick, Flavorful & Nutritious Side

Prep Time 10 minutes
Cook Time 10 minutes
Total Time 20 minutes
Servings 4 servings
Calories 150
A vibrant and nutritious side dish packed with fresh vegetables, perfect for a quick and healthy meal.

Ingredients

Vegetables

  • 2 tbsp olive oil (or avocado oil/butter)
  • 2 cloves garlic, minced
  • 1 small onion, thinly sliced
  • 1 piece bell pepper, sliced
  • 1 medium zucchini, sliced into half-moons
  • 1 cup broccoli florets
  • 1 medium carrot, julienned or sliced thin
  • ½ cup snap peas
  • ½ cup mushrooms, sliced
  • to taste Salt and black pepper
  • 1 tsp lemon juice (optional)
  • 1 tsp balsamic vinegar or soy sauce (optional)

Optional toppings

  • toasted nuts, seeds, fresh herbs, grated Parmesan

Instructions 

  • Wash and cut all vegetables into uniform pieces.
  • Heat oil in a skillet over medium-high heat.
  • Sauté garlic and onions 1–2 minutes until fragrant.
  • Add carrots and broccoli; cook 3–4 minutes, stirring.
  • Add remaining vegetables; sauté 4–5 minutes until crisp-tender. Season with salt, pepper, and optional flavorings. Toss and serve garnished with toppings.

Notes

Use fresh vegetables for best flavor and texture.
Calories: 150kcal
Cost: $15
Course: Side Dish
Keyword: vegetables

Nutrition

Calories: 150kcal | Carbohydrates: 20g | Protein: 4g | Fat: 7g | Sodium: 300mg

Discover the Joy of Baking: Banana Oatmeal Bars

Welcome, fellow food adventurers! Today, we’re diving into the world of banana oatmeal bars, a delightful treat that perfectly marries health and indulgence. These bars are not just any snack; they are a celebration of flavors and textures that will ignite your passion for cooking. Packed with creamy peanut butter, ripe bananas, and a sprinkle of dark chocolate, this easy recipe is perfect for breakfast or a mid-day pick-me-up. Let’s embark on this flavorful journey together!

Why You’ll Love This Recipe

  • Nutritious Kickstart: Each bar is a powerhouse of energy, making them a fantastic breakfast option or an afternoon snack to keep those hunger pangs at bay.
  • Simple Ingredients: This recipe uses everyday pantry staples, ensuring you can whip these up any day of the week without a trip to the store.
  • Customizable Delight: With endless variations, you can easily tailor these bars to suit your taste, whether you prefer them nutty, fruity, or chocolatey.
  • Make-Ahead Convenience: These bars can be prepared in advance, making them a great grab-and-go option for busy mornings.
  • Family-Friendly Fun: Kids love them, and they’re a sneaky way to pack in nutrients without sacrificing flavor.

Key Ingredients and Substitutions

To make these delicious banana oatmeal bars, you’ll need the following ingredients:

  • 1 1/2 cups rolled oats: The base of your bars, providing texture and heartiness. You can use old-fashioned or quick oats, depending on your preference.
  • 1/2 tsp cinnamon: Adds warmth and depth. Feel free to increase this if you love a spicier kick.
  • 1/4 tsp salt: Enhances the sweetness of the bananas and balances the flavors.
  • 1/2 tsp baking powder: Helps the bars rise, giving them a fluffy texture.
  • 2 ripe bananas (approx 1 cup mashed): The star of the show! The riper, the better, as they add natural sweetness and moisture.
  • 1/2 cup peanut butter: Creamy or runny, it provides healthy fats and protein. If you’re nut-free, try sunflower seed butter or tahini.
  • 1/3 cup maple syrup: For added sweetness. You can substitute honey if you prefer.
  • 1 tsp vanilla extract: A must for flavor; it rounds out the sweetness beautifully.
  • 1/3 cup dark chocolate chips: Optional, but they add a delightful richness that elevates the bars.

How to Make Banana Oatmeal Bars

Appetizing banana oatmeal bars displayed on a wooden board, highlighting the texture and chocolate pieces.

Now that we have our ingredients ready, let’s get baking! Follow these simple steps:

  1. Preheat your oven to 350°F (175°C). Line an 8×8 inch baking pan with parchment paper for easy removal.
  2. In a large mixing bowl, combine the rolled oats, cinnamon, salt, and baking powder.
  3. In another bowl, mash the bananas until smooth, then mix in the peanut butter, maple syrup, and vanilla extract until well combined.
  4. Pour the wet ingredients into the dry ingredients and stir until just combined. Gently fold in the dark chocolate chips.
  5. Spread the mixture evenly into the prepared baking pan, optionally sprinkling a few extra chocolate chips on top.
  6. Bake for about 20-25 minutes, or until the edges start to turn golden brown. Let the bars cool for 10 minutes before removing from the pan and slicing into squares.

Pro Tips for Perfecting Your Bars

  • Use Ripe Bananas: The sweeter the bananas, the sweeter your bars will be. Look for bananas with plenty of brown spots!
  • Don’t Overmix: Stir the wet and dry ingredients just until combined to avoid tough bars.
  • Chill Before Cutting: For cleaner cuts, let the bars cool completely in the pan before slicing.
  • Experiment with Add-ins: Try adding nuts, dried fruits, or seeds for extra texture and flavor.
  • Store Properly: Keep the bars in an airtight container to maintain freshness. They can also be frozen for longer shelf life.

Common Mistakes and Troubleshooting

Even the best chefs make mistakes, and that’s all part of the adventure! Here are some common pitfalls to avoid:

  • Not Using Enough Bananas: Insufficient bananas can lead to dry bars. Always measure for a full cup of mashed bananas.
  • Skipping the Baking Powder: This ingredient is essential for the right rise; don’t leave it out!
  • Baking Too Long: Keep an eye on your bars, as ovens can vary. Remove them when the edges are golden brown.

Delicious Variations to Try

Feeling adventurous? Here are some tasty variations to make these bars your own:

  • Chocolate Chip & Walnut: Add chopped walnuts along with chocolate chips for a nutty crunch.
  • Berry Blast: Toss in fresh or frozen blueberries or raspberries for a fruity twist.
  • Coconut Delight: Mix in shredded coconut for a tropical vibe and extra chewiness.
  • Spiced Pumpkin: Replace bananas with pumpkin puree and add pumpkin spice for a fall-inspired treat.

How to Store Banana Oatmeal Bars

To keep your bars fresh and tasty:

  • Refrigerate: Store in an airtight container in the fridge for up to one week.
  • Freeze: These bars freeze beautifully! Wrap individually in plastic wrap and store in a freezer-safe bag for up to three months.

Frequently Asked Questions

  • Can I use a different type of flour? Yes! Whole wheat flour or gluten-free blends work well.
  • Can I substitute the peanut butter? Absolutely! Use any nut or seed butter that you prefer.
  • What if I don’t have maple syrup? Honey or agave nectar can be used instead.
  • How can I make these bars vegan? Substitute honey with maple syrup and ensure your chocolate chips are dairy-free.
  • Can I add protein powder? Yes! If you want an extra protein boost, add a scoop to the dry ingredients.
  • How do I know when they’re done baking? Look for golden edges and a firm center. A toothpick inserted should come out clean.
  • Are these bars gluten-free? They can be made gluten-free by using certified gluten-free oats and flour.
  • Can I double the recipe? Certainly! Just use a larger baking pan and adjust the baking time as needed.

Nutritional Insights and Dietary Adaptations

These banana oatmeal bars are not only delicious but also nutritious! Here’s a quick look at their benefits:

  • High in Fiber: Thanks to the oats and bananas, these bars are a great source of dietary fiber, promoting digestive health.
  • Rich in Protein: The peanut butter adds a healthy dose of protein, perfect for keeping you full.
  • Low in Added Sugars: With natural sweetness from bananas and minimal added sugars, these bars are a guilt-free treat.

Equipment Recommendations

To make your baking experience seamless, here’s a shortlist of essential equipment:

  • Mixing Bowls: A set of mixing bowls in various sizes is crucial for combining ingredients.
  • Baking Pan: An 8×8 inch pan is perfect for these bars, but feel free to use larger pans for thicker bars.
  • Spatula: A good spatula is essential for spreading the batter evenly in the pan.
  • Measuring Cups and Spoons: Accurate measurements ensure your bars turn out just right.

Serving Suggestions

These bars are incredibly versatile and can be served in various ways:

  • On Their Own: Perfect as a quick snack or breakfast.
  • With Yogurt: Serve alongside a dollop of Greek yogurt and fresh fruit for a filling meal.
  • With Nut Butter: Spread a little extra peanut butter or almond butter on top for an added protein boost.

Conclusion: Your Culinary Adventure Awaits!

There you have it! My ultimate recipe for banana oatmeal bars that are not only easy to make but also bursting with flavor and nutrition. Remember, cooking is a journey — don’t be afraid to experiment and make these bars your own. So grab your apron, unleash your creativity, and let’s make something delicious together! Until next time, keep cooking with heat and passion!

Banana Oatmeal Bars

Prep Time 10 minutes
Cook Time 25 minutes
Total Time 35 minutes
Servings 12 bars
Calories 220
Delicious and healthy banana oatmeal bars perfect for a quick snack or breakfast on the go.

Ingredients

Dry ingredients

  • 1 1/2 cups rolled oats
  • 1/2 tsp cinnamon
  • 1/4 tsp salt
  • 1/2 tsp baking powder

Wet ingredients

  • 2 ripe bananas ripe bananas (approx 1 cup mashed)
  • 1/2 cup peanut butter (creamy or runny)
  • 1/3 cup maple syrup (can sub honey)
  • 1 tsp vanilla extract
  • 1/3 cup dark chocolate chips

Instructions 

  • Preheat oven to 350°F (175°C) and line an 8x8 inch pan with parchment.
  • Mix dry ingredients in a bowl. Mash bananas and combine with peanut butter, maple syrup, and vanilla.
  • Combine wet and dry mixtures, then fold in chocolate chips.
  • Pour batter into pan, spread evenly, and sprinkle extra chocolate chips if desired.
  • Bake for 20-25 minutes until edges are golden. Cool for 10 minutes before slicing.

Notes

Store in an airtight container for up to 3 days.
Calories: 220kcal
Cost: $10
Course: Snack
Cuisine: American
Keyword: Banana, oats

Nutrition

Calories: 220kcal | Carbohydrates: 30g | Protein: 4g | Fat: 10g | Sodium: 50mg

Welcome to a culinary adventure where sweetness meets health in the most delightful way! Get ready to dive into the world of sugar free indulgence with these amazing Apple Brownies. Not only are they heavenly in taste, but they also cater to your health-conscious side. In this article, we’ll explore every aspect of these brownies, from the ingredients to the common pitfalls, ensuring that you’re equipped to create a masterpiece in your kitchen.

Why You’ll Love This Recipe

These brownies are not just a dessert; they are a celebration of flavor and health. Here’s why you’ll fall head over heels for this recipe:

  • Guilt-Free Indulgence: Enjoy the rich flavors without the guilt! Made with natural ingredients, these brownies are perfect for satisfying your sweet tooth.
  • Simple Ingredients: The recipe uses everyday items that you probably already have in your pantry, making it hassle-free and convenient.
  • Customizable Sweetness: Adjust the sweetness to your liking with options like honey or maple syrup, so you can tailor it to your taste buds.
  • Health Benefits: Packed with apples and almond flour, these brownies provide fiber and healthy fats, supporting your blood sugar levels.
  • Perfect for Everyone: Whether you’re gluten-free, sugar-free, or just looking for a healthier treat, these brownies cater to all dietary needs.

Ingredients Breakdown

Before we get our hands dirty, let’s review the ingredients that will make these sugar free Apple Brownies sing!

  • 2 cups grated apples: Choose sweet varieties like Honeycrisp or Fuji for the best flavor. You can also substitute with unsweetened applesauce if you’re in a pinch.
  • 1 cup almond flour: A perfect gluten-free base that adds moisture and a nutty flavor. You can substitute with oat flour if needed.
  • 1/2 cup unsweetened cocoa powder: This adds a rich chocolatey depth. Make sure it’s unsweetened to keep the brownies sugar free.
  • 1/2 cup unsweetened applesauce: Enhances moisture without adding sugar. You can replace it with additional grated apples if you prefer.
  • 1/4 cup honey or maple syrup (optional): For a touch of sweetness, you can adjust or skip this based on your taste.
  • 1/4 cup nut butter (almond or peanut): This adds creaminess and helps bind the ingredients together. You can use sunflower seed butter for a nut-free version.
  • 1 teaspoon vanilla extract: Adds a lovely aroma and flavor.
  • 1 teaspoon baking powder: Helps the brownies rise and achieve a soft texture.
  • 1/2 teaspoon cinnamon: A warm spice that complements the apple beautifully.
  • 1/4 teaspoon salt: Just a pinch enhances all the flavors.
  • 1/2 cup chopped nuts or chocolate chips (optional): For added crunch and richness, feel free to include these!

How to Make Your Sugar Free Apple Brownies

Time to roll up your sleeves and get cooking! Here are the steps to create your decadent treat:

  1. Preheat your oven: Set it to 350°F (175°C) and grease a baking dish or line it with parchment paper.
  2. Mix the dry ingredients: In a large bowl, combine the grated apples, almond flour, cocoa powder, and cinnamon.
  3. Prepare the wet ingredients: In another bowl, mix the applesauce, nut butter, honey or maple syrup, and vanilla extract until smooth.
  4. Combine wet and dry: Pour the wet mixture into the dry ingredients and stir until fully combined.
  5. Add leavening and optional add-ins: Stir in the baking powder, salt, and any optional nuts or chocolate chips.
  6. Pour the batter: Transfer the mixture into the prepared baking dish and spread it evenly.
  7. Bake: Place in the oven and bake for 25-30 minutes. A toothpick inserted in the center should come out clean.
  8. Cool and serve: Allow to cool completely before cutting into squares.

Pro Tips for Perfect Brownies

Let’s elevate your brownie game with these expert insights:

  • Ingredient Quality: Use the freshest apples for maximum flavor. The better the ingredients, the tastier your brownies!
  • Don’t Overmix: When combining wet and dry ingredients, mix just until combined to keep the texture light and airy.
  • Check Doneness Early: Ovens can vary, so check the brownies a few minutes early to prevent overbaking.
  • Cool Before Cutting: Letting the brownies cool completely helps them set, making them easier to cut.
  • Experiment with Flavors: Feel free to add spices like nutmeg or even a dash of cayenne for a subtle kick!
  • Serving Temperature: These brownies taste fantastic warm, but they’re just as delicious chilled!
  • Pairing Suggestions: Serve with a dollop of Greek yogurt or a scoop of your favorite ice cream for an indulgent treat.
  • Storage: Keep leftovers in an airtight container at room temperature for up to 3 days or refrigerate for up to a week.

Common Mistakes and Troubleshooting

Even the best chefs can hit a snag. Here are some common pitfalls and how to avoid them:

  • Too Dry: This can happen if you overbake. Start checking at 25 minutes!
  • Too Sweet: If you find them too sweet, reduce or omit the optional sweetener next time.
  • Dense Texture: Overmixing can lead to dense brownies. Mix just until incorporated.
  • Flavorless: Ensure you use fresh spices and quality ingredients for that depth of flavor.

Variations to Try

Get creative in the kitchen! Here are some fun variations to try:

  • Nut-Free Version: Replace almond flour with oat flour and skip the nuts for a nut-free treat.
  • Chocolate Version: Add cocoa nibs or dark chocolate chips for an extra chocolatey kick.
  • Fruity Twist: Mix in berries or mashed bananas for a fruity flavor boost.
  • Spicy Brownies: Add a pinch of cayenne or chili powder for a surprising heat!

Storage and Make-Ahead Instructions

Want to enjoy these brownies later? Here’s how to store and prepare ahead:

  • Room Temperature: Store in an airtight container for up to 3 days.
  • Refrigeration: They can be kept in the fridge for up to a week, just make sure they’re sealed well to maintain freshness.
  • Freezing: Wrap individual brownies in plastic wrap and store in a freezer bag for up to 3 months. They thaw beautifully!
  • Make-Ahead Prep: You can prepare the batter a day in advance and bake it fresh when you’re ready.

Frequently Asked Questions

Got questions? We’ve got answers! Here are some common inquiries about these scrumptious brownies:

  • Can I use a different sweetener? Absolutely! You can use stevia, monk fruit, or any sugar alternative that suits your dietary needs.
  • Are these brownies gluten-free? Yes! Made with almond flour, they are naturally gluten-free.
  • Can I substitute the apples? If you’re not a fan of apples, you can use grated zucchini or even mashed bananas as a substitute.
  • How can I make them vegan? Substitute the honey or maple syrup with agave nectar and ensure your nut butter is vegan-friendly.
  • What’s the best way to serve these brownies? They’re delicious on their own, but pairing them with ice cream or yogurt makes them even more indulgent!
  • Can I add protein powder? Yes! If you want an extra protein boost, gently fold in a scoop of your favorite protein powder.
  • Why did my brownies not rise? Ensure your baking powder is fresh and that you didn’t overmix the batter.
  • Can I use store-bought applesauce? Definitely! Just ensure it’s unsweetened to keep with the sugar free theme.

Nutritional Tips and Dietary Adaptations

Keeping it healthy? Here are some tips to adapt the recipe further:

  • Low-Carb Option: Use a low-carb sweetener like erythritol to keep things low-carb.
  • High-Protein Version: Add a scoop of protein powder to the batter for an extra protein punch.
  • Fiber Boost: Mix in ground flaxseed or chia seeds to enhance the fiber content.

Equipment Recommendations

To make your baking experience smooth, here’s a list of handy equipment:

  • Mixing Bowls: A set of nesting mixing bowls for easy ingredient mixing.
  • Measuring Cups and Spoons: Accurate measurements are crucial for baking success.
  • Whisk: For evenly mixing your wet ingredients.
  • Spatula: To fold in the ingredients without deflating the batter.
  • Baking Dish: An 8×8-inch baking dish works perfectly for this recipe.

Serving Suggestions

Ready to enjoy your creations? Here are some delightful serving ideas:

  • With Whipped Cream: Top with a dollop of whipped cream or Greek yogurt for a creamy contrast.
  • Ice Cream Pairing: A scoop of vanilla or cinnamon ice cream pairs wonderfully with the brownies.
  • Fruit Garnish: Serve with fresh fruit like strawberries or raspberries for a vibrant touch.
  • Drizzle of Chocolate: A light drizzle of melted dark chocolate on top makes for a stunning presentation.

Now you’re all set to embark on your baking journey with these Decadent Apple Brownies. Embrace the thrill of experimenting with flavors and textures, and remember that cooking is all about joy and creativity. So grab your apron, turn up the heat, and let’s make some magic in the kitchen!

Unleash Your Taste Buds: A Flavorful Journey with Chicken Avocado Wraps

Welcome to a culinary adventure that’s all about bold flavors and vibrant ingredients! If you’re ready to dive into a world where creamy avocado meets spicy, seasoned chicken, then you’ve come to the right place. My Chicken Avocado Wrap recipe is not just another meal; it’s an experience that will challenge your taste buds and invigorate your kitchen routine. This dish is perfect for anyone craving a kick with every bite, and trust me, it’s as satisfying as it is simple to make. Let’s get started!

Why You’ll Love This Recipe

Before we jump into the nitty-gritty of the recipe, let’s talk about why this Chicken Avocado Wrap is destined to become a staple in your menu:

  • Flavor Explosion: The combination of creamy avocado, seasoned chicken, and fresh veggies creates a mouthwatering balance of textures and flavors.
  • Quick and Easy: With minimal prep and cooking time, you can whip these wraps up in under 30 minutes—perfect for those busy weeknights.
  • Customizable: Tailor the fillings and spices to suit your palate. Whether you prefer it spicy or mild, the choice is yours!
  • Healthy & Wholesome: Packed with protein and healthy fats, these wraps make for a nutritious meal that keeps you energized.
  • Great for Meal Prep: Make them ahead and store them for quick lunches or snacks throughout the week.

Gathering Your Ingredients

For the ultimate Chicken Avocado Wrap, you’ll need a few fresh ingredients. Here’s what you’ll want to gather:

  • 2 cooked chicken breasts: Sliced or shredded, the chicken serves as the hearty base of your wrap.
  • 1 ripe avocado: Creamy and rich, it’s the star of the show.
  • 4 large tortillas: Choose your favorite—flour, whole wheat, or low-carb options.
  • 1 cup lettuce: Shredded for that delightful crunch.
  • 1 tomato: Diced, to add a juicy freshness.
  • 1/2 cup cheese: Shredded cheddar or your choice for added richness.
  • 2 tablespoons mayonnaise or yogurt: For a creamy spread.
  • Salt and pepper: To taste, enhancing all the flavors.
  • Lime juice: Optional, but it adds a zesty kick that brightens everything up.

Cooking Instructions

Now that you have your ingredients, let’s assemble this mouthwatering wrap step by step:

  1. Prepare the Mayo Mixture: In a bowl, mix the mayonnaise or yogurt with a squeeze of lime juice, salt, and pepper. This creamy combination adds depth to your wrap.
  2. Lay Out the Tortillas: On a clean, flat surface, spread out your tortillas, ready for layering.
  3. Spread the Mayo: Apply a thin layer of the mayo mixture on each tortilla to ensure every bite is packed with flavor.
  4. Layer the Fillings: Evenly distribute the sliced chicken, avocado, lettuce, tomato, and cheese on each tortilla, creating a colorful display.
  5. Wrap It Up: Fold in the sides of the tortilla and roll it tightly from the bottom, securing all those delicious fillings inside.
  6. Slice and Serve: Cut the wraps in half diagonally and serve immediately for the best taste experience.

Creative Variations

Let’s take your Chicken Avocado Wraps to the next level with these creative variations:

  • Spicy Kick: Add jalapeños or a sprinkle of cayenne pepper for a fiery twist.
  • Tex-Mex Style: Incorporate black beans, corn, and cilantro for a southwestern flair.
  • Asian Fusion: Swap the mayo for a sesame dressing and add shredded carrots and cucumber.
  • Vegan Delight: Use chickpeas or tofu instead of chicken, and add a vegan dressing for a plant-based version.

Storage and Make-Ahead Instructions

Want to make these wraps ahead of time? Here’s how to store them effectively:

  • Wrap and Refrigerate: Wrap each prepared Chicken Avocado Wrap in plastic wrap or foil and store them in the fridge for up to 3 days.
  • Freezing Option: You can freeze the wraps before assembling. Just store the cooked chicken and fillings separately, and assemble when ready to eat.
  • To Reheat: If you’ve made them ahead, unwrap and microwave for about 30 seconds, or enjoy them cold as a refreshing meal.

Common Mistakes and Troubleshooting

Let’s ensure your Chicken Avocado Wraps turn out perfectly every time. Here are some common mistakes and how to avoid them:

  • Overstuffing: Resist the urge to overload your wrap; too much filling can lead to messy wraps that fall apart.
  • Brown Avocado: To prevent browning, store your avocado with lime juice or keep it covered tightly before serving.
  • Dry Chicken: Ensure your chicken is well-seasoned and cooked just enough to remain juicy. Consider marinating for added flavor.
  • Stale Tortillas: Use fresh tortillas for the best texture. If they’re stale, warm them briefly in a pan to soften.

Comprehensive FAQs

Got questions? I’ve got answers! Here are the most common inquiries about Chicken Avocado Wraps:

  • Can I make these wraps ahead of time? Absolutely! Wrap them tightly and store them in the fridge.
  • What can I substitute for chicken? Try chickpeas, tofu, or grilled shrimp for a protein swap.
  • Are these wraps gluten-free? Use gluten-free tortillas to make them suitable for a gluten-free diet.
  • What’s the best way to store leftovers? Keep them in an airtight container in the fridge.
  • Can I freeze these wraps? Yes, but it’s best to freeze the fillings separately and assemble when ready to eat.
  • What dips pair well with these wraps? Try salsa, guacamole, or a spicy yogurt dip!
  • How can I make these wraps spicier? Add hot sauce or diced jalapeños to the chicken mixture.
  • Are these wraps suitable for kids? Yes! Just adjust the spice level to suit their taste.

Nutritional Tips and Dietary Adaptations

For those watching their health, here are some nutritional tips:

  • Low-Calorie Option: Use low-calorie tortillas and Greek yogurt instead of mayonnaise.
  • High-Protein Boost: Add beans or quinoa to enhance the protein content.
  • Fiber-Rich: Load up on veggies like spinach, bell peppers, or cucumbers for added fiber.

Equipment Recommendations

To make your Chicken Avocado Wraps, you’ll need:

  • Sharp Knife: For slicing the chicken and veggies precisely.
  • Cutting Board: A sturdy surface for all your prep work.
  • Mixing Bowl: For combining the mayo and seasonings.
  • Skillet: If you decide to warm your tortillas or cook your chicken.

Serving Suggestions

Elevate your wrap experience with these serving ideas:

  • Side of Chips: Serve with tortilla chips and salsa for a crunchy accompaniment.
  • Fresh Salad: Pair with a light side salad for a refreshing meal.
  • Fruit Salsa: A mango or pineapple salsa adds a tropical twist.

So there you have it! A captivating culinary journey through my Chicken Avocado Wrap recipe that’s bursting with flavor and creativity. Remember, cooking is all about experimentation, so feel free to play around with the ingredients and make this dish your own. Now go grab your skillet, embrace the thrill of cooking with heat, and enjoy every delicious bite!

Unlock the Secrets of Perfectly Gooey Levain-Inspired Cookies

Welcome to a delicious journey where we turn simple ingredients into a symphony of flavor! My Levain-Inspired Two-Chip Chocolate Chip Cookies are not just cookies; they are an experience, a celebration of flavor that will awaken your taste buds and elevate your baking game. Get ready to embrace the thrill of creating the perfect dessert that balances gooey centers and golden edges with a melody of chocolate that sings with each bite!

Why You’ll Love This Recipe

If you’re looking for a cookie recipe that stands out, you’ve come to the right place. Here are just a few reasons why these cookies will become your new go-to:

  • Irresistibly Gooey Centers: These cookies are crafted to have that perfect soft and chewy middle, ensuring every bite is a delightful treat.
  • Two Types of Chocolate: The combination of semisweet and milk chocolate chips creates a layered flavor profile that dances on your palate.
  • Simple Ingredients: You don’t need to be a master baker; this recipe uses everyday ingredients that are easy to find.
  • Perfect for Sharing: Whether it’s a gathering or a cozy night in, these cookies are great for sharing (or keeping all to yourself!).
  • Customizable: You can easily adapt this recipe by adding nuts, dried fruits, or even a sprinkle of sea salt for that extra kick.

Ingredient Breakdown

Let’s dive into the ingredients that make these cookies unforgettable. Here’s what you’ll need, along with some substitutions:

  • 2 cups all-purpose flour: The base of your cookies. For gluten-free options, consider using almond or oat flour.
  • 1/2 teaspoon baking soda: This helps the cookies rise beautifully.
  • 1/2 teaspoon salt: Balances the sweetness and enhances flavor.
  • 1 cup unsalted butter, softened: Provides richness. For a lighter option, you can use coconut oil.
  • 3/4 cup brown sugar, packed: Adds moisture and a hint of caramel flavor. You can substitute with coconut sugar for a healthier alternative.
  • 3/4 cup granulated sugar: Sweetness and structure. You can replace it with honey, but adjust the liquid in the recipe.
  • 2 large eggs: Binds the ingredients together. For a vegan option, use flax eggs.
  • 2 teaspoons vanilla extract: Adds depth of flavor. Homemade vanilla extract is even better!
  • 1 cup semisweet chocolate chips: The classic choice for chocolate lovers.
  • 1 cup milk chocolate chips: For that extra touch of sweetness.

Step-by-Step Instructions

Let’s get baking! Follow these straightforward steps for cookie perfection:

  • Preheat your oven to 350°F (175°C) and line a baking sheet with parchment paper.
  • In a bowl, whisk together the flour, baking soda, and salt. Set aside.
  • In a large mixing bowl, cream the softened butter, brown sugar, and granulated sugar until light and fluffy.
  • Add the eggs one at a time, mixing well after each addition, then stir in the vanilla extract.
  • Gradually add the dry ingredients to the wet ingredients, mixing until just combined.
  • Fold in the semisweet and milk chocolate chips until evenly distributed.
  • Scoop large portions of dough (about 1/4 cup each) onto the prepared baking sheet, spacing them about 2 inches apart.
  • Bake in the preheated oven for 12-15 minutes, or until the edges are golden brown but the centers are still soft.
  • Remove from the oven and let the cookies cool on the baking sheet for 5 minutes before transferring them to a wire rack to cool completely.

Pro Tips for Cookie Excellence

Want to take your cookie game to the next level? Here are some expert insights:

  • Chill the Dough: For thicker cookies, chill the dough for at least 30 minutes before baking.
  • Use Quality Chocolate: Invest in high-quality chocolate chips for the best flavor.
  • Don’t Overmix: Mix just until combined to keep your cookies tender.
  • Experiment with Flavors: Try adding a pinch of cinnamon or espresso powder for a unique twist.
  • Watch the Baking Time: For soft cookies, err on the side of underbaking slightly.
  • Store Properly: Keep cookies in an airtight container to maintain freshness.
  • Try Different Shapes: Shape your cookies into different forms for fun presentation.
  • Pair with Milk: These cookies are best enjoyed with a glass of milk or your favorite alternative.

Common Mistakes and Troubleshooting

Even the best bakers make mistakes. Here’s how to avoid common pitfalls:

  • Too Dry Cookies: Ensure you’re measuring flour accurately; too much flour can lead to dryness.
  • Flat Cookies: If your cookies spread too much, check that your butter is softened but not melted.
  • Overbaking: Keep an eye on your cookies; they can go from perfect to burnt quickly.
  • Uneven Baking: Rotate your baking sheet halfway through to ensure even baking.

Variations to Try

Feeling adventurous? Here are some variations to spice up your cookie-making:

  • Nuts Galore: Add chopped walnuts or pecans for a crunchy texture.
  • Dried Fruits: Include raisins or cranberries for a burst of sweetness.
  • Spicy Kick: A sprinkle of cayenne pepper can add a subtle heat that complements the chocolate.
  • Stuffed Cookies: Stuff each dough ball with a mini chocolate bar for an over-the-top treat.

Storage and Make-Ahead Instructions

Want to prepare ahead of time? Here’s how to store your cookies:

  • Room Temperature: Store in an airtight container for up to one week.
  • Freezing Dough: Freeze unbaked dough balls for up to three months. Bake from frozen, adding an extra minute or two to the baking time.
  • Baked Cookies: Store baked cookies in the freezer for up to two months. Thaw at room temperature before enjoying.

Frequently Asked Questions

Here are some common questions about making Levain-Inspired Two-Chip Chocolate Chip Cookies:

  • Can I use whole wheat flour? Yes, just keep in mind that it may alter the texture.
  • How do I know when they’re done? Look for golden edges and a slightly soft center.
  • What if I don’t have brown sugar? You can substitute with an equal amount of granulated sugar mixed with a little molasses.
  • Are these cookies safe to eat raw? It’s best to avoid raw cookie dough due to the potential for raw eggs and flour.
  • Can I make them without eggs? Yes, use flax eggs or applesauce as a binding substitute.
  • What’s the best way to reheat cookies? Microwave for a few seconds or pop them in an oven at low heat.
  • Can I add other flavors like mint? Absolutely! Feel free to experiment with your favorite flavors.
  • How do I prevent cookies from spreading too much? Ensure your butter is softened and not melted, and consider chilling the dough.

Nutritional Tips and Dietary Adaptations

Want to make your cookies healthier? Here are some tips:

  • Reduce Sugar: Cut back on sugars to lower calories; use natural sweeteners like honey or maple syrup.
  • Substitute Fats: Replace butter with avocado or coconut oil for a healthier fat option.
  • Gluten-Free: Use almond flour or a gluten-free flour blend for a gluten-free version.
  • Dairy-Free: Use dairy-free chocolate chips and coconut oil to make it dairy-free.

Essential Equipment Recommendations

Here’s what you’ll need to make these cookies:

  • Mixing Bowls: A set of mixing bowls in various sizes is essential for combining ingredients.
  • Measuring Cups and Spoons: Accurate measurements are crucial for baking success.
  • Baking Sheet: A good-quality baking sheet ensures even baking.
  • Parchment Paper: This prevents sticking and allows for easy cleanup.
  • Cooling Rack: A cooling rack helps your cookies cool evenly and prevents sogginess.

Serving Suggestions

Ready to serve your delicious creations? Here are some ideas:

  • Classic Milk Pairing: Serve with a tall glass of cold milk for a traditional treat.
  • Ice Cream Sandwiches: Sandwich your favorite ice cream between two cookies for a decadent dessert.
  • Garnish with Sea Salt: A sprinkle of flaky sea salt adds a gourmet touch.
  • Gift Them: Package them nicely for a sweet gift to friends and family.

Now you’re armed with everything you need to create the best Levain-Inspired Two-Chip Chocolate Chip Cookies that will have everyone coming back for seconds! Embrace the thrill of baking, and let your kitchen be the canvas for your culinary masterpiece. Happy baking!

Discover the Magic of Low Carb Cooking!

Welcome to a culinary journey that brings bold flavors and comforting textures together in one extraordinary dish: the Creamy Low Carb Chicken Casserole. This recipe is not just about keeping it low carb; it’s about creating a meal that ignites your taste buds and warms your soul. With every bite, you’ll experience a delightful blend of succulent chicken, vibrant vegetables, and a creamy sauce that will leave you craving more.

Embrace the adventure of cooking with heat! Let’s dive into why this casserole is a must-try and how you can make it your own.

Why You’ll Love This Recipe

  • Comforting and Satisfying: This casserole is the perfect blend of creamy and hearty, offering a comforting meal that feels indulgent without the carbs.
  • Quick Preparation: With just a few simple steps, you can whip up this dish in under an hour, making it a great choice for busy weeknights.
  • Flexibility: You can easily customize this recipe with your favorite vegetables or proteins, making it as unique as your culinary style.
  • Meal Prep Friendly: This casserole is ideal for make-ahead meals, ensuring you have a tasty, healthy option ready when time is short.
  • Kid-Friendly: Packed with flavor and creamy goodness, even picky eaters will be asking for seconds!

Ingredients Breakdown

Let’s break down the ingredients that make this Low Carb Chicken Casserole a star:

  • 2 cups cooked chicken, shredded: You can use rotisserie chicken for convenience, or cook your own for a fresher taste.
  • 1 cup broccoli florets: Fresh or frozen; just ensure to thaw completely if using frozen.
  • 1 cup cauliflower florets: These add a wonderful texture and absorb flavors beautifully.
  • 1 cup cream cheese, softened: This creates the creamy base that holds everything together.
  • 1 cup shredded cheddar cheese: For that melty, cheesy topping that oozes comfort.
  • 1/2 cup chicken broth: Use low-sodium for better control over the saltiness of the dish.
  • 1 teaspoon garlic powder: Adds a depth of flavor that’s essential in any savory dish.
  • 1 teaspoon onion powder: Enhances the overall taste profile of the casserole.
  • Salt and pepper to taste: Adjust these to your preference for a balanced flavor.
  • 1 tablespoon olive oil: For sautéing vegetables, infusing them with rich flavor.

Step-by-Step Instructions

Now, let’s get cooking! Follow these simple steps to create your Creamy Low Carb Chicken Casserole.

  • Step 1: Preheat your oven to 375°F (190°C).
  • Step 2: In a large skillet, heat the olive oil over medium heat. Sauté the broccoli and cauliflower until tender.
  • Step 3: In a large bowl, combine the cooked chicken, sautéed vegetables, cream cheese, chicken broth, garlic powder, onion powder, salt, and pepper. Mix until well combined.
  • Step 4: Transfer the mixture to a greased 9×13 inch casserole dish.
  • Step 5: Sprinkle the shredded cheddar cheese evenly over the top.
  • Step 6: Bake in the preheated oven for 25-30 minutes, or until the casserole is bubbly and the cheese is melted and golden.
  • Step 7: Allow it to cool for a few minutes before serving to let the flavors settle.

Pro Tips for a Flawless Casserole

  • Mix it Up: Feel free to swap in other vegetables like bell peppers or zucchini for a new twist.
  • Cheese Choices: Experiment with different cheeses like mozzarella or pepper jack for added flavor.
  • Spice it Up: Add a pinch of cayenne or paprika for a kick that will awaken your taste buds.
  • Don’t Rush the Cooling: Letting the casserole sit for a few minutes after baking helps it set and makes serving easier.
  • Use Fresh Ingredients: Whenever possible, go for fresh veggies to enhance the flavor and nutritional value.
  • Check for Doneness: Ensure the casserole is bubbly and the cheese is golden for the best texture.
  • Make it Ahead: This dish can be made in advance and stored in the fridge for up to 3 days before baking.
  • Freeze for Later: Assemble the casserole but don’t bake it; wrap tightly and freeze for up to 3 months.

Common Mistakes and Troubleshooting

Even the best chefs make mistakes! Here are some common pitfalls and how to avoid them:

  • Too Watery: If using frozen broccoli, ensure it’s thawed and excess water is removed before mixing.
  • Flavorless Dish: Always taste and adjust seasoning before baking; it should be well-seasoned for the best flavor.
  • Overcooked Chicken: If using freshly cooked chicken, ensure it’s cooked just until done — overcooking can lead to dryness.

Variations to Explore

Ready to take your casserole game to the next level? Try these variations:

  • Mexican Twist: Add black beans, corn, and top with salsa for a festive flavor.
  • Italian Style: Incorporate spinach, sun-dried tomatoes, and Italian herbs for a Mediterranean flair.
  • Buffalo Chicken: Mix in buffalo sauce and top with crumbled blue cheese for a spicy kick.
  • Herb Infusion: Add fresh herbs like basil or thyme to elevate the flavor profile.

Storage and Make-Ahead Instructions

Let’s talk about keeping that delicious casserole fresh:

  • Refrigeration: Store leftovers in an airtight container in the fridge for up to 3 days.
  • Freezing: Assemble but do not bake, then wrap tightly and freeze for up to 3 months.
  • Reheating: Reheat in the oven at 350°F (175°C) until warmed through, about 20-25 minutes.

Comprehensive FAQ

Got questions? We’ve got answers!

  • Can I use other meats? Absolutely! Feel free to substitute turkey, beef, or even tofu for a vegetarian option.
  • Is this casserole gluten-free? Yes, all ingredients listed are gluten-free, making it a safe choice for gluten-sensitive diets.
  • Can I add more vegetables? Yes! Feel free to experiment with your favorites. Just adjust cooking times as needed.
  • How do I make this dairy-free? Substitute cream cheese and cheese with dairy-free alternatives.
  • Can I use fresh vegetables instead of frozen? Yes! Fresh vegetables are encouraged for better flavor and texture.
  • What can I serve with this casserole? Pair it with a fresh salad or roasted vegetables for a complete meal.
  • How long does it take to cook? The total cooking time is approximately 30-35 minutes, including prep time.
  • Can I double the recipe? Yes! Just make sure to use a larger baking dish to accommodate the extra ingredients.

Nutritional Insights and Dietary Adaptations

This Low Carb Chicken Casserole not only satisfies cravings but also aligns with various dietary preferences:

  • Low Carb: Perfect for those on a low carb or keto diet, helping to maintain energy without the excess carbs.
  • High Protein: Loaded with chicken and cheese, it’s an excellent choice for protein-packed meals.
  • Customizable: Easily adapt this recipe for paleo or whole30 diets by swapping out non-compliant ingredients.

Equipment Recommendations

For a successful casserole, here’s what you’ll need:

  • 9×13 inch casserole dish: A must for the perfect baking size.
  • Large skillet: Ideal for sautéing your vegetables to perfection.
  • Mixing bowl: For combining all your delicious ingredients effortlessly.
  • Measuring cups and spoons: Precision is key for a balanced flavor.

Serving Suggestions

Ready to serve? Here’s how to make it even better:

  • Garnish: Top with fresh herbs like parsley or cilantro for a pop of color and flavor.
  • Serve with a side salad: A crunchy salad complements the creamy casserole beautifully.
  • Pair with a drink: Consider serving with a refreshing iced tea or sparkling water.

Conclusion: The Adventure Awaits!

Cooking is an adventure, and this Creamy Low Carb Chicken Casserole is your ticket to a flavorful exploration. Embrace the spice, enjoy the process, and remember — every dish is a chance to tell your story. Gather your ingredients, turn up the heat, and let’s make some magic happen in the kitchen!

Unleash Your Inner Chef with Sizzling Vegan Taquitos

Welcome to a culinary adventure that will ignite your taste buds and transform your kitchen into a fiesta of flavors! These vegan taquitos are not just food; they’re a celebration of everything delicious about Mexican cuisine, reimagined with a plant-powered twist. Stuffed with a hearty filling and crispy on the outside, these taquitos are an invitation to explore the vibrant world of spices and ingredients. Prepare to dive into the thrill of cooking with fire and flair, and let’s make some magic happen!

Why You’ll Love This Recipe

Let’s be honest: cooking should be a joy, not a chore. Here’s why these sizzling vegan taquitos will become a staple in your kitchen:

  • Quick and Easy: With just a handful of ingredients and simple steps, you can whip up these taquitos in no time, making them perfect for weeknight dinners or unexpected guests.
  • Flavor Explosion: Each bite bursts with a balanced medley of spices, textures, and fresh ingredients that will leave your taste buds dancing.
  • Customizable: The filling can be tailored to your liking. Swap in your favorite veggies, beans, or grains for a personalized touch!
  • Perfect for Meal Prep: These taquitos can be made ahead of time and stored, making them a convenient option for busy days.
  • Plant-Based Goodness: Packed with nutrients and flavor, these taquitos support a healthy lifestyle without sacrificing taste.

Ingredients Breakdown

Here’s what you’ll need to create your masterpiece:

  • Corn Tortillas: Use 8 small corn tortillas that are pliable and perfect for rolling. If you’re gluten-free, check for certified gluten-free options.
  • Black Beans: One can (15 oz) of black beans, drained and rinsed, serves as the protein-packed base of your filling.
  • Corn: 1 cup of corn, frozen or canned. This adds sweetness and texture to your filling.
  • Spices: 1 tsp cumin and 1 tsp chili powder for that authentic Mexican flavor, plus 1/2 tsp garlic powder and onion powder for depth.
  • Bell Peppers: 1 cup of diced bell peppers (any color will do) enhances both flavor and nutrition.
  • Oil: Oil for frying, if desired, gives the taquitos a crispy finish, but they can also be baked for a healthier version.
  • Fresh Avocado: Sliced avocado for serving adds creaminess and richness to each bite.
  • Cilantro and Salsa: Fresh cilantro for garnish and salsa for dipping elevate the overall experience.

Preparation Steps for Perfect Vegan Taquitos

Ready to get cooking? Follow these simple steps:

  1. In a mixing bowl, mash the black beans with a fork until slightly chunky.
  2. Add corn, cumin, chili powder, garlic powder, onion powder, salt, and pepper to the mashed beans. Mix well.
  3. Heat a skillet over medium heat and lightly sauté the diced bell peppers until soft, about 3-4 minutes.
  4. Combine the sautéed bell peppers with the bean and corn mixture.
  5. Warm the corn tortillas in a dry skillet or microwave until pliable.
  6. Place about 2 tablespoons of the filling in the center of each tortilla and roll tightly.
  7. Secure the edges with a toothpick if necessary.
  8. In the same skillet, add a little oil and fry the taquitos until golden brown and crispy on all sides, about 2-3 minutes per side.
  9. Remove from heat and drain on paper towels.
  10. Serve hot with avocado slices, fresh cilantro, and salsa.

Pro Tips for Perfect Taquitos

Want to elevate your cooking game? Here are some expert insights:

  • Warm Tortillas: Always warm your corn tortillas before filling them. This prevents cracking and ensures they roll smoothly.
  • Filling Consistency: Make sure your filling is not too wet. This will help your taquitos stay intact while frying.
  • Experiment with Spices: Feel free to experiment with spices like smoked paprika or chipotle powder for an extra kick.
  • Healthy Cooking: For a healthier version, bake your taquitos at 400°F (200°C) for about 20 minutes, flipping halfway through.
  • Make-Ahead: Prepare the filling a day in advance and store it in the fridge. This will save you time.
  • Freezing Taquitos: Freeze uncooked taquitos on a baking sheet, then transfer to a freezer bag. Cook from frozen when you’re ready!
  • Serving Styles: Consider pairing the taquitos with homemade guacamole or a zesty lime-infused vegan yogurt for dipping.
  • Perfect Pairings: These taquitos are perfect with a side of Mexican rice, quinoa salad, or a fresh green salad.

Common Mistakes and Troubleshooting

Even seasoned chefs can make mistakes. Here’s how to avoid common pitfalls:

  • Moisture Issues: If your taquitos are soggy, check the moisture level of your filling. Too much liquid can ruin the texture.
  • Overfilling: Don’t overstuff your tortillas. A little filling goes a long way; otherwise, they’ll burst during frying.
  • Burnt Exteriors: If the outside is browning too quickly, lower the heat. You want a golden brown, not charred.
  • Inconsistent Sizes: Aim for even-sized taquitos for uniform cooking. Practice makes perfect!

Delicious Variations to Explore

These taquitos can be as versatile as your culinary imagination allows. Here are a few delicious variations:

  • Sweet Potato Taquitos: Substitute black beans with mashed sweet potatoes for a sweet and savory twist.
  • Spicy Tofu Filling: Add crumbled, seasoned tofu to your filling for a protein boost and extra flavor.
  • Cheesy Vegan Option: Incorporate vegan cheese into the filling for a creamy texture that melts beautifully.
  • Vegetable Medley: Mix in other vegetables like zucchini, mushrooms, or spinach for added nutrition and taste.

Storage and Make-Ahead Instructions

Want to keep your cooking streamlined? Here’s how to store and prepare ahead:

  • Refrigeration: Store cooked taquitos in an airtight container in the fridge for up to 3 days.
  • Freezing: Freeze uncooked taquitos on a baking sheet, then transfer to a freezer bag for up to 3 months. Cook directly from frozen.
  • Reheating: Reheat leftovers in a 350°F (175°C) oven for about 10-15 minutes to maintain crispiness.

Comprehensive FAQ

Got questions? We’ve got answers! Here are some frequently asked questions about these vegan taquitos:

  • Can I use flour tortillas instead? Absolutely! Just keep in mind that the texture will differ—corn tortillas are traditional.
  • Are these taquitos gluten-free? If you use gluten-free corn tortillas, then yes!
  • What can I substitute for black beans? Feel free to use pinto beans, lentils, or chickpeas for a different flavor.
  • How spicy are these taquitos? The spice level can be adjusted based on your preference. Add more chili powder for heat or omit it for milder flavors.
  • Can I bake these taquitos instead of frying? Yes! Baking them makes for a healthier option and they can still be crispy.
  • How do I make them ahead of time? Prepare the filling and store it in advance. Assemble the taquitos when you’re ready to cook.
  • What dips pair well with taquitos? Consider guacamole, salsa, or a tangy vegan yogurt dip for a refreshing contrast.
  • Can I make these taquitos spicy? Definitely! Add jalapeños or hot sauce to the filling for an extra kick.

Nutritional Tips and Dietary Adaptations

For those watching their nutrition, here are some tips:

  • High in Protein: Black beans are a great source of plant-based protein, making these taquitos filling and nutritious.
  • Low-Calorie Option: Baking instead of frying significantly reduces calories and fat content.
  • Fiber Rich: These taquitos are filled with fiber from beans and veggies, promoting digestive health.
  • Vegan and Gluten-Free: This recipe fits a vegan diet and can be easily adapted to be gluten-free.

Essential Equipment Recommendations

Before you start cooking, here’s what you’ll need to make your taquitos:

  • Non-Stick Skillet: Ideal for frying without excessive oil and for even cooking.
  • Mixing Bowls: For combining your filling ingredients.
  • Spatula: To help flip and turn your taquitos while frying.
  • Measuring Cups and Spoons: For accurate ingredient measurements.

Serving Suggestions

How you serve your taquitos can elevate the experience. Here are some ideas:

  • Garnish: Top with fresh cilantro, sliced avocado, or a sprinkle of lime juice for brightness.
  • Accompaniments: Serve with a side of Mexican rice, fresh salad, or refried beans for a complete meal.
  • Dipping Sauces: Prepare a zesty salsa, creamy guacamole, or a tangy vegan yogurt sauce to complement the flavors.

Now that you’re armed with all the knowledge to create these sizzling vegan taquitos, it’s time to embrace your adventurous spirit in the kitchen! Cooking is an exploration, a chance to express yourself and bring joy to your table. So grab your skillet, turn up the heat, and let the flavor journey begin. Enjoy your cooking, and remember: with a little spice, every meal becomes a story worth sharing!