Author

Avery Collins

Browsing

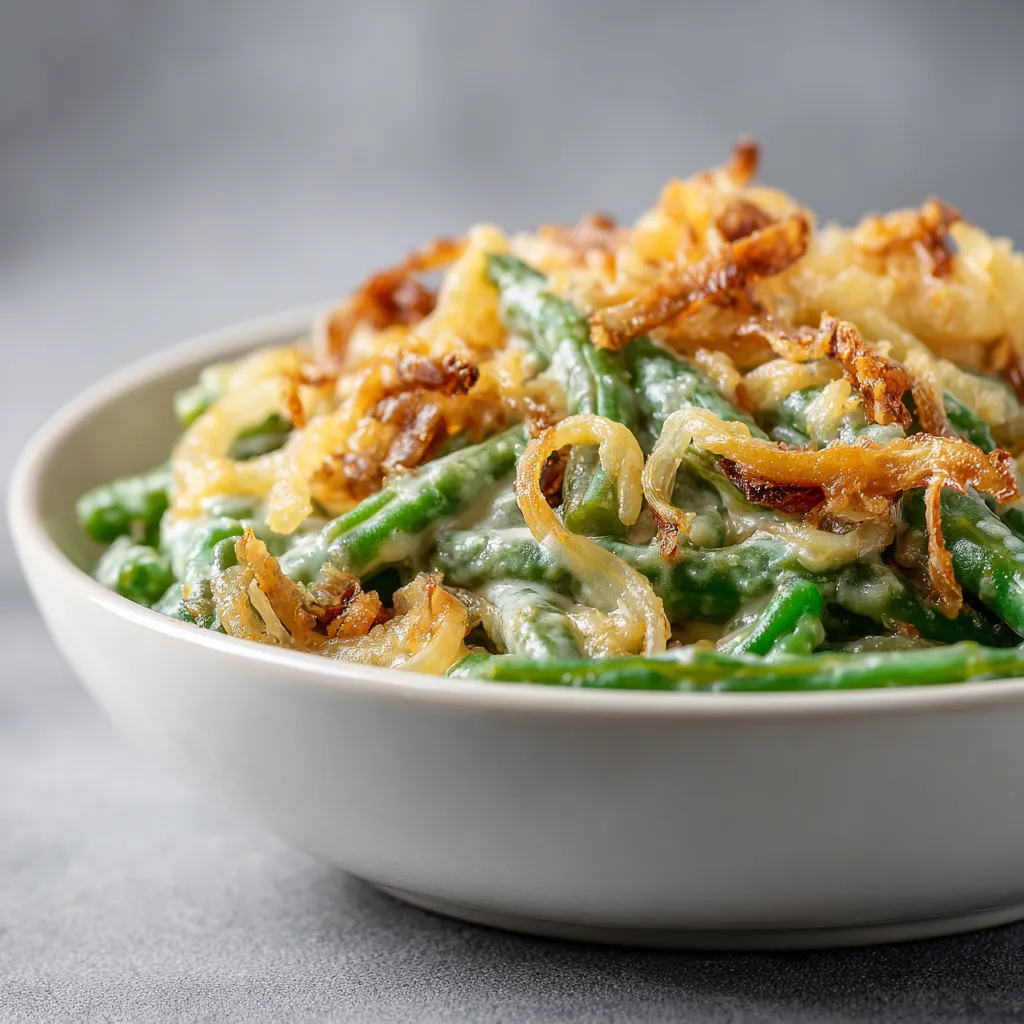
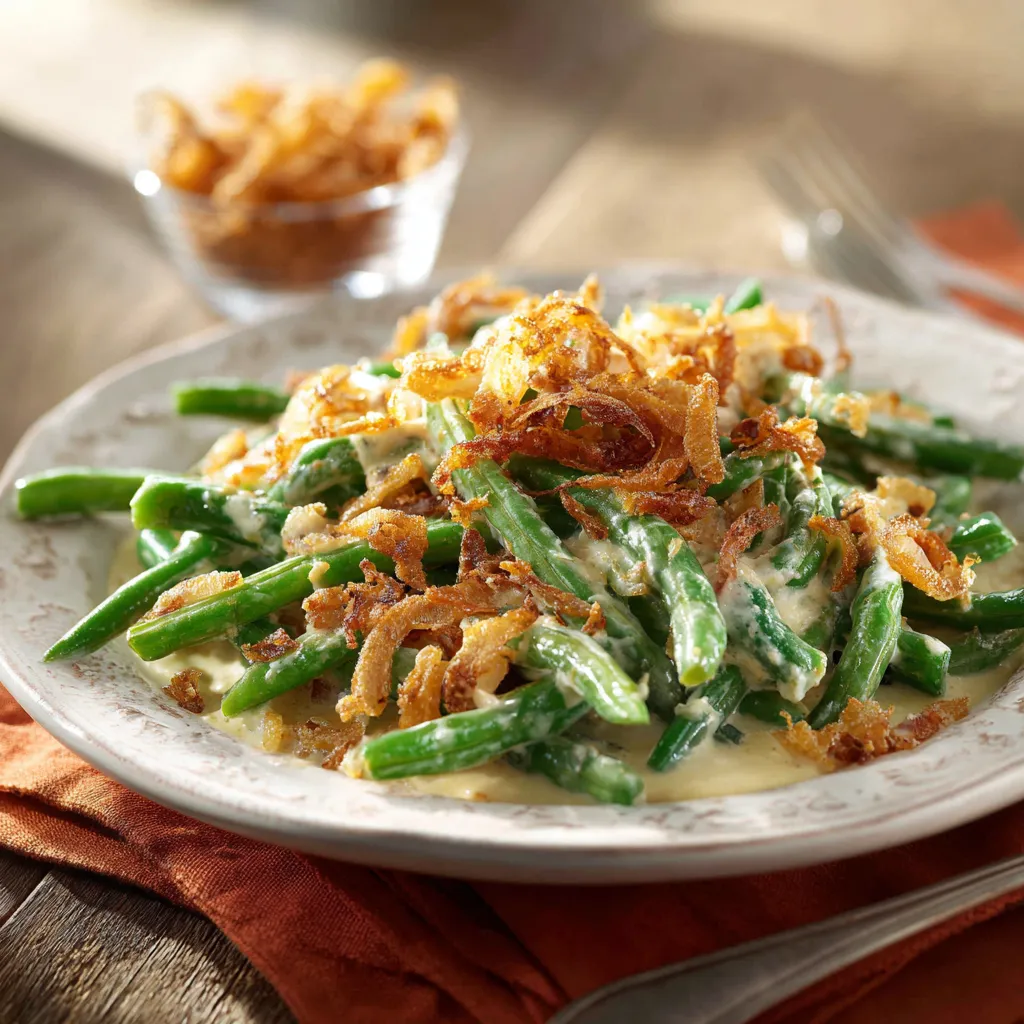
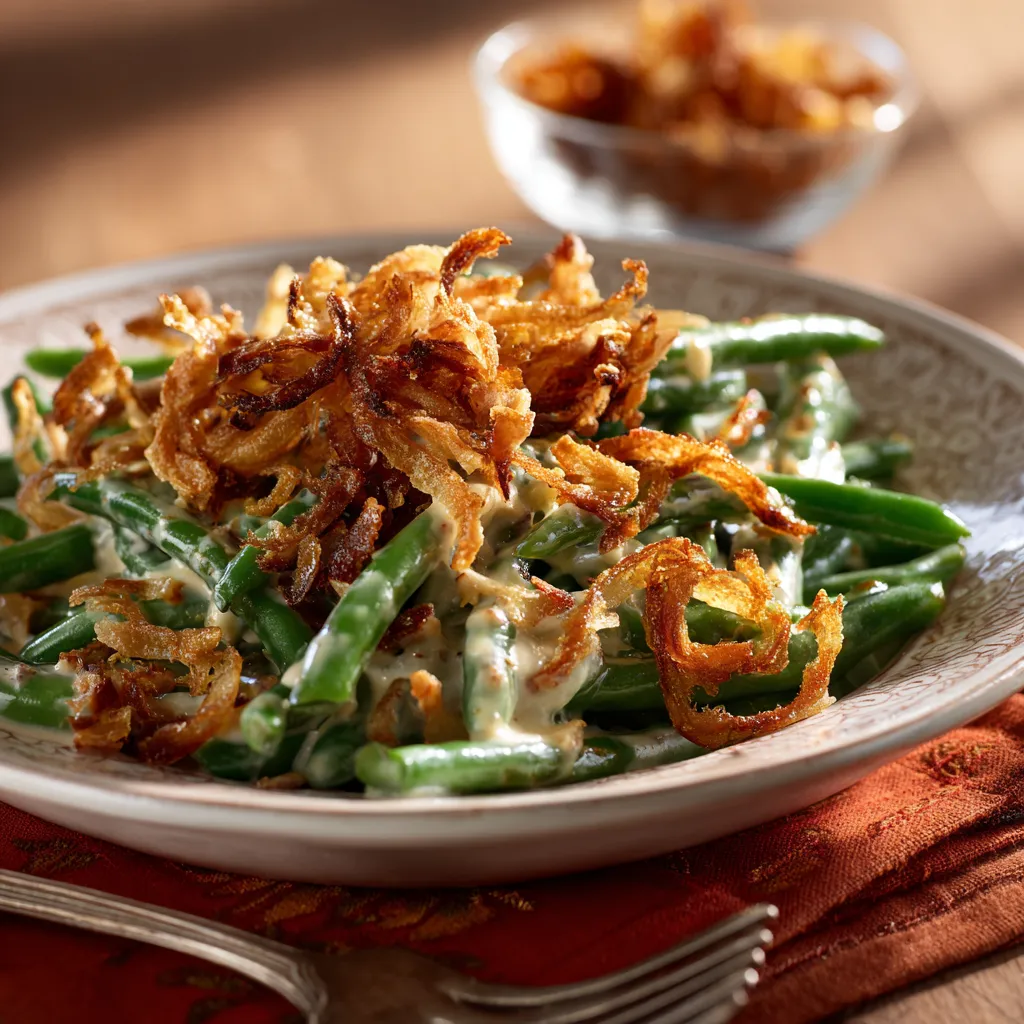
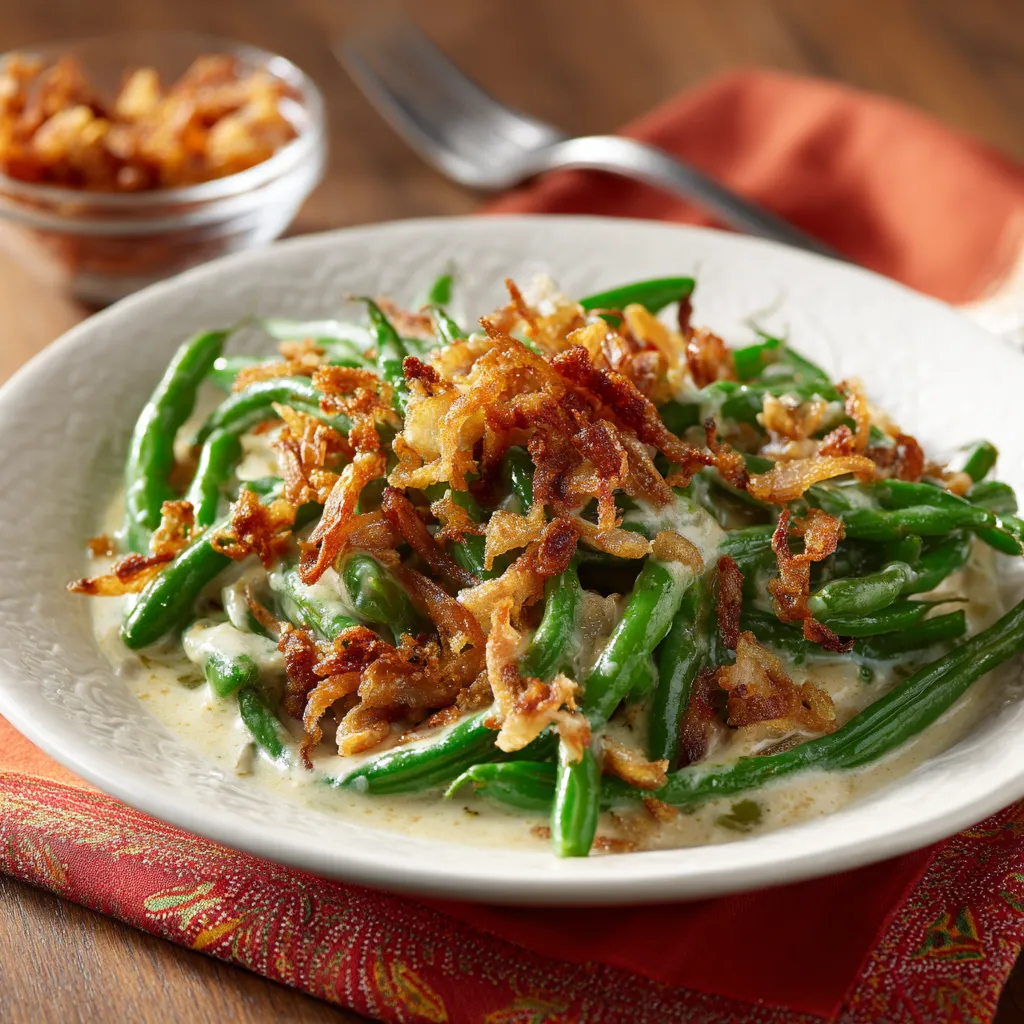
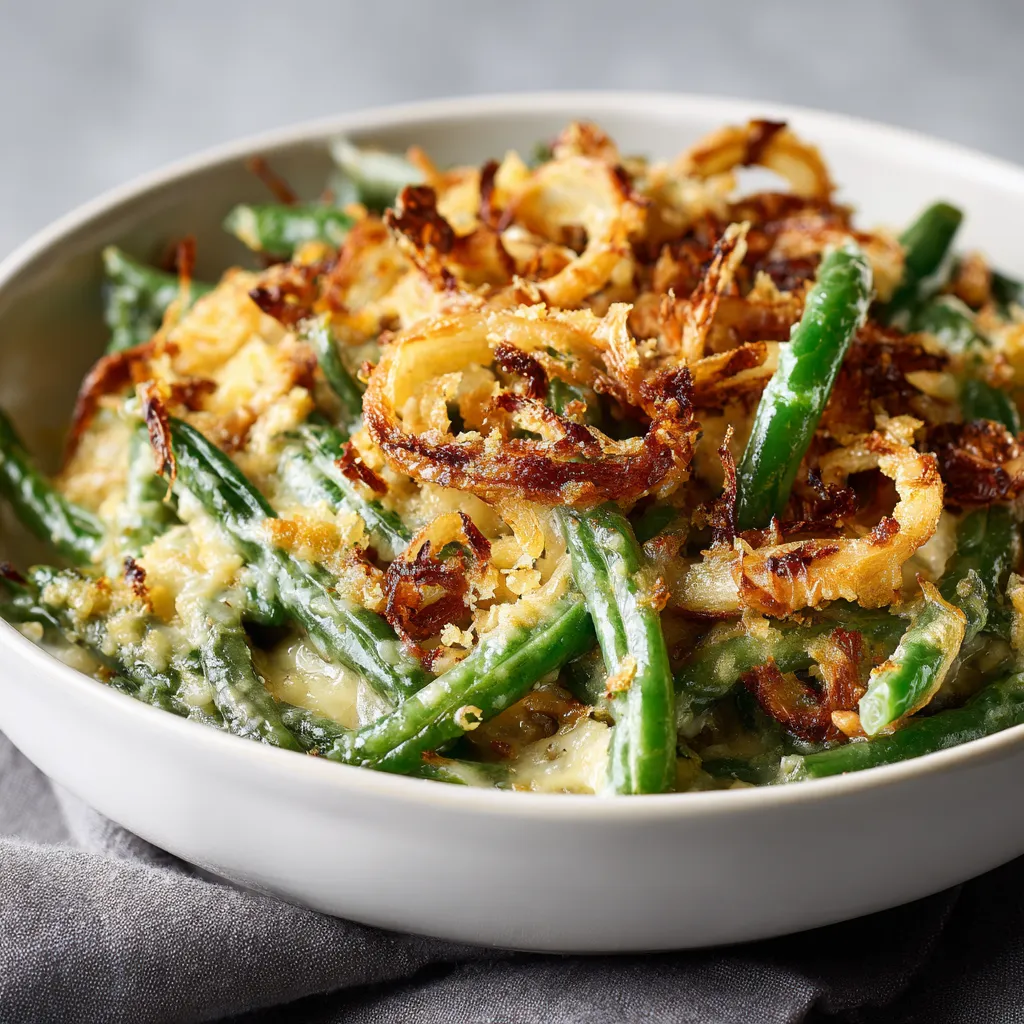
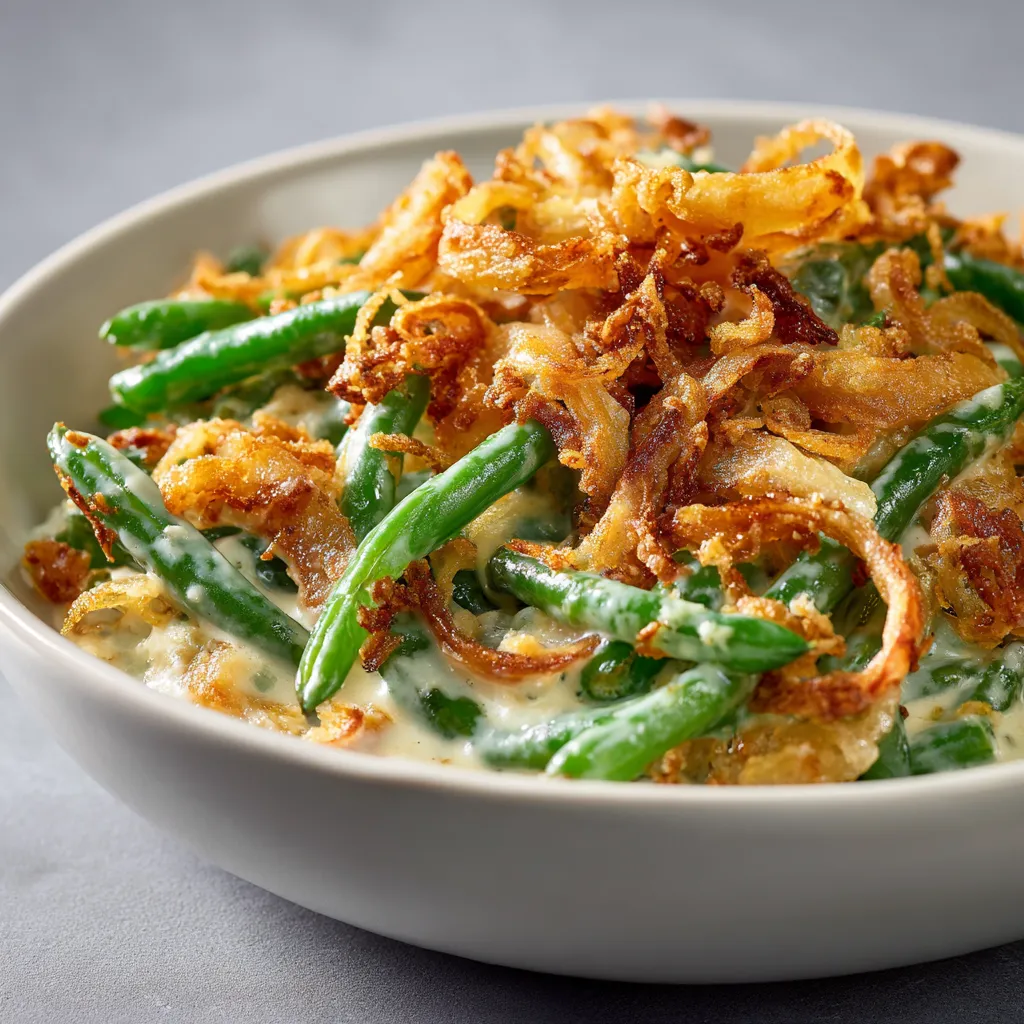
Welcome to a culinary journey that’s all about embracing bold flavors and adding a touch of fire to the classic green bean casserole. This dish is not just a side; it’s a vibrant experience that transforms humble ingredients into a celebration of taste. With every bite, you’ll feel the warmth of spices and the comfort of creamy goodness, making this casserole a perfect companion for your holiday table or a weeknight dinner. Let’s dive into this delicious recipe that will make your taste buds sing!

Why You’ll Love This Recipe

  • Easy to Prepare: With minimal prep time and straightforward steps, this casserole can be whipped up in under an hour, making it perfect for busy cooks.
  • Flavor Explosion: The combination of creamy mushroom soup, cheddar cheese, and crispy fried onions delivers a flavor punch that elevates the classic dish.
  • Customizable: This recipe is a blank canvas! Add your favorite spices or swap ingredients to create a version that suits your palate.
  • Perfect for Leftovers: This green bean casserole can be made ahead of time and reheats beautifully, making it an ideal choice for gatherings.
  • Comfort Food Reinvented: Say goodbye to boring sides! This casserole brings warmth and nostalgia while adding an exciting kick to your meal.

Ingredient Breakdown

Let’s explore the components that make this casserole shine. Each ingredient plays a crucial role, and I’ll also share some potential substitutions if you’re feeling adventurous!

  • Green Beans: I recommend using **fresh green beans** for the best texture, but **canned green beans** can also be used in a pinch. If you opt for canned, make sure to drain them well.
  • Cream of Mushroom Soup: This is the heart of the casserole. For a healthier twist, use a homemade version or a low-fat alternative. Feel free to experiment with **cream of chicken soup** for a different flavor profile.
  • Milk: Whole milk adds creaminess, but you can substitute it with **almond milk** or **oat milk** for a dairy-free option.
  • Cheddar Cheese: A must for that melty goodness! Swap it for **pepper jack** if you want an extra kick or use a dairy-free cheese for a vegan variant.
  • Soy Sauce: Just a teaspoon adds depth. You can also use **tamari** for a gluten-free option.
  • Garlic Powder: This enhances the flavor, but using **fresh minced garlic** can elevate it even further.
  • Black Pepper: A pinch adds a bit of heat. Feel free to add more if you like it spicy!
  • French Fried Onions: The crunchy topping that everyone loves! You can make your own or use store-bought for convenience.

Pro Tips for the Perfect Casserole

A delicious green bean casserole with melted cheese and a golden crispy topping, served in a rustic dish.

Here are some expert insights to ensure your green bean casserole turns out perfectly every time:

  • Prep Ahead: You can prepare the casserole a day in advance. Just assemble it and store it in the fridge until you’re ready to bake.
  • Layer Wisely: For an even distribution of flavors, layer the ingredients rather than mixing them all together at once.
  • Don’t Overcook: If using fresh beans, steam them for a few minutes before adding to the mix. This keeps them crisp and vibrant.
  • Add Heat: Feeling adventurous? Toss in some **crushed red pepper flakes** or a dash of **hot sauce** for an added kick.
  • Experiment with Cheese: Mix different types of cheese for a unique flavor blend. Gouda or mozzarella can make great additions!
  • Check for Doneness: The casserole is done when the top is golden brown and the edges are bubbly; keep an eye on it to avoid burning!
  • Use a Larger Dish: If you’re doubling the recipe, make sure to use a larger baking dish to ensure even cooking.
  • Garnish Before Serving: Throw some extra fried onions on top just before serving for that extra crunch and visual appeal!

Common Mistakes and Troubleshooting

Even the best chefs make mistakes! Here’s how to troubleshoot common issues:

  • Too Watery: If your casserole ends up too watery, make sure your green beans are well-drained. You can also add a bit of cornstarch to thicken the mixture.
  • Burnt Onions: If your fried onions start to brown too quickly, cover the casserole with foil until the last few minutes of baking.
  • Flavorless Casserole: Always taste before serving! Add more seasoning if needed, especially salt and pepper.
  • Too Dry: If your casserole seems dry, add a splash more milk or cream and stir it in before serving.

Delicious Variations

Let’s shake things up! Here are some creative variations to try:

  • Spicy Jalapeño: Add diced jalapeños or a spoonful of jalapeño relish for a spicy twist.
  • Cheesy Bacon: Incorporate crispy bacon bits for a smoky flavor that pairs beautifully with the green beans.
  • Veggie-Loaded: Toss in some sautéed mushrooms or bell peppers for added nutrients and flavor.
  • Vegan Delight: Swap all dairy ingredients for plant-based options, and use **panko breadcrumbs** instead of fried onions for crunch.

Storage and Make-Ahead Instructions

This casserole is perfect for meal prep! Here’s how to store it:

  • Refrigeration: Store leftovers in an airtight container in the fridge for up to 3 days.
  • Freezing: To freeze, allow the casserole to cool completely, then cover tightly with plastic wrap and foil. It can be frozen for up to 2 months.
  • Reheating: Reheat in the oven at 350°F (175°C) until warmed through, about 20-30 minutes. You can also microwave individual portions.

Comprehensive FAQ

Got questions? I’ve got answers! Here are some frequently asked questions about green bean casserole:

  • Can I make this casserole ahead of time? Absolutely! Prepare it up to a day in advance and store it in the fridge until you’re ready to bake.
  • Can I use frozen green beans? Yes, frozen green beans work well too! Just thaw and drain them before adding to the casserole.
  • Is it okay to use low-fat soup? Yes, low-fat options can be used without compromising the flavor too much.
  • How do I make it gluten-free? Use gluten-free soy sauce and ensure your cream of mushroom soup is gluten-free.
  • Can I add other vegetables? Definitely! Carrots, corn, or even spinach can be delicious additions.
  • What can I use instead of French fried onions? You can try crushed crackers, **panko breadcrumbs**, or even toasted nuts for a crunch.
  • How spicy is this casserole? The spice level is adjustable! You can omit any spicy elements for a milder version.
  • What should I serve with this casserole? It pairs beautifully with roasted meats, mashed potatoes, or a fresh salad.

Nutritional Tips and Dietary Adaptations

Here are some ways to adapt this recipe for various dietary needs:

  • Low-Carb: Substitute green beans with **zucchini noodles** or **cauliflower rice** for a lower-carb option.
  • High-Protein: Add shredded chicken or turkey to boost the protein content.
  • Vegan: Use plant-based substitutes for all dairy ingredients and ensure the fried onions are vegan-friendly.
  • Low-Calorie: Opt for reduced-fat soup and cheese, and control portion sizes to keep the calories in check.

Essential Equipment

Before you start, gather these kitchen essentials:

  • 9×13 inch Baking Dish: The perfect size for this casserole!
  • Mixing Bowls: For combining your ingredients easily.
  • Cooking Spray or Grease: To ensure your casserole doesn’t stick!
  • Measuring Cups and Spoons: Accurate measurements lead to delicious results.

Serving Suggestions

Now that your casserole is ready, here are some serving ideas:

  • Garnish: Top with fresh herbs like parsley or chives for a burst of color and freshness.
  • Pair with Proteins: Serve alongside roasted chicken, turkey, or a hearty beef dish to create a complete meal.
  • Enjoy with Bread: A slice of crusty bread or fluffy dinner rolls makes a perfect accompaniment.

Conclusion

There you have it, folks! A green bean casserole that not only pays homage to tradition but also invites a spicy twist that will have everyone coming back for seconds. Embrace the heat, let your taste buds dance, and remember that cooking is all about experimentation. So grab your skillet, add a little fire to your food, and make this dish your own. Happy cooking!

Best Green Bean Casserole

Prep Time 10 minutes
Cook Time 35 minutes
Total Time 45 minutes
Servings 6 servings
Calories 250
A classic holiday side dish that's easy to prepare and full of flavor, combining tender green beans with creamy mushroom soup and crispy fried onions.

Ingredients

Green Beans

  • 2 cans green beans, drained
  • 1 can cream of mushroom soup
  • 1/2 cup milk
  • 1 cup shredded cheddar cheese
  • 1 teaspoon soy sauce
  • 1/2 teaspoon garlic powder
  • 1/4 teaspoon black pepper
  • 1 cup french fried onions

Instructions 

  • Preheat oven to 350°F (175°C).
  • Mix green beans, mushroom soup, milk, cheese, soy sauce, garlic powder, and pepper.
  • Pour into a greased baking dish and bake for 25 minutes.
  • Stir in half of the fried onions, top with remaining onions, and bake for 10-15 minutes.
  • Let cool briefly before serving.

Notes

For extra crunch, add more fried onions on top before baking.
Calories: 250kcal
Cost: $10
Course: Side Dish
Cuisine: American
Keyword: Green Beans

Nutrition

Calories: 250kcal | Carbohydrates: 20g | Protein: 10g | Fat: 15g | Sodium: 600mg

Loved this recipe? Save it to your favorite Pinterest board so you can easily find it later! It’s the perfect way to keep all your sweet ideas in one place. ✨

Freshly baked green bean casserole showcasing vibrant green beans and a rich, creamy texture.

Unlock the Flavors of the Garlic Keto Flatbread

Welcome to a culinary adventure that promises to elevate your low-carb cooking game! This Garlic Keto Flatbread is not just a recipe; it’s a way to embrace your passion for flavors while keeping your diet on track. If you’ve ever dreamt of enjoying flatbread without the guilt, you’re in the right place. With just a handful of ingredients, a dash of creativity, and a little bit of your kitchen magic, you’ll create a delicious, versatile bread that complements any dish. Let’s dive into the world of this garlic-infused delight!

Why You’ll Love This Recipe

Here are five compelling reasons to get excited about making this Garlic Keto Flatbread:

  • Low Carb Delight: Perfectly fits into your keto lifestyle, allowing you to indulge without the carbs.
  • Quick and Easy: With minimal prep time and just a few ingredients, you can whip this up in no time.
  • Versatile Base: Whether you’re craving pizza, wraps, or a side for your favorite dip, this flatbread has you covered.
  • Flavor-Packed: Infused with garlic and optional herbs, each bite bursts with savory goodness.
  • Healthy Fats: Made with almond flour and cheese, it offers healthy fats that keep you satisfied.

A Deep Dive into Ingredients

Let’s break down the ingredients that make this Garlic Keto Flatbread shine, and explore some fantastic substitutions:

  • Almond Flour: The star of this low-carb flatbread! It provides a nutty flavor and a soft texture. If you need a nut-free option, consider sunflower seed flour.
  • Shredded Mozzarella Cheese: This cheese melts beautifully, creating that gooey texture we love. You can substitute with other low-moisture cheeses like cheddar for a different flavor.
  • Cream Cheese: Adds richness and helps bind the ingredients together. Neufchâtel is a lighter option that works just as well.
  • Egg: Essential for structure; you can use a flax egg (1 tablespoon ground flaxseed mixed with 2.5 tablespoons water) for a vegan option.
  • Garlic: Fresh is best! However, if you’re in a pinch, garlic powder can work too.
  • Baking Powder: This gives the flatbread a little lift; be sure to check that it’s gluten-free.
  • Salt: Enhances all the flavors. Sea salt or Himalayan pink salt are great choices.
  • Olive Oil: Not only adds flavor but helps keep the flatbread moist. Avocado oil is a great alternative.
  • Italian Seasoning: An optional touch that can elevate the taste. Feel free to mix your favorite dried herbs!

Step-by-Step Instructions to Craft Your Flatbread

Ready to get cooking? Here’s how to make your Garlic Keto Flatbread:

  1. Preheat your oven to 400°F (200°C) and line a baking sheet with parchment paper.
  2. In a microwave-safe bowl, combine the mozzarella cheese and cream cheese. Microwave for about 30 seconds to 1 minute until melted and smooth.
  3. In a mixing bowl, whisk together the almond flour, baking powder, minced garlic, salt, and Italian seasoning (if using).
  4. Pour the melted cheese mixture and egg into the dry ingredients. Mix until a dough forms.
  5. Transfer the dough to the prepared baking sheet and press it out into a flat, even layer, about 1/4 inch thick.
  6. Drizzle olive oil over the top and optionally sprinkle with additional minced garlic or herbs.
  7. Bake in the preheated oven for 12-15 minutes or until golden brown.
  8. Remove from the oven, let it cool slightly, then cut into pieces and serve warm.

Pro Tips for the Perfect Flatbread

To ensure your Garlic Keto Flatbread turns out perfectly every time, here are some expert insights:

  • Don’t Overmix: When combining wet and dry ingredients, mix just until they come together to keep the flatbread tender.
  • Watch the Oven: Every oven behaves differently—keep an eye on it towards the end to avoid burning.
  • Make it Your Own: Experiment with different spices and toppings to find your perfect flavor combination!
  • Use Fresh Ingredients: Fresh garlic adds a punch that dried garlic just can’t match.
  • Let it Rest: Allow the flatbread to cool slightly before cutting—it helps retain its shape.
  • Adjust Texture: If the dough feels too dry, add a splash of water or more cheese; if too wet, add a bit more almond flour.
  • Experiment with Thickness: A thinner flatbread will crisp up nicely, while a thicker one will be softer.
  • Serve Immediately: For the best taste, enjoy your flatbread fresh from the oven!

Common Mistakes and Troubleshooting

Even the best chefs make mistakes! Here are some common pitfalls and how to avoid them:

  • Flatbread Falls Apart: This can happen if the dough is too dry or overbaked. Ensure your mixture is well combined and adjust baking time as needed.
  • Too Dense: If the flatbread is heavy, it may be due to not enough rising agent. Double-check your baking powder measurements.
  • Garlic Overload: While garlic is delightful, too much can overpower the dish. Stick to the recipe for a balanced flavor.
  • Burnt Edges: If the edges are browning too quickly, lower the oven temperature slightly or move the baking sheet to a lower rack.

Flavor Variations to Spice Things Up

Feeling adventurous? Here are some flavorful variations you can try:

  • Cheesy Garlic Flatbread: Add extra cheese to the dough for a gooey, cheesy treat.
  • Herb-Infused Flatbread: Mix in fresh herbs like rosemary or thyme for an aromatic twist.
  • Spicy Garlic Flatbread: Add crushed red pepper flakes or diced jalapeños for a kick.
  • Sweet Garlic Flatbread: Drizzle with a little honey post-baking for a sweet-savory experience.

Storage & Make-Ahead Instructions

Have leftovers? Here’s how to store your Garlic Keto Flatbread:

  • Refrigerate: Store in an airtight container in the fridge for up to 5 days.
  • Freeze: Wrap tightly in plastic wrap and foil, then freeze for up to 3 months. Thaw before reheating.
  • Reheat: For best results, reheat in a toaster oven or skillet for a crispy texture.

Frequently Asked Questions

Got questions? Here are some common queries about the Garlic Keto Flatbread:

  • Can I use a different flour? Yes, but results may vary. Coconut flour is another low-carb option, but you’ll need to adjust the liquid.
  • Is this flatbread gluten-free? Absolutely! All the ingredients are naturally gluten-free.
  • How can I make it dairy-free? Use dairy-free cheese alternatives or omit cheese altogether, adjusting the liquid as needed.
  • What dishes pair well with this flatbread? It’s great with dips, soups, salads, or as a pizza base!
  • Can I make this flatbread in advance? Yes! Prepare the dough, shape it, and store it in the fridge for up to 24 hours before baking.
  • How do I know when it’s done? Look for a golden-brown color and a firm texture when lightly pressed.
  • Can I add toppings before baking? Yes! Feel free to add herbs, cheese, or toppings before baking for added flavor.
  • What if my dough is too sticky? Sprinkle in a little more almond flour until it reaches the right consistency.

Nutritional Benefits & Dietary Adaptations

This Garlic Keto Flatbread is not only delicious but also packs a nutritious punch:

  • Low in Carbs: Perfect for keto diets, helping you maintain your low-carb lifestyle.
  • Rich in Healthy Fats: The combination of almond flour and cheese provides beneficial fats that support energy levels.
  • High in Protein: With the addition of cheese and eggs, this flatbread supports muscle health and keeps you feeling full longer.
  • Customizable: Easily adapt the recipe to suit your dietary needs (dairy-free, nut-free, etc.).

Essential Equipment You’ll Need

Before you start baking, gather these essential tools:

  • Mixing Bowls: For combining ingredients—preferably one large and one small.
  • Microwave-Safe Bowl: Essential for melting the cheese.
  • Baking Sheet: A sturdy sheet lined with parchment paper for easy cleanup.
  • Spatula: For spreading the dough evenly on the baking sheet.
  • Measuring Cups and Spoons: Accuracy is key to perfecting this recipe!

Serving Suggestions to Brighten Your Table

Now that your Garlic Keto Flatbread is ready, here are some serving ideas:

  • With Dips: Serve alongside guacamole, hummus, or tzatziki for an irresistible appetizer.
  • Pizza Night: Top with your favorite sauce and toppings for a low-carb pizza night.
  • Wrap It Up: Use it as a wrap for your favorite fillings—think grilled chicken, veggies, and sauce.
  • Salad Companion: Pair with a fresh salad for a balanced meal.

This Garlic Keto Flatbread isn’t just a recipe; it’s a canvas for your culinary creativity! It’s an invitation to experiment, enjoy, and share delicious moments with those you love. So, grab your skillet, let your inner chef shine, and remember: cooking is an adventure—embrace it with open arms and a sprinkle of spice!

Awaken Your Taste Buds with Sweet Potato Curry

Welcome to a culinary adventure that dances with flavor! In just 30 minutes, you can whip up a dish that bursts with warmth and spice: my Easy Sweet Potato Curry. This vibrant recipe is not just a meal; it’s an invitation to dive into the heart of comfort food, where every bite tells a story of boldness and creativity. Whether you’re a seasoned chef or a kitchen novice, this recipe is your passport to a world where cooking is an exciting journey, not just a chore.

Why You’ll Love This Recipe

  • Quick and Easy: With a total cooking time of just 30 minutes, this sweet potato curry is perfect for busy weeknights when you crave something delicious but don’t have hours to spend in the kitchen.
  • Flavor Explosion: The combination of sweet potatoes, coconut milk, and aromatic spices creates a rich, satisfying dish that’ll leave your taste buds singing.
  • Plant-Based Goodness: This recipe is entirely vegan, making it a fantastic option for anyone looking to incorporate more plant-based meals into their diet without sacrificing flavor.
  • Customizable: Feel free to adjust the spices or add in your favorite veggies to make this curry truly your own. The possibilities are endless!
  • Healthy and Nutritious: Packed with vitamins and minerals, sweet potatoes are a great source of fiber and antioxidants, offering a wholesome meal that nourishes both body and soul.

Ingredient Breakdown

Eye-level photo showcasing a creamy sweet potato curry, highlighting its rich texture and colors.

Let’s explore the key ingredients that make this sweet potato curry a standout dish, along with some handy substitutions if you’re missing anything.

  • Sweet Potatoes: The star of this dish! Aim for 2 medium sweet potatoes, peeled and diced into bite-sized chunks. If sweet potatoes aren’t available, you can substitute with butternut squash for a similar sweetness.
  • Coconut Milk: A can (14 oz) of full-fat coconut milk adds creaminess and depth. If you prefer a lighter version, you can use reduced-fat coconut milk. Regular dairy milk can also work in a pinch, though it will alter the flavor.
  • Chickpeas: One can (15 oz) of chickpeas, drained and rinsed, provides protein and texture. Feel free to swap in cooked lentils or even diced tofu for a different protein source.
  • Onion, Garlic, and Ginger: These aromatics are essential for building flavor. Use one medium onion, two cloves of minced garlic, and one teaspoon of ground ginger for that spicy kick. Fresh ginger is best, but ground works too.
  • Curry Powder: One tablespoon of curry powder is your secret weapon! It’s a blend of spices that delivers a warm and fragrant flavor. If you’re feeling adventurous, try using garam masala or a homemade spice blend.

Pro Tips for the Perfect Curry

Before you start cooking, here are a few expert insights to elevate your sweet potato curry:

  • Balance the Spice: Always taste as you go! Adjust the spice levels based on your heat tolerance. If you love it spicy, consider adding a dash of cayenne pepper or chopped jalapeños.
  • Layer Your Flavors: Sauté the onion until golden before adding garlic and spices to bloom their flavors. This technique enhances the overall aroma and taste.
  • Thicken to Your Liking: If you prefer a thicker consistency, let the curry simmer longer or mash some sweet potato chunks directly in the pot.
  • Fresh Herbs Matter: Garnish with fresh cilantro for a burst of freshness that brightens the dish. You can also add a squeeze of lime for a zesty finish.
  • Make Ahead: This curry tastes even better the next day! Make it ahead of time and store it in the fridge — just reheat gently before serving.
  • Experiment Freely: Don’t hesitate to throw in additional vegetables like spinach, bell peppers, or peas for added nutrition and color!
  • Serve with a Side: This curry pairs beautifully with rice, quinoa, or warm naan bread. Consider preparing a simple side salad for a well-rounded meal.
  • Storage Tips: Store leftovers in an airtight container in the fridge for up to 4 days. You can also freeze it for up to 3 months — just thaw and reheat when you’re ready to enjoy!

Common Mistakes and Troubleshooting

Even the best of us make mistakes in the kitchen. Here’s how to troubleshoot common issues:

  • Too Thick: If your curry turns out thicker than desired, simply add a splash of vegetable broth or water to thin it out.
  • Too Spicy: Balance out the heat by adding a little more coconut milk or a pinch of sugar to mellow it out.
  • Not Enough Flavor: If your curry lacks depth, consider adding more spices or a splash of soy sauce or tamari for umami richness.
  • Burnt Bottom: If you notice the curry sticking or burning at the bottom, reduce the heat and add a splash of liquid to deglaze the pot.

Variations to Spice Up Your Curry

Feel like mixing it up? Here are some variations to try:

  • Chickpea & Spinach Curry: Add a couple of handfuls of fresh spinach just before serving for a nutrient boost and pop of color.
  • Coconut & Lime Curry: Squeeze fresh lime juice into the curry just before serving for a refreshing twist.
  • Sweet Potato & Lentil Curry: Substitute half the chickpeas with red or green lentils for added texture and protein.
  • Thai-Inspired Curry: Swap curry powder for Thai red curry paste and add bell peppers and snap peas for a different flavor profile.

How to Store and Make Ahead

If you want to plan ahead for busy days, here’s how to effectively store and prepare your sweet potato curry:

  • Refrigerator: Store in an airtight container for up to 4 days. Reheat on the stove or in the microwave.
  • Freezer: Allow the curry to cool completely, then transfer it to freezer-safe bags or containers. It can be frozen for up to 3 months.
  • Make-Ahead Tip: Prepare the curry base (sauté onions and spices) a day in advance. When you’re ready to cook, just add the sweet potatoes and chickpeas!

Frequently Asked Questions

Got questions? I’ve got answers! Here are some FAQs about this recipe:

  • Can I make this curry in advance? Absolutely! This dish tastes even better the next day as the flavors meld together.
  • Is this sweet potato curry spicy? The spice level is adjustable! You can add more or less curry powder based on your preference.
  • What can I serve with sweet potato curry? It pairs beautifully with rice, quinoa, or warm naan bread. A side salad also complements the meal nicely.
  • Can I freeze sweet potato curry? Yes! It freezes well. Just make sure to cool it completely before placing it in a freezer-safe container.
  • Can I use other vegetables in this recipe? Definitely! Feel free to add in your favorite vegetables like carrots, peas, or bell peppers.
  • Is this recipe gluten-free? Yes, it’s naturally gluten-free, making it suitable for those with gluten sensitivities.
  • How can I make it creamier? Use full-fat coconut milk for a richer, creamier texture. You can also blend part of the curry for a smoother consistency.
  • Can I use fresh sweet potatoes instead of canned? Yes, fresh sweet potatoes are encouraged! Just make sure to cook them until tender.

Nutrition Tips and Dietary Adaptations

This sweet potato curry is not only delicious but also packed with nutrients. Here are some tips for dietary adaptations:

  • Low-Carb Option: Substitute sweet potatoes with cauliflower for a lower-carb version while still keeping that comfort food feel.
  • Protein Boost: Add cooked quinoa or tofu for an extra protein punch.
  • Dairy-Free: This recipe is already dairy-free, so it’s perfect for those with lactose intolerance.
  • Low-Sodium: Use low-sodium vegetable broth instead of salt to keep the sodium levels in check.

Essential Equipment for Making Curry

Before you start cooking, make sure you have the right tools on hand:

  • Large Pot or Dutch Oven: Essential for sautéing and simmering your curry.
  • Cutting Board and Sharp Knife: Keep your prep efficient with a sturdy cutting board and a good knife for chopping.
  • Measuring Cups and Spoons: Accurate measurements ensure the right balance of flavors in your dish.
  • Wooden Spoon: Perfect for stirring and scraping up any delicious bits stuck to the bottom of your pot.

Serving Suggestions

Now that your sweet potato curry is ready, here’s how to serve it for maximum enjoyment:

  • Garnish: Fresh cilantro and a squeeze of lime brighten up the dish beautifully.
  • Pairing: Serve with fluffy jasmine rice or warm naan bread to soak up all the delicious sauce.
  • Add Crunch: Consider topping with toasted nuts or seeds for a delightful crunch and added nutrition.

This Easy Sweet Potato Curry is more than just a recipe; it’s a celebration of flavors that invites you to explore the art of cooking. With every bite, you’ll experience the warmth of home and the thrill of adventure. So grab your skillet, unleash your inner chef, and remember: cooking is not just a task; it’s a joyful exploration of tastes and aromas that connect us all. Embrace the fire, savor the flavors, and let your culinary journey begin!

Easy Sweet Potato Curry (30 mins)

Prep Time 10 minutes
Cook Time 20 minutes
Total Time 30 minutes
Servings 4 servings
Calories 350
A quick and flavorful vegetarian curry featuring sweet potatoes and chickpeas in a creamy coconut sauce.

Ingredients

Vegetables

  • 2 medium sweet potatoes, peeled and diced
  • 1 can (14 oz) coconut milk
  • 1 can (15 oz) chickpeas, drained and rinsed
  • 1 medium onion, chopped
  • 2 cloves garlic, minced
  • 1 tablespoon curry powder
  • 1 teaspoon ground ginger
  • 2 tablespoons vegetable oil
  • to taste salt and pepper
  • for garnish fresh cilantro

Instructions 

  • Heat oil in a large pot over medium heat.
  • Sauté onion for 5 minutes until softened.
  • Add garlic, curry powder, and ginger; cook for 1 minute.
  • Add sweet potatoes, coconut milk, chickpeas, salt, and pepper; simmer until tender, about 15 minutes.
  • Garnish with cilantro before serving.

Notes

Adjust seasoning to taste and serve with rice or bread.
Calories: 350kcal
Cost: $15
Course: Main Course
Cuisine: International
Keyword: sweet potato

Nutrition

Calories: 350kcal | Carbohydrates: 60g | Protein: 10g | Fat: 12g | Sodium: 600mg

Loved this recipe? Save it to your favorite Pinterest board so you can easily find it later! It’s the perfect way to keep all your sweet ideas in one place. ✨

Delicious sweet potato curry in a rustic bowl, with soft shadows and warm lighting enhancing its appeal.

Welcome to Your Next Flavor Adventure: Roasted Red Pepper Pasta

Are you ready to ignite your palate and elevate your culinary skills? This Roasted Red Pepper Pasta is the perfect dish to captivate your taste buds and impress your guests. With its bold flavors and creamy texture, this pasta is a delightful mix of heat and harmony. In just a few simple steps, you’ll transform a handful of ingredients into a dish that feels gourmet yet is accessible for any home cook. So grab your skillet, and let’s dive into this deliciously unforgettable recipe!

Why You’ll Love This Recipe

  • Quick to Prepare: This dish comes together in about 30 minutes, making it perfect for weeknight dinners or last-minute gatherings.
  • Flavor Explosion: The combination of roasted red peppers and aromatic garlic creates a sauce that’s rich in flavor without being overwhelming.
  • Customizable: Feel free to adapt this recipe to your taste by adding your favorite proteins or vegetables.
  • Vegetarian-Friendly: This pasta is fully vegetarian, making it suitable for a wide range of dietary preferences.
  • Impressive Presentation: With vibrant colors and fresh basil on top, this dish looks as good as it tastes, perfect for impressing dinner guests.

Ingredients Breakdown

To create this mouthwatering Roasted Red Pepper Pasta, you’ll need the following ingredients:

  • 8 oz pasta of choice: You can use spaghetti, penne, or even gluten-free pasta if desired.
  • 2 large red bell peppers: These should be roasted to bring out their natural sweetness.
  • 2 tablespoons olive oil: For sautéing and adding richness.
  • 2 cloves garlic, minced: Fresh garlic adds a punch of flavor.
  • 1/2 cup heavy cream: This lends a creamy texture to the sauce.
  • 1/2 cup grated parmesan cheese: For a savory touch, but feel free to substitute with nutritional yeast for a vegan option.
  • Salt and pepper to taste: Essential for seasoning.
  • Fresh basil for garnish: A bright, aromatic finish.

Pro Tips for Success

  • Roasting Technique: For the best flavor, roast the peppers until the skins are charred. This caramelization enhances the sweetness.
  • Skin Removal: After roasting, cover the peppers with foil to steam them, making it easier to peel off the skins.
  • Blending Smoothness: For a super creamy sauce, blend the roasted peppers and garlic thoroughly before adding the cream.
  • Cheese Options: Substitute with ricotta or goat cheese for a different flavor profile.
  • Flavor Boost: Add a pinch of red pepper flakes for an extra kick if you love heat!
  • Leftover Sauce: The sauce can be stored in the fridge for up to 4 days, making it perfect for meal prep.
  • Cooking Pasta: Always cook pasta to al dente for the best texture in your dish.
  • Fresh Herbs: Experiment with other herbs like thyme or parsley for varied flavor.

Common Mistakes and Troubleshooting

Even the most seasoned cooks can make mistakes. Here are some common pitfalls and how to avoid them:

  • Overcooking Peppers: Ensure to roast your peppers just until charred; overcooking can lead to a mushy texture.
  • Too Much Cream: Start with less cream and adjust to your taste; you want a creamy sauce, not a soup!
  • Unseasoned Pasta: Always season your pasta water with salt; this is crucial for flavor.
  • Skipping the Basil: Fresh herbs add a burst of flavor and brightness that balances the richness.

Delicious Variations

This Roasted Red Pepper Pasta is incredibly versatile. Here are some variations to keep your meals exciting:

  • Protein-Packed: Add grilled chicken, shrimp, or sautéed tofu for protein.
  • Veggie Lover’s: Toss in sautéed spinach, zucchini, or cherry tomatoes for added nutrition.
  • Spicy Kick: Incorporate jalapeños or hot sauce for a fiery version.
  • Nutty Flavor: Mix in toasted pine nuts or walnuts for added texture and taste.

Storage and Make-Ahead Instructions

This dish keeps well and can be prepared ahead of time:

  • Refrigerate: Store leftovers in an airtight container for up to 4 days.
  • Freeze: The sauce can be frozen for up to 3 months. Thaw and reheat with a splash of cream.
  • Prep Ahead: Roast the peppers and make the sauce a day in advance to save time on busy nights.

Frequently Asked Questions

Here are some common queries about this dish:

  • Can I use other types of peppers?: Absolutely! Feel free to experiment with yellow or orange bell peppers for a sweeter flavor.
  • Is this pasta gluten-free?: Yes, just substitute regular pasta with your favorite gluten-free option.
  • Can I make this vegan?: Yes! Replace heavy cream with coconut cream and omit the cheese or use a vegan alternative.
  • How can I make the sauce spicier?: Add more red pepper flakes or fresh chili peppers to the sauce while blending.
  • What’s the best way to reheat leftovers?: Reheat on the stove with a little added cream or broth to keep it creamy.
  • Can I use jarred roasted red peppers?: Yes, for convenience. Just skip the roasting step!
  • What pasta shapes work best?: Any shape works, but thinner pastas like spaghetti coat better with the sauce.
  • Can I make this a one-pot meal?: Yes! Cook the pasta in the same pot with the sauce for easy cleanup.

Nutritional Tips and Dietary Adaptations

This Roasted Red Pepper Pasta can accommodate various dietary needs:

  • Low-Carb: Use spiralized zucchini or cauliflower rice instead of traditional pasta.
  • Heart-Healthy: Substitute heavy cream with Greek yogurt for a lighter sauce.
  • Protein Boost: Add chickpeas or lentils for extra protein and fiber.

Equipment Recommendations

To make your cooking experience seamless, consider these essential tools:

  • High-Speed Blender: For a silky smooth sauce, a powerful blender is key.
  • Baking Sheet: A sturdy baking sheet for roasting your peppers evenly.
  • Large Skillet: A non-stick skillet for sautéing garlic and combining the pasta.

Serving Suggestions

When serving your Roasted Red Pepper Pasta, consider these ideas to elevate the dining experience:

  • Garnish Generously: Top with freshly grated parmesan and a sprinkle of fresh basil for color and flavor.
  • Pair with Wine: A chilled glass of Sauvignon Blanc complements the richness beautifully.
  • Side Dish Ideas: Serve with a light salad or crusty bread to soak up any leftover sauce.

So there you have it! A comprehensive guide to creating the most flavorful Roasted Red Pepper Pasta that will make your taste buds dance. Get ready to impress your family and friends with this easy yet sophisticated dish. Remember, cooking is all about adventure, so don’t be afraid to experiment and make it your own. Happy cooking!

Unleashing Flavor: The Ultimate Crock Pot Green Bean Casserole

Nothing says comfort like a creamy, savory green bean casserole, especially when it’s made in a slow cooker. This recipe doesn’t just bring nostalgia to the table; it elevates the traditional dish to a new level of deliciousness. In this guide, we’ll explore not just how to create this culinary masterpiece but also why it’s an essential addition to your holiday feasts and cozy dinners alike.

Why You’ll Love This Recipe

  • Effortless Preparation: With minimal prep time, you can set it and forget it, freeing you to focus on other dishes or enjoy time with family.
  • Comfort Food with a Twist: This dish retains all the classic flavors you love while introducing a creamy texture and crispy topping that makes it irresistible.
  • Perfect for Gatherings: Whether it’s Thanksgiving or a casual dinner, this casserole serves a crowd, allowing you to share warmth and flavor with loved ones.
  • Customizable to Your Taste: From adding spices to incorporating different cheeses, this recipe invites you to experiment and make it uniquely yours.
  • Quick Clean-Up: Cooking in a slow cooker means fewer dishes to wash, letting you savor the moment rather than dread the aftermath.

Ingredient Breakdown

A delicious Crock Pot Green Bean Casserole with melted cheese and golden onion garnish.

Let’s dive into the essentials for crafting this slow cooker green bean casserole. Each ingredient plays a crucial role, and I’ve also included some great substitutions if you find yourself missing an item.

  • Green Beans: 2 cans (14.5 oz each), drained. You can also use frozen green beans for a quick fix.
  • Cream of Mushroom Soup: 1 can (10.5 oz). If you prefer, opt for a homemade version or use cream of chicken for a different flavor.
  • Milk: 1/2 cup. Substitute with almond or oat milk for a dairy-free option.
  • Cheddar Cheese: 1 cup shredded. Feel free to mix in some mozzarella or pepper jack for an extra kick.
  • French Fried Onions: 1 cup, divided. These add the perfect crunch and flavor contrast.
  • Spices: 1/2 teaspoon garlic powder, 1/2 teaspoon black pepper, and 1/2 teaspoon salt to enhance the dish’s flavor profile.

How to Make Your Crock Pot Green Bean Casserole

Follow these simple steps to create a dish that will leave your taste buds dancing:

  1. In a large bowl, combine the drained green beans, cream of mushroom soup, milk, garlic powder, salt, and black pepper. Stir until well mixed.
  2. Gently fold in half of the French fried onions and half of the shredded cheddar cheese, ensuring an even distribution.
  3. Pour the mixture into the slow cooker and spread it evenly across the bottom.
  4. Cover and cook on low for 4 hours or until the casserole is heated through and bubbly.
  5. About 30 minutes before serving, sprinkle the remaining cheddar cheese and French fried onions on top. Cover and continue cooking until the cheese is melted and deliciously bubbly.

Pro Tips for the Perfect Casserole

  • Use Fresh Ingredients: Always opt for the freshest green beans you can find to enhance flavor and texture.
  • Layer Your Flavors: Consider adding sautéed mushrooms or onions for more depth.
  • Monitor Cooking Time: Every slow cooker heats differently; keep an eye on your casserole to avoid overcooking.
  • Cheese Variations: Experiment with different cheeses like gouda or parmesan for unique flavor profiles.
  • Make Ahead: Prepare the mixture a day in advance and store it in the fridge. Just pop it in the slow cooker when you’re ready to cook!
  • Leftover Love: Use leftovers to create a delicious breakfast hash or stuffing for omelets.
  • Spice It Up: For a kick, add a pinch of cayenne or crushed red pepper flakes to the mix.
  • Garnish Smartly: Fresh herbs like thyme or parsley can elevate the dish’s presentation and aroma.

Common Mistakes and Troubleshooting

Even the best of us can run into issues when cooking. Here are some common pitfalls and how to avoid them:

  • Overcooked Beans: Watch your cooking time closely; overcooked green beans can turn mushy. Aim for a texture that’s tender but still has a bite.
  • Too Much Liquid: If your casserole is too soupy, try adding a little cornstarch mixed with water to thicken it up.
  • Underseasoned Dish: Don’t be shy with the spices! Taste as you go to ensure you achieve the right flavor balance.
  • Burnt Topping: If you notice the French fried onions are getting too dark, cover the casserole with foil for the last part of cooking.

Variations to Explore

Don’t let your creativity stop here! Here are some variations to keep this dish fresh and exciting:

  • Cheesy Bacon Casserole: Add cooked, crumbled bacon for a smoky twist.
  • Vegan Green Bean Casserole: Swap the cream of mushroom soup for a homemade cashew cream and omit cheese.
  • Spicy Southwest Version: Mix in diced jalapeños or green chiles for a kick.
  • Herbed Delight: Add fresh herbs like dill or rosemary for a bright flavor contrast.

Storage and Make-Ahead Instructions

This casserole is not only delightful fresh but also great for leftovers! Here’s how to store and reheat:

  • Refrigerator: Keep covered in an airtight container for up to 3 days.
  • Freezer: Freeze leftovers in a freezer-safe container for up to 2 months. Thaw overnight in the fridge before reheating.
  • Reheating: Warm in a preheated oven at 350°F until heated through, about 20-30 minutes.

Frequently Asked Questions

Here are some common queries about this recipe:

  • Can I use fresh green beans? Yes! Fresh green beans will enhance the flavor and texture.
  • What can I substitute for cream of mushroom soup? You can use homemade soup or cream of chicken for a different taste.
  • How do I make this gluten-free? Ensure your cream of mushroom soup is gluten-free or make your own using cornstarch and broth.
  • Can I make this dish in advance? Absolutely! Prepare it the day before and just set it in the slow cooker when you’re ready.
  • What if my casserole is too dry? Add a splash of milk or broth to moisten before serving.
  • Is it safe to leave the slow cooker on overnight? Yes, but ensure you’re using a reliable slow cooker and follow safety guidelines.
  • Can I add other vegetables? Certainly! Carrots, corn, or bell peppers can add flavor and color.
  • Is this dish suitable for freezing? Yes, it freezes well, but the texture of the green beans may change slightly upon thawing.

Nutritional Tips and Dietary Adaptations

This casserole can fit into various dietary needs:

  • Low-Carb Option: Use cauliflower rice instead of beans for a hearty alternative.
  • Dairy-Free: Use plant-based alternatives for milk and cheese.
  • Heart-Healthy: Opt for low-sodium soup and cheese to reduce salt intake.

Essential Equipment Recommendations

To make the perfect green bean casserole, you’ll need:

  • Slow Cooker: A reliable model to ensure even cooking.
  • Mixing Bowl: For combining ingredients seamlessly.
  • Measuring Cups and Spoons: Accurate measurements guarantee consistent results.

Serving Suggestions

This casserole pairs beautifully with:

  • Roast Turkey: A classic pairing that’s sure to please.
  • Grilled Chicken: The creamy casserole complements the smoky flavors of grilled meats.
  • Crusty Bread: Serve with a loaf of crusty bread to soak up all that delicious sauce.

So, there you have it! A comprehensive guide to crafting the ultimate Crock Pot Green Bean Casserole. This dish isn’t just about filling bellies; it’s about creating moments, evoking memories, and celebrating the joy of cooking. Grab your slow cooker, gather your ingredients, and let’s get cooking. Remember, spice is the adventure, and it’s time to embrace it!

Crock Pot Green Bean Casserole with French Fried Onions

Prep Time 10 minutes
Cook Time 4 hours
Total Time 4 hours 10 minutes
Servings 6 servings
Calories 250
A creamy, cheesy green bean casserole topped with crispy French fried onions, perfect for a comforting side dish.

Ingredients

Green Beans

  • 2 cans green beans, drained
  • 1 can cream of mushroom soup
  • 0.5 cup milk
  • 1 cup shredded cheddar cheese
  • 1 cup french fried onions
  • 0.5 teaspoon garlic powder
  • 0.5 teaspoon black pepper
  • 0.5 teaspoon salt

Instructions 

  • Combine green beans, mushroom soup, milk, garlic powder, salt, and pepper in a large bowl.
  • Stir in half of the French fried onions and cheese.
  • Pour mixture into the Crock Pot and cook on low for 4 hours.
  • Before serving, top with remaining cheese and onions, then cook until melted.

Notes

For extra flavor, add a dash of soy sauce or hot sauce.
Calories: 250kcal
Cost: $15
Course: Side Dish
Cuisine: American
Keyword: Green Beans

Nutrition

Calories: 250kcal | Carbohydrates: 20g | Protein: 10g | Fat: 15g | Sodium: 600mg

Loved this recipe? Save it to your favorite Pinterest board so you can easily find it later! It’s the perfect way to keep all your sweet ideas in one place. ✨

A mouthwatering dish of green bean casserole featuring French fried onions against a blurred background.

Dive into a world of bold flavors with these Sweet Potato Taco Bowls! Perfect for a healthy weeknight dinner, this recipe combines vibrant spices, hearty sweet potatoes, and fresh toppings to create a culinary experience that’ll light up your taste buds. Get ready to embrace the heat and make dinner a delicious adventure!

Why You’ll Love This Recipe

  • Flavor Explosion: Each bite bursts with rich, layered flavors from roasted sweet potatoes and zesty toppings.
  • Healthy Ingredients: Packed with nutrients, sweet potatoes and black beans provide a wholesome base for your meal.
  • Customizable: Tailor the ingredients to your taste — add your favorite proteins or veggies for a unique twist!
  • Meal Prep Friendly: Make a big batch and enjoy these bowls throughout the week without losing quality.
  • Quick and Easy: With minimal prep and cook time, these bowls come together in under 45 minutes!

Ingredients Breakdown

Before we dive into cooking, let’s gather our ingredients! Here’s what you’ll need:

  • 2 medium sweet potatoes: Peeled and diced for the perfect balance of sweetness and texture.
  • 1 tablespoon olive oil: Essential for roasting — it helps caramelize the sweet potatoes.
  • 1 teaspoon chili powder: Adds a smoky kick; feel free to adjust based on your spice tolerance!
  • 1 teaspoon cumin: Provides earthiness and depth to the flavor profile.
  • 1/2 teaspoon garlic powder: A must for that aromatic punch.
  • 1/2 teaspoon salt: Enhances all the flavors — don’t skip it!
  • 1 can black beans: Rinsed and drained; they’re loaded with protein and fiber.
  • 1 cup corn: Fresh or frozen, it’s sweet and adds a nice crunch.
  • 1 cup cherry tomatoes: Halved for a juicy, fresh burst.
  • 1 avocado: Diced for creaminess and healthy fats.
  • 1/4 cup fresh cilantro: Chopped, adds brightness and freshness.
  • Juice of 1 lime: For that zesty, tangy finish.
  • Cooked brown rice or quinoa: Use as the base for your taco bowls, offering whole grains and extra nourishment.

Let’s Get Cooking: Step-by-Step Instructions

Ready to cook? Let’s turn up the heat!

  1. Preheat the oven: Set your oven to 425°F (220°C) and let it warm up.
  2. Toss the sweet potatoes: In a large bowl, combine the diced sweet potatoes with olive oil, chili powder, cumin, garlic powder, and salt. Mix well to coat every piece.
  3. Roast the sweet potatoes: Spread the sweet potatoes on a baking sheet and roast in the oven for 25-30 minutes, flipping halfway through, until tender and slightly crispy.
  4. Prepare the black bean mixture: In a separate bowl, combine the black beans, corn, cherry tomatoes, diced avocado, cilantro, and lime juice. Season with salt to taste.
  5. Assemble the bowls: Once the sweet potatoes are roasted, start building your taco bowls by layering cooked brown rice or quinoa at the bottom, followed by the roasted sweet potatoes and the fresh black bean mixture.
  6. Serve and enjoy!: Dig in immediately for the best flavor experience!

Pro Tips for the Best Sweet Potato Taco Bowls

  • Choose the right sweet potatoes: Aim for firm, heavy sweet potatoes for the best taste and texture.
  • Spice it up: Experiment with different spices like smoked paprika or cayenne for additional heat.
  • Don’t skip the lime: The acidity of lime juice brightens up the dish and balances the flavors.
  • Texture matters: Ensure your sweet potatoes are diced evenly for consistent roasting.
  • Mix it up: Try different grains like farro or quinoa for variety in your bowls.
  • Garnish creatively: Add a dollop of sour cream or guacamole for extra richness.
  • Make it vegan: Omit any dairy or animal products and use chickpeas instead of black beans for protein.
  • Use leftovers wisely: Leftover sweet potatoes can be used in breakfast hashes or salads!

Common Mistakes to Avoid

To ensure your taco bowls turn out perfect every time, steer clear of these common pitfalls:

  • Overcrowding the baking sheet: Give your sweet potatoes room to roast evenly; overcrowding leads to steaming, not roasting.
  • Ignoring the seasonings: Don’t skimp on spices; they’re what elevate your sweet potato taco bowls!
  • Not letting the flavors meld: Letting the black bean mixture sit for a few minutes allows the flavors to marry beautifully.

Variations to Explore

Feeling adventurous? Here are some variations to spice things up:

  • Protein-Packed: Add grilled chicken, beef, or shrimp for a heartier meal.
  • Vegan Delight: Swap out beans for lentils or chickpeas and use avocado instead of cheese.
  • Spicy Kick: Mix in jalapeños or use spicy taco seasoning for extra heat.
  • Seasonal Spin: Incorporate seasonal veggies like zucchini or bell peppers for a fresh twist.

Storage and Make-Ahead Instructions

These taco bowls are perfect for meal prep! Here’s how to store them:

  • Refrigeration: Store leftovers in an airtight container for up to 4 days.
  • Freezing: You can freeze the roasted sweet potatoes separately for up to 3 months. Thaw before reheating.
  • Make Ahead: Prep the sweet potatoes and black bean mixture a day ahead; just assemble before serving!

Frequently Asked Questions

  • Can I make this sweet potato taco bowl vegan? Yes! Simply omit any animal products and use plant-based toppings.
  • How can I adjust the spice level? Start with less chili powder and gradually add more to taste.
  • What can I use instead of sweet potatoes? Butternut squash or regular potatoes work well as substitutes.
  • Can I use an air fryer for sweet potatoes? Absolutely! Air fry at 400°F for 20 minutes, shaking halfway through for even cooking.
  • What sides pair well? Serve with a side of tortilla chips, a fresh salad, or a zesty corn salsa.
  • How do I prevent my sweet potatoes from getting mushy? Ensure they are cut uniformly and roast at a high temperature to achieve that perfect balance.
  • Can I use canned beans? Yes, canned black beans work just fine; just make sure to rinse them well.
  • What’s the best way to reheat leftovers? Reheat in the oven for crispiness or in a microwave for convenience.

Nutritional Information & Dietary Adaptations

This recipe is packed with beneficial nutrients:

  • High in Fiber: Sweet potatoes and black beans are excellent sources of dietary fiber.
  • Rich in Vitamins: Sweet potatoes are loaded with Vitamin A, promoting healthy vision and skin.
  • Protein-Packed: Adding beans provides a solid protein source, making this dish satisfying.

Equipment Recommendations

To make your cooking process smooth, here are some essential tools:

  • Baking Sheet: A sturdy, non-stick baking sheet for roasting sweet potatoes.
  • Mixing Bowls: A set of mixing bowls for combining ingredients.
  • Chef’s Knife: A good-quality knife for easy dicing of vegetables.
  • Spatula: A heat-resistant spatula for flipping your sweet potatoes.

Serving Suggestions

These sweet potato taco bowls shine when served with:

  • Fresh Pico de Gallo: Add a bright, zesty touch with homemade pico de gallo.
  • Guacamole: The creaminess of guacamole complements the spices perfectly.
  • Sour Cream or Greek Yogurt: A dollop of tangy sour cream adds richness and balances the heat.

Now that you’re equipped with all the tips and tricks, it’s time to unleash your inner chef! Embrace the thrill of cooking boldly and enjoy every fiery bite of your Sweet Potato Taco Bowls. Remember, cooking is not just about following a recipe; it’s about exploring flavors and creating your own culinary adventure. So gather your ingredients, turn up the heat, and make this delicious dish your own!

Discover the Sweet Potato Salad That Will Ignite Your Culinary Adventure

Sweet potatoes have a special place in my heart—and my kitchen. Growing up in San Antonio, I learned that the right ingredients can turn a simple dish into a culinary masterpiece. In this bold and vibrant Sweet Potato Salad recipe, we embrace the natural sweetness of roasted sweet potatoes, the crunch of candied pecans, and the zest of a homemade orange-lemon dressing. You’re not just making a salad; you’re creating a flavor explosion that invites everyone to the table. Let’s dive into the adventure of cooking boldly!

Why You’ll Love This Recipe

  • Flavor Explosion: This salad is a harmonious blend of sweet, tangy, and nutty flavors that dance on your palate.
  • Textural Delight: With a mix of crunchy and tender ingredients, each bite provides a satisfying contrast.
  • Health Boost: Packed with vitamins and antioxidants, sweet potatoes are a nutritious addition to your meals.
  • Versatile Dish: Perfect as a side or a main, just add some protein to make it a complete meal.
  • Make Ahead Friendly: Prepare it in advance for quick meals or gatherings without sacrificing freshness.

Ingredient Breakdown

Detailed shot of Sweet Potato Salad with greens, apples, and candied pecans.

Let’s explore the key ingredients that make this Sweet Potato Salad a standout dish:

  • Sweet Potatoes: The star of the show! Choose orange-fleshed sweet potatoes for their rich sweetness and vibrant color. You can also substitute with yams if you prefer.
  • Arugula: This peppery green adds a spicy kick. If you don’t have arugula, spinach or mixed greens can be great alternatives.
  • Granny Smith Apples: Their tartness balances the sweetness of the potatoes. Feel free to swap with any crisp apple variety you enjoy.
  • Maple-Ginger Candied Pecans: These bring a sweet crunch. You can make them at home or purchase pre-made. Walnuts or almonds can also work well.
  • Feta Cheese: For a creamy, tangy element. If you’re vegan, consider using a plant-based feta or omit it entirely.
  • Dried Cranberries: They add a pop of sweetness and color. Raisins or chopped dates can be a delicious substitute.
  • Orange-Lemon Dressing: This zesty dressing ties all the flavors together. You can make it from scratch or use a store-bought citrus vinaigrette.

How to Make Sweet Potato Salad

Creating this salad is as easy as 1-2-3. Here’s how:

  1. Roast the Sweet Potatoes: Preheat your oven to 400°F (200°C). Peel and cube the sweet potatoes, toss them with olive oil, salt, and pepper, and roast for 25-30 minutes until tender and caramelized.
  2. Prepare the Salad Ingredients: While the sweet potatoes are roasting, wash and dry the arugula, slice the apples, and prepare the candied pecans.
  3. Assemble the Salad: In a large bowl, combine the roasted sweet potatoes, arugula, apples, pecans, feta, and cranberries. Drizzle with the orange-lemon dressing and toss gently to combine.

Pro Tips for the Perfect Salad

  • Don’t Overcrowd the Baking Sheet: Spread the sweet potatoes in a single layer to ensure even roasting and caramelization.
  • Mix Up Your Greens: Experiment with different greens for added flavor and nutrition—kale or Swiss chard can be fantastic alternatives.
  • Make It a Main Dish: Add grilled chicken, chickpeas, or quinoa for a hearty meal that’s packed with protein.
  • Adjust the Sweetness: If you prefer a less sweet salad, reduce the amount of cranberries or use unsweetened pecans.
  • Dress It Just Before Serving: To keep the greens crisp, add the dressing right before you dig in.
  • Use Fresh Ingredients: Opt for seasonal produce for the best flavor and texture.
  • Store Leftovers Properly: Keep any leftovers in an airtight container in the fridge for up to 3 days.
  • Customize the Dressing: Feel free to tweak the orange-lemon dressing with your favorite herbs or spices for a personalized touch.

Common Mistakes and Troubleshooting

Even the best of us make mistakes! Here are some common pitfalls and how to avoid them:

  • Overcooking Sweet Potatoes: Keep an eye on your sweet potatoes; they should be tender but not mushy. Aim for a slight crisp on the edges.
  • Too Much Dressing: Start with a little dressing and add more as needed. It’s easier to add than to remove!
  • Neglecting Seasoning: Don’t forget to season each component—sweet potatoes, greens, and dressing all benefit from a sprinkle of salt and pepper.
  • Forgetting Texture: Balancing soft and crunchy ingredients is key. Make sure you have a variety of textures in each bite.

Sweet Potato Salad Variations

Feel free to get creative! Here are four tasty twists on the original recipe:

  • Mexican Flair: Add black beans, corn, avocado, and a squeeze of lime for a southwestern twist.
  • Fall Harvest: Incorporate roasted butternut squash and toasted pumpkin seeds for a seasonal spin.
  • Mediterranean Vibes: Swap feta for goat cheese and add olives, sun-dried tomatoes, and fresh herbs.
  • Asian-Inspired: Toss in edamame, sesame seeds, and a ginger-soy dressing for an unexpected flavor profile.

How to Store and Make Ahead

This salad is perfect for meal prep! Here’s how to store it:

  • Refrigeration: Keep the salad in an airtight container in the fridge for up to 3 days. Store the dressing separately to prevent sogginess.
  • Make-Ahead Tips: Roast the sweet potatoes and prepare the dressing a day in advance. Assemble the salad right before serving for the freshest taste.

FAQ

Got questions? I’ve got answers! Here are some common inquiries about this Sweet Potato Salad:

  • Can I use other types of potatoes? Absolutely! While sweet potatoes are key to this recipe, you can experiment with regular potatoes for a different flavor.
  • Is this salad vegan? Yes, it can be made vegan by omitting the feta cheese or using a plant-based alternative.
  • How can I make it gluten-free? All ingredients are naturally gluten-free, but always check labels on processed items like dressings.
  • Can I freeze this salad? It’s best enjoyed fresh, but you can freeze the sweet potatoes separately. Just thaw and reheat before adding to the salad.
  • What dressing pairs well with this salad? Besides the orange-lemon dressing, a balsamic vinaigrette or tahini dressing also works beautifully.
  • Can I use dried fruits other than cranberries? Yes! Raisins, apricots, or even figs can add a unique twist to your salad.
  • How do I make the salad spicier? Add a pinch of cayenne pepper or chili flakes to the dressing for an extra kick!
  • What’s the best way to reheat leftovers? Gently warm the sweet potatoes in a skillet over low heat, then toss with the other salad ingredients.

Nutritional Tips and Dietary Adaptations

This Sweet Potato Salad is not only delicious but also packed with nutrients:

  • Rich in Vitamins: Sweet potatoes are high in vitamin A, C, and fiber, promoting good health.
  • Protein Boost: By adding grilled chicken or chickpeas, you can easily increase the protein content for a balanced meal.
  • Low-Calorie Option: Keep the salad light by using less dressing and opting for fewer candied nuts.
  • Heart-Healthy Fats: The addition of nuts and olive oil provides healthy fats that are good for your heart.

Equipment Recommendations

To create this culinary masterpiece, you’ll need a few essential tools:

  • Cutting Board: A sturdy surface for chopping your fruits and veggies.
  • Chef’s Knife: A sharp knife makes all the difference when prepping ingredients.
  • Baking Sheet: Choose a rimmed baking sheet for roasting your sweet potatoes to prevent spills.
  • Mixing Bowls: A large bowl for tossing the salad and a smaller one for the dressing.
  • Whisk: Essential for mixing the dressing ingredients smoothly.

Serving Suggestions

This Sweet Potato Salad is a versatile dish that pairs wonderfully with various meals:

  • Grilled Meat: Serve alongside grilled chicken, steak, or salmon for a complete dinner.
  • Picnic Favorite: Perfect for outdoor gatherings, it travels well and holds up beautifully.
  • Light Lunch: Enjoy it alone or alongside a bowl of soup for a satisfying lunch.
  • Brunch Delight: Add it to your brunch spread, paired with eggs or quiche for a colorful display.

Conclusion

Cooking is about adventure, and this Sweet Potato Salad invites you to explore the vibrant world of flavors and textures. Embrace the spice, the sweetness, and the crunch—each bite is a celebration of culinary creativity. So grab your ingredients, channel your inner chef, and let’s make a dish that dares you to spice it up! Remember, every meal is a story waiting to be told, and with this salad, you’re writing a delicious chapter. Happy cooking!

Sweet Potato Salad

Prep Time 15 minutes
Cook Time 30 minutes
Total Time 45 minutes
Servings 4 servings
Calories 350
A vibrant and flavorful salad combining roasted sweet potatoes, crisp apples, and crunchy pecans, all coated in a bright citrus dressing.

Ingredients

Vegetables

  • 2 medium sweet potatoes (roasted and cubed)
  • 2 cups arugula
  • 1 medium granny smith apples (thin sliced)
  • 0.5 cup feta (crumbled)
  • 0.5 cup dried cranberries (sweetened)

Nuts

  • 0.5 cup maple-ginger candied pecans

Dressing

  • 0.25 cup orange-lemon dressing

Instructions 

  • Roast sweet potatoes until tender, then cube.
  • Thinly slice granny smith apples.
  • Combine arugula, roasted sweet potatoes, apples, feta, cranberries, and pecans in a bowl.
  • Drizzle with orange-lemon dressing and toss gently.
  • Serve immediately or chill before serving.

Notes

For added protein, consider adding grilled chicken.
Calories: 350kcal
Cost: $15
Course: Salad
Cuisine: American
Keyword: sweet potato

Nutrition

Calories: 350kcal | Carbohydrates: 50g | Protein: 8g | Fat: 15g | Sodium: 400mg

Loved this recipe? Save it to your favorite Pinterest board so you can easily find it later! It’s the perfect way to keep all your sweet ideas in one place. ✨

Eye-level view of a Sweet Potato Salad with fresh arugula and feta.

Dive into the vibrant world of Italian Pink Sauce, an exquisite blend of rich tomato and creamy goodness that will elevate your pasta game to new heights. This dish is not just a meal; it’s an experience that ignites your taste buds, encouraging culinary experimentation and bold choices. In less than 30 minutes, you’ll have a dish that sings with flavor, inviting everyone around the table to join in the adventure.

Why You’ll Love This Recipe

Here’s why this pink sauce recipe stands out:

  • Quick and Easy: Ready in just 20 minutes, this recipe is perfect for a weeknight dinner or a last-minute gathering.
  • Versatile Flavor: The combination of heavy cream and marinara sauce creates a deliciously creamy texture that pairs beautifully with any pasta.
  • Customizable: Feel free to add your favorite ingredients or adjust the spice level to suit your palate—this sauce is a canvas waiting for your touch!
  • Great for Meal Prep: Make a big batch and store it for busy nights. It freezes well and can be reheated with ease.
  • Impressive Presentation: Garnished with fresh basil and grated Parmesan, this dish looks as stunning as it tastes—perfect for impressing guests!

Ingredient Breakdown

Let’s dive into the ingredients that create this beautiful sauce:

  • Pasta (8 oz): Use penne or fusilli for the best texture. You can also substitute with whole-grain or gluten-free pasta for dietary needs.
  • Heavy Cream (1 cup): For a lighter version, consider using half-and-half or a plant-based cream alternative.
  • Marinara Sauce (1 cup): Opt for a high-quality store-bought sauce, or make your own to control the ingredients.
  • Olive Oil (2 tablespoons): Extra virgin olive oil adds depth of flavor and richness.
  • Garlic (2 cloves, minced): Fresh garlic elevates the dish with its aromatic flavor. You can use garlic powder in a pinch.
  • Red Pepper Flakes (1/2 teaspoon, optional): This adds a hint of heat. Adjust to your preference.
  • Salt and Pepper to taste: Essential for balancing the flavors.
  • Fresh Basil for garnish: Adds a pop of color and freshness.
  • Grated Parmesan Cheese for serving: A lovely finishing touch that enhances the creaminess.

How to Make Pink Sauce Pasta

Now, let’s get cooking! Follow these steps to create your delicious Italian Pink Sauce Pasta:

  1. Cook the pasta according to package instructions until al dente. Drain and set aside.
  2. In a large skillet, heat the olive oil over medium heat. Add the minced garlic and sauté for 1-2 minutes until fragrant.
  3. Stir in the marinara sauce and bring to a simmer, letting the flavors meld.
  4. Add the heavy cream, stirring to combine. Allow it to simmer for about 5 minutes until slightly thickened.
  5. Season with red pepper flakes, salt, and pepper to taste.
  6. Add the cooked pasta to the sauce, tossing to coat evenly.
  7. Serve hot, garnished with fresh basil and a sprinkle of grated Parmesan cheese.

Pro Tips for Perfection

Here are some expert tips to ensure your pink sauce pasta shines:

  • Perfect Texture: Ensure your pasta is *al dente* for the best bite; it should have a slight firmness when you chew.
  • Flavor Boost: Adding a splash of white wine to the sauce can enhance its flavor profile before adding the cream.
  • Fresh Ingredients: Whenever possible, use fresh garlic and high-quality marinara sauce for a richer flavor.
  • Adjust the Heat: If you like it spicy, add more red pepper flakes or even a dash of hot sauce.
  • Mix It Up: Add sautéed vegetables like spinach or bell peppers for extra nutrition and flavor.
  • Cheese Options: Try mixing in different cheeses like ricotta or mozzarella for a creamy twist.
  • Herb Infusion: Experiment with herbs such as oregano or thyme for a more complex flavor profile.
  • Serving Temperature: Serve the pasta immediately for the best taste and texture.

Common Mistakes and Troubleshooting

Even seasoned cooks can make slip-ups. Here’s how to avoid common pitfalls:

  • Overcooking Pasta: Always set a timer! Overcooked pasta can become mushy and less enjoyable.
  • Too Thick Sauce: If your sauce is too thick, add a splash of pasta water or additional cream to reach your desired consistency.
  • Insufficient Seasoning: Taste your sauce as you go. Adjust salt and pepper to ensure the flavors pop.
  • Burnt Garlic: Keep an eye on the garlic while sautéing; burnt garlic can make your dish taste bitter.

Variations and Substitutions

Feel free to customize your pink sauce with these variations:

  • Vegetarian Delight: Add sautéed mushrooms or zucchini for a hearty, meatless option.
  • Protein-Packed: Toss in grilled chicken, shrimp, or sausage for a protein boost.
  • Herbed Pink Sauce: Incorporate fresh herbs like parsley or thyme for an aromatic twist.
  • Spicy Pink Sauce: Increase the amount of red pepper flakes or add chopped jalapeños for an extra kick.

Storage and Make-Ahead Instructions

This recipe is perfect for meal prep:

  • Make-Ahead: Prepare the sauce a day in advance and store it in the fridge. Reheat gently before serving.
  • Freezing: The sauce can be frozen for up to three months. Thaw overnight in the fridge before reheating.
  • Leftovers: Store leftovers in an airtight container for up to 3 days. Reheat on the stove with a splash of cream or water to revive its texture.

Frequently Asked Questions

Here are some common queries about making pink sauce:

  • Can I use a different type of pasta? Absolutely! Any pasta shape will work, but penne and fusilli hold the sauce well.
  • Is this sauce spicy? The level of heat depends on how much red pepper flakes you add. Feel free to adjust according to your taste!
  • Can I make this sauce vegan? Yes! Substitute heavy cream with coconut cream or a nut-based cream and use a vegan pasta.
  • What can I serve with pink sauce pasta? This dish pairs wonderfully with garlic bread, a fresh salad, or roasted vegetables.
  • How do I thicken the sauce? If your sauce is too thin, simmer it longer to reduce it, or add a bit more cream.
  • Can I add meat to this dish? Yes! Grilled chicken, shrimp, or Italian sausage can be delicious additions.
  • How long does it take to make? This recipe is quick and can be prepared in under 30 minutes!
  • What’s the best way to reheat leftovers? Reheat on the stove with a splash of cream or water to keep it creamy.

Nutrition Tips and Dietary Adaptations

This dish can be adapted to fit various dietary needs:

  • Low-Carb Option: Swap out traditional pasta for zucchini noodles or spaghetti squash for a low-carb alternative.
  • Dairy-Free: Use a dairy-free cream substitute to keep it rich without the dairy.
  • Whole Grain: Choose whole-grain pasta for added fiber and nutrients.
  • Low-Calorie: Reduce the cream and replace it with a vegetable broth for a lighter sauce.

Equipment Recommendations

Here’s what you’ll need to whip up this delightful dish:

  • Large Pot: For boiling your pasta to perfection.
  • Skillet: A large skillet allows for even cooking and easy stirring.
  • Wooden Spoon: Perfect for mixing the sauce and avoiding scratches on your cookware.
  • Measuring Cups and Spoons: Accurate measurements ensure a balanced flavor.

Serving Suggestions

Make your meal complete with these serving ideas:

  • Pair with Wine: A crisp white wine, like Sauvignon Blanc, complements the creaminess of the sauce.
  • Side Dishes: Serve with a simple arugula salad dressed in lemon vinaigrette for a refreshing contrast.
  • Garnishes: Freshly cracked black pepper and a sprinkle of additional herbs can enhance presentation and flavor.
  • Cheese Lovers: Offer a variety of cheeses at the table for guests to sprinkle on top.

Cooking with spice and flavor is a journey, and this Italian Pink Sauce is an invitation to explore. Boldly embrace your culinary creativity and share this delightful dish with friends and family. Remember, every meal is an opportunity to tell a story — let this sauce be the star of yours!

Unlock the Flavor: Garlic Butter Roasted Sweet Potatoes

If you’re searching for a dish that harmonizes rich sweetness with a bold buttery kick, look no further than Garlic Butter Roasted Sweet Potatoes. This recipe elevates the humble sweet potato into a spectacular side dish that can steal the show at any dinner table. With its irresistible aroma and flavor, this dish invites you to embrace the magic of cooking. Let’s dive into this culinary adventure and discover why you’ll fall in love with this recipe!

Why You’ll Love This Recipe

Garlic Butter Roasted Sweet Potatoes are more than just a delicious side; they offer a multitude of benefits that make them a must-try:

  • Flavor Explosion: The rich garlic butter mixture infuses the sweet potatoes, creating a delightful balance between sweetness and savory depth.
  • Simple Ingredients: Made with everyday pantry staples, this recipe is easy to whip up without any fuss.
  • Health Benefits: Sweet potatoes are packed with vitamins A and C, fiber, and antioxidants, making them a nutritious addition to your plate.
  • Versatile Pairings: These sweet potatoes complement a variety of main dishes, from grilled meats to vegetarian entrees, enhancing any meal.
  • Meal Prep Friendly: Not only can you make them ahead of time, but they also store well, allowing you to enjoy them throughout the week.

Essential Ingredients Breakdown

Savory roasted sweet potatoes with a buttery garlic glaze, garnished with parsley.

Let’s get down to the nitty-gritty of what you’ll need to whip up these Garlic Butter Roasted Sweet Potatoes. Here’s a detailed look at each ingredient, along with possible substitutions:

  • Sweet Potatoes: About 2 large, peeled and cubed. **Substitution**: You can use yams or butternut squash for a different flavor profile.
  • Unsalted Butter: 4 tablespoons, melted. **Substitution**: Olive oil works well for a dairy-free option.
  • Garlic: 4 cloves, minced. **Substitution**: Garlic powder can be used, though fresh garlic gives the best flavor.
  • Salt: 1 teaspoon. Essential for enhancing flavor.
  • Black Pepper: 1/2 teaspoon for a bit of heat.
  • Dried Thyme (optional): 1 teaspoon for aromatic notes. **Substitution**: Fresh thyme or rosemary can also be delightful.
  • Fresh Parsley: A tablespoon, chopped, for garnishing.

Step-by-Step Instructions

Ready to get cooking? Let’s transform those sweet potatoes into a sensational dish!

  1. Preheat the Oven: Start by preheating your oven to 400°F (200°C).
  2. Mix the Garlic Butter: In a large bowl, combine the melted butter, minced garlic, salt, black pepper, and dried thyme. Stir until well mixed.
  3. Coat the Sweet Potatoes: Add the cubed sweet potatoes to the bowl and toss until they are evenly coated with the garlic butter mixture.
  4. Prepare the Baking Sheet: Spread the sweet potatoes out in a single layer on a baking sheet lined with parchment paper to prevent sticking.
  5. Roast to Perfection: Place the baking sheet in the oven and roast for 25-30 minutes. Stir halfway through to ensure even cooking. You’re looking for tender, golden edges.
  6. Garnish and Serve: Once roasted, remove from the oven and sprinkle with fresh parsley before serving. Enjoy the aromatic experience!

Pro Tips for the Best Roasted Sweet Potatoes

Maximize flavor and texture with these expert insights:

  • Uniform Cutting: Cut your sweet potatoes into similar-sized cubes to ensure even cooking.
  • High Heat Roasting: Roasting at a high temperature enhances caramelization, leading to crispy edges and tender interiors.
  • Don’t Overcrowd the Pan: Give the sweet potatoes room to roast instead of steam. Use two baking sheets if necessary.
  • Experiment with Spice: Consider adding a pinch of cayenne or smoked paprika for an extra kick.
  • Fresh Herbs: Try adding rosemary or oregano for a unique flavor twist.
  • Rest Before Serving: Let the potatoes sit for a few minutes after roasting to enhance their flavor.
  • Use a Quality Baking Sheet: A heavy-duty baking sheet promotes better browning and prevents warping.
  • Monitor Closely: Every oven is different; keep an eye on your sweet potatoes to avoid overcooking.

Common Mistakes and Troubleshooting

Even the best chefs make mistakes! Here’s how to avoid common pitfalls:

  • Overcooking: If they become mushy, reduce cooking time and check for doneness earlier.
  • Underseasoning: Don’t skimp on salt! Taste before serving and adjust as needed.
  • Poor Texture: If the potatoes aren’t crispy, try broiling them for the last few minutes of cooking.

Delicious Variations

Mix things up with these tasty twists:

  • Maple Glazed Sweet Potatoes: Drizzle with maple syrup before roasting for an extra layer of sweetness.
  • Spicy Chipotle Sweet Potatoes: Add chipotle powder or diced chipotle peppers for a smoky heat.
  • Cheesy Garlic Butter Sweet Potatoes: Top with shredded cheese in the last 5 minutes of baking for a melty finish.
  • Herb-Infused Sweet Potatoes: Use a blend of fresh herbs like basil, cilantro, or dill for a fresh taste.

Storage and Make-Ahead Instructions

These roasted sweet potatoes can be a lifesaver for meal prep:

  • Storage: Allow the sweet potatoes to cool completely, then store them in an airtight container in the fridge for up to 4 days.
  • Reheating: Reheat in the oven at 350°F (175°C) until warmed through for the best texture.
  • Make-Ahead: Prepare the garlic butter mixture and chop the sweet potatoes a day in advance for quick assembly.

Frequently Asked Questions

Get answers to your burning questions:

  • Can I use yams instead of sweet potatoes? Yes, yams work well in this recipe and will provide a slightly different taste.
  • How do I make these dairy-free? Substitute the butter with olive oil or a vegan butter alternative.
  • Can I freeze roasted sweet potatoes? Yes, but they may lose some texture. Freeze in a single layer, then transfer to a freezer bag.
  • What can I serve with garlic butter roasted sweet potatoes? They pair beautifully with grilled chicken, pork, or alongside a hearty salad.
  • How do I know when sweet potatoes are done? They should be fork-tender and caramelized on the edges.
  • Can I add other vegetables? Absolutely! Carrots, bell peppers, or Brussels sprouts can be added for more color and flavor.
  • What’s the best way to peel sweet potatoes? A vegetable peeler works well, but you can also roast them whole and scoop out the flesh!
  • Are roasted sweet potatoes healthy? Yes! They’re low in calories and high in nutrients, making them a wholesome choice.

Nutritional Insights and Dietary Adaptations

Sweet potatoes are nutritional powerhouses:

  • Vitamins and Minerals: Rich in vitamins A and C, potassium, and fiber.
  • Caloric Content: Approximately 112 calories per medium sweet potato, making it a healthy choice.
  • Gluten-Free: Naturally gluten-free, making it suitable for those with gluten sensitivities.

Equipment Recommendations

Here are some kitchen tools that will make your cooking experience smoother:

  • Sharp Knife: For easy peeling and chopping of sweet potatoes.
  • Mixing Bowl: A large bowl for mixing your garlic butter and sweet potatoes.
  • Baking Sheet: A heavy-duty sheet ensures even roasting.
  • Parchment Paper: Helps prevent sticking and makes cleanup a breeze.

Serving Suggestions

How to make this dish shine on your table:

  • Garnish: A sprinkle of fresh herbs elevates the presentation.
  • Complementary Dishes: Serve alongside grilled meats or a colorful salad for a vibrant meal.
  • Presentation: Serve in a rustic bowl or on a wooden board for an inviting display.

Conclusion

There you have it! Garlic Butter Roasted Sweet Potatoes are not just a side dish; they’re a celebration of flavor that will have everyone asking for seconds. It’s time to embrace the adventure in your kitchen and let these sweet potatoes ignite your culinary creativity. So grab your skillet, and let’s add a little fire to your food!

Garlic Butter Roasted Sweet Potatoes

Prep Time 10 minutes
Cook Time 30 minutes
Total Time 40 minutes
Servings 4 servings
Calories 180
Enjoy these flavorful roasted sweet potatoes coated in garlic butter, perfect as a side dish or snack.

Ingredients

Sweet Potatoes

  • 2 large sweet potatoes, peeled and cubed
  • 4 tablespoons unsalted butter, melted
  • 4 cloves garlic, minced
  • 1 teaspoon salt
  • 1/2 teaspoon black pepper
  • 1 teaspoon dried thyme (optional)
  • 1 tablespoon fresh parsley, chopped (for garnish)

Instructions 

  • Preheat oven to 400°F (200°C).
  • Mix melted butter, garlic, salt, pepper, and thyme.
  • Toss sweet potatoes in the garlic butter mixture.
  • Spread on a baking sheet and roast for 25-30 minutes.
  • Garnish with parsley before serving.

Notes

For extra flavor, add a pinch of paprika or chili flakes.
Calories: 180kcal
Cost: $12
Course: Side Dish
Keyword: Sweet Potatoes

Nutrition

Calories: 180kcal | Carbohydrates: 40g | Protein: 2g | Fat: 5g | Sodium: 300mg

Loved this recipe? Save it to your favorite Pinterest board so you can easily find it later! It’s the perfect way to keep all your sweet ideas in one place. ✨

Delicious roasted sweet potato cubes, lightly browned and topped with fresh herbs.

Welcome to the Bold World of Flavor!

When it comes to cooking, there’s an adventure waiting in every spice jar, and today we’re diving into a culinary delight that will transform your dinner table! Introducing the Keto Garlic Mushroom Chicken Casserole — a creamy, savory dish that marries the rich flavors of garlic and mushrooms with tender chicken, all while keeping it low-carb. Whether you’re a seasoned chef or just starting out, this dish is designed to inspire you to embrace the thrill of cooking with heat and heart.

This recipe is not just about satisfying your taste buds; it’s about inviting you to explore the essence of flavor and the joy of cooking. Let’s get started on a recipe that’s not only delicious but also a perfect fit for your keto lifestyle!

Why You’ll Love This Recipe

  • Flavor Explosion: With rich garlic and earthy mushrooms, each bite is a testament to the power of simple ingredients combined with love.
  • Easy to Prepare: This casserole takes less than an hour from prep to plate, making it a great option for busy weeknights.
  • Low-Carb Goodness: Perfect for those on a keto diet, this dish is packed with protein and healthy fats while keeping the carbs low.
  • Meal Prep Friendly: Make a big batch and enjoy it throughout the week, saving time and ensuring you have delicious meals ready when hunger strikes.
  • Customizable: This recipe serves as a canvas — feel free to mix in your favorite vegetables or proteins to make it your own!

Gather Your Ingredients

Delicious baked casserole featuring chicken, mushrooms, and cheese in a creamy sauce.

To create the Keto Garlic Mushroom Chicken Casserole, you’ll need the following ingredients:

  • 2 cups cooked chicken, shredded
  • 1 cup mushrooms, sliced
  • 1 cup heavy cream
  • 1 cup shredded cheddar cheese
  • 3 cloves garlic, minced
  • 1/2 cup chicken broth
  • 1 teaspoon Italian seasoning
  • Salt and pepper to taste
  • 2 tablespoons olive oil
  • 1/4 cup green onions, chopped (for garnish)

Ingredient Breakdown & Substitutions

Let’s make sure you have everything you need to elevate this dish!

  • Cooked Chicken: Use leftover rotisserie chicken for convenience, or try shredded turkey for a twist.
  • Mushrooms: Opt for fresh varieties like button or cremini for the best texture. Canned mushrooms can work in a pinch, but fresh is always best.
  • Heavy Cream: For a lighter option, consider using full-fat coconut milk or unsweetened almond milk thickened with a bit of cream cheese.
  • Cheddar Cheese: Feel free to experiment with different cheeses like mozzarella, gouda, or a spicy pepper jack for an extra kick!
  • Garlic: Fresh garlic packs the most flavor, but pre-minced garlic can be used if you’re short on time.

Expert Pro Tips for the Perfect Casserole

  • Don’t Skimp on Sautéing: Ensure you sauté the mushrooms until golden brown; this deepens their flavor.
  • Let It Rest: After baking, allow the casserole to cool for about 5 minutes before serving — this helps the flavors meld beautifully.
  • Layering Flavors: Consider adding a splash of white wine to deglaze the pan after sautéing the mushrooms for an added depth of flavor.
  • Garnish Wisely: Fresh herbs like parsley or thyme can brighten the dish just before serving.
  • Check for Doneness: Ensure the casserole is bubbly and the cheese is golden for the best presentation.

Common Mistakes & Troubleshooting

Even the best chefs can hit a bump in the road. Here are some common pitfalls to avoid!

  • Overcooking the Chicken: If using leftover chicken, add it to the casserole just before baking to prevent it from drying out.
  • Too Much Liquid: If your sauce seems too runny, return the casserole to the oven uncovered for a few minutes to thicken it up.
  • Uneven Cooking: Make sure to spread the mixture evenly in the casserole dish for consistent baking.
  • Burnt Cheese: If the cheese is browning too quickly, cover the dish with foil during the last few minutes of baking.

Delicious Variations to Try

This recipe is versatile and can be adapted to suit your taste buds. Here are a few ideas:

  • Veggie Delight: Add steamed broccoli or spinach for a nutrient boost.
  • Mushroom Medley: Incorporate different types of mushrooms like shiitake or portobello for a gourmet touch.
  • Spicy Kick: Stir in some red pepper flakes or diced jalapeños for a fiery twist.
  • Herb Infusion: Experiment with fresh herbs like basil, dill, or oregano to elevate the flavor profile.

Storing & Make-Ahead Instructions

This casserole is perfect for meal prep! Here’s how to ensure it stays fresh:

  • Refrigeration: Store in an airtight container in the fridge for up to 4 days.
  • Freezing: Freeze the casserole before baking for up to 3 months. Thaw in the fridge before baking.
  • Reheating: Reheat in the oven at 350°F (175°C) until heated through, about 20 minutes.

FAQs: Your Questions Answered

  • Can I use raw chicken? Yes, but you’ll need to adjust the cooking time and ensure it’s fully cooked before serving.
  • Can I make this dairy-free? Absolutely! Substitute the heavy cream with coconut milk and use dairy-free cheese.
  • What sides pair well with this casserole? Serve with a crisp green salad or steamed vegetables for a complete meal.
  • How can I make it spicier? Add crushed red pepper flakes or a dash of hot sauce to the mixture before baking.
  • Is it suitable for freezing? Yes! This casserole freezes beautifully, making it perfect for meal prep.
  • What can I use instead of Italian seasoning? A combination of dried oregano, basil, and thyme will work well.
  • How do I know when it’s done? The casserole is ready when the cheese is bubbly and golden brown.
  • Can I add other proteins? Yes! Feel free to incorporate shrimp or sausage for a different flavor profile.

Nutritional Tips & Dietary Adaptations

This casserole is not just low-carb; it’s also a balanced option for anyone looking to maintain a healthy diet. Here are a few tips:

  • Protein Power: Each serving is packed with protein, helping to keep you full and satisfied.
  • Low Glycemic Index: The ingredients used have a low glycemic index, making this dish suitable for those watching their blood sugar.
  • Healthy Fats: The heavy cream and olive oil provide healthy fats that are essential for a well-rounded keto diet.

Essential Kitchen Equipment

To whip up this delicious casserole, you’ll need a few essential tools:

  • Skillet: A good non-stick skillet is perfect for sautéing the mushrooms and garlic.
  • Casserole Dish: Opt for a 9×13 inch dish to hold all your delicious ingredients.
  • Mixing Bowl: A large mixing bowl is essential for combining all your ingredients effortlessly.

Serving Suggestions

This Keto Garlic Mushroom Chicken Casserole is a meal on its own, but here are a few ideas to enhance your dining experience:

  • Garnish: Top with fresh herbs just before serving for added flavor and presentation.
  • Side Dishes: Pair with roasted vegetables or a fresh garden salad for a complete, satisfying meal.
  • Beverage Pairing: Complement your dish with a glass of crisp white wine or a refreshing sparkling water with a slice of lemon.

Conclusion: Embrace the Adventure of Cooking

Cooking should be a joyous adventure, a celebration of flavors and creativity. The Keto Garlic Mushroom Chicken Casserole is more than just a meal; it’s an invitation to explore the world of flavor and embrace the art of cooking with spice and heart. So grab your skillet, turn up the heat, and let this dish take you on a culinary journey that will delight your taste buds and warm your soul!

Keto Garlic Mushroom Chicken Casserole — Creamy, Easy & Low-Carb!

Prep Time 10 minutes
Cook Time 30 minutes
Total Time 40 minutes
Servings 4 servings
Calories 650
A delicious low-carb casserole combining tender chicken, sautéed mushrooms, and creamy cheese, perfect for a quick and satisfying meal.

Ingredients

Protein

  • 2 cups cooked chicken, shredded

Vegetables

  • 1 cup mushrooms, sliced

Dairy

  • 1 cup heavy cream
  • 1 cup shredded cheddar cheese

Aromatics & Seasonings

  • 3 cloves garlic, minced
  • 0.5 cup chicken broth
  • 1 teaspoon italian seasoning
  • to taste salt and pepper

Oils

  • 2 tablespoons olive oil

Garnish

  • 0.25 cup green onions, chopped

Instructions 

  • Preheat oven to 375°F (190°C).
  • Sauté mushrooms in olive oil until tender, about 5 minutes, then add garlic and cook 1 minute.
  • Mix shredded chicken, sautéed mushrooms, cream, broth, seasoning, salt, and pepper in a bowl.
  • Transfer to a greased dish, top with cheese, and bake 25-30 minutes until bubbly.
  • Let cool slightly, garnish with green onions, and serve.

Notes

For extra flavor, add a pinch of red pepper flakes or fresh herbs.
Calories: 650kcal
Cost: $15
Course: Main Course
Cuisine: American
Keyword: chicken, Keto, Mushrooms

Nutrition

Calories: 650kcal | Carbohydrates: 12g | Protein: 55g | Fat: 42g | Sodium: 850mg

Loved this recipe? Save it to your favorite Pinterest board so you can easily find it later! It’s the perfect way to keep all your sweet ideas in one place. ✨

Savory Keto Chicken Casserole with garlic and mushrooms, showcased in warm lighting.