Author

Avery Collins

Browsing

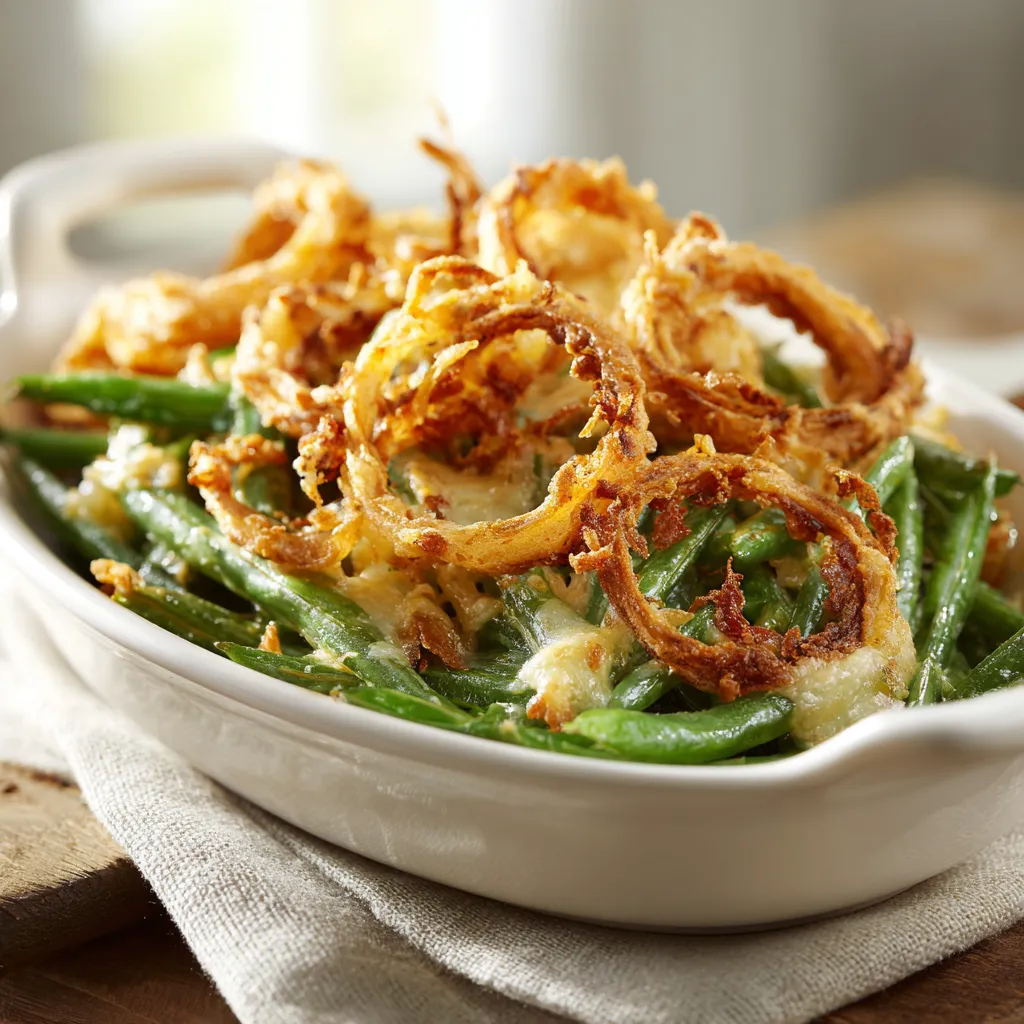
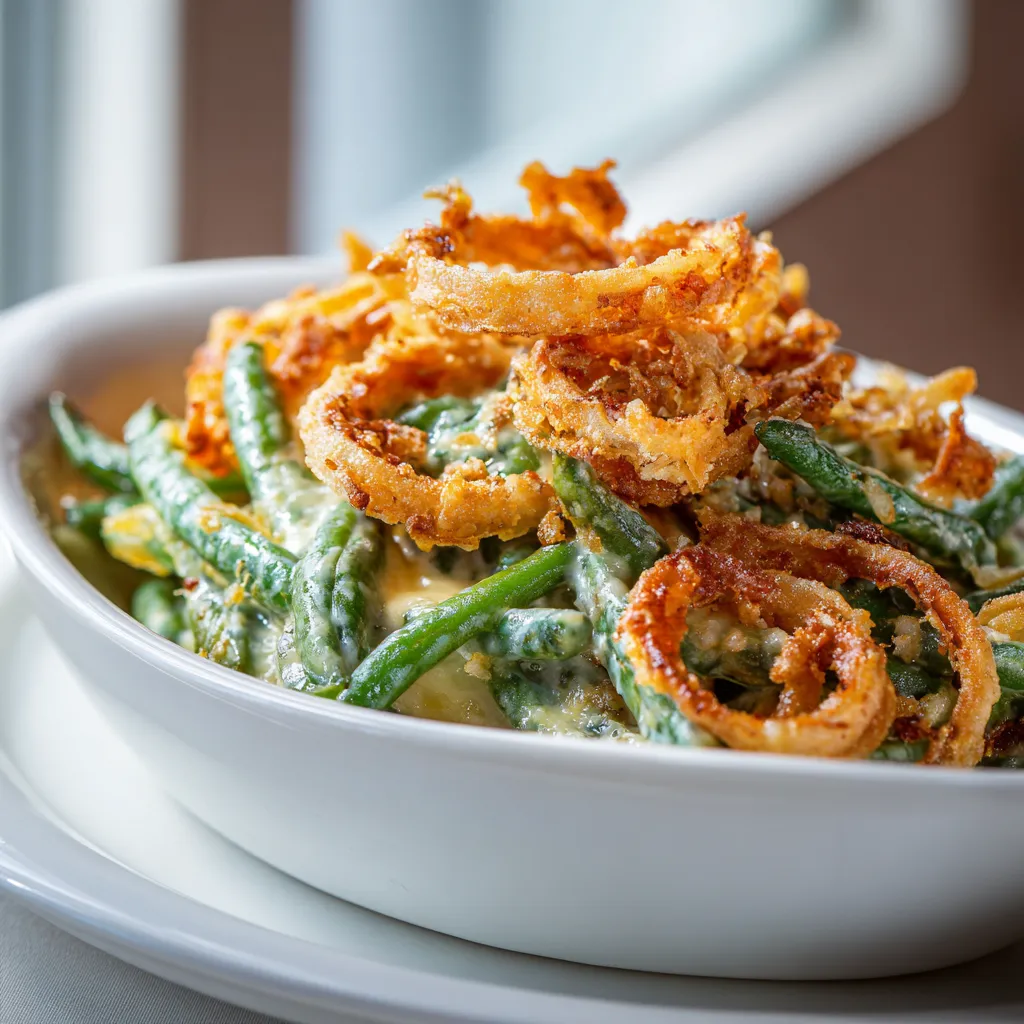
Welcome to the ultimate adventure in comfort food! If you think green bean casserole is just a bland side dish, think again. This Green Bean Casserole is a delightful twist on the classic Campbell’s recipe, packed with flavor and a touch of daring spirit. Join me as we explore the bold flavors that will transform your table into a culinary celebration.

Why You’ll Love This Recipe

This isn’t just any green bean casserole; it’s a dish that brings warmth and excitement to your meals. Here’s why it’s bound to become a staple at your gatherings:

  • Easy to Prepare: With just a handful of ingredients, you can whip this up in no time, perfect for busy weeknights or festive occasions.
  • Comforting Flavors: The creamy mushroom sauce paired with crunchy fried onions creates a nostalgic dish that feels like a warm hug.
  • Versatile Dish: Whether it’s Thanksgiving or a casual dinner, this casserole fits right in with any menu.
  • Room for Creativity: Add your personal touch with various ingredients and spices to make it uniquely yours.
  • Crowd-Pleaser: Even the pickiest eaters will be coming back for seconds when they taste this deliciousness!

Ingredients Breakdown

Let’s dive into what you need to create this masterpiece:

  • Green Beans: 2 cans (14.5 oz each), drained. Fresh or frozen options also work beautifully for extra crunch.
  • Cream of Mushroom Soup: 1 can (10.5 oz) Campbell’s soup for that rich, creamy base. Feel free to try homemade versions for a gourmet twist.
  • Milk: 3/4 cup. Opt for whole milk for creaminess, or swap in plant-based milk for a dairy-free alternative.
  • Soy Sauce: 1/2 teaspoon for an umami kick that rounds out the flavors.
  • Black Pepper: 1/4 teaspoon to enhance the overall taste.
  • French’s Crispy Fried Onions: 1 1/3 cups for that irresistible crunch on top.

Pro Tips for Perfection

Delicious green bean casserole served in a rustic dish, garnished with golden onion topping.

Here’s how to take your casserole from good to unforgettable:

  • Fresh vs. Canned: Use fresh green beans for a vibrant texture and flavor. If using canned, rinse them to reduce excess sodium.
  • Customize Your Soup: Swap in cream of celery or cheddar cheese soup for a different flavor profile.
  • Extra Crunch: Mix some fried onions into the casserole before baking for an unexpected crunch throughout!
  • Layering Flavors: Consider adding sautéed mushrooms or garlic for depth.
  • Spice It Up: A dash of cayenne or smoked paprika can kick things up a notch!
  • Let It Rest: After baking, allow your casserole to sit for a few minutes to set. This helps in serving clean slices.
  • Serve Warm: This dish is best enjoyed fresh from the oven, but it can also be reheated in the oven, covered to prevent drying out.
  • Garnish Wisely: A sprinkle of fresh parsley or chives adds color and freshness to the final dish.

Avoiding Common Mistakes

Even the best cooks can stumble! Here are some common pitfalls to watch out for:

  • Overcooking Beans: Make sure to avoid mushy beans; if using fresh, blanch them first.
  • Soupy Casserole: Be careful not to add too much milk or soup — it should be creamy, not runny.
  • Under-seasoning: Taste as you go! Adjust salt and pepper to your liking.
  • Skipping the Resting Period: This step helps the casserole set and improves the texture.

Delicious Variations

Feeling adventurous? Here are some variations to try:

  • Cheesy Spin: Add shredded cheddar or mozzarella cheese to the mixture for a gooey twist.
  • Herb Infusion: Incorporate fresh herbs like thyme or rosemary into the soup mix for an aromatic flavor boost.
  • Meaty Delight: Stir in cooked bacon or diced ham for a savory, meaty version.
  • Spicy Spinach: Mix in sautéed spinach or kale for a nutrient boost and vibrant color.

Storage and Make-Ahead Instructions

Want to prep ahead of time? Here’s how:

  • Make-Ahead: Assemble the casserole up to one day in advance. Cover and refrigerate until ready to bake.
  • Storing Leftovers: Store any leftovers in an airtight container in the fridge for up to 3 days.
  • Freezing: To freeze, cool completely, then wrap tightly in plastic wrap and foil. It can last up to 2 months in the freezer. Thaw overnight in the fridge before reheating.

Frequently Asked Questions

Let’s tackle some common queries about this beloved dish:

  • Can I use frozen green beans instead of canned? Absolutely! Just blanch them for a few minutes before mixing.
  • How long does it take to bake the casserole? Bake for about 30 minutes total, or until bubbly and golden.
  • Can I make this vegan? Yes! Use a plant-based cream of mushroom and non-dairy milk.
  • Is it possible to make this gluten-free? Use gluten-free crispy onions and ensure your soup is gluten-free.
  • What can I do if it’s too dry? Add a splash more milk or soup to the mixture before baking.
  • Can I make it ahead of time? Yes, prepare it a day in advance and bake just before serving.
  • What’s the best way to reheat it? Reheat in the oven at 350°F until warmed through, about 15-20 minutes.
  • How can I add more flavor? Experiment with different spices, herbs, or even hot sauce to enhance the flavor profile.

Nutritional Tips and Dietary Adaptations

Want to make this dish healthier? Consider these options:

  • Lower Fat: Use light versions of the cream soup and milk.
  • Whole Grains: Serve it with whole grain bread or over brown rice for a wholesome meal.
  • Vegetable Boost: Increase the vegetable content by adding carrots or bell peppers.

Essential Equipment

Before you get cooking, make sure you have these kitchen essentials:

  • Mixing Bowl: For combining all your ingredients.
  • Casserole Dish: A 1.5-quart dish is perfect for this recipe.
  • Measuring Cups and Spoons: Precision is key in cooking!
  • Spoon or Spatula: For mixing and serving.

Serving Suggestions

Pair your Green Bean Casserole with these delicious options:

  • Roast Chicken: The perfect complement to this creamy dish.
  • Grilled Steak: The rich flavors of steak balance beautifully with the casserole.
  • Stuffing: A classic side that always works well with green bean casserole.
  • Mashed Potatoes: Serve with a generous helping of creamy mashed potatoes.

With every bite of this Green Bean Casserole, you’re not just enjoying a meal; you’re sharing a story of flavor, warmth, and the joy of cooking boldly. So grab your skillet, embrace the heat, and get ready to elevate your side dish game like never before!

Drool-Worthy Classic Campbells Green Bean Casserole Perfection

Prep Time 10 minutes
Cook Time 30 minutes
Total Time 40 minutes
Servings 6 servings
Calories 250
A delicious and easy green bean casserole perfect for holiday gatherings or weeknight dinners.

Ingredients

Green Beans

  • 2 cans green beans, drained
  • 1 can campbell's cream of mushroom soup
  • 3/4 cup milk
  • 1/2 teaspoon soy sauce
  • 1/4 teaspoon black pepper
  • 1 1/3 cups french's crispy fried onions

Instructions 

  • Preheat oven to 350°F (175°C).
  • Mix green beans, mushroom soup, milk, soy sauce, and pepper.
  • Pour into a greased 1.5-quart casserole dish and bake for 25 minutes.
  • Stir in 2/3 cup fried onions, top with remaining onions, and bake 5-10 minutes.
  • Let cool briefly before serving. Enjoy!

Notes

For extra crunch, add more fried onions on top before baking.
Calories: 250kcal
Cost: $15
Course: Side Dish
Cuisine: American
Keyword: Green Beans

Nutrition

Calories: 250kcal | Carbohydrates: 35g | Protein: 6g | Fat: 10g | Sodium: 600mg

Loved this recipe? Save it to your favorite Pinterest board so you can easily find it later! It’s the perfect way to keep all your sweet ideas in one place. ✨

Warm green bean casserole with a rich sauce, highlighted by soft light and blurred background.

Ignite Your Kitchen: A Zesty Journey with Lemon Garlic Shrimp and Asparagus

Ready to turn up the heat and savor a dish that dances on your palate? This Lemon Garlic Shrimp and Asparagus recipe is your ticket to a culinary adventure that’s quick, easy, and exploding with flavor. In just 20 minutes, you’ll create a vibrant meal that not only satisfies your hunger but also elevates your cooking game. Let’s dive into this recipe that celebrates the perfect marriage of succulent shrimp and crisp asparagus, all tied together with the zesty brightness of lemon.

Why You’ll Love This Recipe

This recipe is not just another dish; it’s an experience that will transform your weeknight dinners. Here’s why you’ll fall in love with it:

  • Quick and Easy: With only 20 minutes from start to finish, this dish is perfect for busy nights when you crave something delicious without the fuss.
  • Flavor Explosion: The bold combination of garlic, lemon, and a hint of red pepper flakes creates a flavor profile that’s unforgettable.
  • Health-Conscious: High in protein and low in carbs, this dish is a fantastic choice for anyone pursuing a healthy lifestyle.
  • Versatile Ingredients: Shrimp and asparagus are not only delicious but also adaptable. You can easily swap in your favorite seasonal veggies or protein.
  • Impressive Presentation: The vibrant colors of this dish make it visually stunning, perfect for impressing guests at your next gathering.

Ingredient Breakdown

Delicious Lemon Garlic Shrimp and Asparagus with a soft-focus background.

Let’s see what you need to make this mouthwatering Lemon Garlic Shrimp and Asparagus dish.

  • Shrimp: 1 pound large shrimp, peeled and deveined. Fresh is best, but you can also use frozen shrimp—just ensure they are thawed before cooking.
  • Asparagus: 1 bunch, trimmed and cut into 2-inch pieces. If you can’t find asparagus, broccoli or green beans work well too!
  • Garlic: 4 cloves, minced. The more garlic, the merrier! Feel free to adjust according to your love for this aromatic.
  • Olive Oil: 2 tablespoons. This healthy fat adds richness and helps in cooking.
  • Lemon: 1, juiced and zested. The star of the show—don’t skimp on the zest for that burst of flavor!
  • Salt and Pepper: to taste. Essential for bringing out all the flavors.
  • Red Pepper Flakes: 1/4 teaspoon (optional). If you like a little kick, this is your go-to spice!
  • Chopped Parsley: for garnish. A fresh touch that brightens up your dish.

Pro Tips for Success

Want to elevate your cooking game? Here are some expert insights to ensure your dish is a hit:

  • Pat Your Shrimp Dry: Before cooking, pat your shrimp dry with paper towels to achieve a beautiful sear.
  • Don’t Overcrowd the Pan: Cook shrimp in batches if your skillet is small; this prevents steaming and allows for better browning.
  • Adjust the Heat: Keep an eye on the heat level; too high can burn the garlic, while too low can lead to soggy shrimp.
  • Fresh Ingredients: Always opt for fresh herbs and vegetables for the most vibrant flavors.
  • Experiment with Citrus: Try adding lime or orange juice for a unique twist on the classic lemon flavor.
  • Marinate for More Flavor: For an even bolder taste, marinate the shrimp in garlic and lemon juice for 15-30 minutes before cooking.
  • Finish with Butter: For an extra rich sauce, stir in a tablespoon of cold butter just before serving.
  • Garnish Generously: Don’t skimp on the parsley; it adds a beautiful pop of color and freshness to the dish.

Avoiding Common Mistakes

Even seasoned cooks can run into pitfalls. Here’s how to avoid them:

  • Overcooking the Shrimp: Shrimp cooks quickly—remove them from the heat as soon as they turn pink and opaque.
  • Burning Garlic: Sauté garlic until fragrant, about 30 seconds. Timing is everything here!
  • Too Much Acid: Balance is key; add lemon gradually, taste-testing as you go to avoid overpowering the dish.
  • Neglecting Texture: Ensure your asparagus is tender-crisp; overcooked asparagus can become mushy and lose its vibrant color.

Delicious Variations

Want to switch things up? Here are some tantalizing variations to inspire your cooking:

  • Asian Twist: Add soy sauce and ginger for a flavorful Asian-inspired version.
  • Herb Medley: Swap parsley for fresh basil or dill for a different flavor profile.
  • Spicy Cajun: Toss in Cajun seasoning instead of red pepper flakes for a Southern kick.
  • Pasta Delight: Serve the shrimp and asparagus over cooked pasta for a hearty meal.

Storage and Make-Ahead Instructions

Planning ahead? Here’s how to store and reheat your dish:

  • Refrigeration: Store leftovers in an airtight container in the fridge for up to 2 days.
  • Freezing: While best enjoyed fresh, you can freeze the shrimp separately for up to 3 months. Just thaw in the fridge before reheating.
  • Reheating: Gently reheat in a skillet over medium heat, adding a splash of olive oil to keep things moist.

FAQ: Your Burning Questions Answered

Got questions? We’ve got answers! Here are the most frequently asked questions about this dish:

  • Can I use frozen shrimp? Yes! Just ensure they are fully thawed and patted dry before cooking.
  • Is this recipe gluten-free? Absolutely! All ingredients are gluten-free, making it a great option for those with dietary restrictions.
  • What can I substitute for asparagus? Broccoli, green beans, or bell peppers are fantastic alternatives.
  • Can I add other seafood? Definitely! Scallops or calamari would also work beautifully in this dish.
  • How can I make this dish spicier? Add more red pepper flakes or incorporate fresh chopped chilies.
  • Can I prepare this dish in advance? It’s best served fresh, but you can prepare the ingredients ahead of time for quick cooking.
  • What can I serve with this dish? It pairs wonderfully with rice, quinoa, or a fresh green salad.
  • How do I know when the shrimp are done? They should be pink and opaque when fully cooked—about 2-3 minutes on each side.

Nutritional Insights

This dish is not only a feast for the senses but also packed with nutritional benefits:

  • High in Protein: This dish provides a substantial amount of protein, supporting muscle health and keeping you full.
  • Low in Carbs: Perfect for those on a low-carb or ketogenic diet, making it a smart choice for healthy eating.
  • Rich in Vitamins: Asparagus is a great source of vitamins A, C, E, and K, essential for overall health.
  • Good Fats: The olive oil provides healthy fats that are beneficial for heart health.

Essential Equipment

To create this dish, you’ll need some basic kitchen tools:

  • Large Skillet: A non-stick skillet works best for this recipe to prevent sticking and ensure even cooking.
  • Spatula: For flipping and stirring your shrimp and veggies.
  • Measuring Cups and Spoons: For accurate measurement of ingredients.
  • Knife and Cutting Board: Essential for prepping your asparagus and garlic.

Serving Suggestions to Impress

Ready to serve up your creation? Here are some ideas to make it even more special:

  • Plate with Flair: Arrange the shrimp and asparagus artistically on the plate, drizzling with any remaining pan sauce.
  • Add a Side Salad: A fresh green salad with a light vinaigrette complements the dish beautifully.
  • Pair with Wine: A crisp white wine, like Sauvignon Blanc, enhances the flavors of the shrimp.
  • Garnish Generously: Finish with extra lemon wedges and parsley for a pop of color.

Time to Embark on Your Culinary Adventure!

There you have it! This Lemon Garlic Shrimp and Asparagus recipe is your invitation to embrace bold flavors and ignite your kitchen with the thrill of cooking. Don’t shy away from experimentation; with the right spices and a dash of creativity, every meal can be a masterpiece. So grab your skillet, gather your ingredients, and let’s get cooking! Remember, food is not just fuel; it’s an adventure waiting to happen. Enjoy every bite!

Lemon Garlic Shrimp and Asparagus (20-Minutes)

Prep Time 5 minutes
Cook Time 15 minutes
Total Time 20 minutes
Servings 4 servings
Calories 250
A quick and flavorful seafood dish featuring tender shrimp and crisp asparagus, perfect for a healthy weeknight dinner.

Ingredients

Protein

  • 1 pound large shrimp, peeled and deveined

Vegetables

  • 1 bunch asparagus, trimmed and cut into 2-inch pieces

Aromatics

  • 4 cloves garlic, minced

Oils & Fats

  • 2 tablespoons olive oil

Citrus

  • 1 lemon lemon, juiced and zested

Seasonings

  • salt and pepper to taste salt and pepper
  • 1/4 teaspoon red pepper flakes (optional)

Garnish

  • chopped parsley for garnish (optional) chopped parsley (for garnish)

Instructions 

  • Heat olive oil in a large skillet over medium-high heat.
  • Add minced garlic and sauté for 30 seconds.
  • Add shrimp, season with salt, pepper, and red pepper flakes; cook 2-3 minutes until pink.
  • Add asparagus and cook 3-4 minutes until tender-crisp.
  • Stir in lemon juice and zest; cook 1 minute. Garnish with parsley if desired. Serve immediately.

Notes

For extra flavor, add a pinch of red pepper flakes or fresh herbs.
Calories: 250kcal
Cost: $15
Course: Main Course
Cuisine: American
Keyword: Seafood

Nutrition

Calories: 250kcal | Carbohydrates: 12g | Protein: 30g | Fat: 10g | Sodium: 600mg

Loved this recipe? Save it to your favorite Pinterest board so you can easily find it later! It’s the perfect way to keep all your sweet ideas in one place. ✨

Eye-level view of a vibrant Lemon Garlic Shrimp dish with asparagus spears.

Gather around, my fellow culinary adventurers! If you’re ready to turn your Thanksgiving feast into a flavor fiesta, you’ve arrived at the right recipe. This Jiffy Cornbread Stuffing combines warmth, spice, and a sprinkle of adventure—perfect for celebrating the season with your loved ones. With a base of buttery cornbread and a medley of aromatic vegetables, this dish is not just a side; it’s a culinary experience that will leave your taste buds dancing.

Why You’ll Love This Recipe

  • Quick and Easy: Using Jiffy cornbread mix cuts down prep time significantly, making it a breeze to create this delicious stuffing in under an hour!
  • Flavor Explosion: A blend of sage, thyme, and optional sausage adds an irresistible depth of flavor that transforms any meal into a festive occasion.
  • Customizable: Whether you want to keep it classic or add a twist with fruits or nuts, this recipe welcomes your creativity.
  • Perfectly Textured: The golden, crispy top combined with moist stuffing underneath creates a delightful contrast that everyone will love.
  • Make-Ahead Friendly: This stuffing can be assembled a day in advance, allowing you to enjoy more time with family and less time in the kitchen!

Ingredient Breakdown

Let’s dive into the heart of this recipe! Here’s what you’ll need to create this unforgettable Jiffy Cornbread Stuffing.

  • 1 box Jiffy cornbread mix: This is your base. If you prefer homemade cornbread, feel free to substitute it. Just ensure it’s crumbled well.
  • 1 cup chicken broth: Adds moisture and flavor. You can substitute vegetable broth for a vegetarian option.
  • 1 cup celery, chopped: For crunch and freshness. Green onions can be used for a milder onion flavor.
  • 1 cup onion, chopped: Adds sweetness and depth. You can also use shallots for a more gourmet touch.
  • 1/2 cup butter: Use unsalted butter for control over seasoning.
  • 1 tsp sage: A classic stuffing herb; feel free to add more if you like!
  • 1 tsp thyme: Enhances the earthy flavors of the stuffing.
  • 1/2 tsp black pepper: For a little kick.
  • 1/2 tsp salt: Enhances all the flavors.
  • 2 eggs, beaten: Helps bind everything together.
  • 1 cup cooked sausage (optional): For those who want to add heartiness and richness.
  • 1/2 cup chopped pecans (optional): For a delightful crunch and nutty flavor.

How to Make This Flavorful Stuffing

Delicious Jiffy Cornbread Stuffing displayed in a rustic dish, showcasing its rich textures.

Now that you have all your ingredients, let’s get cooking! Follow these simple steps to create your Jiffy Cornbread Stuffing:

  1. Preheat the oven to 350°F (175°C).
  2. Prepare the Jiffy Cornbread mix according to package instructions and bake in a greased pan until golden brown. Let it cool, then crumble into large pieces.
  3. In a skillet, melt the butter over medium heat. Add the chopped celery and onion, cooking until softened, about 5-7 minutes.
  4. In a large bowl, crumble the baked cornbread. Add the sautéed vegetables, chicken broth, sage, thyme, black pepper, salt, beaten eggs, and optional cooked sausage and pecans. Mix well until combined.
  5. Transfer the mixture to a greased baking dish and spread evenly.
  6. Bake for 30-35 minutes or until the top is golden and crispy.
  7. Let cool for a few minutes before serving. This will help the flavors meld together beautifully!

Pro Tips for the Ultimate Stuffing

  • Use day-old cornbread: This helps prevent the stuffing from becoming too soggy. If you don’t have day-old, let fresh cornbread sit out for a few hours.
  • Balance your flavors: Taste the mixture before baking and adjust seasoning as needed.
  • Experiment with textures: Consider adding chopped apples or dried cranberries for a sweet twist.
  • Don’t overcrowd the pan: This allows for even baking and ensures that the top gets nice and crispy.
  • Let it rest: Allowing the stuffing to rest for a few minutes after baking will help it set up beautifully.
  • Cover with foil: If the top browns too quickly, cover it with foil to prevent burning while it finishes baking.
  • Warm up your broth: Using warm broth helps the stuffing absorb the liquid better and enhances the overall flavor.
  • Don’t skip the herbs: Fresh herbs can elevate the flavor profile dramatically. If you have fresh sage or thyme, use them!

Common Mistakes and Troubleshooting

Even the best chefs can have mishaps. Here are some common pitfalls to avoid:

  • Too Dry: If your stuffing turns out dry, try adding a splash more broth before baking or cover it with foil during the first half of the baking time.
  • Too Soggy: If it’s too wet, reduce the amount of broth or increase the baking time to allow for evaporation.
  • Not Enough Flavor: Make sure you season adequately; taste before baking! Add more herbs or spices if needed.
  • Uneven Baking: If the stuffing isn’t browning evenly, stir it halfway through baking to ensure even cooking.

Variations to Spice Things Up

Ready to take your cornbread stuffing to the next level? Here are some fun variations to try:

  • Spicy Sausage Stuffing: Add spicy sausage and diced jalapeños for a kick that’ll awaken your taste buds.
  • Sweet and Savory: Mix in dried cranberries or chopped apples for a touch of sweetness and a beautiful contrast to the savory flavors.
  • Herbed Mushroom Stuffing: Sauté mushrooms with the celery and onion to add an earthy depth of flavor.
  • Nutty Cranberry Cornbread Dressing: Substitute pecans with walnuts or add a handful of toasted almonds for a different crunch.

Storage and Make-Ahead Instructions

This stuffing can be prepared ahead of time! Here’s how to store and make it:

  • Make-Ahead: Assemble your stuffing a day in advance and cover it tightly in the refrigerator. Just bake it on the day of your gathering.
  • Storage: Leftover stuffing can be stored in an airtight container in the fridge for up to 3 days.
  • Freezing: You can freeze the baked stuffing! Just let it cool completely, then wrap it tightly and freeze for up to 3 months. Thaw in the fridge before reheating.

Frequently Asked Questions

Got questions? I’ve got answers! Here are some of the most common inquiries regarding Jiffy Cornbread Stuffing:

  • Can I use homemade cornbread? Yes! Just make sure to crumble it into chunks similar in size to Jiffy cornbread.
  • How do I make it vegetarian? Simply use vegetable broth instead of chicken broth and omit the sausage.
  • Can I bake this stuffing in a different pan? Absolutely! Just adjust the baking time depending on the size and type of pan you use.
  • Can I add more vegetables? Of course! Feel free to add bell peppers, zucchini, or even spinach for added nutrition.
  • What if I don’t have sage? Thyme or poultry seasoning can be substituted for sage if you’re in a pinch.
  • How do I reheat leftovers? Reheat in the oven at 350°F (175°C) until heated through, about 20-30 minutes.
  • Can I prepare this stuffing without eggs? Yes! You can use flaxseed meal mixed with water as a binding agent.
  • How do I know when it’s done baking? The top should be golden brown and the edges should pull away from the pan slightly.

Nutritional Tips and Dietary Adaptations

This Jiffy Cornbread Stuffing can fit into various dietary needs with a few modifications:

  • Low-Carb: Use a low-carb cornbread mix or substitute with a keto-friendly option.
  • Gluten-Free: Ensure you use a gluten-free cornbread mix.
  • Lower Fat: Substitute the butter with olive oil or unsweetened applesauce for a lighter version.
  • High-Protein: Add cooked quinoa or lentils to boost protein content.

Equipment Recommendations

Before you start, make sure you have these essential tools:

  • 9×13 inch baking dish: Perfect for baking your stuffing evenly.
  • Large mixing bowl: To combine all your ingredients effortlessly.
  • Skillet: For sautéing vegetables to bring out their flavors.
  • Measuring cups and spoons: Accuracy is key!
  • Spatula: For mixing and transferring ingredients with ease.

Serving Suggestions

Pair this stuffing with a variety of dishes to create a complete meal:

  • Roast Turkey: The classic pairing that never goes out of style.
  • Honey Glazed Ham: The sweetness of ham complements the savory stuffing beautifully.
  • Grilled Vegetables: Add a colorful array of grilled veggies for a fresh contrast.
  • Green Bean Casserole: A holiday staple that paired with stuffing makes for hearty comfort food.

So there you have it! My ultimate guide to creating a vibrant and flavorful Jiffy Cornbread Stuffing that will ignite the spirit of Thanksgiving on your table. Remember, cooking is an adventure—embrace the process, enjoy the flavors, and don’t be afraid to add your own twist. Happy cooking, my friends!

Thanksgiving Side Dish 2024 ~ Jiffy Cornbread Stuffing

Prep Time 15 minutes
Cook Time 35 minutes
Total Time 50 minutes
Servings 8 servings
Calories 250
A flavorful and easy-to-make stuffing perfect for Thanksgiving, combining cornbread, vegetables, herbs, and optional sausage and pecans.

Ingredients

Dried Mix

  • 1 box jiffy cornbread mix
  • 1 cup chicken broth
  • 1 cup celery, chopped
  • 1 cup onion, chopped
  • 1/2 cup butter
  • 1 tsp sage
  • 1 tsp thyme
  • 1/2 tsp black pepper
  • 1/2 tsp salt
  • 2 eggs eggs, beaten
  • 1 cup cooked sausage (optional) (optional)
  • 1/2 cup chopped pecans (optional) (optional)

Instructions 

  • Preheat oven to 350°F (175°C). Prepare and bake cornbread according to package instructions.
  • Melt butter in a skillet; sauté celery and onion until softened.
  • Crumble baked cornbread into a large bowl. Mix in sautéed vegetables, chicken broth, herbs, eggs, and optional sausage and pecans.
  • Transfer mixture to a greased baking dish and bake for 30-35 minutes until golden.
  • Let cool briefly before serving.

Notes

For extra flavor, add a dash of additional herbs or spices as desired.
Calories: 250kcal
Cost: $15
Course: Side Dish
Cuisine: American
Keyword: Cornbread, Thanksgiving

Nutrition

Calories: 250kcal | Carbohydrates: 35g | Protein: 8g | Fat: 12g | Sodium: 600mg

Loved this recipe? Save it to your favorite Pinterest board so you can easily find it later! It’s the perfect way to keep all your sweet ideas in one place. ✨

Warm Jiffy Cornbread Stuffing featuring a mix of cornbread, vegetables, and herbs in natural light.

Ignite Your Culinary Adventure with Sizzling Serbian Chicken Rice

Welcome to the vibrant world of Serbian Chicken Rice, a dish that combines hearty flavors and a touch of spice in a delightful one-pot experience. Imagine the aroma of sizzling chicken, the warmth of spices, and the comfort of rice all coming together in a single dish that not only nourishes but also excites your taste buds. This recipe is a celebration of spice and comfort, inviting you to embrace the thrill of cooking with heat. Join me on this culinary journey that balances health with unforgettable taste!

Why You’ll Love This Recipe

  • One-Pot Wonder: Enjoy the simplicity of a meal that cooks in one pot, making cleanup a breeze while maximizing flavor.
  • Rich Balkan Flavors: Experience the unique blend of spices such as paprika and oregano, infusing every bite with authentic Serbian essence.
  • Quick & Easy: Perfect for busy weeknights, this dish can be ready in under an hour, keeping your family satisfied without the hassle.
  • Healthy & Nourishing: Packed with lean chicken, fresh vegetables, and wholesome rice, it’s a nutrient-dense meal that fuels your body.
  • Customizable: With various ingredient options and easy swaps, you can tailor this recipe to your personal taste preferences or dietary needs.

Ingredients You’ll Need

Detailed shot of a bowl of Serbian chicken rice topped with fresh parsley and vibrant veggies.

Gather these ingredients for a delicious batch of Serbian Chicken Rice:

  • 500g chicken breast, diced: The star of the dish, providing lean protein.
  • 200g rice (long-grain or basmati): The perfect base that absorbs all the flavorful juices.
  • 1 onion, diced: Adds sweetness and depth of flavor.
  • 2 cloves garlic, minced: For that aromatic kick that elevates the dish.
  • 1 bell pepper, diced: A pop of color and sweetness.
  • 2 carrots, sliced: Adds natural sweetness and a vibrant crunch.
  • 400ml chicken broth: Essential for moistening and enriching the rice.
  • 1 can diced tomatoes (400g): Adds acidity and moisture, enhancing the overall flavor.
  • 2 tbsp olive oil: For sautéing and flavor.
  • 1 tsp paprika: The key spice that gives the dish its characteristic warmth.
  • 1 tsp oregano: Adds a fragrant herbal note.
  • Salt and pepper to taste: Essential for seasoning.
  • Fresh parsley for garnish: A fresh finish that brightens the dish.

Pro Tips for Perfecting Your Serbian Chicken Rice

  • Choose the Right Rice: Long-grain or basmati rice works best as they remain fluffy and separate when cooked.
  • Marinate for Extra Flavor: Consider marinating the chicken in olive oil, garlic, and spices for at least 30 minutes for deeper flavor.
  • Don’t Rush the Searing: Ensure the chicken is golden brown before moving on to the next steps; this adds a rich flavor!
  • Cover to Retain Moisture: Keeping the pot covered while simmering helps trap steam and ensures the rice cooks evenly.
  • Adjust the Spice Level: If you like it hot, add a pinch of cayenne or some chili flakes to the mix!
  • Let It Rest: After cooking, let the dish sit for a few minutes before serving. This allows flavors to meld together.
  • Garnish Generously: Fresh parsley not only adds color but a burst of fresh flavor.
  • Experiment with Vegetables: Feel free to mix in or substitute with your favorite veggies like peas or green beans!

Common Mistakes and Troubleshooting

  • Overcooking the Rice: Keep an eye on the cooking time and avoid lifting the lid too often.
  • Not Seasoning Enough: Don’t shy away from salt and pepper; they enhance the dish’s overall flavor.
  • Skipping the Sear: Searing the chicken is crucial for flavor development; don’t skip this step!

Delicious Variations

  • Vegetarian Version: Swap chicken for chickpeas or tofu and use vegetable broth.
  • Spicy Twist: Add diced jalapeños or a splash of hot sauce for a spicy kick.
  • Curry Flavor: Incorporate curry powder instead of paprika for a different flavor profile.
  • Herb-Infused: Mix in fresh herbs like thyme or rosemary for added depth.

Make Ahead and Storage Instructions

This dish is perfect for meal prep! Here’s how to store it:

  • Make Ahead: You can prepare the rice and chicken mixture a day in advance and store it in the fridge. Just reheat before serving.
  • Storage: Keep leftovers in an airtight container in the refrigerator for up to 3 days.
  • Freezing: This dish freezes well—store it in freezer-safe containers for up to 3 months. Thaw in the refrigerator before reheating.

FAQs

  • Can I use brown rice instead of white rice? Yes, but brown rice takes longer to cook, so adjust the liquid and cooking time accordingly.
  • What can I substitute for chicken broth? Vegetable broth or water will work, but chicken broth adds more flavor.
  • Can I add more vegetables? Absolutely! Feel free to toss in your favorite veggies for extra nutrition.
  • Is this recipe gluten-free? Yes, as long as you use gluten-free chicken broth.
  • How spicy is this dish? The spice level can be adjusted by adding more or less paprika and seasonings to your taste.
  • Can I make this in a slow cooker? Yes, you can adapt this recipe for a slow cooker—just brown the chicken first and then cook on low for 4-6 hours.
  • What is the best way to reheat leftovers? Reheat in a saucepan with a splash of water or broth to help restore moisture.
  • How do I know when the rice is done? The rice should be tender and have absorbed most of the liquid; you can fluff it with a fork to check.

Nutritional Tips and Dietary Adaptations

This Sizzling Serbian Chicken Rice is not only delicious but also offers a healthy meal option:

  • Low-Calorie: With lean chicken and plenty of vegetables, it’s a great option for those watching their calorie intake.
  • High Protein: Chicken provides a great source of protein, essential for muscle repair and growth.
  • Rich in Fiber: The inclusion of vegetables and brown rice (if used) adds fiber, promoting digestive health.

Essential Equipment

To make this dish, you’ll need:

  • Large Pot or Dutch Oven: For even cooking and retention of heat.
  • Sharp Knife: For easy chopping of ingredients.
  • Wooden Spoon: For stirring and preventing scratching.

Serving Suggestions

Serve this dish with a side of:

  • Fresh Salad: A crisp green salad with a tangy vinaigrette pairs beautifully.
  • Crusty Bread: Perfect for soaking up the delicious juices.
  • Yogurt or Sour Cream: A dollop of yogurt or sour cream adds a creamy contrast to the spices.

There you have it! A comprehensive guide to making Sizzling Serbian Chicken Rice that will have you embracing the art of cooking with joy and adventure. Remember, cooking is about experimenting and having fun, so don’t be afraid to make this dish your own. Happy cooking!

Serbisches Reisfleisch mit Hähnchen | One Pot Reis | gesund kochen | kalorienarme Rezepte

Prep Time 10 minutes
Cook Time 20 minutes
Total Time 30 minutes
Servings 4 portionen
Calories 550
Ein leckeres und gesundes Gericht aus Hähnchen, Reis und frischem Gemüse, perfekt für eine schnelle Mahlzeit.

Ingredients

Protein

  • 500 g Hähnchenbrustfilet, gewürfelt

Carbohydrate

  • 200 g Reis (z.b. langkornreis oder basmatireis)

Vegetables

  • 1 stück Zwiebel, gewürfelt
  • 2 zehen Knoblauchzehen, gehackt
  • 1 stück Paprika, gewürfelt
  • 2 stück Karotten, in Scheiben

Liquids

  • 400 ml Hühnerbrühe
  • 1 dose Gehackte Tomaten (400g)

Fette & Öle

  • 2 EL Olivenöl

Gewürze & Kräuter

  • 1 TL Paprikapulver
  • 1 TL Oregano

Seasonings

  • nach Geschmack Salz und Pfeffer

Garnish

  • zum Garnieren Frische Petersilie

Instructions 

  • Zwiebel und Knoblauch in Olivenöl glasig anbraten.
  • Hähnchenwürfel hinzufügen und goldbraun anbraten.
  • Paprika und Karotten dazugeben und 5 Minuten mitbraten.
  • Reis einrühren, dann Brühe und Tomaten hinzufügen, würzen und aufkochen.
  • Hitze reduzieren, abdecken und 20 Minuten köcheln lassen. Mit Petersilie garnieren.

Notes

Für eine kalorienärmere Variante, verwenden Sie weniger Öl und mageres Hähnchen.
Calories: 550kcal
Cost: $12
Course: Hauptgericht
Cuisine: Serbisch
Keyword: gesund, Hähnchen, Reis

Nutrition

Calories: 550kcal | Carbohydrates: 70g | Protein: 45g | Fat: 12g | Sodium: 900mg

Loved this recipe? Save it to your favorite Pinterest board so you can easily find it later! It’s the perfect way to keep all your sweet ideas in one place. ✨

Eye-level view of a plate of Serbian chicken rice, showcasing the texture and ingredients.

Welcome to the Creamy World of Crockpot Mac N Cheese

When it comes to comfort food, few dishes are as universally beloved as mac n cheese. This creamy crockpot mac n cheese recipe takes your taste buds on a journey, infusing rich flavors and velvety textures that feel like a warm hug on a chilly evening. Imagine diving into a bowl of smooth, cheesy goodness, where every bite is an adventure! Let’s explore how to make this culinary classic in your trusty slow cooker, creating a dish that’s both easy and unforgettable.

Why You’ll Love This Recipe

  • Set it and forget it: With this crockpot mac n cheese, you can simply toss in your ingredients and let the slow cooker do all the work. Perfect for busy days!
  • Ultimate creaminess: The combination of sharp cheddar, mozzarella, and cream cheese creates a rich, gooey texture that’s simply irresistible.
  • Customizable flavors: Feel free to experiment with different cheeses and spices to make this dish uniquely yours. The possibilities are endless!
  • Family-friendly: This dish is a guaranteed crowd-pleaser, making it ideal for family dinners, potlucks, and gatherings with friends.
  • Leftover bliss: Any leftovers can be easily stored and reheated, making for quick meals throughout the week.

Ingredients Breakdown

Bowl of macaroni and cheese, featuring a creamy texture and cheese pull.

To create this scrumptious mac n cheese, gather the following ingredients:

  • 16 oz elbow macaroni: The classic choice for mac n cheese, it holds the cheese sauce beautifully.
  • 4 cups sharp cheddar cheese, shredded: Offers a robust flavor that pairs perfectly with the creaminess.
  • 2 cups mozzarella cheese, shredded: Adds a stretchy texture that makes each bite delightful.
  • 1 cup cream cheese, cubed: For that extra creaminess that makes this dish unforgettable.
  • 4 cups milk: Use whole milk for a rich flavor, or substitute with low-fat for a lighter version.
  • 1/2 cup unsalted butter, melted: Enhances the flavor and contributes to the creamy texture.
  • 1 teaspoon garlic powder: Adds depth to the flavor profile.
  • 1 teaspoon onion powder: Complements the garlic for a savory kick.
  • 1 teaspoon mustard powder: A secret ingredient that enhances the cheese flavor.
  • Salt and pepper to taste: Essential for balancing the flavors.

How to Make This Crockpot Mac N Cheese

Follow these simple steps to create your own bowl of comfort:

  1. In a large crockpot, combine the uncooked elbow macaroni, sharp cheddar cheese, mozzarella cheese, and cubed cream cheese.
  2. In a separate bowl, whisk together the milk, melted butter, garlic powder, onion powder, mustard powder, salt, and pepper until well combined.
  3. Pour the milk mixture over the macaroni and cheese in the crockpot, stirring gently to combine.
  4. Cover and cook on low heat for 2 to 3 hours, stirring occasionally to ensure even cooking.
  5. Once the pasta is tender and the cheese is melted and creamy, give it a final stir and serve hot.

Pro Tips for Perfect Crockpot Mac N Cheese

  • Stir occasionally: This helps to prevent sticking and ensures an even melt of the cheese.
  • Don’t overcook: Keep an eye on the pasta; it should be tender but not mushy.
  • Use freshly shredded cheese: Pre-shredded cheese often contains anti-caking agents that can affect creaminess.
  • Add a splash of hot sauce: For those who like a kick, a few dashes of hot sauce can elevate the dish.
  • Experiment with toppings: Try adding breadcrumbs, bacon bits, or crispy onions before serving for an extra layer of flavor.
  • Boost your nutrition: Add steamed vegetables like broccoli or spinach for a healthier twist.
  • Let it rest: After cooking, let the dish sit for 10-15 minutes; this allows the flavors to meld.
  • Double the recipe: This dish freezes well, so consider making a larger batch for quick meals later.

Common Mistakes and Troubleshooting

Even the best chefs can encounter hiccups. Here are some common mistakes and how to avoid them:

  • Pasta sticking together: Ensure you stir the mixture occasionally while cooking to keep the pasta coated in cheese sauce.
  • Too thick or too runny: If the mac n cheese is too thick, add a little extra milk. If it’s too runny, cook uncovered for the last 30 minutes to thicken it up.
  • Cheese clumping: Always use freshly shredded cheese for a smoother melt.

Delicious Variations of Mac N Cheese

Why stop at classic when you can spice things up? Here are some tasty variations to try:

  • Buffalo Chicken Mac N Cheese: Stir in shredded rotisserie chicken and buffalo sauce for a spicy twist.
  • Tex-Mex Mac N Cheese: Add diced tomatoes, green chiles, and a sprinkle of taco seasoning for a zesty flavor.
  • Truffle Mac N Cheese: Drizzle with truffle oil before serving for a touch of luxury.
  • Vegetarian Delight: Incorporate sautéed mushrooms, spinach, or roasted bell peppers for a hearty vegetarian option.

Storage and Make-Ahead Instructions

This crockpot mac n cheese is perfect for meal prep! Here’s how to store and reheat:

  • Refrigeration: Store leftovers in an airtight container in the refrigerator for up to 5 days.
  • Freezing: You can freeze the mac n cheese for up to 3 months. Just thaw in the refrigerator overnight before reheating.
  • Reheating: Gently reheat in the microwave or on the stovetop, adding a splash of milk to restore creaminess.

Frequently Asked Questions

Got questions? We’ve got answers! Here are some common queries about crockpot mac n cheese:

  • Can I use gluten-free pasta? Yes! Just substitute regular macaroni with gluten-free pasta.
  • What’s the best cheese for mac n cheese? A blend of sharp cheddar and mozzarella works wonderfully, but feel free to experiment!
  • Can I make this ahead of time? Absolutely! Prepare the ingredients and store them in the refrigerator until you’re ready to cook.
  • How can I make this dish spicy? Add hot sauce or diced jalapeños before cooking for a kick of heat!
  • Is it possible to use different types of milk? Yes! You can use any milk you prefer, though whole milk gives the creamiest results.
  • Can I add meat to this recipe? Definitely! Cooked bacon, ham, or shredded chicken are great additions.
  • Why is my mac n cheese grainy? This can happen if the cheese gets overheated. Always melt cheese on low heat and stir gently.
  • How do I fix clumpy mac n cheese? If it comes out clumpy, you can stir in a bit of milk while reheating to smooth it out.

Nutritional Tips and Dietary Adaptations

Want to make this dish fit your dietary needs? Here are some tips:

  • Low-fat version: Substitute low-fat cheese and milk to reduce calories.
  • Dairy-free alternative: Use dairy-free cheese and almond milk for a vegan option.
  • Protein boost: Add cooked lentils or beans to increase protein content without meat.

Essential Equipment Recommendations

To make the most out of your crockpot mac n cheese, you’ll need:

  • Crockpot: A reliable slow cooker is essential for even cooking.
  • Mixing bowls: For combining your wet ingredients and cheese.
  • Measuring cups and spoons: Precision is key for the best flavor.

Serving Suggestions

Ready to serve? Here are some ideas to enhance your mac n cheese experience:

  • Garnish with herbs: Fresh parsley or chives add a pop of color and freshness.
  • Serve with a side salad: A crisp, green salad pairs perfectly with creamy mac n cheese.
  • Pair with grilled meats: This dish complements grilled chicken or steak beautifully.

Now that you have the ultimate guide to making creamy crockpot mac n cheese, it’s time to roll up your sleeves and get cooking! Embrace the adventure, and remember: cooking is not just about the end result, but the joy and memories created along the way. Dig in, and let your taste buds dance!

The Creamiest Crockpot Mac N Cheese Recipe You'll Ever Make

Prep Time 10 minutes
Cook Time 2 hours 30 minutes
Total Time 2 hours 40 minutes
Servings 6 servings
Calories 850
This creamy crockpot mac and cheese is the ultimate comfort food, easy to prepare and irresistibly cheesy.

Ingredients

Pasta

  • 16 oz elbow macaroni

Cheese

  • 4 cups sharp cheddar cheese, shredded
  • 2 cups mozzarella cheese, shredded
  • 1 cup cream cheese, cubed

Liquids and fats

  • 4 cups milk
  • 1/2 cup unsalted butter, melted

Spices and seasonings

  • 1 teaspoon garlic powder
  • 1 teaspoon onion powder
  • 1 teaspoon mustard powder
  • to taste salt and pepper

Instructions 

  • Combine uncooked macaroni, shredded cheeses, and cream cheese in the crockpot.
  • Whisk together milk, melted butter, garlic powder, onion powder, mustard powder, salt, and pepper.
  • Pour the milk mixture over the pasta and cheese, stirring to combine.
  • Cover and cook on low for 2-3 hours, stirring occasionally until creamy and cooked through.
  • Stir well and serve hot.

Notes

Stir occasionally during cooking for an even creamy texture.
Calories: 850kcal
Cost: $15
Course: Main Course
Cuisine: American
Keyword: Mac and Cheese

Nutrition

Calories: 850kcal | Carbohydrates: 100g | Protein: 40g | Fat: 45g | Sodium: 900mg

Loved this recipe? Save it to your favorite Pinterest board so you can easily find it later! It’s the perfect way to keep all your sweet ideas in one place. ✨

Delicious Crockpot Mac N Cheese with a rich, gooey appearance.

Fuel Your Adventure with a Protein-Packed Burrito Bowl

Welcome, fellow culinary adventurers! Today, we’re diving into a dish that’s not just a meal — it’s a celebration of bold flavors and nourishing ingredients. The Protein-Packed Low Carb Burrito Bowl is your ticket to guilt-free indulgence without losing the vibrant essence of Tex-Mex cooking. With **cauliflower rice** as the base, this low carb burrito bowl is a delightful twist on a classic favorite, designed for those who crave excitement in every bite. Let’s spark our taste buds and embrace the thrill of cooking!

Why You’ll Love This Recipe

This recipe isn’t just about filling your belly; it’s a gateway to flavor exploration. Here’s why you’ll love it:

  • High Protein Content: Each serving is loaded with protein, making it an ideal meal for those looking to fuel their bodies for adventure.
  • Low Carb Delight: With cauliflower rice replacing traditional grains, you can enjoy this burrito bowl while keeping your carb intake in check.
  • Quick Prep Time: Ready in under 30 minutes, this dish is perfect for busy weeknights or meal prep for the week ahead.
  • Customizable: Mix and match your favorite toppings to create a bowl that excites your palate every time.
  • Meal Prep Friendly: Store leftovers for a quick, satisfying lunch or dinner any day of the week.

Ingredients Breakdown

Protein packed burrito bowl featuring black beans, diced avocado, and bright cherry tomatoes on a wooden table.

Let’s get to the heart of this dish — the ingredients! Here’s what you’ll need:

  • 1 lb ground turkey or chicken: A lean protein choice. Feel free to substitute with ground beef, pork, or plant-based protein for a veggie option.
  • 1 tablespoon olive oil: For sautéing and adding healthy fats.
  • 1 teaspoon cumin: This spice brings warmth and depth to your dish.
  • 1 teaspoon chili powder: Essential for that Tex-Mex kick!
  • 1/2 teaspoon garlic powder: Adds flavor without the chopping.
  • 1/2 teaspoon onion powder: For an aromatic base.
  • Salt and pepper: To taste, enhancing all the flavors.
  • 2 cups cauliflower rice: A fantastic low-carb alternative to regular rice.
  • 1 cup black beans: Packed with fiber and protein.
  • 1 cup bell peppers, diced: For crunch and color.
  • 1 avocado, diced: Creamy and rich in healthy fats.
  • 1/2 cup cherry tomatoes, halved: Freshness in every bite.
  • 1/4 cup fresh cilantro, chopped: Brightens the dish and adds a burst of flavor.
  • Lime wedges: For that zesty finish.
  • Salsa or hot sauce (optional): Add if you like it spicy!

Step-by-Step Instructions

Ready to bring this bowl to life? Follow these easy steps:

  1. In a large skillet, heat olive oil over medium heat.
  2. Add the ground turkey or chicken, followed by cumin, chili powder, garlic powder, onion powder, salt, and pepper. Cook until the meat is browned and cooked through, about 7-10 minutes.
  3. In another pan, sauté the bell peppers for 3-4 minutes until tender.
  4. Prepare cauliflower rice according to package instructions or sauté in the same pan for 5-7 minutes until tender.
  5. In meal prep containers, layer cauliflower rice, cooked meat, sautéed bell peppers, black beans, diced avocado, and cherry tomatoes.
  6. Top each bowl with fresh cilantro and a lime wedge. Add salsa or hot sauce if desired.
  7. Store in the refrigerator for up to 5 days and enjoy throughout the week!

Pro Tips for Cooking Success

Here are some expert insights to elevate your burrito bowl game:

  • Prepping Ahead: Chop your veggies ahead of time to save valuable minutes on busy nights.
  • Texture Matters: For a more authentic experience, use a mixture of fresh and frozen vegetables to achieve varied textures.
  • Layering Flavors: Don’t rush the seasoning process; let the spices mingle with the proteins for deeper flavor.
  • Perfect Avocado: To keep your avocado fresh, sprinkle it with lime juice right after cutting.
  • Spice It Up: If you love heat, add diced jalapeños or a splash of your favorite hot sauce during cooking.
  • Storage Secrets: Use airtight containers to keep your burrito bowls fresh longer.
  • Scale It Up: Double the recipe for meal prep or to feed a crowd!
  • Experiment!: Try different proteins or veggies to keep the meal exciting.

Common Mistakes and Troubleshooting

Even the best chefs can have off days. Here’s how to avoid common pitfalls:

  • Overcooking the Meat: Keep an eye on your protein; it should be just cooked through to stay juicy.
  • Too Much Liquid: Drain any excess liquid from canned beans to prevent a soggy bowl.
  • Burnt Veggies: Stir frequently while sautéing to avoid burning those beautiful bell peppers.
  • Stale Spices: Check your spices’ freshness; old spices can dull flavors.

Variations to Spice Things Up

Want to shake things up? Try these exciting variations:

  • Southwestern Style: Add corn and diced green chiles for a southwestern twist.
  • Breakfast Burrito Bowl: Top with scrambled eggs and diced jalapeños for a hearty breakfast option.
  • Mediterranean Influence: Swap black beans for chickpeas, add feta cheese, and use tzatziki sauce!
  • BBQ Flavor: Mix in BBQ sauce with your protein for a smoky, tangy experience.

Storage and Make-Ahead Instructions

Planning is key! Here’s how to store and prep this dish:

  • Refrigeration: Store in airtight containers for up to 5 days.
  • Freezing: This dish freezes well. Pack in freezer-safe containers, and it’ll last up to 3 months.
  • Reheating: Microwave until heated through or reheat on the stovetop for best results.

Frequently Asked Questions

Got questions? I’ve got answers!

  • Can I use other proteins? Yes! Ground beef, pork, or even tofu work great.
  • Is this recipe gluten-free? Absolutely! All ingredients are gluten-free.
  • Can I make this vegan? Sure! Simply replace meat with plant-based protein and skip the cheese and sour cream.
  • How do I keep my cauliflower rice from getting mushy? Avoid overcooking and sauté it just until tender.
  • Can I use frozen veggies? Yes, frozen veggies are a convenient and nutritious option.
  • How spicy is this dish? You control the heat! Adjust spices and add hot sauce to taste.
  • What can I serve with this bowl? Pair with a side of tortilla chips, a fresh salad, or even a fruit salsa.
  • Can I make this in advance? Yes! Prep your ingredients ahead of time for a quick assembly later.

Nutritional Tips and Dietary Adaptations

Embrace your health while enjoying this flavorful dish:

  • Fiber Boost: Enhance fiber content by adding more beans or veggies.
  • Low-Calorie Option: Use turkey or chicken breast to lower calories without sacrificing flavor.
  • Healthy Fats: Avocado provides heart-healthy fats, making it a nutritious choice.

Essential Equipment Recommendations

Having the right tools makes cooking a breeze:

  • Non-stick Skillet: Ideal for browning meat and sautéing vegetables without sticking.
  • Meal Prep Containers: Invest in high-quality, airtight containers for easy storage.
  • Cutting Board and Knife: A good knife and sturdy cutting board make prepping ingredients a joy.

Serving Suggestions

Finish off your bowl with a flourish:

  • Garnish with Lime: A squeeze of lime brightens every bite.
  • Top with Salsa: Add your favorite salsa for an extra kick of flavor.
  • Serve with Tortilla Chips: For crunchy contrast, consider serving with chips on the side.

So there you have it, my adventurous friends! The Protein-Packed Low Carb Burrito Bowl is more than just a meal; it’s an experience to savor. Embrace the spices, dance with the flavors, and remember — cooking is about joy and exploration. Grab your skillet, fire up the stove, and let’s make some magic in the kitchen!

Protein Packed Low Carb Burrito Bowl: Nourishing Meal Prep with Guilt Free Flavor

Prep Time 10 minutes
Cook Time 20 minutes
Total Time 30 minutes
Servings 4 servings
Calories 450
This flavorful burrito bowl combines lean protein, vegetables, and healthy fats for a satisfying low-carb meal perfect for meal prep.

Ingredients

Protein

  • 1 lb ground turkey or chicken
  • 1 tablespoon olive oil
  • 1 teaspoon cumin
  • 1 teaspoon chili powder
  • 0.5 teaspoon garlic powder
  • 0.5 teaspoon onion powder
  • to taste salt and pepper salt and pepper

Vegetables

  • 2 cups cauliflower rice
  • 1 cup black beans, drained and rinsed
  • 1 cup bell peppers, diced
  • 1 avocado diced
  • 0.5 cup cherry tomatoes, halved
  • 0.25 cup fresh cilantro, chopped

Extras

  • to taste lime wedges lime wedges for serving
  • optional salsa or hot sauce salsa or hot sauce

Instructions 

  • Heat olive oil in a skillet and cook ground meat with spices until browned, about 7-10 minutes.
  • Sauté bell peppers for 3-4 minutes until tender.
  • Prepare cauliflower rice and cook for 5-7 minutes until tender.
  • Assemble bowls with cauliflower rice, meat, vegetables, black beans, avocado, and tomatoes. Garnish with cilantro and lime.
  • Serve immediately or store in containers for up to 5 days.

Notes

For extra flavor, add a squeeze of lime or hot sauce before serving.
Calories: 450kcal
Cost: $15
Course: Main Course
Cuisine: Mexican-inspired
Keyword: Low Carb, meal prep, protein

Nutrition

Calories: 450kcal | Carbohydrates: 40g | Protein: 35g | Fat: 15g | Sodium: 800mg

Loved this recipe? Save it to your favorite Pinterest board so you can easily find it later! It’s the perfect way to keep all your sweet ideas in one place. ✨

Eye-level shot of a nutritious burrito bowl, showcasing textures of meat, rice, and vibrant toppings.

Unlocking the Flavors of Broccoli: A Casserole Adventure

Welcome to the heart of comfort food, where we embrace the vibrant flavors and textures of broccoli! This casserole recipe is not just another side dish; it’s a celebration of culinary creativity, bringing you the warmth of home-cooked goodness with a kick of spice. Whether you’re preparing for a festive gathering or a cozy family dinner, this broccoli casserole will become a staple on your table. Let’s dive into the art of making a *Cheesy Broccoli Casserole* that’s sure to ignite your taste buds and warm your heart!

Why You’ll Love This Recipe

Here are just a few reasons this *Broccoli Casserole* will steal the show:

  • Ultimate Comfort Food: A warm, cheesy casserole that feels like a hug on your plate, perfect for chilly evenings or family gatherings.
  • Health Meets Indulgence: Packed with nutrient-rich broccoli, this dish combines health benefits with creamy, cheesy goodness.
  • Customizable Delight: You can easily adapt this recipe to suit your taste—add your favorite spices or proteins!
  • Easy Preparation: With simple steps and common ingredients, this casserole is a breeze to whip up, even on busy weeknights.
  • Leftover Love: This casserole tastes even better the next day, making it a fantastic option for meal prep!

Ingredient Breakdown

A mouthwatering assortment of bread and biscuits featuring strawberries and a dusting of cinnamon.

Let’s gather the essentials for our *Cheesy Broccoli Casserole*. Here’s what you’ll need:

  • Fresh Broccoli: About 4 cups, chopped into florets. You can use frozen broccoli in a pinch, but fresh gives the best texture.
  • Cheddar Cheese: 2 cups, shredded. A sharp cheddar adds a wonderful depth of flavor.
  • Cheese Sauce: Prepare a simple homemade cheese sauce using butter, flour, milk, and spices for that creamy touch.
  • Panko Breadcrumbs: For a crispy topping. Mix these with a bit of melted butter for that golden finish.
  • Shallots and Garlic: Sautéed for flavor; these aromatics will elevate your dish!

Pro Tips for Perfection

Before you dive into the recipe, here are some expert insights:

  • Steam the Broccoli: Lightly steaming the broccoli before adding it to the casserole ensures it retains its vibrant color and crunch.
  • Make Your Own Cheese Sauce: Avoid canned soup! A homemade cheese sauce is richer and tastier, providing a deeper flavor profile.
  • Layering is Key: When assembling, layer your ingredients for even distribution of flavors and textures.
  • Experiment with Cheeses: Feel free to mix cheeses! A blend of mozzarella and gouda can add a delightful twist.
  • Spice it Up: Add a pinch of cayenne or paprika for a little kick without overwhelming the dish.

Common Mistakes and Troubleshooting

Even the best chefs can run into hiccups. Here’s how to avoid common pitfalls:

  • Overcooking the Broccoli: Make sure to cook it just until tender to maintain that beautiful texture.
  • Soggy Casserole: Ensure you drain excess moisture from the broccoli to prevent a watery casserole.
  • Not Enough Cheese: Don’t skimp on the cheese—after all, it’s a *Cheesy Broccoli Casserole*! A generous amount makes all the difference.

Delicious Variations to Try

Mix things up with these creative variations:

  • Meat Lovers Casserole: Add diced cooked chicken or bacon for a protein-packed version.
  • Vegan Delight: Substitute cheese with nutritional yeast and use a plant-based milk to create a creamy sauce.
  • Spicy Southwest Twist: Incorporate jalapeños or chipotle peppers for a smoky flavor.
  • Whole Grain Goodness: Use quinoa or brown rice as a base for added texture and nutrition.

Storage and Make-Ahead Instructions

This casserole is perfect for meal prep!

  • Refrigerate: Store any leftovers in an airtight container for up to 4 days.
  • Freeze: You can freeze the casserole before baking for up to 3 months. Just thaw and bake when you’re ready!
  • Make Ahead: Assemble the casserole a day in advance and store it in the refrigerator. Just pop it in the oven when you’re ready to eat!

FAQs about Broccoli Casserole

Here are answers to some common questions:

  • Can I use frozen broccoli? Yes, but fresh broccoli is preferred for texture.
  • How can I make this gluten-free? Use gluten-free breadcrumbs and a cornstarch slurry for the cheese sauce.
  • What if I don’t have cheddar cheese? Feel free to substitute with any cheese you enjoy—just ensure it melts well.
  • Can I add other vegetables? Absolutely! Carrots, cauliflower, and bell peppers work wonderfully.
  • How long do I bake the casserole? Bake for about 25-30 minutes at 350°F (175°C) or until bubbly and golden brown.
  • Is this casserole good for meal prep? Yes! It stores well and can be reheated easily.
  • Can I double the recipe? Sure! Just make sure you have a larger baking dish to accommodate the extra ingredients.
  • What should I serve with this casserole? Pair it with grilled meats, a fresh salad, or crusty bread for a complete meal.

Nutrition Tips and Dietary Adaptations

Elevate your dish with these nutritional insights:

  • Boost Fiber: Add lentils or chickpeas for an extra punch of fiber and protein.
  • Low-Calorie Option: Use low-fat cheese and reduce the amount of butter in the sauce.
  • Vegetarian-Friendly: This recipe is naturally vegetarian; just ensure your cheese is rennet-free if strict vegan.

Equipment Recommendations

To make your cooking experience smooth, here’s what you’ll need:

  • Large Pot: For blanching broccoli.
  • Skillet: To sauté shallots and garlic.
  • Baking Dish: A 9×13-inch dish works perfectly for this casserole.
  • Whisk: To ensure a lump-free cheese sauce.

Serving Suggestions

Now that your casserole is ready, let’s talk about serving:

  • Garnish with Herbs: A sprinkle of fresh parsley or chives adds a pop of color and freshness.
  • Serve with Protein: Roast chicken or grilled fish pair beautifully with the creamy casserole.
  • A Side Salad: A crisp green salad balances the richness of the dish.

So there you have it—your ultimate guide to crafting a *Cheesy Broccoli Casserole* that will not only satisfy your cravings but also invite others to the table. Remember, cooking is an adventure, so don’t be afraid to add your own spin to this recipe. Let the flavors dance, the spices sing, and the heat ignite your culinary passion. Now grab your skillet and get cooking; the world of flavor awaits!

Bread & Biscuit Recipes

Prep Time 15 minutes
Cook Time 20 minutes
Total Time 35 minutes
Servings 8 pieces
Calories 250
Delight in homemade bread and biscuits with simple ingredients and easy steps. Perfect for any meal or snack.

Ingredients

Dough

  • 1 packet yeast (Active dry yeast)
  • 1 cup cup buttermilk
  • 1 cup cup almond flour
  • 1/2 cup cup oats
  • 2 tbsp tablespoons honey
  • 1/2 cup cup sour cream
  • 1/4 cup cup pineapple juice
  • 1 tsp teaspoon cinnamon
  • 1/4 cup cup cornmeal
  • 1 cup cup strawberries
  • 2 tbsp tablespoons butter

Instructions 

  • Mix yeast with warm water and let it activate for 5 minutes.
  • Combine all dry ingredients and add wet ingredients; knead into a dough.
  • Shape dough into desired forms and let rise for 10 minutes.
  • Bake at 375°F (190°C) for 20 minutes until golden.
  • Serve warm with butter or toppings of choice.

Notes

Use fresh ingredients for best flavor and texture.
Calories: 250kcal
Cost: $15
Course: Bakery
Cuisine: American
Keyword: biscuits, bread

Nutrition

Calories: 250kcal | Carbohydrates: 45g | Protein: 6g | Fat: 8g | Sodium: 300mg

Loved this recipe? Save it to your favorite Pinterest board so you can easily find it later! It’s the perfect way to keep all your sweet ideas in one place. ✨

An inviting spread of warm bread and biscuits, showcasing their flaky layers and rich ingredients.

Ignite Your Culinary Passion with Spinach and Ricotta Stuffed Shells

Welcome, fellow food adventurers! If you’re ready to embark on a mouthwatering journey, you’re in the right place. Today, we’re diving into the world of spinach and ricotta stuffed shells—a dish that’s not only delicious but also brings a heap of comfort and warmth to your dinner table. With creamy ricotta, vibrant spinach, and a rich marinara sauce, these stuffed pasta shells deliver everything you love about Italian cuisine. Whether you’re a seasoned chef or a kitchen novice, this recipe invites you to unleash your inner chef and create something truly spectacular.

Why You’ll Love This Recipe

This isn’t just another pasta recipe; it’s an experience that will tantalize your taste buds and fill your home with irresistible aromas. Here’s why you’ll absolutely adore these spinach and ricotta stuffed shells:

  • Flavor Explosion: The harmonious blend of creamy ricotta and fresh spinach creates a filling that’s rich in flavor yet light enough to savor every bite.
  • Simple & Quick: With straightforward steps, this recipe is perfect for weeknight dinners, taking less than an hour from prep to plate.
  • Make-Ahead Friendly: Prepare the stuffed shells in advance and pop them in the oven when you’re ready to eat, making it a stress-free option for busy days.
  • Versatile Dish: You can easily customize the filling by adding your favorite herbs or proteins, making it adaptable for any dietary preference.
  • Freezer-Friendly: Make extra and freeze them for a future meal, ensuring you have a delicious dinner ready to go on hectic nights.

Ingredients You’ll Need

Jumbo pasta shells filled with creamy ricotta and fresh spinach, topped with melted cheese and served in a dish.

Gathering the right ingredients is the first step to creating these delightful stuffed shells. Here’s a breakdown of what you’ll need, along with some fantastic substitutions:

  • 12 jumbo pasta shells: Look for conchiglioni or any large pasta that can hold a generous filling. If you can’t find jumbo shells, large manicotti tubes work too.
  • 2 cups fresh spinach, chopped: Feel free to use frozen spinach; just make sure to thaw and squeeze out excess water for the best texture.
  • 1 cup ricotta cheese: For a creamier filling, opt for whole-milk ricotta. You can substitute with cottage cheese for a lighter option.
  • 1 cup shredded mozzarella cheese: Use a blend of mozzarella and provolone for a flavor boost.
  • 1/2 cup grated parmesan cheese: This adds a delightful nuttiness. Pecorino Romano can also work if you prefer a sharper taste.
  • 1 egg: Acts as a binder. For a vegan version, replace with 1/4 cup of silken tofu.
  • 1 teaspoon garlic powder: Fresh minced garlic can elevate the flavor even more.
  • 1 teaspoon Italian seasoning: A mix of dried herbs like basil, oregano, and thyme will do the trick.
  • Salt and pepper to taste: Essential for enhancing all the flavors in the dish.
  • 2 cups marinara sauce: Whether homemade or store-bought, choose a sauce that you love, as it ties the whole dish together.

Step-by-Step Instructions

Let’s get cooking! Follow these detailed steps to create your spinach and ricotta stuffed shells:

  • Preheat the oven: Set your oven to 375°F (190°C) to prepare for the baking magic.
  • Cook the pasta shells: Boil the jumbo pasta shells according to package instructions until al dente (firm to the bite). Drain and set aside.
  • Prepare the filling: In a large bowl, mix together the chopped spinach, ricotta cheese, 1/2 cup of mozzarella, Parmesan cheese, egg, garlic powder, Italian seasoning, salt, and pepper. Stir until well combined.
  • Assemble the dish: Spread 1 cup of marinara sauce in the bottom of a baking dish. Stuff each cooked pasta shell with the spinach and ricotta mixture, then place them on top of the sauce.
  • Add the sauce and cheese: Pour the remaining marinara sauce over the stuffed shells, then sprinkle with the remaining mozzarella cheese.
  • Bake to perfection: Cover the dish with aluminum foil and bake for 25 minutes. Remove the foil and bake for an additional 10 minutes, or until the cheese is bubbly and golden.
  • Serve and enjoy: Let the dish cool for a few minutes before serving. Enjoy your homemade masterpiece!

Pro Tips for Success

Want to elevate your stuffed shells even further? Here are some expert insights to ensure your dish turns out perfectly:

  • Don’t overcook the pasta: Al dente shells hold their shape better and won’t fall apart when being stuffed.
  • Experiment with spices: Add a pinch of red pepper flakes for heat or fresh herbs like basil and parsley for a burst of freshness.
  • Use quality ingredients: High-quality cheeses and fresh spinach make a noticeable difference in flavor.
  • Make it saucy: Don’t skimp on the marinara—extra sauce keeps the shells moist and flavorful.
  • Let it rest: Allowing your dish to sit for a few minutes after baking helps the flavors meld and makes for easier serving.
  • Customize your fillings: Add sautéed mushrooms, roasted red peppers, or even crumbled sausage for a twist.
  • Use a deep baking dish: This ensures plenty of sauce can soak into the shells while they bake.
  • Top with fresh herbs: A sprinkle of fresh basil or parsley just before serving adds a pop of color and flavor.

Common Mistakes and Troubleshooting

Even the best chefs make mistakes! Here are some common pitfalls and how to avoid them:

  • Filling too much: Avoid overstuffing the shells; a generous amount is great, but they should still fit comfortably in the baking dish.
  • Mushy shells: If your shells become mushy, make sure to cook them al dente before baking.
  • Dry filling: If your filling feels dry, add a little more ricotta or a splash of cream to keep it moist.
  • Overbaking: Keep an eye on the cheese as it bakes; remove from the oven as soon as it’s bubbly to prevent drying out.

Variations to Try

Feeling adventurous? Here are some creative variations to put your own spin on these stuffed shells:

  • Meat Lovers Delight: Add cooked ground beef or Italian sausage to the filling for a hearty twist!
  • Cheesy Spinach & Artichoke: Mix in chopped artichoke hearts for an extra layer of flavor.
  • Mexican-Inspired: Swap marinara for enchilada sauce and mix in some taco seasoning for a zesty kick.
  • Vegan Version: Substitute ricotta with a vegan cheese or blended tofu to make it plant-based.

Storage and Make-Ahead Instructions

Want to prepare these stuffed shells in advance? Here’s how to store and reheat them:

  • Refrigerate: Assemble the dish a day ahead and keep it covered in the fridge. Bake when you’re ready!
  • Freeze: You can freeze unbaked stuffed shells for up to 3 months. Just thaw in the fridge overnight before baking.
  • Reheat: To reheat, cover with foil and warm in a 350°F (175°C) oven until heated through, about 20-25 minutes.

Frequently Asked Questions

Here are some common questions about spinach and ricotta stuffed shells:

  • Can I use other types of cheese? Yes! Feel free to mix different cheeses to find your perfect flavor combination.
  • How do I make homemade marinara sauce? Combine crushed tomatoes, garlic, onion, and herbs in a pot, simmering for about 30 minutes for a delicious homemade sauce.
  • What can I serve with stuffed shells? A fresh salad, garlic bread, or steamed vegetables make great accompaniments!
  • Can I prepare the filling in advance? Absolutely! You can make the filling a day ahead and store it in the fridge until you’re ready to stuff the shells.
  • How do I know when they are done baking? Look for bubbly, golden cheese on top—this is a sure sign your stuffed shells are ready!
  • Can I use whole wheat or gluten-free shells? Yes, both options work well and can add nutritional value.
  • What’s the best way to prevent the shells from sticking? Make sure your pasta shells are well-coated with sauce and separate them on the baking dish.
  • How long will leftovers last? Leftover stuffed shells can be stored in the refrigerator for up to 3 days.

Nutritional Tips and Dietary Adaptations

Here are a few tips to make this dish fit your dietary needs:

  • Low-Carb Option: Substitute pasta with zucchini boats or eggplant slices for a lighter dish.
  • Gluten-Free: Look for gluten-free jumbo shells or use vegetables as the vessel for stuffing.
  • Boost Nutrients: Add chopped kale or mushrooms to the filling for extra vitamins and minerals.
  • Reduce Fat: Use low-fat cheese options to lighten the dish while still keeping it creamy.

Equipment Recommendations

Here’s what you’ll need to get the best results:

  • Large Pot: For boiling pasta shells, opt for a sturdy pot to ensure even cooking.
  • Baking Dish: A deep casserole dish is ideal for holding all the stuffed shells and sauce.
  • Mixing Bowl: A large bowl for combining the filling ingredients thoroughly.
  • Spoon or Spatula: For stuffing the shells; a small spoon can help you get just the right amount in each shell.

Serving Suggestions

Finally, let’s talk about how to serve your masterpiece:

  • Garnish: Fresh basil or parsley adds a vibrant touch and enhances flavor.
  • Parmesan Sprinkle: A dusting of grated Parmesan or a drizzle of olive oil just before serving elevates the dish.
  • Pairing: Serve with a crisp green salad dressed with balsamic vinaigrette to balance the richness of the stuffed shells.
  • Wine Selection: A glass of Chianti or Sauvignon Blanc complements the meal beautifully.

Now you’re equipped with everything you need to create these spinach and ricotta stuffed shells. Whether you’re sharing with friends, family, or savoring them solo, each bite is a celebration of flavors that will leave you feeling satisfied and inspired. So grab your apron, let’s get cooking, and remember: cooking is about the journey, and every meal is an adventure waiting to happen!

Easy Spinach and Ricotta Stuffed Shells – A Healthy Veggie Dinner

Prep Time 15 minutes
Cook Time 35 minutes
Total Time 50 minutes
Servings 4 servings
Calories 350
A delicious and healthy vegetarian dish featuring jumbo pasta shells filled with spinach and ricotta, baked to perfection with marinara sauce.

Ingredients

Pasta

  • 12 pieces jumbo pasta shells
  • 2 cups fresh spinach, chopped
  • 1 cup ricotta cheese
  • 1 cup shredded mozzarella cheese
  • 0.5 cup grated parmesan cheese
  • 1 egg egg
  • 1 teaspoon garlic powder
  • 1 teaspoon italian seasoning
  • to taste salt and pepper
  • 2 cups marinara sauce

Instructions 

  • Preheat oven to 375°F (190°C). Cook shells until al dente, then drain.
  • Mix spinach, ricotta, 1/2 cup mozzarella, Parmesan, egg, garlic, Italian seasoning, salt, and pepper.
  • Spread 1 cup marinara in a baking dish. Stuff shells with filling and place in dish.
  • Pour remaining marinara over shells, sprinkle with remaining mozzarella, cover, and bake 25 minutes.
  • Remove foil, bake 10 more minutes until bubbly and golden. Serve warm.

Notes

You can add extra spinach for more greens or top with fresh basil for added flavor.
Calories: 350kcal
Cost: $15
Course: Main Course
Cuisine: Italian
Keyword: pasta, Vegetarian

Nutrition

Calories: 350kcal | Carbohydrates: 45g | Protein: 20g | Fat: 15g | Sodium: 800mg

Loved this recipe? Save it to your favorite Pinterest board so you can easily find it later! It’s the perfect way to keep all your sweet ideas in one place. ✨

Deliciously presented spinach and ricotta stuffed shells, showcasing a vibrant marinara sauce and cheese topping.

Transform Your Holiday Feast with the Ultimate Green Bean Casserole

Welcome to the heart of your Thanksgiving kitchen! If you’re looking to elevate your traditional green bean casserole into a culinary masterpiece, you’ve found the right recipe. This dish isn’t just about the green beans; it’s a celebration of flavors, textures, and a nod to the cherished memories of holiday gatherings. With each layer, you’ll discover how a simple dish can become the star of the table.

Why You’ll Love This Recipe

There’s something magical about a classic green bean casserole that warms the heart and tickles the taste buds. Here’s why this particular recipe will become your go-to:

  • Flavor explosion: The combination of creamy mushroom soup and crispy fried onions creates a delightful contrast that keeps every bite exciting.
  • Quick and easy: With just a few ingredients and minimal prep time, you can whip up this dish in no time, making it perfect for those busy holiday days.
  • Customizable: This recipe allows for numerous variations, so you can tailor it to your family’s tastes or dietary needs.
  • Hearty and comforting: It’s the kind of dish that wraps you up in warmth, making it a staple at family gatherings.
  • Elegant presentation: The golden crispy topping and vibrant green beans make for a stunning centerpiece on your holiday table.

Ingredient Breakdown

A warm green bean casserole with a golden crust, captured in natural light.

Let’s dive into the essentials you’ll need for this comforting dish. Each ingredient plays a vital role in achieving that perfect balance of flavor and texture.

  • Green Beans: 2 cans (14.5 oz each) of green beans, drained. You can use fresh or frozen if you prefer a more vibrant flavor.
  • Cream of Mushroom Soup: 1 can (10.5 oz) of Campbell’s cream of mushroom soup adds creaminess and umami. You can substitute with homemade cream of mushroom soup for a gourmet twist.
  • Milk: 3/4 cup of milk (whole or low-fat) ensures the casserole is rich and creamy. For a dairy-free option, almond or oat milk work beautifully.
  • Crispy Fried Onions: 1 1/3 cups of French’s crispy fried onions create that signature crunchy topping. You can also make your own for a fresher taste.
  • Soy Sauce: Just 1/2 teaspoon adds depth and enhances the other flavors.
  • Black Pepper: 1/4 teaspoon for a touch of spice. You can increase it for more of a kick.

Pro Tips for the Perfect Casserole

Want to ensure your green bean casserole turns out perfectly every time? Here are some expert tips:

  • Choose the right beans: Opt for fresh green beans if possible; they’ll add a vibrant flavor and crunch that canned beans can’t match.
  • Don’t skip the soy sauce: A small amount can elevate the flavors significantly. It’s a secret ingredient that makes a difference!
  • Layer your flavors: Consider sautéing garlic or onions before adding them to the mix for an extra layer of flavor.
  • Watch the baking time: Keep an eye on the casserole to prevent the onions from burning. You want them golden and crispy, not dark brown.
  • Make it ahead: This casserole can be assembled a day in advance and baked just before serving.
  • Experiment with toppings: Try adding parmesan cheese or crushed crackers mixed with herbs for a different texture.
  • Garnish: Fresh parsley sprinkled on top adds a pop of color and freshness.
  • Don’t overcook the beans: If you’re using fresh beans, cook them just until crisp-tender before mixing them in.
  • Mix ingredients gently: Overmixing can break the beans and make your casserole mushy.
  • Serve hot: This dish is best enjoyed fresh out of the oven, so plan to serve it immediately!

Avoiding Common Mistakes

Even seasoned chefs can make missteps! Here’s how to avoid common pitfalls:

  • Using old beans: Check expiration dates on canned goods to ensure freshness.
  • Skipping the preheat: Always preheat your oven for even cooking.
  • Not tasting: Don’t forget to taste your mixture before baking. Adjust seasoning as needed.
  • Overbaking: This can lead to a dry casserole. Keep an eye on it during the final minutes.

Delicious Variations to Try

Make this green bean casserole your own with these creative variations!

  • Cheesy Green Bean Casserole: Add 1 cup of shredded cheddar cheese into the mix and sprinkle more on top before the final bake.
  • Spicy Casserole: Incorporate diced jalapeños or a pinch of cayenne pepper for a kick.
  • Vegan Version: Use vegan cream of mushroom soup and plant-based milk, plus substitute crispy fried onions with toasted panko.
  • Herbed Casserole: Add fresh herbs like thyme or rosemary for a fragrant twist.

Storage and Make-Ahead Instructions

Planning ahead? Here’s how to store and prepare your casserole:

  • Storing leftovers: Keep any leftover casserole in an airtight container in the refrigerator for up to 3 days.
  • Freezing: While not recommended for the fried onions, you can freeze the green bean mixture before baking. Thaw overnight in the fridge before baking.
  • Make-ahead options: Assemble the casserole a day in advance, cover, and refrigerate. Bake just before serving.

Frequently Asked Questions

Still have questions? Let’s address some common inquiries:

  • Can I use fresh green beans instead of canned? Absolutely! Fresh beans will provide a crunchier texture.
  • What can I substitute for cream of mushroom soup? You can use a homemade version or swap it for cream of chicken soup (if not vegetarian).
  • Can I prepare this dish in advance? Yes, it can be assembled a day ahead and baked when you’re ready.
  • Is this casserole gluten-free? Yes, just ensure your cream of mushroom soup and fried onions are gluten-free.
  • How do I reheat leftovers? Reheat in the oven at 350°F until warmed through for best results.
  • Can I double the recipe? Yes, simply use a larger baking dish and adjust the baking time as needed.
  • What should I serve with this casserole? It pairs well with turkey, ham, or a simple roast chicken.
  • Can I add other vegetables? Feel free to add carrots, potatoes, or corn for added color and nutrition!

Nutritional Tips and Dietary Adaptations

Want to make your casserole a bit healthier? Here are some tips:

  • Reduce calories: Use low-fat versions of cream of mushroom soup and milk.
  • Increase fiber: Add chopped nuts or seeds for a crunchy topping that’s also nutritious.
  • Make it lower in sodium: Opt for low-sodium versions of soup and soy sauce.

Equipment Recommendations

To make your cooking experience smoother, here’s what you’ll need:

  • Mixing bowl: A large bowl for combining ingredients.
  • Baking dish: A 1.5-quart dish works perfectly for this recipe.
  • Measuring cups and spoons: For precise ingredient measurements.
  • Oven mitts: Keep your hands safe when handling hot dishes!

Serving Suggestions

Bring out the best in your green bean casserole with these serving ideas:

  • Garnish with herbs: Freshly chopped parsley or thyme adds a beautiful touch.
  • Pair with cranberry sauce: The sweetness balances the savory flavors beautifully.
  • Offer a variety of sides: Serve alongside mashed potatoes or stuffing for a complete meal.

With this ultimate green bean casserole recipe, you’ll not only honor tradition but also elevate it to new heights. So grab your skillet and embrace the spice of life — because every meal is an adventure waiting to happen!

Discover the Perfect Green Bean Casserole Campbells Recipe for a Classic Thanksgiving Dish

Prep Time 10 minutes
Cook Time 30 minutes
Total Time 40 minutes
Servings 6 servings
Calories 180
A delicious and easy green bean casserole perfect for Thanksgiving, combining creamy mushroom soup and crispy onions.

Ingredients

Green Beans

  • 2 cans green beans, drained
  • 1 can campbell's cream of mushroom soup
  • 3/4 cup milk
  • 1 1/3 cups french's crispy fried onions
  • 1/2 teaspoon soy sauce
  • 1/4 teaspoon black pepper

Instructions 

  • Preheat oven to 350°F (175°C).
  • Mix green beans, mushroom soup, milk, soy sauce, and pepper.
  • Stir in 1 cup of fried onions and pour into a baking dish.
  • Bake for 25 minutes, then top with remaining onions and bake 5-10 more minutes.
  • Let cool slightly before serving.

Notes

For extra crunch, add more fried onions on top before the final bake.
Calories: 180kcal
Cost: $15
Course: Side Dish
Cuisine: American
Keyword: Green Beans

Nutrition

Calories: 180kcal | Carbohydrates: 25g | Protein: 5g | Fat: 7g | Sodium: 600mg

Loved this recipe? Save it to your favorite Pinterest board so you can easily find it later! It’s the perfect way to keep all your sweet ideas in one place. ✨

Delicious green bean casserole in a dish, showcasing its texture and color.

Ignite Your Cooking Adventure with High Protein Low Calorie Butter Chicken Curry

Welcome to a culinary journey that will awaken your taste buds and set your kitchen ablaze! This High Protein Low Calorie Butter Chicken Curry recipe is not just a meal; it’s an experience that celebrates the bold flavors and aromatic spices that warm the heart and excite the palate. Perfectly spiced and irresistibly delicious, it’s a nutritious delight that will reignite your cooking passion. Whether you’re looking to lose weight or simply seeking a satisfying comfort food, this recipe will help you turn up the heat and savor every bite!

Why You’ll Love This Recipe

Get ready to fall in love with this dish! Here’s why:

  • High in Protein: Packed with lean chicken and Greek yogurt, this recipe offers a protein boost to keep you feeling full and energized.
  • Low Calorie: Enjoy the rich flavors without the guilt. This dish is designed to be low in calories while still delivering a satisfying experience.
  • Easy to Prepare: With simple ingredients and straightforward steps, even novice cooks can master this curry.
  • Customizable Heat: Adjust the chili powder to your taste preferences. Whether you like it mild or fiery, you’re in control!
  • Meal Prep Friendly: This curry is perfect for meal prep! Make a big batch to enjoy throughout the week or freeze for future meals.

Ingredient Breakdown and Substitutions

Aerial view of a serving of butter chicken curry, featuring tender diced chicken in a creamy sauce, served with cauliflower rice.

Before diving into the cooking process, let’s break down the ingredients:

  • 1 lb boneless, skinless chicken breast: Diced for quick cooking. Substitute with chicken thighs for a juicier option.
  • 1 cup plain Greek yogurt: Acts as a marinade and thickener. You can replace it with coconut yogurt for a dairy-free version.
  • 1 tablespoon ginger paste: Adds warmth. Fresh ginger can be used if you prefer.
  • 1 tablespoon garlic paste: Offers aromatic depth. Fresh minced garlic works just as well.
  • 1 tablespoon lemon juice: Brightens the dish. Lime juice can be a zesty substitute.
  • 1 tablespoon olive oil: For sautéing. Feel free to use coconut oil for a tropical twist.
  • 1 cup diced tomatoes: Adds moisture and flavor. Canned tomatoes are a convenient choice.
  • 1 tablespoon tomato paste: Intensifies the tomato flavor. You can skip it if you prefer a lighter sauce.
  • Spices: garam masala, cumin, paprika, turmeric, chili powder: These spices create the signature taste. Feel free to experiment with your favorite spices!
  • Salt and pepper: To taste.
  • 1 cup cauliflower rice: A great low-carb alternative to traditional rice. You can use brown rice or quinoa if preferred.
  • Fresh cilantro: For garnish and freshness. Parsley can be a good substitute.

Pro Tips for Perfecting Your Butter Chicken Curry

Want to elevate your dish to the next level? Here are some expert tips:

  • Marinate Well: Allow the chicken to marinate for at least 30 minutes, but for best results, let it sit overnight in the fridge to enhance flavor.
  • Control the Heat: Start with less chili powder, and you can always add more during cooking if you want it spicier.
  • Use Fresh Spices: For the best flavor, use fresh spices and replace them every six months to maintain potency.
  • Cook Slowly: Simmering the curry allows the flavors to meld beautifully. Don’t rush this step!
  • Garnish Generously: A sprinkle of fresh cilantro not only adds color but a burst of freshness that brightens the dish.
  • Experiment with Pairings: Try serving it with naan, rice, or even a fresh salad for a complete meal.
  • Make It Creamier: If you want an even creamier sauce, stir in a splash of coconut milk during the simmering process.
  • Store Properly: Allow the curry to cool before storing it in airtight containers to maintain freshness.

Common Mistakes and Troubleshooting

Even the best chefs make mistakes! Here’s how to avoid common pitfalls:

  • Overcooking Chicken: Chicken can become dry if overcooked. Aim for a juicy texture by cooking until just done.
  • Too Much Spice: If you accidentally overdo the spices, balance it out with a bit more yogurt or some sugar to cut the heat.
  • Thick Sauce: If your sauce is too thick, add a splash of water or broth to loosen it up.
  • Not Enough Flavor: If your curry lacks flavor, consider adding more spices or a dash of salt to enhance it.

Delicious Variations to Try

Get creative with your butter chicken! Here are some tasty variations:

  • Vegetarian Version: Substitute chicken with chickpeas or tofu for a vegetarian delight.
  • Spicy Butter Chicken: Increase the chili powder or add fresh green chilies for an extra kick.
  • Butter Chicken Tacos: Serve the curry in taco shells topped with slaw for a fun twist.
  • Butter Chicken Pizza: Spread the curry over pizza dough, add cheese, and bake for a fusion dish!

Storage and Make-Ahead Instructions

This butter chicken is perfect for meal prep:

  • Refrigerator: Store in an airtight container for up to 4 days.
  • Freezer: Freeze in portions for up to 3 months. Thaw overnight in the fridge before reheating.
  • Reheating: Gently reheat in a skillet over low heat or in the microwave until warmed through.

Comprehensive FAQ

Got questions? We’ve got answers!

  • Can I use other proteins?: Absolutely! You can substitute chicken with shrimp, fish, or even paneer.
  • Is this recipe gluten-free?: Yes! As long as you use gluten-free spices and serve it with gluten-free alternatives.
  • How spicy is this curry?: The spice level can be adjusted based on your taste preferences; start mild and add heat gradually.
  • Can I make this dairy-free?: Yes! Use coconut yogurt instead of Greek yogurt.
  • What can I serve with butter chicken?: It pairs wonderfully with rice, naan, or even roasted vegetables.
  • Can I make this in a slow cooker?: Yes! Combine ingredients in a slow cooker and cook on low for 6-8 hours.
  • How do I know when the chicken is done?: Chicken should reach an internal temperature of 165°F (75°C).
  • Can I double the recipe?: Certainly! Just ensure your cooking vessel can accommodate the larger quantity.

Nutritional Tips and Dietary Adaptations

This dish is not only delicious but also nutritious:

  • Protein-Packed: Each serving is loaded with protein to support muscle recovery and keep you satiated.
  • Low in Fat: Using Greek yogurt and lean chicken minimizes the fat content without sacrificing flavor.
  • Rich in Spices: The spices used are not only flavorful but also offer various health benefits, such as anti-inflammatory properties.
  • Customizable for Diets: This recipe can easily be adapted for keto, paleo, and whole30 diets by swapping the carb sources.

Essential Equipment Recommendations

To make your cooking process smoother, here’s what you’ll need:

  • Skillet: A wide skillet is best for even cooking and ample space for simmering.
  • Mixing Bowl: For marinating your chicken.
  • Spatula or Wooden Spoon: For stirring your ingredients together.
  • Knife and Cutting Board: Essential for chopping your ingredients efficiently.

Serving Suggestions

Now that your curry is ready, how do you serve it? Here are some ideas:

  • With Cauliflower Rice: A low-carb option that perfectly absorbs the sauce.
  • With Naan Bread: Perfect for scooping up the curry — a classic pairing!
  • Over Quinoa: A protein-rich grain that complements the dish beautifully.
  • With a Side Salad: A light salad adds freshness and crunch to balance the rich flavors.

Get ready to spice up your cooking routine with this High Protein Low Calorie Butter Chicken Curry recipe. Remember, cooking is an adventure! Embrace the flavors, have fun, and most importantly, enjoy every delicious bite. Now go on, grab your skillet, and let’s get cooking!

Macro Friendly High Protein "Low Calorie" Butter Chicken Curry Recipe

Prep Time 10 minutes
Cook Time 20 minutes
Total Time 30 minutes
Servings 4 servings
Calories 350
A healthy, high-protein butter chicken curry that's low in calories and packed with flavor. Perfect for a nutritious meal that satisfies your cravings.

Ingredients

Protein

  • 1 lb boneless, skinless chicken breast, diced

Dairy

  • 1 cup plain greek yogurt

Spices & Condiments

  • 1 tbsp ginger paste
  • 1 tbsp garlic paste
  • 1 tbsp lemon juice
  • 1 tbsp olive oil
  • 1 cup diced tomatoes (canned or fresh)
  • 1 tbsp tomato paste
  • 1 tsp garam masala
  • 1 tsp cumin
  • 1 tsp paprika
  • 0.5 tsp turmeric
  • 0.5 tsp chili powder (optional)

Salt and Pepper

  • to taste salt and pepper

Vegetables & Sides

  • 1 cup cauliflower rice (for serving)

Garnish

  • as needed fresh cilantro for garnish

Instructions 

  • Combine chicken, Greek yogurt, ginger, garlic, lemon juice, salt, and pepper. Marinate for 30 minutes.
  • Cook marinated chicken in olive oil until browned, about 5-7 minutes.
  • Add tomatoes, tomato paste, and spices. Stir well and simmer for 10-15 minutes.
  • Serve over cauliflower rice and garnish with cilantro.

Notes

Using Greek yogurt boosts protein while keeping calories low. Adjust spices to taste.
Calories: 350kcal
Cost: $15
Course: Main Course
Cuisine: Indian
Keyword: chicken, High Protein, Low Calorie

Nutrition

Calories: 350kcal | Carbohydrates: 20g | Protein: 45g | Fat: 8g | Sodium: 600mg

Loved this recipe? Save it to your favorite Pinterest board so you can easily find it later! It’s the perfect way to keep all your sweet ideas in one place. ✨

Delicious butter chicken curry in a rustic bowl, showcasing rich colors and textures, highlighted by warm natural lighting.