Author

Avery Collins

Browsing

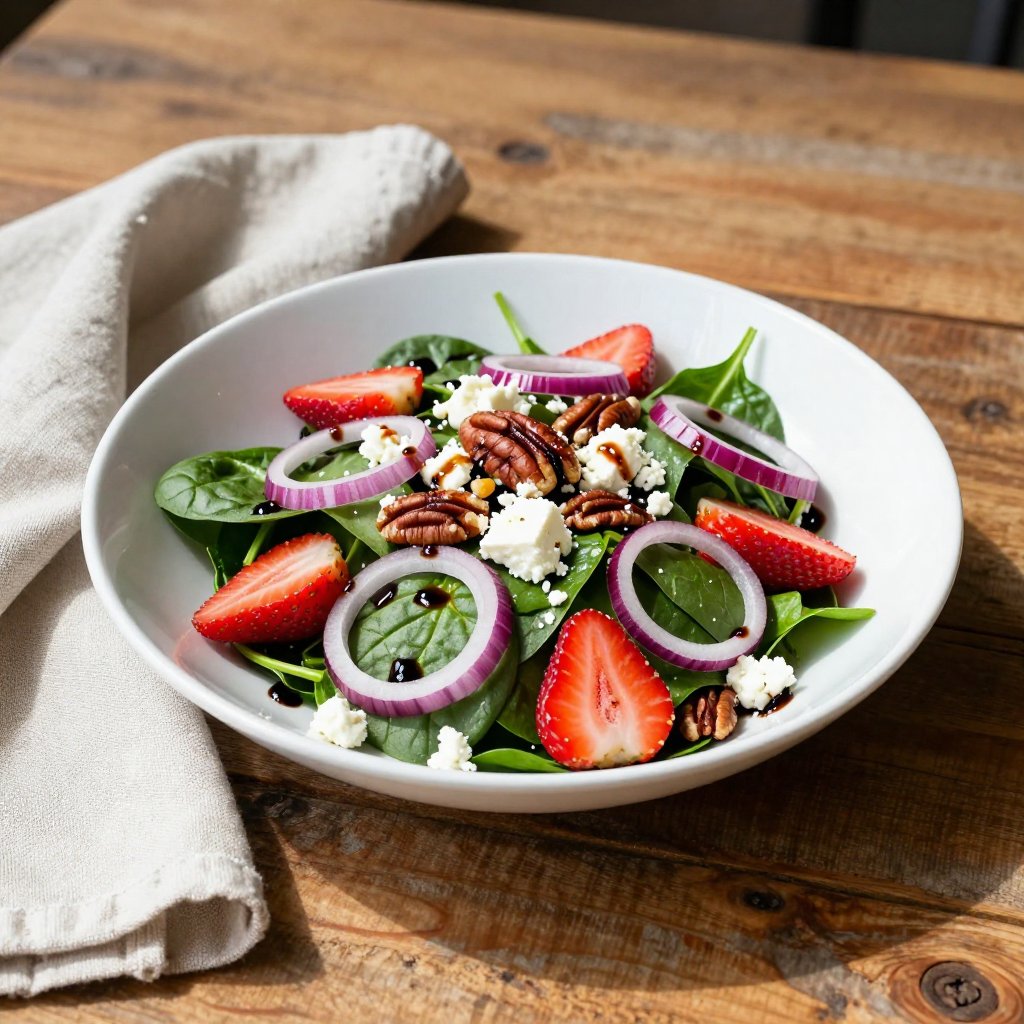
Hello, friends! Avery here, from my little kitchen corner in Portland. Today, I’m so excited to share one of my absolute go-to recipes: a vibrant, flavorful Strawberry Spinach Salad. It’s a dish that embodies everything I love about cooking – simple ingredients, joyful flavors, and a meal that nourishes both body and soul. This isn’t just a salad; it’s a little slice of sunshine on a plate, perfect for those days when you need a boost of energy and a reminder of the goodness around us.

My journey into healthy eating started not from a place of culinary ambition, but from a place of necessity. After years of neglecting myself with stress and takeout, my body finally put its foot down. That’s when I discovered the power of real food. And this salad? It became a staple. It’s quick, it’s easy, and it always makes me feel good. Let’s dive in, shall we?

Why You’ll Love This Strawberry Spinach Salad

This isn’t your average leafy green concoction. This strawberry spinach salad is a symphony of flavors and textures that will have you coming back for more. It’s the perfect balance of sweet, savory, and crunchy, all wrapped up in a healthy and satisfying package. Here’s why I think you’ll adore it:

  • Sweet and Savory Harmony: The sweetness of ripe strawberries perfectly complements the earthy notes of fresh spinach.
  • Textural Delight: Crunchy toasted pecans, creamy feta cheese, and crisp red onion create a delightful contrast of textures in every bite.
  • Quick and Easy: This salad is ready in minutes, making it perfect for busy weeknights or lazy weekend lunches.
  • Nutrient-Packed: Loaded with vitamins, minerals, and antioxidants, this salad is a powerhouse of goodness.
  • Versatile: Easily customizable to suit your taste preferences and dietary needs.
  • Perfect for Any Occasion: Whether it’s a summer picnic, a potluck gathering, or a simple weeknight dinner, this salad is always a hit.

It’s truly a salad that embodies the spirit of simple, healthy eating. I promise, even the most skeptical veggie-eaters will be converted!

Strawberry Spinach Salad Ingredients

Here’s what you’ll need to create this culinary masterpiece. Don’t worry if you don’t have everything on hand; I’ll share some substitutions and variations later on.

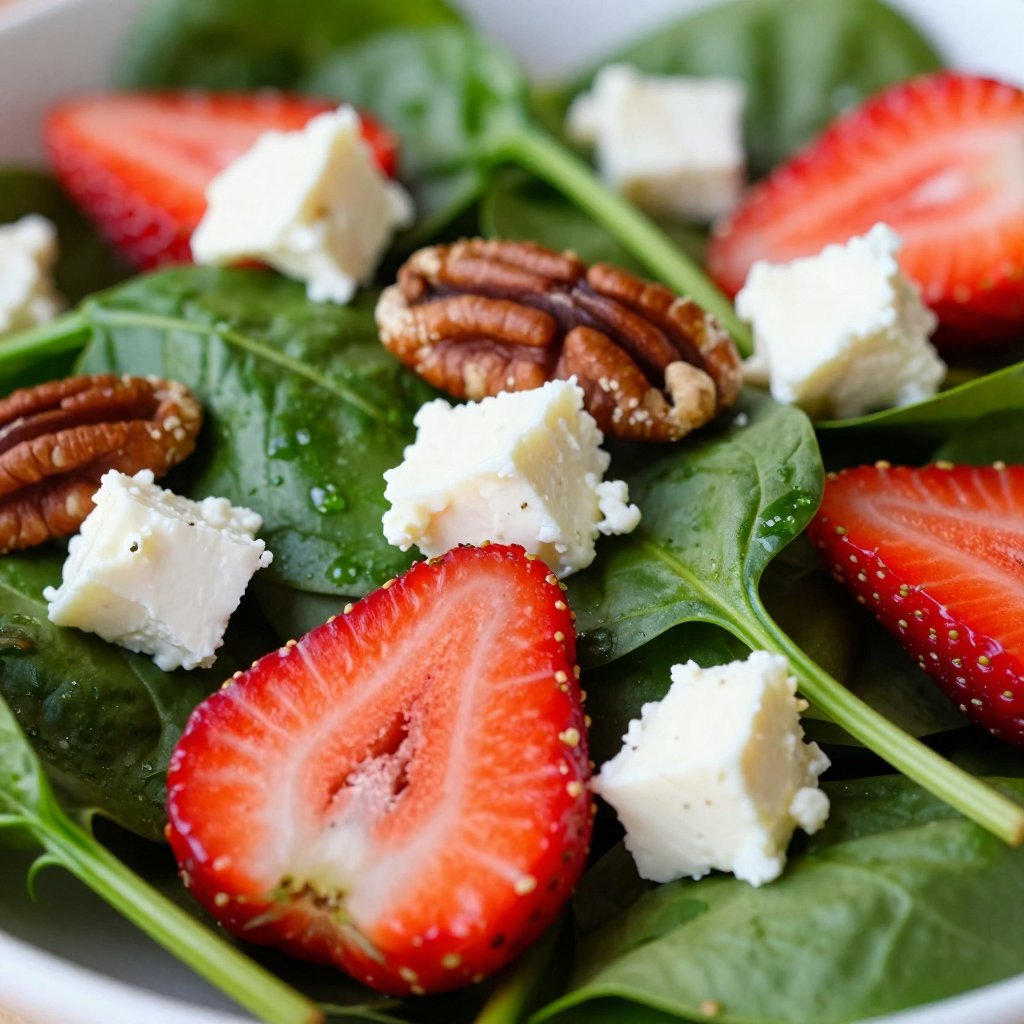
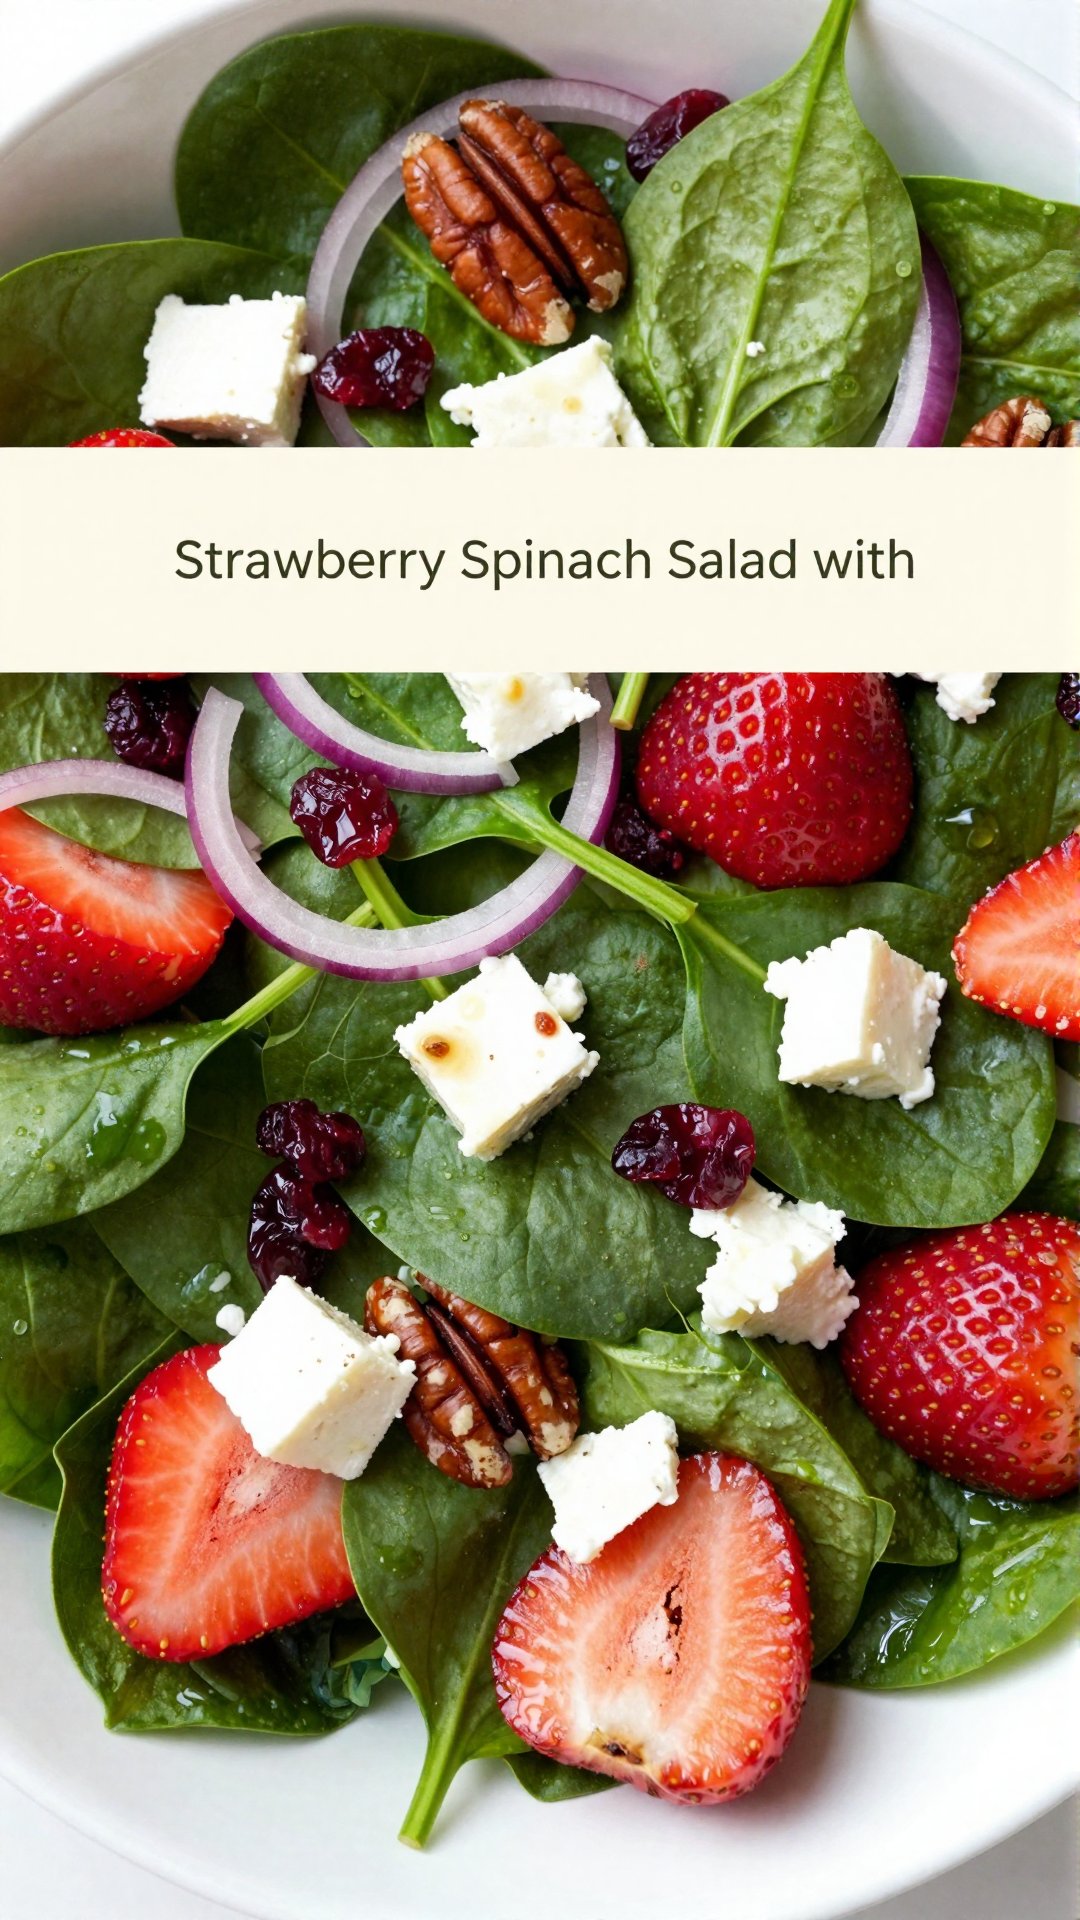
  • 4 cups fresh spinach, washed and dried
  • 2 cups ripe strawberries, hulled and sliced
  • 1/4 cup red onion, thinly sliced
  • 1/2 cup crumbled feta cheese
  • 1/3 cup pecan halves, toasted
  • 1/4 cup balsamic vinaigrette
Recipe Image

How to Make Strawberry Spinach Salad: Step-by-Step

Ready to get started? This salad comes together in just a few simple steps. It’s so easy, it’s almost therapeutic!

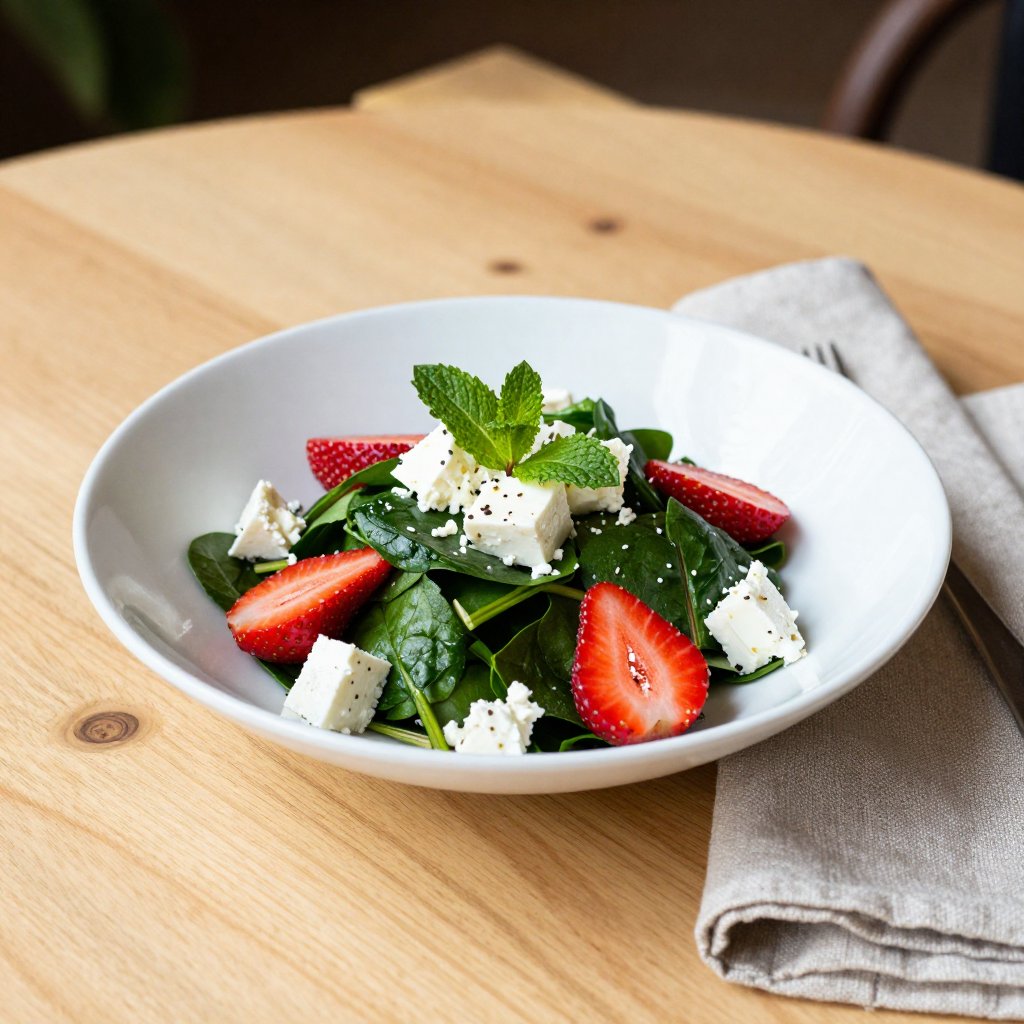
  1. Combine Spinach and Strawberries: In a large bowl, gently combine the 4 cups of fresh spinach and 2 cups of sliced strawberries. The vibrant green leaves and juicy red berries create a beautiful visual contrast.
  2. Add Red Onion and Feta: Gently toss in the 1/4 cup of thinly sliced red onion and sprinkle with 1/2 cup of crumbled feta cheese. The red onion adds a subtle bite, while the feta provides a creamy, salty counterpoint.
  3. Toast Pecans: If you haven’t already, toast the 1/3 cup of pecan halves. Toasting enhances their nutty flavor and adds a delightful crunch. You can do this in a dry skillet over medium heat for a few minutes, or in the oven at 350°F for 5-7 minutes. Watch them closely so they don’t burn!
  4. Drizzle with Vinaigrette: Just before serving, drizzle 1/4 cup of balsamic vinaigrette over the salad. Be careful not to overdress it; you want the flavors to shine through.
  5. Gently Toss and Serve: Toss lightly to coat without bruising the greens. Serve immediately for the freshest taste.

And that’s it! A simple, delicious Strawberry Spinach Salad ready to brighten your day. I like to serve it alongside grilled chicken or fish for a complete meal. It’s also wonderful as a light lunch or a side dish at a potluck.

Pro Tips for the Perfect Salad

Want to take your Strawberry Spinach Salad to the next level? Here are a few of my favorite tips:

  • Use Fresh, High-Quality Ingredients: The better the ingredients, the better the salad. Look for ripe, juicy strawberries and fresh, vibrant spinach.
  • Toast Your Nuts: Toasting the pecans enhances their flavor and adds a satisfying crunch. Don’t skip this step!
  • Don’t Overdress: A little balsamic vinaigrette goes a long way. Start with a small amount and add more as needed. You want the flavors of the ingredients to shine through.
  • Serve Immediately: This salad is best served fresh. The spinach can wilt if it sits for too long.
  • Chill the Strawberries: For an extra refreshing salad, chill the strawberries in the refrigerator for about 30 minutes before slicing.

Common Mistakes to Avoid

Even the simplest recipes can have their pitfalls. Here are a few common mistakes to avoid when making Strawberry Spinach Salad:

  • Using Wilted Spinach: Make sure your spinach is fresh and crisp. Wilted spinach will make the salad soggy and unappetizing.
  • Overdressing the Salad: Too much vinaigrette will make the salad heavy and drown out the other flavors.
  • Not Toasting the Nuts: Toasted pecans add a crucial element of flavor and texture. Don’t skip this step!
  • Letting the Salad Sit Too Long: This salad is best served immediately. The spinach will wilt if it sits for too long.
  • Using Underripe Strawberries: Ripe, juicy strawberries are essential for the best flavor. Avoid using underripe or sour strawberries.

Strawberry Spinach Salad Variations

One of the things I love most about this salad is how versatile it is. Feel free to experiment with different ingredients and flavors to create your own signature version. Here are a few ideas:

  • Add Grilled Chicken or Salmon: Turn this salad into a complete meal by adding grilled chicken or salmon.
  • Substitute Goat Cheese for Feta: Goat cheese adds a tangy, creamy flavor that pairs beautifully with strawberries and spinach.
  • Add Avocado: Sliced avocado adds a creamy, healthy fat that makes the salad even more satisfying.
  • Use a Different Vinaigrette: Experiment with different vinaigrettes, such as raspberry vinaigrette or poppy seed dressing.
  • Add Other Fruits: Blueberries, raspberries, or blackberries would all be delicious additions to this salad.
  • Include Candied Pecans: For an extra touch of sweetness, use candied pecans instead of toasted pecans.

How to Store Strawberry Spinach Salad

This salad is best served immediately, but if you have leftovers, you can store them in an airtight container in the refrigerator for up to 24 hours. However, keep in mind that the spinach may wilt slightly, and the salad may become a bit soggy. To prevent this, store the vinaigrette separately and add it just before serving.

Frequently Asked Questions (FAQ)

  • Can I make this salad ahead of time? While it’s best served immediately, you can prepare the individual components (spinach, strawberries, red onion, feta, pecans) ahead of time and store them separately. Then, combine everything and add the vinaigrette just before serving.
  • Can I use frozen strawberries? Fresh strawberries are best for this salad. Frozen strawberries will release too much moisture and make the salad soggy.
  • What if I don’t like feta cheese? You can substitute goat cheese, blue cheese, or even shredded cheddar cheese.
  • Can I use a different type of nut? Walnuts, almonds, or sunflower seeds would all be delicious alternatives to pecans.
  • Is this salad gluten-free? Yes, this salad is naturally gluten-free.
  • Is this salad vegetarian? Yes, this salad is vegetarian.
  • Can I make this salad vegan? Yes, simply omit the feta cheese or substitute it with a vegan cheese alternative.

Serving Suggestions

This Strawberry Spinach Salad is incredibly versatile and can be served in a variety of ways. Here are a few of my favorite serving suggestions:

  • As a Side Dish: Serve it alongside grilled chicken, fish, or tofu for a complete and balanced meal.
  • As a Light Lunch: Enjoy it as a light and refreshing lunch on a warm day.
  • At a Potluck or BBQ: This salad is always a hit at potlucks and barbecues.
  • As a Starter: Serve it as a starter before a larger meal.
  • In a Wrap or Sandwich: Add it to a wrap or sandwich for a boost of flavor and nutrients.

Ultimately, this strawberry spinach salad is a celebration of simple, wholesome ingredients and the joy of cooking. I hope you enjoy making and eating it as much as I do! From my kitchen to yours, happy cooking!

Strawberry Spinach Salad

Prep Time 15 minutes
Total Time 15 minutes
Servings 4 people
Calories 220
A refreshing and vibrant salad combining the sweetness of strawberries with the earthy flavor of spinach. Perfect as a light lunch or a side dish for any occasion.

Ingredients

Salad Ingredients

  • 4 cups fresh spinach (washed and dried)
  • 2 cups ripe strawberries (hulled and sliced)
  • 1/4 cup red onion (thinly sliced)
  • 1/2 cup crumbled feta cheese
  • 1/3 cup pecan halves (toasted)

Dressing

  • 1/4 cup balsamic vinaigrette

Instructions 

  • Combine spinach and strawberries in a bowl.
  • Toss in red onion, feta cheese, and pecans.
  • Drizzle with balsamic vinaigrette before serving.
  • Toss lightly to coat.
  • Serve immediately.

Notes

For a vegan option, omit the feta cheese or substitute with a plant-based alternative.
Calories: 220kcal
Cost: $12
Course: Salad
Cuisine: American
Keyword: Spinach

Nutrition

Calories: 220kcal | Carbohydrates: 18g | Protein: 7g | Fat: 15g | Sodium: 180mg
pin

Easy Lemon Asparagus Pasta with Chicken: A Weeknight Delight

Hello, friends! Avery here, from my cozy kitchen in rainy Portland. Today, I’m sharing a recipe that’s become a staple in my home – Easy Lemon Asparagus Pasta with Chicken. It’s the kind of dish that makes you feel good from the inside out – vibrant, flavorful, and surprisingly simple to whip up even on the busiest weeknights.

I remember when I first started cooking for myself, overwhelmed by complicated recipes and endless ingredient lists. This recipe embodies everything I’ve learned since then: that delicious, healthy food doesn’t have to be intimidating. It’s about finding joy in simple ingredients and creating something nourishing and satisfying.

Why You’ll Love This Lemon Asparagus Pasta

This isn’t just another pasta dish; it’s a celebration of spring flavors, a comforting hug in a bowl, and a testament to the power of simple, fresh ingredients. Here’s why I think you’ll fall in love with it:

  • Quick and Easy: Ready in under 30 minutes, it’s perfect for busy weeknights.
  • Fresh and Flavorful: The bright lemon and tender asparagus create a vibrant, refreshing taste.
  • Healthy and Balanced: Packed with protein, vegetables, and wholesome carbohydrates.
  • Versatile: Easily adaptable to your dietary needs and preferences. Swap out the chicken for shrimp, add different vegetables, or use gluten-free pasta.
  • Comforting: A creamy, comforting dish that satisfies without feeling heavy.

The Magic Behind the Ingredients

Let’s talk ingredients. Each one plays a crucial role in creating the symphony of flavors in this pasta.

  • Chicken: Provides lean protein to keep you feeling full and satisfied.
  • Asparagus: Adds a delicate sweetness and a boost of vitamins and minerals.
  • Linguine: A classic pasta shape that perfectly complements the creamy sauce.
  • Whipping Cream: Creates a luscious, velvety sauce.
  • Butter: Adds richness and depth of flavor.
  • Lemon: Brightens the dish with its zesty, citrusy notes.
  • Parmesan Cheese: Provides a salty, savory finish.

Ingredients You’ll Need

  • 1 pound boneless, skinless chicken breasts (grilled and sliced into strips)
  • 1 pound asparagus (trimmed, cut into 1-inch pieces)
  • 10 ounces linguine (spaghetti or fettuccine can be used too)
  • 3/4 cup whipping cream
  • 2 tablespoons butter
  • Salt and pepper to your liking
  • 1 tablespoon grated lemon peel
  • 1 tablespoon fresh lemon juice
  • 1/3 cup finely grated parmesan cheese
  • Optional toppings: lemon slices and chopped parsley
Recipe Image

Step-by-Step: Making the Lemon Asparagus Pasta

Alright, let’s get cooking! Here’s how to bring this dish to life:

  1. Cook the Pasta: Bring a large pot of salted water to a boil. Add the linguine and cook according to package directions until al dente. Remember to reserve about 1 cup of pasta water before draining! This starchy water is liquid gold and will help create the perfect creamy sauce.
  2. Sauté the Asparagus: While the pasta is cooking, melt the butter in a large skillet over medium heat. Add the asparagus and cook for 5-7 minutes, or until tender-crisp. Season with salt and pepper.
  3. Create the Sauce: Pour in the whipping cream, lemon juice, and lemon zest. Bring to a simmer and cook for 2-3 minutes, or until the sauce has slightly thickened.
  4. Combine Everything: Add the cooked pasta and chicken to the skillet with the sauce. Toss to combine, adding a little pasta water at a time if needed to reach your desired consistency.
  5. Finish with Parmesan: Stir in the parmesan cheese and season with salt and pepper to taste.
  6. Serve and Enjoy: Serve immediately, garnished with lemon slices and chopped parsley, if desired.

Pro Tips for Pasta Perfection

Here are a few secrets I’ve learned over the years to elevate your pasta game:

  • Salt Your Pasta Water: This is crucial for flavoring the pasta from the inside out. Don’t be shy with the salt!
  • Cook Pasta Al Dente: This means “to the tooth” in Italian. The pasta should be firm and slightly chewy, not mushy.
  • Reserve Pasta Water: This starchy water is a game-changer for creating creamy, emulsified sauces.
  • Don’t Overcook the Asparagus: You want it to be tender-crisp, not limp and soggy.
  • Use Fresh Lemon Juice and Zest: The flavor is much brighter and more vibrant than bottled lemon juice.

Common Mistakes to Avoid

We all make mistakes in the kitchen – it’s part of the learning process! Here are a few common pitfalls to watch out for:

  • Overcooking the Pasta: Nobody likes mushy pasta. Cook it al dente!
  • Forgetting to Salt the Pasta Water: This is a missed opportunity to add flavor to the pasta itself.
  • Overcooking the Asparagus: Aim for tender-crisp, not soggy.
  • Using Bottled Lemon Juice: Fresh is always best when it comes to lemon flavor.
  • Not Adding Enough Salt: Salt is essential for balancing the flavors in the dish.

Variations: Make It Your Own

The beauty of this recipe is that it’s incredibly versatile. Feel free to experiment and make it your own!

  • Protein: Swap the chicken for shrimp, salmon, or tofu.
  • Vegetables: Add other seasonal vegetables like peas, spinach, or zucchini.
  • Cheese: Use ricotta, goat cheese, or feta instead of parmesan.
  • Pasta: Experiment with different pasta shapes like penne, farfalle, or rotini.
  • Spice: Add a pinch of red pepper flakes for a little heat.
  • Dairy-Free: Use coconut cream or cashew cream instead of whipping cream.

Storing and Reheating

Leftovers can be stored in an airtight container in the refrigerator for up to 3 days. To reheat, gently warm in a skillet over medium heat, adding a splash of milk or cream if needed to loosen the sauce. Avoid microwaving, as it can make the pasta mushy.

Frequently Asked Questions

  • Can I use frozen asparagus? While fresh asparagus is best, you can use frozen asparagus in a pinch. Just be sure to thaw it completely and pat it dry before cooking.
  • Can I make this dish ahead of time? The pasta is best served fresh, but you can prepare the sauce ahead of time and store it in the refrigerator for up to 2 days.
  • Can I use a different type of pasta? Yes, feel free to use any pasta shape you like. Spaghetti, fettuccine, and penne all work well.
  • Is this recipe gluten-free? Not as written, but you can easily make it gluten-free by using gluten-free pasta.
  • Can I add more vegetables? Absolutely! Feel free to add any vegetables you like. Peas, spinach, and zucchini are all great additions.

Serving Suggestions

This Lemon Asparagus Pasta with Chicken is delicious on its own, but here are a few ideas to round out your meal:

  • Side Salad: A simple green salad with a lemon vinaigrette is a perfect complement.
  • Garlic Bread: Crusty garlic bread is always a welcome addition.
  • Roasted Vegetables: Roasted broccoli or Brussels sprouts would be a delicious side dish.
  • Dessert: A light and refreshing dessert like lemon sorbet or fresh berries is the perfect ending to the meal.

And there you have it – my Easy Lemon Asparagus Pasta with Chicken! I hope you enjoy making and eating this dish as much as I do. Remember, cooking should be fun and relaxing. Don’t be afraid to experiment and make it your own. Until next time, happy cooking!

This pasta dish, with its vibrant flavors, is a testament to how simple ingredients can create something truly special. If you’re looking for a quick, healthy, and delicious weeknight meal, this lemon asparagus pasta is the answer. The creamy sauce, the tender asparagus, and the savory chicken all come together in perfect harmony. You can easily customize the recipe to your liking, adding different vegetables or proteins. The key is to use fresh, high-quality ingredients and to cook the pasta al dente. If you re new to cooking, don’t be intimidated. This recipe is very forgiving and easy to follow. You can even get the kids involved! The asparagus and the chicken are a great way to get them to eat their vegetables. Remember to reserve some of the pasta water when you drain the pasta. This starchy water will help to create a creamy and emulsified sauce. The lemon juice and zest add a bright and refreshing flavor to the dish. If you prefer a richer sauce, you can use heavy cream instead of whipping cream. This pasta with chicken and asparagus is a perfect example of how healthy eating can be both delicious and satisfying. So go ahead, give it a try! I promise you won’t be disappointed.

Easy Lemon Asparagus Pasta with Chicken

Prep Time 15 minutes
Cook Time 20 minutes
Total Time 35 minutes
Servings 4 people
Calories 550
A delightful and easy pasta dish featuring tender chicken, fresh asparagus, and a bright lemon sauce. Perfect for a quick weeknight dinner!

Ingredients

Ingredients

  • 1 pound boneless, skinless chicken breasts (grilled and sliced into strips)
  • 1 pound asparagus (trimmed, cut into 1-inch pieces)
  • 10 ounces linguine (spaghetti or fettuccine can be used too)
  • 0.75 cup whipping cream
  • 2 tablespoons butter
  • Salt and pepper (to your liking)
  • 1 tablespoon grated lemon peel
  • 1 tablespoon fresh lemon juice
  • 0.33 cup finely grated parmesan cheese
  • Optional toppings: lemon slices and chopped parsley

Notes

Add a splash of white wine to the sauce for extra flavor!
Calories: 550kcal
Cost: $20
Course: Dinner
Cuisine: Italian
Keyword: chicken

Nutrition

Calories: 550kcal | Carbohydrates: 55g | Protein: 40g | Fat: 25g | Sodium: 300mg
pin

Hey there, friend! It’s Avery, and I’m so excited to share one of my absolute go-to recipes with you: Creamy Lemon Pasta. This dish isn’t just food; it’s a hug in a bowl, perfect for those days when you need a little extra comfort or a quick, satisfying meal. I love how it manages to be both light and decadent, a testament to the magic that happens when simple ingredients come together.

My journey with this recipe started, like many of my kitchen adventures, out of necessity. I needed something quick, flavorful, and comforting after a long day. And let me tell you, this creamy lemon pasta recipe absolutely delivers. It’s become a staple in my rotation, and I have a feeling it will become one of yours too.

Why You’ll Love This Creamy Lemon Pasta

What makes this creamy lemon pasta so special? Let me count the ways:

  • Quick & Easy: From start to finish, this dish comes together in under 20 minutes. Perfect for busy weeknights!
  • Bright & Flavorful: The combination of lemon zest, lemon juice, and parmesan cheese creates a vibrant, zesty flavor that is truly irresistible.
  • Comforting & Satisfying: The creamy sauce coats the pasta beautifully, creating a comforting and satisfying meal.
  • Versatile: This recipe is easily customizable. Add your favorite vegetables, proteins, or herbs to make it your own.
  • Simple Ingredients: You probably already have most of these ingredients in your pantry and refrigerator!

Honestly, it’s the kind of dish that makes you feel good from the inside out. The bright lemon flavor is so uplifting, and the creamy sauce is just pure comfort. Plus, it’s a great way to use up leftover pasta or that lemon that’s been sitting in your fridge, just waiting for its moment to shine.

Ingredients for Creamy Lemon Pasta

Here’s what you’ll need to create this creamy, dreamy pasta:

  • 8 oz fresh pasta: Fresh pasta cooks quickly and has a wonderful texture, but dried pasta works too!
  • 2 tbsp freshly cracked black pepper: Don’t skimp on the pepper! It adds a wonderful warmth and depth of flavor.
  • 2 tbsp butter: Butter is the base of our creamy sauce, adding richness and flavor.
  • ½ tbsp flour: A little flour helps to thicken the sauce, creating that perfect creamy consistency.
  • ½ cup chicken broth: Chicken broth adds a savory element to the sauce, balancing the acidity of the lemon. Vegetable broth works too!
  • 1 lemon zested and juiced (seeds removed): The star of the show! Fresh lemon zest and juice provide that bright, zesty flavor.
  • ¾ cup heavy whipping cream: Heavy cream creates a luxurious, creamy sauce that coats the pasta perfectly.
  • ½ cup freshly fine grated parmesan reggiano cheese: Parmesan cheese adds a salty, umami flavor that complements the lemon beautifully.
  • Garnish: cracked black pepper (extra lemon zest, extra cheese): For that extra touch of flavor and visual appeal.
Recipe Image

How to Make Creamy Lemon Pasta: Step-by-Step

Alright, let’s get cooking! Here’s how to bring this creamy lemon pasta to life:

  1. Boil the Pasta: Bring a large pot of salted water to a boil.
  2. Toast the Pepper: Add black pepper to the dry skillet and heat on medium-high heat. Cook for 1-2 mins or until very fragrant. Add the butter to a skillet and stir around. Once it melts, sprinkle the flour in and cook for 1-2 minutes, whisking frequently.
  3. Create the Sauce: Add in the broth and let the mixture come to a low simmer. Whisk in cream and cook it for a few minutes until the sauce has thickened slightly.
  4. Cook the Pasta: Add fresh pasta to the boiling water and cook according to package instructions.
  5. Combine and Season: Stir in the parmesan cheese and take the skillet off the heat. Season with salt & pepper to taste.
  6. Coat the Pasta: Add the drained pasta to the skillet along with lemon zest and juice. Toss until pasta is coated. Add in ¼ cup of pasta water at a time if the sauce becomes too thick.
  7. Garnish and Serve: Garnish with more parmesan, lemon zest, black pepper and a bit of chopped parsley if desired. Serve immediately.

The pasta is coated beautifully with the creamy sauce, and the lemon zest adds such a burst of freshness. Remember to taste and adjust the seasoning as you go. You’ll want to make sure the sauce is perfectly balanced to your liking. The aroma alone is enough to make your mouth water!

Pro Tips for the Best Creamy Lemon Pasta

Here are a few tricks I’ve learned over the years to take this dish from good to amazing:

  • Use Fresh Ingredients: Fresh lemon juice and zest make a huge difference in the flavor of this dish.
  • Don’t Overcook the Pasta: Cook the pasta al dente, so it still has a slight bite. It will continue to cook in the sauce.
  • Save the Pasta Water: Pasta water is liquid gold! It helps to create a smooth, emulsified sauce.
  • Grate Your Own Parmesan: Pre-grated parmesan cheese often contains cellulose, which can prevent it from melting smoothly.
  • Taste and Adjust: Don’t be afraid to adjust the amount of lemon juice, parmesan cheese, or black pepper to your liking.

I always say, cooking is an art, not a science. Trust your instincts and don’t be afraid to experiment. If you like a little more tang, add lemon juice. If you prefer a richer sauce, add a little more cream. Make it your own!

Common Mistakes to Avoid

We all make mistakes in the kitchen, but here are a few common pitfalls to avoid when making creamy lemon pasta:

  • Overcooking the Pasta: Mushy pasta is never a good thing! Be sure to cook the pasta al dente.
  • Burning the Butter: Keep the heat on medium-low when melting the butter to prevent it from burning.
  • Adding Cold Cream: Adding cold cream to the hot sauce can cause it to curdle. Let the cream come to room temperature before adding it to the skillet.
  • Forgetting to Season: Salt and pepper are essential for bringing out the flavors in this dish. Don’t forget to season!
  • Not Removing Seeds: Make sure to remove any seeds from the lemon juice to avoid a bitter taste.

Remember, even if you make a mistake, it’s okay! Cooking is all about learning and experimenting. I’ve definitely had my fair share of kitchen mishaps, but that’s how I’ve learned to become a better cook.

Variations to Try

One of the things I love most about this recipe is how versatile it is. Here are a few variations to inspire you:

  • Add Vegetables: Sautéed spinach, asparagus, or mushrooms would be delicious in this dish.
  • Add Protein: Grilled chicken, shrimp, or salmon would make this a more substantial meal.
  • Spice it Up: Add a pinch of red pepper flakes for a little heat.
  • Add Herbs: Fresh basil, parsley, or thyme would add a lovely herbal note.
  • Use Different Cheese: Try using pecorino romano or asiago cheese instead of parmesan.

Feel free to get creative and experiment with different flavors and textures. The possibilities are endless! Think about what’s in season and what you’re craving, and let that guide you.

How to Store Leftover Creamy Lemon Pasta

If you happen to have any leftovers (which is rare in my house!), here’s how to store them:

  • Refrigerate: Store the pasta in an airtight container in the refrigerator for up to 3 days.
  • Reheat: Reheat the pasta in a skillet over medium heat, adding a little bit of broth or water to loosen the sauce. You can also reheat it in the microwave, but be careful not to overcook it.

Keep in mind that the sauce may thicken as it sits, so you may need to add a little extra liquid when reheating. I don’t recommend freezing this pasta, as the sauce may separate and become grainy.

Frequently Asked Questions (FAQ)

Here are some common questions I get about this recipe:

  • Can I use dried pasta instead of fresh pasta? Yes, you can! Just be sure to cook it according to package instructions.
  • Can I use low-fat cream? I don’t recommend it, as it won’t create the same creamy texture.
  • Can I make this recipe dairy-free? You can try using a plant-based cream alternative, but the results may vary. Nutritional yeast can give a cheesy flavor.
  • Can I make this recipe gluten-free? Yes, simply use gluten-free pasta.
  • How can I prevent the sauce from curdling? Make sure to use room temperature cream and don’t overheat the sauce.

If you have any other questions, feel free to leave a comment below! I’m always happy to help.

Serving Suggestions

This creamy lemon pasta is delicious on its own, but here are a few ideas for serving it:

  • With a Side Salad: A simple green salad with a lemon vinaigrette would be a perfect complement to this dish.
  • With Garlic Bread: Because who doesn’t love garlic bread with pasta?
  • As a Side Dish: This pasta would be a great side dish for grilled chicken, fish, or vegetables.
  • With a Glass of White Wine: A crisp Sauvignon Blanc or Pinot Grigio would pair beautifully with the lemon flavors in this dish.

Ultimately, it is a fantastic recipe that is full of flavor and easy to make. This creamy lemon pasta is more than just a meal; it’s an experience. It’s about taking a few simple ingredients and turning them into something truly special. It’s about nourishing your body and soul with good food and good company. And it’s about finding joy in the process, not just the result.

So, go ahead, give this recipe a try. I promise you won’t be disappointed. And if you do, be sure to share your creations with me! I can’t wait to see what you come up with. Happy cooking, friends!

Creamy Lemon Pasta

Prep Time 5 minutes
Cook Time 15 minutes
Total Time 20 minutes
Servings 4 servings
Calories 450
A delightful and easy-to-make pasta dish featuring a creamy lemon sauce. Perfect for a quick weeknight dinner.

Ingredients

Ingredients

  • 8 oz fresh pasta
  • 2 tbsp freshly cracked black pepper
  • 2 tbsp butter
  • 0.5 tbsp flour
  • 0.5 cup chicken broth
  • 1 lemon lemon zested and juiced (seeds removed)
  • 0.75 cup heavy whipping cream
  • 0.5 cup freshly fine grated parmesan reggiano cheese

Garnish

  • cracked black pepper (extra lemon zest, extra cheese)

Instructions 

  • Bring a large pot of salted water to a boil.
  • Add black pepper to the dry skillet and heat on medium-high heat. Cook for 1-2 mins or until very fragrant. Add the butter to a skillet and stir around. Once it melts, sprinkle the flour in and cook for 1-2 minutes, whisking frequently.
  • Add in the broth and let the mixture come to a low simmer. Whisk in cream and cook it for a few minutes until the sauce has thickened slightly.
  • Add fresh pasta to the boiling water and cook according to package instructions.
  • Stir in the parmesan cheese and take the skillet off the heat. Season with salt & pepper to taste.
  • Add the drained pasta to the skillet along with lemon zest and juice. Toss until pasta is coated. Add in ¼ cup of pasta water at a time if the sauce becomes too thick.
  • Garnish with more parmesan, lemon zest, black pepper and a bit of chopped parsley if desired. Serve immediately.

Notes

Adjust the amount of lemon juice and zest to your preference for a more or less intense lemon flavor.
Calories: 450kcal
Cost: $12
Course: Main Course
Cuisine: Italian
Keyword: pasta

Nutrition

Calories: 450kcal | Carbohydrates: 50g | Protein: 18g | Fat: 22g | Sodium: 300mg
pin

Easy Low Carb Green Goddess Dip Recipe: A Symphony of Freshness

Hello, friends! Avery here, from my little kitchen in rainy Portland. Today, I want to share a recipe that’s become a staple in my life: a vibrant, incredibly delicious Low Carb Green Goddess Dip. This isn’t just any dip; it’s a celebration of fresh herbs, creamy textures, and flavors that sing. It’s the kind of recipe that makes you feel good from the inside out, and that’s what cooking is all about, isn’t it?

My journey with food started out of necessity, a desperate attempt to reclaim my health. And along the way, I discovered the magic of simple ingredients, the joy of creating something nourishing with my own two hands. This Green Goddess Dip is a perfect example of that magic. It’s easy, adaptable, and packed with goodness. And the best part? It’s low carb, so you can indulge without any guilt. It is light and fresh, making it a perfect addition to any gathering or a simple solo snack.

Why You’ll Love This Low Carb Green Goddess Dip

This dip is more than just a tasty snack; it’s a little jar of happiness. Here’s why I think you’ll fall in love with it:

  • Fresh Herb Power: The combination of parsley, chives, and tarragon creates a symphony of flavors that’s both bright and comforting. Fresh herbs are the heart of this dip.
  • Creamy Dreamy Texture: The blend of mayonnaise and sour cream creates a luscious, velvety texture that’s irresistible. You can add greek yogurt for a lighter twist.
  • Quick and Easy: This dip comes together in minutes, making it perfect for busy weeknights or impromptu gatherings.
  • Low Carb Delight: If you’re watching your carbs, this dip is a winner. It’s a guilt-free way to enjoy a creamy, flavorful snack. This dip is also keto-friendly!
  • Versatile Goodness: Serve it with veggies, use it as a salad dressing, or spread it on your favorite low-carb crackers. The possibilities are endless. As a salad dressing, it adds a burst of flavor.

I truly believe that the best recipes are the ones that are both delicious and good for you. This Green Goddess Dip ticks all the boxes. It’s a healthy green salad dressing that doesn’t compromise on flavor. And who doesn’t love a good green dip?

Ingredients for the Best Green Goddess Dip

Here’s what you’ll need to create this little jar of green goodness:

  • 1 cup mayonnaise (full-fat)
  • 1/2 cup sour cream (full-fat)
  • 1/4 cup chopped fresh parsley
  • 1/4 cup chopped fresh chives
  • 1/4 cup chopped fresh tarragon
  • 2 tablespoons lemon juice
  • 2 cloves garlic, minced
  • 2 anchovy fillets, minced (optional)
  • 1/4 teaspoon salt
  • 1/8 teaspoon black pepper
  • 2 tablespoons olive oil
Recipe Image

How to Make Low Carb Green Goddess Dip: Step-by-Step

Making this dip is as easy as 1-2-3! Here’s how:

  1. Combine Ingredients: In a food processor or blender, combine all the ingredients.
  2. Process Until Smooth: Process until the mixture is smooth and creamy.
  3. Taste and Adjust: Taste the dip and adjust the seasonings as needed. Add more salt, pepper, or lemon juice to your liking.
  4. Chill: Refrigerate the dip for at least 30 minutes to allow the flavors to meld. This step is crucial for the best flavor.
  5. Serve and Enjoy: Serve the dip with your favorite low-carb vegetables or use it as a salad dressing.

Pro Tips for the Perfect Green Goddess Dip

Here are a few tips to ensure your Green Goddess Dip is a culinary masterpiece:

  • Use Fresh Herbs: The fresher the herbs, the better the flavor. If possible, use herbs from your garden or a local farmer’s market.
  • Don’t Skip the Anchovies: I know, I know, anchovies can be a bit intimidating. But trust me, they add a depth of flavor that’s truly special. If you’re not a fan, you can omit them, but I highly recommend giving them a try. No anchovies? No problem!
  • Adjust the Consistency: If you prefer a thinner dip, add a tablespoon or two of water or olive oil until you reach your desired consistency.
  • Let it Rest: Refrigerating the dip for at least 30 minutes allows the flavors to meld and deepen. This step is essential for the best flavor.
  • Taste as You Go: Taste the dip frequently and adjust the seasonings as needed. Everyone’s palate is different, so make it your own!

Common Mistakes to Avoid

Even the simplest recipes can have their pitfalls. Here are a few common mistakes to avoid when making Green Goddess Dip:

  • Using Dried Herbs: Dried herbs simply don’t have the same vibrancy as fresh herbs. Stick with fresh for the best flavor.
  • Over-Processing: Over-processing the dip can result in a bitter taste. Process until smooth, but don’t go overboard.
  • Not Tasting: Failing to taste and adjust the seasonings can result in a bland dip. Taste as you go and make it your own.
  • Skipping the Chill Time: Rushing the chilling process can prevent the flavors from fully melding. Be patient and let it rest!

Green Goddess Dip Variations: Make it Your Own!

One of the things I love most about this recipe is how adaptable it is. Here are a few variations to try:

  • Spicy Goddess: Add a pinch of red pepper flakes or a dash of hot sauce for a spicy kick.
  • Avocado Goddess: Add half an avocado for an extra creamy and healthy twist. The avocado and fresh herbs create a wonderful blend.
  • Vegan Goddess: Substitute the mayonnaise and sour cream with vegan alternatives.
  • Lighter Goddess: Replace some of the mayonnaise with Greek yogurt for a lighter version. Greek green goddess dressing is a fantastic option. A lighter green goddess dressing is a great way to reduce calories.
  • Lemon-Lime Goddess: Use a combination of lemon and lime juice for a zesty twist.

How to Store Your Green Goddess Dip

This dip is best stored in an airtight container in the refrigerator. It will keep for up to 3-4 days. The goddess dip is best when fresh!

  • Airtight Container: Ensure the container is properly sealed to maintain freshness.
  • Refrigeration: Always store in the refrigerator to prevent spoilage.
  • Best Used Within 3-4 Days: For optimal flavor and texture, consume within 3-4 days.

Green Goddess Dip FAQs

Here are some frequently asked questions about Green Goddess Dip:

  • Can I use dried herbs? While fresh herbs are preferred, you can use dried herbs in a pinch. Use about 1 teaspoon of each dried herb for every 1 tablespoon of fresh herbs.
  • Can I make this dip ahead of time? Absolutely! In fact, I recommend making it a few hours ahead of time to allow the flavors to meld.
  • Is this dip keto-friendly? Yes, this dip is keto-friendly as long as you use full-fat mayonnaise and sour cream.
  • Can I freeze this dip? I don’t recommend freezing this dip, as the texture may change upon thawing.

Serving Suggestions: Beyond the Dip

While this dip is delicious with vegetables, it’s also incredibly versatile. Here are a few other ways to enjoy it:

  • Salad Dressing: Use it as a creamy, flavorful salad dressing.
  • Sandwich Spread: Spread it on your favorite sandwiches or wraps.
  • Baked Potato Topping: Top baked potatoes with a dollop of Green Goddess Dip.
  • Cracker Dip: Serve with your favorite low-carb crackers.
  • Veggie Dip: The classic pairing! Serve with cucumber, celery, bell peppers, and broccoli.

I hope you enjoy this Low Carb Green Goddess Dip as much as I do. It’s a little jar of sunshine that’s sure to brighten your day. Remember, cooking is about more than just following a recipe; it’s about connecting with your food and nourishing your body and soul. Happy cooking, friends!

P.S. I love hearing from you! If you try this recipe, be sure to leave a comment below and let me know what you think. And don’t forget to subscribe to your email and my newsletter for more delicious, healthy recipes delivered straight to your inbox. We’ll send you exclusive content and special offers!

Low Carb Green Goddess Dip

Prep Time 10 minutes
Total Time 10 minutes
Servings 8 servings
Calories 250
A creamy and flavorful dip perfect for low-carb snacking. This Green Goddess Dip is packed with fresh herbs and healthy fats, making it a delicious and guilt-free treat.

Ingredients

Ingredients

  • 1 cup mayonnaise (full-fat)
  • 1/2 cup sour cream (full-fat)
  • 1/4 cup fresh parsley (chopped)
  • 1/4 cup fresh chives (chopped)
  • 1/4 cup fresh tarragon (chopped)
  • 2 tablespoons lemon juice
  • 2 cloves garlic (minced)
  • 2 anchovy fillets anchovy fillets (minced (optional))
  • 1/4 teaspoon salt
  • 1/8 teaspoon black pepper
  • 2 tablespoons olive oil

Instructions 

  • Combine all ingredients in a food processor or blender.
  • Process until smooth and creamy.
  • Taste and adjust seasonings as needed.
  • Refrigerate for at least 30 minutes to allow flavors to meld.
  • Serve with low-carb vegetables like cucumber, celery, bell peppers, or broccoli.

Notes

For a thicker dip, use Greek yogurt instead of sour cream.
Calories: 250kcal
Cost: $8
Course: Appetizer, Snack
Cuisine: American
Keyword: Avocado

Nutrition

Calories: 250kcal | Carbohydrates: 3g | Protein: 2g | Fat: 26g | Sodium: 200mg
pin

Error: AI returned broken format. Expecting ‘,’ delimiter: line 2 column 5596 (char 5597)

Recipe Image

Lemon Garlic Shrimp Pasta With Spinach for a Quick Dinner Joy

Prep Time 10 minutes
Cook Time 15 minutes
Total Time 25 minutes
Servings 2 servings
Calories 550
This Lemon Garlic Shrimp Pasta is a quick and easy dinner that's packed with flavor. The combination of lemon, garlic, and shrimp with spinach makes for a delicious and healthy meal.

Ingredients

Pasta

  • 5 ounces dry pasta (approx. 140 grams)

Shrimp

  • 1 pound shrimp (thawed and tails removed)

Seasoning

  • 1 Tbsp olive oil (for seasoning)
  • 3 Tbsp olive oil (divided for cooking)
  • 1 tsp smoked paprika
  • 0.5 tsp chili flakes
  • to taste salt
  • to taste pepper

Other Ingredients

  • 5 cloves garlic (minced)
  • 4 cups spinach (can substitute with kale or Swiss chard)
  • 0.5 lemon lemon (juice + zest)
  • 0.25 cup fresh basil or parsley (chopped)
  • for serving (optional) fresh Parmesan

Notes

Adjust the amount of chili flakes to your spice preference.
Calories: 550kcal
Cost: $18
Course: Dinner
Cuisine: Italian
Keyword: shrimp

Nutrition

Calories: 550kcal | Carbohydrates: 60g | Protein: 40g | Fat: 20g | Sodium: 400mg
pin

Hello, friends! Avery here, from my little kitchen in Portland. Today, I want to share a recipe that has become a staple in my house, especially when the sun finally decides to peek through the clouds: Strawberry Spinach Salad with Feta. It’s a dish that sings of summer, bursting with fresh flavors and vibrant colors. More than just a salad, it’s a celebration of simple, wholesome ingredients that nourish both body and soul.

This isn’t just another salad recipe; it’s a reminder that healthy eating can be joyful and delicious. It’s about finding pleasure in every bite and connecting with the food we eat. I hope this salad brings as much happiness to your table as it does to mine.

Why You’ll Love This Strawberry Spinach Salad

I’ve always believed that the best recipes are the ones that are both easy to make and incredibly satisfying. This Strawberry Spinach Salad with Feta ticks all those boxes. Here’s why I think you’ll fall in love with it:

  • Fresh Flavors: The combination of sweet strawberries, earthy spinach, and salty feta is a match made in heaven. Each bite is a delightful explosion of taste.
  • Quick and Easy: From start to finish, this salad comes together in under 15 minutes. Perfect for busy weeknights or impromptu gatherings.
  • Versatile: It’s delicious as a light lunch, a side dish, or even a vegetarian main course. The flavors pair beautifully with grilled chicken or fish if you’re looking to add protein.
  • Healthy and Nutritious: Packed with vitamins, minerals, and antioxidants, this salad is as good for you as it tastes.
  • A Visual Treat: The vibrant colors of the strawberries, spinach, and red onion make this salad a feast for the eyes as well as the palate.

Honestly, **this salad** has become my go-to when I need something quick, healthy, and satisfying. I often find myself making it for lunch on a sunny afternoon or bringing it to potlucks with friends. Everyone always raves about it!

The Star Ingredients

Let’s talk about the ingredients that make this **strawberry spinach salad** so special. Each component plays a vital role in creating a harmonious and balanced dish:

  • Baby Spinach: The base of our salad, baby spinach is tender, mild, and packed with nutrients. Look for spinach that is vibrant green and free from any signs of wilting.
  • Fresh Strawberries: The sweetness of the strawberries is what truly makes this salad shine. Choose ripe, juicy strawberries for the best flavor.
  • Feta Cheese: Salty, tangy, and creamy, feta cheese adds a wonderful contrast to the sweetness of the strawberries and the earthiness of the spinach. I prefer to use crumbled feta for easy distribution.
  • Red Onion: A little bit of red onion goes a long way in adding a sharp, pungent flavor to the salad. Be sure to slice it thinly to avoid overpowering the other ingredients.
  • Candied Pecans or Walnuts: These add a delightful crunch and a touch of sweetness to the salad. You can use store-bought candied nuts or make your own at home.
  • Dried Cranberries (Optional): For an extra burst of sweetness and chewiness, add a sprinkle of dried cranberries.

Ingredients You’ll Need

  • 8 cups fresh baby spinach
  • 2 cups fresh strawberries, sliced
  • 1 cup crumbled feta cheese
  • 1/2 cup thinly sliced red onion
  • 1/2 cup candied pecans or walnuts
  • 1/4 cup dried cranberries (optional)

For the Balsamic Vinaigrette:

  • 1/4 cup olive oil
  • 2 tablespoons balsamic vinegar
  • 1 tablespoon honey

  • 1 teaspoon Dijon mustard
  • 1 clove garlic, minced
  • Salt and pepper to taste
Recipe Image

How to Make Strawberry Spinach Salad: Step-by-Step

Making **this salad** is incredibly simple. Follow these easy steps, and you’ll have a delicious and refreshing dish in no time:

  1. Prepare the Dressing: In a small jar or bowl, whisk together the olive oil, balsamic vinegar, honey, Dijon mustard, minced garlic, salt, and pepper. Shake or whisk until the dressing is emulsified and creamy.
  2. Prep the Ingredients: Wash and thoroughly dry the baby spinach. Slice the strawberries and red onion as needed.
  3. Assemble the Salad: In a large bowl, gently toss the spinach with about two-thirds of the balsamic vinaigrette. This ensures that the spinach is lightly coated without being soggy.
  4. Layer the Toppings: Arrange the sliced strawberries, crumbled feta cheese, thinly sliced red onion, candied pecans or walnuts, and dried cranberries (if using) over the dressed spinach.
  5. Drizzle and Serve: Drizzle the remaining dressing over the top of the salad just before serving. This keeps the toppings fresh and prevents them from becoming soggy.

**To make** the salad even more appealing, consider chilling the ingredients for about 15 minutes before assembling. This helps to keep the salad crisp and refreshing, especially on a hot day.

Pro Tips for the Perfect Salad

Here are a few of my favorite tips and tricks for making the best **strawberry spinach salad with feta**:

  • Use Fresh, High-Quality Ingredients: The better the ingredients, the better the salad. Choose ripe strawberries, fresh spinach, and good-quality feta cheese.
  • Dry the Spinach Thoroughly: Wet spinach will make the salad soggy. Use a salad spinner or pat the spinach dry with paper towels.
  • Don’t Overdress the Salad: Add the dressing gradually, tossing gently until the spinach is lightly coated. You can always add more dressing if needed.
  • Chill the Ingredients: Chilling the spinach, strawberries, and feta cheese before assembling the salad helps to keep it crisp and refreshing.
  • Make the Dressing Ahead of Time: The balsamic vinaigrette can be made up to a week in advance and stored in the refrigerator. This saves time and allows the flavors to meld together.

**I’m** always experimenting with different variations of this salad, but these simple tips always ensure a delicious and satisfying result.

Common Mistakes to Avoid

Even though this salad is easy to make, there are a few common mistakes that can affect the final result. Here’s what to watch out for:

  • Using Wilted Spinach: Wilted spinach will make the salad look unappetizing and taste bland. Choose fresh, vibrant green spinach for the best flavor and texture.
  • Overdressing the Salad: Too much dressing will make the salad soggy and overpower the other flavors. Add the dressing gradually, tossing gently until the spinach is lightly coated.
  • Not Slicing the Red Onion Thinly Enough: Thick slices of red onion can be overpowering. Use a mandoline or a sharp knife to slice the red onion thinly.
  • Adding the Dressing Too Early: If you’re not serving the salad immediately, wait to add the dressing until just before serving. This will prevent the spinach from wilting.
  • Forgetting to Taste and Adjust the Dressing: Before adding the dressing to the salad, taste it and adjust the seasonings as needed. You may want to add a little more honey for sweetness or a pinch of salt for flavor.

**It’s** all about balance and attention to detail. A little care can elevate this simple salad to something truly special.

Strawberry Spinach Salad Variations

**Your strawberry spinach** salad doesn’t have to be the same every time. Here are a few fun and creative variations to try:

  • Add Grilled Chicken or Shrimp: For a heartier meal, add grilled chicken or shrimp to the salad. The smoky flavor of the grill pairs beautifully with the sweetness of the strawberries and the tanginess of the feta.
  • Use Different Types of Cheese: If you’re not a fan of feta cheese, try using goat cheese, blue cheese, or mozzarella. Each cheese will add a unique flavor and texture to the salad.
  • Add Avocado: Creamy avocado slices add a healthy dose of fats and a smooth, buttery texture to the salad.
  • Use Different Types of Nuts: Instead of candied pecans or walnuts, try using almonds, pistachios, or sunflower seeds.
  • Add a Citrus Twist: Add a squeeze of lemon or orange juice to the dressing for a bright, citrusy flavor.

**Feta is** a classic choice, but don’t be afraid to experiment and find what works best for you!

How to Store Strawberry Spinach Salad

This salad is best enjoyed fresh, but if you have leftovers, here’s how to store them:

  • Store the Dressing Separately: If you’re not serving the salad immediately, store the dressing in a separate container. This will prevent the spinach from wilting.
  • Store in an Airtight Container: Place the salad in an airtight container and store it in the refrigerator for up to 24 hours.
  • Refrigerate Promptly: Refrigerate the salad as soon as possible after serving to prevent bacterial growth.
  • Avoid Freezing: Freezing this salad is not recommended, as the spinach and strawberries will become mushy and lose their texture.

**Here are some** additional tips: If you know you’ll have leftovers, dress only the portion you plan to eat immediately. This keeps the remaining salad fresh and crisp.

Frequently Asked Questions (FAQ)

  • Can I make this salad ahead of time? While it’s best served fresh, you can prep the ingredients ahead of time. Wash and dry the spinach, slice the strawberries and red onion, and make the dressing. Store everything separately and assemble the salad just before serving.
  • Can I use frozen strawberries? Fresh strawberries are best for this salad, but if you only have frozen strawberries on hand, thaw them completely and pat them dry before adding them to the salad. Keep in mind that they may be a bit softer than fresh strawberries.
  • Can I make this salad vegan? Yes! Simply omit the feta cheese or substitute it with a vegan feta alternative.
  • Is this salad gluten-free? Yes, this salad is naturally gluten-free.
  • Can I add other fruits to this salad? Absolutely! Blueberries, raspberries, and blackberries are all delicious additions to this salad.

**Here are some** more tips: Feel free to adapt **your strawberry spinach** salad to your dietary needs and preferences.

Serving Suggestions

**Salad is** delicious on its own, but it also pairs well with a variety of other dishes. Here are a few serving suggestions:

  • As a Side Dish: Serve this salad alongside grilled chicken, fish, or tofu.
  • As a Light Lunch: Enjoy a bowl of this salad for a refreshing and healthy lunch.
  • At a Potluck or BBQ: This salad is always a crowd-pleaser at potlucks and barbecues.
  • With a Sandwich or Soup: Pair this salad with a sandwich or soup for a complete and satisfying meal.
  • As an Appetizer: Serve small portions of this salad as an appetizer before a larger meal.

**This delightful dish that** is both versatile and satisfying. Whether you’re serving it as a side, a light lunch, or a party appetizer, it’s sure to be a hit.

From my cozy kitchen to yours, I hope you enjoy this Strawberry Spinach Salad with Feta as much as I do. Remember, cooking is about more than just following a recipe; it’s about connecting with the ingredients and finding joy in the process. Happy cooking!

Strawberry Spinach Salad with Feta

Prep Time 15 minutes
Total Time 15 minutes
Servings 6 servings
Calories 250
A refreshing and vibrant salad combining the sweetness of strawberries with the savory flavors of spinach and feta. Perfect as a light lunch or a side dish.

Ingredients

Salad

  • 8 cups fresh baby spinach
  • 2 cups fresh strawberries (sliced)
  • 1 cup crumbled feta cheese
  • 1/2 cup thinly sliced red onion
  • 1/2 cup candied pecans or walnuts
  • 1/4 cup dried cranberries (optional)

Instructions 

  • Prepare the dressing by mixing olive oil, balsamic vinegar, honey, Dijon mustard, minced garlic, salt, and pepper. Shake or whisk until emulsified.
  • Wash and dry the spinach thoroughly. Slice strawberries and onions as needed.
  • In a large bowl, toss spinach with two-thirds of the dressing.
  • Layer strawberries, feta, onions, nuts, and cranberries over the dressed spinach.
  • Drizzle remaining dressing over the top before serving.

Notes

Adjust the amount of dressing to your preference. For a tangier flavor, add a squeeze of lemon juice.
Calories: 250kcal
Cost: $12
Course: Salad
Cuisine: American
Keyword: Spinach

Nutrition

Calories: 250kcal | Carbohydrates: 20g | Protein: 8g | Fat: 15g | Sodium: 200mg
pin

Hey there, friend! Avery Collins here, coming to you from my cozy Portland kitchen. Today, we’re making something that has become a staple in my house: Lemon Pepper Chicken. It’s quick, it’s flavorful, and it’s the perfect antidote to a long day. I’m talking juicy chicken breasts, kissed with bright lemon and a little kick of pepper. Trust me, this is a recipe you’ll be making again and again.

My own journey with healthy-ish cooking started out of necessity, not passion. I was feeling run-down and frankly, pretty awful. Cooking became my way back to feeling good, and this Lemon Pepper Chicken is a perfect example of the kind of simple, joyful food that helped me get there. No crazy ingredients, no complicated techniques, just honest-to-goodness flavor.

Why You’ll Love This Lemon Pepper Chicken

Let’s be real, weeknight dinners need to be easy and delicious. This recipe delivers on both fronts. Here’s why I think you’ll fall in love with it:

  • Quick & Easy: From fridge to table in under 30 minutes. Perfect for busy weeknights.
  • Flavor Bomb: The combination of lemon and pepper is a classic for a reason. It’s bright, zesty, and just a little bit spicy.
  • Versatile: Serve it with pasta, rice, roasted veggies, or a simple salad. The possibilities are endless.
  • Healthy-ish: Packed with protein and flavor, but still feels light and fresh.
  • Makes you smile: Because food should be enjoyable, right? This recipe always brings a little sunshine to my day.

Lemon Pepper Chicken Ingredients

Here’s what you’ll need to create this culinary magic:

  • 2 Large Chicken Breasts, Boneless and Skinless: The star of the show! Choose high-quality chicken for the best flavor.
  • ¾ Cup All Purpose Flour: This helps create a nice crust on the chicken.
  • ½ Teaspoon Kosher Salt: To season the chicken and enhance the other flavors.
  • ½ Cup Extra Virgin Olive Oil: For frying the chicken to golden perfection.
  • 3 Tablespoons Lemon Pepper Seasoning: The key to that signature lemon pepper flavor.
  • 2 Tablespoons Salted Butter: Adds richness and flavor to the sauce.
  • ½ Cup Chicken Stock: Forms the base of our delicious lemon pepper sauce.
  • 2 Garlic Cloves, Minced: Adds a pungent aroma and flavor.
  • 1 Large Sized Lemon, Squeezed: Fresh lemon juice is essential for that bright, zesty flavor.
  • 1 Tablespoon Honey: A touch of sweetness to balance the lemon and pepper.
  • ½ Teaspoon Lemon Zest: Intensifies the lemon flavor.
  • ½ Cup Parsley, Chopped: For garnish and a pop of freshness.
  • 2 Tablespoons Extra virgin olive oil For frying the chicken.
Recipe Image

How to Make Lemon Pepper Chicken: Step-by-Step

Ready to get cooking? Here’s how to make this amazing lemon pepper chicken:

  1. Prep the Chicken: Clean the chicken breasts and cut them into thinner halves, like cutlets. This helps them cook evenly and quickly.
  2. Season and Coat: In a small bowl, mix lemon pepper seasoning and kosher salt. Place flour on a separate plate for coating. Season each side of the chicken breasts with the lemon pepper seasoning. Coat them with the flour. Shake off excess flour and put at rest on a wire rack.
  3. Fry the Chicken: Heat extra virgin olive oil on a fry pan over medium-high heat. Put the chicken breasts in the pan in a single layer. Fry the chicken breasts for 3 minutes, then flip the other part and fry for another 2 minutes, or until golden brown and cooked through.
  4. Make the Lemon Pepper Sauce: Melt butter in a pan on medium heat. Add minced garlic and saute until fragrant (about 30 seconds).
  5. Simmer the Sauce: Now add chicken stock, lemon juice, honey, and ½ teaspoon of lemon pepper seasoning to the pan. Bring to a boil and let it simmer for 2 minutes, checking if salt or pepper is needed. Your lemon pepper sauce will be ready.
  6. Combine and Serve: Place the chicken breasts on the lemon pepper sauce. Coat both sides very well. Transfer them to a plate for serving. Garnish with chopped parsley and lemon slices.

Pro Tips for Perfect Lemon Pepper Chicken

Want to take your lemon pepper chicken to the next level? Here are a few of my favorite tips:

  • Pound the Chicken: For even cooking, pound the chicken breasts to an even thickness. Place the chicken between two pieces of plastic wrap and use a meat mallet or rolling pin.
  • Don’t Overcrowd the Pan: Cook the chicken in batches to avoid overcrowding the pan. Overcrowding will lower the temperature of the oil and result in steamed, not fried, chicken.
  • Use Fresh Lemon Juice: Bottled lemon juice just doesn’t compare to the bright, zesty flavor of fresh lemon juice.
  • Taste and Adjust: Taste the sauce as it simmers and adjust the seasoning as needed. Add more lemon juice for tanginess, honey for sweetness, or pepper for a kick.
  • Rest the Chicken: Let the chicken rest for a few minutes before slicing and serving. This allows the juices to redistribute, resulting in a more tender and flavorful chicken.

Common Mistakes to Avoid

We all make mistakes in the kitchen! Here are a few common pitfalls to watch out for when making lemon pepper chicken:

  • Overcooking the Chicken: Overcooked chicken is dry and tough. Use a meat thermometer to ensure the chicken is cooked to an internal temperature of 165°F (74°C).
  • Burning the Garlic: Garlic burns easily, so keep a close eye on it while it’s sauteing. If it starts to brown too quickly, reduce the heat.
  • Using Too Much Lemon Pepper Seasoning: Lemon pepper seasoning can be quite salty, so start with a smaller amount and add more to taste.
  • Not Drying the Chicken: Pat the chicken breasts dry with paper towels before seasoning and coating. This will help the flour adhere better and create a crispier crust.

Lemon Pepper Chicken Variations

Want to mix things up? Here are a few fun variations on this classic recipe:

  • Lemon Herb Chicken: Add fresh herbs like thyme, rosemary, or oregano to the lemon pepper seasoning for a more complex flavor.
  • Spicy Lemon Pepper Chicken: Add a pinch of red pepper flakes to the lemon pepper seasoning for a little heat.
  • Lemon Pepper Chicken with Vegetables: Add your favorite vegetables, such as broccoli, asparagus, or bell peppers, to the pan while the chicken is cooking.
  • Baked Lemon Pepper Chicken: For a healthier option, bake the chicken in the oven instead of frying it. Preheat the oven to 400°F (200°C) and bake for 20-25 minutes, or until cooked through.

Storing Leftover Lemon Pepper Chicken

Got leftovers? Lucky you! Here’s how to store them:

  • Refrigerate: Store leftover lemon pepper chicken in an airtight container in the refrigerator for up to 3-4 days.
  • Reheat: Reheat the chicken in the microwave, oven, or skillet until heated through. Be careful not to overcook it, or it will dry out.

Frequently Asked Questions (FAQ)

Here are some common questions I get about this recipe:

  • Can I use frozen chicken breasts? Yes, but make sure to thaw them completely before cooking.
  • Can I use boneless, skin-on chicken thighs? Absolutely! Just adjust the cooking time accordingly.
  • Can I make this recipe gluten-free? Yes, simply use a gluten-free flour blend instead of all-purpose flour.
  • Can I make this recipe dairy-free? Yes, just use olive oil instead of butter.
  • Can I freeze lemon pepper chicken? Yes, but the texture may change slightly after freezing. Store in an airtight container for up to 2-3 months.

Serving Suggestions

This lemon pepper chicken is incredibly versatile. Here are a few of my favorite ways to serve it:

  • With Pasta: Toss it with your favorite pasta and a drizzle of olive oil.
  • With Rice: Serve it over steamed rice or quinoa for a complete meal.
  • With Roasted Vegetables: Pair it with roasted broccoli, asparagus, or Brussels sprouts.
  • In a Salad: Slice it and add it to a salad for a protein-packed lunch or dinner.
  • In a Sandwich: Use it as a filling for sandwiches or wraps.

I really hope you enjoy this recipe, friend! It’s a little bit of sunshine on a plate, and I think you’ll find it as comforting and delicious as I do. Happy cooking!

This recipe focuses on creating juicy and flavorful *lemon pepper chicken*. The use of *lemon pepper seasoning* is crucial, and the addition of fresh *lemon juice* enhances the flavor. Many enjoy this *chicken recipe* with *steamed rice*. It’s a perfect way to enjoy *chicken and* vegetables. The *chicken breast* is cooked to perfection, and *the sauce* adds a zesty touch. You’ll love how easy it is *to make*! Our *lemon pepper sauce* is simple and delicious. This is *our lemon* best *chicken recipe* ever, and *if you* try it, you will agree! You’ll need *fresh lemon* for the best flavor. The *chicken breasts in* this recipe are incredibly tender. Remember to use *extra virgin* olive oil for the best results. The key is in the *lemon zest* and the balance of flavors. Don’t forget the *pepper sauce*! Get your *breasts in* the pan and cook to golden perfection. The *chicken breasts* are seasoned with *pepper seasoning*. This is a simple *pepper chicken* recipe. The *chicken breasts* are so juicy and flavorful. Remember, this *lemon pepper chicken* is all about simplicity and flavor. Enjoy!

Lemon Pepper Chicken

Prep Time 15 minutes
Cook Time 20 minutes
Total Time 35 minutes
Servings 2 breasts
Calories 450
A flavorful and easy-to-make Lemon Pepper Chicken recipe that's perfect for a quick weeknight dinner. The chicken is coated in lemon pepper seasoning and flour, then pan-fried and served with a delicious lemon pepper sauce.

Ingredients

Chicken

  • 2 Large Chicken Breasts, Boneless and Skinless

Dry Ingredients

  • 0.75 Cup All Purpose Flour
  • 0.5 Teaspoon Kosher salt
  • 3 Tablespoons Lemon Pepper Seasoning

Sauce

  • 2 Tablespoons Extra virgin olive oil
  • 0.5 Cup Extra Virgin Olive Oil
  • 2 Tablespoons Salted Butter
  • 0.5 Cup Chicken Stock
  • 2 Garlic Cloves Garlic Cloves, Minced
  • 1 Large Sized Lemon, Squeezed
  • 1 Tablespoon Honey
  • 0.5 Teaspoon Lemon Zest
  • 0.5 Cup Parsley, Chopped

Instructions 

  • Clean and slice chicken breasts into thinner halves.
  • Mix lemon pepper seasoning and salt. Coat chicken with flour, then seasoned flour. Shake off excess.
  • Heat oil in a pan. Fry chicken for 3 minutes on one side, then 2 minutes on the other.
  • Melt butter, add garlic, and saute until fragrant (30 seconds).
  • Add chicken stock, lemon juice, honey, and lemon pepper seasoning. Boil for 2 minutes.
  • Place chicken in sauce, coat well, and transfer to a plate. Garnish with parsley and lemon slices.

Notes

For extra flavor, marinate the chicken in lemon juice and lemon pepper seasoning for at least 30 minutes before cooking.
Calories: 450kcal
Cost: $12
Course: Main Course
Cuisine: American
Keyword: chicken

Nutrition

Calories: 450kcal | Carbohydrates: 30g | Protein: 40g | Fat: 20g | Sodium: 500mg
pin

Hey friends! Avery here, from my little kitchen in Portland. Today, I’m so excited to share one of my absolute favorite recipes: Green Goddess Salad with Parmesan Chicken. This isn’t just a salad; it’s a vibrant, flavor-packed experience that will leave you feeling nourished and satisfied. It’s the kind of meal that makes you feel good from the inside out, and let me tell you, that’s what I’m all about.

Remember when I told you about my journey to healthier eating? This salad is a direct result of that journey. It’s about finding joy in simple, whole ingredients and creating something truly delicious. It’s proof that healthy doesn’t have to mean boring or restrictive. It’s a celebration of fresh herbs, creamy textures, and crispy, savory chicken. I am so excited for you to try it!

Why You’ll Love This Green Goddess Salad

Honestly, where do I even begin? This salad is more than just the sum of its parts. It’s a symphony of flavors and textures that will tantalize your taste buds. Here are a few reasons why I think you’ll fall in love with it:

  • Flavor Explosion: The Green Goddess dressing is a creamy, herb-filled dream. It’s bright, tangy, and utterly addictive.
  • Texture Heaven: From the crisp romaine and crunchy celery to the tender chicken and creamy avocado (optional, but highly recommended!), every bite is a delightful textural experience.
  • Healthy & Satisfying: Packed with vegetables, protein, and healthy fats, this salad is a complete meal that will keep you feeling full and energized for hours.
  • Easy to Customize: This recipe is incredibly versatile. Feel free to swap out vegetables, add different proteins, or adjust the dressing to your liking.
  • Perfect for Any Occasion: Whether you’re looking for a quick and easy lunch, a light dinner, or a crowd-pleasing dish to bring to a potluck, this Green Goddess Salad is always a winner.

Ingredients You’ll Need

Here’s what you’ll need to make this amazing salad:

  • For the Green Goddess Dressing:
    • 1 cup greek yogurt
    • ½ cup fresh parsley leaves
    • ½ cup fresh basil leaves
    • 2 tablespoons dill
    • 2 tablespoons chopped chives
    • 1 clove garlic
    • 1 teaspoon salt
    • ½ teaspoon pepper
    • 2 tablespoons fresh lemon juice
    • ¼ cup olive oil
    • ¼ water (more or less to thin)
  • For the Salad:
    • ½ head napa cabbage (shredded)
    • 1 heart romaine (finely chopped)
    • 3 stalks celery (chopped)
    • 3 green onions (diced)
    • 1 english cucumber (diced)
  • For the Parmesan Chicken:
    • 1 pound chicken breast
    • ½ cup grated parmesan cheese (plus more for garnish)
    • ½ cup Italian Style panko bread crumbs
    • 1 teaspoon salt
    • ½ teaspoon garlic powder
    • ½ teaspoon ground black pepper
    • 2 eggs
    • 1 tablespoon olive oil
Recipe Image

How to Make Green Goddess Salad with Parmesan Chicken: Step-by-Step

Let’s get cooking! Here’s how to bring this delicious salad to life:

  1. Make the Green Goddess Dressing: In a blender or food processor, combine the Greek yogurt, parsley, basil, dill, chives, garlic, salt, pepper, lemon juice, and olive oil. Blend until smooth and creamy. Add water, a tablespoon at a time, until you reach your desired consistency. Taste and adjust seasonings as needed. If you want a vegan dressing, you can substitute the greek yogurt with a plant-based alternative.
  2. Prepare the Parmesan Chicken: Preheat your oven to 400°F (200°C). Slice the chicken breasts in half horizontally to create thinner cutlets. In a shallow dish, whisk the eggs. In another shallow dish, combine the parmesan cheese, panko bread crumbs, salt, garlic powder, and pepper. Dip each chicken cutlet in the egg mixture, then dredge in the parmesan-panko mixture, pressing to coat evenly.
  3. Bake the Chicken: Heat the olive oil in an oven-safe skillet over medium-high heat. Sear the chicken cutlets for 2-3 minutes per side, until golden brown. Transfer the skillet to the preheated oven and bake for 10-12 minutes, or until the chicken is cooked through and the internal temperature reaches 165°F (74°C). Let the chicken rest for a few minutes before slicing.
  4. Assemble the Salad: In a large bowl, combine the shredded napa cabbage, chopped romaine lettuce, celery, green onions, and cucumber. Add the sliced parmesan chicken. Drizzle generously with the Green Goddess dressing and toss gently to coat. Garnish with extra parmesan cheese, if desired.
  5. Serve & Enjoy: Serve immediately and savor every bite of this incredible Green Goddess Salad with Parmesan Chicken!

Pro Tips for the Perfect Salad

Want to take your Green Goddess Salad to the next level? Here are a few of my favorite pro tips:

  • Use Fresh Herbs: The key to a truly vibrant Green Goddess dressing is fresh herbs. Don’t skimp on the parsley, basil, dill, and chives!
  • Adjust the Dressing to Your Liking: Feel free to play around with the ingredients in the dressing. Add a little more lemon juice for extra tang, or a pinch of red pepper flakes for a touch of heat. If you like a sweeter dressing, you can add a touch of honey or maple syrup.
  • Don’t Overdress the Salad: Add the dressing gradually, tossing until everything is lightly coated. You don’t want the salad to be swimming in dressing.
  • Chill the Dressing: For the best flavor, make the dressing ahead of time and chill it in the refrigerator for at least 30 minutes before serving. This will allow the flavors to meld together.
  • Get Creative with Toppings: Feel free to add other toppings to your salad, such as avocado, cherry tomatoes, bell peppers, or crumbled feta cheese.

Common Mistakes to Avoid

Even the best cooks make mistakes sometimes! Here are a few common pitfalls to watch out for when making Green Goddess Salad:

  • Using Dried Herbs: As I mentioned earlier, fresh herbs are essential for a truly vibrant Green Goddess dressing. Dried herbs just don’t have the same flavor.
  • Over-blending the Dressing: Be careful not to over-blend the dressing, as this can make it bitter. Blend just until smooth and creamy.
  • Overcooking the Chicken: Nobody likes dry, tough chicken! Use a meat thermometer to ensure that the chicken is cooked through but not overcooked.
  • Adding the Dressing Too Early: If you’re not serving the salad immediately, wait to add the dressing until just before serving. Otherwise, the lettuce will get soggy.

Delicious Variations to Try

The beauty of this recipe is that it’s so versatile! Here are a few fun variations to try:

  • Green Goddess Pasta Salad: Toss the Green Goddess dressing with cooked pasta (such as rotini or penne), chopped vegetables, and grilled chicken or shrimp.
  • Green Goddess Chicken Salad Sandwich: Mix shredded cooked chicken with the Green Goddess dressing, chopped celery, and grapes. Serve on croissants or your favorite bread.
  • Vegan Green Goddess Salad: Substitute the Greek yogurt with a plant-based yogurt alternative.
  • Spicy Green Goddess Salad: Add a pinch of red pepper flakes or a dash of hot sauce to the dressing for a kick of heat.
  • Green Goddess Grain Bowl: Combine cooked quinoa or farro with the Green Goddess dressing, roasted vegetables, and grilled tofu or tempeh.

How to Store Leftovers

If you have any leftovers (which is unlikely, because this salad is so good!), store the undressed salad and the dressing separately in airtight containers in the refrigerator. The salad will stay fresh for up to 2 days. The dressing will keep for up to 5 days.

Frequently Asked Questions (FAQ)

Here are a few common questions I get about this recipe:

  • Can I make the Green Goddess dressing ahead of time? Absolutely! In fact, I recommend it. The dressing will keep in the refrigerator for up to 5 days.
  • Can I use a different type of lettuce? Sure! Romaine lettuce is my favorite for this salad, but you can also use butter lettuce, green leaf lettuce, or even spinach.
  • Can I add other vegetables? Of course! Feel free to add any vegetables you like, such as bell peppers, cherry tomatoes, or radishes.
  • Can I use a different protein? Yes! Grilled shrimp, tofu, or tempeh would all be delicious in this salad.

Serving Suggestions

This Green Goddess Salad with Parmesan Chicken is a complete meal on its own, but here are a few ideas for how to serve it:

  • As a light lunch or dinner: This salad is perfect for a quick and easy meal.
  • As a side dish: Serve it alongside grilled fish, chicken, or steak.
  • At a potluck or picnic: This salad is always a crowd-pleaser.
  • In a wrap or pita: Stuff the salad into a wrap or pita for a portable and delicious meal.

I hope you love this Green Goddess Salad with Parmesan Chicken as much as I do! It’s a recipe that’s close to my heart, and I’m so excited to share it with you. Remember, cooking should be fun and enjoyable. Don’t be afraid to experiment and make this recipe your own. And most importantly, savor every bite!

Happy cooking!

Recipe Card:

This recipe is sure to be a hit. The dressing and salad are the perfect mix of flavors. To make this recipe card easier to use, here is a simplified version:

Green Goddess Salad with Parmesan Chicken Recipe Card

Ingredients:

  • Green Goddess Dressing: Greek yogurt, parsley, basil, dill, chives, garlic, lemon juice, olive oil, water, salt, pepper.
  • Salad: Napa cabbage, romaine lettuce, celery, green onions, cucumber.
  • Parmesan Chicken: Chicken breast, parmesan cheese, panko bread crumbs, egg, olive oil, salt, garlic powder, pepper.

Instructions:

  1. Blend dressing ingredients until creamy.
  2. Coat chicken in egg, then parmesan-panko mixture.
  3. Sear chicken in skillet, then bake until cooked.
  4. Combine salad ingredients, top with chicken and dressing.

Enjoy this goddess salad with parmesan chicken! It’s a creamy, herb filled, and flavorful salad with dressing and chicken. If you make this, let me know how it goes!

Green Goddess Salad with Parmesan Chicken

Prep Time 20 minutes
Cook Time 20 minutes
Total Time 40 minutes
Servings 4 servings
Calories 450
A vibrant and flavorful salad featuring a creamy green goddess dressing and crispy parmesan-crusted chicken. This recipe is a healthy and delicious meal option.

Ingredients

Green Goddess Dressing

  • 1 cup greek yogurt
  • 0.5 cup fresh parsley leaves
  • 0.5 cup fresh basil leaves
  • 2 tablespoons dill
  • 2 tablespoons chopped chives
  • 1 clove garlic
  • 1 teaspoon salt
  • 0.5 teaspoon pepper
  • 2 tablespoons fresh lemon juice
  • 0.25 cup olive oil
  • 0.25 cup water (more or less to thin)

Salad

  • 0.5 head napa cabbage (shredded)
  • 1 heart romaine (finely chopped)
  • 3 stalks celery (chopped)
  • 3 green onions (diced)
  • 1 english cucumber (diced)

Parmesan Chicken

  • 1 pound chicken breast
  • 0.5 cup grated parmesan cheese (plus more for garnish)
  • 0.5 cup Italian Style panko bread crumbs
  • 1 teaspoon salt
  • 0.5 teaspoon garlic powder
  • 0.5 teaspoon ground black pepper
  • 2 eggs
  • 1 tablespoon olive oil

Notes

Adjust the amount of water in the dressing to achieve your desired consistency. For extra flavor, marinate the chicken in the green goddess dressing for at least 30 minutes before cooking.
Calories: 450kcal
Cost: $20
Course: Dinner, Lunch, Main Course
Cuisine: American
Keyword: chicken, Salad

Nutrition

Calories: 450kcal | Carbohydrates: 30g | Protein: 45g | Fat: 20g | Sodium: 700mg
pin

Quick & Easy Lemon Garlic Shrimp Pasta: A Love Story

Hi, friends! Avery here, from my cozy Portland kitchen. Today, I’m sharing a recipe that’s near and dear to my heart: Lemon Garlic Shrimp Pasta. It’s the kind of dish that comes together in a flash, tastes incredibly decadent, and always leaves me feeling satisfied. This isn’t just a recipe; it’s an invitation to slow down, savor the moment, and create something delicious with minimal fuss. I remember when I first started cooking, feeling overwhelmed by complicated recipes. This one? It’s the opposite. It’s forgiving, adaptable, and genuinely joyful to make. I’m not kidding when I say it’s ready in minutes!

My journey into healthy cooking started out of necessity, a desperate attempt to reclaim my well-being. Now, it’s a source of immense pleasure, a way to connect with the earth and nourish my body from the inside out. And this Lemon Garlic Shrimp Pasta? It’s a perfect example of how healthy eating can be both simple and incredibly delicious. It’s the perfect dish to make when you want something quick, flavorful, and satisfying, but don’t want to spend hours in the kitchen.

Why You’ll Love This Lemon Garlic Shrimp Pasta

This recipe isn’t just about convenience; it’s about creating a symphony of flavors that dance on your tongue. The bright acidity of the lemon, the savory depth of the garlic, and the succulent tenderness of the shrimp combine to create a truly unforgettable dish. Here’s why you’ll keep coming back to this recipe:

  • Quick & Easy: From start to finish, this dish is ready in under 30 minutes. Perfect for busy weeknights!
  • Bursting with Flavor: The lemon garlic sauce is bright, zesty, and incredibly flavorful.
  • Versatile: Use your favorite pasta, add veggies, or adjust the spice level to your liking.
  • Healthy & Delicious: Packed with protein and healthy fats, this pasta is a guilt-free indulgence.
  • Crowd-Pleaser: Everyone loves shrimp pasta! It’s a guaranteed hit at any gathering.

Honestly, have to say, this is one of my go-to meals when I’m craving something comforting and flavorful. I’m not exaggerating when I say it’s a staple in my kitchen.

Lemon Garlic Shrimp Pasta Ingredients

Here’s what you’ll need to create this culinary masterpiece:

  • 2 Tablespoons olive oil – plus 1 tsp: The foundation for sautéing and preventing pasta from sticking.
  • 4 tablespoons butter: Adds richness and depth to the sauce.
  • 4 cloves of garlic, minced: The star of the show, providing pungent flavor.
  • 1 large shallot, diced: Adds a subtle sweetness and complexity to the sauce.
  • 1 lb large fresh or frozen shrimp, shelled, deveined with tails on or off: The protein powerhouse of the dish.
  • Salt and pepper to taste: Essential for seasoning and enhancing flavors.
  • ¼ cup white grape juice or broth: Adds moisture and helps create the sauce.
  • ½ teaspoon red pepper flakes (optional): Adds a touch of heat and spice.
  • 2 tablespoons lemon juice plus more for garnishing: Provides brightness and acidity.
  • ¼ tsp lemon zest: Enhances the lemon flavor and adds aromatic notes.
  • ¼ cup chopped parsley plus more for garnishing: Adds freshness and a pop of color.
  • ½ lb (227 g) of spaghetti or pasta of choice: The perfect vehicle for the delicious sauce.
  • ¼ reserved pasta water: Helps to emulsify the sauce and create a creamy texture.
Recipe Image

Let’s Get Cooking: Step-by-Step Instructions

Ready to transform these ingredients into a mouthwatering meal? Here’s how:

  1. Cook the Pasta: Cook your pasta in a large pot of boiling salted water according to the instructions on the package.
  2. Reserve Pasta Water: Reserve a ¼ cup of pasta water before draining and set aside. Drain pasta and return to the pot.
  3. Prevent Sticking: Drizzle pasta with the tsp of extra olive oil and set aside while cooking the shrimp. (You could use a little butter instead of oil if you prefer – it’s just to prevent pasta from clumping together while it sits while the shrimp cook)
  4. Sauté Aromatics: Heat olive oil and 2 tablespoons of butter in a large pan or skillet on medium heat. Add garlic, shallots and chili flakes if using and sauté until fragrant and shallots are softened and translucent, just a couple of minutes.
  5. Cook the Shrimp: Add the shrimp, season with salt and pepper to taste and sauté for 1-2 minutes on one side until they just start turning pink and then flip.
  6. Create the Sauce: Pour in grape juice or broth and bring to a simmer for 1-2 minutes or until grape juice reduces by about half and the shrimp is cooked through (do not over cook shrimp)
  7. Finish the Sauce: Stir in the remaining butter, lemon juice, lemon zest and parsley and take off heat immediately.
  8. Combine & Toss: Add the pasta to the pan and gently toss with the shrimp and buttery sauce. Feel free to add a bit of the reserved pasta water if needed to thin the sauce out. Check for seasoning and adjust if more salt and pepper is needed.
  9. Serve: Serve immediately with extra chopped parsley and lemon slices/wedges.

And there you have it! A restaurant-quality meal in the comfort of your own home. It’s so simple, I’m not sure what else I can say about it!

Pro Tips for Perfect Shrimp Pasta

Want to take your Lemon Garlic Shrimp Pasta to the next level? Here are a few of my favorite pro tips:

  • Don’t Overcook the Shrimp: Overcooked shrimp is rubbery and tough. Cook just until pink and opaque.
  • Use Fresh Ingredients: Fresh garlic, lemon juice, and parsley make a world of difference.
  • Salt Your Pasta Water: This seasons the pasta from the inside out.
  • Reserve Pasta Water: This starchy water helps to create a creamy, emulsified sauce.
  • Taste as You Go: Adjust the seasoning and lemon juice to your liking.

I remember when I first started making this recipe, I was so afraid of overcooking the shrimp! Now, I know exactly when they’re perfectly cooked. It’s all about practice and trusting your instincts. The pots and pans I use also make a difference, a good set and a measuring cup are key!

Common Mistakes to Avoid

Even the simplest recipes can have pitfalls. Here are a few common mistakes to avoid when making Lemon Garlic Shrimp Pasta:

  • Overcooking the Shrimp: As mentioned before, this is the biggest culprit.
  • Not Salting the Pasta Water: This can result in bland pasta.
  • Using Too Much Garlic: While garlic is delicious, too much can be overpowering.
  • Forgetting to Reserve Pasta Water: This is crucial for creating a creamy sauce.
  • Not Tasting as You Go: This prevents you from adjusting the seasoning to your liking.

I’ve definitely made all of these mistakes at one point or another! That’s how I learned to perfect this recipe. Don’t be afraid to experiment and learn from your mistakes. It’s not only about the ingredients, but also about the process.

Variations to Spice Things Up

This recipe is incredibly versatile. Here are a few variations to try:

  • Add Veggies: Toss in some spinach, asparagus, or cherry tomatoes for added nutrients and flavor.
  • Make it Spicy: Add more red pepper flakes or a pinch of cayenne pepper.
  • Use Different Pasta: Try linguine, fettuccine, or penne.
  • Add Cheese: Sprinkle with Parmesan cheese or Pecorino Romano.
  • Make it Creamy: Add a splash of heavy cream or half-and-half to the sauce.

Sometimes, I like to add a handful of chopped kale for extra greens. It’s a great way to sneak in some extra nutrients without sacrificing flavor. If you are like me, say I do!

Storing and Reheating Leftovers

If you happen to have any leftovers (which is rare in my house!), here’s how to store and reheat them:

  • Storage: Store in an airtight container in the refrigerator for up to 3 days.
  • Reheating: Reheat gently in a skillet over medium heat, adding a splash of water or broth to prevent drying out. You can also microwave it, but the texture may be slightly altered.

I find that the flavors actually meld together even more overnight. It’s almost better the next day! The key is to reheat it gently so the shrimp doesn’t become rubbery.

Frequently Asked Questions

Here are some common questions about Lemon Garlic Shrimp Pasta:

  • Can I use frozen shrimp?: Yes, just make sure to thaw them completely before cooking.
  • Can I use dried herbs?: Fresh herbs are best, but you can use dried herbs in a pinch. Use about 1 teaspoon of dried parsley in place of ¼ cup of fresh parsley.
  • Can I make this gluten-free?: Yes, simply use gluten-free pasta.
  • Can I add wine to the sauce?: Absolutely! Add ¼ cup of dry white wine along with the grape juice or broth.
  • What kind of shrimp should I use?: I prefer large or jumbo shrimp, but any size will work.

And there you have it! Everything you need to know to make the perfect Lemon Garlic Shrimp Pasta. Let me tell you about the time my friend sent me a message from Trinidad freaking out about dinner, and I suggested this recipe! It was a hit!

Serving Suggestions for a Complete Meal

This Lemon Garlic Shrimp Pasta is delicious on its own, but here are a few serving suggestions to create a complete and satisfying meal:

  • Side Salad: A simple green salad with a lemon vinaigrette complements the pasta perfectly.
  • Garlic Bread: Crusty garlic bread is always a welcome addition.
  • Roasted Vegetables: Roasted asparagus, broccoli, or Brussels sprouts add a healthy and flavorful side.
  • White Wine: A crisp white wine like Sauvignon Blanc or Pinot Grigio pairs beautifully with this dish.
  • Lemon Wedges: Serve with extra lemon wedges for squeezing over the pasta.

I hope you enjoy this recipe as much as I do. It’s a reminder that healthy eating can be both simple and incredibly delicious. So, gather your ingredients, put on some music, and get ready to create a culinary masterpiece! And if you do, please tag me as @AveryCooksPortland so I can see your creations!

Lemon Garlic Shrimp Pasta

Prep Time 10 minutes
Cook Time 15 minutes
Total Time 25 minutes
Servings 4 people
Calories 450
A flavorful and quick pasta dish featuring succulent shrimp, bright lemon, and savory garlic. Perfect for a weeknight dinner!

Ingredients

Ingredients

  • 2 Tablespoons olive oil (plus 1 tsp)
  • 4 tablespoons butter
  • 4 cloves garlic (minced)
  • 1 large shallot (diced)
  • 1 lb large fresh or frozen shrimp (shelled, deveined with tails on or off)
  • Salt and pepper (to taste)
  • 0.25 cup white grape juice or broth
  • 0.5 teaspoon red pepper flakes (optional)
  • 2 tablespoons lemon juice (plus more for garnishing)
  • 0.25 tsp lemon zest
  • 0.25 cup chopped parsley (plus more for garnishing)
  • 0.5 lb spaghetti or pasta of choice

Instructions 

  • Cook pasta in boiling salted water per package instructions.
  • Reserve ¼ cup pasta water, drain pasta, and return to pot.
  • Drizzle pasta with tsp of olive oil to prevent clumping.
  • Heat olive oil and 2 tbsp butter in a pan. Add garlic, shallots, and chili flakes (if using). Sauté until fragrant and shallots are softened.
  • Add shrimp, season with salt and pepper. Sauté 1-2 minutes per side until pink.
  • Pour in grape juice or broth, simmer 1-2 minutes until reduced and shrimp is cooked.
  • Stir in remaining butter, lemon juice, lemon zest, and parsley. Remove from heat.
  • Add pasta to pan, toss with shrimp and sauce. Add pasta water if needed. Adjust seasoning.
  • Serve immediately with extra parsley and lemon slices.

Notes

Adjust the amount of red pepper flakes to your spice preference.
Calories: 450kcal
Cost: $18
Course: Main Course
Cuisine: Italian
Keyword: shrimp

Nutrition

Calories: 450kcal | Carbohydrates: 45g | Protein: 35g | Fat: 18g | Sodium: 600mg
pin

Hey, friend! Avery here, from my little kitchen in Portland. Today, I want to share a recipe that’s near and dear to my heart: Lemon Chicken Pasta. It’s more than just a meal; it’s a reminder of how I rediscovered joy and vitality through cooking. This recipe is perfect for a quick weeknight dinner, or when you need a comforting and flavorful dish.

My journey into cooking started out of necessity. After years of takeout and stress, my body was screaming for something real. This Lemon Chicken Pasta was one of the early wins, a dish that proved healthy eating could be both delicious and deeply satisfying. I remember the first time I made it; the aroma of fresh lemon and garlic filled my kitchen, and I knew I was onto something special. This isn’t just about following steps, it is about creating something that nourishes you.

Why You’ll Love This Lemon Chicken Pasta

This Lemon Chicken Pasta is more than just a recipe, it’s a celebration of simple, fresh ingredients coming together in perfect harmony. Here’s why I think you’ll adore it:

  • Quick and Easy: From start to finish, this dish comes together in under 30 minutes. Perfect for busy weeknights!
  • Bursting with Flavor: The combination of lemon, garlic, and Parmesan creates a bright and zesty flavor profile that is simply irresistible.
  • Versatile: You can easily customize this recipe to suit your taste and dietary preferences. Add your favorite veggies, use different types of pasta, or swap out the chicken for shrimp.
  • Comfort Food with a Healthy Twist: This pasta dish feels indulgent but is packed with protein and fresh ingredients. It’s the perfect balance of comfort and nutrition.
  • Makes Great Leftovers: This pasta tastes just as good (if not better) the next day, making it perfect for meal prepping or packing lunch.

Ingredients for Lemon Chicken Pasta

Here’s what you’ll need to create this delicious Lemon Chicken Pasta:

  • 1 pound pasta: (spaghetti, fettuccine, or penne)
  • 1.5 pounds boneless, skinless chicken breasts: Cut into bite-sized pieces.
  • 2 tablespoons olive oil: For sautéing the chicken.
  • 4 cloves garlic: Minced, for that aromatic flavor.
  • 1/2 cup chicken broth: Adds depth and moisture to the sauce.
  • 1/4 cup lemon juice: Freshly squeezed for the best flavor.
  • 2 tablespoons lemon zest: Adds a bright, citrusy punch.
  • 1/4 cup heavy cream: For a creamy, decadent sauce.
  • 1/4 cup grated Parmesan cheese: Adds a salty, savory note.
  • 2 tablespoons chopped fresh parsley: For a pop of freshness and color.
  • Salt and pepper: To taste, for seasoning.
  • Optional: Red pepper flakes: For a touch of heat.
Recipe Image

How to Make Lemon Chicken Pasta: Step-by-Step

Alright, let’s get cooking! Here’s how to bring this Lemon Chicken Pasta to life:

  1. Cook the Pasta: Cook pasta according to package directions. Before draining, reserve about 1 cup of pasta water. This is crucial for adjusting the sauce consistency later.
  2. Sauté the Chicken: While the pasta is cooking, heat olive oil in a large skillet over medium-high heat. Add the chicken to the skillet and cook until browned and cooked through. Season generously with salt and pepper. I find that cooking the chicken in a single layer helps it brown evenly.
  3. Add Garlic: Add minced garlic to the skillet and cook for about 30 seconds until fragrant. Be careful not to burn the garlic, as it can become bitter.
  4. Create the Sauce: Pour in chicken broth and lemon juice, scraping up any browned bits from the bottom of the skillet. This is where all the flavor is! Stir in lemon zest and heavy cream. Bring to a simmer and cook for a few minutes until the sauce thickens slightly.
  5. Combine Pasta and Sauce: Add the cooked pasta to the skillet with the lemon chicken sauce. Toss to coat, making sure every strand of pasta is covered in that luscious sauce.
  6. Add Cheese and Parsley: Add Parmesan cheese and parsley. Toss again to combine. If the sauce is too thick, add a little pasta water until it reaches your desired consistency.
  7. Season and Serve: Season with salt, pepper, and red pepper flakes (if using) to taste. Serve immediately and enjoy!

Pro Tips for the Best Lemon Chicken Pasta

Here are some of my favorite tips to elevate your Lemon Chicken Pasta:

  • Use Fresh Lemon Juice and Zest: Bottled lemon juice simply doesn’t compare to the bright, vibrant flavor of fresh lemon juice. The zest adds an extra layer of citrusy goodness.
  • Don’t Overcook the Chicken: Overcooked chicken can be dry and tough. Cook it just until it’s cooked through and no longer pink inside. It will continue to cook slightly in the sauce.
  • Reserve Pasta Water: This starchy water is a secret weapon for creating a creamy, emulsified sauce. It helps the sauce cling to the pasta and adds a silky texture.
  • Grate Your Own Parmesan: Pre-grated Parmesan cheese often contains cellulose, which can prevent it from melting smoothly. Grating your own cheese ensures a creamy, flavorful sauce.
  • Taste and Adjust Seasoning: Taste the sauce as you go and adjust the seasoning to your liking. Don’t be afraid to add more lemon juice, salt, or pepper to achieve the perfect balance of flavors.
  • Fresh Herbs are Key: While dried herbs can work in a pinch, fresh herbs add a burst of flavor and aroma that simply can’t be beat. I love using fresh parsley, basil, or thyme in this dish.

Common Mistakes to Avoid

Even the simplest recipes can have pitfalls. Here are some common mistakes to avoid when making Lemon Chicken Pasta:

  • Burning the Garlic: Burnt garlic can ruin the entire dish. Keep a close eye on it and cook it over medium heat for just 30 seconds, until fragrant.
  • Overcooking the Pasta: Mushy pasta is a no-go. Cook the pasta al dente, which means it should be slightly firm to the bite.
  • Not Seasoning Properly: Seasoning is crucial for bringing out the flavors of the dish. Don’t be afraid to season generously with salt and pepper at each stage of the cooking process.
  • Adding Cold Cream to a Hot Pan: This can cause the cream to curdle. Bring the cream to room temperature before adding it to the skillet.
  • Skipping the Lemon Zest: The lemon zest adds a bright, citrusy flavor that is essential to the dish. Don’t skip it!

Lemon Chicken Pasta Variations

One of the best things about this recipe is how easy it is to customize. Here are a few variations to try:

  • Add Vegetables: Sauté zucchini, bell peppers, spinach, or asparagus with the chicken for a boost of nutrients and flavor. This is a great way to use up leftover veggies. You can make a delicious chicken and zucchini pasta or even a chicken and squash pasta. A Summer Squash Bowtie Pasta variation is also great in the summer.
  • Use Different Protein: Swap the chicken for shrimp, salmon, or tofu for a different twist. Shrimp cooks very quickly, so be careful not to overcook it.
  • Make it Gluten-Free: Use gluten-free pasta for a gluten-free version of this dish.
  • Add Cheese: In addition to Parmesan, try adding ricotta, mozzarella, or goat cheese for a different flavor profile.
  • Spice it Up: Add a pinch of red pepper flakes or a dash of hot sauce for a spicy kick.
  • Creamy Pesto Chicken Pasta: Stir in a spoonful of pesto along with the cream for a flavorful twist.

How to Store and Reheat Lemon Chicken Pasta

This Lemon Chicken Pasta is perfect for meal prepping or enjoying as leftovers. Here’s how to store and reheat it:

  • Storage: Store leftover pasta in an airtight container in the refrigerator for up to 3-4 days.
  • Reheating: Reheat the pasta in the microwave or on the stovetop. If reheating on the stovetop, add a splash of chicken broth or water to prevent it from drying out.
  • Freezing: While you can freeze this pasta, the texture may change slightly upon thawing. If freezing, store in an airtight container for up to 2 months. Thaw overnight in the refrigerator before reheating.

Frequently Asked Questions (FAQ)

Here are some common questions I get asked about this Lemon Chicken Pasta recipe:

  • Can I use dried herbs instead of fresh?: Yes, but use half the amount. Dried herbs are more potent than fresh herbs.
  • Can I make this recipe dairy-free?: Yes, substitute the heavy cream with coconut cream or cashew cream for a dairy-free version.
  • Can I use boneless, skinless chicken thighs instead of breasts?: Absolutely! Chicken thighs are a great alternative and can add more flavor.
  • How can I prevent the sauce from being too thin?: Make sure to reserve pasta water and add it gradually until you reach your desired consistency.
  • Can I add more vegetables?: Of course! Feel free to add any vegetables you like. Spinach, zucchini, and bell peppers are great additions.

Serving Suggestions

This Lemon Chicken Pasta is a complete meal on its own, but here are some serving suggestions to round out your meal:

  • Side Salad: Serve with a simple green salad or a Caesar salad for a refreshing contrast.
  • Garlic Bread: A side of garlic bread is always a welcome addition to any pasta dish.
  • Roasted Vegetables: Serve with roasted asparagus, broccoli, or Brussels sprouts for a healthy and flavorful side.
  • Wine Pairing: Pair this dish with a crisp white wine, such as Sauvignon Blanc or Pinot Grigio.

And there you have it! My Easy Lemon Chicken Pasta recipe, straight from my kitchen to yours. I hope this dish brings you as much joy and comfort as it has brought me. Remember, cooking is about more than just following a recipe; it’s about creating something that nourishes your body and soul. So, go ahead, get in the kitchen, and make some magic happen!

Lemon Chicken Pasta

Prep Time 10 minutes
Cook Time 20 minutes
Total Time 30 minutes
Servings 4 people
Calories 550
A delightful and easy-to-make Lemon Chicken Pasta recipe that combines tender chicken with a zesty lemon sauce. Perfect for a quick weeknight dinner!

Ingredients

Pasta

  • 1 pound pasta (spaghetti, fettuccine, or penne)

Chicken

  • 1.5 pounds boneless, skinless chicken breasts (cut into bite-sized pieces)

Sauce

  • 2 tablespoons olive oil
  • 4 cloves garlic (minced)
  • 0.5 cup chicken broth
  • 0.25 cup lemon juice
  • 2 tablespoons lemon zest
  • 0.25 cup heavy cream
  • 0.25 cup grated Parmesan cheese
  • 2 tablespoons chopped fresh parsley
  • to taste Salt and pepper
  • Optional Red pepper flakes (for heat)

Instructions 

  • Cook pasta, reserve 1 cup pasta water.
  • Heat olive oil in skillet over medium-high heat.
  • Cook chicken until browned, season with salt and pepper.
  • Add garlic, cook until fragrant (30 seconds).
  • Pour in chicken broth and lemon juice, scraping browned bits.
  • Stir in lemon zest and heavy cream, simmer until thickened.
  • Add pasta to skillet, toss to coat.
  • Add Parmesan and parsley, toss. Add pasta water if needed.
  • Season with salt, pepper, and red pepper flakes (if using).
  • Serve immediately.

Notes

Adjust lemon juice and zest to your preference for desired tartness.
Calories: 550kcal
Cost: $18
Course: Main Course
Cuisine: Italian
Keyword: chicken

Nutrition

Calories: 550kcal | Carbohydrates: 60g | Protein: 40g | Fat: 20g | Sodium: 300mg
pin