Author

Avery Collins

Browsing

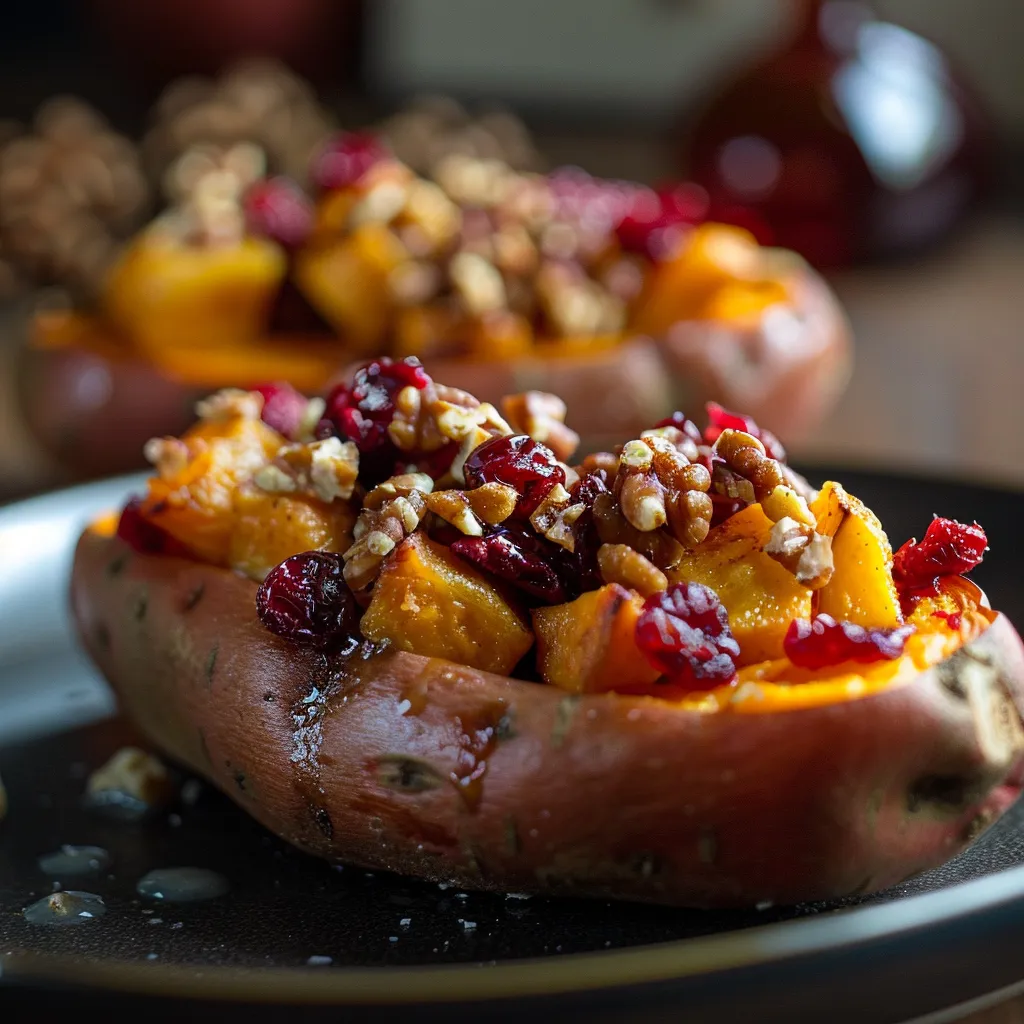
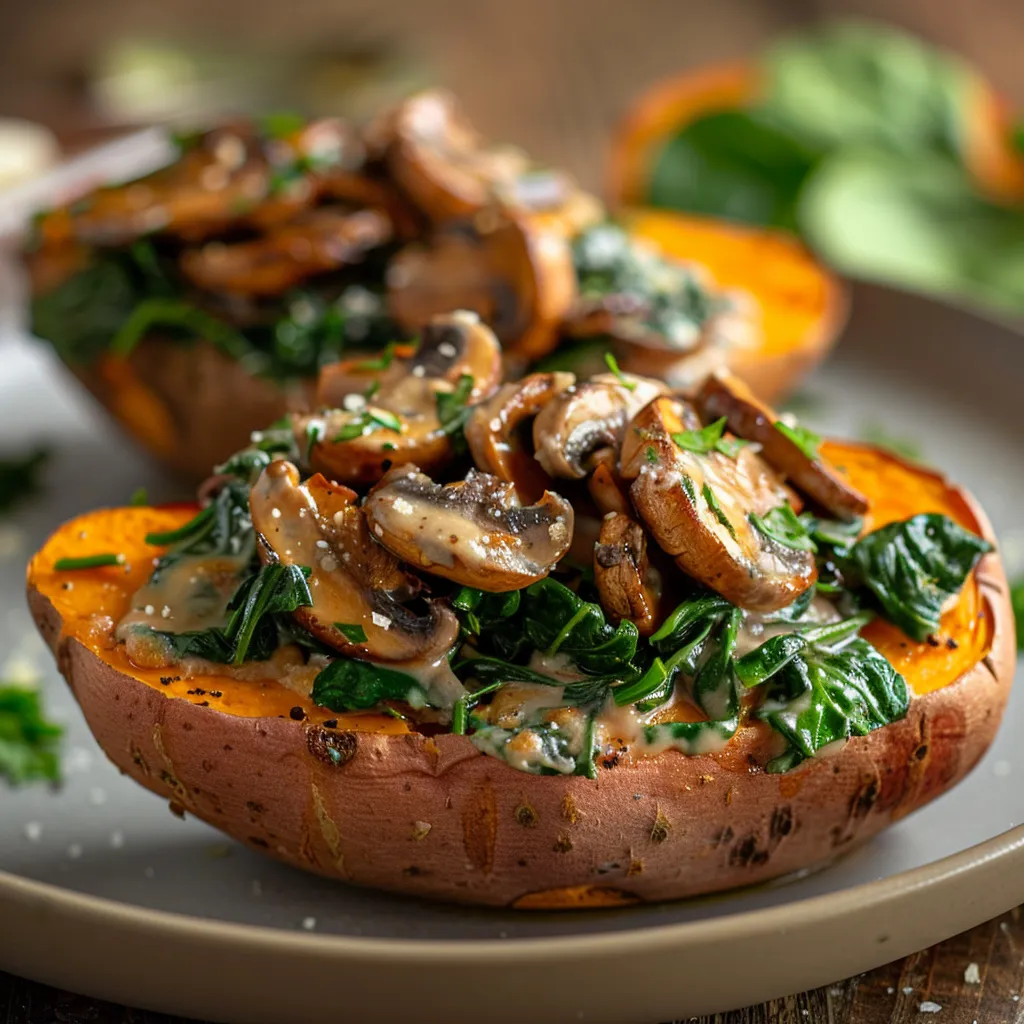
The Comfort Food Classic That Sparks Fire and Flavor in Every Bite

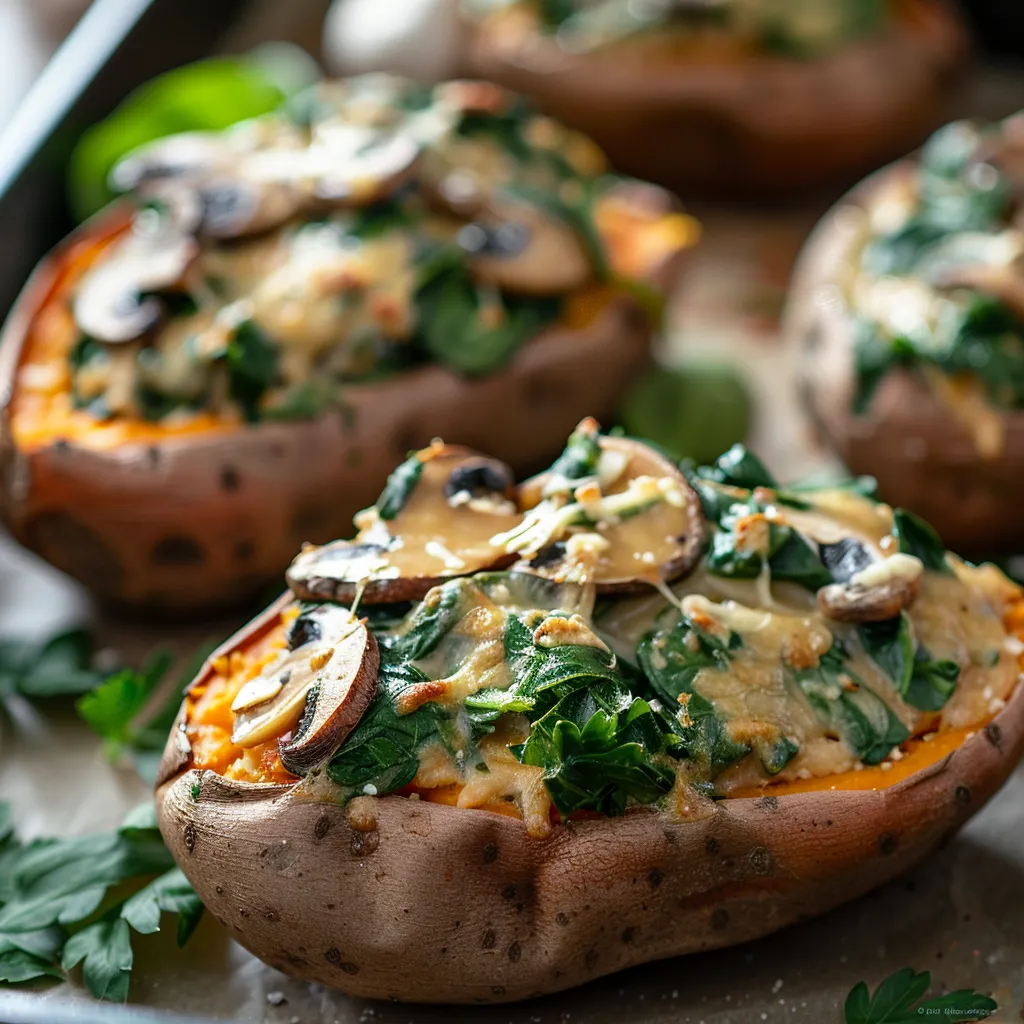
If you’re on a quest for a meal that ignites your taste buds and warms your soul, look no further than my Creamy Mushroom and Spinach Stuffed Sweet Potatoes. This dish is not just a feast for the eyes but a melody of flavors and textures that’ll make you feel like a culinary rock star! With the sweetness of roasted sweet potatoes, the earthy depth of sautéed mushrooms, and the vibrant greens of fresh spinach, each bite is a celebration of comfort food at its finest.

Why You’ll Love Creamy Mushroom and Spinach Stuffed Sweet Potatoes

This isn’t just another veggie dish; it’s a delicious adventure waiting to unfold. Picture this: the sweet, caramelized embrace of tender sweet potatoes cradling a rich, creamy filling that sings with savory notes. This dish is packed with nutrients, making it not only a feast for your taste buds but also a nourishing option for your body. Whether you’re looking for a hearty dinner, a filling lunch, or a show-stopping side for your next gathering, these stuffed sweet potatoes have got your back. Plus, with the added bonus of being vegan and gluten-free, they cater to a wide range of dietary preferences!

Ingredients

Top-down view of stuffed sweet potatoes garnished with parsley and parmesan.
  • 4 large sweet potatoes
  • 1 tablespoon olive oil
  • 1 small onion, chopped
  • 2 cloves garlic, minced
  • 8 oz mushrooms, sliced
  • 2 cups fresh spinach, chopped
  • 1/2 cup cream cheese
  • 1/4 cup grated parmesan cheese
  • Salt and pepper to taste
  • Optional: chopped fresh parsley for garnish

Instructions

Ready to embark on this culinary journey? Let’s dive into the steps that will transform humble ingredients into a show-stopping dish!

  1. Preheat the Oven: Start by preheating your oven to 400°F (200°C). While that’s warming up, grab those sweet potatoes and pierce them with a fork a few times. This step is crucial; it allows steam to escape while baking. Pop them directly onto the oven rack and bake for about 45-50 minutes, or until they’re tender to the touch.
  2. Sauté the Vegetables: While the sweet potatoes bake, it’s time to create magic in a skillet! Heat a tablespoon of olive oil over medium heat. Once hot, toss in the chopped onion and sauté until translucent, about 3-4 minutes. The aroma of the onions will begin to fill your kitchen, setting the stage for the deliciousness to come.
  3. Add Garlic and Mushrooms: Next, introduce the minced garlic and sliced mushrooms to the skillet. The mushrooms will start to release their juices and turn golden brown, about 5-7 minutes. This step is where the flavor starts to deepen, so don’t rush it!
  4. Incorporate the Spinach: As the mushrooms become tender, stir in the chopped spinach and cook until it wilts, about 2 minutes. The vibrant green of the spinach will contrast beautifully with the earthy tones of the mushrooms. Remove the skillet from heat and set aside.
  5. Prepare the Sweet Potatoes: Once the sweet potatoes are cool enough to handle, cut them in half lengthwise and gently scoop out most of the flesh into a mixing bowl, leaving a small border. This will create a cozy little pocket for our creamy filling.
  6. Make the Filling: Mash the sweet potato flesh with cream cheese and Parmesan cheese until you achieve a smooth, creamy consistency. Stir in the mushroom and spinach mixture, and season with salt and pepper to taste. This filling is where the magic really happens, so don’t be shy about tasting it!
  7. Stuff and Bake: Spoon the filling back into the sweet potato skins, mounding it slightly for a generous look. Place the stuffed sweet potatoes on a baking sheet and return them to the oven for an additional 10 minutes at 400°F (200°C), until they’re heated through and slightly golden on top.
  8. Garnish and Serve: If you like, sprinkle with chopped fresh parsley for a touch of color and freshness. Serve these beauties warm, and watch as everyone gathers around the table, eager for a taste!

Nutrition Facts

While indulging in this delicious meal, it’s good to know just how nourishing it is. Each serving offers a hearty dose of vitamins, minerals, and fiber thanks to the sweet potatoes and greens. The cream cheese and Parmesan add a touch of richness without overwhelming the dish, making it both satisfying and wholesome.

Preparation Time

From start to finish, you can whip up these stuffed sweet potatoes in about an hour. Most of that time is spent letting the sweet potatoes bake, giving you plenty of opportunity to prep the filling and maybe even dance a little in the kitchen!

How to Serve

The beauty of Creamy Mushroom and Spinach Stuffed Sweet Potatoes is their versatility. They can be served as a hearty breakfast, a filling lunch, or a light dinner. Pair them with a crisp green salad or a simple soup to round out the meal. They also make for an impressive side dish when hosting guests — just imagine the compliments you’ll receive!

Additional Tips

  • Storage: Leftovers can be stored in an airtight container in the fridge for up to 3 days. Just reheat in the oven or microwave before serving.
  • Freezing: These stuffed sweet potatoes freeze beautifully! Wrap them individually in plastic wrap and store them in a freezer-safe bag for up to 3 months. When you’re ready to enjoy, thaw overnight in the fridge and reheat in the oven.
  • Customization: Feel free to get creative! Add in cooked quinoa for extra protein, swap out the spinach for kale, or toss in some sun-dried tomatoes for a burst of flavor.

FAQs

Can I substitute the cream cheese?

Absolutely! You can use vegan cream cheese for a dairy-free option, or even cashew cream for a nut-based alternative.

What if I don’t have parmesan cheese?

No problem! You can omit it, or use nutritional yeast for a cheesy flavor without dairy.

How do I know when the sweet potatoes are done baking?

They should feel tender when squeezed gently. A fork should easily pierce through the skin and flesh.

What pairs well with stuffed sweet potatoes?

These stuffed sweet potatoes are great on their own, but they also pair well with a side of grilled vegetables or a fresh salad. A drizzle of balsamic reduction can elevate the dish even more!

Conclusion

There you have it! A delicious journey into the world of cooking with flavor and spice. My Creamy Mushroom and Spinach Stuffed Sweet Potatoes are a testament to the magic that happens when humble ingredients come together in harmony. I hope this recipe inspires you to embrace your creativity in the kitchen and to remember that cooking is about joy and experimentation. So grab your skillet, ignite that fire, and let’s make some culinary magic! Don’t forget to share your creations with me — I can’t wait to see how you put your unique spin on this classic comfort food!

For more inspiring recipes, check out my Everyday Delights, explore Nourish Your Soul, or indulge in Joyful Bites of Bliss. Happy cooking!

Creamy Mushroom and Spinach Stuffed Sweet Potatoes - Recipestasteful

Prep Time 15 minutes
Cook Time 1 hour
Total Time 1 hour 15 minutes
Servings 4 servings
Calories 350
A delicious and hearty vegetarian dish featuring baked sweet potatoes filled with a creamy mushroom and spinach mixture, perfect for a comforting meal.

Ingredients

Sweet Potatoes

  • 4 large sweet potatoes
  • 1 tablespoon olive oil
  • 1 small onion, chopped
  • 2 cloves garlic, minced
  • 8 oz mushrooms, sliced
  • 2 cups fresh spinach, chopped
  • 1/2 cup cream cheese
  • 1/4 cup grated parmesan cheese
  • salt and pepper to taste salt and pepper (to taste)
  • optional chopped fresh parsley parsley for garnish (for garnish)

Instructions 

  • Preheat oven to 400°F (200°C). Pierce sweet potatoes and bake for 45-50 minutes.
  • Cook onion in olive oil until translucent, then add garlic and mushrooms; cook until browned.
  • Add spinach and cook until wilted. Scoop out sweet potato flesh and mash with cream cheese and Parmesan.
  • Mix mushroom-spinach mixture into mashed sweet potatoes, season with salt and pepper.
  • Stuff the mixture into halved sweet potatoes, bake for 10 minutes, then garnish with parsley if desired.

Notes

For extra flavor, sprinkle with additional Parmesan or fresh herbs before serving.
Calories: 350kcal
Cost: $15
Course: Main Course
Cuisine: American
Keyword: Sweet Potatoes

Nutrition

Calories: 350kcal | Carbohydrates: 60g | Protein: 8g | Fat: 12g | Sodium: 300mg

Loved this recipe? Save it to your favorite Pinterest board so you can easily find it later! It’s the perfect way to keep all your sweet ideas in one place. ✨

Side view of a sweet potato topped with a savory mushroom and spinach filling under natural light.

Festive and Fiery: How Christmas Tree Deviled Eggs Take Holiday Appetizers to the Next Level

The holiday season is a time for all things bright, merry, and delicious! This year, elevate your festive gatherings with a delightful twist on a classic appetizer: Christmas Tree Deviled Eggs! These vibrant, tasty bites not only satisfy your taste buds but also bring a playful spirit to your holiday table. Imagine the looks of surprise and delight as you reveal these whimsical creations that perfectly capture the essence of Christmas while adding a touch of fiery flavor.

As a chef who has spent years exploring the world of spices and flavors, I can assure you that deviled eggs are a canvas for your creativity. They are a staple at gatherings, but with a little imagination, they can become the stars of your holiday spread. Let’s dive into this festive recipe that combines the rich creaminess of the yolk filling with the colors and decorations reminiscent of Christmas. It’s time to grab your skillet and whip up this adventurous dish!

The Inspiration Behind Christmas Tree Deviled Eggs

Growing up in San Antonio, I was surrounded by the vibrant colors and flavors of Tex-Mex cuisine. The holidays were all about family, laughter, and of course, amazing food. While deviled eggs were a staple at our holiday gatherings, I often found myself wanting to add a little more flair to them. One day, while brainstorming ideas for a holiday appetizer, the image of a Christmas tree popped into my mind. Why not transform these classic bites into festive trees that celebrate the season?

With that spark of inspiration, I set out to create Christmas Tree Deviled Eggs! The idea was simple yet brilliant: using the egg whites as the base for a decorative tree, topped with colorful ornaments made from fresh vegetables. The thrill of bringing a traditional dish to life with a creative twist ignited my passion for this recipe, and I couldn’t wait to share it with all of you.

Ingredients for Christmas Tree Deviled Eggs

Eye-level shot of a holiday-themed deviled eggs arrangement resembling a Christmas tree.

Before we get started, here’s what you’ll need to bring these festive creations to life:

  • 6 large eggs
  • 3 tablespoons mayonnaise
  • 1 teaspoon Dijon mustard
  • 1 teaspoon white vinegar
  • Salt and pepper to taste
  • Cherry tomatoes (for decorations)
  • Black olives (for decorations)
  • Fresh chives or parsley (for garland)
  • Red and green bell peppers (for ornaments)

How to Make Your Christmas Tree Deviled Eggs

Are you ready to embark on this culinary adventure? Here’s how to make Christmas Tree Deviled Eggs from scratch:

Step 1: Boil the Eggs

Start by placing your eggs in a saucepan and covering them with water. It’s crucial to ensure that there’s enough water to cover the eggs completely. Bring the water to a rolling boil over medium heat, then remove the saucepan from the heat. Let the eggs sit in the hot water for about 10 minutes. This method ensures perfectly hard-boiled eggs every time!

Once the time is up, transfer the eggs to an ice water bath to cool completely. This step not only makes peeling easier but also prevents that unsightly greenish ring from forming around the yolk.

Step 2: Prepare the Filling

Once your eggs have cooled, gently peel them and slice them in half lengthwise. Carefully remove the yolks and place them in a mixing bowl. Mash the yolks with a fork until they’re crumbly, then add in the mayonnaise, Dijon mustard, white vinegar, and a generous sprinkle of salt and pepper. Mix until smooth and creamy, ensuring no lumps remain. This creamy filling is where the magic happens, so taste and adjust the seasoning as needed!

Step 3: Fill the Egg Whites

Now it’s time to assemble your Christmas trees! You can use a spoon or a piping bag to fill the egg whites with the yolk mixture. If you’re feeling fancy, use a star-shaped piping tip for that extra festive flair. The goal is to create a tall, tree-like structure, tapering from wide at the bottom to narrow at the top.

Step 4: Create Your Christmas Tree Arrangement

To make your platter look like a Christmas tree, arrange the filled egg whites in a triangular shape, with the wider end at the bottom. This creates a stunning visual effect that immediately draws attention—just like a beautifully decorated tree!

Step 5: Add Decorations

Now comes the fun part—decorating your tree! Use cherry tomatoes as ornaments and black olives for the tree trunk or additional ornaments. To create a garland effect, chop fresh chives or parsley and sprinkle them around. For extra color, cut small pieces of red and green bell peppers to mimic Christmas ornaments. Get creative and make your tree as festive as possible!

Step 6: Serve and Enjoy!

Once your masterpiece is complete, serve the Christmas Tree Deviled Eggs immediately or refrigerate them until you’re ready to dazzle your guests. These bites are best enjoyed fresh, but they can also be made a few hours ahead of time. Just be sure to keep them covered in the fridge to maintain their freshness!

Tips for Perfecting Your Christmas Tree Deviled Eggs

  • Make Ahead: You can prepare the filling a day in advance and store it in the fridge. Just fill the egg whites before serving to keep them looking fresh.
  • Experiment with Flavors: Feel free to spice up your yolk mixture with hot sauce, smoked paprika, or even some crispy bacon bits for a savory twist!
  • Use Fresh Ingredients: Fresh vegetables not only add color but also enhance the flavor. Choose ripe cherry tomatoes and crunchy bell peppers for the best results.
  • Get Creative: Use different piping techniques to create various shapes for your tree. You can even sprinkle edible glitter for an extra festive touch!

Variations on Christmas Tree Deviled Eggs

If you’re feeling adventurous, here are a few variations to consider:

  • Spicy Twist: Add jalapeño or sriracha to your yolk mixture for a fiery kick!
  • Herbed Delight: Mix in fresh herbs like dill or basil for a refreshing flavor profile.
  • Cheese Lover: Incorporate crumbled feta or shredded cheddar into the filling for a cheesy surprise.

Common Substitutions

Don’t have all the ingredients? No problem! Here are some substitutions you can make:

  • Mayonnaise: Swap with Greek yogurt for a healthier option.
  • Dijon Mustard: Use yellow mustard if you prefer a milder flavor.
  • Vinegar: Apple cider vinegar can be used instead of white vinegar for a slightly sweeter taste.

Equipment Needed

  • Medium saucepan
  • Mixing bowl
  • Fork or potato masher
  • Spoon or piping bag with a star tip
  • Cutting board and knife
  • Serving platter

Storage and Freezing

These festive bites can be stored in an airtight container in the refrigerator for up to 3 days. However, it’s best to wait to decorate them until just before serving to maintain their fresh appearance. Unfortunately, deviled eggs do not freeze well, so it’s best to enjoy them fresh!

FAQs About Christmas Tree Deviled Eggs

Can I use different types of eggs?

Absolutely! You can use organic, free-range, or even quail eggs if you want to create mini versions of these delightful trees.

What can I use instead of mayonnaise?

If you prefer a lighter option, Greek yogurt works well as a substitute for mayonnaise, giving you that creamy texture without the extra calories.

How do I prevent the eggs from cracking while boiling?

To minimize cracking, ensure that your eggs are at room temperature before boiling. Adding a splash of vinegar to the water can also help seal any cracks that may form during cooking.

Can I add more decorations?

Of course! Feel free to get creative with your decorations. Shredded coconut can mimic snow, and edible flowers can add a pop of color!

Conclusion

With Christmas Tree Deviled Eggs, you’re not just serving a dish; you’re offering an experience filled with flavor, creativity, and a dash of whimsy. These festive bites are sure to light up your holiday table and leave your guests raving about your culinary skills. So, gather your ingredients, unleash your inner artist, and get ready to impress this holiday season. Remember, cooking should be an adventure—so embrace the heat, mix things up, and most importantly, have fun in the kitchen!

If you’re looking for more festive inspiration, check out my other holiday favorites like Baked Cranberry Brie Treats or Simple Dinners that will complement your holiday gatherings perfectly. Happy cooking and happy holidays!

Christmas Tree Deviled Eggs! 🎄

Prep Time 20 minutes
Cook Time 10 minutes
Total Time 30 minutes
Servings 12 pieces
Calories 150
A festive and fun appetizer perfect for holiday gatherings, these Christmas Tree Deviled Eggs are decorated with colorful vegetables and herbs to resemble a holiday tree.

Ingredients

Eggs

  • 6 large eggs
  • 3 tablespoons mayonnaise
  • 1 teaspoon dijon mustard
  • 1 teaspoon white vinegar
  • to taste salt and pepper
  • as needed cherry tomatoes (for decorations)
  • as needed black olives (for decorations)
  • as needed fresh chives or parsley (for garland)
  • as needed red and green bell peppers (for ornaments)

Instructions 

  • Boil eggs: cover eggs with water, bring to a boil, then cool and peel. Slice in half lengthwise.
  • Remove yolks, mash with mayonnaise, mustard, vinegar, salt, and pepper until smooth.
  • Fill egg whites with yolk mixture and arrange on a platter in a tree shape.
  • Decorate with cherry tomatoes, olives, herbs, and chopped peppers to resemble a Christmas tree.
  • Serve immediately or refrigerate until ready to serve.

Notes

Use fresh ingredients for best flavor and presentation.
Calories: 150kcal
Cost: $15
Course: Appetizer
Cuisine: Holiday
Keyword: Eggs

Nutrition

Calories: 150kcal | Carbohydrates: 8g | Protein: 9g | Fat: 11g | Sodium: 150mg

Loved this recipe? Save it to your favorite Pinterest board so you can easily find it later! It’s the perfect way to keep all your sweet ideas in one place. ✨

Detailed view of deviled eggs decorated with cherry tomatoes, olives, and bell peppers in Christmas tree shape.

The Creamy, Crispy Love Letter I Swear By: Perfecting Scalloped Potatoes

Ah, scalloped potatoes! Just the name alone conjures up images of cozy gatherings, laughter echoing around the dinner table, and a dish that manages to be both indulgently creamy and wonderfully crispy. If you want to impress your friends and family with a side dish that feels like a warm hug, look no further. This Cheesy Scalloped Potatoes Recipe is a masterpiece of comfort food, perfect for Thanksgiving, Christmas dinner, or any time you want to elevate your meal.

Why You Should Try This Recipe

Let me tell you why this scalloped potato recipe deserves a spot in your culinary repertoire. First, it boasts a rich, creamy sauce that envelops tender layers of potatoes, creating a dish that is as comforting as it is delicious. Second, the crispy, golden top adds a delightful crunch that perfectly complements the soft, cheesy interior. It’s a textural love affair that will have your taste buds dancing with joy!

Not only is this dish a crowd-pleaser, but it’s also surprisingly easy to make. With a handful of simple ingredients, you can create a side that will steal the spotlight from even the grandest main course. Plus, it’s incredibly versatile; you can customize it with your favorite cheeses or spices to match your personal taste. Trust me, once you master this recipe, it’ll become your go-to for every special occasion.

Cheesy Scalloped Potatoes Ingredients

Close-up of creamy scalloped potatoes with golden cheese topping.

Here’s what you’ll need to get started on this culinary adventure:

  • 4 large potatoes, sliced
  • 2 cups shredded cheddar cheese
  • 1 cup milk
  • 2 tablespoons butter
  • 2 tablespoons all-purpose flour
  • 1 teaspoon salt
  • 1/2 teaspoon black pepper
  • 1/2 teaspoon paprika (optional)

These ingredients come together to create a dish that is nothing short of magical. The combination of cheddar cheese and cream creates a luscious sauce that will have you dreaming about your next serving.

Tips and Substitutions

Before diving into the cooking process, here are some tips to ensure your scalloped potatoes turn out perfectly:

  • Choose the Right Potatoes: Opt for starchy potatoes like Russets or Yukon Golds. Their creaminess will give your dish that dreamy texture.
  • Cheese Variations: While cheddar is the star of this recipe, feel free to mix in Gruyère, Monterey Jack, or even a sprinkle of parmesan for an extra flavor boost.
  • Spice It Up: If you’re feeling adventurous, add some minced garlic, chopped onions, or even a dash of cayenne for a little kick. Cooking should be an adventure, after all!
  • Make It Ahead: You can prepare the layers the night before, cover them tightly, and refrigerate. Just adjust the baking time slightly if they’re cold from the fridge.

How to Make Cheesy Scalloped Potatoes

Ready to dive into the cooking process? Let’s get you started on crafting these irresistible scalloped potatoes!

Step-by-Step Instructions

Step 1: Preheat your oven to 375°F (190°C). This is the perfect temperature to achieve that golden, bubbly top.

Step 2: In a medium saucepan, melt the butter over medium heat. As the butter begins to sizzle, it’ll fill your kitchen with a delicious aroma. Stir in the flour and cook for about 1 minute. This will create a roux that thickens your sauce.

Step 3: Gradually whisk in the milk, stirring constantly to avoid lumps. The sauce will begin to thicken and bubble—this is where the magic happens! Add in the salt, pepper, and paprika for that extra layer of flavor.

Step 4: Now it’s time to layer those potatoes! In a greased baking dish, layer half of the sliced potatoes. Pour half of the creamy cheese sauce over the potatoes, allowing it to seep into all the nooks and crannies.

Step 5: Repeat with the remaining potatoes and cheese sauce. Make sure everything is evenly distributed, ensuring every bite is as delicious as the last.

Step 6: Top it off with the shredded cheddar cheese, which will melt into a glorious, gooey topping. Cover the baking dish with foil to keep the moisture in.

Step 7: Bake for 45 minutes. The anticipation will be palpable as your kitchen fills with the inviting scents of butter and cheese.

Step 8: After 45 minutes, remove the foil and bake for an additional 15 minutes. This is when your dish will transform into a bubbling, golden masterpiece.

Recipe FAQs

Can I make scalloped potatoes ahead of time?

Absolutely! You can prepare the dish the night before, cover it with foil, and refrigerate. Just be mindful that you may need to add a few extra minutes to the baking time if it’s coming straight from the fridge.

What’s the best type of cheese for scalloped potatoes?

While cheddar is a classic choice, feel free to experiment with other cheeses like Gruyère, which adds a nutty flavor, or a blend for added complexity. Just make sure to use cheese that melts well!

How do I store leftovers?

Store any leftovers in an airtight container in the refrigerator for up to 4 days. Simply reheat in the microwave or oven until warmed through. The creamy goodness will still be there, waiting for you!

Can I freeze scalloped potatoes?

Yes, you can freeze scalloped potatoes! Just make sure to let them cool completely before transferring them to a freezer-safe container. They’ll keep well for up to 2 months. To reheat, thaw in the fridge overnight and bake at a low temperature until heated through.

More Delicious Potato Recipes

If you loved this dish, why not explore more potato perfection? Here are some of my favorite recipes:

Conclusion

There you have it—my heartfelt take on the classic scalloped potatoes. This recipe is more than just a side dish; it’s a celebration of flavor, texture, and the joy of cooking. Whether it’s a holiday feast or a casual weeknight dinner, these scalloped potatoes are sure to impress. So grab your apron, channel your inner chef, and let’s make magic happen in the kitchen! Remember, cooking is not just about following a recipe; it’s about creating memories and sharing love through food. Happy cooking!

Scalloped Potatoes

Prep Time 15 minutes
Cook Time 1 hour
Total Time 1 hour 15 minutes
Servings 6 servings
Calories 350
A creamy and cheesy baked potato dish perfect for family dinners or special occasions.

Ingredients

Potatoes

  • 4 large potatoes, sliced
  • 2 cups shredded cheddar cheese
  • 1 cup milk
  • 2 tablespoons butter
  • 2 tablespoons all-purpose flour
  • 1 teaspoon salt
  • 1/2 teaspoon black pepper
  • 1/2 teaspoon paprika (optional)

Instructions 

  • Preheat oven to 375°F (190°C).
  • Melt butter, stir in flour, then whisk in milk until thickened.
  • Add salt, pepper, and paprika to the sauce.
  • Layer potatoes in a greased dish, pour sauce over, then repeat. Top with cheese.
  • Cover with foil and bake 45 minutes, then uncover and bake 15 more until golden.

Notes

For a richer flavor, add a dash of garlic powder or chopped herbs.
Calories: 350kcal
Cost: $15
Course: Side Dish
Cuisine: American
Keyword: Potatoes

Nutrition

Calories: 350kcal | Carbohydrates: 40g | Protein: 15g | Fat: 18g | Sodium: 800mg

Loved this recipe? Save it to your favorite Pinterest board so you can easily find it later! It’s the perfect way to keep all your sweet ideas in one place. ✨

Delicious scalloped potatoes with cheese and herbs served hot.

The Fiery Stuffed Bell Peppers That Gave My Dinner a Kick of Flavor

Welcome to a culinary adventure that’s bound to spice up your dinner routine! Today, I’m excited to share the recipe for Stuffed Bell Peppers with Ground Turkey. This dish isn’t just a meal; it’s a celebration of flavor, texture, and the thrill of cooking with heat. As someone who grew up surrounded by spices and bold flavors in San Antonio, I can assure you that these stuffed peppers are anything but ordinary. Let’s dive in and transform humble ingredients into a feast that dances on your palate!

Why You’ll Love These Stuffed Bell Peppers

Stuffed bell peppers are the perfect canvas for creativity in the kitchen. The vibrant colors of the peppers—red, yellow, green, or orange—make for a visually stunning dish, while their natural sweetness balances beautifully with the savory filling. When you bite into these peppers, you’ll experience a delightful combination of tender veggies, hearty ground turkey, and fragrant spices. But what truly sets this recipe apart is the fiery kick you can easily add to the mix, making it a wonderful option for those who crave a bit of heat in their meals.

Ingredients You’ll Need

Image of colorful bell peppers halved and filled with seasoned ground turkey, rice, and vegetables.

Gather Your Ingredients

Here’s what you’ll need to create these mouthwatering stuffed peppers with ground turkey:

  • 4 large bell peppers (any color)
  • 1 pound ground turkey
  • 1 cup cooked rice
  • 1 small onion, chopped
  • 2 cloves garlic, minced
  • 1 can (14.5 oz) diced tomatoes
  • 1 teaspoon Italian seasoning
  • Salt and pepper to taste
  • 1 cup shredded cheese (optional)
  • 2 tablespoons olive oil

How to Make Stuffed Bell Peppers

Step-by-Step Instructions

Let’s get cooking! Follow these easy steps to create your flavorful stuffed bell peppers:

  1. Preheat your oven: Begin by preheating your oven to 375°F (190°C). This ensures that your peppers will bake perfectly.
  2. Prep the peppers: Carefully cut the tops off the bell peppers and remove the seeds and membranes. This will create a beautiful little bowl for your filling!
  3. Sauté the aromatics: In a skillet, heat the olive oil over medium heat. Add the chopped onion and minced garlic, cooking until they become translucent and fragrant—about 3-4 minutes.
  4. Cook the turkey: Add the ground turkey to the skillet. Cook until it’s browned and cooked through, breaking it up with a spatula as it cooks. You want to ensure it’s nice and golden, as this will add depth to the flavor.
  5. Mix in the filling: Stir in the diced tomatoes, cooked rice, Italian seasoning, salt, and pepper. Let this mixture heat through for a few minutes, allowing all those flavors to meld together beautifully.
  6. Stuff the peppers: Generously stuff each bell pepper with the turkey mixture, packing it in tightly but not overstuffing. Place the stuffed peppers upright in a baking dish.
  7. Add cheese (optional): If you’re a cheese lover like me, sprinkle shredded cheese on top of each stuffed pepper for that gooey, melty goodness.
  8. Cover and bake: Cover the baking dish with foil and bake for 30-35 minutes, until the peppers are tender and the filling is heated through.
  9. Finish it off: Remove the foil and bake for an additional 5 minutes to melt the cheese, if using. This will give you that perfect golden crust that adds a delightful texture.
  10. Serve and enjoy: Take the peppers out of the oven and let them cool slightly before serving. Dig in and savor the bold flavors!

Tips for Perfect Stuffed Peppers

  • Choose the right peppers: Opt for large, firm peppers that can hold the filling well. Each variety brings its unique sweetness and flavor, so feel free to mix and match colors!
  • Don’t skip the seasoning: Make sure to taste your filling before stuffing. Adjust the seasoning as needed to ensure every bite is packed with flavor.
  • Experiment with heat: If you want to kick things up a notch, consider adding diced jalapeños or a splash of your favorite hot sauce to the filling.
  • Make it a meal prep winner: These stuffed peppers are excellent for meal prep! Make a batch and store them in the fridge for up to 5 days, or freeze them for a quick meal later.

Variations to Try

The beauty of stuffed peppers with ground turkey lies in their versatility. Here are a few delicious variations to consider:

  • Change the protein: Swap out ground turkey for ground chicken, beef, or even a plant-based protein for a vegetarian twist.
  • Add beans: Incorporate black beans or kidney beans into the filling for added protein and fiber.
  • Go global: Try adding spices from different cuisines—how about some cumin and coriander for a Mexican flair or curry powder for an Indian-inspired dish?

Substitutions and Dietary Considerations

Need to make some adjustments? No problem! Here are some substitution ideas:

  • Rice alternatives: If you want to cut carbs, swap the rice for quinoa or cauliflower rice.
  • Cheese alternatives: Use dairy-free cheese or omit it entirely for a lighter version.
  • Vegetarian option: Replace the turkey with a mixture of lentils, mushrooms, and spices for a hearty vegetarian stuffed pepper.

Equipment You’ll Need

Before you start, gather the following equipment:

  • Oven-safe baking dish
  • Skillet
  • Cutting board and knife
  • Spatula or wooden spoon
  • Measuring cups and spoons

Storage and Freezing Tips

These stuffed peppers can be a lifesaver for busy weeknights. Here’s how to store them:

  • Refrigerator: Store leftover stuffed peppers in an airtight container in the fridge for up to 5 days.
  • Freezer: You can freeze unbaked stuffed peppers. Just assemble them, wrap tightly in plastic wrap, and store in a freezer-safe bag. When ready to cook, bake from frozen, adding an extra 10-15 minutes to the cooking time.

Frequently Asked Questions

Can I substitute ground turkey with another meat?

Absolutely! Ground chicken, beef, or even plant-based meat alternatives work wonderfully in this recipe.

How do I make stuffed peppers spicy?

Add diced jalapeños, a sprinkle of crushed red pepper flakes, or your favorite hot sauce to the filling for a fiery twist.

What can I serve with stuffed peppers?

These stuffed peppers are a meal in themselves, but you can pair them with a fresh salad or some crusty bread for a complete dinner.

Conclusion

There you have it! A deliciously bold recipe for Stuffed Bell Peppers with Ground Turkey that’ll make your dinner table come alive. Cooking is all about exploration and expression, so don’t hesitate to make this dish your own. Whether you enjoy it as a hearty weeknight meal or a showstopper for guests, these stuffed peppers are a delightful way to embrace the art of cooking with spice. So grab your apron, turn up the heat, and let’s create some unforgettable flavors together!

Stuffed Bell Peppers with Ground Turkey

Prep Time 15 minutes
Cook Time 40 minutes
Total Time 55 minutes
Servings 4 servings
Calories 350
A delicious and wholesome dish featuring bell peppers stuffed with seasoned ground turkey and rice, baked to perfection.

Ingredients

Bell Peppers

  • 4 large bell peppers (any color)

Ground Turkey

  • 1 pound ground turkey

Cooked Rice

  • 1 cup cooked rice

Onion

  • 1 small small onion (chopped)

Garlic

  • 2 cloves garlic (minced)

Diced Tomatoes

  • 1 can (14.5 oz) diced tomatoes

Italian Seasoning

  • 1 teaspoon italian seasoning

Salt and Pepper

  • to taste salt and pepper

Shredded Cheese

  • 1 cup shredded cheese (optional)

Olive Oil

  • 2 tablespoons olive oil

Instructions 

  • Preheat oven to 375°F (190°C).
  • Cut tops off peppers, remove seeds. Cook onion and garlic in olive oil until translucent.
  • Add ground turkey; cook until browned. Mix in tomatoes, rice, seasoning, salt, and pepper.
  • Stuff peppers with mixture, place in baking dish, top with cheese if desired.
  • Bake covered for 30-35 mins, then uncover and bake 5 mins to melt cheese. Serve hot.

Notes

You can customize the filling with additional vegetables or spices for extra flavor.
Calories: 350kcal
Cost: $15
Course: Main Course
Cuisine: American
Keyword: Stuffed Peppers

Nutrition

Calories: 350kcal | Carbohydrates: 40g | Protein: 30g | Fat: 10g | Sodium: 700mg

Loved this recipe? Save it to your favorite Pinterest board so you can easily find it later! It’s the perfect way to keep all your sweet ideas in one place. ✨

Delicious stuffed bell peppers with ground turkey, cheese, and tomato filling, ready to serve.

The Mushroom and Seitan Stroganoff That Turned Up the Heat on Comfort Food

When it comes to comfort food, few dishes can match the warmth and satisfaction of a rich stroganoff. But why settle for tradition when you can transform this classic dish into a bold, adventurous meal? Enter the Mushroom and Seitan Stroganoff — a recipe that combines earthy mushrooms with hearty seitan for an unforgettable culinary experience. This dish not only tantalizes your taste buds but also invites you to embrace the joy of cooking with heat and flavor.

Ingredients You’ll Need

To make your Mushroom and Seitan Stroganoff sing with flavor, gather the following ingredients:

Main Ingredients:

Eye-level shot of savory mushroom and seitan stew with noodles, garnished with parsley.
  • 2 tablespoons olive oil
  • 1 large onion, finely chopped
  • 3 cloves garlic, minced
  • 10 ounces (about 280 grams) cremini or button mushrooms, sliced
  • 8 ounces (about 225 grams) seitan, sliced into strips
  • 1 tablespoon all-purpose flour
  • 1 ½ cups vegetable broth
  • 1 cup dairy-free sour cream (or regular sour cream for vegetarians)
  • 1 tablespoon Dijon mustard
  • 1 tablespoon soy sauce or tamari
  • 1 teaspoon smoked paprika
  • ½ teaspoon thyme, dried or fresh
  • Salt and pepper to taste
  • Fresh parsley, chopped, for garnish

To Serve:

  • 12 ounces (about 340 grams) wide egg noodles or pappardelle (use vegan pasta for a vegan dish)
  • Lemon wedges (optional)

Step-by-Step Cooking Instructions

Ready to dive into the cooking process? Let’s get started and turn up the heat on this comforting classic!

Prepare the Ingredients

Before you ignite the flames of culinary creativity, take a moment to prepare your ingredients:

  • Chop the onion finely and mince the garlic cloves.
  • Clean and slice the mushrooms, ensuring they are of uniform size for even cooking.
  • Slice the seitan into thin strips, similar in size to what you would find in a traditional beef stroganoff.

Sauté the Onions and Garlic

Heat a large skillet or sauté pan over medium heat, then add the olive oil. The moment that oil hits the pan, you’ll hear a satisfying sizzle. Add the chopped onions and cook for about 5–7 minutes until they become translucent and begin to caramelize. Stir occasionally to prevent burning; this is where the magic begins. The aroma of sautéing onions will fill your kitchen, making it feel like home.

Next, add the minced garlic and sauté for an additional 1–2 minutes. This step is crucial; you want the garlic to release its fragrance without browning, which can turn bitter. Trust me, the combination of onion and garlic sets the foundation for the deep, rich flavors that will develop in this dish.

Cook the Mushrooms

Now, it’s time to bring the star of the show into the spotlight — the mushrooms! Increase the heat slightly to medium-high, then add the sliced mushrooms to the pan. This is where the magic happens; mushrooms release a lot of moisture, so you’ll need to cook them down until all the liquid evaporates and they take on a golden-brown hue. This process should take about 8–10 minutes. The key here is patience; the longer the mushrooms cook, the richer their flavor becomes, and the more umami they contribute to your stroganoff.

Brown the Seitan

Once the mushrooms are beautifully browned, push them to the sides of the pan to create space in the center. If necessary, add a touch more olive oil, then toss in the seitan strips. Cook the seitan for 3–4 minutes, stirring occasionally, until it browns slightly and absorbs some of the delicious flavors from the pan. Seitan, made from wheat gluten, has a meaty texture that works perfectly as a protein substitute in this dish.

Build the Sauce

With the mushrooms and seitan ready, it’s time to create the stroganoff sauce. Sprinkle the flour over the seitan and mushroom mixture, stirring constantly to ensure even coating. This step is essential as the flour acts as a thickening agent for the sauce. Cook for about 2 minutes to eliminate the raw taste of the flour.

Next, slowly pour in the vegetable broth while stirring to avoid lumps. As you do this, you’ll notice the broth deglazing the pan, lifting up all those delicious browned bits that add so much flavor. Once the broth is fully incorporated, add the dairy-free sour cream (or regular if using), Dijon mustard, soy sauce or tamari, smoked paprika, and thyme. Stir the mixture until the sauce is smooth and velvety. Allow it to simmer for 5–7 minutes, during which it will thicken slightly and the flavors will meld together beautifully.

Season and Adjust

Now, this is where you can let your taste buds take the lead. Taste the sauce and season it with salt and pepper according to your preference. If the sauce is too thick, you can add a splash more vegetable broth or water to reach your desired consistency. For those who crave a bit more tang, a squeeze of lemon juice or an extra spoonful of Dijon mustard can add a delightful brightness to the dish.

Cook the Pasta

While the stroganoff sauce simmers, bring a large pot of salted water to a boil. Cook the wide egg noodles or pappardelle according to the package instructions until al dente. If you’re making the vegan version, be sure to use pasta that doesn’t contain eggs. Drain the pasta well, but don’t rinse it — this allows the sauce to cling better to the noodles.

Combine and Serve

Once the pasta is ready, you have two options: either mix the noodles directly into the pan with the sauce, coating them thoroughly, or serve the stroganoff sauce over a bed of noodles for a more elegant presentation. Whichever method you choose, make sure the dish is hot and ready to serve. Finish with a sprinkle of freshly chopped parsley for a pop of color and a hint of freshness. And for an extra touch, consider serving with lemon wedges on the side — their acidity complements the richness of the stroganoff beautifully.

Adaptations and Variations

This Mushroom and Seitan Stroganoff recipe is highly adaptable, allowing you to make it suit different tastes and dietary needs:

  • Swap the seitan: If you’re not a fan or can’t find seitan, try tempeh, tofu, or even lentils for a different protein source.
  • Change up the mushrooms: Experiment with different types of mushrooms like shiitake, portobello, or even mix them together for a more complex flavor profile.
  • Gluten-free option: Use gluten-free pasta and cornstarch instead of flour for thickening.
  • Spice it up: Add a pinch of red pepper flakes or a dash of hot sauce to elevate the heat level if you’re feeling adventurous!

Pairing Suggestions

Mushroom and Seitan Stroganoff pairs wonderfully with a variety of side dishes. Consider these:

  • A crisp green salad with a tangy vinaigrette can cut through the richness of the sauce.
  • Steamed green beans or roasted asparagus also make excellent accompaniments.
  • If you’re in the mood for a heartier meal, consider serving the stroganoff with a side of crusty bread to soak up any extra sauce.

Storage & Freezing

Leftover stroganoff can be stored in an airtight container in the refrigerator for up to 3 days. To reheat, simply warm it gently on the stove with a splash of vegetable broth to loosen the sauce. If you want to freeze your stroganoff, it’s best to do so before adding the sour cream. Freeze the cooled mixture in an airtight container for up to 3 months. When ready to enjoy, thaw it in the fridge overnight and then reheat on the stove, adding your sour cream or dairy-free alternative just before serving.

FAQs

Can I substitute mushrooms for other vegetables?

Absolutely! While mushrooms provide a unique umami flavor, you can add other vegetables like zucchini, bell peppers, or spinach for added nutrition and flavor.

What’s the best way to thicken the sauce?

If you want a thicker sauce, you can add a little more flour or cornstarch mixed with water, allowing it to simmer until it reaches your desired consistency.

Can I make this dish ahead of time?

Yes, you can prepare the stroganoff ahead of time and store it in the fridge. Just reheat it gently when you’re ready to serve.

How can I make this dish spicier?

Add a pinch of cayenne pepper, crushed red pepper flakes, or even a splash of your favorite hot sauce to kick up the heat!

Final Thoughts

The Mushroom and Seitan Stroganoff is more than just a vegetarian alternative to the classic beef version; it’s a celebration of bold, earthy flavors and comforting textures. Whether you’re serving it to family, friends, or enjoying it solo, this dish is sure to satisfy. By following these steps and embracing the flexibility of the recipe, you’ll have a comforting meal that stands out in both taste and heartiness. So grab your skillet, embrace the heat, and let your culinary adventure begin!

For more delightful recipes, check out my posts on simple dinners, clean eating, and baked treats. Happy cooking!

Mushroom and Seitan Stroganoff

Prep Time 10 minutes
Cook Time 20 minutes
Total Time 30 minutes
Servings 4 servings
Calories 550
A hearty and flavorful vegan-friendly dish combining mushrooms and seitan in a creamy sauce served over noodles.

Ingredients

Vegetables and aromatics

  • 2 tablespoons olive oil
  • 1 large onion, finely chopped
  • 3 cloves garlic, minced

Mushrooms

  • 10 ounces cremini or button mushrooms, sliced

Seitan

  • 8 ounces seitan, sliced into strips

Thickening and liquids

  • 1 tablespoon all-purpose flour
  • 1 ½ cups vegetable broth
  • 1 cup dairy-free sour cream
  • 1 tablespoon dijon mustard
  • 1 tablespoon soy sauce or tamari
  • 1 teaspoon smoked paprika
  • ½ teaspoon thyme, dried or fresh

Seasonings

  • to taste salt and pepper

Garnish

  • for garnish fresh parsley, chopped

Pasta

  • 12 ounces wide egg noodles or pappardelle (use vegan pasta for vegan dish)

Optional

  • to taste lemon wedges

Instructions 

  • Cook onions and garlic until translucent, then add mushrooms and cook until browned.
  • Add seitan and cook for a few minutes, then sprinkle flour and stir to coat.
  • Pour in vegetable broth and sour cream, add mustard, soy sauce, paprika, thyme, salt, and pepper. Simmer until thickened.
  • Cook pasta separately, then combine with sauce. Garnish with parsley and serve with lemon wedges if desired.

Notes

Use vegan pasta and dairy-free sour cream to keep the dish vegan.
Calories: 550kcal
Cost: $15
Course: Main Course
Cuisine: International
Keyword: Mushrooms, Seitan, Vegan

Nutrition

Calories: 550kcal | Carbohydrates: 70g | Protein: 30g | Fat: 20g | Sodium: 900mg

Loved this recipe? Save it to your favorite Pinterest board so you can easily find it later! It’s the perfect way to keep all your sweet ideas in one place. ✨

Detailed view of hearty vegan Stroganoff with mushrooms, seitan, and fresh herbs.

The Side Dish That Turns Up the Heat and Tells a Flavor Story

Ah, the humble cabbage. Often relegated to the sidelines of our plates, this leafy green has a reputation that belies its potential. But let me tell you, when you roast chopped red cabbage with olive oil, you unleash a symphony of flavors that transforms it from a mere side dish into something that demands attention. Welcome to the culinary adventure of Roasted Chopped Red Cabbage With Olive Oil, where every bite tells a story of warmth, sweetness, and the thrill of cooking boldly.

Why You’ll Love This Roasted Cabbage Dish

First things first: why should this dish take center stage? Roasting red cabbage brings out its natural sugars, creating a caramelized sweetness that dances on your taste buds. The high heat of the oven crispifies the edges while softening the core, leading to a delightful texture that’s both tender and crunchy. Plus, the vibrant colors of red cabbage brighten any table, making it not just a treat for the palate but also a feast for the eyes.

Imagine the aroma wafting through your kitchen as it roasts—an inviting scent that beckons everyone to gather around the dinner table. This dish is perfect for those who crave bold flavors and want to experiment with their cooking. It’s easy to make, requires minimal ingredients, and is incredibly versatile.

Ingredients & Substitutions

Eye-level shot of seasoned roasted red cabbage with soft natural lighting emphasizing the texture and shadows.

Ready to dive into the recipe? Here’s what you’ll need:

  • Red cabbage: This is the star of the show! Aim for a fresh head that feels dense and has a crisp texture.
  • Olive oil: A good-quality extra virgin olive oil will enhance the flavor and help achieve that beautiful golden brown.
  • Salt: Just a sprinkle to elevate the natural flavors. Feel free to experiment with other seasonings later, but for now, we keep it simple.

In a pinch? You can substitute the olive oil with avocado oil or melted coconut oil for a different flavor profile. If you want to jazz things up, consider adding spices like smoked paprika or cumin for an extra kick.

How to Make Roasted Chopped Red Cabbage With Olive Oil

Now that we’ve gathered our ingredients, let’s get cooking!

  1. Preheat your oven: Set it to 425°F (220°C). This high temperature is crucial for achieving that lovely roast.
  2. Prepare the cabbage: Remove the outer leaves of the cabbage, then cut it into quarters. Remove the core and slice the quarters into thin strips. The goal is to have bite-sized pieces that will roast evenly.
  3. Toss with olive oil and salt: In a large bowl, drizzle the chopped cabbage with olive oil. Sprinkle with salt and toss until all pieces are well coated. This step is essential as it ensures every bit of cabbage gets that beautiful flavor.
  4. Spread on a baking sheet: Line a baking sheet with parchment paper for easy cleanup. Spread the cabbage in an even layer, making sure not to overcrowd the pan, which can lead to steaming instead of roasting.
  5. Roast: Place the baking sheet in the preheated oven and roast for about 25-30 minutes. Halfway through, give it a good stir to ensure even roasting. You want it to be tender, crispy at the edges, and caramelized in color.
  6. Serve and enjoy: Once out of the oven, let it cool for a minute before serving. You can garnish it with a squeeze of lemon juice or a sprinkle of freshly cracked black pepper for an extra zing.

Best Way to Enjoy Roasted Cabbage

So, how do you serve this beautiful dish? The possibilities are endless! Pair it with grilled meats for a hearty dinner, toss it into a salad for a crunchy texture, or use it as a base for a nourishing grain bowl topped with your favorite proteins. If you’re feeling adventurous, try drizzling some balsamic glaze or tahini over the top for added flavor depth.

Tips for Perfect Roasted Cabbage

  • Uniform Size: Cut the cabbage into uniform pieces to ensure even cooking.
  • Don’t Skip the Salt: Salt enhances the natural sweetness of the cabbage, so don’t skimp on it!
  • Experiment with Add-Ins: Feel free to toss in other vegetables to roast alongside the cabbage, like carrots, bell peppers, or onions, for a colorful medley.

Storage & Freezing

Have leftovers? Lucky you! Roasted cabbage can be stored in an airtight container in the refrigerator for up to 4 days. Just reheat in the oven or on the stovetop to bring back that delightful crispness.

If you want to freeze it, let it cool completely, then transfer it to a freezer-safe container. It can last for up to 3 months in the freezer. When you’re ready to enjoy, thaw it in the refrigerator overnight and reheat as desired.

Common Questions About Roasted Cabbage

Can I use green cabbage instead of red?

Absolutely! While red cabbage has a sweeter flavor and beautiful color, green cabbage can work just as well. The roasting technique remains the same.

What other seasonings can I add?

Get creative! Garlic powder, onion powder, or even a sprinkle of cheese before serving can elevate your dish. For a spicy kick, try adding red pepper flakes.

Can I make this dish vegan?

Yes, this recipe is naturally vegan! Just make sure to pair it with other plant-based dishes to create a satisfying meal.

Conclusion: Ignite Your Culinary Adventure

There you have it, my friends! Roasted Chopped Red Cabbage With Olive Oil is more than just a side dish; it’s an invitation to spice up your meals and explore the world of flavors. With just a handful of ingredients and a little bit of time, you can create a dish that not only nourishes but excites the palate. So, grab that cabbage, preheat your oven, and let’s turn up the heat in your kitchen! For more delicious recipes that inspire culinary adventures, check out my simple dinners and snack ideas. Happy cooking!

Roasted Chopped Red Cabbage With Olive Oil (Side Dish)

Prep Time 10 minutes
Cook Time 25 minutes
Total Time 35 minutes
Servings 4 servings
Calories 150
A simple yet flavorful side dish where red cabbage is roasted with olive oil and salt, resulting in a sweet and tender vegetable.

Ingredients

Vegetables

  • 1 head red cabbage
  • 2 tablespoons olive oil
  • 1 teaspoon salt

Instructions 

  • Preheat oven to 400°F (200°C).
  • Chop the red cabbage into bite-sized pieces.
  • Toss the cabbage with olive oil and salt.
  • Spread on a baking sheet and roast for 25 minutes.
  • Serve warm as a flavorful side dish.

Notes

Roasting enhances the natural sweetness of the cabbage.
Calories: 150kcal
Cost: $8
Course: Side Dish
Keyword: red cabbage

Nutrition

Calories: 150kcal | Carbohydrates: 20g | Protein: 3g | Fat: 7g | Sodium: 500mg

Loved this recipe? Save it to your favorite Pinterest board so you can easily find it later! It’s the perfect way to keep all your sweet ideas in one place. ✨

Detailed view of roasted chopped red cabbage garnished with olive oil, with a blurred cozy background.

The Festive Firecracker: My Ultimate Quick Christmas Stuffed Chicken Breast Recipe

As the holiday season approaches, we find ourselves surrounded by the warmth of family gatherings, the laughter of friends, and the delicious aromas wafting from the kitchen. This year, I’m thrilled to share a dish that captures all that festive cheer in one bite: my Quick Christmas Stuffed Chicken Breast. This recipe transforms simple chicken breasts into a striking centerpiece that’s not only fast and flavorful but also brimming with holiday spirit.

Why This Recipe Will Be Your Holiday Showstopper

Imagine a perfectly cooked chicken breast that’s been lovingly stuffed with a sweet and savory mixture of cranberry sauce and gooey mozzarella cheese, all wrapped up in a golden-brown crust. The first slice reveals a vibrant color palette that’s as delightful to the eyes as it is to the palate. This dish is perfect for a Small Family Christmas Dinner or even a grand gathering. Let’s dive into the details of this festive firecracker!

Ingredients

Close-up of a golden-brown chicken breast filled and garnished with fresh parsley.
  • 4 boneless, skinless chicken breasts
  • 1/2 cup cooked cranberry sauce
  • 1/2 cup shredded mozzarella cheese
  • 2 tablespoons chopped fresh parsley
  • 1 teaspoon garlic powder
  • 1 teaspoon salt
  • 1/2 teaspoon black pepper
  • 2 tablespoons olive oil

Step 1: Preheat the Oven

Begin your culinary journey by preheating your oven to 375°F (190°C). This is crucial, as a hot oven helps achieve that perfect golden-brown finish and ensures the chicken cooks through evenly. The anticipation builds as the kitchen fills with the scent of possibilities!

Step 2: Butterfly and Season the Chicken Breasts

Next, it’s time to prepare those chicken breasts. Using a sharp knife, gently slice a pocket into each chicken breast without cutting all the way through. This will create the perfect little hammock for our flavorful stuffing. Once you’ve butterflied the chicken, sprinkle each piece with salt, black pepper, and a touch of garlic powder. This simple seasoning enhances the natural flavor of the chicken, setting the stage for the explosion of taste to come.

Step 3: Prepare the Cheese and Cranberry Filling

In a medium-sized bowl, combine the cooked cranberry sauce, shredded mozzarella cheese, chopped fresh parsley, garlic powder, salt, and black pepper. This mixture will be the star of our dish, bringing together the sweet tang of cranberries and the creamy, melty goodness of mozzarella. Stir until everything is well combined, and let the flavors meld for just a moment.

Step 4: Stuff the Chicken Breasts

Now comes the fun part! Generously stuff each butterflied chicken breast with the cranberry and mozzarella mixture. Don’t be shy; pack it in there! If some of the filling escapes, don’t worry. It will create a delightful crust around the chicken as it cooks. If you want to ensure the stuffing stays intact, secure the edges of the chicken with toothpicks. But keep it casual—this dish is all about comfort and joy.

Step 5: Sear and Bake the Chicken

Heat olive oil in an ovenproof skillet over medium-high heat. As the oil shimmers, carefully place the stuffed chicken breasts in the skillet. Listen to the sizzle as they hit the hot oil—it’s music to my ears! Sear the chicken for about 2-3 minutes on each side until they are beautifully golden brown. This step locks in the juices and adds an irresistible flavor.

Once the chicken is perfectly seared, transfer the skillet to your preheated oven. Bake for 20-25 minutes or until the chicken is cooked through and reaches an internal temperature of 165°F (75°C). The aroma wafting through your kitchen will have everyone gathering around, eager to dig in.

Step 6: Serve and Enjoy!

Remove the skillet from the oven and let the chicken rest for a few minutes. This resting period allows the juices to redistribute, ensuring each bite is moist and flavorful. If you used toothpicks, now’s the time to remove them. Slice the chicken and serve it warm, showcasing the vibrant stuffing that spills out with every cut. This dish is perfect on its own or served with a side of roasted vegetables or a fresh salad.

Tips for Perfecting Your Stuffed Chicken

  • Don’t Overstuff: While it’s tempting to cram in as much filling as possible, too much can lead to a messy situation. Keep it balanced for the best results.
  • Let It Rest: Allowing the chicken to rest after baking is key to juicy meat. Patience is a virtue in cooking!
  • Use High-Quality Ingredients: Fresh herbs, quality cheese, and homemade cranberry sauce elevate this dish from good to unforgettable.

Variations to Spice Things Up

Feeling adventurous? Here are a few variations you might consider:

  • Cheese Swap: Try using goat cheese or gouda for a different flavor. Each cheese brings its own personality to the dish.
  • Add Nuts: Chopped walnuts or pecans can add a delightful crunch to the filling.
  • Herb Infusion: Experiment with different herbs like thyme or rosemary for an aromatic twist.

Substitutions to Consider

If you’re short on certain ingredients, here are some quick substitutions:

  • Cranberry Sauce: If you don’t have cranberry sauce, try using apple sauce or a mix of diced apples and cinnamon for a unique flavor.
  • Cheese Alternatives: If mozzarella isn’t available, any cheese that melts well will do—think cheddar or provolone.
  • Olive Oil Substitution: Canola oil or avocado oil can be used in place of olive oil for sautéing.

Storage & Freezing Tips

Leftovers? No problem! Here’s how to store and freeze your stuffed chicken:

  • Refrigerator: Store leftover chicken in an airtight container in the fridge for up to 3 days.
  • Freezing: Wrap individual portions in plastic wrap and foil, and store in a freezer bag for up to 3 months. Thaw overnight in the fridge before reheating.
  • Reheating: Reheat in the oven at 350°F (175°C) until warmed through, about 15-20 minutes.

FAQs About Christmas Stuffed Chicken

Can I make this dish ahead of time?

Absolutely! You can prepare the chicken and stuff it a day in advance. Just cover and refrigerate until you’re ready to bake.

What’s the best way to check if chicken is cooked?

The most reliable method is using a meat thermometer. Chicken should reach an internal temperature of 165°F (75°C).

Can I use frozen chicken?

While fresh is best, you can use frozen chicken breasts. Just make sure they are fully thawed before you start cooking.

Conclusion

This Quick Christmas Stuffed Chicken Breast recipe is more than just a meal; it’s an invitation to celebrate the joy of cooking and the warmth of the holiday season. With each bite, you’ll experience the delightful contrast of savory and sweet, the satisfaction of perfectly cooked chicken, and the love that goes into every dish. So gather your loved ones, embrace the adventure of cooking, and make this festive firecracker the highlight of your holiday table. Happy cooking, and may your holidays be filled with flavor and joy!

For more delightful recipes that will nourish your spirit, check out my other posts: The Joyful Harmony of Fresh Flavors and Everyday Delights. Let’s keep the fire of cooking alive!

Quick Christmas Stuffed Chicken Breast

Prep Time 10 minutes
Cook Time 25 minutes
Total Time 35 minutes
Servings 4 pieces
Calories 350
A festive and easy-to-make stuffed chicken breast perfect for holiday dinners, combining cranberry sauce and mozzarella for a flavorful surprise.

Ingredients

Main ingredients

  • 4 pieces boneless, skinless chicken breasts
  • 0.5 cup cooked cranberry sauce
  • 0.5 cup shredded mozzarella cheese
  • 2 tablespoons chopped fresh parsley
  • 1 teaspoon garlic powder
  • 1 teaspoon salt
  • 0.5 teaspoon black pepper
  • 2 tablespoons olive oil

Instructions 

  • Preheat oven to 375°F (190°C).
  • Slice pockets into chicken breasts and mix cranberry sauce, cheese, parsley, garlic powder, salt, and pepper.
  • Stuff chicken with mixture and secure with toothpicks.
  • Sear chicken in olive oil for 2-3 minutes per side.
  • Bake for 20-25 minutes, then rest and serve.

Notes

Secure stuffed chicken with toothpicks to prevent filling from spilling out during cooking.
Calories: 350kcal
Cost: $15
Course: Main Course
Cuisine: American
Keyword: chicken, Holiday, stuffed

Nutrition

Calories: 350kcal | Carbohydrates: 20g | Protein: 45g | Fat: 12g | Sodium: 800mg

Loved this recipe? Save it to your favorite Pinterest board so you can easily find it later! It’s the perfect way to keep all your sweet ideas in one place. ✨

Succulent stuffed chicken with cranberry topping, steam rising, on a rustic plate.

The Vegan Wellington That Set My Holiday Feast Ablaze with Flavor

Ah, the holidays! A time when family gathers, laughter fills the air, and the kitchen transforms into a symphony of sizzling sounds and mouthwatering aromas. As someone who has spent countless hours in the kitchen, I can tell you that the centerpiece of any holiday feast is key. And this year, I decided to turn up the heat (figuratively and literally) with a dish that not only looks spectacular but also packs a punch of flavor: the BEST Vegan Wellington. Trust me, this show-stopping recipe will make your holiday table the talk of the season!

Why I Love This Recipe

This Vegan Wellington is more than just a dish; it’s a celebration of bold flavors and textures that will have everyone at the table asking for seconds. Growing up in San Antonio, Texas, I learned early on that food should never be bland; it should be a thrilling adventure for the senses. And what’s more exciting than a beautifully golden Wellington, filled to the brim with a savory mushroom and walnut filling? It’s hearty, satisfying, and the kind of meal that brings people together. Plus, it’s a fantastic vegan option that even non-vegans will rave about!

Ingredient Notes

Side view of a savory Vegan Wellington, showcasing its crisp exterior and moist filling.
  • Vegan Puff Pastry: The star of the show! Make sure it’s thawed and ready to wrap around that luscious filling.
  • Mushrooms: I recommend a mix of cremini and shiitake for a depth of flavor, but any variety will do!
  • Spinach: Fresh spinach wilts down beautifully and adds a pop of color and nutrition.
  • Walnuts: These provide a delightful crunch and richness. If you have nut allergies, feel free to substitute with sunflower seeds.
  • Soy Sauce or Tamari: This adds that umami flavor that ties everything together. For a gluten-free option, tamari is the way to go.

Step-By-Step Instructions

Let’s dive into the cooking adventure! Follow these steps, and you’ll have a Vegan Wellington that will dazzle your guests:

1. Preheat Your Oven

Start by preheating your oven to 400°F (200°C). This ensures that your Wellington will bake evenly and become that perfect golden brown we’re looking for.

2. Prepare Your Baking Sheet

Line a baking sheet with parchment paper. This will prevent any sticking and make cleanup a breeze!

3. Sauté the Onions

In a large skillet, heat 1 tablespoon of olive oil over medium heat. Add the diced onion and cook until it turns translucent, about 3-4 minutes. The smell of sautéing onions is like a warm hug, isn’t it?

4. Add Garlic and Mushrooms

Next, toss in the minced garlic and cook for another minute. Then, add the finely chopped mushrooms. Cook them down until they release their moisture and turn a beautiful golden brown, about 5-7 minutes. This is where the magic happens! The aroma will fill your kitchen, promising something incredible.

5. Season It Up

Stir in the soy sauce, salt, and pepper. Let everything simmer together for another 2-3 minutes. The flavors will meld beautifully, creating a savory base.

6. Stir in Spinach and Walnuts

Remove the skillet from heat and stir in the chopped spinach and walnuts. Cook until the spinach wilts down. Allow this mixture to cool slightly; you don’t want to steam the puff pastry!

7. Roll Out the Puff Pastry

On a lightly floured surface, roll out the vegan puff pastry into a rectangle. Make sure it’s large enough to envelop your filling beautifully.

8. Assemble the Wellington

Place the cooled mushroom mixture in the center of the pastry. Fold the pastry over the filling, sealing the edges with a bit of plant-based milk to ensure it sticks. This step is crucial; we want to keep all that delicious filling inside!

9. Brush with Plant-Based Milk

For that gorgeous golden finish, brush the top of the Wellington with a little plant-based milk.

10. Bake to Perfection

Transfer the Wellington to the prepared baking sheet and bake for 25-30 minutes, or until it’s golden brown and flaky. The anticipation builds as your kitchen fills with the tantalizing aroma!

11. Let It Rest

Once baked, let the Wellington rest for a few minutes before slicing. This helps the filling set and makes for cleaner slices. Cut into this beauty, and you’ll see the layers of savory goodness inside.

Variations and Tips

As a passionate cook, I encourage experimentation! Here are a few variations and tips to elevate your Vegan Wellington:

  • Herb Infusion: Add fresh herbs like thyme or rosemary to the mushroom mixture for an aromatic twist.
  • Spice It Up: If you like a little heat, try adding some crushed red pepper flakes or a dash of smoked paprika.
  • Cheesy Flavor: Mix in some nutritional yeast for a cheesy depth without the dairy.
  • Serving Suggestions: Serve alongside vegan gravy or a tangy cranberry sauce for the perfect balance of flavors. The contrast between savory and sweet is divine!

Storage & Freezing

This Vegan Wellington is not just a one-time wonder! Here’s how to store or freeze it:

  • Refrigeration: Store any leftovers in an airtight container in the fridge for up to 3 days. Simply reheat in the oven for a few minutes to regain that crispy texture.
  • Freezing: You can freeze the assembled, unbaked Wellington. Wrap it tightly in plastic wrap and foil and store it in the freezer for up to 2 months. When you’re ready to bake, thaw it in the fridge overnight and bake as directed.

FAQs

Can I make this Vegan Wellington ahead of time?

Absolutely! You can prepare it a day in advance and keep it in the fridge. Just brush it with plant-based milk right before baking.

What can I substitute for the walnuts?

If you have nut allergies, sunflower seeds or even cooked lentils can work beautifully!

Can I add other vegetables?

Of course! Feel free to mix in roasted carrots or zucchini for added flavor and texture.

Why You’ll Love This Vegan Wellington TLDR

This Vegan Wellington is an explosion of flavors and textures, making it the perfect centerpiece for your holiday table. With its flaky, golden pastry and rich, savory filling, it’s bound to impress everyone—vegan and non-vegan alike. Plus, it’s easy to make and can be prepped ahead of time, giving you more time to enjoy the festivities!

Conclusion

So there you have it! The BEST Vegan Wellington that not only satisfies but also excites the palate. Embrace the adventure of cooking and let your kitchen become a canvas of flavors. Whether you’re hosting a festive gathering or simply looking to spice up your dinner routine, this dish is sure to be a hit. So roll up your sleeves, grab that puff pastry, and let’s get cooking! Your holiday feast awaits, and trust me, this Vegan Wellington will set your table ablaze with flavor!

The BEST Vegan Wellington 😍 Perfect for the Holidays!

Prep Time 15 minutes
Cook Time 30 minutes
Total Time 45 minutes
Servings 4 servings
Calories 350
A delicious vegan Wellington perfect for holiday celebrations, packed with savory mushroom and spinach filling wrapped in flaky puff pastry.

Ingredients

Dough

  • 1 sheet vegan puff pastry (thawed if frozen)

Filling

  • 2 cups mushrooms (finely chopped)
  • 1 small onion (diced)
  • 2 cloves garlic (minced)
  • 1 cup spinach (chopped)
  • 0.5 cup walnuts (chopped)
  • 2 tbsp soy sauce or tamari
  • 1 tbsp olive oil
  • to taste salt and pepper
  • 1 tbsp plant-based milk (for brushing)

Optional

  • as needed vegan gravy or cranberry sauce (for serving)

Instructions 

  • Preheat oven to 400°F (200°C). Line a baking sheet with parchment paper.
  • Cook diced onion and garlic in olive oil until translucent, then add mushrooms and cook until browned. Stir in soy sauce, salt, and pepper.
  • Remove from heat, stir in spinach and walnuts, and let cool slightly.
  • Roll out puff pastry, place filling in center, fold and seal edges with plant-based milk.
  • Brush top with plant-based milk, bake for 25-30 minutes until golden. Rest briefly before slicing and serving with vegan gravy or cranberry sauce.

Notes

Ensure the filling is cooled before wrapping to prevent sogginess.
Calories: 350kcal
Cost: $15
Course: Main Course
Cuisine: Vegan
Keyword: Vegan Wellington

Nutrition

Calories: 350kcal | Carbohydrates: 45g | Protein: 8g | Fat: 18g | Sodium: 600mg

Loved this recipe? Save it to your favorite Pinterest board so you can easily find it later! It’s the perfect way to keep all your sweet ideas in one place. ✨

Appetite-inducing image of a vegan puff pastry Wellington garnished with herbs, ready to serve.

Fire Up Your Future: The Dinner in 2025 That Will Ignite Your Taste Buds

Welcome to a culinary adventure that will make your taste buds dance and your heart race! Today, we’re diving into a dish that encapsulates everything I love about cooking: bold flavors, vibrant colors, and the thrill of experimentation. This isn’t just a meal; it’s a celebration of what’s to come in our kitchens in 2025. If you’re ready to spice up your future with a dish that promises to deliver on flavor and excitement, then let’s get into this incredible recipe for Pin by Jessica on Dinner in 2025.

Ingredients for Fire Up Your Future Dinner

Before we roll up our sleeves and ignite our stoves, let’s gather our ingredients. Each component plays a crucial role in not just elevating the dish, but also creating a symphony of textures and flavors that will leave you craving more.

  • 2 chicken breasts
  • 1 tablespoon olive oil
  • 1 teaspoon garlic powder
  • Salt and pepper to taste
  • 1 cup cherry tomatoes
  • 1 cup fresh spinach
  • 1/2 cup shredded mozzarella cheese
  • Basil leaves for garnish

These ingredients are not just simple; they’re transformative. The tender chicken serves as the perfect canvas, while the cherry tomatoes burst with sweetness, and the spinach adds a vibrant green pop. And let’s not forget the mozzarella, which melts into a creamy blanket of deliciousness! Now, let’s get cooking.

How to Make the Perfect Fire Up Your Future Chicken

Detailed shot of a flavorful dinner plate featuring grilled chicken, fresh vegetables, and cheese.

Let’s dive into the steps of creating this mouthwatering dish. Cooking is an art, and every step is a brushstroke on your culinary canvas. Here’s how to bring this masterpiece to life:

  1. Preheat the Oven: Start by preheating your oven to 375°F (190°C). This is the moment when your kitchen will start to fill with warmth, anticipating the deliciousness to come.
  2. Season the Chicken: Take your chicken breasts and season them generously with garlic powder, salt, and pepper. Imagine the aroma of garlic wafting through your kitchen as you sprinkle these spices. It’s the first hint of the flavor explosion that’s about to happen!
  3. Sear the Chicken: Heat the olive oil in a skillet over medium heat. Once it’s shimmering, gently place the chicken breasts in the pan. Sear them for 2-3 minutes on each side until they develop a beautiful golden crust. This step is crucial for locking in the juices and adding depth to the flavor.
  4. Transfer to Baking Dish: Carefully transfer the seared chicken to a baking dish. Don’t worry if there are some crispy bits stuck to the skillet; they’ll add even more flavor when we layer on the toppings!
  5. Add the Good Stuff: Top each chicken breast with a generous handful of cherry tomatoes and fresh spinach. The colors alone will make your dish look like a work of art. Finally, sprinkle the shredded mozzarella cheese over the top. This is where the magic happens as it melts and creates a gooey, cheesy goodness.
  6. Bake to Perfection: Place the baking dish in your preheated oven and let it bake for 20-25 minutes. You’ll know it’s ready when the chicken is cooked through (an internal temperature of 165°F or 74°C) and the cheese is beautifully melted and bubbling. The aroma will fill your home with a tantalizing scent that will make everyone eager to dig in!
  7. Garnish and Serve: Once out of the oven, garnish your creation with fresh basil leaves. This final touch not only adds a pop of color but elevates the dish with a fresh, aromatic finish.

Tips for the Best Chicken Dish

Want to ensure your Fire Up Your Future Chicken is the best it can be? Here are some tips to keep in mind:

  • Don’t skip the searing: It locks in moisture and adds flavor.
  • Experiment with cheese: While mozzarella is delicious, feel free to mix in some parmesan or provolone for added depth.
  • Fresh vs. dried herbs: Fresh basil is fantastic, but if you’re in a pinch, dried herbs can also work. Just remember to reduce the amount since dried herbs are more concentrated.

Variations to Spice Up Your Dish

Cooking is all about creativity, and this recipe is no exception. Here are some variations to consider:

  • Vegetarian Option: Swap the chicken for hearty portobello mushrooms or a plant-based protein like tofu or tempeh. Just adjust the cooking time accordingly.
  • Add Heat: If you’re feeling adventurous, sprinkle some red pepper flakes over the top before baking for a spicy kick.
  • Seasonal Switch: In the fall, try adding roasted butternut squash or in the winter, some steamed broccoli for added nutrients and flavor.

Substitutions You Can Make

Sometimes, you might not have everything on hand. Here are some substitutions that won’t compromise flavor:

  • Olive Oil: Use avocado oil or melted butter if you prefer.
  • Garlic Powder: Fresh minced garlic can be used instead—about 1-2 cloves should do the trick.
  • Cherry Tomatoes: Substitute with diced bell peppers or sun-dried tomatoes for a different twist.

Equipment You’ll Need

Having the right tools makes cooking so much more enjoyable. For this recipe, you’ll need:

  • A skillet for searing
  • A baking dish for the oven
  • A sharp knife and cutting board for prep
  • A meat thermometer to check for doneness

Storing and Freezing Your Dish

Once you’ve enjoyed your delicious Fire Up Your Future Chicken, you might be wondering about leftovers. Here’s how to store and potentially freeze your dish:

  • Storage: Store any leftovers in an airtight container in the fridge for up to 3 days. Reheat gently in the microwave or on the stovetop.
  • Freezing: While it’s not ideal to freeze the entire dish (the texture of the mozzarella can change), you can freeze the chicken without toppings. Just thaw it in the fridge overnight before reheating.

Frequently Asked Questions

Can I use chicken thighs instead of breasts?

Absolutely! Chicken thighs will add a bit more flavor and moisture, but adjust the cooking time as they may take a little longer to cook through.

Can I make this in advance?

Yes! You can prepare everything up to the baking step, cover it, and store it in the refrigerator for up to 24 hours. Just pop it in the oven when you’re ready to eat!

What should I serve with this dish?

This dish pairs beautifully with a simple side salad or some roasted vegetables. If you’re feeling extra indulgent, serve it with crusty bread to soak up the delicious juices!

Conclusion: Embrace the Fire!

Cooking is an adventure, and with every recipe, you have the chance to explore new flavors and techniques. This Fire Up Your Future: The Dinner in 2025 That Will Ignite Your Taste Buds is not just a meal; it’s a testament to the joy of cooking boldly. So, grab your ingredients, let your passion guide you, and remember: cooking is about more than just food—it’s about creating memories. If you found this recipe inspiring, check out my other culinary creations like Everyday Delights and Nourish Your Soul. Happy cooking!

Pin by Jessica on Dinner in 2025

Prep Time 10 minutes
Cook Time 25 minutes
Total Time 35 minutes
Servings 4 servings
Calories 350
A delicious and easy baked chicken dish topped with fresh vegetables and cheese, perfect for a quick dinner.

Ingredients

Protein

  • 2 pieces chicken breasts
  • 1 tablespoon olive oil
  • 1 teaspoon garlic powder
  • salt and pepper to taste salt and pepper (to taste)
  • 1 cup cherry tomatoes
  • 1 cup fresh spinach
  • 1/2 cup shredded mozzarella cheese

Garnish

  • basil leaves for garnish basil leaves (for garnish)

Instructions 

  • Preheat oven to 375°F (190°C).
  • Season chicken with garlic powder, salt, and pepper. Sear in a skillet with olive oil for 2-3 minutes per side.
  • Transfer chicken to a baking dish. Top with cherry tomatoes, spinach, and cheese.
  • Bake for 20-25 minutes until cooked through and cheese is melted.
  • Garnish with basil leaves before serving.

Notes

Use fresh basil for the best flavor and adjust seasoning as needed.
Calories: 350kcal
Cost: $15
Course: Main Course
Cuisine: American
Keyword: baked, Cheese, chicken

Nutrition

Calories: 350kcal | Carbohydrates: 12g | Protein: 45g | Fat: 15g | Sodium: 600mg

Loved this recipe? Save it to your favorite Pinterest board so you can easily find it later! It’s the perfect way to keep all your sweet ideas in one place. ✨

Eye-level view of a savory chicken dinner garnished with basil, vibrant and appetizing.

The Sweet Heat Revelation: My Passion for Cranberry Apple Twice-Baked Sweet Potatoes

As the crisp autumn air whispers through the trees and the golden leaves dance to the ground, there’s a certain magic that envelops the kitchen. It’s the time of year when the flavors of fall come alive, and there’s no better way to celebrate this season than with a dish that embodies its essence: Irresistible Cranberry Apple Twice-Baked Sweet Potatoes. This recipe is not just a meal; it’s an experience, a symphony of flavors that evokes warmth, nostalgia, and a sense of adventure. So, grab your apron and let’s dive into the delicious world of twice-baked sweet potatoes!

The Essence of Fall Flavors

Fall is a time of harvest, a season where every bite tells a story. The vibrant colors of sweet potatoes, the tartness of fresh cranberries, and the crisp sweetness of apples come together to create a dish that’s as beautiful as it is delicious. When I think of autumn gatherings, I envision tables laden with hearty dishes that not only fill the belly but also warm the soul. This recipe encapsulates that spirit, making it perfect for Thanksgiving Day Dishes or any cozy family meal.

Why Choose Twice-Baked Sweet Potatoes?

Image of a cozy dish featuring twice-baked sweet potatoes with cranberries and diced apples, with soft shadows.

Twice-baked sweet potatoes elevate a humble root vegetable to a whole new level. The first bake allows the sweet potatoes to become tender and caramelized, while the second bake transforms them into a fluffy, creamy delight that’s stuffed with a flavorful filling. The beauty of this recipe lies in its versatility—Sweet Potato Apple Recipes can be adapted to suit your tastes or dietary needs. Not only are they visually stunning, but they also offer a nutritious option that’s rich in vitamins and minerals, making them a go-to choice for Healthy Thanksgiving Dishes.

Ingredients for Irresistible Cranberry Apple Twice-Baked Sweet Potatoes

Key Ingredients Overview

To create this mouthwatering dish, gather the following ingredients:

  • 4 medium sweet potatoes
  • 1 cup fresh cranberries
  • 2 apples (preferably Fuji or Honeycrisp), diced
  • 2 tablespoons honey or maple syrup
  • 1/2 teaspoon cinnamon
  • 1/4 teaspoon nutmeg
  • 1/4 teaspoon salt
  • Optional: chopped walnuts or pecans for topping

Nutritional Benefits of Sweet Potatoes

Sweet potatoes are nutritional powerhouses! They are packed with beta-carotene, which the body converts into vitamin A, supporting eye health and immune function. They also provide a healthy dose of fiber, aiding digestion and promoting a feeling of fullness. With their low glycemic index, sweet potatoes are a fantastic choice for those mindful of blood sugar levels, making them a staple in Weight Watchers Fall Recipes.

Step-by-Step Instructions

How to Make Cranberry Apple Twice-Baked Sweet Potatoes

Now, let’s get to the fun part—creating this delicious dish! Follow these steps for a mouthwatering result:

  1. Preheat your oven: Set your oven to 400°F (200°C) and let it heat up while you prepare the sweet potatoes.
  2. Prepare the sweet potatoes: Wash the sweet potatoes thoroughly and poke holes in them with a fork. This allows steam to escape while they bake, preventing any messy explosions!
  3. First bake: Place the sweet potatoes directly on the oven rack and bake for about 45-50 minutes, or until they are tender and easily pierced with a fork.
  4. Cool and scoop: Once baked, remove the sweet potatoes from the oven and let them cool slightly. Slice each sweet potato in half lengthwise and carefully scoop out the flesh into a mixing bowl, leaving about a quarter-inch of the flesh inside the skins to maintain their shape.
  5. Mix the filling: In the bowl with the sweet potato flesh, mash it with a fork. Add the diced apples, fresh cranberries, honey or maple syrup, cinnamon, nutmeg, and salt. Mix well until all ingredients are combined and the mixture is creamy.
  6. Refill the skins: Spoon the sweet potato filling back into the hollowed-out skins, dividing the mixture evenly among them.
  7. Final bake: Place the filled sweet potato halves on a baking sheet and return them to the oven. Bake for an additional 15-20 minutes, or until the tops are slightly caramelized and the filling is heated through.
  8. Garnish and serve: If desired, sprinkle chopped walnuts or pecans on top before serving. Enjoy your warm, flavorful treat!

Serving Suggestions

Ideal Occasions for Serving

These Cranberry Sweet Potato Recipes are perfect for fall gatherings, holiday feasts, or even just a cozy dinner at home. They pair beautifully with:

  • Roasted turkey or chicken
  • Baked ham
  • Juicy pork tenderloin
  • A fresh green salad or sautéed greens for a lighter option

Pairing Ideas

For a complete meal, consider serving your twice-baked sweet potatoes alongside hearty stews or grain-based dishes like quinoa or wild rice. The sweet and tart flavors complement rich and savory meats perfectly, creating a balance that will have everyone coming back for seconds!

Tips for the Perfect Twice-Baked Sweet Potatoes

Choosing the Right Sweet Potatoes

When selecting sweet potatoes, look for ones that are firm, free from blemishes, and have a vibrant, even color. Larger sweet potatoes provide more surface area for the delicious filling, making them ideal for this recipe.

Variations on the Recipe

Feel free to get creative! You can swap the cranberries for dried cherries or raisins for a different flavor profile. If you prefer a different type of apple, Honeycrisp or Gala are excellent choices. For a touch of crunch, top the sweet potatoes with toasted pecans or walnuts. The options are endless!

Storage & Freezing

How to Store Leftovers

If you have any leftovers (which is rare with this delicious dish!), store them in an airtight container in the refrigerator for up to 3-5 days. To reheat, simply place them in the oven at 350°F (175°C) until warmed through.

Can You Freeze Twice-Baked Sweet Potatoes?

Absolutely! To freeze, let the twice-baked sweet potatoes cool completely, then wrap them tightly in plastic wrap or aluminum foil. Place them in a freezer-safe container or bag. They can be frozen for up to 3 months. When you’re ready to enjoy them, thaw in the refrigerator overnight and reheat in the oven.

FAQs

Does sweet potato lose nutrients when baked?

No, baking sweet potatoes helps concentrate their nutrients, making them more bioavailable for our bodies to absorb.

What can you eat with twice-baked potatoes?

Twice-baked sweet potatoes make a fantastic side dish to roasted meats, hearty stews, or even a fresh salad for a lighter meal.

Can you eat too many baked sweet potatoes?

While sweet potatoes are nutritious, it’s best to enjoy them in moderation. Eating large amounts may lead to digestive discomfort or an excess intake of certain vitamins.

More Related Recipes You Might Enjoy

If you loved these twice-baked sweet potatoes, you might also enjoy:

The Perfect Comfort Food for Fall

In conclusion, Cranberry Apple Twice-Baked Sweet Potatoes are more than just a dish; they are a celebration of the flavors of fall. With each bite, you indulge in a delightful balance of sweetness and tartness, wrapped in the comforting embrace of warm spices. Whether you’re serving them at Thanksgiving dinner or enjoying them as a weeknight meal, these sweet potatoes will ignite your senses and elevate your cooking game. So, embrace the heat, get adventurous in your kitchen, and make this dish a staple in your autumn repertoire. Your taste buds will thank you!

Irresistible Cranberry Apple Twice-Baked Sweet Potatoes – A Healthy Delight!

Prep Time 15 minutes
Cook Time 1 hour 5 minutes
Total Time 1 hour 20 minutes
Servings 4 servings
Calories 250
A delicious and healthy dessert featuring sweet potatoes filled with cranberries and apples, baked to perfection.

Ingredients

Sweet Potatoes

  • 4 medium sweet potatoes (washed and poked with a fork)
  • 1 cup fresh cranberries
  • 2 apples apples (preferably fuji or honeycrisp), diced
  • 2 tablespoons honey or maple syrup
  • 1/2 teaspoon cinnamon
  • 1/4 teaspoon nutmeg
  • 1/4 teaspoon salt

Optional Toppings

  • chopped walnuts or pecans chopped walnuts or pecans for topping (optional)

Instructions 

  • Preheat oven to 400°F (200°C). Bake sweet potatoes for 45-50 minutes until tender.
  • Let sweet potatoes cool slightly, then halve and scoop out flesh, leaving a border.
  • Mash the flesh, then mix in apples, cranberries, honey, cinnamon, nutmeg, and salt.
  • Fill the shells with the mixture and bake for 15-20 minutes until caramelized.
  • Optional: Garnish with nuts before serving. Serve warm.

Notes

For extra flavor, add a sprinkle of chopped nuts on top before serving.
Calories: 250kcal
Cost: $15
Course: Dessert
Keyword: Sweet Potatoes

Nutrition

Calories: 250kcal | Carbohydrates: 55g | Protein: 3g | Fat: 1g | Sodium: 150mg

Loved this recipe? Save it to your favorite Pinterest board so you can easily find it later! It’s the perfect way to keep all your sweet ideas in one place. ✨

Artistic shot of sweet potatoes filled with cranberries and apples, highlighted by natural warm lighting.