Author

Avery Collins

Browsing

Why a Vegetarian Diet is Perfect for Your First Trimester

Congratulations on your journey into motherhood! As you navigate the early stages of pregnancy, the choices you make in your diet are more important than ever. A vegetarian diet can provide a plethora of health benefits, ensuring that you and your baby are nourished during this crucial time. But let’s be honest—it’s not just about health; it’s about flavor, joy, and the excitement of discovering new foods that can make this experience even more delightful.

Embracing a vibrant vegetarian diet during your first trimester is not only a fantastic way to support your growing baby but also an opportunity to explore the vast world of flavors and nutrients. Filled with wholesome ingredients, the vegetarian diet chart we’ll discuss today is designed to keep your energy levels up and your cravings satisfied. Let’s dive into how you can nourish yourself and flourish during this beautiful journey.

Nourishing Ingredients to Fuel Your Pregnancy

When it comes to crafting a vegetarian diet for pregnancy, variety is key! The ingredients in our diet chart are carefully selected to provide essential nutrients while keeping your meals vibrant and exciting. Here’s a closer look at each of them:

  • Whole Grain Cereal: Packed with fiber, this breakfast staple will help maintain your energy levels and provide essential B vitamins.
  • Milk or Plant-Based Milk: A great source of calcium and vitamin D, ensuring strong bones for you and your baby.
  • Bananas: Rich in potassium and vitamin C, bananas are excellent for combating nausea and keeping your energy steady.
  • Spinach: Loaded with iron and folate, spinach is a must-have for supporting your baby’s development.
  • Chickpeas: A fantastic source of protein and fiber, chickpeas will keep you feeling full and satisfied.
  • Quinoa: This ancient grain is not only gluten-free but also packed with complete protein, making it a perfect base for salads.
  • Sweet Potatoes: Full of beta-carotene and fiber, sweet potatoes are a delicious way to add a touch of sweetness to your meals.
  • Avocados: Creamy and rich in healthy fats, avocados are fantastic for brain development and can help with nausea.
  • Carrots: Crunchy and sweet, carrots are a great source of vitamin A and can enhance your immune system.
  • Lentils: Packed with protein and iron, lentils are essential for a healthy pregnancy and can be a hearty addition to your dinner.
  • Brown Rice: This whole grain is a great source of complex carbohydrates, providing sustained energy throughout the day.
  • Greek Yogurt: A protein powerhouse, Greek yogurt is also rich in probiotics, which can support your digestive health.
  • Nuts (Almonds, Walnuts): These are excellent sources of healthy fats, protein, and important vitamins and minerals.
  • Berries (Strawberries, Blueberries): Bursting with antioxidants, berries are a sweet way to satisfy cravings while boosting your nutrient intake.
  • Olive Oil: A heart-healthy fat that can enhance the flavor of your dishes while providing essential fatty acids.
  • Herbs and Spices (Ginger, Turmeric): Not only do they add flavor, but they can also help with nausea and inflammation.

A Day in the Life: Your Vegetarian Diet Chart

Close-up image of a colorful vegetarian diet chart with diverse foods suitable for pregnant women in their first trimester.

Ready to take on the day? Here’s a simple yet satisfying vegetarian diet chart designed specifically for your first trimester:

  1. Breakfast: Start your day with a bowl of whole grain cereal topped with sliced bananas and a glass of milk or plant-based milk. It’s a delicious and energizing way to kick off your morning!
  2. Mid-Morning Snack: For a quick boost, enjoy a handful of nuts paired with a small serving of fresh berries. This combo will keep your energy high without weighing you down.
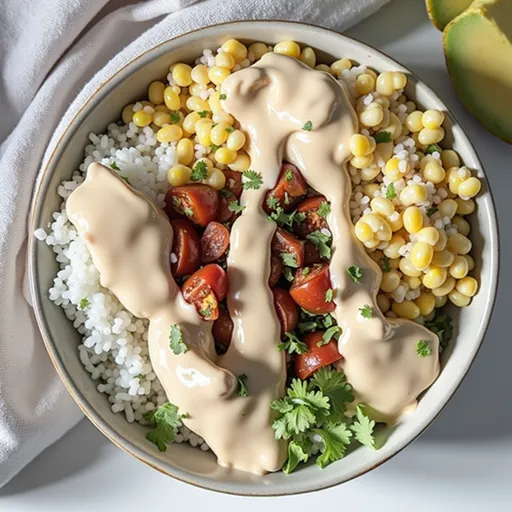
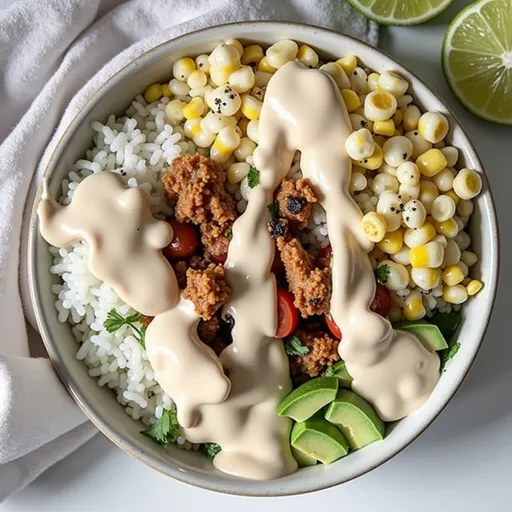
  3. Lunch: Prepare a quinoa salad featuring chickpeas, fresh spinach, diced avocado, and a drizzle of olive oil dressing. It’s colorful, nutritious, and bursting with flavor!
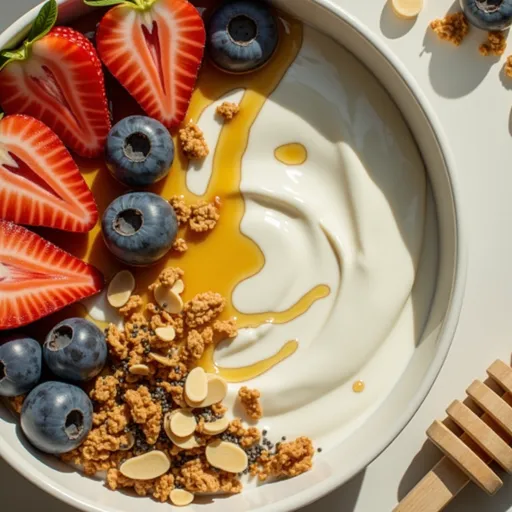
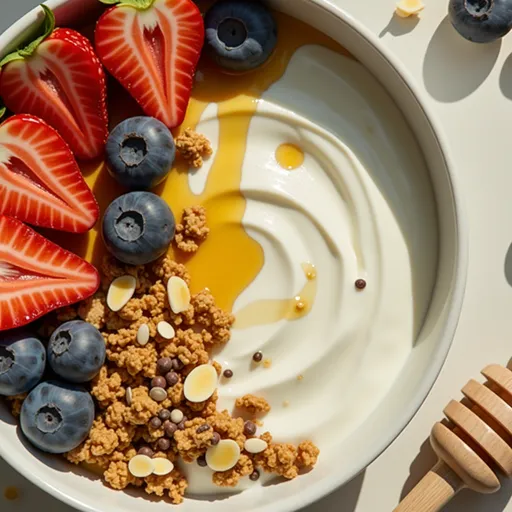
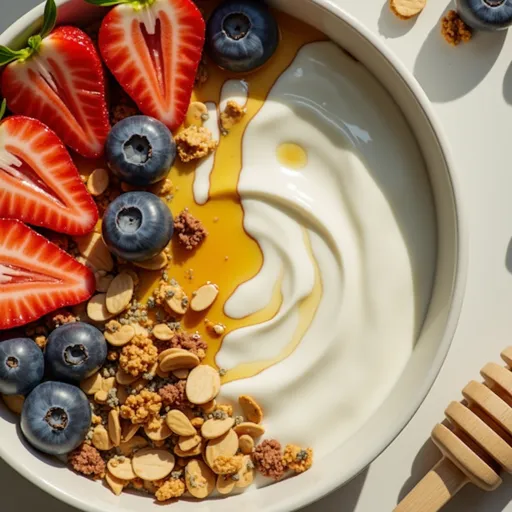
  4. Afternoon Snack: Indulge in Greek yogurt topped with a drizzle of honey and a sprinkle of cinnamon. This is not just a snack; it’s a moment of self-care.
  5. Dinner: Roast sweet potatoes and carrots, serving them alongside a hearty portion of lentils and brown rice. This comforting meal will leave you feeling satisfied and nourished.
  6. Hydration: Throughout the day, keep your hydration levels up with plenty of water and herbal teas. Staying hydrated is crucial during pregnancy!
  7. Ginger Tips: If you’re dealing with nausea, incorporate ginger into your meals or drinks. Ginger tea or ginger-infused smoothies can be a lifesaver!

Tips for Success: Making It Work

Transitioning to a vegetarian diet during pregnancy doesn’t have to be overwhelming. Here are some tips to help you embrace this flavorful journey:

  • Meal Prep: Spend some time each week preparing meals or ingredients in advance. This will make it easier to stick to your diet and reduce stress during busy days.
  • Experiment: Don’t be afraid to try new recipes or ingredients. Each meal is an opportunity to discover flavors and combinations that you love.
  • Listen to Your Body: Pregnancy can bring about cravings and aversions. Pay attention to what your body is telling you and adjust your meals accordingly.
  • Join a Community: Whether it’s an online group or local meet-ups, connecting with other pregnant women can provide support, encouragement, and recipe ideas.

Variations and Substitutions

Your vegetarian diet can be as flexible as you need it to be. Here are some variations and substitutions to consider:

  • Grains: If you’re not a fan of quinoa or brown rice, try farro, bulgur, or even cauliflower rice as a base for salads.
  • Legumes: Substitute chickpeas with black beans or kidney beans for a different flavor profile.
  • Vegetables: Feel free to switch out vegetables based on your preferences or what’s in season. Roasted Brussels sprouts or zucchini can be excellent additions.
  • Dairy Alternatives: If you’re vegan or lactose intolerant, opt for almond, soy, or coconut yogurt as a substitute for Greek yogurt.

Storage and Freezing Tips

Preparing meals in advance can save you time and stress. Here’s how to store your vegetarian meals effectively:

  • Refrigeration: Most of your prepared meals will last up to 3-5 days in the refrigerator. Store them in airtight containers to keep them fresh.
  • Freezing: If you want to prepare meals ahead of time, many dishes freeze well! Consider freezing lentil soups, quinoa salads, or roasted vegetables in individual portions.

Frequently Asked Questions

As you embark on this culinary adventure, you might have some questions. Here are a few common ones answered:

  • Is a vegetarian diet safe during pregnancy? Absolutely! A well-planned vegetarian diet can provide all the nutrients you and your baby need.
  • How do I ensure I’m getting enough protein? Incorporate a variety of protein sources, such as legumes, nuts, seeds, and dairy products, into your meals.
  • Can I still enjoy my favorite flavors? Yes! You can create delicious meals using herbs and spices to enhance the flavors of your dishes.

Troubleshooting Common Issues

Even with the best intentions, you may encounter some challenges along the way. Here’s how to address a few common issues:

  • Nausea: If you’re feeling queasy, stick to bland foods like toast or crackers and gradually reintroduce flavorful dishes.
  • Cravings: If you find yourself craving specific foods, try to find a vegetarian version that satisfies that craving while still being nutritious.

Conclusion: Embrace the Flavorful Journey

As you step into the beautiful world of motherhood, remember that what you eat can be a source of joy, nourishment, and adventure. Embracing a vibrant vegetarian diet during your first trimester is not just about feeding yourself and your baby; it’s about celebrating the flavors and experiences life has to offer. So grab your apron, unleash your creativity, and embark on this flavorful journey. Here’s to nourishing and flourishing together—one delicious bite at a time!

Vegetarian Diet Chart for First Trimester Pregnancy

Prep Time 10 minutes
Cook Time 30 minutes
Total Time 40 minutes
Servings 1 day
Calories 1500
A nutritious and balanced vegetarian meal plan tailored for the first trimester of pregnancy, ensuring essential nutrients and energy.

Ingredients

Breakfast

  • 1 cup whole grain cereal
  • 1 cup milk or plant-based milk
  • 1 piece banana (sliced)

Mid-morning Snack

  • 1 handful nuts (almonds, walnuts)
  • 0.5 cup berries (strawberries, blueberries)

Lunch

  • 1 cup quinoa
  • 0.5 cup chickpeas (cooked)
  • 1 cup spinach (chopped)
  • 1 avocado diced avocado
  • 1 tablespoon olive oil

Afternoon Snack

  • 1 cup Greek yogurt
  • 1 teaspoon honey
  • 0.25 teaspoon cinnamon

Dinner

  • 1 sweet potato roasted sweet potatoes
  • 1 cup carrots (roasted)
  • 0.5 cup lentils (cooked)
  • 0.5 cup brown rice (cooked)

Instructions 

  • Start your day with cereal, bananas, and milk.
  • Enjoy nuts and berries as a snack.
  • Prepare quinoa salad with chickpeas, spinach, and avocado.
  • Have Greek yogurt with honey and cinnamon.
  • Roast sweet potatoes and carrots; serve with lentils and rice.
  • Stay hydrated and incorporate ginger if needed.

Notes

Ensure variety and hydration for optimal health during pregnancy.
Calories: 1500kcal
Cost: $15
Course: Meal Plan
Cuisine: vegetarian
Keyword: healthy, Pregnancy, Vegetarian

Nutrition

Calories: 1500kcal | Carbohydrates: 250g | Protein: 70g | Fat: 40g | Sodium: 1500mg

Loved this recipe? Save it to your favorite Pinterest board so you can easily find it later! It’s the perfect way to keep all your sweet ideas in one place. ✨

A beautifully arranged vegetarian diet chart showcasing fresh produce and nutritious grains for first trimester pregnancy.

Why You’ll Love This Recipe

Let’s be honest: who doesn’t crave a dish that offers a perfect blend of heat, flavor, and versatility? Buffalo Chicken Bowls are that culinary trifecta, making them perfect for busy weeknights or laid-back weekends. Imagine tender, spicy chicken harmonizing with a medley of fresh toppings, all served over a bed of fluffy rice or vibrant greens. This dish not only satisfies your hunger but also ignites your taste buds with every bite. Plus, they’re incredibly easy to make and can be customized to suit your preferences. Whether you’re a spice enthusiast or simply looking for a quick meal prep option, these bowls deliver on all fronts.

Ingredients That Pack a Punch

To create your unforgettable Buffalo Chicken Bowls, gather the following ingredients:

  • 2 cups cooked rice (white or brown)
  • 2 cups shredded cooked chicken
  • 1/2 cup buffalo sauce
  • 1 cup corn (canned or frozen)
  • 1 cup black beans (canned, rinsed and drained)
  • 1 cup diced tomatoes
  • 1/2 cup shredded cheddar cheese
  • 1/4 cup chopped green onions
  • 1/4 cup ranch dressing (optional)
  • Salt and pepper to taste

How to Make Buffalo Chicken Bowls

Delicious Buffalo Chicken Bowl with vibrant ingredients like corn, black beans, and cheese, captured in soft natural light.

Ready to embark on your culinary adventure? Follow these simple steps to create mouthwatering Buffalo Chicken Bowls that will have your family and friends coming back for seconds!

Step 1: Prepare the Chicken Mixture

In a large bowl, combine the shredded chicken and buffalo sauce. Mix until the chicken is thoroughly coated in the vibrant, spicy sauce. The fiery orange hue is not just a feast for the eyes; it’s a promise of flavor that awaits you!

Step 2: Layer the Base

In serving bowls, layer the cooked rice as your base. Whether you opt for fluffy white rice or nutty brown rice, this foundation will soak up all the delicious flavors from the toppings, creating a satisfying experience with each bite.

Step 3: Assemble Your Bowls

Top the rice generously with the buffalo chicken mixture. Next, it’s time to add the colorful toppings: sprinkle corn, black beans, and diced tomatoes over the chicken. Each of these ingredients contributes not only to the flavor but also to the texture and visual appeal of your dish.

Step 4: Add the Finishing Touches

Finally, sprinkle shredded cheddar cheese and chopped green onions over the top for that extra pop of flavor. If you’re feeling indulgent, drizzle ranch dressing to add creaminess that balances the spice. Season with salt and pepper to taste before serving.

Tips for Success

While this recipe is straightforward, here are some tips to ensure your Buffalo Chicken Bowls turn out perfectly:

  • Quality Ingredients: Use high-quality buffalo sauce to achieve the best flavor. A homemade version can elevate your dish even further.
  • Meal Prep: These bowls are perfect for meal prep! Cook the chicken and rice in advance, then assemble when you’re ready to eat.
  • Spice Level: Adjust the amount of buffalo sauce based on your heat tolerance. Start small, and you can always add more!
  • Fresh Toppings: Don’t skimp on fresh toppings. They provide a refreshing contrast to the spicy chicken and add essential nutrients.

Equipment Needed

Before you dive in, make sure you have the right tools on hand:

  • Large mixing bowl
  • Serving bowls
  • Measuring cups
  • Cooking pot or rice cooker

Variations to Spice It Up

In the realm of cooking, experimentation is key! Here are some variations to customize your Buffalo Chicken Bowls:

  • Swap the Protein: Try using shredded turkey, tofu, or even jackfruit for a vegetarian version.
  • Whole Grain Options: Consider quinoa or farro for a hearty, nutrient-dense base.
  • Add More Veggies: Include bell peppers, avocado, or zucchini for added flavor and nutrition.

Storing and Freezing Your Bowls

If you have leftovers (which is rare but can happen), store them in airtight containers in the refrigerator for up to three days. For longer storage, you can freeze the chicken mixture and rice separately. When you’re ready to eat, simply reheat in the microwave or on the stovetop. Just remember to keep the toppings fresh for the best experience!

FAQs About Buffalo Chicken Bowls

Here are some frequently asked questions that might help you along your cooking journey:

  • Can I make these bowls ahead of time? Absolutely! You can prepare the chicken and rice in advance and assemble when you’re ready to eat.
  • Can I use frozen chicken? Yes! Just make sure to cook the chicken thoroughly before shredding it. You can use a pressure cooker or slow cooker for convenience.
  • How spicy are these bowls? The spice level can be adjusted based on the amount of buffalo sauce you use. Start with a small amount and add more to taste.
  • Are these bowls gluten-free? Yes, as long as you use gluten-free buffalo sauce and check other ingredient labels.

Troubleshooting Common Issues

Even the best chefs face challenges in the kitchen! Here are some common issues and how to solve them:

  • Too Spicy: If your buffalo chicken is too spicy, add more rice or some sour cream to balance out the heat.
  • Dried Out Chicken: Ensure you don’t overcook the chicken. Keep it moist by adding a splash of chicken broth if needed.

Final Thoughts

Buffalo Chicken Bowls are more than just a meal; they’re an experience that brings zest and excitement to your dining table. The combination of flavors, textures, and colors not only makes your taste buds dance but also creates a feast for the eyes. Whether you’re cooking for family, friends, or just for yourself, these bowls are a perfect way to explore the art of cooking with spice. So grab your apron, embrace the heat, and get ready to ignite your culinary passion. Trust me, once you dive into these bowls, you’ll be hooked on the thrill of cooking with bold flavors. Enjoy every fiery bite!

Buffalo Chicken Bowls

Prep Time 10 minutes
Cook Time 15 minutes
Total Time 25 minutes
Servings 4 servings
Calories 650
A flavorful and easy-to-make bowl combining spicy buffalo chicken with fresh vegetables and rice for a satisfying meal.

Ingredients

Base

  • 2 cups cooked rice (white or brown)

Protein

  • 2 cups shredded cooked chicken

Sauce

  • 1/2 cup buffalo sauce

Vegetables & Beans

  • 1 cup corn (canned or frozen)
  • 1 cup black beans (canned, rinsed and drained)
  • 1 cup diced tomatoes

Cheese & Garnish

  • 1/2 cup shredded cheddar cheese
  • 1/4 cup chopped green onions

Dressing & Seasoning

  • 1/4 cup ranch dressing (optional)
  • to taste salt and pepper

Instructions 

  • Mix shredded chicken with buffalo sauce until well coated.
  • Layer cooked rice in bowls as the base.
  • Top rice with buffalo chicken mixture, then add corn, black beans, and tomatoes.
  • Sprinkle with cheddar cheese and green onions.
  • Drizzle ranch dressing if desired, season with salt and pepper, then serve.

Notes

Adjust spice level with more or less buffalo sauce.
Calories: 650kcal
Cost: $15
Course: Main Course
Cuisine: American
Keyword: Buffalo Chicken

Nutrition

Calories: 650kcal | Carbohydrates: 85g | Protein: 45g | Fat: 20g | Sodium: 1500mg

Loved this recipe? Save it to your favorite Pinterest board so you can easily find it later! It’s the perfect way to keep all your sweet ideas in one place. ✨

An appetizing Buffalo Chicken Bowl showcasing layered ingredients including rice and buffalo sauce, beautifully lit from the side.

Welcome to a culinary adventure that will ignite your taste buds and fill your home with irresistible aromas! This Chicken Zucchini Casserole is not just a dish; it’s a celebration of flavors that combines tender chicken, fresh zucchini, and cheesy goodness into a comforting meal that the whole family will love. Whether you’re looking for a quick weeknight dinner or a dish to impress your friends, this casserole is your ticket to culinary glory. In this article, we’ll dive deep into the art of making a Chicken Zucchini Casserole that feeds the soul and the stomach!

Why You’ll Love This Recipe

This Chicken Zucchini Casserole is packed with flavor and nutrition, making it an ideal choice for any meal. Here are five reasons why this dish is a must-try:

  • Flavor-packed layers: Each bite is a harmonious blend of tender chicken, creamy cheese, and the subtle sweetness of fresh zucchini — truly a flavor explosion!
  • Meal prep champion: This casserole is perfect for meal prep! Make it ahead of time, store it in the fridge, and reheat for a quick, delicious meal any day of the week.
  • Family-friendly: Kids and adults alike will rave about this dish. It’s comforting and familiar, yet exciting enough to keep everyone coming back for more.
  • Customizable: You can easily adapt this recipe to suit your dietary needs. Swap ingredients or add your favorite spices to create your perfect casserole.
  • Healthy indulgence: With fresh ingredients and wholesome chicken, this casserole is a nutritious option that doesn’t skimp on flavor.

Ingredients Needed for Chicken Zucchini Casserole

Let’s gather our ingredients and get ready to create magic in the kitchen! Here’s what you’ll need:

  • 3 medium zucchini
  • 2 cups cooked shredded chicken
  • 1 cup sour cream
  • 1 cup shredded cheddar cheese
  • 1/2 cup grated Parmesan cheese
  • 2 large eggs
  • 1 teaspoon garlic powder
  • 1 teaspoon onion powder
  • 1/2 teaspoon salt
  • 1/2 teaspoon black pepper

Feel free to get creative! Here are some substitutions and additions you might consider:

  • Protein swap: Use ground turkey or beef instead of chicken for a different flavor profile.
  • Cheese alternatives: Try mozzarella or pepper jack for a twist on the classic cheesy goodness.
  • Herbs and spices: Add fresh herbs like basil or thyme for a burst of freshness.
  • Vegetable mix-ins: Consider adding bell peppers, spinach, or mushrooms to boost the veggie factor!

How to Make Chicken Zucchini Casserole

Ready to whip up this delicious casserole? Follow these straightforward steps:

  1. Slice zucchini thinly and lay on paper towels. Sprinkle with salt and let sit for 10 minutes to draw out moisture. Pat dry.
  2. Preheat your oven to 375°F and grease a 9×13-inch casserole dish.
  3. In a large bowl, mix together shredded chicken, sour cream, cheddar cheese, Parmesan cheese, eggs, garlic powder, onion powder, salt, and pepper until combined.
  4. In the prepared baking dish, layer half of the zucchini slices on the bottom. Spread half of the chicken mixture over the zucchini. Repeat the layers, ending with cheese on top.
  5. Bake for 30 to 35 minutes, or until the top is golden and bubbly.
  6. Let the casserole rest for 5–10 minutes before serving. Enjoy!

Pro Tips for the Best Chicken Zucchini Casserole

A delicious Chicken Zucchini Casserole in a baking dish, highlighting the melted cheese and zucchini.

Want to take your casserole from great to extraordinary? Check out these expert insights:

  • Layer wisely: Ensure that zucchini slices are not overlapping too much to prevent sogginess; this helps them cook evenly.
  • Let it rest: Allowing the casserole to rest after baking helps it set and makes it easier to slice and serve.
  • Go for fresh: Use fresh, in-season zucchini for the best flavor and texture.
  • Adjust the creaminess: If you prefer a creamier casserole, add an extra dollop of sour cream or a splash of cream.
  • Cheese it up: Experiment with different cheese blends for unique flavors — try a mix of Gruyère and cheddar!
  • Spice it up: For a kick, add red pepper flakes or fresh jalapeños to the chicken mixture.
  • Freezer-friendly: This casserole can be frozen before baking. Just cover it well and bake from frozen, adding extra time as needed.
  • Garnish for flair: Top with fresh herbs like parsley or cilantro before serving for a pop of color and freshness.

Common Mistakes and Troubleshooting

Even the best cooks make mistakes, so here are common pitfalls to avoid while making your Chicken Zucchini Casserole:

  • Soggy casserole: To prevent a watery casserole, ensure you pat the zucchini dry after salting, and don’t skip the resting period after baking.
  • Overcooked chicken: If your chicken is dry, it’s likely overcooked. Use rotisserie or pre-cooked chicken to ensure tenderness and flavor.
  • Cheese burning: If the cheese is browning too quickly, cover the casserole with foil halfway through cooking.
  • Flavorless filling: Don’t skimp on seasoning! Taste your filling before baking and adjust as needed.

Delicious Variations to Try

Feeling adventurous? Here are some variations to spice things up:

  • Mexican Chicken Zucchini Casserole: Add taco seasoning and top with salsa and avocado for a fiesta of flavors!
  • Italian-Inspired Casserole: Incorporate marinara sauce, Italian herbs, and mozzarella cheese for a taste of Italy.
  • Low-Carb Version: Use cauliflower rice instead of chicken for a vegetarian twist that’s still hearty and satisfying.
  • Breakfast Casserole: Add scrambled eggs and cooked bacon or sausage for a hearty breakfast option that’s great for brunches.

Storage and Make-Ahead Instructions

This casserole is a meal prep dream! Here’s how to store and reheat it:

  • Refrigeration: Store leftovers in an airtight container in the fridge for up to 3–4 days.
  • Freezing: Freeze the casserole before baking for up to 3 months. Just thaw overnight in the fridge before baking.
  • Reheating: Reheat in the oven at 350°F until warmed through, approximately 20-25 minutes. You can also microwave individual portions if you’re in a hurry.

Frequently Asked Questions About Chicken Zucchini Casserole

Let’s tackle some common questions to ensure your casserole turns out perfectly every time:

  • Can I make this casserole ahead of time? Absolutely! Prepare it the night before and store it in the fridge until you’re ready to bake.
  • What can I serve with Chicken Zucchini Casserole? Pair it with a crisp salad or garlic bread for a complete meal.
  • How do I know when the casserole is done? It’s ready when the top is golden brown and the filling is bubbly.
  • Can I use frozen zucchini? Fresh zucchini is best, but if you’re using frozen, make sure to thaw and drain it well to avoid excess moisture.
  • Is this casserole gluten-free? Yes, as long as you use gluten-free chicken and avoid any pre-packaged ingredients that may contain gluten.
  • How can I add more veggies? Feel free to incorporate bell peppers, spinach, or carrots for added nutrition and flavor!
  • Can I substitute the chicken? Yes! You can use turkey, or even beans for a vegetarian version.
  • What’s the best way to store leftovers? Keep leftovers in an airtight container in the fridge for up to 4 days for best results.

Nutrition Tips and Dietary Adaptations

This Chicken Zucchini Casserole can be tailored to fit various dietary needs:

  • Low-carb option: Substitute zucchini for pasta for a lower-carb, veggie-packed dish.
  • Vegetarian adaptation: Replace chicken with chickpeas or lentils, and use eggs to bind the mixture.
  • Dairy-free version: Swap sour cream and cheese for dairy-free alternatives like cashew cream and nutritional yeast.

Equipment Recommendations

To make your cooking experience smoother, here are some essential kitchen tools for this recipe:

  • Sharp knife: For slicing zucchini and shredding chicken smoothly.
  • Cutting board: A sturdy surface for all your chopping needs.
  • Mixing bowl: A large bowl for combining all your ingredients without mess.
  • Casserole dish: A deep 9×13 dish is perfect for layering your casserole.
  • Oven mitts: Keep your hands safe while handling hot dishes.

Serving Suggestions

Let’s make this dish even more delightful! Here are some serving ideas:

  • Top with fresh herbs: Add a sprinkle of parsley or basil for a fresh touch.
  • Serve with a side salad: A light, zesty salad pairs beautifully with the rich flavors of the casserole.
  • Offer hot sauce: For those who love a kick, provide hot sauce or chili flakes on the side.

Conclusion

There you have it, my fellow culinary adventurers! This Chicken Zucchini Casserole is not just a meal; it’s a canvas for creativity, flavor, and love. Whether you’re serving it at a family dinner or enjoying it as leftovers, it promises to deliver joy and satisfaction in every bite. So grab your skillet, embrace the heat, and let’s cook something unforgettable together!

Chicken Zucchini Casserole: 5 Reasons to Love This Dish

Prep Time 15 minutes
Cook Time 35 minutes
Total Time 50 minutes
Servings 4 servings
Calories 450
This delicious casserole combines tender zucchini and shredded chicken with cheesy goodness, making it a perfect comfort meal.

Ingredients

Zucchini

  • 3 medium zucchini (sliced thin and salted)

Chicken

  • 2 cups cooked shredded chicken

Dairy

  • 1 cup sour cream
  • 1 cup shredded cheddar cheese
  • 1/2 cup grated Parmesan cheese

Eggs

  • 2 large eggs

Spices

  • 1 teaspoon garlic powder
  • 1 teaspoon onion powder
  • 1/2 teaspoon salt
  • 1/2 teaspoon black pepper

Instructions 

  • Slice zucchini thin, salt, and sit 10 minutes. Pat dry.
  • Preheat oven to 375°F (190°C) and grease dish.
  • Mix chicken, sour cream, cheeses, eggs, and spices.
  • Layer zucchini and chicken mixture, top with cheese, and bake 30-35 mins.
  • Rest 5-10 mins before serving.

Notes

Use fresh zucchini for best flavor.
Calories: 450kcal
Cost: $15
Course: Main Course
Cuisine: American
Keyword: casserole, chicken, zucchini

Nutrition

Calories: 450kcal | Carbohydrates: 20g | Protein: 40g | Fat: 25g | Sodium: 800mg

Why You’ll Love This Quick Miso Soup

There’s something truly magical about a steaming bowl of miso soup. It’s comfort food and health food rolled into one, a warm hug for your soul. In just 10 minutes, you can create a delicious, umami-rich soup that transforms your kitchen into a cozy haven. Whether you’re diving into a culinary adventure or simply seeking a quick meal, this 10 Minute Miso Soup is the answer. Perfect for those busy weeknights or as a delightful starter to a more elaborate dinner, this recipe invites you to embrace the flavors of Japan right at home.

With just a handful of ingredients, this soup allows you to explore the depths of flavor, all while being incredibly easy to make. Plus, it’s vegetarian and can easily be made gluten-free! So, let’s roll up our sleeves and dive into the world of miso, where every spoonful tells a story.

Ingredient Notes

Before we get cooking, let’s take a moment to appreciate the ingredients that make this soup sing:

  • Water: The base of our soup, it’s important to use good quality water for the best flavor.
  • Miso Paste: This fermented soybean paste is the heart of miso soup. Choose between white (sweet), yellow (mild), or red (strong) miso based on your preference. For a gluten-free option, ensure you select a gluten-free miso.
  • Silken Tofu: Soft and creamy, silken tofu adds a delightful texture. It’s rich in protein and makes the soup more filling.
  • Green Onions: Freshly chopped green onions add a burst of flavor and a pop of color.
  • Seaweed (Wakame): Rehydrated wakame seaweed brings a subtle oceanic flavor that complements the miso perfectly.
  • Soy Sauce: This is optional but can enhance the umami flavor to your liking.

How to Make Quick Miso Soup

Delicious miso soup featuring seaweed and cubed silken tofu in soft lighting.

Ready to whip up your own bowl of miso magic? Follow these simple steps:

  1. In a pot, bring 4 cups of water to a gentle boil.
  2. Reduce heat to low and add 2 tablespoons of miso paste, stirring until fully dissolved.
  3. Add 1/2 cup cubed silken tofu and 1/4 cup rehydrated wakame to the pot.
  4. Simmer for 2-3 minutes until heated through.
  5. Remove from heat and stir in 1/4 cup chopped green onions.
  6. Taste and adjust seasoning with soy sauce if desired.
  7. Serve hot and enjoy your quick miso soup!

What to Serve with Miso Soup

Miso soup is incredibly versatile and pairs wonderfully with a variety of dishes. Here are some delightful suggestions:

  • Sushi: The lightness of miso soup complements the flavors of sushi, making for a perfect pairing.
  • Rice Dishes: Serve alongside a bowl of steamed rice or fried rice for a hearty meal.
  • Salads: A fresh cucumber salad or seaweed salad is a great side to balance the warmth of the soup.
  • Grilled Meats or Tofu: The savory flavors of grilled chicken or marinated tofu enhance your overall dining experience.

Recipe Tips for Perfect Miso Soup

To elevate your miso soup game, consider these helpful tips:

  • Don’t Boil Miso: Always turn off the heat before adding miso paste. Boiling can kill the beneficial probiotics and alter the flavor.
  • Customize Your Add-Ins: Feel free to add other vegetables like mushrooms, spinach, or carrots for extra nutrition and flavor.
  • Experiment with Miso Varieties: Try different types of miso for unique flavor profiles. Each type brings its own spin to the dish.

Variations to Explore

The beauty of miso soup lies in its adaptability. Here are some fun variations to try:

  • Spicy Miso Soup: Add a teaspoon of chili paste or flakes for a kick that’ll make your taste buds dance.
  • Seafood Miso Soup: Incorporate shrimp or clams for a delightful seafood twist.
  • Vegetable Miso Soup: Load it up with seasonal vegetables like bok choy, zucchini, or baby corn for a vibrant, nutritious bowl.

Equipment You’ll Need

Having the right tools can make your cooking process smoother. Here’s what you need:

  • Medium Pot: A sturdy pot is essential for boiling water and simmering your soup.
  • Whisk or Spoon: To help dissolve the miso paste without clumps.
  • Measuring Cups: Accurate measurements ensure the perfect balance of flavors.
  • Cutting Board and Knife: For chopping your green onions and tofu.

Storage and Freezing

Want to save some of that delicious miso soup for later? Here’s how to store it:

  • Refrigeration: Allow the soup to cool completely before transferring it to an airtight container. It will keep well in the fridge for up to 3 days.
  • Freezing: Miso soup can be frozen, but it’s best to store it before adding the miso paste. When you’re ready to enjoy it, thaw and heat the broth, then add the miso paste just before serving.

FAQs About Miso Soup

Got questions about making miso soup? You’re not alone! Here are some frequently asked questions:

  • Can I use regular tofu instead of silken? Absolutely! Just cube firm tofu and add it to the soup. The texture will be different, but still delicious.
  • What if I can’t find miso paste? If you’re in a pinch, try using a bouillon cube or powder, but it won’t have the same rich flavor.
  • How do I know if my miso paste is still good? Check for any off smells or discoloration. If it smells like miso and has no mold, it’s probably fine.

Troubleshooting Common Issues

Even the best chefs have hiccups in the kitchen! If you encounter any issues, here’s what to do:

  • Too Salty: Add a little more water to dilute the saltiness. You can also add more tofu or vegetables to balance it out.
  • Not Flavorful Enough: Consider adding a bit of soy sauce or adjusting your miso paste quantity to boost the umami flavor.
  • Texture Issues: If your tofu crumbles too much, try using slightly firmer tofu or handle it gently while stirring.

Conclusion

There you have it! A delightful, quick, and easy 10 Minute Miso Soup that’s not only a treat for your taste buds but also a celebration of culinary creativity. Cooking doesn’t have to be complicated to be delicious. With this recipe, you can embrace the flavors of miso and create something extraordinary in just minutes. So, grab your ingredients, gather your loved ones, and dive into this comforting bowl of warmth. And remember, every time you cook, you’re not just feeding your body; you’re feeding your spirit. Happy cooking!

10 Minute Miso Soup

Prep Time 2 minutes
Cook Time 8 minutes
Total Time 10 minutes
Servings 2 cups
Calories 80
A quick and comforting Japanese soup made with miso, tofu, seaweed, and green onions, ready in just 10 minutes.

Ingredients

Water

  • 4 cups water

Miso paste

  • 2 tablespoons miso paste

Silken tofu

  • 1/2 cup silken tofu, cubed

Green onions

  • 1/4 cup green onions, chopped

Seaweed (wakame)

  • 1/4 cup seaweed (wakame), rehydrated

Soy sauce

  • to taste soy sauce (optional)

Instructions 

  • Bring water to a gentle boil in a pot.
  • Stir in miso paste until dissolved.
  • Add tofu and seaweed, simmer briefly.
  • Remove from heat, add green onions, and season with soy sauce if desired.
  • Serve hot and enjoy!

Notes

Adjust soy sauce to taste for saltiness.
Calories: 80kcal
Cost: $5
Course: Soup
Cuisine: Japanese
Keyword: miso

Nutrition

Calories: 80kcal | Carbohydrates: 10g | Protein: 6g | Fat: 2g | Sodium: 900mg

Loved this recipe? Save it to your favorite Pinterest board so you can easily find it later! It’s the perfect way to keep all your sweet ideas in one place. ✨

Eye-level view of a warm bowl of miso soup, highlighting its textures and ingredients.

Why You’ll Love This Breakfast Bowl

Let’s face it: mornings can feel like a race against the clock. Between snoozing alarms and rushing to get out the door, the thought of preparing a hearty breakfast can seem daunting. But what if I told you that a delicious and nutritious meal could be whipped up in a matter of minutes? Enter the Greek Yogurt Breakfast Bowl — not just a meal, but a delightful experience that tantalizes your taste buds and fuels your day. This bowl is bursting with flavors, textures, and a sprinkle of creativity that makes waking up a little less painful and a lot more exciting.

The Magic of Greek Yogurt

Greek yogurt is the unsung hero of the breakfast world. Why is it so magical, you ask? For starters, it packs a punch of protein, delivering about 27 grams in just one cup! This means it keeps you fuller for longer, making it the perfect antidote to those mid-morning snack cravings. Plus, it’s rich in probiotics, which are fantastic for gut health, and calcium, which strengthens your bones. So not only does it taste divine, but it also supports your well-being.

But wait, there’s more! Greek yogurt is incredibly versatile. It can be sweetened, spiced, or even turned savory. This flexibility is what makes it a star ingredient in our breakfast bowl. You can keep it simple or go all out with toppings — the choice is yours!

The Classic Greek Yogurt Breakfast Bowl Recipe

Elevated view of a healthy breakfast bowl featuring Greek yogurt, honey, and fresh fruit.

Ready to dive into this breakfast adventure? Let’s get down to the nitty-gritty of how to create your own Greek Yogurt Breakfast Bowl that will spark joy in your mornings!

Ingredients

  • 1 cup Greek yogurt
  • 1/2 cup granola
  • 1/2 cup mixed berries (strawberries, blueberries, raspberries)
  • 1 tablespoon honey or maple syrup
  • 1 tablespoon chia seeds (optional)
  • Fresh mint leaves for garnish (optional)

How to Make It

  1. In a bowl, add 1 cup of Greek yogurt as the base.
  2. Top the yogurt with 1/2 cup of granola evenly.
  3. Add 1/2 cup of mixed berries on top of the granola.
  4. Drizzle 1 tablespoon of honey or maple syrup over the berries.
  5. Sprinkle 1 tablespoon of chia seeds for added nutrition, if desired.
  6. Garnish with fresh mint leaves for a refreshing touch.
  7. Serve immediately and enjoy your healthy and delicious breakfast bowl!

Why This Works So Well

The beauty of this breakfast bowl lies in its balance. The creamy texture of the Greek yogurt pairs perfectly with the crunch of granola, while the sweet and tart mixed berries add a burst of freshness. Drizzling honey or maple syrup brings a touch of sweetness that rounds out the flavors beautifully. It’s like a symphony of tastes and textures playing a delightful morning tune in your mouth!

Creative Variations to Try

Feeling adventurous? Let’s explore some variations that can elevate your breakfast bowl game even further!

1. Tropical Bowl

Swap out the mixed berries for tropical fruits like mango, pineapple, and banana. Top it with shredded coconut and a sprinkle of lime juice for that beachy vibe.

2. Savory Yogurt Bowl

If sweet isn’t your style in the morning, try a savory twist! Use Greek yogurt as a base, then add diced cucumbers, cherry tomatoes, olives, and a drizzle of olive oil. Sprinkle with za’atar or paprika for an exotic flair.

3. Peanut Butter & Jam

Combine your love for peanut butter and jelly with this bowl! Swirl in some natural peanut butter and top with your favorite jam or fresh fruit for a nostalgic breakfast.

4. S’mores Bowl

Channel your inner camper by adding mini marshmallows, crushed graham crackers, and a drizzle of chocolate syrup. It’s a breakfast that tastes like dessert!

Tips for the Perfect Bowl

To ensure you create the ultimate Greek Yogurt Breakfast Bowl, keep these tips in mind:

  • Choose quality yogurt: Opt for full-fat or low-fat Greek yogurt based on your preference. The creaminess makes a significant difference!
  • Granola matters: Use a granola that you genuinely enjoy. Whether it’s nutty, fruity, or chocolatey, it should complement the yogurt.
  • Fresh is best: Whenever possible, use fresh fruits to get that vibrant flavor and color.
  • Customize: Don’t shy away from experimenting with different toppings. Try nuts, seeds, or even yogurt-based dressings!

Nutritional Benefits You’ll Love

This breakfast bowl isn’t just a treat for your taste buds; it’s a powerhouse of nutrition. Here’s what you’re getting:

  • Protein: The Greek yogurt provides a hefty dose of protein, essential for muscle repair and growth.
  • Fiber: Granola and fruits add fiber to keep your digestive system happy.
  • Vitamins and Minerals: Berries are rich in antioxidants, while chia seeds offer omega-3 fatty acids and additional protein.
  • Low in Sugar: By using natural sweeteners like honey or maple syrup, you control the sugar content, making it a healthier option compared to sugary cereals.

Personal Touch: Why I’m All About This Bowl

As someone who thrives on flavor and adventure in the kitchen, the Greek Yogurt Breakfast Bowl has become a staple in my morning routine. It’s not just about eating; it’s about celebrating the joy of cooking and enjoying the little moments. Each bowl I create is a reflection of my mood, my cravings, and my desire to start the day on a high note.

FAQs and Common Questions

Let’s tackle some common questions you might have about this delicious breakfast bowl:

  • Can I prep this bowl the night before? Absolutely! You can layer the ingredients in a jar and refrigerate it overnight for a quick grab-and-go breakfast.
  • What if I’m lactose intolerant? You can substitute Greek yogurt with lactose-free yogurt or even try plant-based alternatives like coconut or almond yogurt.
  • How long will leftovers last? If you have any leftovers, store them in an airtight container in the fridge for up to 2 days, although fresh ingredients are best enjoyed right away.

Final Thoughts

Breakfast should be a celebration, not a chore. With this Greek Yogurt Breakfast Bowl, you have the freedom to explore flavors while nourishing your body. It’s a canvas for your culinary creativity and a way to embrace the morning with open arms. So, why not give it a try? Mix, match, and make it your own. Remember, each bowl is a story waiting to be told, filled with flavors that kickstart your day. Here’s to joyful mornings and delicious adventures in your kitchen!

Greek Yogurt Breakfast Bowl Recipe (Healthy & Delicious!) - MyFavMeals in 2025

Prep Time 5 minutes
Total Time 5 minutes
Servings 1 bowl
Calories 250
Start your day with this nutritious and delicious Greek yogurt breakfast bowl, packed with fresh berries, crunchy granola, and a touch of honey.

Ingredients

Base

  • 1 cup Greek yogurt

Toppings

  • 1/2 cup granola
  • 1/2 cup mixed berries (strawberries, blueberries, raspberries)
  • 1 tablespoon honey or maple syrup
  • 1 tablespoon chia seeds (optional)
  • fresh leaves mint leaves (for garnish, optional)

Instructions 

  • Add Greek yogurt to a bowl as the base.
  • Top with granola and mixed berries.
  • Drizzle honey or maple syrup over the toppings.
  • Sprinkle chia seeds if desired and garnish with mint leaves.
  • Serve immediately and enjoy!

Notes

You can customize the toppings with your favorite fruits or nuts for added flavor and nutrition.
Calories: 250kcal
Cost: $10
Course: Breakfast
Cuisine: Greek
Keyword: yogurt

Nutrition

Calories: 250kcal | Carbohydrates: 40g | Protein: 15g | Fat: 5g | Sodium: 70mg

Loved this recipe? Save it to your favorite Pinterest board so you can easily find it later! It’s the perfect way to keep all your sweet ideas in one place. ✨

A vibrant Greek Yogurt Breakfast Bowl showcasing colorful berries and chia seeds.

Ignite Your Taste Buds with Chicken Broccoli Bake

Welcome to a culinary adventure where **comfort food meets bold flavor**! This Chicken Broccoli Bake is not just a meal; it’s a celebration of the art of cooking with spice and creativity. In this article, you’ll discover everything you need to know about making this dish, from detailed ingredient breakdowns to expert tips that elevate your cooking game. Embrace the excitement of cooking, as we dive into why this recipe deserves a spot in your kitchen!

Why You’ll Love This Recipe

This Chicken Broccoli Bake is more than just a dish; it’s an experience! Here are five reasons you’ll fall head over heels for it:

  • Easy Prep: With minimal chopping and straightforward steps, this recipe is perfect for busy weeknights.
  • Flavor Explosion: The combination of cream cheese and cheddar cheese creates a creamy, dreamy texture that hugs every ingredient.
  • Nutritious Balance: Broccoli packs a punch of vitamins, making this casserole not just delicious but also a healthy choice.
  • Customizable: This recipe is a blank canvas, allowing you to experiment with different proteins and spices to match your taste.
  • Make-Ahead Friendly: Prep it in advance for an effortless dinner that’s ready when you are!

Ingredient Breakdown

Let’s get into the nitty-gritty of what makes this Chicken Broccoli Bake so special. Here’s what you need:

  • 4 cups broccoli florets: Fresh or frozen, broccoli adds not only nutrition but also a beautiful green color.
  • 1/2 cup cream cheese: Softened for easy blending, cream cheese provides the creamy base.
  • 2 tbsp mayonnaise: Adds richness and moisture, balancing the dish perfectly.
  • 1/2 cup grated cheddar: This cheese brings a sharp taste that complements the creaminess.
  • 1/2 tsp garlic powder: For that aromatic touch that elevates the entire dish.
  • 1/4 tsp sea salt: Enhances all the flavors, ensuring every bite is satisfying.
  • 1/4 tsp pepper: A hint of spice that brings the whole dish to life.
  • 1 1/2 cups chopped, cooked chicken: Use rotisserie chicken for convenience or any leftover chicken you have on hand.
  • 1/4 cup grated cheese (for topping): This creates a bubbly, golden crust on top that’s simply irresistible.

Pro Tips for a Flawless Bake

Side view of a delicious Chicken Broccoli Bake, revealing layers of broccoli, chicken, and melted cheese.

Before you dive into the cooking, here are some expert insights that will help you nail this dish:

  • Steam, Don’t Boil: Steaming the broccoli helps retain its bright color and nutrients. Just 2 minutes is all you need!
  • Room Temperature Ingredients: Allow your cream cheese to soften at room temperature for a smoother mixture.
  • Mix It Up: Feel free to add other ingredients like cooked quinoa or bell peppers for added texture and flavor.
  • Don’t Skip the Broil: Broiling at the end creates that gorgeous, bubbly top. Keep an eye on it, though; it can go from golden to burnt in a flash!
  • Cheese Choices: Experiment with different cheeses like Monterey Jack or pepper jack for a spicy kick.
  • Herb Infusion: Add fresh herbs like thyme or basil for an aromatic twist.
  • Leftover Love: This bake is perfect for using up leftover veggies or meats; get creative!
  • Serving Size: This recipe is easily doubled for larger gatherings or meal prep.

Common Mistakes and Troubleshooting

Even the best cooks can make mistakes. Here’s how to avoid common pitfalls:

  • Overcooking Broccoli: If your broccoli is mushy, just steam it for less time next time. You want it tender but not falling apart!
  • Too Much Cheese: While cheese is delicious, too much can make your bake greasy. Stick to the recommended amounts for the best texture.
  • Dry Casserole: If your bake turns out dry, try adding a splash of chicken broth or more cream cheese for moisture.
  • Uneven Cooking: Ensure your oven is properly preheated and consider using an oven thermometer to guarantee consistent temperatures.
  • Skipping the Topping: The topping is what makes this dish visually appealing and adds a delightful crunch. Don’t skip it!

Variations to Spice Things Up

This Chicken Broccoli Bake is a fantastic base for creativity! Here are four delicious variations you might want to try:

  • Mexican Twist: Add black beans, corn, and taco seasoning for a zesty, southwest-inspired bake.
  • Buffalo Chicken: Mix in buffalo sauce with the chicken for a spicy kick that’s sure to please heat lovers.
  • Cheesy Spinach: Swap out some broccoli for spinach or kale, adding more nutrients and a different flavor profile.
  • Quinoa Bake: Mix cooked quinoa into the chicken mixture for a heartier, vegetarian-friendly option.

Storage and Make-Ahead Instructions

Planning ahead? Here’s how to make this dish work for you:

  • Make Ahead: Prepare the casserole up to the baking step, cover it tightly, and refrigerate for up to 24 hours.
  • Freezing: You can freeze the unbaked casserole for up to three months. Just thaw in the fridge overnight before baking.
  • Leftovers: Store leftovers in an airtight container in the fridge for up to three days. Reheat in the oven or microwave until heated through.

Frequently Asked Questions

Got questions? We’ve got answers! Here’s what people often ask about Chicken Broccoli Bake:

  • Can I use frozen broccoli? Yes! Just make sure to thaw and drain the excess water before adding it to the mixture.
  • Is this recipe gluten-free? Absolutely! Just ensure your mayonnaise is gluten-free, and you’re all set.
  • What can I substitute for cream cheese? Greek yogurt or ricotta cheese can be used for a different flavor and texture.
  • How do I make this dish spicier? Add diced jalapeños or a splash of hot sauce to the mixture for an extra kick!
  • Can I use leftover rotisserie chicken? Yes! It’s a great way to use leftovers and save time.
  • How do I know when it’s done? The casserole is done when the cheese is bubbly and golden brown, and the edges are slightly crispy.
  • Can I make this vegetarian? Sure! Omit the chicken and add more vegetables or a meat substitute like tofu or tempeh.
  • What should I serve with this bake? It pairs beautifully with a simple green salad or some crusty bread to soak up any creamy goodness.

Nutritional Tips and Dietary Adaptations

This Chicken Broccoli Bake is flexible, allowing you to adjust it according to your dietary needs:

  • Low Carb: Substitute the cream cheese with a low-carb cream cheese alternative and use cauliflower instead of broccoli.
  • High Protein: Boost protein by adding more chicken or incorporating chickpeas.
  • Dairy-Free: Use dairy-free cream cheese and cheese alternatives for a delicious, allergen-friendly meal.

Essential Kitchen Equipment

To make this Chicken Broccoli Bake, you’ll need:

  • Casserole Dish: A 9 x 9 dish works perfectly for this recipe.
  • Large Mixing Bowl: For combining all your ingredients smoothly.
  • Steamer Basket: Ideal for perfectly steamed broccoli.
  • Oven Mitts: Safety first when handling hot dishes!

Serving Suggestions

Serve this Chicken Broccoli Bake warm, straight from the oven. Here are some ideas to elevate your presentation:

  • Garnish: Fresh herbs like parsley or cilantro add a pop of color and freshness.
  • Side Dishes: Pair with a crisp salad or roasted vegetables to complement the richness of the bake.
  • Comforting Accompaniments: A side of garlic bread or a light soup can round out the meal beautifully.

Conclusion

Your journey into the world of flavor doesn’t have to end here. This Chicken Broccoli Bake serves as a launching pad for your culinary creativity. Remember, cooking is about exploration and joy. Embrace the spices, the textures, and the bold flavors that make food a story worth telling. So grab your apron, gather your ingredients, and let’s ignite those taste buds! Thank you for joining me on this adventure — until next time, keep cooking with heart and spice!

Chicken Broccoli Bake

Prep Time 10 minutes
Cook Time 20 minutes
Total Time 30 minutes
Servings 4 servings
Calories 350
A creamy, cheesy casserole combining tender chicken and broccoli for a comforting meal.

Ingredients

Vegetables

  • 4 cups broccoli florets

Dairy

  • 1/2 cup cream cheese (softened)
  • 2 tbsp mayonnaise
  • 1/2 cup grated cheddar

Spices & Seasonings

  • 1/2 tsp garlic powder
  • 1/4 tsp sea salt
  • 1/4 tsp pepper

Protein

  • 1 1/2 cups chopped, cooked chicken

Topping

  • 1/4 cup grated cheese (for topping)

Instructions 

  • Preheat oven to 375°F (190°C). Grease a 9x9 casserole dish.
  • Steam broccoli for 2 minutes, then drain and set aside.
  • Mix cream cheese, mayo, seasonings, cheddar, chicken, and broccoli in a bowl.
  • Pour mixture into dish, sprinkle with grated cheese, and bake for 15 minutes. Broil for 2-3 minutes until bubbly and browned.
  • Serve warm. Store leftovers covered in fridge for up to three days.

Notes

For a creamier texture, use full-fat cream cheese and cheddar.
Calories: 350kcal
Cost: $15
Course: Main Course
Keyword: bake, Broccoli, chicken

Nutrition

Calories: 350kcal | Carbohydrates: 20g | Protein: 30g | Fat: 20g | Sodium: 600mg

Why You’ll Love These Vegetarian Quesadillas

Calling all flavor enthusiasts! If you’re ready to embark on a culinary adventure that tantalizes your taste buds and fills your kitchen with the mouthwatering aroma of a fiesta, then you’re in the right place. These Vegetarian Quesadillas with Black Beans and Sweet Potato are not just a meal; they’re a celebration of vibrant flavors and textures wrapped in a warm tortilla embrace. Imagine sinking your teeth into crispy, golden-brown quesadillas, bursting with the creamy sweetness of roasted sweet potatoes and the hearty goodness of black beans. Each bite is an explosion of flavor that dances on your palate, making this dish a true masterpiece of vegetarian cooking.

Ingredient Notes

To create these delicious quesadillas, you’ll need a handful of simple yet impactful ingredients. Here’s what you’ll gather:

  • 1 medium sweet potato, peeled and diced – This starchy wonder adds both sweetness and creaminess.
  • 1 can (15 oz) black beans, drained and rinsed – Packed with protein and fiber, they bring a satisfying texture.
  • 1 cup shredded cheese (cheddar or monterey jack) – The gooey, melty goodness that ties everything together.
  • 4 large flour tortillas – The perfect vehicle for our flavorful filling.
  • 1 tablespoon olive oil – For roasting and adding depth of flavor.
  • 1 teaspoon cumin – A warm, earthy spice that elevates the dish.
  • 1/2 teaspoon paprika – For a hint of smokiness.
  • Salt and pepper to taste – Essential for enhancing flavors.
  • Fresh cilantro (optional, for garnish) – Adds a burst of freshness.
  • Sour cream or salsa (optional, for serving) – Perfect for dipping and drizzling.

Instructions

Warm, cheesy Vegetarian Quesadillas showcasing black beans and diced sweet potato, served on a rustic plate.

Filling Prep

Ready to bring your culinary skills to life? Let’s kick things off with the filling:

  1. Preheat your oven to 400°F (200°C). This is where the magic begins!
  2. On a baking sheet, toss the diced sweet potato with olive oil, cumin, paprika, salt, and pepper, ensuring they’re evenly coated. Spread them out in a single layer to allow for even roasting.
  3. Roast in the oven for 20-25 minutes, or until the sweet potatoes are tender and slightly caramelized. This roasting process brings out their natural sweetness and adds depth to your quesadilla filling.
  4. Once roasted, combine the sweet potatoes in a mixing bowl with the black beans and half of the cheese. Mix well to create a colorful and flavorful filling.

Veggie Quesadilla Assembly

Now, let’s assemble these beauties!

  1. Heat a skillet over medium heat. This is where the quesadilla magic happens.
  2. Place one tortilla in the skillet and spread a portion of the sweet potato and black bean mixture over half of the tortilla. Be generous, but don’t overstuff it!
  3. Sprinkle some of the remaining cheese over the filling, adding that gooey goodness we all love.
  4. Fold the tortilla in half, pressing gently to seal the filling inside. Cook for 2-3 minutes on each side until the tortilla is golden brown and the cheese has melted. The sizzling sound will make your heart race with anticipation!
  5. Repeat the process for the remaining tortillas, creating a stack of cheesy, crispy quesadillas.

Cooking the Quesadilla

In this step, you’ll witness the transformation of simple ingredients into a savory delight:

  • As the quesadillas cook, keep an eye on them; you want that perfect golden-brown color and melty cheese.
  • Once cooked, cut the quesadillas into wedges and serve warm, garnished with fresh cilantro and accompanied by sour cream or salsa for dipping.

Serving Suggestions

These quesadillas are delicious on their own, but why not elevate the experience? Here are some serving suggestions:

  • Garnish with fresh cilantro for a burst of freshness and a pop of color.
  • Serve with sour cream or homemade salsa for dipping. A dollop of guacamole wouldn’t hurt either!
  • Pair with a refreshing salad or a side of Mexican street corn for a complete meal.

Pro Tips

Before you dive into making these quesadillas, here are some tips to ensure your cooking adventure is a success:

  • Don’t Overfill: While it’s tempting to pack in all the delicious filling, too much can lead to a messy situation. A moderate amount allows for easy flipping!
  • Experiment with Spices: Feel free to add a pinch of cayenne or chili powder for an extra kick. Spice is your friend!
  • Use Fresh Ingredients: Fresh herbs and high-quality cheese can elevate your quesadillas to restaurant-quality.

Variations

There’s so much room for creativity with these quesadillas! Here are some variations you might enjoy:

  • Mexican Street Corn: Toss in some grilled corn for a sweet crunch.
  • Extra Veggies: Add roasted zucchini, bell peppers, or spinach to the filling for more color and nutrients.
  • Meat Lovers: If you’re not strictly vegetarian, shredded chicken or beef can easily be added for heartier quesadillas.

Substitutions

Need to adjust for dietary preferences or what you have on hand? Here are some substitutions:

  • Cheese: For a vegan option, swap in your favorite plant-based cheese.
  • Tortillas: Whole wheat or gluten-free tortillas work beautifully.
  • Beans: If black beans aren’t your thing, pinto beans or chickpeas can be great alternatives.

Equipment Needed

Before you get cooking, gather these essentials:

  • Oven and baking sheet for roasting.
  • A mixing bowl for combining the filling.
  • A non-stick skillet for cooking the quesadillas.
  • A spatula for flipping.

Storage/Freezing

Have leftovers? Here’s how to store them for later:

  • Cooked quesadillas can be stored in the fridge for up to 3 days. Just keep them in an airtight container.
  • For freezing, place uncooked quesadillas between layers of parchment paper and store in a freezer-safe bag. When you’re ready to enjoy them, cook from frozen – just add a couple of extra minutes to the cooking time.

FAQs

Here are some common questions about making quesadillas:

  • Can I use corn tortillas? Absolutely! Corn tortillas will add a delightful flavor twist.
  • What can I serve with quesadillas? They pair wonderfully with a side salad, rice, or Mexican beans.
  • Can I make these quesadillas ahead of time? Yes, you can prepare the filling in advance and assemble them just before cooking.

Troubleshooting

If you encounter any issues, don’t fret! Here are some solutions:

  • Quesadillas are soggy: Ensure your filling is not too wet. Drain excess moisture from beans and avoid overloading with ingredients.
  • Cheese isn’t melting: Make sure your skillet is at the right temperature. Low heat can lead to uneven melting.

Final Thoughts

There you have it! A deliciously simple way to spice up your meal routine. These Vegetarian Quesadillas with Black Beans and Sweet Potato are not just a dish; they are an experience filled with flavor, color, and joy. Remember, cooking is all about exploration, so don’t hesitate to experiment with different ingredients and spices. Each time you make these quesadillas, you’re not just feeding your body; you’re feeding your soul. So grab your skillet, embrace the heat, and let your kitchen be your playground. Happy cooking!

Vegetarian Quesadillas with Black Beans and Sweet Potato

Prep Time 10 minutes
Cook Time 25 minutes
Total Time 35 minutes
Servings 4 servings
Calories 450
Enjoy these flavorful vegetarian quesadillas packed with roasted sweet potatoes, black beans, and melted cheese, perfect for a quick and satisfying meal.

Ingredients

Sweet Potato

  • 1 medium sweet potato, peeled and diced

Black Beans

  • 1 can (15 oz) black beans, drained and rinsed

Cheese

  • 1 cup shredded cheese (cheddar or monterey jack)

Tortillas

  • 4 large flour tortillas

Olive Oil

  • 1 tablespoon olive oil

Spices

  • 1 teaspoon cumin
  • 1/2 teaspoon paprika
  • to taste salt and pepper

Optional Garnishes

  • as needed fresh cilantro, sour cream, salsa (for garnish and serving)

Instructions 

  • Preheat oven to 400°F (200°C). Toss sweet potato with olive oil, cumin, paprika, salt, and pepper; roast for 20-25 minutes.
  • Mix roasted sweet potato with black beans and half of the cheese.
  • Heat a skillet over medium heat. Fill tortillas with the mixture, fold, and cook until golden and cheese melts, about 2-3 minutes per side.
  • Repeat with remaining tortillas. Cut into wedges, garnish with cilantro, and serve with sour cream or salsa if desired.

Notes

For extra flavor, add a squeeze of lime or hot sauce.
Calories: 450kcal
Cost: $12
Course: Main Course
Cuisine: Mexican
Keyword: Black Beans, Quesadillas, sweet potato, Vegetarian

Nutrition

Calories: 450kcal | Carbohydrates: 60g | Protein: 20g | Fat: 15g | Sodium: 800mg

Loved this recipe? Save it to your favorite Pinterest board so you can easily find it later! It’s the perfect way to keep all your sweet ideas in one place. ✨

Appetizing Vegetarian Quesadillas with a golden-brown exterior, highlighting the vibrant filling and soft shadows.

Why You’ll Love These Bowls

Are you ready to embark on a culinary adventure that will tantalize your taste buds and elevate your dinner game? These Easy Street Corn Chicken Rice Bowls are more than just a meal; they’re an experience! Bursting with flavor, nutrition, and vibrant colors, this dish is a celebration of everything that makes cooking fun and exciting. Whether you’re prepping for a busy week or looking to impress at your next gathering, these bowls are versatile enough to suit any occasion.

With a base of hearty brown rice, succulent chicken, and a delightful medley of fresh toppings, you’re not just feeding your hunger; you’re nourishing your soul. Plus, the combination of smoky spices and zesty lime brings a kick that will keep you coming back for more. Let’s dive into the ingredients and steps to create this delicious dish that’s sure to become a family favorite!

Key Ingredient Notes and Substitution Ideas

For the Chicken

A vibrant rice bowl filled with brown rice, diced chicken, corn, black beans, and fresh vegetables, captured in soft natural light.

The hero of our dish is, of course, the chicken! You’ll want to use 1 pound of boneless, skinless chicken breasts, diced into bite-sized pieces. If you’re feeling adventurous, try using thighs for a juicier option or even grilled shrimp for a seafood twist!

For the Rice

We’re using 1 cup of brown rice for a nutritious and satisfying base. Brown rice is packed with fiber and nutrients, but if you’re in a rush, feel free to substitute with quinoa or white rice—just adjust the cooking time accordingly.

For the Veggies

This recipe shines with the addition of 1 cup of corn (which can be fresh, frozen, or canned), 1 cup of black beans (rinsed and drained), and 1 cup of halved cherry tomatoes. The freshness of these ingredients brings a delightful crunch and balance to the dish. You can swap the cherry tomatoes for diced bell peppers or add some diced jalapeños for an extra kick!

For the Toppings

We finish off these bowls with a creamy avocado and a sprinkle of fresh cilantro. The avocado adds a rich creaminess that perfectly complements the spiced chicken. If you’re not a fan of cilantro, try swapping it for fresh parsley or green onions.

How to Make Street Corn Chicken Rice Bowls

Let’s get cooking! Follow these simple steps to create your vibrant Street Corn Chicken Rice Bowls:

  1. In a medium saucepan, combine 1 cup of brown rice and 2 cups of water or low-sodium chicken broth. Bring to a boil, then reduce the heat to low, cover, and simmer for about 45 minutes or until the rice is tender and the liquid is absorbed.
  2. While the rice is cooking, heat 1 tablespoon of olive oil in a large skillet over medium heat. Add the diced chicken, along with 1 teaspoon of paprika, 1 teaspoon of garlic powder, 1 teaspoon of cumin, salt, and pepper to taste. Cook until the chicken is browned and cooked through, about 7-10 minutes.
  3. Stir in the corn and black beans into the skillet with the chicken. Cook for an additional 5 minutes until heated through.
  4. Once the rice is done, fluff it with a fork and divide it into serving bowls.
  5. Top each bowl with the chicken and corn mixture, halved cherry tomatoes, diced avocado, and fresh cilantro.
  6. Squeeze lime juice over each bowl before serving. Enjoy your healthy meal!

Tips for a Perfect Bowl

Cooking is an art, and like any great artist, you can benefit from a few tips:

  • Marinate for More Flavor: If you have the time, marinate the diced chicken in the spices for at least 30 minutes before cooking. This allows the flavors to penetrate the meat.
  • Customize Your Toppings: Don’t be afraid to mix and match! Add ingredients like shredded cheese, sliced radishes, or even a dollop of Greek yogurt for extra creaminess.
  • Meal Prep Magic: These bowls are perfect for meal prep! Make a batch of the chicken and rice, and store them in separate containers for quick and easy lunches throughout the week.

Variations to Explore

While this recipe is fantastic as is, it’s always fun to switch things up. Here are a few variations to consider:

  • Spicy Kick: Add diced jalapeños or a splash of hot sauce to the chicken mixture for an extra kick.
  • Vegetarian Option: Replace the chicken with sautéed tofu or tempeh for a delicious vegetarian version.
  • Grain Swap: Experiment with different grains like quinoa or farro to give your bowls a unique twist.

Equipment You’ll Need

Before you jump into the kitchen, make sure you have these essential tools:

  • A medium saucepan for cooking the rice.
  • A large skillet to cook the chicken and mix in the other ingredients.
  • A cutting board and knife for chopping veggies.
  • Measuring cups and spoons for accuracy.

Storage and Freezing Tips

These bowls store beautifully and can be a lifesaver on busy nights:

  • Refrigeration: Store the chicken and rice in airtight containers in the fridge for up to 4 days. Keep toppings like avocado and tomatoes separate until ready to eat.
  • Freezing: You can freeze the chicken and corn mixture for up to 2 months. Just reheat it thoroughly before serving!

FAQs

Can I use brown rice instead of white rice?

Absolutely! Brown rice adds more fiber and nutrients to your dish, making it a healthier option.

What can I substitute for chicken?

Feel free to use turkey, tofu, or even grilled shrimp. The spices will work wonderfully with any protein!

Can I make this dish ahead of time?

Yes! Prepare all components in advance and assemble the bowls right before serving for a fresh taste.

Troubleshooting Common Issues

Every great cook faces challenges, but don’t let them deter you:

  • Rice Too Sticky? If your rice is sticky, it may have been overcooked. Next time, try rinsing the rice before cooking to remove excess starch.
  • Chicken Not Browning? Ensure your skillet is hot enough before adding the chicken. A hot pan promotes a nice sear.

Conclusion

There you have it! A delicious, healthy, and vibrant dish that’s perfect for any occasion. The Easy Street Corn Chicken Rice Bowls are more than just a meal; they’re an invitation to explore, create, and enjoy the process of cooking. With its combination of flavors, textures, and colors, this dish is sure to become a staple in your kitchen. So grab your skillet, embrace the adventure, and make every bite count. Happy cooking!

Loved this recipe? Save it to your favorite Pinterest board so you can easily find it later! It’s the perfect way to keep all your sweet ideas in one place. ✨

Eye-level view of a healthy Easy Street Corn Chicken Rice Bowl, highlighting its fresh ingredients and textures on a blurred background.

Ignite Your Taste Buds with Sizzling Healthy Baked Chicken Tacos!

Welcome to a flavorful fiesta! If you’re ready to embrace a culinary adventure that will tantalize your taste buds, you’ve landed in the right place. These Healthy Baked Chicken Tacos are not just a meal; they’re a vibrant celebration of freshness, spice, and the joy of cooking. With a perfect blend of spices and wholesome ingredients, these tacos are designed to make your palate dance and your kitchen come alive. So, roll up your sleeves, because it’s time to dive into a world where every bite tells a story and every flavor sings!

Why You’ll Love This Recipe

These tacos aren’t just about taste—they’re a powerhouse of benefits! Here’s why this recipe deserves a spot in your weekly meal rotation:

  • Nutritious and Wholesome: Made with lean chicken, fresh veggies, and low-fat yogurt, these tacos are packed with nutrients without sacrificing flavor.
  • Versatile: Perfect for meal prep, you can fill these tacos with your favorite toppings, making them customizable for everyone’s taste.
  • Quick and Easy: With straightforward steps, you can have these delicious tacos ready in under 30 minutes, perfect for busy weeknights!
  • Low-Calorie Delight: Each taco is designed to be low in calories yet high in flavor, allowing you to indulge without the guilt.
  • Family-Friendly: Kid-approved and easy to make, these tacos are a great way to get the whole family involved in cooking!

Ingredients Breakdown

Let’s get into the nitty-gritty of what you’ll need for these baked chicken tacos and explore some substitutions to fit your dietary needs:

  • Chicken Breasts: 2 boneless, skinless breasts, cut into thick slices. For a twist, try using turkey or tofu for a vegetarian option.
  • Spices: Salt, garlic powder, onion powder, dried oregano, ground cumin, ground coriander, and smoked paprika. Feel free to experiment with your favorite spices—Mexican chili powder or chipotle can add a smoky kick!
  • Olive Oil: 1 tablespoon for cooking. You can substitute with avocado oil for a higher smoke point.
  • Fresh Ingredients: Avocado, tomatoes, and onion add freshness and crunch. You can also use corn, bell peppers, or radishes for a zesty twist.
  • Cilantro Yogurt Sauce: Made with low-fat Greek yogurt, cilantro, garlic, and lime juice, this creamy sauce elevates your tacos. If you’re dairy-free, use cashew yogurt or a vegan sour cream alternative.

Pro Tips for Taco Mastery

Juicy baked chicken tacos on a plate with avocado and diced tomatoes.

Here are some expert insights to ensure your tacos are top-notch:

  • Marinate for Flavor: Let the chicken marinate with spices for at least 30 minutes (or overnight) to deepen the flavors.
  • Air Fryer Magic: For perfectly cooked chicken with a crispy exterior, use the air fryer. Preheat it to 400°F (200°C) and cook in batches.
  • Oven-Baked Goodness: If you prefer baking, ensure your chicken is spread out on the tray to cook evenly.
  • Rest Before Slicing: Always let your chicken rest for a few minutes after cooking. This helps retain moisture and flavor.
  • Fresh Salsa: Make your salsa just before serving to keep the ingredients fresh and vibrant.
  • Assembly Line: When assembling, set up an ‘assembly line’ of toppings so everyone can customize their tacos.
  • Texture Matters: For a delightful crunch, warm your tortillas briefly in a pan before filling them.
  • Experiment with Sauces: Besides cilantro yogurt sauce, try a spicy chipotle mayo or a zesty lime crema for an extra flavor punch.

Avoid Common Mistakes

Even seasoned chefs face challenges! Here are some common mistakes and how to troubleshoot them:

  • Overcooking Chicken: To avoid dry chicken, monitor the cooking time closely and use a meat thermometer (165°F or 75°C).
  • Too Much Spice: If your tacos turn out too spicy, balance it with extra yogurt sauce or sour cream.
  • Soggy Tortillas: Ensure your chicken isn’t overly moist before assembling to prevent soggy tortillas.
  • Neglecting Seasoning: Don’t skip the seasoning! Spice blends enhance the flavor and are essential for a mouthwatering experience.

Variations to Spice Things Up

Feeling adventurous? Here are some variations to keep your taco nights exciting:

  • Vegetarian Tacos: Swap chicken for roasted vegetables or black beans for a hearty vegetarian option.
  • Fish Tacos: Use grilled fish fillets seasoned with lime and chili powder for a fresh twist.
  • Breakfast Tacos: Fill with scrambled eggs, avocado, and salsa for a delightful breakfast treat.
  • Tex-Mex Twist: Add shredded cheese, jalapeños, and refried beans for a delicious Tex-Mex flair.

Storage and Make-Ahead Tips

Want to prep ahead? Here’s how to store and reheat your tacos:

  • Make Ahead: Cook the chicken and prepare the salsa and yogurt sauce a day in advance. Store separately in airtight containers in the fridge.
  • Storage: Keep assembled tacos in the fridge for up to 2 days. Reheat the chicken in the oven for crispy results.
  • Freezing: For longer storage, freeze the cooked chicken in portions. Thaw and reheat before assembling your tacos.

Frequently Asked Questions

Curious minds want to know! Here are some common questions about making these mouthwatering tacos:

  • Can I use other meats? Absolutely! Ground turkey, beef, or even shrimp can be used in place of chicken.
  • What toppings do you recommend? Fresh cilantro, diced onions, jalapeños, and lime wedges are fantastic additions!
  • Can I make this recipe gluten-free? Yes! Use corn tortillas or gluten-free flour tortillas for a gluten-free option.
  • How can I make the tacos spicier? Add diced jalapeños to your salsa or include a spicy salsa as a topping.
  • Can I prepare the sauce in advance? Yes! The cilantro yogurt sauce can be made up to 3 days in advance and stored in the fridge.
  • What’s the best way to reheat leftovers? Reheat chicken in the oven or air fryer to maintain its crispy texture. Avoid microwaving to prevent sogginess.
  • How do I know when the chicken is cooked? Use a meat thermometer; chicken should reach an internal temperature of 165°F (75°C).
  • Can I customize the spice level? Definitely! Adjust the amount of spices in the chicken or use milder salsa to tame the heat.

Nutrition Tips and Dietary Adaptations

These tacos are not only delicious but also cater to various dietary needs:

  • Low-Carb Option: Use lettuce wraps instead of tortillas for a low-carb alternative.
  • High-Protein Twist: Add extra chicken or top with black beans for an added protein boost.
  • Low-Fat Version: Opt for skinless chicken and low-fat yogurt to keep things light.

Essential Kitchen Equipment

Here’s what you need to whip up these taco wonders:

  • Air Fryer: For perfectly cooked chicken with minimal oil.
  • Baking Tray: If you prefer oven-baking, a sturdy tray is essential.
  • Mixing Bowls: For marinating chicken and mixing salsa and sauce.
  • Blender or Food Processor: For a smooth cilantro yogurt sauce.

Serving Suggestions

Now that your tacos are ready, here’s how to serve them for maximum enjoyment:

  • On a Taco Bar: Set up a taco bar with all the fixings—salsa, guacamole, and toppings—for a fun party atmosphere.
  • With a Side Salad: Pair with a fresh garden salad or Mexican street corn salad for a complete meal.
  • Perfect for Gatherings: These tacos are a hit at gatherings; serve with drinks and appetizers for a festive spread!

With these Sizzling Healthy Baked Chicken Tacos, you’re not just cooking; you’re creating an experience. So grab your skillet, unleash your creativity, and let the flavors ignite your passion for cooking. Because the world of spice and flavor awaits you, and every meal is an opportunity for adventure!

Healthy Baked Chicken Tacos

Prep Time 15 minutes
Cook Time 20 minutes
Total Time 35 minutes
Servings 4 servings
Calories 450
Enjoy these flavorful baked chicken tacos with fresh salsa and creamy cilantro sauce, perfect for a healthy and satisfying meal.

Ingredients

Chicken

  • 2 pieces chicken breasts (boneless and skinless, cut into thick slices)
  • 1.5 teaspoons salt
  • 1 teaspoon garlic powder
  • 1 teaspoon onion powder
  • 1 teaspoon dried oregano
  • 1 teaspoon ground cumin
  • 1 teaspoon ground coriander seed
  • 2 teaspoons smoked paprika
  • 1 tablespoon olive oil

Salsa

  • 1 piece avocado (diced, see notes)
  • 2 medium tomatoes (diced, keep the seeds)
  • ¼ white/red onion onion (finely diced)
  • ½ lime juice of lime
  • ¼ teaspoon salt

Cilantro Sauce

  • 4 oz low-fat Greek yogurt (about 120 grams)
  • cup cilantro leaves (fresh)
  • 1 clove garlic (roughly diced)
  • ¼ teaspoon salt

Tortillas

  • 12 small tortillas (low-carb, high-protein or regular)

Extras

  • to taste N/A hot sauce or salsa for serving

Instructions 

  • Slice chicken breasts, season with salt, herbs, spices, and olive oil; set aside.
  • Cook chicken in air fryer at 200°C for 12 minutes, flipping halfway; rest and slice into strips.
  • Alternatively, bake chicken at 200°C for 15-20 minutes, flipping halfway; rest and slice.
  • Blend yogurt, cilantro, garlic, and salt to make cilantro sauce; chill if desired.
  • Mix avocado, tomatoes, onion, lime juice, and salt to prepare salsa; set aside.
  • Assemble tacos with chicken, salsa, cilantro sauce, and hot sauce as desired.

Notes

For best flavor, chill the cilantro sauce before serving.
Calories: 450kcal
Cost: $15
Course: Main Course
Cuisine: Mexican
Keyword: chicken, healthy, Tacos

Nutrition

Calories: 450kcal | Carbohydrates: 45g | Protein: 40g | Fat: 12g | Sodium: 900mg

Why This Recipe is a Game-Changer

When life gets hectic, the last thing you want to do is stress about dinner. Enter the Best Keto Crockpot Chicken – a dish that transforms your ordinary meal into a flavor-packed adventure. Imagine coming home after a long day to the tantalizing aroma of perfectly cooked chicken, enveloped in a creamy, cheesy sauce. It’s not just food; it’s a warm embrace after the chaos of life. This recipe is not only keto-friendly but also checks all the boxes for comfort, ease, and taste. Perfect for meal prepping or impressing dinner guests, this dish is bound to become a staple in your kitchen.

What Ingredients You Will Need

Before diving into the cooking process, let’s gather the ingredients that will make this dish sing. Here’s what you’ll need:

  • 2 lbs boneless, skinless chicken thighs
  • 1 cup chicken broth
  • 1 cup heavy cream
  • 1 cup shredded cheddar cheese
  • 1/2 cup cream cheese, softened
  • 1 tablespoon garlic powder
  • 1 tablespoon onion powder
  • 1 teaspoon paprika
  • Salt and pepper to taste
  • Chopped parsley for garnish (optional)

These ingredients are not only accessible but also pack a punch of flavor. The combination of chicken thighs, heavy cream, and cheeses creates a rich base that’s impossible to resist. Plus, it’s a low-carb delight that fits perfectly within your keto lifestyle.

Essential Equipment

Succulent boneless chicken thighs in a rich, cheesy sauce, garnished with parsley.

To make your cooking experience smooth and enjoyable, you’ll need some basic kitchen equipment:

  • A reliable crockpot (or slow cooker) – this is where the magic happens!
  • A mixing bowl for combining the sauce ingredients
  • Measuring cups and spoons for precision
  • Two forks for shredding the chicken
  • A spatula to help mix and serve

With these tools at your disposal, you’re ready to embark on your culinary adventure!

Preparation Method

Let’s get to the fun part – cooking! Here’s how to craft this delightful dish step-by-step:

  1. Place the chicken thighs in the crockpot, ensuring they are evenly distributed.
  2. In a mixing bowl, combine the chicken broth, heavy cream, cream cheese, garlic powder, onion powder, paprika, salt, and pepper. Mix until smooth and well-blended.
  3. Pour the creamy mixture over the chicken in the crockpot, ensuring each piece is well-coated.
  4. Cover the crockpot and cook on low for 6-8 hours or until the chicken is tender and easily shreds apart.
  5. About 30 minutes before serving, add the shredded cheddar cheese to the crockpot and stir to combine.
  6. Once cooking is complete, shred the chicken using two forks and mix it well with the sauce.
  7. Serve hot, garnished with chopped parsley if desired.

And there you have it! A simple yet satisfying dish that’s perfect for any occasion.

Cooking Tips & Techniques

To elevate your cooking game and ensure your Keto Crockpot Chicken turns out perfectly every time, keep these tips in mind:

  • Sear the Chicken: For an added depth of flavor, consider searing the chicken thighs in a hot skillet for a few minutes before placing them in the crockpot. This step enhances the taste and adds a lovely color.
  • Adjusting the Thickness: If the sauce is too thin for your liking, transfer it to a saucepan after cooking. Simmer it over medium heat until it thickens to your desired consistency.
  • Flavor Variations: Don’t hesitate to experiment! Adding ingredients like sun-dried tomatoes, spinach, or even jalapeños can bring a new twist to this classic recipe.
  • Monitor Cooking Time: Chicken thighs are forgiving, but keep an eye on the cooking time. If you’re using chicken breasts, they may cook faster and could dry out if overcooked.

Variations & Adaptations

This dish is incredibly versatile, so feel free to adapt it to suit your taste or dietary needs:

  • Spice It Up: If you like a little heat, add crushed red pepper flakes or diced green chiles for a spicy kick.
  • Herb Infusion: Fresh herbs like thyme or rosemary can be added for an aromatic touch. Simply toss them in with the chicken before cooking.
  • Dairy-Free Option: Replace heavy cream with coconut cream and use a dairy-free cream cheese alternative for a delicious dairy-free version.

Serving & Storage Suggestions

Now that your Keto Crockpot Chicken is ready, let’s talk about how to serve it. This dish pairs beautifully with:

  • Cauliflower rice for a low-carb base that soaks up the creamy sauce.
  • Zoodles (zucchini noodles) for a fresh and light alternative.
  • Steamed broccoli or green beans for a pop of color and added nutrients.

When it comes to leftovers, you’re in luck! This dish stores well:

  • Keep it in an airtight container in the refrigerator for up to 4 days.
  • For longer storage, freeze individual portions in freezer-safe containers for up to 3 months. Just thaw overnight in the fridge before reheating.

Nutritional Information & Benefits

This Keto Crockpot Chicken is not just delicious but also supports a healthy lifestyle. Here’s why:

  • High in protein: The chicken thighs provide essential protein to keep you feeling full and satisfied.
  • Low in carbs: Perfect for those following a keto diet, this recipe is low in carbohydrates while still being rich in flavor.
  • Healthy fats: The heavy cream and cheese contribute beneficial fats, helping to fuel your body efficiently.

With wholesome ingredients and plenty of flavor, this dish is a nutritious option that doesn’t compromise on taste.

FAQs

Can I use chicken breasts instead of thighs?

Absolutely! Just keep in mind that chicken breasts tend to cook faster and can dry out, so check them for doneness earlier in the cooking process.

Can I make this recipe dairy-free?

Yes! Replace the heavy cream with coconut cream and use a dairy-free cream cheese for a creamy, dairy-free version of this dish.

Can I cook this recipe on the stovetop?

Yes! You can simmer the ingredients in a large pot over low heat for 30-40 minutes until the chicken is cooked through and tender.

What’s the best way to thicken the sauce?

If the sauce is too thin, transfer it to a saucepan and simmer until it reaches your desired consistency. You can also blend in additional cream cheese for extra creaminess.

What can I serve this with besides cauliflower rice?

Try serving it with roasted vegetables, a fresh salad, or even mashed cauliflower for a comforting side dish.

Conclusion

There you have it, folks! The Best Keto Crockpot Chicken is not just a recipe; it’s an invitation to explore flavor, embrace comfort, and enjoy the simplicity of cooking. Whether you’re meal prepping, cooking for family, or treating yourself to a cozy dinner, this dish is sure to please. So grab your crockpot, gather those ingredients, and get ready to embark on a culinary adventure that will warm your heart and tantalize your taste buds. Remember, cooking should be fun and adventurous, so don’t hesitate to make this recipe your own! Happy cooking!

Best Keto Crockpot Chicken – Low Carb Comfort Food

Prep Time 10 minutes
Cook Time 6 hours
Total Time 6 hours 10 minutes
Servings 4 servings
Calories 550
This creamy, flavorful keto chicken recipe is perfect for a comforting low-carb meal made effortlessly in the crockpot.

Ingredients

Protein

  • 2 lbs boneless, skinless chicken thighs

Liquid

  • 1 cup chicken broth
  • 1 cup heavy cream

Dairy

  • 1 cup shredded cheddar cheese
  • 1/2 cup cream cheese, softened

Spices & Seasonings

  • 1 tablespoon garlic powder
  • 1 tablespoon onion powder
  • 1 teaspoon paprika

To taste

  • to taste salt and pepper

Garnish

  • optional chopped parsley (for garnish)

Instructions 

  • Place chicken thighs in crockpot.
  • Mix chicken broth, heavy cream, cream cheese, garlic powder, onion powder, paprika, salt, and pepper; pour over chicken.
  • Cook on low for 6-8 hours until tender.
  • Stir in shredded cheddar cheese 30 minutes before serving, then shred chicken and mix well.
  • Serve hot, garnished with parsley if desired.

Notes

This dish is perfect for a low-carb, high-fat keto diet and is easy to prepare in the crockpot for a hassle-free meal.
Calories: 550kcal
Cost: $15
Course: Main Course
Cuisine: American
Keyword: chicken, crockpot, Keto

Nutrition

Calories: 550kcal | Carbohydrates: 8g | Protein: 50g | Fat: 35g | Sodium: 900mg

Loved this recipe? Save it to your favorite Pinterest board so you can easily find it later! It’s the perfect way to keep all your sweet ideas in one place. ✨

Appetizing bowl of Keto Crockpot Chicken featuring a blend of creamy textures and spices.