Author

Avery Collins

Browsing

Why You’ll Love These Cookies

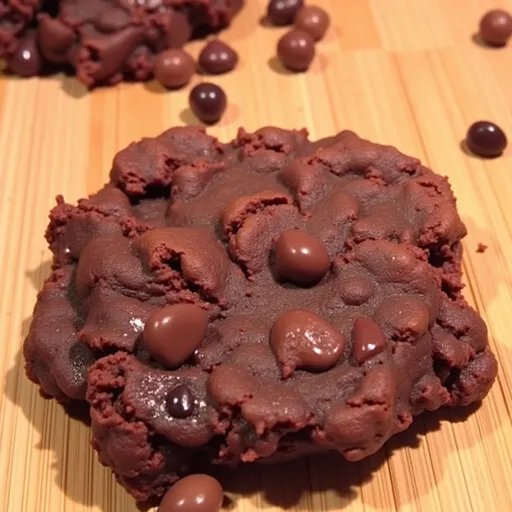
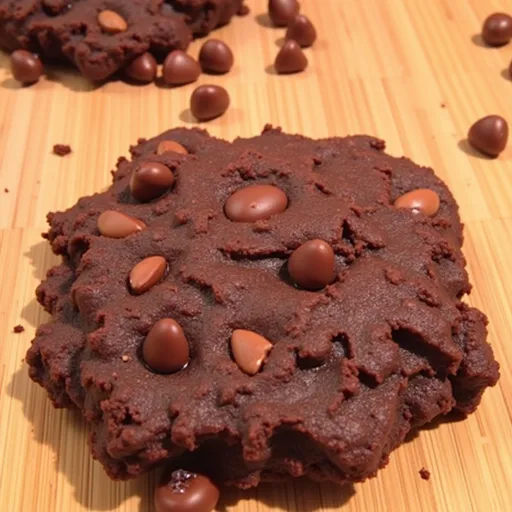
When it comes to indulgence without the guilt, these easy and delicious 3-ingredient healthy chocolate cookies stand out like a beacon of hope in the dessert world. Imagine taking a bite and being greeted by a rich, chocolatey flavor that satisfies your sweet tooth while nourishing your body. Yes, you heard that right! These cookies redefine what it means to indulge healthily. With just three simple ingredients—almond butter, honey or maple syrup, and cocoa powder—you can whip up a treat that feels decadent but is packed with wholesome goodness. Whether you’re looking for a post-workout snack, a quick breakfast option, or a sweet treat to share with friends, these cookies are your new best friend in the kitchen.

Overview of the Ingredients

Let’s dive into the magic behind this recipe. Each ingredient plays a vital role in creating these divine cookies:

  • Almond Butter: This nutty delight is the foundation of our cookies. It’s creamy, rich in healthy fats, and adds a delightful texture that will have you craving more.
  • Honey or Maple Syrup: A natural sweetener that not only enhances the flavor but also offers a hint of moisture, ensuring your cookies don’t dry out. Both options are fantastic, but they lend slightly different flavors—honey is more floral, while maple syrup adds a woodsy sweetness.
  • Cocoa Powder: The star of the show! Unsweetened cocoa powder gives these cookies that deep chocolatey richness we all adore, packing in antioxidants and a touch of sophistication.

How to Make These Irresistible Cookies

Beautifully lit chocolate cookies featuring a glossy surface, placed in a cozy kitchen setting with blurred background elements.

Now that we’ve covered the ingredients, let’s get into the fun part—making the cookies! Here’s how to create these healthy 3 ingredient cookies step-by-step:

  1. Preheat your oven to 350°F (175°C). This step is crucial for achieving the perfect texture.
  2. Mix the ingredients: In a mixing bowl, combine 1 cup of almond butter, 1/2 cup of honey (or maple syrup), and 1/2 cup of cocoa powder. Stir until everything is well mixed and forms a cohesive dough.
  3. Scoop the dough: Use a tablespoon to scoop portions of the dough onto a lined baking sheet. Space them about 2 inches apart, as the cookies will spread slightly while baking.
  4. Flatten the cookies: With the back of a fork, gently flatten each cookie. This not only helps them cook evenly but also gives them that classic cookie look!
  5. Bake: Pop the tray into your preheated oven and bake for 10-12 minutes, or until the cookies are set. They may look a bit soft, but they will firm up as they cool.
  6. Cool: Allow the cookies to cool on the baking sheet for a few minutes before transferring them to a wire rack to cool completely. This step is key to achieving the right texture.

Tips for Baking Success

As with any recipe, a few tips can elevate your baking game:

  • Use room temperature ingredients: For the best mixing results, let your almond butter and honey sit at room temperature for a bit.
  • Don’t overbake: These cookies can go from perfect to dry quickly. Keep a close eye on them, especially after the 10-minute mark.
  • Experiment with flavors: Feel free to add in extras like vanilla extract, a pinch of sea salt, or even some cinnamon for a little twist.

Variations to Try

These cookies are like a blank canvas, ready for your creative touch! Here are some variations to consider:

  • Nut Butter Swap: If almond butter isn’t your jam, feel free to use peanut butter, cashew butter, or even sunflower seed butter for a nut-free version.
  • Chocolate Chips: Toss in a handful of dark chocolate chips or even white chocolate chips for an extra indulgent experience.
  • Nutty Crunch: Add chopped nuts like walnuts or pecans to give your cookies a delightful crunch.
  • Dried Fruits: Incorporate dried fruits like cranberries or raisins for a chewy texture and a burst of flavor.

Substitutions for Dietary Needs

If you have specific dietary restrictions, here are some easy substitutions:

  • Vegan Option: Swap honey for maple syrup, and ensure your chocolate chips are dairy-free.
  • Low-Carb Option: Use a sugar substitute like erythritol in place of honey or maple syrup.
  • Nut-Free Option: Use sunflower seed butter instead of almond butter for a nut-free alternative that still has that creamy texture.

Essential Equipment

No fancy gadgets here! To make these cookies, you’ll need:

  • A mixing bowl
  • A spoon or spatula for mixing
  • A tablespoon for scooping
  • A lined baking sheet (parchment paper works best)
  • A wire rack for cooling

Storage and Freezing Tips

These cookies can be stored easily, and they maintain their deliciousness over time:

  • Room Temperature: Store in an airtight container for up to a week.
  • Refrigerator: For longer freshness, keep them in the fridge, where they can last for up to two weeks.
  • Freezing: You can freeze the cookies for up to three months. Just make sure to separate them with parchment paper before putting them in a freezer bag, so they don’t stick together.

FAQs

Let’s tackle some common questions you might have:

  • Can I use another sweetener besides honey or maple syrup? Yes! You can try agave nectar or coconut sugar, but be mindful that it may change the flavor slightly.
  • What if my dough is too sticky? If your dough is too sticky to handle, add a bit more cocoa powder or almond butter until you reach the desired consistency.
  • Can these cookies be made gluten-free? Absolutely! This recipe is naturally gluten-free, ensuring everyone can enjoy a bite.

Troubleshooting Common Issues

If your cookies don’t come out as expected, here’s how to troubleshoot:

  • Too crumbly? This may happen if you didn’t add enough honey or maple syrup. Just mix in a little more until the dough holds together.
  • Too dry? Make sure you didn’t overbake them! If they are already baked, you can sandwich them with a little nut butter or yogurt to add moisture.

Conclusion

There you have it! A simple yet scrumptious 3-ingredient healthy chocolate cookie recipe that proves indulgence can be wholesome. These cookies aren’t just a treat; they’re a celebration of flavor, creativity, and the joy of cooking. So grab your ingredients, turn on your oven, and prepare to enjoy a cookie that not only delights your taste buds but also nourishes your body. Whether enjoyed fresh out of the oven or as a make-ahead snack, these cookies are sure to become a staple in your home. Happy baking, and remember—cooking is an adventure, so don’t be afraid to explore and make this recipe your own!

Easy and Delicious 3-Ingredient Healthy Chocolate Cookie Recipe

Prep Time 10 minutes
Cook Time 12 minutes
Total Time 22 minutes
Servings 12 cookies
Calories 150
Enjoy these simple, healthy chocolate cookies made with just three ingredients. Perfect for a quick treat that satisfies your sweet tooth!

Ingredients

Main ingredients

  • 1 cup almond butter
  • 1/2 cup honey or maple syrup
  • 1/2 cup cocoa powder

Instructions 

  • Preheat oven to 350°F (175°C).
  • Mix almond butter, honey (or syrup), and cocoa powder until smooth.
  • Scoop dough onto a lined baking sheet, spacing 2 inches apart.
  • Flatten cookies with a fork.
  • Bake for 10-12 minutes, then cool on a wire rack.

Notes

Store in an airtight container for freshness.
Calories: 150kcal
Cost: $10
Course: Dessert
Cuisine: Healthy
Keyword: chocolate

Nutrition

Calories: 150kcal | Carbohydrates: 15g | Protein: 4g | Fat: 10g | Sodium: 5mg

Loved this recipe? Save it to your favorite Pinterest board so you can easily find it later! It’s the perfect way to keep all your sweet ideas in one place. ✨

A fresh batch of 3-ingredient healthy chocolate cookies, showcasing their texture and warmth under soft, natural lighting.

Why You’ll Love It

Let me tell you, if you haven’t yet embraced the spicy, savory world of Moong Dal Chilla, you’re missing out on a culinary adventure that’s as bold as it is nourishing. Picture this: crispy, golden pancakes made from split yellow lentils, packed with vibrant veggies and bursting with flavor. Not only are these pancakes a fantastic breakfast option, but they also double as a snack or a light dinner, proving that food doesn’t have to be complicated to be delicious. This recipe is a staple in my kitchen, and once you try it, it may just become a favorite in yours too!

What is Moong Dal Chilla?

Moong Dal Chilla, also known as cheela or pudla, is a traditional Indian savory pancake made from split yellow moong dal. This dish is celebrated for its simplicity and versatility, allowing you to incorporate a variety of vegetables and spices. The beauty of chilla lies in its ability to cater to different tastes and preferences, making it a beloved dish across the Indian subcontinent. Whether you enjoy it as a hearty breakfast or a quick snack, chilla brings a delightful crunch and a burst of flavor to your plate.

Hot Indian Breakfast

Savory lentil pancake garnished with vegetables, captured in warm, natural light.

In India, breakfast is often a lavish affair, filled with an array of dishes that tantalize the taste buds and fuel the day ahead. Moong Dal Chilla holds a special place in this lineup. It’s quick to prepare, packed with protein, and can be served with various sides like chutney or yogurt. Growing up, I remember the aroma of freshly cooked chillas wafting through the kitchen as my grandmother flipped them with expert hands. It was a ritual that brought the family together, a moment to savor before diving into the day.

Why Make This?

Why should you add Moong Dal Chilla to your culinary repertoire? Here are a few compelling reasons:

  • Nutritious: Moong dal is a powerhouse of protein, making this dish an excellent choice for vegans and vegetarians.
  • Quick and Easy: With just a few ingredients and minimal prep time, you can whip up a batch of these savory pancakes in under 30 minutes.
  • Customizable: Feel free to experiment with different vegetables, spices, or even grains to suit your preferences.
  • Delicious: The combination of spices and fresh ingredients creates a flavor profile that is simply irresistible.

Ingredients Needed 🧾

To make these delicious Moong Dal Chillas, you’ll need the following ingredients:

  • 1 cup split yellow moong dal
  • 1/4 cup chopped onions
  • 1/4 cup chopped tomatoes
  • 1/4 cup chopped bell peppers
  • 2 green chilies, finely chopped
  • 1/2 inch ginger, grated
  • 1/4 teaspoon turmeric powder
  • 1/2 teaspoon cumin seeds
  • Salt to taste
  • Water as needed
  • Oil for cooking

How to Make It 🔪

Ready to embark on this culinary journey? Here’s how to create the perfect Moong Dal Chilla:

  1. Soak the Moong Dal: Begin by soaking the moong dal in water for 3-4 hours or overnight. This softens the lentils and makes them easier to blend.
  2. Blend the Dal: Drain the soaked dal and transfer it to a blender. Add a little water and blend until you achieve a smooth batter. The consistency should resemble that of pancake batter.
  3. Combine Ingredients: In a mixing bowl, combine the dal batter with the chopped onions, tomatoes, bell peppers, green chilies, ginger, turmeric, cumin seeds, and salt. Mix well until all ingredients are incorporated.
  4. Heat the Pan: Heat a non-stick pan or skillet over medium heat and lightly grease it with oil.
  5. Cook the Chilla: Pour a ladleful of the batter onto the pan, spreading it into a thin circle. Cook for 2-3 minutes until the edges begin to lift and the bottom is golden brown. Flip and cook the other side until equally golden.
  6. Repeat: Continue the process with the remaining batter, adding more oil as needed.
  7. Serve: Serve hot with your favorite chutney or yogurt.

Serving Suggestions 🍽

Now that you’ve mastered the art of making Moong Dal Chilla, how can you elevate your serving experience? Here are a few ideas:

  • Chutney Delight: Pair your chilla with tangy green chutney or a creamy yogurt dip for a burst of flavor.
  • Wrap It Up: Stuff your chilla with mashed potatoes, crumbled paneer, or roasted veggies for a heartier meal.
  • Flatbread Alternative: Use chilla as a gluten-free flatbread to accompany your favorite curry dishes.

Top Recipe Tips 💭

To ensure your Moong Dal Chilla turns out perfectly every time, keep these tips in mind:

  • Consistency is Key: The batter should be pourable but not too runny. Adjust with water or flour as needed.
  • Heat Management: Ensure your skillet is hot enough for a crispy edge but not so hot that it burns the chilla before cooking through.
  • Texture Preference: You can blend the dal to a smooth consistency or leave it slightly coarse for more texture.
  • Fresh Ingredients: Use fresh vegetables for the best flavor and nutrition.

Variations

Feel free to get creative with your Moong Dal Chilla. Here are some delightful variations to consider:

  • Cheesy Chilla: Add grated cheese on top before flipping for a gooey, savory treat.
  • Greens Galore: Incorporate spinach, kale, or even grated carrots for added nutrients and flavor.
  • Spice It Up: Experiment with different spices such as crushed coriander or fennel seeds to give your chilla a unique twist.

Substitutions

If you’re missing an ingredient or want to customize your chilla, consider these substitutions:

  • Dal Alternatives: If you can’t find split yellow moong dal, you can use red lentils or split peas.
  • Vegetable Swaps: Use any vegetables you have on hand, like zucchini, mushrooms, or grated beetroot.
  • Gluten-Free Options: If you’re looking for a gluten-free option, ensure you use only lentils and vegetables without adding any flour.

Equipment

To make your Moong Dal Chilla, you’ll need the following kitchen essentials:

  • Blender or food processor for making the batter
  • Non-stick skillet or frying pan for cooking
  • Spatula for flipping
  • Mixing bowl for combining ingredients

Storage/Freezing

Got leftovers? Here’s how to store and freeze your chilla:

  • Refrigeration: Store leftover chillas in an airtight container in the fridge for up to 3 days. Reheat in a skillet or microwave before serving.
  • Freezing: You can also freeze the batter for up to 1 month. Thaw overnight in the fridge before using.
  • Cooked Chilla Storage: Freeze cooked chillas with parchment paper between them to prevent sticking.

FAQs 📖

Here are some common questions about Moong Dal Chilla:

  • Can I make this chilla without soaking the dal? While soaking is recommended for better texture, you can use unsoaked dal for a coarser chilla.
  • Is Moong Dal Chilla gluten-free? Yes! As long as you only use lentils and vegetables, this recipe is naturally gluten-free.
  • Can I add more spices? Absolutely! Feel free to adjust the spice levels to suit your taste.

Troubleshooting

If your chilla doesn’t turn out as expected, don’t fret! Here are some solutions:

  • Chilla Sticking to the Pan: Ensure your pan is properly greased and preheated. You can also try using a non-stick spray.
  • Too Thick or Thin Batter: Adjust the consistency by adding a little water or flour until you reach the desired thickness.
  • Cooking Unevenly: Make sure your skillet is evenly heated to cook the chilla uniformly.

Conclusion

Embracing the heat of Moong Dal Chilla in my kitchen has transformed my cooking adventures, inspiring me to explore the vibrant world of spices and flavors. This recipe is not just a meal; it’s a celebration of creativity, tradition, and boldness in cooking. So, gather your ingredients, unleash your inner chef, and let the flavors dance on your palate. Whether you share it with loved ones or savor it solo, each bite will remind you that cooking is indeed an adventure worth embarking on. Happy cooking!

Moong Dal Chilla | Savory Lentil Pancakes

Prep Time 4 hours
Cook Time 15 minutes
Total Time 4 hours 15 minutes
Servings 4 pancakes
Calories 150
Enjoy these nutritious and flavorful savory pancakes made from split yellow moong dal, perfect for a healthy breakfast or snack.

Ingredients

Main

  • 1 cup split yellow moong dal
  • 1/4 cup chopped onions
  • 1/4 cup chopped tomatoes
  • 1/4 cup chopped bell peppers
  • 2 green chilies green chilies, finely chopped
  • 0.5 inch ginger, grated
  • 0.25 teaspoon turmeric powder
  • 0.5 teaspoon cumin seeds
  • to taste salt
  • as needed water
  • for cooking oil

Instructions 

  • Soak the moong dal for 3-4 hours, then blend with water into a smooth batter.
  • Mix chopped vegetables, spices, and salt into the batter.
  • Heat a greased pan, pour batter, and spread into a thin circle.
  • Cook for 2-3 minutes, flip, and cook until golden brown.
  • Repeat with remaining batter and serve hot with chutney or yogurt.

Notes

Serve immediately for best taste and texture.
Calories: 150kcal
Cost: $4
Course: Breakfast, Snack
Cuisine: Indian
Keyword: lentils

Nutrition

Calories: 150kcal | Carbohydrates: 25g | Protein: 9g | Fat: 3g | Sodium: 300mg

Loved this recipe? Save it to your favorite Pinterest board so you can easily find it later! It’s the perfect way to keep all your sweet ideas in one place. ✨

A beautifully textured Moong Dal Chilla on a plate, illuminated by side lighting.

Why You’ll Love This Dish

There’s something utterly captivating about the way a simple bowl of Sticky Chicken Rice can ignite your taste buds and inspire your culinary creativity. This dish is not just a meal; it’s an experience, a journey into the vibrant world of flavors that come together in harmonious perfection. With tender, juicy chicken enveloped in a sweet and savory glaze, nestled on a bed of fluffy jasmine rice, and complemented by the crunch of fresh vegetables, each bite is a celebration. Whether you’re preparing it for a busy weeknight or a leisurely weekend dinner, this recipe is designed to impress and satisfy. Let’s dive into what makes these Sticky Chicken Rice Bowls so irresistible!

Ingredients You’ll Need

Creating this delightful dish is simple and requires just a handful of ingredients. Here’s what you’ll need to whip up your own sticky chicken goodness:

For the Chicken:

A vibrant Sticky Chicken Rice Bowl with glistening chicken, garnished with green onions and sesame seeds.
  • 1 pound boneless, skinless chicken thighs

For the Marinade:

  • 1/4 cup soy sauce
  • 1/4 cup honey
  • 2 tablespoons sesame oil
  • 2 cloves garlic, minced
  • 1 inch ginger, grated

For the Sauce:

  • 1 tablespoon cornstarch
  • 1/4 cup water

For the Rice:

  • 2 cups cooked jasmine rice

For Garnishing:

  • 2 green onions, sliced
  • Sesame seeds for garnish
  • Steamed vegetables (optional)

How to Make Sticky Chicken Rice Bowls

Now that you have your ingredients prepped, let’s get into the cooking process! Trust me; this is where the magic happens.

Step 1: Prepare the Marinade

In a medium-sized bowl, you’ll want to mix together the soy sauce, honey, sesame oil, minced garlic, and grated ginger. This marinade is the heart of your dish, infusing the chicken with a rich, aromatic flavor that will elevate your meal to new heights.

Step 2: Marinate the Chicken

Take your chicken thighs and add them to the marinade, ensuring each piece is well-coated. Cover the bowl with plastic wrap and let it sit in the refrigerator for at least 30 minutes. If you can, let it marinate longer—up to overnight—to deepen those flavors and achieve a truly sticky glaze.

Step 3: Cook the Chicken

Heat a skillet over medium heat and add the marinated chicken. Allow it to cook for about 5-7 minutes on each side, or until it’s cooked through and beautifully caramelized. The key here is to let that marinade work its magic, creating a sweet, sticky crust on the chicken.

Step 4: Prepare the Sauce

Once your chicken is cooked, remove it from the skillet and let it rest for a few minutes before slicing. In the same skillet, add the cornstarch and water to the remaining marinade. Bring this mixture to a simmer, stirring continuously until it thickens into a luscious sauce that will coat your chicken perfectly.

Step 5: Assemble the Bowls

To create your masterpiece, start with a generous scoop of cooked jasmine rice at the bottom of your bowl. Top it with sliced chicken, drenching it in that sticky sauce. Add a sprinkle of sliced green onions and sesame seeds for a delightful crunch. If you’re feeling extra, toss in some steamed vegetables for added color and nutrition. And there you have it—your Sticky Chicken Rice Bowls are ready to be devoured!

Helpful Tips for Success

  • Marinate Longer for a Flavor Boost: If time allows, let your chicken marinate for a few hours or overnight to maximize flavor.
  • Don’t Rush the Cooking: Allow the chicken to cook evenly; this will help achieve that perfect golden brown color.
  • Experiment with Vegetables: Feel free to add your favorite steamed vegetables like broccoli, bell peppers, or snap peas to enhance the dish.

Variations to Try

If you’re looking to switch things up, here are a few variations that will keep your Sticky Chicken Rice Bowls exciting:

  • Spicy Kick: Add a teaspoon of chili paste to the marinade for a spicy twist.
  • Sweet and Sour: Mix in some pineapple chunks to the sauce for a tropical flavor.
  • Herbal Infusion: Incorporate fresh herbs like cilantro or basil for a fresh finish.

Substitutions

Don’t have all the ingredients? No problem! Here are some substitutions you can make without losing the essence of this dish:

  • Chicken: Chicken breasts can be used instead of thighs, but be cautious not to overcook them.
  • Soy Sauce: Use tamari or coconut aminos for a gluten-free option.
  • Honey: Maple syrup can be used as a vegan alternative to honey.

Essential Equipment

To conquer this recipe, you will need the following kitchen tools:

  • A sharp knife for slicing
  • A cutting board
  • A medium-sized bowl for marinating
  • A skillet or frying pan for cooking
  • A whisk for mixing the marinade

Storage and Freezing

These Sticky Chicken Rice Bowls are perfect for meal prep! Here’s how to store them:

  • Refrigerator: Store leftovers in airtight containers in the fridge for up to 4 days.
  • Freezer: You can freeze the cooked chicken and rice separately for up to 2 months. Defrost overnight in the refrigerator before reheating.

Frequently Asked Questions

Can I use chicken breasts instead of thighs?

Absolutely! Chicken breasts are a leaner option, but they work just as well in this recipe. Just be sure to monitor the cooking time to avoid drying them out.

How can I make this dish gluten-free?

Substituting regular soy sauce with tamari or a gluten-free soy sauce will make this dish gluten-free!

Can I add more vegetables?

Yes! Feel free to add snap peas, zucchini, or bok choy for extra nutrition and color.

What if I don’t have jasmine rice?

Brown rice, quinoa, or even cauliflower rice can be great alternatives!

Troubleshooting Common Issues

If things don’t go as planned, here are some solutions:

  • Too Much Sauce: If your sauce is too runny, add a bit more cornstarch mixed with water to thicken it up.
  • Chicken Too Dry: Make sure to monitor the cooking time and remove the chicken from heat as soon as it’s cooked through.

Conclusion

Sticky Chicken Rice Bowls are more than just a meal; they’re an adventure waiting to unfold in your kitchen. With their sweet and savory flavors, tender chicken, and vibrant veggies, these bowls are perfect for any occasion. So grab your skillet, embrace the heat, and let your culinary creativity soar! This dish is sure to become a go-to favorite in your household. Enjoy your cooking journey and don’t forget to share your delicious creations with friends and family!

Sticky Chicken Rice Bowls

Prep Time 10 minutes
Cook Time 20 minutes
Total Time 30 minutes
Servings 4 servings
Calories 550
A flavorful and easy-to-make dish featuring tender chicken glazed in a sweet-savory sauce served over jasmine rice.

Ingredients

Rice

  • 2 cups cooked jasmine rice

Chicken

  • 1 pound chicken thighs, boneless and skinless

Sauces and oils

  • 1/4 cup soy sauce
  • 1/4 cup honey
  • 2 tablespoons sesame oil
  • 2 cloves garlic, minced
  • 1 inch ginger, grated
  • 1 tablespoon cornstarch
  • 1/4 cup water

Garnishes and optional

  • 2 green onions sliced green onions
  • to taste sesame seeds for garnish
  • optional steamed vegetables (for serving)

Instructions 

  • Mix soy sauce, honey, sesame oil, garlic, and ginger to make a marinade.
  • Add chicken to marinade and let sit for 30 minutes.
  • Cook chicken in a skillet for 5-7 minutes per side until done. Rest and slice.
  • In the same skillet, mix cornstarch and water, add to marinade, and simmer until thickened.
  • Assemble bowls with rice, sliced chicken, and sauce. Garnish with green onions and sesame seeds. Add vegetables if desired.

Notes

For extra flavor, marinate the chicken longer or add a dash of chili flakes for heat.
Calories: 550kcal
Cost: $15
Course: Main Course
Cuisine: Asian
Keyword: chicken

Nutrition

Calories: 550kcal | Carbohydrates: 70g | Protein: 35g | Fat: 15g | Sodium: 1500mg

Loved this recipe? Save it to your favorite Pinterest board so you can easily find it later! It’s the perfect way to keep all your sweet ideas in one place. ✨

Deliciously presented Sticky Chicken Rice Bowl showcasing chicken thighs, rice, and colorful vegetables.

Why You’ll Fall in Love with This Dish

When the air turns crisp and the leaves begin their colorful descent, there’s something magical about cozying up with a dish that warms both body and soul. Enter my comforting high protein casserole, a dish that’s not just about nourishing your body, but also about igniting your culinary passion. This isn’t just any casserole; it’s a celebration of fall flavors, combining the nutty richness of quinoa, the sweetness of butternut squash, and the heartiness of ground turkey. With every bite, you’ll taste the essence of autumn, wrapped in a blanket of gooey melted cheese.

This casserole is perfect for those chilly evenings when comfort food calls your name. It’s easy to prepare and packed with nutrients, making it an ideal choice for families or meal-prepping enthusiasts. With a delightful blend of spices and textures, this dish promises to become a staple in your kitchen. So grab your apron, and let’s embark on this flavorful journey together!

What Ingredients You Will Need

Cooking should never feel overwhelming, and my comforting high protein casserole is proof of that. The ingredients are simple, wholesome, and easy to find. Here’s what you’ll need:

  • 1 pound ground turkey
  • 1 cup cooked quinoa
  • 1 cup chopped butternut squash
  • 1 cup chopped kale
  • 1 can (15 oz) chickpeas, drained and rinsed
  • 1 cup low-sodium chicken broth
  • 1 teaspoon dried sage
  • 1 teaspoon dried thyme
  • 1 teaspoon garlic powder
  • 1/2 teaspoon salt
  • 1/2 teaspoon black pepper
  • 1 cup shredded mozzarella cheese
  • 1/4 cup grated parmesan cheese
  • 2 tablespoons olive oil

Essential Equipment Needed

No need for fancy gadgets here! To create this delightful casserole, you’ll need:

  • A large skillet for browning the turkey and sautéing the vegetables
  • A 9×13 inch baking dish to assemble and bake your casserole
  • A mixing bowl for combining ingredients
  • A spatula or wooden spoon for stirring

Preparation Method: Cooking Made Simple

Now that we’ve gathered our ingredients and equipment, it’s time to jump into the cooking process. Follow these steps, and you’ll have a comforting high protein casserole ready in no time:

  1. Preheat your oven to 375°F (190°C).
  2. In a large skillet, heat the olive oil over medium heat. Add the ground turkey and cook until it’s beautifully browned, about 5-7 minutes.
  3. Stir in the chopped butternut squash, kale, chickpeas, garlic powder, sage, thyme, salt, and pepper. Cook for an additional 5-7 minutes, until the squash is slightly tender and the kale has wilted.
  4. In a large bowl, combine the cooked turkey mixture with the cooked quinoa and chicken broth. Mix everything together until well combined.
  5. Transfer the mixture to the greased baking dish, spreading it evenly across the surface.
  6. Top the casserole with the shredded mozzarella and grated parmesan cheeses, creating a cheesy layer that will melt to perfection.
  7. Cover the dish with aluminum foil and bake for 25 minutes. Then, remove the foil and bake for an additional 10-15 minutes, until the cheese is bubbly and golden.
  8. Allow the casserole to cool for a few minutes before serving to let all those delicious flavors meld together.

Cooking Tips & Techniques for Success

To ensure your high protein casserole turns out perfectly every time, consider these helpful tips:

  • Sautéing is Key: Don’t skip the sautéing step for the onions and garlic, as it enhances the overall flavor profile of the dish.
  • Uniform Pieces: Cut the butternut squash into uniform pieces for even cooking; this way, you’ll avoid having some pieces too soft while others are still hard.
  • Rinsing Beans: Rinse your canned chickpeas thoroughly to remove excess sodium and improve the dish’s overall flavor.
  • Fresh Herbs: If possible, use fresh sage and thyme for a stronger flavor that elevates your casserole.
  • Cheese Choices: Customize the cheesy topping with your favorite varieties like Gruyere, cheddar, or even a spicy pepper jack for an extra kick!

Variations & Adaptations to Try

This casserole is incredibly versatile, making it easy to adapt based on your preferences or dietary needs. Here are a few variations you might enjoy:

  • Vegetarian Delight: Swap the ground turkey for crumbled tempeh or additional chickpeas for a protein-packed vegetarian option.
  • Seasonal Vegetables: Feel free to add in seasonal vegetables like zucchini, bell peppers, or even spinach for extra nutrition and flavor.
  • Cheesy Spin: For a twist, add a layer of cream cheese or ricotta between the quinoa mixture and the cheese topping.
  • Spicy Kick: For those who crave heat, toss in some diced jalapeños or a sprinkle of crushed red pepper flakes to spice things up!

Serving & Storage Suggestions

Your comforting high protein casserole is best served warm, straight from the oven. Pair it with a simple side salad or a serving of roasted vegetables for a complete meal. And if you’re looking to elevate the experience even further, consider serving it alongside a glass of dry white wine or a warm apple cider — perfect for those cozy fall evenings!

As for leftovers, store them in an airtight container in the refrigerator for up to 4 days. The flavors will deepen as it sits, making it even more delicious the next day. To reheat, simply pop it back in the oven at 350°F (175°C) for about 10-15 minutes, or microwave individual portions until heated through.

If you want to freeze this casserole for future enjoyment, let it cool completely, then wrap it tightly in plastic wrap and foil before freezing. It’ll keep well in the freezer for up to 3 months. To reheat, thaw it in the refrigerator overnight and bake at 375°F (190°C) for about 25 minutes.

Nutritional Information & Benefits

This high protein casserole isn’t just comforting; it’s also packed with nutrition. Here’s a breakdown of the approximate nutritional benefits per serving:

  • Ground Turkey: Lean protein source that helps keep you feeling full and satisfied.
  • Quinoa: A complete protein and gluten-free grain rich in fiber and essential nutrients.
  • Butternut Squash: Provides beta-carotene, vitamin C, and potassium, contributing to overall health.
  • Kale: Loaded with vitamins A, C, and K, along with antioxidants that support immune function.
  • Chickpeas: A fantastic source of plant-based protein and fiber, promoting digestive health.

FAQs About Your Casserole Experience

Can I make this casserole ahead of time?

Absolutely! You can assemble the casserole in advance, cover it tightly, and refrigerate for up to 24 hours before baking. This is perfect for busy weeknights!

What’s the best way to reheat this casserole?

The best way to reheat is in the oven at 350°F (175°C) for about 10-15 minutes, ensuring it stays moist and delicious.

Can I use ground beef instead of turkey?

Yes, you can! Ground beef will add a slightly richer flavor, but the dish will still be just as satisfying.

Is this casserole gluten-free?

Yes, this recipe is naturally gluten-free as it doesn’t include any flour or breadcrumbs.

What other vegetables can I add?

Get creative! You can add diced zucchini, bell peppers, or mushrooms for extra variety and nutrition. Just sauté them with the onions and garlic.

Conclusion: A Hug in a Bowl

Your comforting high protein casserole with fall flavors is more than just a meal; it’s a warm hug on a plate that brings family and friends together. With its hearty ingredients, rich flavors, and effortless preparation, it’s destined to become a cherished recipe in your home. So don’t shy away from the kitchen; dive into this adventure of flavors and let the spice of life inspire you. Grab your ingredients, gather your loved ones, and let’s make some delicious memories together — because every bite deserves to be savored! Happy cooking!

Why You’ll Fall in Love with This Dish

Imagine stepping into a world where the aroma of spices dances through the air, teasing your senses and inviting you to indulge in a culinary adventure. That’s exactly what my quick and easy homemade butter chicken delivers! This dish is a rich tapestry of flavors that brings comfort, warmth, and a hint of adventure to your dining table. It’s perfect for cozy family dinners, casual get-togethers, or even a weeknight treat that feels special. With tender chicken simmered in a creamy tomato sauce and a symphony of spices, you’re just one bite away from a flavor explosion. Let’s dive into this magical recipe that will surely become a favorite in your home!

Ingredients You’ll Need

Gathering the right ingredients is the first step to creating this delicious masterpiece. Here’s what you’ll need:

  • 1 lb chicken breast, cut into bite-sized pieces
  • 2 tablespoons butter
  • 1 medium onion, finely chopped
  • 3 cloves garlic, minced
  • 1 inch ginger, grated
  • 1 can (14 oz) crushed tomatoes
  • 1 cup heavy cream
  • 2 tablespoons garam masala
  • 1 teaspoon turmeric
  • 1 teaspoon cumin
  • Salt to taste
  • Fresh cilantro for garnish
  • Cooked rice or naan for serving

Step-by-Step Instructions

Delicious homemade butter chicken served in a rustic bowl with soft, warm lighting highlighting the texture.

Now that you have your ingredients ready, let’s get cooking! Follow these simple steps to whip up your butter chicken.

  1. In a large skillet, melt the butter over medium heat, allowing it to sizzle and fill your kitchen with its rich aroma.
  2. Add the chopped onion and sauté until it turns translucent, about 5 minutes. This step is crucial as it builds the flavor base for your dish!
  3. Stir in the minced garlic and grated ginger, cooking for another minute until fragrant. The combination of garlic and ginger is where the magic begins!
  4. Add the chicken pieces to the skillet and cook until they are no longer pink, about 5-7 minutes. Make sure to stir occasionally to ensure even cooking.
  5. Sprinkle in the garam masala, turmeric, and cumin, stirring well to coat the chicken with those vibrant spices.
  6. Pour in the crushed tomatoes and season with salt. Bring the mixture to a gentle simmer and let it bubble away for about 10 minutes, allowing the flavors to meld beautifully.
  7. Reduce the heat and stir in the heavy cream, cooking for an additional 5 minutes until the sauce is creamy and luscious.
  8. Garnish with fresh cilantro and serve hot with fluffy rice or warm naan. Enjoy the symphony of flavors!

Tips for a Perfect Butter Chicken

Cooking should be an adventure, and these tips will help you navigate your way to the perfect butter chicken:

  • Use Fresh Spices: Freshly ground spices can enhance the flavor dramatically. If you have whole spices, consider grinding them just before use.
  • Adjust the Heat: If you prefer a little kick, add a pinch of cayenne pepper or a chopped green chili while cooking.
  • Let it Simmer: Don’t rush the simmering process. Allowing the chicken to cook slowly in the sauce helps deepen the flavor.
  • Freezing Tips: This dish freezes beautifully. Just cool it completely before transferring it to an airtight container and storing it in the freezer for up to 2 months!
  • Customization: Feel free to add vegetables like bell peppers or peas for added color and nutrition!

Variations to Explore

Once you’ve mastered the classic butter chicken, why not explore some variations to keep things exciting?

  • Butter Chicken with Coconut Milk: For a tropical twist, replace heavy cream with coconut milk for a slightly different flavor profile.
  • Vegetarian Option: Substitute chicken with paneer or chickpeas for a satisfying vegetarian version that’s equally delicious!
  • Spicy Butter Chicken: If you love heat, use hot curry powder or add some red chili flakes for an extra punch.

Substitutions You Can Make

Not every kitchen is stocked with the same ingredients, and that’s okay! Here are some substitutions you can consider:

  • Chicken Thighs: If you prefer juicier meat, chicken thighs can be used instead of breasts. Just adjust the cooking time slightly.
  • Greek Yogurt: For a lighter option, you can substitute heavy cream with full-fat Greek yogurt, but be sure to temper it by mixing it with a bit of the sauce before adding it to prevent curdling.
  • Non-Dairy Options: For a dairy-free version, use coconut cream or a non-dairy alternative that suits your taste.

Essential Equipment

To make your cooking experience smooth and enjoyable, here’s a list of essential equipment you’ll need:

  • Large Skillet: A non-stick or cast-iron skillet is perfect for this recipe, allowing for even cooking.
  • Wooden Spoon: Great for stirring and scraping up those flavorful bits from the bottom of the pan.
  • Measuring Cups and Spoons: Accurate measurements are key in getting the flavors just right!
  • Chopping Board and Knife: To prep your ingredients with ease and efficiency.

Storage and Freezing Tips

If you happen to have leftovers (which is unlikely, but hey, it happens!), here’s how to store and enjoy them later:

  • Refrigeration: Place any leftovers in an airtight container and store in the fridge for up to 3 days.
  • Freezing: To freeze, let the butter chicken cool completely, then transfer to a freezer-safe container. It will keep well for up to 2 months. Thaw overnight in the refrigerator before reheating.
  • Reheating: Gently reheat on the stovetop over low heat, adding a splash of water or cream if necessary to restore creaminess.

FAQs About Butter Chicken

Here are some common questions and answers that might help you on your butter chicken journey:

  • Can I make this dish spicy? Absolutely! Adjust the spices to your liking by adding more cayenne or using a spicy curry powder.
  • What can I serve with butter chicken? It pairs beautifully with basmati rice, naan, or even a fresh salad for a lighter meal.
  • Is butter chicken healthy? It can be part of a balanced diet! Just be mindful of portion sizes and enjoy it as an occasional treat.

Troubleshooting Common Issues

If things don’t go as planned, here are some troubleshooting tips:

  • Too Thick: If your sauce is too thick, simply add a little water or stock to loosen it up.
  • Too Spicy: If it’s too spicy for your taste, balance it with a bit more cream or serve it alongside rice to tone down the heat.
  • Flavor is Off: If the flavor isn’t as rich as you’d like, adjust with more spices or a pinch of sugar to balance the acidity of the tomatoes.

Conclusion: Your Journey Awaits

Cooking is an adventure, and this butter chicken recipe is your ticket to a flavor-packed journey. With its creamy texture and harmonious blend of spices, it’s sure to become a staple in your kitchen. So, roll up your sleeves, unleash your creativity, and let the spices guide you. Whether you’re cooking for family, friends, or just for yourself, remember that every meal is a chance to tell a story and create memories. Now, are you ready to spice things up and take your taste buds on a delightful ride? Happy cooking!

Quick & Easy Homemade Butter Chicken

Prep Time 10 minutes
Cook Time 20 minutes
Total Time 30 minutes
Servings 4 servings
Calories 450
A flavorful and creamy butter chicken recipe that's quick to prepare and perfect for a satisfying meal.

Ingredients

Protein

  • 1 lb chicken breast, cut into bite-sized pieces

Dairy & Fats

  • 2 tablespoons butter

Vegetables & Aromatics

  • 1 medium onion, finely chopped
  • 3 cloves garlic, minced
  • 1 inch ginger, grated

Canned Goods

  • 1 can (14 oz) crushed tomatoes

Dairy

  • 1 cup heavy cream

Spices

  • 2 tablespoons garam masala
  • 1 teaspoon turmeric
  • 1 teaspoon cumin

Seasonings

  • to taste salt

Garnish & Serve

  • fresh cilantro for garnish
  • cooked rice or naan for serving

Instructions 

  • Melt butter in a skillet over medium heat.
  • Sauté onion until translucent, then add garlic and ginger, cooking for 1 minute.
  • Add chicken and cook until no longer pink.
  • Stir in spices, then add crushed tomatoes and simmer for 10 minutes.
  • Reduce heat, stir in heavy cream, cook for 5 minutes, then garnish with cilantro and serve.

Notes

For a milder flavor, reduce spices; serve with rice or naan for a complete meal.
Calories: 450kcal
Cost: $15
Course: Main Course
Cuisine: Indian
Keyword: Butter Chicken

Nutrition

Calories: 450kcal | Carbohydrates: 40g | Protein: 35g | Fat: 20g | Sodium: 600mg

Loved this recipe? Save it to your favorite Pinterest board so you can easily find it later! It’s the perfect way to keep all your sweet ideas in one place. ✨

A vibrant plate of butter chicken featuring rich gravy and pieces of chicken, elegantly presented.

Why You’ll Love These Decadent Brownies

Let’s face it: Brownies hold a special place in the heart of dessert lovers everywhere. They are the ultimate indulgence, a sweet treat that can turn any day around. Today, we’re diving into a world that merges simplicity with bold flavors, creating something truly unforgettable. These brownies are not just any brownies; they are a celebration of ripe bananas, rich chocolate, and a hint of creativity. Whether you’re a seasoned baker or a kitchen novice, this recipe is designed to make your cooking experience as enjoyable as the result itself.

Ingredients That Pack a Punch

When it comes to baking, the quality of your ingredients can make or break your dish. Here’s what you need to whip up these delightful brownies:

  • Managed Hosting – Think of this as your base; it’s crucial for a smooth baking experience.
  • Managed Hosting for WordPress – This is like the sweet cream that adds richness and depth.
  • Enterprise Hosting for WordPress – Just like a touch of fine chocolate, it elevates the dish.
  • Managed Hosting for Mediavine – A dash of complexity, just like the spices that bring everything together.
  • Managed Servers – The backbone of your dessert, ensuring everything runs flawlessly.
  • Cloud VPS – The lightness that keeps your brownies from becoming too dense.
  • Dedicated Servers – A commitment to quality, ensuring each bite is as good as the last.
  • Web Hosting – The essential framework, making sure your brownies are perfectly baked.
  • Shared Hosting – A collaborative effort, just like sharing these brownies with friends.
  • Performance Services – The dynamic touch that brings everything to life.
  • Boost by BigScoots – The secret ingredient that takes these brownies from good to unforgettable.

Cooking Up a Storm: The Steps to Success

A beautifully plated dish captured at eye level, featuring rich colors and details in natural light.

Ready to unleash your inner chef? Let’s get started on crafting these delectable brownies. Follow these simple steps, and you’ll be enjoying a batch of warm, gooey goodness in no time:

  1. Talk to a Human: Don’t hesitate to reach out for help if you need it. A conversation can spark inspiration!
  2. Give Us a Call: Ring the magic number 877-570-3396 for any queries or support.
  3. Live Chat: For instant assistance, hop onto our live chat — it’s like having a sous chef at your fingertips!
  4. Login for Support 24/7/365: Our team is always here for you, ready to help you navigate through any baking hurdles.
  5. Sign Up: Join the community, and get ready to bake like a pro!
  6. Submit Your Migration Request: Just like preparing your ingredients, get your requests sorted out for a smooth baking experience.
  7. Relax as Our Experts Take Care of Everything Else: Once you’ve done your part, sit back and enjoy the aroma of your soon-to-be brownies filling your kitchen.

Tips for the Perfect Brownies

Every great baker has a few tricks up their sleeve. Here are some tips to ensure your brownies turn out perfectly:

  • Use Ripe Bananas: The sweeter and more spotty, the better! Ripe bananas add natural sweetness and a moist texture.
  • Mind the Baking Time: Keep a close eye on your brownies. Remove them from the oven just before they look done; they’ll continue to firm up as they cool.
  • Experiment with Toppings: Get creative! Adding nuts, chocolate chips, or a sprinkle of sea salt can elevate your brownies to new levels.

Delicious Variations to Try

Why stop at one recipe? Here are some fun variations to keep your baking adventures exciting:

  • Chocolate Chip Banana Brownies: Fold in some chocolate chips for that extra chocolatey goodness.
  • Nutty Banana Brownies: Add walnuts or pecans for a delightful crunch.
  • Swirled Nut Butter Brownies: A swirl of almond or peanut butter can take these brownies to the next level.

Substitutions for Special Diets

Have specific dietary needs? No problem! Here are some substitutions to keep everyone happy:

  • Gluten-Free: Use gluten-free flour in place of regular flour for a gluten-free version.
  • Vegan: Swap eggs for flax eggs (1 tablespoon of flaxseed meal mixed with 2.5 tablespoons of water per egg).
  • Low-Sugar: If you’re cutting back on sugar, substitute coconut sugar or maple syrup for a healthier option.

Equipment You’ll Need

Before you start, gather your tools. Here’s what you’ll need:

  • Mixing bowls
  • Whisk
  • Rubber spatula
  • 9×9-inch baking pan
  • Parchment paper (for easy removal)
  • Oven mitts (safety first!)

Storage and Freezing Tips

Got leftovers? Here’s how to store your brownies:

  • Room Temperature: Store in an airtight container for up to 3 days.
  • Refrigeration: For longer freshness, keep them in the fridge for up to a week.
  • Freezing: Wrap brownies tightly in plastic wrap and then place them in a freezer-safe bag for up to 3 months. Let them thaw at room temperature before enjoying.

FAQs About Brownies

Got questions? Here are some common inquiries:

  • Can I use frozen bananas? Absolutely! Just make sure to thaw and drain them before using.
  • My brownies came out too dense. What happened? This could be due to overmixing or using too much flour. Be gentle when mixing!
  • How do I know when my brownies are done? A toothpick inserted in the center should come out with a few moist crumbs.

Troubleshooting Common Issues

Sometimes, even the best bakers encounter hiccups. Here’s how to tackle common problems:

  • Too Dry: Overbaking is usually the culprit. Keep an eye on your brownies and remove them from the oven just before they look done.
  • Too Gooey: If they’re too gooey in the center, give them a few more minutes in the oven. Just watch carefully!
  • Uneven Baking: Make sure to rotate your pan halfway through baking for even results.

Conclusion: Your New Go-To Brownie Recipe

There you have it! A luscious, flavorful brownie recipe that’s bound to become a staple in your kitchen. These brownies are not just about satisfying your sweet tooth; they’re an experience, a journey through flavor that brings joy and warmth. So go ahead, gather your ingredients, and let your culinary creativity flow. Remember, cooking is about exploration, and every dish tells a story. Let this be the beginning of many delicious tales!

BigScoots Hosting Services

Prep Time 10 minutes
Cook Time 20 minutes
Total Time 30 minutes
Servings 1 service
Experience reliable and high-performance hosting solutions tailored for WordPress and enterprise needs with BigScoots.

Ingredients

Hosting Services

  • 1 service managed hosting
  • 1 service managed hosting for wordpress
  • 1 service enterprise hosting for wordpress
  • 1 service managed hosting for mediavine
  • 1 service managed servers
  • 1 service cloud vps
  • 1 service dedicated servers
  • 1 service web hosting
  • 1 service shared hosting
  • 1 service performance services
  • 1 service boost by bigscoots
  • 1 service performance services for wordpress

Instructions 

  • Contact BigScoots via live chat or phone to set up your hosting.
  • Sign up and submit your migration request.
  • Our experts will handle the migration and setup.

Notes

Ideal for businesses seeking reliable hosting solutions.
Cost: $15
Course: Hosting
Cuisine: Technology
Keyword: Managed Hosting

Loved this recipe? Save it to your favorite Pinterest board so you can easily find it later! It’s the perfect way to keep all your sweet ideas in one place. ✨

An appetizing food presentation with a blurred background, showcasing intricate textures and warm lighting.

Why You’ll Fall in Love with This Recipe

Let’s be real—nothing beats coming home after a long day and being greeted by the comforting aroma of a home-cooked meal wafting through the air. This Easy Garlic Parmesan Crockpot Chicken & Potatoes Recipe brings that dream to life! Imagine tender chicken breasts, succulent baby potatoes, and a rich garlic-parmesan sauce all mingling in your slow cooker, creating a symphony of flavors that will warm your soul. This dish is not only packed with flavor but also incredibly easy to prepare, perfect for those busy weeknights when you want something hearty and satisfying without spending hours in the kitchen.

Ingredients You’ll Need

Before we dive into the cooking magic, let’s gather our ingredients. This recipe calls for simple, wholesome components that you might already have in your pantry:

  • 4 boneless, skinless chicken breasts
  • 1 pound baby potatoes, halved
  • 1/2 cup grated parmesan cheese
  • 1/4 cup unsalted butter, melted
  • 4 cloves garlic, minced
  • 1 teaspoon Italian seasoning
  • Salt and pepper to taste
  • Fresh parsley for garnish (optional)

These ingredients come together to create a dish that’s not just a meal but an experience—a hug on a plate! You can feel the love in every bite, and trust me, your family will be asking for seconds.

How to Prepare This Dish

Now that we have our ingredients ready, let’s get to the fun part—cooking! Here’s how to craft this delightful dish:

  1. In a medium bowl, mix together the melted butter, minced garlic, parmesan cheese, Italian seasoning, salt, and pepper until well combined.
  2. Place the halved baby potatoes in the bottom of your crockpot.
  3. Lay the chicken breasts on top of the potatoes, ensuring even coverage.
  4. Pour the garlic parmesan mixture over the chicken and potatoes, making sure everything is well coated with that luscious sauce.
  5. Cover the crockpot and cook on low for 6-7 hours or on high for 4 hours, until the chicken is cooked through and tender.
  6. Once cooked, shred the chicken if desired and stir everything together to combine the flavors.
  7. Garnish with fresh parsley before serving.

And just like that, dinner is served! It’s as simple as a few steps, and the slow cooker does all the heavy lifting while you focus on more important things—like putting your feet up for a moment.

Understanding Cooking Times

Cooking times are crucial when it comes to slow-cooking meat. Here’s the lowdown:

  • Low Setting: 6-7 hours gives you tender chicken that practically falls apart at the touch of a fork.
  • High Setting: 4 hours will also yield delicious results, but be mindful not to overcook, as that can lead to dry chicken.

As a general rule, always check the internal temperature of the chicken. It should reach 165°F at its thickest part. And remember, the longer, slower cooking method often yields the most mouthwatering results!

Why This Dish Will Be Your New Favorite

This Easy Garlic Parmesan Crockpot Chicken & Potatoes Recipe is a game-changer for several reasons:

  • Minimal Effort: Toss everything in the crockpot, and you’re good to go. It’s perfect for those chaotic days.
  • Flavor Explosion: The garlic and parmesan meld together beautifully, creating a rich sauce that seeps into every bite of chicken and potato.
  • Versatility: You can serve this dish as is, or pair it with a fresh salad, steamed veggies, or even some fluffy rice for a complete meal.

Once you make this dish, you’ll find yourself craving it again and again. It’s the kind of meal that brings everyone to the table, eager to dig in.

Foolproof Tips for Perfection

While this recipe is straightforward, here are some pro tips to elevate it even further:

  • Use Fresh Ingredients: Fresh garlic and high-quality parmesan cheese make a world of difference in flavor.
  • Don’t Skip on Seasoning: Taste and adjust the salt and pepper before cooking to ensure that the flavors pop.
  • Layer Wisely: Always place the potatoes at the bottom of the crockpot. They need the heat and moisture to cook perfectly.
  • Resist the Urge to Stir: Let the ingredients cook undisturbed to develop those beautiful browned bits on top!

These small tweaks can transform an already fantastic dish into something truly spectacular.

Serving Suggestions

Presentation is key! Here are a few ideas on how to serve this dish:

  • Fresh Herbs: Sprinkle extra parsley or even some fresh basil right before serving to add a pop of color.
  • Citrus Zest: A squeeze of fresh lemon juice brightens the flavors and adds a refreshing zing.
  • Side Dishes: Pair with a crisp side salad or some roasted veggies for a well-rounded meal.

These simple additions can make a simple dish feel like a gourmet experience.

Storage and Reheating

Leftovers? Yes, please! This dish tastes even better the next day! Here’s how to store and reheat it properly:

  • Refrigeration: Store any leftovers in an airtight container in the fridge for up to 3 days.
  • Reheating: For quick reheating, use the microwave (about 2 minutes), or for crispy potatoes, pop them in a 350°F oven for about 10 minutes with a splash of water or broth to keep them moist.

And don’t forget—the leftover juices make an incredible sauce for drenching pasta or drizzling over rice!

FAQs About This Recipe

Got questions? Let’s tackle some common queries:

  • Can I use chicken thighs instead of breasts? Absolutely! Chicken thighs are juicier and hold up well in the slow cooker. Just adjust the cooking time by about 30-45 minutes.
  • What if I don’t have Parmesan cheese? You can use nutritional yeast for a dairy-free option, though it won’t have the same creamy richness.
  • How can I thicken the sauce if it’s too watery? Mix 1 tablespoon of cornstarch with a bit of the cooking liquid until smooth, then stir it back into the crockpot and cook uncovered for an additional 15 minutes.
  • Can I prep this ahead of time? Definitely! Assemble everything (except for parsley) the night before and refrigerate. In the morning, just pop it in the slow cooker as directed!

These answers should help you navigate your cooking journey with confidence!

Troubleshooting Common Issues

If you encounter any bumps along the way, here are a few tips to troubleshoot common issues:

  • Dry Chicken: If your chicken turns out dry, it might be due to overcooking. Always check the internal temperature to avoid this.
  • Watery Sauce: If your sauce is too watery, follow the thickening technique mentioned above.
  • Flavor Not Strong Enough: Adjust the seasoning and add more garlic or parmesan to enhance the flavor.

With a little patience and adjustments, you’ll master this recipe in no time!

Conclusion: A Recipe Worth Making

Cooking should be an adventure, and this Easy Garlic Parmesan Crockpot Chicken & Potatoes Recipe is the perfect way to dive into the world of flavors! It’s simple, satisfying, and full of heart—just like a good meal should be. So, gather your ingredients, fire up that crockpot, and let the magic happen. I can’t wait to hear how your culinary journey unfolds with this recipe. Remember, cooking with love and a hint of spice can turn any ordinary meal into a cherished memory. Happy cooking, friends! Share your experiences, and let’s keep this delicious conversation going!

Why This Veggie Pot Pie Casserole Will Become Your Go-To Comfort Food

When the leaves start to turn and the air carries a crispness that sends a shiver down your spine, it’s time to break out the cozy recipes that warm our hearts and fill our bellies. One dish that never fails to deliver is a hearty veggie pot pie casserole. Imagine a creamy filling loaded with vibrant vegetables encased in a flaky biscuit topping that’s golden and irresistible. This dish isn’t just about comfort; it’s about bringing a dash of joy to your dining table, inviting everyone to gather and share in the magic of wholesome, home-cooked love.

This recipe is a celebration of flavors, textures, and the simple delight of cooking at home. As someone who grew up surrounded by the rich culinary traditions of San Antonio, I believe that every bite should be an adventure. So roll up your sleeves, turn up the heat, and let’s whisk up some wonder!

Ingredients: What You’ll Need

Creating this veggie pot pie casserole is as straightforward as it gets. Here’s everything you’ll need:

  • 2 tablespoons olive oil
  • 1 medium yellow onion, diced
  • 2 cloves garlic, minced
  • 2 medium carrots, diced
  • 1 cup frozen peas
  • 1 cup frozen corn
  • 2 cups broccoli florets (fresh or frozen)
  • 8 ounces mushrooms, sliced
  • 1/4 cup all-purpose flour
  • 2 cups vegetable broth
  • 1 cup milk (or a non-dairy alternative)
  • 1 teaspoon dried thyme
  • 1 teaspoon salt
  • 1/2 teaspoon pepper

For the biscuit topping:

  • 2 cups all-purpose flour
  • 1 tablespoon baking powder
  • 1/2 teaspoon salt
  • 1/2 cup unsalted butter, cold and cubed
  • 3/4 cup milk (or a non-dairy alternative)

Steps to Create Your Delicious Casserole

Eye-level shot of a mouthwatering baked good, showcasing detailed textures and soft shadows in natural light.

Now that we have our ingredients ready, let’s get cooking! Follow these steps for a scrumptious veggie pot pie casserole that will make your kitchen smell divine.

1. Prepare the Filling

In a large skillet, heat the olive oil over medium heat. Add the diced onions and sauté until they become translucent, about 5 minutes. Toss in the minced garlic and let it cook for an additional minute, just until fragrant.

2. Add Vegetables

Next, add the diced carrots, broccoli florets, sliced mushrooms, frozen peas, and frozen corn. Stir everything together and let it cook for about 5–7 minutes until the vegetables begin to soften.

3. Create the Sauce

Sprinkle the flour over the vegetable mixture and stir to coat. This is your roux, and it will help thicken the filling. Gradually pour in the vegetable broth while stirring continuously to prevent lumps. Follow with the milk, dried thyme, salt, and pepper. Stir until everything is well combined and let it simmer for another 5 minutes or until the sauce thickens to a creamy consistency.

4. Assemble the Casserole

Preheat your oven to 375°F (190°C). Pour the vegetable filling into a greased 9×13 inch baking dish or a deep-dish pie pan.

5. Make the Biscuit Topping

In a mixing bowl, combine the flour, baking powder, and salt for the biscuit topping. Add the cold, cubed butter and use a pastry cutter or your fingers to mix until the mixture resembles coarse crumbs. Pour in the milk and stir until just combined. Avoid overmixing; you want to keep those biscuits light and fluffy!

6. Top and Bake

Drop spoonfuls of the biscuit batter over the vegetable filling, covering as much surface area as possible. Bake in the preheated oven for 25–30 minutes or until the biscuits are golden brown and the filling is bubbling around the edges. Let it cool for a few minutes before serving.

Tips for the Perfect Casserole

  • Experiment with Veggies: Feel free to substitute or add any vegetables you have on hand. Zucchini, bell peppers, or even sweet potatoes can work beautifully in this dish.
  • Make it Vegan: Swap out milk for a plant-based alternative and use vegan butter for the biscuit topping to create a vegan version of this casserole.
  • Spice it Up: If you like a bit of heat, add a pinch of red pepper flakes or a dash of your favorite hot sauce to the filling.

Storage and Freezing Instructions

This veggie pot pie casserole makes for excellent leftovers! Store any uneaten portions in an airtight container in the refrigerator for up to 3 days. You can also freeze the unbaked casserole for up to 2 months. Just be sure to cover it well with plastic wrap and foil. When you’re ready to bake it, let it thaw in the refrigerator overnight and bake as directed.

FAQs: Your Pot Pie Questions Answered

Can I use frozen vegetables?

Absolutely! Frozen vegetables work great in this recipe. There’s no need to thaw them beforehand; just toss them straight into the skillet!

What if I want to add meat?

If you’d like to make a heartier version, feel free to add cooked chicken or turkey to the filling. Just make sure to adjust the seasoning accordingly.

Can I substitute the biscuit topping with pie crust?

Of course! If you prefer a traditional pot pie, you can top this casserole with a pre-made pie crust. Just roll it out, place it over the filling, and cut slits for steam vents before baking.

Variations to Explore

This veggie pot pie casserole is incredibly versatile. Here are a few variations you might consider:

  • Curried Veggie Pot Pie: Add curry powder to the filling for an Indian-inspired twist.
  • Southwestern Style: Incorporate black beans, corn, and spices like cumin and chili powder for a Southwestern flair.
  • Cheesy Delight: Mix in shredded cheese to the filling for a creamy, cheesy version that’s hard to resist.

Conclusion: A Dish That Warms the Heart

There you have it, my friends! A veggie pot pie casserole that’s not just a meal, but a celebration of flavors, warmth, and memories. As you gather around the table with family and friends, this dish will surely spark joy and ignite laughter. So, get cooking, and embrace the adventure of turning simple ingredients into a masterpiece that brings everyone closer. Here’s to many cozy nights filled with hearty comfort food and delightful conversations. Happy cooking!

Sally’s Baking 101

Prep Time 15 minutes
Cook Time 30 minutes
Total Time 45 minutes
Servings 4 servings
Calories 250
Discover the basics of baking with Sally’s simple and delicious recipes that are perfect for beginners and seasoned bakers alike.

Ingredients

Dry Ingredients

  • 2 cups all-purpose flour
  • 1 cup granulated sugar
  • 1 teaspoon baking powder

Wet Ingredients

  • 1 cup milk
  • 0.5 cup vegetable oil
  • 2 large eggs

Instructions 

  • Preheat oven to 350°F (175°C). Grease a baking pan.
  • Mix dry ingredients in a bowl. In a separate bowl, whisk wet ingredients.
  • Combine wet and dry ingredients until smooth.
  • Pour batter into the prepared pan and bake for 30 minutes.
  • Let cool, then serve or store.

Notes

For best results, measure ingredients accurately and do not overmix the batter.
Calories: 250kcal
Cost: $15
Course: Dessert
Cuisine: American
Keyword: baking

Nutrition

Calories: 250kcal | Carbohydrates: 35g | Protein: 6g | Fat: 10g | Sodium: 150mg

Loved this recipe? Save it to your favorite Pinterest board so you can easily find it later! It’s the perfect way to keep all your sweet ideas in one place. ✨

Delicious homemade pastry from Sally’s Baking 101, with a cozy blurred background and natural highlights.

Why You’ll Love It

Welcome to a culinary adventure that will not only tantalize your taste buds but also ignite your passion for cooking! My Spicy Chicken Tacos are more than just a meal; they’re an experience. Each bite is a celebration of bold flavors and a dance of spices that will transport you straight to the vibrant streets of Mexico. When you embrace the heat, you embrace a world of culinary possibilities.

These tacos are the perfect blend of juicy, marinated chicken, fresh toppings, and a kick that keeps you coming back for more. Whether you’re hosting a taco night with friends or simply treating yourself to a flavorful dinner, these spicy chicken tacos are sure to impress. Let’s dive into the recipe and unlock the secrets of flavor and fire!

Ingredients

Before we get cooking, let’s gather our ingredients. Here’s what you’ll need for these irresistible spicy chicken tacos:

  • 1 lb boneless, skinless chicken thighs
  • 2 tablespoons olive oil
  • 3 cloves garlic, minced
  • 1 teaspoon ground cumin
  • 1 teaspoon smoked paprika
  • 1 teaspoon chili powder
  • 1/2 teaspoon cayenne pepper (adjust for heat preference)
  • Salt and pepper to taste
  • Juice of 1 lime
  • 8 small corn tortillas
  • Fresh cilantro, chopped (for garnish)
  • 1 cup diced tomatoes
  • 1 avocado, sliced
  • 1/2 cup red onion, thinly sliced
  • 1/2 cup sour cream or Greek yogurt (optional)

Steps to Spice it Up

An eye-level shot of delicious spicy chicken tacos with vibrant toppings.

Now that we have everything ready, let’s jump into the cooking process. This recipe is straightforward, but the flavors will leave a lasting impression!

  1. Marinate the Chicken: In a bowl, combine the olive oil, minced garlic, ground cumin, smoked paprika, chili powder, cayenne pepper, lime juice, salt, and pepper. Mix well to create a marinade. Add the chicken thighs, ensuring they are well-coated in the marinade. Let them sit for at least 30 minutes, or if you have time, refrigerate for a few hours for deeper flavor.
  2. Cook the Chicken: Heat a skillet over medium-high heat. Once hot, add the marinated chicken thighs. Cook for about 6-7 minutes on each side, or until the chicken is fully cooked and has a beautiful char. You can also use a grill for that smoky flavor!
  3. Rest and Slice: Once cooked, remove the chicken from the skillet and let it rest for a few minutes. This helps keep the juices locked in. After resting, slice the chicken into strips.
  4. Warm the Tortillas: In the same skillet, quickly warm the corn tortillas for about 30 seconds on each side until they are pliable and slightly toasted. This adds a lovely texture.
  5. Assemble Your Tacos: Start with the warm tortilla, add a generous amount of sliced chicken, and top it with diced tomatoes, avocado slices, red onion, and a sprinkle of fresh cilantro. Drizzle with sour cream or Greek yogurt if you like a creamy finish.
  6. Serve and Enjoy: These tacos are best enjoyed fresh. Serve them with lime wedges on the side for an extra zing!

Tips for Perfect Tacos

  • Chicken Choice: While I recommend chicken thighs for their flavor and juiciness, you can use chicken breasts as a lighter alternative. Just remember to adjust the cooking time accordingly.
  • Marination Time: The longer you marinate the chicken, the more intense the flavor. If you can, marinate overnight!
  • Heat Control: If you’re not a fan of too much heat, reduce the cayenne pepper or leave it out entirely. Spice is all about balance!

Variations to Explore

Don’t be afraid to get creative with your spicy chicken tacos! Here are a few variations to consider:

  • Spicy Pineapple Salsa: Add a tropical twist by mixing diced pineapple, red onion, cilantro, lime juice, and jalapeños for a refreshing salsa.
  • Chipotle Sauce: Blend chipotle peppers in adobo with sour cream for a smoky and creamy topping.
  • Vegetarian Option: Substitute chicken with grilled veggies or black beans for a delicious vegetarian taco.

Substitutions You Can Make

Every kitchen is different, and you might not have all the ingredients on hand. Here are some substitutions:

  • Olive Oil: You can use canola oil or avocado oil if olive oil isn’t available.
  • Fresh Herbs: If you don’t have cilantro, try fresh parsley or even a sprinkle of fresh mint for a unique taste.
  • Yogurt Alternatives: For a dairy-free option, try coconut yogurt or omit the creamy topping entirely.

Equipment You’ll Need

Before you start cooking, make sure you have the right tools to help you out:

  • Cutting board and knife for chopping
  • Mixing bowl for the marinade
  • Skillet or grill for cooking
  • Tongs for flipping the chicken
  • Serving platter for assembling tacos

Storage and Freezing Tips

If you find yourself with leftovers (which is rare, but it happens), here’s how to store them:

  • Refrigeration: Store leftover chicken and toppings separately in airtight containers in the fridge for up to 3 days.
  • Freezing: You can freeze the marinated chicken before cooking. Just make sure to thaw thoroughly before cooking. Cooked chicken can also be frozen for up to 2 months.

Frequently Asked Questions

Can I make these tacos ahead of time?
Absolutely! You can marinate the chicken the night before and cook it when you’re ready to serve. Just warm the tortillas right before serving for the best texture.

What sides pair well with spicy chicken tacos?
Serve these tacos with a side of Mexican rice, black beans, or a fresh corn salad for a complete meal.

How do I adjust the heat level?
To dial back the heat, reduce the cayenne pepper and opt for a milder chili powder. You can also add more toppings like avocado and sour cream to balance the spice.

Troubleshooting Common Issues

My chicken is dry: This can happen if the chicken is overcooked. Keep an eye on it and use a meat thermometer to ensure it reaches 165°F.

The tortillas are tearing: If your tortillas are breaking, they might be too cold or too dry. Warm them in a dry skillet to make them more pliable.

Conclusion

There you have it! My Spicy Chicken Tacos recipe is not just about satisfying hunger but about awakening your culinary creativity. Cooking is a journey, and every taco tells a story — a story of flavor, adventure, and the joy that comes from sharing food with loved ones. So grab your apron, turn up the heat, and let’s create something unforgettable. Remember, spice is your friend — so don’t be shy! Dive in and enjoy every delicious bite. Happy cooking!

Classic Spaghetti Carbonara

Prep Time 10 minutes
Cook Time 15 minutes
Total Time 25 minutes
Servings 4 servings
Calories 550
A quick and creamy Italian pasta dish made with eggs, cheese, pancetta, and pepper.

Ingredients

Pasta

  • 400 grams spaghetti
  • 150 grams pancetta (diced)
  • 3 large eggs (beaten)
  • 1 cup Parmesan cheese (grated)
  • 1 teaspoon black pepper (freshly ground)

Salt

  • to taste salt

Instructions 

  • Cook spaghetti in boiling salted water until al dente, then drain.
  • Cook pancetta in a skillet until crispy.
  • Mix eggs and Parmesan in a bowl.
  • Combine hot pasta with pancetta, then quickly mix in egg mixture to create a creamy sauce.
  • Season with black pepper and salt to taste, then serve immediately.

Notes

Use freshly grated Parmesan for best flavor.
Calories: 550kcal
Cost: $12
Course: Main Course
Cuisine: Italian
Keyword: pasta

Nutrition

Calories: 550kcal | Carbohydrates: 70g | Protein: 25g | Fat: 20g | Sodium: 600mg

Loved this recipe? Save it to your favorite Pinterest board so you can easily find it later! It’s the perfect way to keep all your sweet ideas in one place. ✨

Detailed view of spicy chicken tacos showcasing textures and colors.

Why You’ll Love This Vegan Frittata

Are you ready to awaken your senses with a dish that is as vibrant as it is nourishing? The Ultimate Vegan Vegetable Frittata is not just a recipe; it’s a culinary adventure waiting to happen! Bursting with fresh vegetables, bold flavors, and a sprinkle of spice, this frittata transforms humble ingredients into a magnificent meal that can be enjoyed for breakfast, brunch, or even dinner. Not only does it cater to vegan diets, but it also embraces the principles of low-carb and gluten-free eating. Let’s dive into the world of flavors and textures that will leave your taste buds dancing!

Ingredient Notes

Before we jump into the cooking process, let’s take a moment to appreciate the star players of this dish:

  • Chickpea Flour: This is the foundation of our frittata. Packed with protein and fiber, chickpea flour is not only nutritious but also gives our frittata a delightful texture.
  • Nutritional Yeast: This magical ingredient adds a cheesy, umami flavor without any dairy. It’s a must-have in any vegan kitchen!
  • Turmeric: Known for its vibrant color and health benefits, turmeric gives our frittata a warm hue and a touch of earthiness.
  • Fresh Vegetables: Spinach, bell peppers, onions, mushrooms, and tomatoes create a colorful medley that not only enhances flavor but also adds a plethora of vitamins and minerals.
  • Olive Oil: A splash of good-quality olive oil not only helps in sautéing our vegetables but also enriches the dish with healthy fats.

How To Make The Ultimate Vegan Frittata

Eye-level shot of a golden, fluffy vegan frittata garnished with fresh herbs and natural light highlighting its texture.

Let’s roll up our sleeves and get cooking! Here’s how to bring this beautiful dish to life:

  1. Preheat Your Oven: Start by preheating your oven to 375°F (190°C). A hot oven is crucial for that perfect frittata texture.
  2. Mix the Base: In a mixing bowl, combine 1 cup of chickpea flour, 1 cup of water, 1 tablespoon of nutritional yeast, 1 teaspoon of turmeric powder, 1 teaspoon of garlic powder, 1 teaspoon of onion powder, and salt and pepper to taste. Whisk until the mixture is smooth and free of lumps.
  3. Sauté Your Vegetables: Heat 2 tablespoons of olive oil in a skillet over medium heat. Add 1/2 cup of diced onions and 1/2 cup of diced bell peppers. Sauté until softened, about 5 minutes.
  4. Add the Good Stuff: Toss in 1/4 cup of chopped mushrooms, 1 cup of chopped spinach, and 1/2 cup of diced tomatoes. Cook for another 3-4 minutes until the vegetables are tender and vibrant.
  5. Combine: Pour the chickpea batter over the sautéed vegetables in the skillet, spreading it evenly. Let it cook on the stovetop for about 5 minutes, allowing the edges to set slightly.
  6. Bake to Perfection: Transfer the skillet to the preheated oven and bake for 20-25 minutes or until the frittata is firm and lightly golden on top. The aroma will be simply irresistible!
  7. Cool & Serve: Remove from the oven and let it cool for a few minutes before slicing. Garnish with fresh herbs if desired and serve warm.

Serving Suggestions

This frittata is incredibly versatile and can be served in various ways:

  • As a Main Dish: Serve warm with a side salad for a light lunch or dinner. The flavors meld beautifully, making it satisfying and wholesome.
  • Breakfast Delight: Pair it with avocado slices and a drizzle of hot sauce for a spicy kick that will jumpstart your day.
  • Meal Prep Hero: This frittata can be made ahead of time, making it perfect for busy mornings. Just reheat and enjoy!

Tips for Success

Here are a few tips to ensure your frittata turns out perfectly every time:

  • Don’t Overcrowd the Veggies: Make sure not to add too many watery vegetables, as they can make the frittata soggy. Stick to the recommended amounts or choose firmer veggies.
  • Experiment with Spices: Feel free to add your favorite spices or herbs to the chickpea batter. A pinch of smoked paprika or fresh basil can take this dish to new heights!
  • Use a Cast Iron Skillet: If you have one, a cast iron skillet is perfect for this recipe. It distributes heat evenly and creates a beautiful crust.

Variations to Try

One of the joys of cooking is the freedom to experiment. Here are some variations to consider:

  • Herb-Infused: Add fresh herbs like dill, chives, or parsley for an aromatic twist.
  • Cheesy Twist: If you’re not strictly vegan, consider adding a sprinkle of vegan cheese on top before baking for that extra cheesy goodness.
  • Spice It Up: Use jalapeños or a dash of cayenne pepper in the batter for a frittata with a fiery kick!

Storage and Freezing

Leftovers? No problem! Here’s how to store them:

  • Refrigeration: Store your frittata in an airtight container in the fridge for up to 4-5 days. Just reheat in the oven or microwave when you’re ready to enjoy it again.
  • Freezing: For longer storage, cut the frittata into portions, wrap them in plastic wrap, and place them in a freezer-safe container. It will keep well for up to 2-3 months.

FAQs

Can I make the frittata ahead of time?
Absolutely! Prepare the frittata up to the baking step, cover it, and refrigerate. When you’re ready, simply bake as directed.

What can I substitute for chickpea flour?
If you’re looking for alternatives, you could try using a gluten-free all-purpose flour or a mix of ground flaxseed and water for a different texture.

What if my frittata is too soft?
This can happen if the vegetables release too much moisture. Be mindful of your veggie choices and consider sautéing them longer to reduce their water content.

Conclusion

The Ultimate Vegan Vegetable Frittata is not just a meal; it’s a celebration of flavor, nutrition, and creativity in the kitchen. Whether you’re cooking for yourself, hosting friends, or simply looking to spice up your weekly meal prep, this dish is bound to impress. With its vibrant colors and delightful textures, it’s an invitation to gather around the table and share stories over a hearty bite. So grab your skillet, unleash your inner chef, and let the magic of cooking ignite your passion for plant-based cuisine. Enjoy every spicy, flavorful morsel!

Ultimate Vegan Vegetable Frittata Recipe

Prep Time 10 minutes
Cook Time 25 minutes
Total Time 35 minutes
Servings 4 servings
Calories 250
A delicious and nutritious vegan frittata packed with vegetables and flavor, perfect for any meal.

Ingredients

Batter

  • 1 cup chickpea flour
  • 1 cup water
  • 1 tablespoon nutritional yeast
  • 1 teaspoon turmeric powder
  • 1 teaspoon garlic powder
  • 1 teaspoon onion powder
  • to taste salt and pepper
  • 1 cup chopped spinach
  • 1/2 cup diced bell peppers
  • 1/2 cup chopped onions
  • 1/2 cup diced tomatoes
  • 1/4 cup chopped mushrooms
  • 2 tablespoons olive oil

Garnish

  • fresh herbs for garnish (optional)

Instructions 

  • Preheat oven to 375°F (190°C).
  • Mix chickpea flour, water, nutritional yeast, turmeric, garlic powder, onion powder, salt, and pepper until smooth.
  • Sauté onions and bell peppers in olive oil until softened, then add mushrooms, spinach, and tomatoes; cook 3-4 minutes.
  • Pour batter over vegetables in skillet, cook 5 minutes, then transfer to oven and bake 20-25 minutes.
  • Let cool slightly, garnish with herbs if desired, and serve warm.

Notes

You can customize the vegetables and herbs for variety.
Calories: 250kcal
Cost: $15
Course: Breakfast, Brunch
Cuisine: Vegan
Keyword: vegetables

Nutrition

Calories: 250kcal | Carbohydrates: 35g | Protein: 12g | Fat: 8g | Sodium: 400mg

Loved this recipe? Save it to your favorite Pinterest board so you can easily find it later! It’s the perfect way to keep all your sweet ideas in one place. ✨

Delicious vegan vegetable frittata displayed on a rustic plate, showcasing ingredients like mushrooms and herbs.