Author

Avery Collins

Browsing

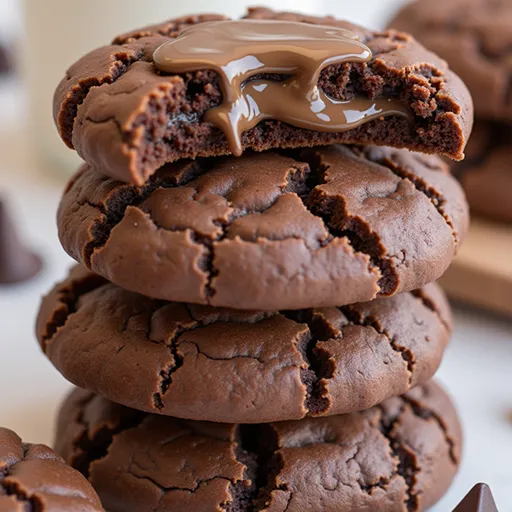
Why You’ll Love These Cookies

Hey there, fellow food lovers! Are you ready to embark on a deliciously guilt-free adventure? Today, we’re diving into the world of Double Chocolate Greek Yogurt Cookies—the ultimate treat that’s here to satisfy your sweet tooth while keeping your health goals in check. Trust me, these cookies are not just another baked good; they are a celebration of flavor, texture, and nourishment. Imagine biting into a soft, fudgy cookie that bursts with rich chocolate goodness and has a secret ingredient that adds creaminess and depth—hello, Greek yogurt! Let’s explore why these cookies deserve a spot in your baking repertoire.

The Magic of Greek Yogurt

So, what makes Greek yogurt such a superstar in this recipe? For starters, it brings moisture and richness without the extra calories found in traditional butter or cream. When you bake with Greek yogurt, you get:

  • Moisture and Texture: Greek yogurt adds a delightful creaminess that gives these cookies a soft, chewy texture. Say goodbye to dry, crumbly cookies!
  • Protein Boost: With its high protein content, Greek yogurt transforms these cookies into a snack that not only satisfies your cravings but also keeps you feeling full longer.
  • Health Benefits: Incorporating Greek yogurt into your baked goods is an easy way to sneak in probiotics and essential nutrients, making your treats just a bit healthier.

The Allure of Double Chocolate

A beautifully lit image of double chocolate Greek yogurt cookies, highlighting their soft, chewy appearance and glossy chocolate topping.

What could possibly make these cookies even better? Double the chocolate, of course! One layer of chocolate is great, but let’s be honest—who doesn’t want double the decadence? Here’s why you’ll be head over heels for these cookies:

  • Rich Flavor: The combination of unsweetened cocoa powder and dark chocolate chips creates a deep, seductive chocolate flavor that will have you coming back for more.
  • Perfect Balance: The sweetness from honey or maple syrup perfectly complements the rich cocoa, resulting in a cookie that’s indulgent yet balanced.
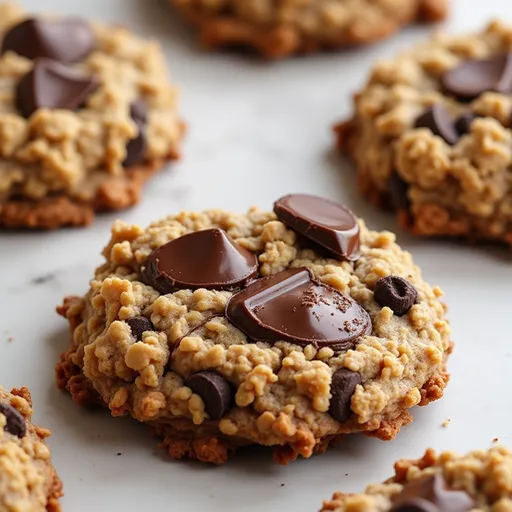
  • Visual Appeal: You’ll love the sight of those gooey chocolate chips peeking through the dark dough, making these cookies irresistible to anyone who lays eyes on them.

Ingredients You’ll Need

Ready to start baking? Here’s what you’ll need to whip up a batch of these delightful cookies:

  • 1 cup whole wheat flour
  • 1/2 cup unsweetened cocoa powder
  • 1/2 teaspoon baking soda
  • 1/4 teaspoon salt
  • 1/2 cup Greek yogurt
  • 1/4 cup honey or maple syrup
  • 1/4 cup coconut oil, melted
  • 1 teaspoon vanilla extract
  • 1/2 cup dark chocolate chips

Step-by-Step Recipe: Let’s Bake!

Prepping the Scene

Before we dive into the mixing, let’s get our kitchen ready! Preheat your oven to 350°F (175°C) and line a baking sheet with parchment paper. This will ensure your cookies bake evenly and don’t stick to the pan.

Mixing the Dry Ingredients

In a large bowl, whisk together the whole wheat flour, unsweetened cocoa powder, baking soda, and salt. This is where the magic starts as the dry ingredients blend harmoniously, setting the stage for deliciousness.

Creating the Wet Mixture

In another bowl, combine the Greek yogurt, honey or maple syrup, melted coconut oil, and vanilla extract until smooth. This creamy mixture is going to make your cookies incredibly moist and flavorful.

Bringing It All Together

Now, gradually add the wet ingredients to the dry ingredients, mixing until just combined. Don’t overdo it! You want to keep that tender texture intact.

Chocolate Chip Drop

Fold in those luscious dark chocolate chips until they’re evenly distributed. It’s time to get your hands dirty! Scoop tablespoon-sized amounts of dough onto the prepared baking sheet, spacing them about 2 inches apart to allow for spreading.

Baking Time

Slide the baking sheet into the preheated oven and bake for 10-12 minutes, or until the edges are set but the centers are still soft. This is the key to achieving that chewy, fudgy texture that we all crave.

Cooling Off

Once out of the oven, allow the cookies to cool on the baking sheet for about 5 minutes before transferring them to a wire rack to cool completely. This step is crucial for helping them set up just right. And trust me, the aroma wafting through your kitchen will be nothing short of heavenly!

Baking Tips & Tricks

Every great baker has a few tricks up their sleeves. Here are some tips to ensure your cookies turn out perfectly every time:

  • Measure Accurately: Spoon your flour into the measuring cup and level it off with a knife. This prevents your cookies from becoming too dense.
  • Don’t Overmix: When combining the wet and dry ingredients, mix just until combined to maintain a tender texture.
  • Chill the Dough: If you prefer thicker cookies, chill the dough for about 30 minutes before baking for a chewier result.

Creative Variations

Feeling adventurous? Here are some fun variations you can try to mix things up:

Nuts for Nuts

Add a handful of chopped nuts, like walnuts or pecans, for an extra crunch that complements the chocolate.

Minty Fresh

Incorporate a few drops of peppermint extract for a delightful mint chocolate cookie experience.

White Chocolate & Cranberry

Switch out the dark chocolate chips for white chocolate and toss in some dried cranberries for a fruity twist.

Health-Conscious Tweaks

Want to make these cookies even healthier? Here are a few substitutions:

  • Use almond flour or oat flour instead of whole wheat flour for a gluten-free option.
  • Substitute the honey or maple syrup with a sugar-free sweetener if you’re watching your sugar intake.
  • Incorporate chia seeds or flaxseeds for added fiber and omega-3 fatty acids.

Serving Suggestions

These cookies are perfect on their own, but if you want to elevate your dessert game, consider serving them with:

  • A scoop of vanilla or chocolate ice cream for an indulgent treat.
  • A drizzle of melted dark chocolate for a gourmet touch.
  • A dusting of powdered sugar for a beautiful presentation.

How to Store & Freeze

To keep your cookies fresh, store them in an airtight container at room temperature for up to a week. If you want to make a larger batch for later, these cookies freeze beautifully! Just place them in a single layer in a freezer-safe bag or container, and they’ll be good for up to three months. To enjoy them, simply let them thaw at room temperature or pop them in the microwave for a few seconds for that fresh-baked taste.

FAQs

Got questions? I’ve got answers! Here are a few frequently asked questions about these delicious cookies:

  • Can I use a different type of yogurt? Absolutely! You can substitute with any yogurt, but Greek yogurt gives the best texture and flavor.
  • What if my cookies turn out too cakey? This could be due to too much flour or overmixing. Make sure to measure your flour correctly and mix gently.
  • Can I halve the recipe? Yes, feel free to halve the ingredients for a smaller batch. Just keep an eye on the baking time!

Troubleshooting

If you run into any issues while baking, don’t worry! Here are some common problems and solutions:

  • Cookies spreading too much: This can happen if your dough is too warm. Try chilling it before baking.
  • Cookies turning out too dry: Make sure not to overbake them! They should still be soft in the center when you take them out.

Final Thoughts

There you have it, friends! Double Chocolate Greek Yogurt Cookies are not just a treat; they’re a testament to the idea that you can indulge without the guilt. With every bite, you’ll experience the perfect balance of rich chocolate and creamy goodness, all while knowing you’re making a healthier choice. Whether you’re sharing them with friends or enjoying them solo, these cookies are sure to bring a smile to your face. So grab your mixing bowl, embrace your inner baker, and let’s make some magic happen in the kitchen! Happy baking!

Double Chocolate Greek Yogurt Cookies: The Healthy Treat You’ll Regret Not Trying

Prep Time 10 minutes
Cook Time 12 minutes
Total Time 22 minutes
Servings 12 cookies
Calories 150
Enjoy these healthy, indulgent double chocolate cookies made with Greek yogurt and dark chocolate chips, perfect for a guilt-free treat.

Ingredients

dry ingredients

  • 1 cup whole wheat flour
  • 1/2 cup unsweetened cocoa powder
  • 1/2 teaspoon baking soda
  • 1/4 teaspoon salt

wet ingredients

  • 1/2 cup greek yogurt
  • 1/4 cup honey or maple syrup
  • 1/4 cup coconut oil, melted
  • 1 teaspoon vanilla extract
  • 1/2 cup dark chocolate chips

Instructions 

  • Preheat oven to 350°F (175°C) and line a baking sheet.
  • Mix dry ingredients in a bowl; combine wet ingredients in another.
  • Combine wet and dry, then fold in chocolate chips.
  • Scoop dough onto baking sheet and bake for 10-12 minutes.
  • Cool cookies for 5 minutes before transferring to a wire rack.

Notes

Using dark chocolate chips enhances flavor; store cookies in an airtight container.
Calories: 150kcal
Cost: $15
Course: Dessert
Cuisine: Healthy
Keyword: chocolate

Nutrition

Calories: 150kcal | Carbohydrates: 20g | Protein: 3g | Fat: 8g | Sodium: 50mg

Loved this recipe? Save it to your favorite Pinterest board so you can easily find it later! It’s the perfect way to keep all your sweet ideas in one place. ✨

Delicious double chocolate cookies featuring a dark, glossy surface and sprinkled with chocolate chips against a cozy background.

Why You’ll Love This Recipe

Are you ready to embark on a culinary adventure that will transport your taste buds straight to the heart of Louisiana? My Slow Cooker Chicken Jambalaya is not just a dish; it’s a celebration of bold flavors and vibrant spices that will awaken your senses and warm your soul. Imagine tender chicken thighs dancing alongside smoky sausage, all wrapped in a blanket of rich, spiced broth and fluffy rice. This dish is the epitome of comfort food, perfect for family gatherings or cozy nights in.

In the world of culinary delights, jambalaya stands out for its incredible versatility and depth of flavor. Originating from the French, Spanish, and African influences in Louisiana, it’s a dish that tells a story with every bite. Whether you’re a seasoned cook or just starting your kitchen journey, this recipe is your ticket to mastering a classic that’s sure to impress.

Understanding Jambalaya: The Heart of Cajun Cuisine

Before diving into the nitty-gritty of the recipe, let’s take a moment to understand what makes jambalaya so special. Often confused with gumbo (which is more of a stew served over rice), jambalaya is a one-pot wonder that combines all its ingredients, including rice, into a harmonious blend. This means that every grain of rice is infused with the flavors of the spices, meats, and vegetables surrounding it.

There are two main variations of jambalaya: Creole and Cajun. Creole jambalaya typically includes tomatoes, while Cajun jambalaya is often made without them, focusing instead on the smoky flavors of the sausage and spices. My slow cooker version leans towards the Creole style, bringing in those tomatoes for added richness.

The Ingredients: What You Need

Delicious Slow Cooker Chicken Jambalaya displayed in a warm, inviting setting.

Here’s what you’ll need to embark on this delicious journey:

  • 1 pound boneless, skinless chicken thighs, chopped
  • 1 cup sliced smoked sausage
  • 1 cup bell pepper, diced
  • 1 cup onion, diced
  • 1 cup celery, diced
  • 3 cloves garlic, minced
  • 1 can (14.5 oz) diced tomatoes, undrained
  • 1 cup chicken broth
  • 2 cups uncooked long-grain rice
  • 2 tablespoons Cajun seasoning
  • 1 teaspoon dried thyme
  • 1 bay leaf
  • Salt and pepper to taste
  • Green onions, chopped (for garnish)

How to Create Your Slow Cooker Chicken Jambalaya

Now that we have our ingredients lined up, let’s get to the fun part: cooking! Follow these simple steps, and you’ll have a dish that’s bursting with flavor.

  1. In your slow cooker, combine the chopped chicken thighs, sliced sausage, bell pepper, onion, celery, and minced garlic.
  2. Add the diced tomatoes along with their juice, chicken broth, rice, Cajun seasoning, thyme, bay leaf, salt, and pepper. Stir everything together until well combined.
  3. Cover the slow cooker and cook on low for 6-8 hours or on high for 3-4 hours. The goal is to let the flavors meld beautifully while ensuring the rice is tender and the chicken is fully cooked.
  4. Before serving, remember to remove the bay leaf. Garnish your jambalaya with freshly chopped green onions for a pop of color and freshness.
  5. Serve hot, and watch as your family and friends dive into this incredible dish!

Tips for the Perfect Jambalaya

Cooking is an art, and like any artist, you’ll want to have a few tricks up your sleeve. Here are some tips to elevate your jambalaya:

  • Use Quality Ingredients: The flavors in this dish rely heavily on the quality of your ingredients. Look for fresh vegetables and high-quality sausage to make a difference.
  • Adjust the Spice Level: If you’re cooking for kids or those sensitive to spice, feel free to reduce the Cajun seasoning. You can always add hot sauce later for those who enjoy a kick!
  • Don’t Skip the Browning: If you have a little extra time, consider browning the chicken and sausage in a skillet before adding them to the slow cooker. This step enhances the flavors through caramelization.
  • Experiment: Jambalaya is a versatile dish. Feel free to swap out chicken for shrimp or add other vegetables like zucchini or okra for a unique twist.

Variations to Try

One of the best things about jambalaya is its adaptability. Here are a few variations to consider:

  • Shrimp Jambalaya: Swap out the chicken for shrimp, adding them in the last 30 minutes of cooking to prevent overcooking.
  • Vegetarian Jambalaya: Omit the meat altogether and replace it with an extra cup of diced vegetables or beans for protein.
  • Spicy Sausage Jambalaya: Use andouille sausage for a spicier, more authentic flavor profile.

What to Serve with Your Jambalaya

Now that you have a steaming pot of jambalaya, you might be wondering what to pair it with. Here are some ideas:

  • Crusty Bread: A loaf of fresh, crusty bread is perfect for soaking up the delicious juices.
  • Green Salad: A light green salad with a tangy vinaigrette can balance the richness of the jambalaya.
  • Coleslaw: A creamy coleslaw adds a refreshing crunch that complements the dish beautifully.

Frequently Asked Questions

Let’s address some common questions you may have about this recipe:

Can I use brown rice instead of white rice?

Yes, but you will need to adjust the cooking time and liquid ratio since brown rice takes longer to cook. Aim for about 1.5 cups of liquid for every cup of brown rice.

Can I freeze leftover jambalaya?

Absolutely! Allow it to cool completely before transferring to an airtight container. It can be frozen for up to three months. Reheat it gently on the stove or in the microwave.

What if my jambalaya is too soupy?

If your jambalaya ends up too soupy, you can let it cook a little longer with the lid off to allow some of the liquid to evaporate.

Storage and Reheating Tips

To ensure your jambalaya stays delicious for days to come, follow these storage tips:

  • Store in an airtight container in the refrigerator for up to four days.
  • When reheating, add a splash of chicken broth to loosen the consistency and prevent it from drying out.
  • For longer storage, freeze in individual portions for easy meals later on.

Final Thoughts

Cooking is an act of love, and my Slow Cooker Chicken Jambalaya embodies that spirit. It’s about gathering around the table, sharing stories, and savoring each bite. Whether you’re cooking for your family or hosting a gathering, this dish promises to bring joy and warmth to your table. So grab your slow cooker, unleash your inner chef, and let the flavors of the bayou come alive in your kitchen. Your taste buds will thank you, and trust me, once you taste this jambalaya, you’ll be dreaming up your next culinary adventure. Happy cooking!

Slow Cooker Chicken Jambalaya

Prep Time 15 minutes
Cook Time 4 hours
Total Time 4 hours 15 minutes
Servings 4 servings
Calories 450
A flavorful and hearty dish combining chicken, sausage, and rice, cooked to perfection in a slow cooker.

Ingredients

Protein

  • 1 pound boneless, skinless chicken thighs, chopped
  • 1 cup sliced smoked sausage

Vegetables

  • 1 cup bell pepper, diced
  • 1 cup onion, diced
  • 1 cup celery, diced

Garlic

  • 3 cloves garlic, minced

Canned Goods

  • 1 can diced tomatoes (14.5 oz), undrained
  • 1 cup chicken broth

Grains

  • 2 cups uncooked long-grain rice

Spices & Seasonings

  • 2 tablespoons cajun seasoning
  • 1 teaspoon dried thyme
  • 1 bay leaf bay leaf
  • to taste salt and pepper

Garnish

  • green onions, chopped green onions, chopped (for garnish)

Instructions 

  • Combine chicken, sausage, peppers, onion, celery, and garlic in the slow cooker.
  • Add tomatoes, broth, rice, seasonings, bay leaf, salt, and pepper; stir well.
  • Cook on low for 6-8 hours or high for 3-4 hours until rice is tender and chicken is cooked.
  • Remove bay leaf, garnish with green onions, and serve.

Notes

For extra flavor, let the dish sit for 10 minutes before serving.
Calories: 450kcal
Cost: $15
Course: Main Course
Cuisine: Cajun
Keyword: chicken, Jambalaya

Nutrition

Calories: 450kcal | Carbohydrates: 60g | Protein: 35g | Fat: 12g | Sodium: 900mg

Loved this recipe? Save it to your favorite Pinterest board so you can easily find it later! It’s the perfect way to keep all your sweet ideas in one place. ✨

A bowl of Slow Cooker Chicken Jambalaya featuring chunks of chicken and colorful vegetables.

Why You’ll Love This Dish

Get ready to embark on a culinary adventure that’s as vibrant as a Texas sunset! My High-Protein Honey Garlic Shrimp is not just a meal; it’s a celebration of flavor that combines the sweetness of honey with the savory zing of garlic. This dish is perfect for anyone looking to spice up their weeknight dinners or meal prep without sacrificing flavor or nutrition. Each bite transports you to a world where sweet meets heat, creating a harmony that dances on your palate.

Whether you’re a busy professional seeking a quick, healthy meal, a fitness enthusiast looking for a high-protein option to fuel your workouts, or simply someone who loves great food, this recipe ticks all the boxes. Plus, it’s quick to whip up—perfect for those evenings when you want something delicious without spending hours in the kitchen. Let’s dive into this flavor-packed wonder!

Preparation and Cooking Time

This recipe is designed for ease and efficiency:

  • Prep Time: 15 minutes
  • Cook Time: 6-8 minutes
  • Total Time: 21-23 minutes
  • Servings: 4 servings

Ingredients

A plate of succulent shrimp coated in honey and garlic sauce, presented in an inviting setting.

Gather the following ingredients to create your culinary masterpiece:

  • 1 pound large shrimp, peeled and deveined
  • 1/4 cup honey
  • 3 tablespoons soy sauce
  • 3 cloves garlic, minced
  • 1 tablespoon olive oil
  • 1 teaspoon sesame oil
  • Salt and pepper to taste
  • Chopped green onions for garnish
  • Sesame seeds for garnish

Step-by-Step Instructions

Creating this delicious dish is as simple as following these easy steps:

  1. Prepare the Marinade: In a bowl, mix together the honey, soy sauce, minced garlic, olive oil, sesame oil, salt, and pepper. This luscious marinade is where the magic begins, infusing the shrimp with incredible flavor.
  2. Add the Shrimp: Toss the peeled and deveined shrimp into the marinade, ensuring they are well-coated. Let them sit for at least 15 minutes—this allows time for the flavors to penetrate the shrimp.
  3. Heat the Skillet: Place a skillet over medium-high heat and add a drizzle of olive oil. Wait until the oil is shimmering—this is your signal that it’s time to add the shrimp.
  4. Cook the Shrimp: Add the marinated shrimp to the hot skillet in a single layer. Cook for about 2-3 minutes on each side, or until they are pink and opaque. Watch them closely; shrimp cook quickly!
  5. Remove from Heat: Once cooked, take the skillet off the heat and garnish the shrimp with chopped green onions and a sprinkle of sesame seeds for an added crunch.
  6. Serve and Enjoy: Dive into your creation immediately while it’s still warm. Serve it over a bed of rice, quinoa, or alongside sautéed vegetables for a complete meal.

How to Serve

Serving suggestions for your High-Protein Honey Garlic Shrimp are endless:

  • Over Rice: Fluffy jasmine or brown rice makes a great base to soak up the savory-sweet sauce.
  • With Quinoa: For a nutty twist, serve it over quinoa—this adds extra protein and fiber.
  • Vegetable Medley: Pair with stir-fried or roasted vegetables to create a colorful, nutritious plate.
  • Tacos: Use the shrimp in soft corn tortillas topped with avocado and fresh cilantro for a fun twist.

Additional Tips

To make your cooking experience even smoother, consider these helpful tips:

  • Thicker Sauce: If you prefer a thicker sauce, add a teaspoon of cornstarch to the marinade before mixing it in.
  • Marination Time: For an extra punch of flavor, marinate the shrimp for up to an hour in the refrigerator.
  • Don’t Overcook: Keep an eye on the shrimp as they cook; overcooked shrimp can become rubbery. They’re done when they turn a lovely pink and opaque.

Recipe Variations

Want to switch things up? Here are some variations to make this dish your own:

  • Spicy Kick: Add a teaspoon of red pepper flakes or a splash of sriracha to the marinade for a fiery twist.
  • Different Proteins: Substitute shrimp with chicken, tofu, or scallops for a different protein experience.
  • Vegetarian Option: Replace shrimp with a medley of vegetables like bell peppers, snap peas, and broccoli for a vegetarian delight.

Freezing and Storage

This dish is perfect for meal prep! Here’s how to store it:

  • Refrigeration: Keep leftovers in an airtight container in the fridge for up to 3 days.
  • Freezing: You can freeze the cooked shrimp for up to 3 months. Just ensure they are well-sealed in a freezer-safe container.
  • Reheating: Reheat gently in a skillet over low heat to avoid overcooking.

Special Equipment

No special equipment is needed for this recipe! Just a good skillet and some mixing bowls will do the trick. However, a non-stick skillet can make cleanup easier and prevent sticking.

Frequently Asked Questions

Let’s address some common queries about this dish:

  • Can I use frozen shrimp? Absolutely! Just ensure they are fully thawed before marinating and cooking.
  • What if I don’t have sesame oil? You can substitute it with more olive oil, though the flavor will differ slightly.
  • Is this dish gluten-free? To make it gluten-free, use tamari instead of soy sauce.
  • Can I make this recipe ahead of time? Yes! Marinate the shrimp ahead of time and store it in the refrigerator until ready to cook.

Troubleshooting

If you encounter any issues while making your High-Protein Honey Garlic Shrimp, here are some troubleshooting tips:

  • Too Sweet? If the dish turns out too sweet, add a splash of lime juice or vinegar to balance the flavors.
  • Overcooked Shrimp? If they turn out rubbery, consider reducing the cooking time next time; shrimp cook quickly!
  • Not Enough Sauce? If you like a saucier shrimp, double the marinade ingredients for extra flavor.

Conclusion

Cooking should be an adventure, and my High-Protein Honey Garlic Shrimp is a passport to an exciting flavor experience! With just a handful of simple ingredients, you can create a dish that not only nourishes but also tantalizes your taste buds. Whether enjoyed on a busy weeknight or shared with friends over a festive dinner, this recipe is a reminder that great meals don’t need to be complicated. So grab your skillet, summon your inner chef, and let the sweet heat inspire you to create something extraordinary. Happy cooking!

High-Protein Honey Garlic Shrimp

Prep Time 10 minutes
Cook Time 10 minutes
Total Time 20 minutes
Servings 4 servings
Calories 250
A quick and delicious high-protein dish featuring succulent shrimp coated in a sweet and savory honey garlic sauce.

Ingredients

Main

  • 1 pound large shrimp, peeled and deveined
  • 1/4 cup honey
  • 3 tablespoons soy sauce
  • 3 cloves garlic, minced
  • 1 tablespoon olive oil
  • 1 teaspoon sesame oil
  • to taste salt and pepper
  • chopped green onions for garnish chopped green onions (for garnish)
  • sesame seeds for garnish sesame seeds (for garnish)

Instructions 

  • Mix honey, soy sauce, garlic, olive oil, sesame oil, salt, and pepper to make marinade.
  • Marinate shrimp for at least 15 minutes.
  • Heat a skillet with a little olive oil over medium-high heat.
  • Cook shrimp 2-3 minutes per side until pink and opaque.
  • Garnish with green onions and sesame seeds, then serve.

Notes

Serve immediately for best flavor and texture.
Calories: 250kcal
Cost: $15
Course: Main Course
Cuisine: Asian
Keyword: shrimp

Nutrition

Calories: 250kcal | Carbohydrates: 30g | Protein: 25g | Fat: 8g | Sodium: 900mg

Loved this recipe? Save it to your favorite Pinterest board so you can easily find it later! It’s the perfect way to keep all your sweet ideas in one place. ✨

Detailed view of cooked shrimp in a honey garlic sauce, highlighting the texture and garnishes.

Why You’ll Adore These Wholesome Cookies

If you’ve ever found yourself yearning for a sweet treat that won’t derail your health goals, I’ve got something special for you. These Easy Healthy Banana Oat Cookies No Sugar or Flour are not just cookies; they’re a celebration of flavor, nutrition, and creativity in your kitchen. Imagine biting into a warm, chewy cookie that’s not only delicious but also guilt-free! Made with simple, wholesome ingredients, these cookies bring together the natural sweetness of ripe bananas and the heartiness of oats, creating a satisfying snack or dessert that your taste buds will thank you for.

What makes these cookies stand out is their versatility. You can easily customize them with your favorite add-ins, turning each batch into something uniquely yours. Plus, they’re super easy to whip up, making them the perfect choice for a quick snack or an impromptu dessert. Let’s dive into the magic of these cookies and discover how to make them.

Ingredients You’ll Need

Gathering your ingredients is part of the fun! Here’s what you’ll need:

  • 2 ripe bananas
  • 1 cup rolled oats
  • 1/2 cup unsweetened applesauce
  • 1/2 teaspoon vanilla extract
  • 1/2 teaspoon cinnamon
  • 1/4 cup chopped nuts (optional)
  • 1/4 cup dark chocolate chips or raisins (optional)

How to Make Easy Healthy Banana Oat Cookies No Sugar or Flour

Delicious banana oat cookies displayed on a rustic wooden surface, warmly lit.

Step 1: Preheat and Prepare

Before you get your hands dirty, preheat your oven to 350°F (175°C). Line a baking sheet with parchment paper. This not only prevents the cookies from sticking but also makes cleanup a breeze. Trust me, a well-prepared kitchen is the first step to culinary success!

Step 2: Mash the Bananas

In a large mixing bowl, take those ripe bananas and mash them with a fork until smooth. The riper the bananas, the sweeter and more flavorful your cookies will be. You want a creamy consistency that will help bind your ingredients together.

Step 3: Mix the Magic

Now it’s time to add the rolled oats, unsweetened applesauce, vanilla extract, and cinnamon to the mashed bananas. Stir everything together until well combined. The applesauce adds moisture without any added sugar, while the cinnamon brings warmth and depth to the flavor profile.

Step 4: Fold in the Extras

If you’re feeling adventurous, this is where you can fold in the optional ingredients like chopped nuts or dark chocolate chips. Mixed nuts add a delightful crunch, and dark chocolate brings a rich, indulgent flavor that pairs beautifully with the sweetness of bananas. If you prefer a fruity touch, toss in some raisins instead!

Step 5: Shape Your Cookies

Using a spoon, drop spoonfuls of the cookie mixture onto the prepared baking sheet, spacing them about 2 inches apart. Don’t worry about perfect shapes; these cookies are meant to have a rustic charm. Each dollop will spread a little while baking, creating the perfect chewy texture.

Step 6: Bake to Perfection

Pop the baking sheet into the preheated oven and bake for 12-15 minutes, or until the edges turn a lovely golden brown. The aroma wafting through your kitchen will make it hard to resist sneaking a taste!

Step 7: Cool and Enjoy

Once they’re out of the oven, let the cookies cool on the baking sheet for a few minutes to firm up. Then, transfer them to a wire rack to cool completely. If you can wait, they taste even better once cooled, but I won’t judge you if you snag one while it’s still warm!

How to Serve Your Wholesome Cookies

Garnishes

For an extra touch, sprinkle a little sea salt on top of the cookies while they’re still warm. This enhances the sweet and salty contrast that makes each bite irresistible. A light dusting of cinnamon or nutmeg can also elevate the flavor, making these cookies feel like a warm hug on a chilly day.

Side Dishes

Pair these cookies with a cup of unsweetened herbal tea or your favorite plant-based milk for a balanced snack. If you’re feeling indulgent, serve them warm with a scoop of vanilla or coconut ice cream for a delightful dessert experience.

Creative Ways to Present

Make a charming dessert platter by stacking these cookies with parchment paper in between to keep them from sticking together. You can also crumble a few cookies over smoothie bowls or yogurt parfaits for added texture and sweetness.

Make Ahead and Storage

Storing Leftovers

These cookies are best enjoyed fresh, but you can store any leftovers in an airtight container at room temperature for up to three days. The bananas and oats help keep them moist, but because of the fresh fruit, it’s ideal to consume them relatively soon for the best texture.

Freezing

If you want to stash some away for later, freeze the cookies in a single layer on a baking sheet before transferring them to a freezer-safe container or bag. They freeze beautifully for up to two months and thaw quickly at room temperature.

Reheating

To revive that fresh-baked goodness, pop them in the microwave for about 15 seconds or warm gently in a preheated oven at 300°F (150°C) for 5 minutes. This brings back that lovely soft texture and slightly melty chocolate that’s just irresistible.

FAQs

Can I use gluten-free oats for this recipe?

Absolutely! Using gluten-free oats is a fantastic way to make these cookies safe for gluten-sensitive diets without sacrificing taste or texture.

What kind of dark chocolate is best for these cookies?

Opt for a dark chocolate with at least 70% cocoa and no added sugars. Brands like Lily’s provide rich flavor while keeping the cookie healthy and low on sugar.

Can I substitute the almond milk with another liquid?

Yes, feel free to swap almond milk for any other plant-based milk or even regular milk if you prefer. Just make sure to maintain a similar liquid ratio so the dough stays moist but not overly wet.

Are these cookies suitable for meal prep or packed lunches?

Definitely! They’re hearty, nutrient-dense, and travel well, making them an ideal healthy snack to keep you energized throughout the day.

What if I don’t have ripe bananas?

If your bananas aren’t very ripe, you can gently microwave them for 30 seconds to soften and bring out their natural sugars before mashing.

Tips for Success

For the best results, aim for ripe bananas with plenty of brown spots. They’re sweeter and will yield a more flavorful cookie. Also, consider experimenting with different spices like nutmeg or cardamom to find your perfect flavor profile.

Final Thoughts

These Easy Healthy Banana Oat Cookies No Sugar or Flour are a delightful way to satisfy your sweet tooth without compromising your health. They’re simple to make, customizable, and perfect for any time of day. So go ahead, whip up a batch, and let the wholesome goodness transform your kitchen into a flavor laboratory. Your taste buds and body will thank you for this delicious treat!

Easy Healthy Banana Oat Cookies No Sugar or Flour

Prep Time 10 minutes
Cook Time 15 minutes
Total Time 25 minutes
Servings 12 cookies
Calories 80
These simple, healthy cookies require no sugar or flour, making them a perfect guilt-free treat for any time of day.

Ingredients

Bananas

  • 2 pieces ripe bananas
  • 1 cup rolled oats
  • 1/2 cup unsweetened applesauce
  • 1/2 teaspoon vanilla extract
  • 1/2 teaspoon cinnamon
  • 1/4 cup chopped nuts (optional)
  • 1/4 cup dark chocolate chips or raisins (optional)

Instructions 

  • Preheat oven to 350°F (175°C) and line a baking sheet.
  • Mash bananas until smooth, then mix in oats, applesauce, vanilla, and cinnamon.
  • Fold in nuts and chocolate chips if using.
  • Drop spoonfuls onto baking sheet, spacing 2 inches apart.
  • Bake for 12-15 minutes until edges are golden. Cool before serving.

Notes

For added flavor, sprinkle with a little extra cinnamon before baking.
Calories: 80kcal
Cost: $10
Course: Dessert
Cuisine: Healthy
Keyword: Banana

Nutrition

Calories: 80kcal | Carbohydrates: 14g | Protein: 2g | Fat: 2g | Sodium: 1mg

Loved this recipe? Save it to your favorite Pinterest board so you can easily find it later! It’s the perfect way to keep all your sweet ideas in one place. ✨

Soft, chewy banana oat cookies with a textured surface and a blurred cozy background.

Why You’ll Love This Dish

Welcome to a culinary experience that will whisk you away to tropical shores with every bite! The Coconut Chicken Rice Bowl is not just a meal; it’s an adventure waiting to unfold on your dinner table. Imagine tender chicken sautéed in a creamy coconut sauce, infused with garlic and ginger, and served over fluffy jasmine rice. This dish isn’t just about flavor; it’s about the love of cooking and the joy of sharing good food with family and friends. Whether you’re whipping it up for a quick weeknight dinner or a fun weekend gathering, this bowl of goodness is sure to impress.

What makes this bowl even more special is its versatility. It caters to various dietary preferences, making it a fantastic option for your gluten-free and dairy-free friends. Plus, it’s packed with protein, making it a winner for those looking for healthy, high-protein meals. Let’s dive deeper into what makes this recipe a must-try!

Ingredients You’ll Need

Gathering the right ingredients is the first step towards creating a dish that sings. For this Coconut Chicken Rice Bowl, you’ll need:

  • 1 cup jasmine rice
  • 1 can (13.5 oz) coconut milk
  • 2 cups water
  • 2 chicken breasts, diced
  • 1 tablespoon vegetable oil
  • 2 cloves garlic, minced
  • 1 teaspoon ginger, grated
  • 1 tablespoon soy sauce
  • 1 tablespoon lime juice
  • Salt and pepper to taste
  • Fresh cilantro for garnish
  • Lime wedges for serving

These ingredients come together to create a dish that is not only delicious but also visually stunning, with vibrant colors and aromas that will captivate your senses.

Step-by-Step Guide to Making Coconut Chicken Rice Bowls

A vibrant Coconut Chicken Rice Bowl featuring rice, chicken, and lime wedges, captured in soft, warm light.

Now that we have our ingredients, it’s time to get cooking! Follow these steps to create your Coconut Chicken Rice Bowl:

  1. Rinse the Rice: Start by rinsing the jasmine rice under cold water until the water runs clear. This removes excess starch and helps achieve that perfect, fluffy texture.
  2. Cook the Rice: In a saucepan, combine the rinsed rice, coconut milk, and water. Bring to a boil over medium-high heat.
  3. Simmer: Once boiling, reduce the heat to low, cover, and let it simmer for 15-20 minutes until the rice is cooked and all the liquid is absorbed. Fluff the rice with a fork once done.
  4. Sauté the Aromatics: While the rice cooks, heat the vegetable oil in a skillet over medium heat. Add the minced garlic and grated ginger, sautéing for about 1 minute until fragrant.
  5. Cook the Chicken: Add the diced chicken to the skillet, season with salt and pepper, and cook until golden and cooked through, about 5-7 minutes.
  6. Add Flavor: Stir in the soy sauce and lime juice, cooking for an additional 2 minutes. This will enhance the dish with a zesty kick!
  7. Assemble the Bowls: To serve, divide the fluffy coconut rice into bowls and top each with the coconut chicken mixture.
  8. Garnish: Finish off with fresh cilantro and serve with lime wedges on the side for an extra pop of flavor.

What to Serve with Your Chicken Rice Bowls

These bowls are fantastic on their own, but if you want to elevate the experience further, consider these side dishes:

  • Fresh Cucumber Salad: A light cucumber salad can add a refreshing crunch.
  • Grilled Vegetables: Pair with some grilled zucchini or bell peppers for a burst of color and flavor.
  • Spicy Slaw: If you love heat, a spicy slaw can add a delightful contrast to the creamy coconut chicken.

Meal Prep Magic

These Coconut Chicken Rice Bowls are perfect for meal prep! They’re easy to make in batches, and you can store them in airtight containers for quick lunches or dinners throughout the week. Here’s how to meal prep:

  • Cook a double batch of rice and chicken.
  • Divide into individual containers, ensuring each has a portion of rice and chicken.
  • Garnish with cilantro and keep lime wedges on the side until ready to eat.

These bowls will last in the refrigerator for up to four days, making them an ideal choice for busy weekdays.

Storing and Freezing Tips

If you find yourself with leftovers (which is rare but can happen), storing them properly is key to maintaining their deliciousness:

  • Refrigerate: Place your bowls in airtight containers and store them in the fridge for up to four days.
  • Freeze: For longer storage, you can freeze the chicken and rice mixture separately. Just ensure they are completely cooled before placing them in freezer bags. They can be frozen for up to three months.

FAQs

Can I use brown rice instead of jasmine rice?

Absolutely! Just keep in mind that brown rice will require a longer cooking time, generally about 40-45 minutes, and you may need to adjust the liquid ratio.

How can I make this dish spicier?

If you’re a spice lover, consider adding some red pepper flakes or a dash of sriracha to the chicken while it cooks. You could also top it with sliced jalapeños for that extra kick!

What if I don’t have coconut milk?

No worries! You can substitute coconut milk with chicken broth for a different flavor profile or use a non-dairy milk like almond milk, but the taste will differ.

Tips for Perfecting Your Coconut Chicken Rice Bowl

  • Balance is Key: When cooking with spices, remember to balance flavors. Don’t be afraid to adjust salt, pepper, or lime juice to suit your taste.
  • Experiment: Feel free to add your favorite vegetables to the chicken mixture. Bell peppers, snap peas, or even spinach can add color and nutrition!
  • Garnishing: Fresh herbs like basil or mint can also elevate the dish if you want to play around with flavors.

Conclusion: Join the Flavor Adventure!

The Coconut Chicken Rice Bowl is more than just a meal; it’s an invitation to explore the vibrant world of flavors. It’s a dish that embodies the spirit of cooking boldly and embracing the beauty of simplicity. So roll up your sleeves, grab those spices, and let your culinary creativity shine! Whether you’re new to cooking or a seasoned pro, this dish will dance its way into your heart and become a staple in your kitchen. Remember, good food is about connection, exploration, and a bit of spice — so enjoy every moment of your cooking adventure!

Coconut Chicken Rice Bowl

Prep Time 10 minutes
Cook Time 20 minutes
Total Time 30 minutes
Servings 4 servings
Calories 550
A flavorful and creamy rice bowl featuring tender chicken and coconut-infused rice, perfect for a quick and satisfying meal.

Ingredients

Rice and liquids

  • 1 cup jasmine rice
  • 1 can (13.5 oz) coconut milk
  • 2 cups water

Chicken and seasonings

  • 2 chicken breasts diced chicken breasts
  • 1 tablespoon vegetable oil
  • 2 cloves garlic, minced
  • 1 teaspoon ginger, grated
  • 1 tablespoon soy sauce
  • 1 tablespoon lime juice

Seasoning and garnish

  • to taste salt and pepper salt and pepper
  • for garnish fresh cilantro fresh cilantro
  • for serving lime wedges lime wedges

Instructions 

  • Rinse rice, then combine with coconut milk and water; bring to a boil.
  • Reduce heat, cover, and simmer for 15-20 minutes until cooked.
  • Cook diced chicken in oil with garlic and ginger until golden, then add soy sauce and lime juice.
  • Fluff rice, divide into bowls, top with chicken mixture, and garnish with cilantro and lime wedges.

Notes

Use fresh cilantro for best flavor and adjust seasoning to taste.
Calories: 550kcal
Cost: $15
Course: Main Course
Cuisine: Asian
Keyword: chicken, coconut, Rice

Nutrition

Calories: 550kcal | Carbohydrates: 70g | Protein: 35g | Fat: 15g | Sodium: 900mg

Loved this recipe? Save it to your favorite Pinterest board so you can easily find it later! It’s the perfect way to keep all your sweet ideas in one place. ✨

Artistic presentation of a Coconut Chicken Rice Bowl, showcasing textures of chicken, rice, and herbs in a cozy atmosphere.

Why You’ll Love This Dish

There’s something magical about the combination of sweet and savory flavors, especially when they come together in a dish that’s as comforting as Honey Garlic Ground Beef and Broccoli. When I think back to my childhood, I can almost smell the garlic sizzling in the pan, mixed with the warm sweetness of honey. This dish brings me back to those joyful family dinners, filled with laughter and the irresistible aroma of home-cooked goodness. It’s a recipe that not only satisfies hunger but also warms the soul.

Picture this: tender ground beef, perfectly cooked broccoli, and a glossy honey garlic sauce that wraps around each ingredient like a warm hug. It’s quick to prepare, making it a perfect weeknight meal, and can easily impress guests if you choose to serve it during a gathering. Let’s dive into the details and uncover the secrets of this delightful recipe!

Ingredients You’ll Need

To whip up this delicious Honey Garlic Ground Beef and Broccoli, gather the following ingredients:

  • 1 pound ground beef
  • 2 cups broccoli florets
  • 1/4 cup honey
  • 1/4 cup soy sauce
  • 3 cloves garlic, minced
  • 1 tablespoon vegetable oil
  • 1 teaspoon ginger, minced
  • Salt and pepper, to taste
  • Cooked rice, for serving

How to Make This Irresistible Meal

A bowl of ground beef and broccoli drizzled with honey garlic sauce, served over rice.

Now, let’s break down the steps to create this culinary masterpiece. Trust me, your taste buds will thank you for it!

  1. Start with the Aromatics: In a large skillet, heat the vegetable oil over medium heat. Add the minced garlic and ginger, sautéing for about 1 minute until fragrant. This step is crucial as it sets the flavor foundation for the dish.
  2. Brown the Beef: Add the ground beef to the skillet, breaking it apart with a spatula. Cook until browned and fully cooked, about 5–7 minutes. It’s essential to ensure the beef is nicely browned for that rich flavor.
  3. Prepare the Broccoli: While the beef is cooking, steam or blanch the broccoli florets until bright green and tender-crisp, about 3-4 minutes. You want the broccoli to maintain its vibrant color and crunch!
  4. Mix the Sauce: In a small bowl, mix together the honey and soy sauce. This sweet and savory blend is what makes this dish truly irresistible.
  5. Combine Everything: Once the beef is cooked, drain any excess fat, then add the honey-soy sauce mixture to the skillet. Stir to combine, allowing the sauce to coat the beef thoroughly.
  6. Finish with Broccoli: Add the cooked broccoli to the skillet and mix well, cooking for an additional 2-3 minutes until everything is heated through. Season with salt and pepper to taste.
  7. Serve Hot: Serve the honey garlic ground beef and broccoli over a bed of fluffy cooked rice. This dish is meant to be enjoyed hot, with each bite bursting with flavor!

Helpful Tips

  • Don’t Overcook the Broccoli: Keep an eye on the broccoli while you’re cooking it. You want it tender but still crisp to maintain that perfect texture.
  • Customize Your Sauce: Feel free to add a splash of sesame oil or a sprinkle of red pepper flakes for a little kick. If you like it spicy, don’t be shy!
  • Use Fresh Ingredients: Whenever possible, use fresh garlic and ginger for the best flavor. They make a world of difference in this dish.

Variations to Try

This recipe is highly versatile! Here are a few variations you can experiment with:

  • Swap the Protein: Ground turkey or chicken can be used instead of beef for a lighter option.
  • Add More Veggies: Feel free to toss in some sliced bell peppers, snap peas, or even carrots for extra color and nutrition.
  • Make it Vegetarian: Substitute the beef with tofu or tempeh. Just ensure you press and cube the tofu before cooking for the best texture.

Substitutions You Can Make

If you’re missing an ingredient or two, here are some substitutions:

  • Honey: Maple syrup can be a great alternative if you want to change up the sweetness.
  • Soy Sauce: For a gluten-free version, use tamari or coconut aminos.
  • Vegetable Oil: Sesame oil works well for a more authentic Asian flavor.

Equipment You’ll Need

Before you start cooking, make sure you have these essential tools:

  • A large skillet or wok for cooking
  • A spatula for stirring and breaking up the meat
  • A small mixing bowl for the sauce
  • A steaming basket or pot for the broccoli

Storage and Freezing Instructions

This dish is not only delicious but also makes great leftovers! Here’s how to store it:

  • Refrigerator: Store any leftovers in an airtight container in the fridge for up to 3 days.
  • Freezer: You can freeze this dish for up to 3 months. Just ensure it’s in a freezer-safe container. Thaw in the fridge overnight before reheating.
  • Reheating: Reheat in a skillet over medium heat until warmed through, adding a splash of water if it looks dry.

Frequently Asked Questions

Got a question about this recipe? Let’s tackle some common queries:

  • Can I make this recipe ahead of time? Absolutely! You can prepare the beef and broccoli in advance and reheat when you’re ready to serve.
  • What can I serve with this dish? It’s fantastic on its own, but you can also pair it with spring rolls, dumplings, or a simple salad for a complete meal.
  • Is this dish kid-friendly? Yes! The sweet and savory flavors are usually a hit with kids, making it a great family dinner option.

Troubleshooting Tips

If you encounter any issues while making this dish, here are a few tips to help you out:

  • Too Sweet: If the sauce is too sweet for your taste, add a splash of vinegar or lime juice to balance it out.
  • Beef Too Greasy: Make sure to drain excess fat after browning the beef to avoid a greasy dish.
  • Broccoli Overcooked: If your broccoli is mushy, reduce the cooking time next time to ensure it stays crisp.

Conclusion

Honey Garlic Ground Beef and Broccoli is more than just a meal; it’s a celebration of flavors and memories. This dish encapsulates the essence of cooking — the warmth, the joy, and the satisfaction of creating something delicious from simple ingredients. Whether you’re whipping it up on a busy weeknight or serving it to guests, you can’t go wrong with this recipe. So gather your ingredients, fire up that skillet, and let the sweet and savory dance of flavors take center stage in your kitchen. Enjoy every bite, and remember — cooking is an adventure, so don’t be afraid to add your own flair!

Honey Garlic Ground Beef and Broccoli

Prep Time 10 minutes
Cook Time 15 minutes
Total Time 25 minutes
Servings 4 servings
Calories 450
A quick and flavorful stir-fry combining tender ground beef, crisp broccoli, and a sweet-savory honey soy sauce, served over rice.

Ingredients

Meat and Vegetables

  • 1 pound ground beef
  • 2 cups broccoli florets
  • 3 cloves garlic, minced
  • 1 tablespoon vegetable oil
  • 1 teaspoon ginger, minced
  • salt and pepper to taste salt and pepper
  • 1/4 cup honey
  • 1/4 cup soy sauce
  • cooked rice for serving cooked rice

Instructions 

  • Heat oil in a skillet over medium heat. Sauté garlic and ginger for 1 minute.
  • Add ground beef, cook until browned, then drain excess fat.
  • Mix honey and soy sauce, then add to the beef. Stir well.
  • Add broccoli, cook for 2-3 minutes until heated through. Season with salt and pepper.
  • Serve over cooked rice.

Notes

Use fresh broccoli for best texture and flavor.
Calories: 450kcal
Cost: $12
Course: Main Course
Cuisine: Asian
Keyword: ground beef

Nutrition

Calories: 450kcal | Carbohydrates: 50g | Protein: 30g | Fat: 15g | Sodium: 900mg

Loved this recipe? Save it to your favorite Pinterest board so you can easily find it later! It’s the perfect way to keep all your sweet ideas in one place. ✨

Delicious honey garlic ground beef mixed with vibrant broccoli florets on a rustic background.

Why You’ll Love This Dish

If you’re looking to redefine your weeknight dinners, you’ve landed in the right place. These Spinach Stuffed Chicken Breasts are more than just a meal; they’re a culinary experience waiting to unfold on your plate. Packed with vibrant flavors and loaded with nutrients, this dish is a celebration of wholesome eating without sacrificing taste. The creamy filling contrasts beautifully with the tender chicken, creating a delightful harmony that will have your family asking for seconds—and maybe even thirds!

Beyond being a feast for the senses, this recipe is a healthy low-carb dinner option, making it perfect for anyone on a keto journey or simply looking to eat better. With the combination of fresh spinach, rich cream cheese, and savory Parmesan, you get a burst of flavor in every bite. So, let’s dive in and discover how to create this mouthwatering dish that’s sure to impress!

Ingredients You’ll Need

Gathering the right ingredients is the first step toward culinary success. For these Spinach Stuffed Chicken Breasts, you’ll need:

  • 4 boneless, skinless chicken breasts
  • 2 cups fresh spinach, chopped
  • 1 cup cream cheese, softened
  • 1/2 cup grated Parmesan cheese
  • 2 cloves garlic, minced
  • 1 teaspoon onion powder
  • Salt and pepper to taste
  • 1 tablespoon olive oil

How to Prepare This Flavorful Meal

A plated dish featuring Spinach Stuffed Chicken Breasts garnished with herbs.

Ready to unleash your inner chef? Follow these straightforward steps to whip up a dish that dazzles:

  1. Preheat Your Oven: Set the oven temperature to 375°F (190°C) so it’s ready when your chicken is.
  2. Mix the Filling: In a mixing bowl, combine the chopped spinach, softened cream cheese, grated Parmesan, minced garlic, onion powder, and a pinch of salt and pepper. Stir until everything is well incorporated and the mixture is creamy and inviting.
  3. Prepare the Chicken: Using a sharp knife, carefully slice a pocket into each chicken breast. Aim for the center, but be cautious not to cut all the way through. You want enough space to hold that delicious filling.
  4. Stuff the Chicken: Generously stuff each chicken breast with the spinach mixture. If necessary, use toothpicks to secure the openings, ensuring none of that creamy goodness escapes during cooking.
  5. Sear for Flavor: Heat olive oil in an oven-safe skillet over medium-high heat. Once hot, place the stuffed chicken breasts in the skillet and sear them for about 3-4 minutes on each side, or until golden brown. This step adds a beautiful crust that enhances the overall flavor.
  6. Bake to Perfection: Transfer the skillet to your preheated oven and bake for 20-25 minutes. Your chicken is done when it reaches an internal temperature of 165°F (75°C). It’s important to ensure it’s fully cooked while keeping it juicy and tender.
  7. Rest and Serve: Once out of the oven, let the chicken rest for a few minutes. This allows the juices to redistribute, making each bite succulent and flavorful. Serve warm and enjoy the chorus of flavors dancing on your palate!

Tips for Success

To elevate your Spinach Stuffed Chicken Breasts and make your cooking experience seamless, here are some handy tips:

  • Use Fresh Ingredients: Fresh spinach really makes a difference in flavor. If you can, opt for organic for the best taste and nutrients.
  • Don’t Rush the Searing: Taking the time to sear your chicken will lock in moisture and add a fantastic depth of flavor. Don’t skip this step!
  • Let It Rest: Allowing the chicken to rest post-baking helps keep it juicy. Patience pays off!

Variations to Try

Feeling adventurous? Here are some fun variations to customize your Spinach Stuffed Chicken:

  • Add Cheese: Mix in some feta or mozzarella cheese for an extra layer of flavor.
  • Spice It Up: For a kick, add crushed red pepper flakes or diced jalapeños to the filling.
  • Use Different Greens: Substitute spinach with kale or arugula for a different taste profile.

Equipment You’ll Need

Before you start cooking, make sure you have the following tools on hand:

  • A sharp chef’s knife for easy slicing.
  • A mixing bowl for combining your filling.
  • An oven-safe skillet for searing and baking.
  • A meat thermometer to check the chicken’s doneness.
  • Toothpicks for securing the stuffed chicken (if necessary).

Storage and Freezing Tips

Got leftovers? Here’s how to store and preserve your delicious creation:

  • Refrigeration: Store any leftovers in an airtight container in the fridge for up to 3 days. Reheat in the oven or microwave until warmed through.
  • Freezing: You can freeze uncooked stuffed chicken breasts before baking. Wrap them tightly in plastic wrap and place them in a freezer-safe bag. They’ll keep well for up to 3 months. Thaw in the refrigerator before cooking.

FAQs About Spinach Stuffed Chicken

Here are some common questions and answers that might help you in your cooking journey:

  • Can I use frozen spinach? Yes, but make sure to thaw and drain it well to remove excess moisture.
  • What can I serve with stuffed chicken? Pair it with a light salad, roasted vegetables, or a side of quinoa for a complete meal.
  • How do I know when the chicken is done? The safest way is to use a meat thermometer. Look for an internal temperature of 165°F (75°C).

Troubleshooting Common Issues

If you encounter any hiccups along the way, don’t worry! Here’s how to troubleshoot:

  • Dry Chicken: Avoid overcooking by using a meat thermometer and ensuring you let the chicken rest.
  • Filling Leakage: If the filling escapes during cooking, ensure to stuff the chicken firmly and secure with toothpicks if needed.
  • Uneven Cooking: If your chicken breasts are uneven in thickness, consider pounding them gently to create uniformity for even cooking.

Invite Flavor into Your Kitchen

As you venture into the world of cooking with these Spinach Stuffed Chicken Breasts, let the process ignite your passion for food. This dish not only nourishes the body but also feeds the soul, reminding us that cooking can be a joyous adventure. So grab your skillet, embrace the flavors, and let each bite tell a story. Your kitchen is your canvas; paint it with bold flavors, and watch as your family gathers around the table, eager to share in the delight of a meal made with love.

So, what are you waiting for? Get started on this recipe today, and let the savory aromas fill your home. Happy cooking, my friends! May your culinary journey be filled with flavor, joy, and a little bit of spice!

Spinach Stuffed Chicken Breasts - a healthy low carb dinner option!

Prep Time 10 minutes
Cook Time 25 minutes
Total Time 35 minutes
Servings 4 pieces
Calories 350
A delicious and healthy low-carb dinner featuring tender chicken breasts filled with a flavorful spinach and cheese mixture.

Ingredients

Chicken

  • 4 pieces boneless, skinless chicken breasts

Filling

  • 2 cups fresh spinach, chopped
  • 1 cup cream cheese, softened
  • 1/2 cup grated parmesan cheese
  • 2 cloves garlic, minced
  • 1 teaspoon onion powder
  • to taste salt and pepper

Cooking Oil

  • 1 tablespoon olive oil

Instructions 

  • Preheat oven to 375°F (190°C).
  • Mix spinach, cream cheese, Parmesan, garlic, onion powder, salt, and pepper.
  • Create pockets in chicken breasts and stuff with the mixture.
  • Sear chicken in olive oil for 3-4 minutes per side.
  • Bake in oven for 20-25 minutes until cooked through.
  • Rest briefly, then serve warm.

Notes

Secure stuffed chicken with toothpicks if needed to prevent filling from spilling out.
Calories: 350kcal
Cost: $15
Course: Main Course
Cuisine: American
Keyword: chicken, Low Carb, Spinach

Nutrition

Calories: 350kcal | Carbohydrates: 8g | Protein: 45g | Fat: 18g | Sodium: 600mg

Loved this recipe? Save it to your favorite Pinterest board so you can easily find it later! It’s the perfect way to keep all your sweet ideas in one place. ✨

Succulent Spinach Stuffed Chicken Breasts on a rustic surface, showcasing stuffing.

Why You’ll Love This Recipe

Imagine a dessert that captures the essence of indulgence without a hint of guilt. That’s exactly what you get with this Light and Healthy Cheesecake Fluff. It’s a delightful combination of creamy textures and bright flavors, designed to satisfy your sweet tooth while keeping things light. Perfect for a cozy family gathering or an elegant dinner party, this dessert is as versatile as it is delicious. Plus, it’s incredibly easy to whip up, making it a go-to recipe for both seasoned bakers and kitchen novices alike.

Key Ingredients for a Decadent Yet Wholesome Treat

This cheesecake fluff is all about simplicity and quality ingredients. Let’s break down what you’ll need:

  • 1 cup low-fat cream cheese, softened: The star of the show, it provides that rich cheesecake flavor without the heavy calories.
  • 1 cup Greek yogurt: This adds a tangy twist and boosts the protein content, making it a healthier choice.
  • 1/4 cup honey or maple syrup: Nature’s sweeteners, they provide a touch of sweetness that perfectly complements the cream cheese.
  • 1 teaspoon vanilla extract: This elevates the flavor profile, bringing warmth and depth to the fluff.
  • 1 cup whipped topping (light or sugar-free): For that airy texture that makes this dessert so delightful.
  • Fresh berries for garnish: A burst of color and flavor, they make every bite feel like a celebration!

How to Create Cheesecake Magic

Creamy cheesecake fluff in a bowl, garnished with vibrant berries, shot in natural light.

Let’s get down to the delicious details of making your Light and Healthy Cheesecake Fluff. Follow these steps, and you’ll have a show-stopping dessert ready in no time:

  1. In a large mixing bowl, beat the softened cream cheese until smooth. This is crucial for avoiding lumps in your fluff.
  2. Add the Greek yogurt, honey (or maple syrup), and vanilla extract to the bowl. Mix until well combined and creamy. You want this mixture to be luscious!
  3. Gently fold in the whipped topping until fully incorporated. Take your time here; you want to maintain that light, airy texture.
  4. Spoon the cheesecake fluff into serving bowls or cups. Individual servings are perfect for impressing your guests!
  5. Refrigerate for at least 30 minutes to allow the flavors to meld. Trust me, this step is worth the wait.
  6. Serve chilled, topped with fresh berries for that added flair. Enjoy every creamy, dreamy spoonful!

Serving Suggestions to Elevate Your Dessert Game

While this fluff is delightful on its own, there are countless ways to dress it up for an unforgettable presentation:

  • Layered Parfaits: Alternate layers of cheesecake fluff with your favorite granola and fresh fruits in a clear glass for an eye-catching dessert.
  • Drizzle of Chocolate: A light drizzle of melted dark chocolate over the top can add a touch of decadence.
  • Nutty Crunch: Top with toasted nuts for added texture and flavor. Almonds or pecans work beautifully.
  • Herbal Infusion: A sprig of mint or a sprinkle of lemon zest can provide a refreshing contrast to the creamy sweetness.

Storage and Freezing Tips

Want to prepare this treat ahead of time? Here’s how to keep your Light and Healthy Cheesecake Fluff fresh:

  • Store in an airtight container in the refrigerator for up to 2-3 days. Make sure it’s well covered to prevent any absorption of odors.
  • If you want to freeze it, spoon the mixture into freezer-safe containers, leaving some room for expansion. It can be frozen for up to a month.
  • To enjoy your frozen fluff, thaw it overnight in the refrigerator. Give it a gentle stir if it looks a bit deflated!

Variations to Spice It Up

Feeling adventurous? Here are some variations to consider:

  • Chocolate Cheesecake Fluff: Add cocoa powder to the cream cheese mixture to transform it into a chocolate dream.
  • Fruit-Infused: Blend in some pureed strawberries or raspberries for a fruity twist.
  • Spiced Fluff: A pinch of cinnamon or nutmeg can add a warm, cozy flavor profile.
  • Nut Butter Swirl: Incorporate a swirl of almond or peanut butter for added richness and flavor.

Frequently Asked Questions

Can I use regular cream cheese instead of low-fat cream cheese in this recipe?

Absolutely! Just keep in mind that this will increase the calorie and fat content of your dessert.

How long can I store the cheesecake fluff in the refrigerator?

It’s best enjoyed within 2-3 days to maintain its creamy texture and fresh taste.

Can I use frozen berries instead of fresh ones?

Yes, just make sure to thaw and drain them completely before folding them into the cheesecake fluff.

Is the cheesecake fluff suitable for those following a gluten-free diet?

Yes, as long as all the ingredients used are certified gluten-free. Always check the labels!

Can I add any other fruits or toppings to customize the cheesecake fluff?

Definitely! Feel free to get creative with toppings like shredded coconut, chopped nuts, or even a drizzle of caramel sauce!

Conclusion: A Sweet Adventure Awaits

Your culinary journey doesn’t have to be a complex maze of flavors and techniques. With this Light and Healthy Cheesecake Fluff, you can create a delightful dessert that’s not only easy to prepare but also bursting with joy and flavor. Whether you’re enjoying it as a guilt-free snack or dressing it up for a special occasion, this fluffy treat is sure to impress. So roll up your sleeves, gather your ingredients, and get ready to indulge in a world of creamy delight. Happy cooking, and remember, the kitchen is your playground — go forth and create delicious memories!

Light and Healthy Cheesecake Fluff

Prep Time 10 minutes
Total Time 10 minutes
Servings 4 servings
Calories 250
A light, creamy dessert perfect for a healthy treat, topped with fresh berries.

Ingredients

Dairy

  • 1 cup low-fat cream cheese, softened
  • 1 cup greek yogurt
  • 1/4 cup honey or maple syrup
  • 1 teaspoon vanilla extract
  • 1 cup whipped topping (light or sugar-free)
  • fresh berries for garnish fresh berries (for topping)

Instructions 

  • Beat the softened cream cheese until smooth.
  • Add Greek yogurt, honey, and vanilla; mix until creamy.
  • Gently fold in whipped topping.
  • Spoon into serving bowls and refrigerate for 30 minutes.
  • Serve topped with fresh berries.

Notes

This recipe is quick to prepare and perfect for a healthy dessert option.
Calories: 250kcal
Cost: $8
Course: Dessert
Cuisine: American
Keyword: Berries, cheesecake, healthy

Nutrition

Calories: 250kcal | Carbohydrates: 35g | Protein: 6g | Fat: 10g | Sodium: 150mg

Loved this recipe? Save it to your favorite Pinterest board so you can easily find it later! It’s the perfect way to keep all your sweet ideas in one place. ✨

Eye-level view of a delicious cheesecake fluff dessert with berries, showcasing its texture.

Why This Dish Will Become a Family Favorite

When it comes to comfort food, few dishes can rival the warmth and satisfaction of a casserole. Picture this: a hearty Crockpot Hamburger Potato Casserole bubbling away in your kitchen, filling the air with a rich, savory aroma that beckons everyone to the table. This dish is a celebration of simplicity and flavor, combining tender ground beef, soft potatoes, and gooey cheese into a delightful medley that’s as inviting as it is delicious.

The beauty of this casserole lies not only in its taste but also in its convenience. With your trusty crockpot doing all the heavy lifting, this recipe is perfect for busy weeknights or lazy Sundays. You can prepare it in the morning, set it to cook, and return home to a warm, comforting meal that feels like a hug from the inside out. So grab your apron and let’s dive into the savory symphony of flavors that this casserole offers!

Ingredients You’ll Need

Before we get cooking, let’s gather our ingredients. This recipe is all about accessibility and flavor, featuring ingredients that are likely already in your pantry:

  • 1 pound ground beef
  • 4 medium potatoes, sliced
  • 1 onion, chopped
  • 2 cups shredded cheddar cheese
  • 1 can cream of mushroom soup
  • 1 cup milk
  • Salt and pepper to taste
  • 1 teaspoon garlic powder
  • 1 teaspoon paprika

Each ingredient plays a crucial role in building layers of flavor that meld together beautifully as they cook. The ground beef provides that hearty protein base, while the potatoes lend a creamy texture and the cheese brings richness and indulgence. The cream of mushroom soup acts as a luscious sauce, binding everything together.

How to Create Your Crockpot Masterpiece

Delicious serving of Hamburger Potato Casserole topped with cheese, resting in a warm bowl.

Now, let’s get to the fun part — cooking! Follow these simple steps to create your Crockpot Hamburger Potato Casserole:

Step 1: Brown the Beef and Onion

Start by heating a skillet over medium heat. Add the ground beef and chopped onion, cooking until the beef is fully browned and no longer pink. This step is crucial as it builds a rich flavor base. Once cooked, drain any excess fat to keep the dish from becoming greasy.

Step 2: Prepare the Creamy Sauce

In a large bowl, combine the cream of mushroom soup, milk, garlic powder, paprika, salt, and pepper. This creamy mixture will be the heart of your casserole, adding moisture and flavor to every layer.

Step 3: Layer the Potatoes

Now it’s time to start layering! In your crockpot, place half of the sliced potatoes in an even layer. This will serve as the foundation for your casserole.

Step 4: Add the Beef and Onion Mixture

Next, sprinkle half of the cooked ground beef and onion mixture over the potatoes. This step is all about building flavor, so make sure to spread it evenly.

Step 5: Pour the Creamy Sauce

Pour half of your creamy soup mixture over the layered ingredients, ensuring all the potatoes and beef are generously coated.

Step 6: Sprinkle with Cheddar Cheese

Top the first layer with half of the shredded cheddar cheese. This will melt beautifully during cooking, creating a luscious layer of cheesy goodness.

Step 7: Repeat the Layers

Repeat the layering process with the remaining potatoes, ground beef mixture, soup mixture, and finish with the rest of the cheddar cheese on top. This ensures every bite is a delightful combination of all the flavors.

Step 8: Cook the Casserole

Cover your crockpot and set it to cook on low for 6-8 hours, or on high for 3-4 hours. The low and slow method allows the flavors to meld together beautifully while ensuring the potatoes become tender.

Pro Tips for Success

To elevate your cooking experience, here are some pro tips:

  • Don’t Rush the Browning: Browning the beef and onions creates a depth of flavor that you won’t want to skip.
  • Slice Evenly: Ensure your potatoes are sliced to about 1/8-inch thick for even cooking. This helps them become tender without turning mushy.
  • Experiment with Cheese: While cheddar is a classic choice, feel free to mix in other cheeses like Monterey Jack, mozzarella, or even pepper jack for a spicy kick.
  • Season to Taste: Don’t be afraid to adjust the seasonings to your liking. A pinch of cayenne pepper can add a beautiful warmth!

How to Serve Your Casserole

Once your casserole is beautifully cooked, it’s time to serve! Here are some ideas to make your meal even more enjoyable:

Garnishes

Fresh herbs like chopped parsley or chives can add a pop of color and a burst of freshness to your dish. Just sprinkle them on top before serving!

Side Dishes

Pair your casserole with a crisp green salad, steamed green beans, or roasted broccoli. These sides will balance the hearty richness of the casserole beautifully.

Creative Presentation

For a cozy presentation, serve the casserole in individual ramekins or scoop generous portions into bowls. A dollop of sour cream and a sprinkle of crispy fried onions can take the dish to the next level!

Make Ahead and Storage

This casserole is ideal for meal prep or leftovers. Here’s how to make the most of it:

Storing Leftovers

Keep any leftovers in an airtight container in the refrigerator for up to 3 days. The flavors actually meld and deepen overnight, making the next day’s meal even more delightful.

Freezing

If you want to freeze your casserole, portion cooled leftovers into freezer-safe containers and store for up to 3 months. It’s a lifesaver for those busy nights.

Reheating

To reheat, simply thaw in the refrigerator overnight and warm gently in the oven at 350°F (175°C) for 20-30 minutes until heated through. You can also microwave portions until hot, adding a splash of milk for extra creaminess.

FAQs

Can I use ground turkey instead of ground beef?

Absolutely! Ground turkey is a great lean alternative that works well in this recipe.

Do I need to thaw frozen potatoes before cooking?

It’s best to use fresh potatoes sliced just before cooking to avoid excess moisture. However, if you use frozen potatoes, make sure to thaw and drain them properly to prevent sogginess.

Can I add other vegetables?

Yes! Feel free to include diced carrots, peas, bell peppers, or corn to increase nutrition and flavor variety.

What if I don’t have cream of mushroom soup?

You can substitute it with cream of chicken or cream of celery soup, or even make a quick homemade white sauce as a base.

How thick should I slice the potatoes?

Slicing the potatoes about 1/8-inch thick ensures they cook evenly and become tender without turning mushy.

Final Thoughts

With a Crockpot Hamburger Potato Casserole, you’re not just preparing a meal — you’re creating a memorable experience. This dish is all about bringing people together, sharing flavors, and celebrating the joy of home-cooked comfort food. So the next time you’re looking for an easy dinner recipe, let this savory casserole dance on your palate and fill your home with warmth. Trust me, once you try it, you’ll be reaching for your crockpot time and time again. Happy cooking, and may your kitchen always be filled with delightful aromas and hearty laughter!

Crockpot Hamburger Potato Casserole

Prep Time 15 minutes
Cook Time 4 hours
Total Time 4 hours 15 minutes
Servings 6 servings
Calories 650
A hearty and easy-to-make casserole combining ground beef, potatoes, and cheese, cooked to perfection in the crockpot.

Ingredients

Meat and Dairy

  • 1 pound ground beef
  • 2 cups shredded cheddar cheese
  • 1 can cream of mushroom soup
  • 1 cup milk

Instructions 

  • Brown ground beef and chopped onion in a skillet; drain excess fat.
  • Mix mushroom soup, milk, garlic powder, paprika, salt, and pepper in a bowl.
  • Layer half of sliced potatoes and cooked beef mixture in the crockpot.
  • Pour half of the soup mixture and sprinkle half of the cheese over layers; repeat with remaining ingredients.
  • Cover and cook on low for 6-8 hours or high for 3-4 hours until potatoes are tender.

Notes

For a creamier texture, add a splash of sour cream before serving.
Calories: 650kcal
Cost: $15
Course: Main Course
Cuisine: American
Keyword: beef, crockpot, Potatoes

Nutrition

Calories: 650kcal | Carbohydrates: 50g | Protein: 40g | Fat: 35g | Sodium: 1200mg

Loved this recipe? Save it to your favorite Pinterest board so you can easily find it later! It’s the perfect way to keep all your sweet ideas in one place. ✨

A comforting Crockpot Hamburger Potato Casserole showcasing layers of ground beef and potatoes.

Why You’ll Love This Dish

Let’s face it: life can sometimes feel like a whirlwind, and cooking can often fall to the bottom of our to-do lists. But what if I told you that you could whip up a meal that not only satisfies your cravings but also brings a spark of joy back into your kitchen? Enter the sweet and savory world of honey garlic chicken. This dish is like a culinary adventure waiting to happen, balancing the rich sweetness of honey with the umami punch of soy sauce and the aromatic allure of garlic. It invites you to embrace the heat, to dance with flavors, and to create a meal that feels like a warm hug on a plate.

This recipe is perfect for busy weeknights when you want something quick but don’t want to sacrifice flavor. With just a handful of ingredients and a bit of your time, you can create a dish that tastes like it came straight from your favorite restaurant—without the greasy takeout containers! So grab your skillet and get ready to ignite your culinary passion.

Ingredients: The Building Blocks of Flavor

Before we dive into the cooking process, let’s gather our ingredients. Each one plays a crucial role in creating that irresistible flavor profile:

  • 1 lb chicken breasts, cut into bite-sized pieces
  • 1/4 cup honey
  • 1/4 cup soy sauce
  • 4 cloves garlic, minced
  • 1 tablespoon olive oil
  • 1 teaspoon ginger, minced (optional, but trust me, it adds a lovely kick)
  • Salt and pepper to taste
  • Chopped green onions for garnish (optional, but they add a fresh touch)

The Cooking Process: Getting Hands-On

Detailed shot of tender Chicken pieces coated in honey garlic sauce, garnished with green onions.

Now that we’ve rounded up our ingredients, it’s time to get down to business. Cooking honey garlic chicken is not just about following steps; it’s about immersing yourself in the process, feeling the textures, and savoring the aromas. Are you ready? Let’s do this!

Step 1: Marinade Magic

In a mixing bowl, combine the honey, soy sauce, minced garlic, olive oil, and ginger if you’re feeling adventurous. Whisk it all together until well blended. This marinade is where the magic happens—sweet, savory, and utterly delicious!

Step 2: Coat That Chicken

Add your chicken pieces to the marinade, ensuring they’re well coated. It’s essential to let them soak up those flavors, so let it marinate for at least 30 minutes. If you have more time, let it sit longer in the fridge. Trust me; your taste buds will thank you!

Step 3: Sizzle and Brown

Heat a skillet over medium-high heat. Once it’s nice and hot, add the marinated chicken along with the marinade. Sear the chicken for about 5-7 minutes, stirring occasionally. You want those pieces to get a lovely golden brown and for the sauce to thicken up. The aroma will be tantalizing, drawing everyone into the kitchen!

Step 4: Season to Perfection

Once the chicken is cooked through, season with salt and pepper to taste. A little sprinkle goes a long way in enhancing the flavors already present. And just like that, your honey garlic chicken is ready to shine!

Step 5: Serve and Garnish

Plate the chicken hot, garnished with chopped green onions if you’re feeling fancy. The fresh crunch of the onions balances the sweetness of the dish beautifully.

Tips for Culinary Success

Cooking is an art, and like any artist, you need a few tips to create your masterpiece:

  • Don’t Rush the Marinade: The longer you let the chicken soak in the marinade, the deeper the flavors will penetrate. Aim for at least 30 minutes, but feel free to let it sit even longer.
  • Use a Hot Skillet: Make sure your skillet is hot before adding the chicken. This helps to sear the meat and lock in those juices.
  • Experiment with Ingredients: Spice up the dish by adding a pinch of red pepper flakes for some heat or swapping out honey for maple syrup for a unique twist.

Variations: Making It Your Own

One of the best parts about cooking is the freedom to experiment. Here are a few variations to consider:

  • Honey Garlic Chicken Thighs: Swap out chicken breasts for thighs for an even juicier result.
  • Honey Garlic Tofu: For a vegetarian option, use firm tofu. Just be sure to press it to remove excess moisture before marinating!
  • Honey Garlic Shrimp: If you’re a seafood lover, shrimp is a fantastic alternative. Cook for just a few minutes until they turn pink!

Storage and Freezing: Keeping the Goodness

Leftovers are a beautiful thing! Here’s how to store your honey garlic chicken:

  • Refrigeration: Place any leftovers in an airtight container. They will stay fresh for up to 3 days in the refrigerator.
  • Freezing: If you want to save some for later, freeze the chicken in a sealed container for up to a month. Just be sure to thaw in the refrigerator before reheating.

FAQs: Your Questions Answered

Got questions? I’ve got answers!

  • Can I use frozen chicken? Absolutely! Just add a few extra minutes to the cooking time to ensure it’s cooked through.
  • What can I serve with this dish? Honey garlic chicken pairs beautifully with steamed rice, sautéed vegetables, or even a crunchy salad. Get creative!
  • Can I double the recipe? Yes! Just make sure you have a large enough skillet to accommodate all the chicken.

Troubleshooting: Common Issues

If things don’t turn out as expected, don’t fret! Here’s how to troubleshoot:

  • Too Sweet: If the dish is too sweet for your taste, add a splash of vinegar or some extra soy sauce to balance the flavors.
  • Not Thickening: If your sauce isn’t thickening, let it cook a bit longer or mix in a cornstarch slurry (1 tablespoon cornstarch with 2 tablespoons water) to thicken it up.

Final Thoughts: Ignite Your Culinary Adventure

Cooking is a journey, and with this honey garlic chicken recipe, you’re not just making a meal; you’re crafting a story—a story filled with warmth, flavor, and a dash of adventure. The balance of sweet and savory in this dish is a reminder that life is best enjoyed with a hint of spice and a touch of boldness. So gather your ingredients, put on your favorite playlist, and let your kitchen become a canvas for creativity. Remember, every great dish starts with a little courage and a whole lot of passion. Embrace the heat and enjoy every bite!

HONEY GARLIC CHICKEN

Prep Time 10 minutes
Cook Time 10 minutes
Total Time 20 minutes
Servings 4 servings
Calories 350
A quick and flavorful dish featuring tender chicken in a sweet and savory honey garlic sauce.

Ingredients

Main

  • 1 lb chicken breasts, cut into bite-sized pieces
  • 1/4 cup honey
  • 1/4 cup soy sauce
  • 4 cloves garlic, minced
  • 1 tablespoon olive oil
  • 1 teaspoon ginger, minced (optional)
  • to taste salt and pepper (for seasoning)
  • for garnish chopped green onions (optional)

Instructions 

  • Mix honey, soy sauce, garlic, olive oil, and ginger (if using).
  • Marinate chicken for at least 30 minutes.
  • Cook chicken in a skillet over medium-high heat until done, about 5-7 minutes.
  • Stir in marinade and cook until sauce thickens.
  • Season with salt and pepper, then serve garnished with green onions if desired.

Notes

Serve with rice or vegetables for a complete meal.
Calories: 350kcal
Cost: $12
Course: Main Course
Cuisine: Asian
Keyword: chicken, garlic, honey

Nutrition

Calories: 350kcal | Carbohydrates: 40g | Protein: 30g | Fat: 10g | Sodium: 900mg

Loved this recipe? Save it to your favorite Pinterest board so you can easily find it later! It’s the perfect way to keep all your sweet ideas in one place. ✨

Eye-level view of succulent Honey Garlic Chicken, showcasing its glistening texture under warm light.