Author

Avery Collins

Browsing

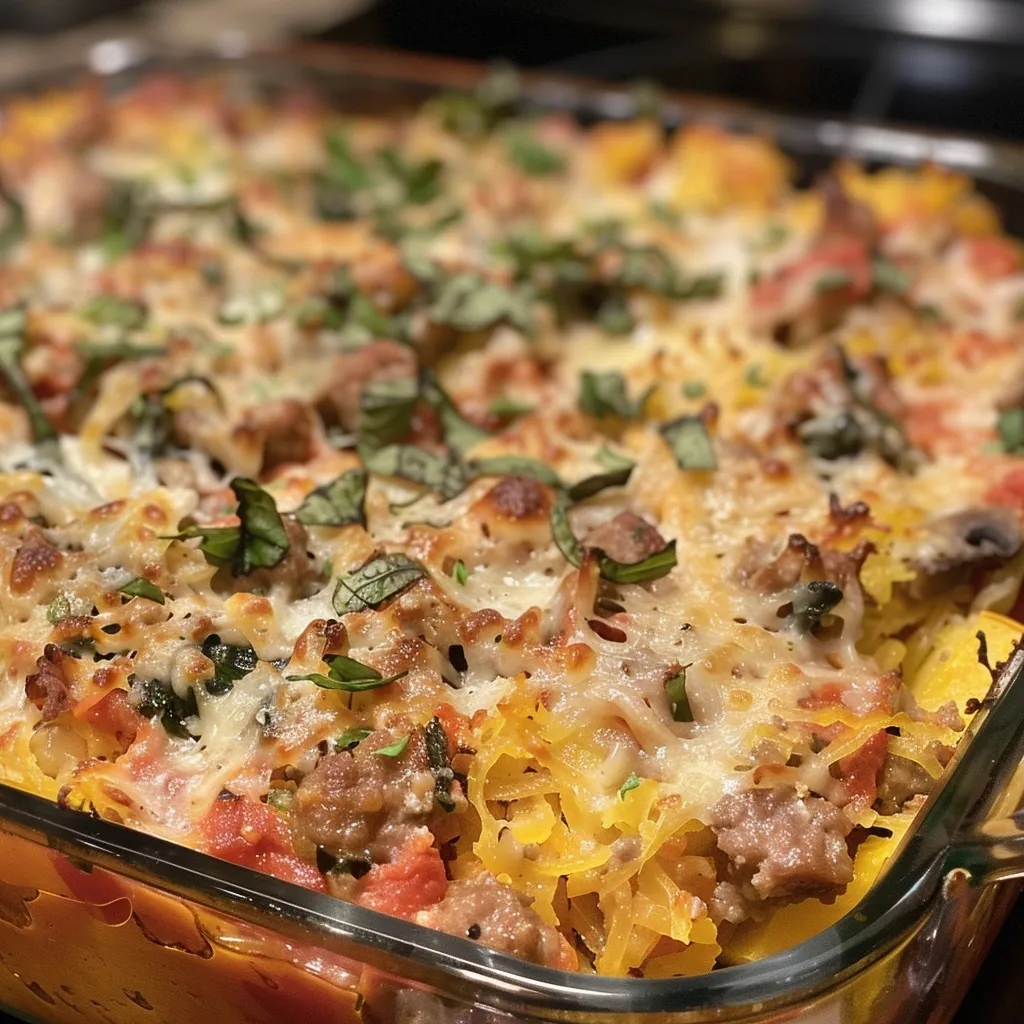
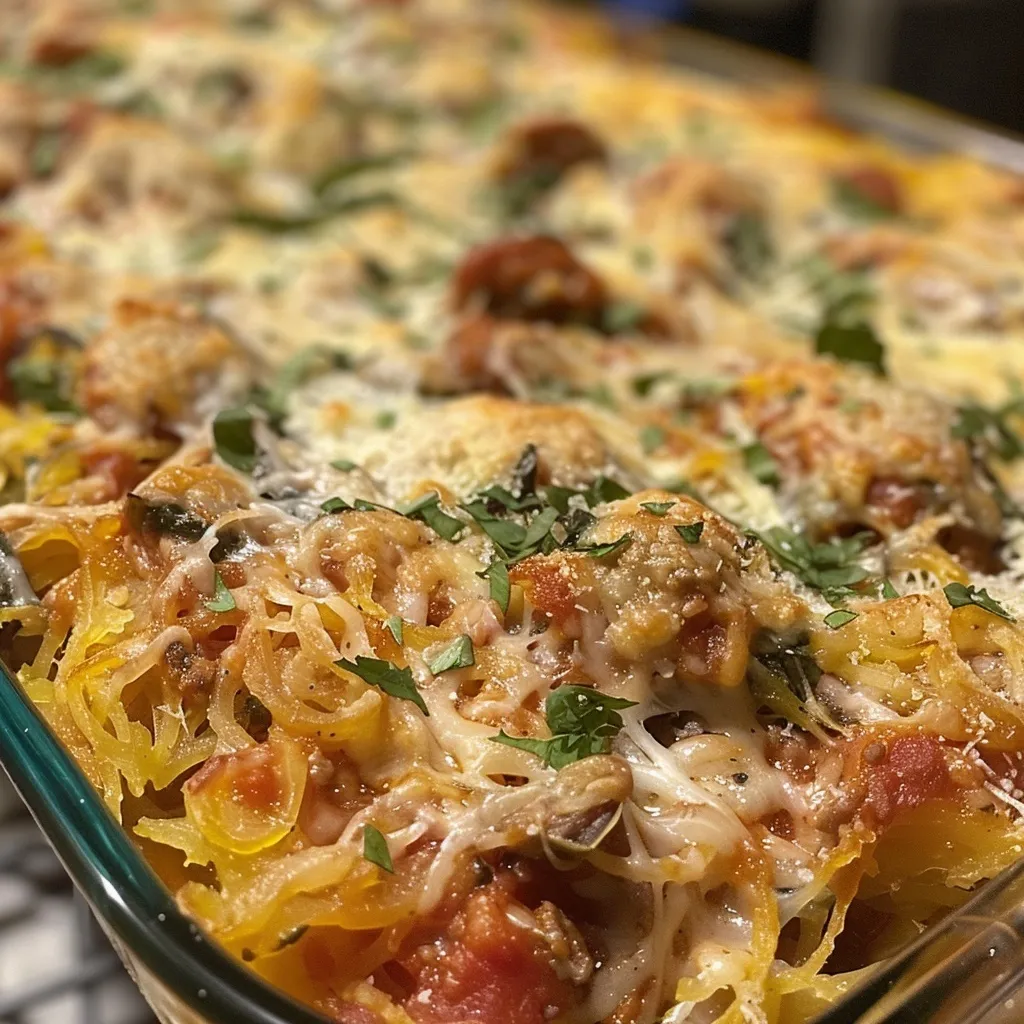
Unlock the Comfort of Chicken and Broccoli Pasta Bake

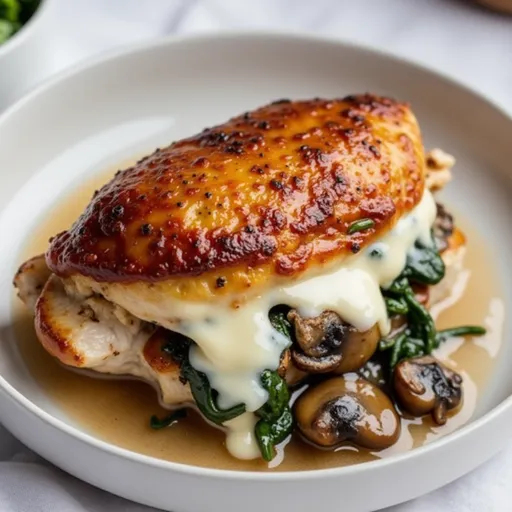
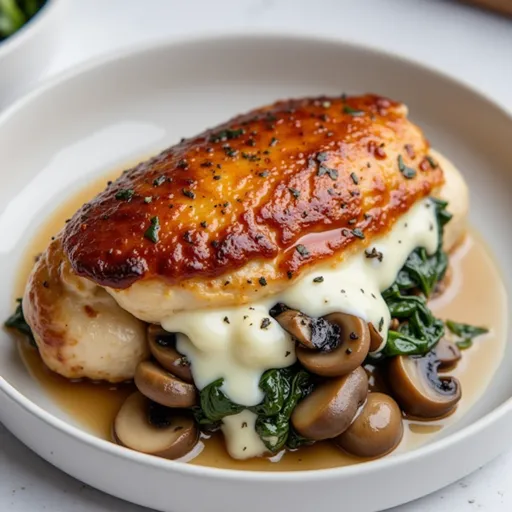
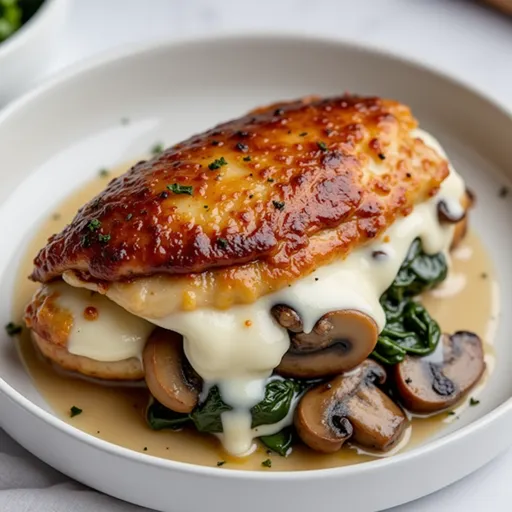
Welcome to the culinary adventure that is my Chicken and Broccoli Pasta Bake! This dish is not just a recipe; it’s a vibrant tapestry of flavors, textures, and memories that transports you straight to the heart of comfort food. With creamy layers, tender chicken, and vibrant broccoli, this pasta bake is an invitation to spice up your dinner table. Let’s dive into what makes this dish a must-try!

Why You’ll Love This Recipe

There are countless reasons to fall head over heels for this Chicken and Broccoli Pasta Bake. Here are just a few:

  • Comfort in Every Bite: The creamy sauce and tender pasta provide a heartwarming comfort that feels like a hug from your grandmother.
  • Easy to Prepare: With straightforward steps, you can whip this up even on busy weeknights, making it a perfect choice for family dinners.
  • Customizable Ingredients: This recipe is flexible! Whether you prefer gluten-free pasta or want to swap chicken for a plant-based protein, the possibilities are endless.
  • Nutrition Packed: With broccoli, baby spinach, and lean chicken, this dish is as nutritious as it is delicious, ensuring everyone leaves the table satisfied.
  • Impressive Presentation: The golden, cheesy top is sure to impress your guests, making it an excellent choice for gatherings or special occasions.

Ingredient Breakdown with Substitutions

Let’s talk ingredients! Here’s what you’ll need to create this masterpiece, along with some smart substitutions.

  • 500 grams gluten-free pasta: Feel free to use regular pasta if gluten isn’t a concern. You can also try chickpea or lentil pasta for an extra protein boost.
  • 50 grams butter: For a dairy-free option, use coconut oil or vegan butter.
  • 1 medium brown onion: Shallots or leeks can add a different flavor profile.
  • 4 cloves garlic: Because you can never have too much garlic! Adjust to your taste.
  • ¼ cup buckwheat flour: This can be replaced with regular all-purpose flour or cornstarch for a gluten-free thickener.
  • 1 ½ cups soy milk: Almond or oat milk work just as well, ensuring you choose unsweetened varieties.
  • 1 ½ cups chicken stock: Vegetable stock can be used for a vegetarian version.
  • 1 tablespoon wholegrain mustard: Feel free to substitute with yellow mustard for a milder flavor.
  • 1 tablespoon Dijon mustard: This adds a tangy kick that can be adjusted based on your preference.
  • 1 teaspoon sea salt flakes: Sea salt, kosher salt, or even flavored salts can elevate this dish.
  • ¼ teaspoon dried thyme: Substitute with oregano or Italian seasoning for a different flavor.
  • Cracked black pepper: Adjust this to your heat preference.
  • 500 grams cooked chicken: Shredded rotisserie chicken or leftover turkey works beautifully.
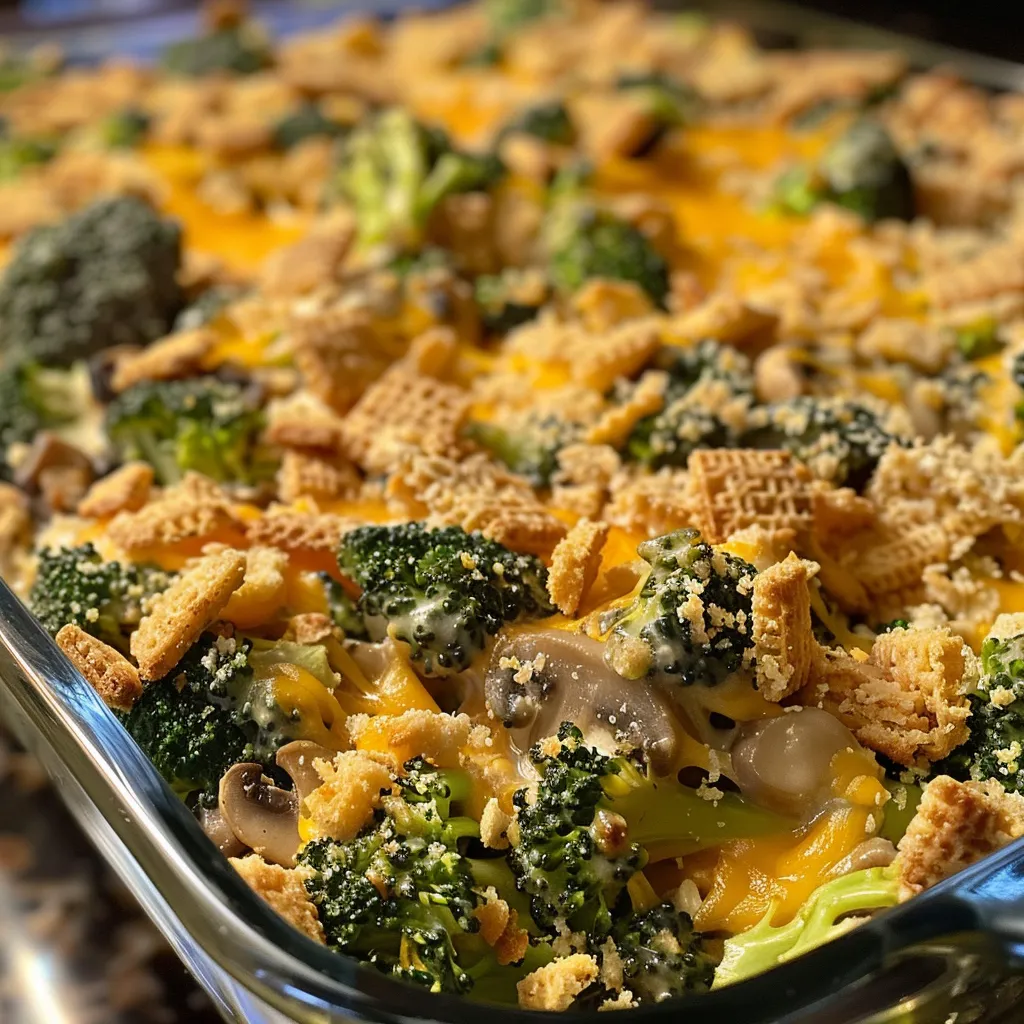
  • 1 head broccoli: Feel free to add other veggies like bell peppers or zucchini for a colorful twist.
  • 60 grams baby spinach: Kale or Swiss chard can also be great additions.
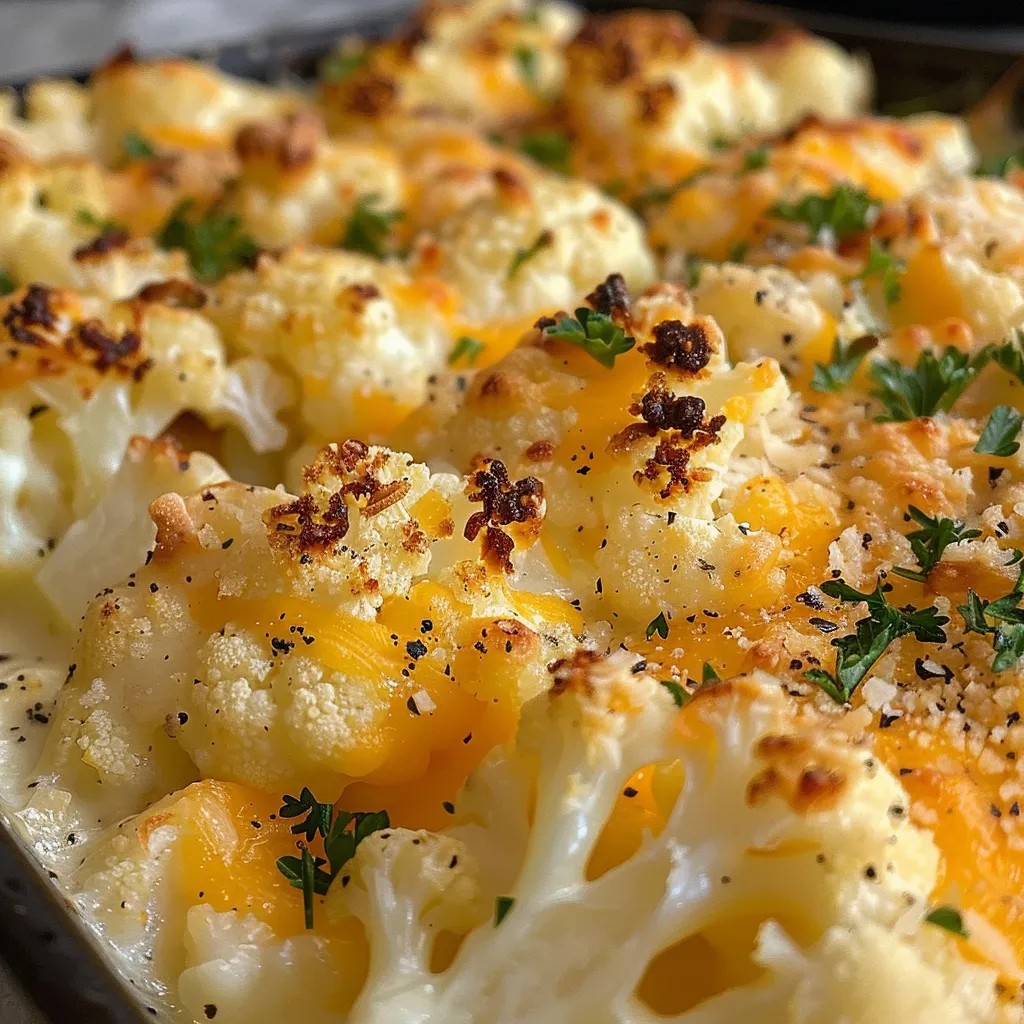
  • 1 cup mozzarella and 1 cup cheddar cheese: Any melty cheese will do! Try gouda or pepper jack for a flavorful kick.

How to Make This Chicken and Broccoli Pasta Bake

Side view of a bubbling Chicken and Broccoli Pasta Bake, highlighting golden melted cheese and fresh ingredients.

Ready to get cooking? Follow these steps for a dish that will make your taste buds dance!

  1. Preheat the oven: Set your oven to 180°C/356°F (fan forced) so it’s nice and hot when you’re ready to bake.
  2. Cook the pasta: Fill a large pot with water ⅔ of the way up, add a generous pinch of salt, and bring to a boil. Add the pasta and stir occasionally. Boil until al dente, then strain and return to the pot.
  3. Sauté the aromatics: In a large, shallow casserole pan, melt the butter over medium heat. Add the diced onion and sauté until translucent. Add the minced garlic and sauté until fragrant.
  4. Make the sauce: Stir in the buckwheat flour, then gradually whisk in the soy milk until smooth. Add chicken stock and stir until thickened, about 5 minutes. The sauce should coat the back of a spoon.
  5. Season the sauce: Add the wholegrain mustard, Dijon mustard, thyme, salt, and pepper. Stir in the baby spinach until wilted, then turn off the heat.
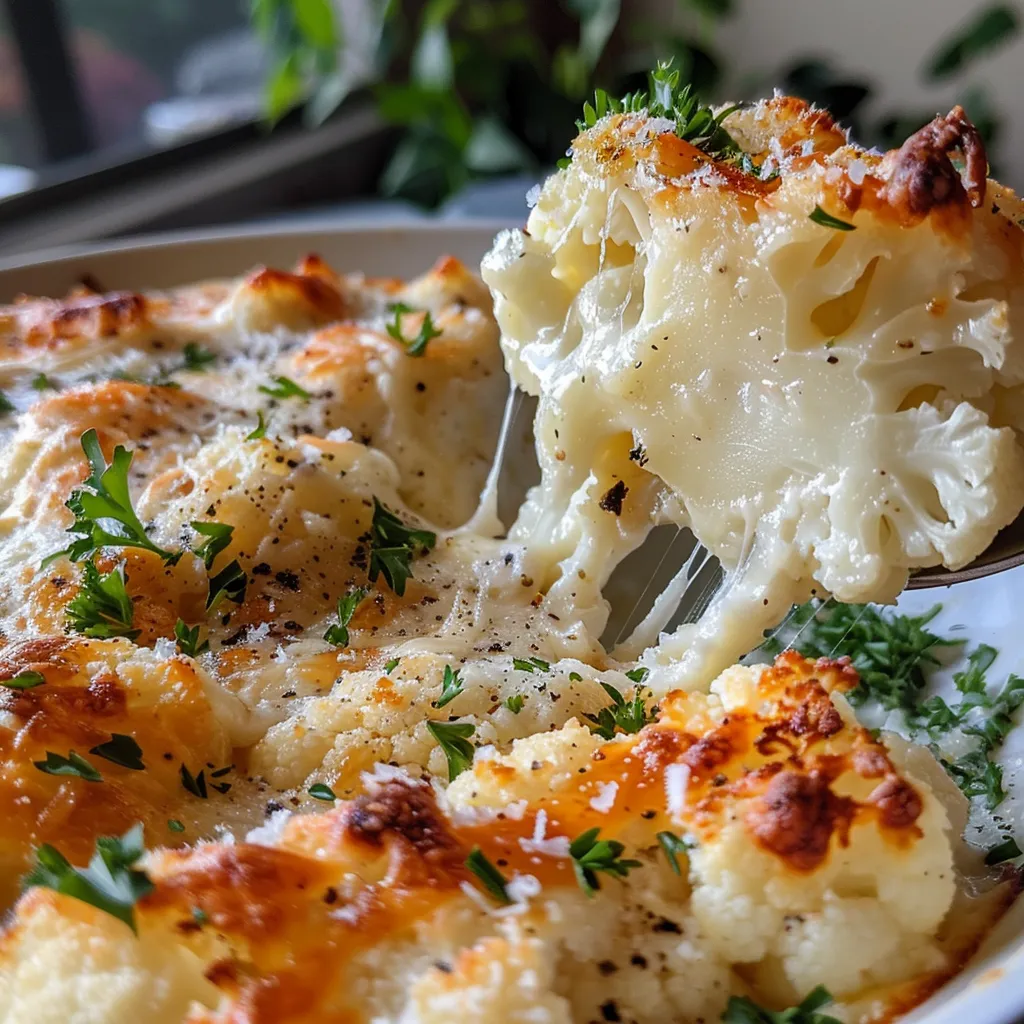
  6. Combine and bake: Add the shredded chicken and broccoli to the sauce, mixing well. Transfer the mixture to a baking dish, top with grated mozzarella and cheddar, and bake for 15 minutes or until golden brown.

Pro Tips for a Perfect Bake

Here’s how to elevate your Chicken and Broccoli Pasta Bake to legendary status!

  • Don’t overcook the pasta: Aim for al dente since the pasta will continue to cook while baking.
  • Use fresh ingredients: Fresh garlic and onions bring a depth of flavor that dried options can’t match.
  • Optimize your cheese: Mix different cheeses for a complex flavor and gooey texture.
  • Experiment with spices: Add a pinch of red pepper flakes for heat or smoked paprika for a smoky twist.
  • Layer the cheese: For a truly indulgent topping, mix cheeses and sprinkle them in layers.
  • Let it rest: Allow the bake to sit for a few minutes before serving; this helps the flavors meld.

Common Mistakes and Troubleshooting

Even the best chefs make mistakes! Here’s how to avoid common pitfalls:

  • Too dry: If your bake turns out dry, add more sauce or a splash of chicken stock before serving.
  • Cheese not melting: Ensure your oven is preheated properly and bake until the cheese is bubbling and golden.
  • Overpowering mustard flavor: If it’s too tangy, balance it with a bit more sugar or honey in the sauce.

Delicious Variations

Want to switch things up? Here are some variations to inspire your culinary creativity:

  • Vegetarian Delight: Swap chicken for lentils or chickpeas and use vegetable stock.
  • Spicy Kick: Add diced jalapeños or sriracha to the sauce for a fiery twist.
  • Herb Infusion: Fresh herbs like parsley or basil can brighten the dish immensely.
  • Pasta Swap: Try using different pasta shapes like penne or fusilli for a fun texture.

Storage and Make-Ahead Instructions

Planning ahead? Here’s how to store and prepare your Chicken and Broccoli Pasta Bake:

  • Refrigeration: Store leftover bake in an airtight container for up to 3 days.
  • Freezing: This dish freezes beautifully! Freeze before baking for up to 3 months.
  • Reheating: To reheat, cover with foil and warm in the oven at 180°C (350°F) until heated through.

Comprehensive FAQ

Got questions? I’ve got answers!

  • Can I use frozen broccoli?: Absolutely! Just add it directly to the sauce without thawing.
  • What if I don’t have buckwheat flour?: All-purpose flour or cornstarch works well as a substitute.
  • Is this pasta bake gluten-free?: Yes, as long as you use gluten-free pasta and flour.
  • Can I add more vegetables?: Yes! Feel free to get creative with veggies like bell peppers, carrots, or zucchini.
  • How can I make this dish dairy-free?: Use plant-based butter, milk, and cheese alternatives.
  • What is the best way to serve it?: Garnish with fresh herbs for a pop of color and flavor.
  • Can I make this ahead of time?: Yes! Assemble it and refrigerate until you’re ready to bake.
  • Are leftovers good?: They taste even better the next day as the flavors meld!

Nutrition Tips and Dietary Adaptations

Feed your body with goodness! This recipe is packed with nutrients, but here are some tips to make it even healthier:

  • Protein Boost: Add beans or lentils for extra protein and fiber.
  • Lower the Fat: Use low-fat cheese and milk alternatives to reduce calories.
  • Load Up on Veggies: The more colorful your bake, the more nutrients it brings!

Essential Equipment Recommendations

To make your cooking experience smooth, here’s what you’ll need:

  • Large pot: For boiling the pasta efficiently.
  • Casserole dish: A shallow dish for even baking and easy serving.
  • Whisk: Essential for mixing the sauce and achieving a creamy consistency.
  • Colander: For straining the pasta without fuss.

Serving Suggestions

To elevate your dining experience, consider these serving ideas:

  • Fresh Salad: Pair with a crisp green salad to balance the richness of the bake.
  • Garlic Bread: Serve with warm garlic bread for a comforting combo.
  • Wine Pairing: A light white wine like Sauvignon Blanc complements the dish beautifully.

Conclusion: Your Culinary Adventure Awaits!

There you have it, folks! My Chicken and Broccoli Pasta Bake is more than just a meal; it’s a celebration of flavors, memories, and the joy of cooking. So, grab your ingredients, turn up the heat, and let your kitchen become a canvas for culinary creativity. Remember, cooking is an adventure, and every bite tells a story. Enjoy!

Chicken and Broccoli Pasta Bake

Prep Time 15 minutes
Cook Time 30 minutes
Total Time 45 minutes
Servings 4 servings
Calories 850
A hearty and cheesy baked pasta dish combining tender chicken, fresh broccoli, and a creamy sauce, perfect for a comforting meal.

Ingredients

Pasta

  • 500 grams gluten free pasta
  • 50 grams butter
  • 1 medium brown onion (finely diced)
  • 4 cloves garlic (peeled and minced)
  • 0.25 cup buckwheat flour
  • 1.5 cups soy milk (or milk of choice)
  • 1.5 cups chicken stock
  • 1 tablespoon wholegrain mustard
  • 1 tablespoon Dijon mustard
  • 1 teaspoon sea salt flakes
  • 0.25 teaspoon dried thyme
  • to taste cracked black pepper
  • 500 grams cooked chicken (shredded)
  • 1 head broccoli (roughly chopped; stem diced)
  • 60 grams baby spinach
  • 1 cup mozzarella (grated)
  • 1 cup cheddar cheese (grated)

Instructions 

  • Preheat oven to 180°C/356°F. Cook pasta until al dente, then drain.
  • Melt butter, sauté onions and garlic. Add flour, whisk in milk and stock to make a creamy sauce. Stir in mustards, thyme, salt, pepper, and wilt spinach.
  • Combine cooked pasta, shredded chicken, and broccoli with the sauce. Top with grated cheeses and bake for 15 minutes until golden.

Notes

For extra flavor, add herbs or spices of your choice before baking.
Calories: 850kcal
Cost: $15
Course: Main Course
Cuisine: International
Keyword: chicken, pasta

Nutrition

Calories: 850kcal | Carbohydrates: 100g | Protein: 60g | Fat: 35g | Sodium: 1500mg

Why This Dish Will Ignite Your Taste Buds

Let’s talk about the magic that happens when tender chicken meets a savory mushroom filling. Imagine a juicy chicken breast, perfectly cooked, cradling a rich, creamy mixture of mushrooms and cheese, all enhanced by the aromatic kiss of garlic and thyme. This Mushroom Stuffed Chicken Breast is not just a meal; it’s an experience that transforms ordinary weeknight dinners into culinary adventures. If you’ve ever wanted to impress your family or guests without spending hours in the kitchen, this recipe is your golden ticket. With just a handful of ingredients and a dash of creativity, you can create something truly spectacular that bursts with flavor and warmth.

Ingredients That Bring the Flavor

Before we dive into the cooking process, let’s take a moment to appreciate the ingredients that will elevate this dish. Here’s what you’ll need:

  • 2 boneless, skinless chicken breasts
  • 1 cup mushrooms, finely chopped
  • 1/2 cup cream cheese, softened
  • 1/4 cup grated Parmesan cheese
  • 2 cloves garlic, minced
  • 1 tablespoon olive oil
  • Salt and pepper to taste
  • 1 teaspoon dried thyme
  • 1 teaspoon paprika

Each ingredient plays a crucial role in creating that unforgettable flavor profile. The mushrooms bring an earthy depth, while cream cheese and Parmesan provide a luscious creaminess. Garlic and thyme tie everything together, creating an aromatic symphony that welcomes everyone to the table.

Step-by-Step Cooking Guide

A beautifully plated mushroom stuffed chicken breast, with visible mushroom and cheese filling.

Now that we have our ingredients ready, let’s embark on this culinary journey together!

Step 1: Preheat and Prepare

Preheat your oven to 375°F (190°C). This is crucial because we want our chicken to cook evenly and come out perfectly juicy. While the oven warms up, let’s prepare our chicken breasts.

Step 2: Sautéing the Mushrooms

In a skillet, heat the olive oil over medium heat. Add the minced garlic and chopped mushrooms to the pan. As they cook, you’ll experience that intoxicating aroma wafting through your kitchen. Cook for about 5-7 minutes, or until the mushrooms are soft and most of their liquid has evaporated. This step is essential as it concentrates the flavor and ensures a delightful stuffing.

Step 3: Make the Filling

In a bowl, combine the sautéed mushrooms, softened cream cheese, grated Parmesan, thyme, salt, and pepper. Mix well until everything is beautifully blended. The filling should be rich, creamy, and bursting with flavor.

Step 4: Prepare the Chicken Breasts

Now comes the fun part—stuffing our chicken! Carefully cut a pocket into each chicken breast by slicing it horizontally. Be cautious not to cut all the way through; you want to create a secure pocket for your filling. Season the inside and outside of the chicken with salt and pepper to taste.

Step 5: Stuff and Secure

Generously stuff each chicken breast with the mushroom mixture. If you find that the filling is overflowing a bit, don’t worry! Just secure the opening with toothpicks if needed. This is your chance to be generous with the filling; after all, who doesn’t love a hearty bite?

Step 6: Spice It Up!

Sprinkle paprika over the stuffed chicken breasts for a touch of color and an extra kick of flavor. Paprika not only enhances the visual appeal but also adds a subtle sweetness that balances the savory notes of the mushrooms.

Step 7: Bake to Perfection

Place the stuffed chicken breasts in a baking dish and pop them into your preheated oven. Bake for 25-30 minutes, or until the chicken is cooked through and the juices run clear. The internal temperature should reach 165°F (74°C) for safety. This is where the magic happens as the chicken absorbs all those incredible flavors!

Step 8: Rest and Serve

Once cooked, remove the chicken from the oven and let it rest for a few minutes. This step is critical; it allows the juices to redistribute, ensuring every bite is moist and flavorful. When you’re ready, slice into the chicken, and watch the creamy filling spill out—it’s a sight that’ll make anyone’s mouth water!

Perfect Pairings for Your Stuffed Chicken

While this stuffed chicken is a star on its own, consider serving it with some delightful sides to complete the meal. Here are a few ideas:

  • Light Salad: A fresh arugula salad with a drizzle of balsamic vinaigrette complements the richness of the chicken.
  • Mashed Potatoes: Creamy or garlic-infused mashed potatoes are perfect for soaking up any extra mushroom goodness.
  • Roasted Vegetables: Seasonal roasted veggies like asparagus or Brussels sprouts add a beautiful crunch and balance.
  • Risotto: A lemon herb risotto makes this dish feel utterly gourmet and adds a touch of elegance.

Tips for Success

Cooking should be an adventure, and with a few tips, you can elevate your experience:

  • Choose Fresh Mushrooms: Opt for firm, fresh mushrooms without blemishes. They will provide the best flavor and texture.
  • Don’t Overcrowd the Pan: When sautéing mushrooms, give them space. Overcrowding can lead to steaming rather than browning.
  • Resting is Key: Allowing the chicken to rest after baking ensures it remains juicy and tender.

Storage and Freezing

Planning for leftovers? This dish stores beautifully! Here’s how to keep it fresh:

  • Refrigeration: Place any leftover stuffed chicken in an airtight container. It will stay fresh for up to 3 days.
  • Freezing: For longer storage, wrap each stuffed chicken breast individually in plastic wrap and place them in a freezer bag. They can be frozen for up to 3 months.
  • Reheating: To reheat, pop the chicken in the oven at 350°F (175°C) for about 15-20 minutes, or until heated through. This method helps maintain that lovely texture.

Common Questions and Troubleshooting

If you’re new to cooking stuffed chicken, you might have some questions. Here are a few common concerns and solutions:

  • What if my chicken breasts are uneven? If some parts are thicker than others, consider pounding them to an even thickness before stuffing. This ensures even cooking.
  • How do I know when the chicken is done? Use a meat thermometer to check the internal temperature. It should read 165°F (74°C).
  • What if my filling is too runny? If your filling seems too wet, try reducing the amount of cream cheese or cooking the mushrooms longer to evaporate excess moisture.

Embrace the Adventure in Cooking!

Cooking is more than just putting ingredients together; it’s about celebrating flavors, textures, and the joy of creating something beautiful. This Mushroom Stuffed Chicken Breast recipe is a testament to that philosophy. It invites you to explore the depths of savory mushrooms, the richness of cheese, and the satisfaction of serving a dish that not only nourishes but also delights. So, grab your skillet and dive into this culinary adventure—your taste buds will thank you!

Mushroom Stuffed Chicken Breast - Quick and Easy

Prep Time 10 minutes
Cook Time 30 minutes
Total Time 40 minutes
Servings 4 pieces
Calories 350
A delicious and quick recipe featuring tender chicken breasts filled with savory mushroom and cheese mixture, perfect for a satisfying meal.

Ingredients

Protein

  • 2 pieces boneless, skinless chicken breasts

Vegetables

  • 1 cup mushrooms, finely chopped

Dairy

  • 1/2 cup cream cheese, softened
  • 1/4 cup grated parmesan cheese

Spices & Oils

  • 2 cloves garlic, minced
  • 1 tablespoon olive oil
  • to taste salt and pepper
  • 1 teaspoon dried thyme
  • 1 teaspoon paprika

Instructions 

  • Preheat oven to 375°F (190°C).
  • Cook garlic and mushrooms in olive oil until soft, about 5-7 minutes.
  • Mix mushrooms, cream cheese, Parmesan, thyme, salt, and pepper.
  • Cut pockets in chicken breasts, stuff with mushroom mixture, and secure.
  • Sprinkle paprika, bake for 25-30 minutes, then rest and serve.

Notes

Use toothpicks to secure the stuffed chicken if needed.
Calories: 350kcal
Cost: $15
Course: Main Course
Cuisine: American
Keyword: chicken, Mushrooms

Nutrition

Calories: 350kcal | Carbohydrates: 10g | Protein: 45g | Fat: 15g | Sodium: 600mg

Loved this recipe? Save it to your favorite Pinterest board so you can easily find it later! It’s the perfect way to keep all your sweet ideas in one place. ✨

Juicy chicken breast stuffed with mushrooms and herbs, captured in natural light.

Why This Dish Will Become a Family Favorite

When it comes to quick and delicious weeknight meals, few dishes can rival the charm of Honey Garlic Chicken Breasts. Imagine sinking your teeth into juicy chicken, perfectly seared and drizzled with a tantalizing honey garlic sauce that balances sweetness with a kick of savory flavor. This isn’t just dinner; it’s a celebration on your plate, a harmony of contrasting tastes that dance delightful on your taste buds.

This dish is not only easy to prepare but also incredibly versatile. Whether you’re looking to impress guests at a dinner party or simply whip up something satisfying for a busy weeknight, Honey Garlic Chicken Breasts is your go-to recipe. Ready in under 30 minutes, it’s a meal that’s both simple and comforting — perfect for college students learning the ropes of cooking or anyone in need of a quick, home-cooked meal.

The Magic of the Ingredients

At the heart of this recipe are a few key ingredients that come together to create a symphony of flavor:

  • 2 chicken breasts – The star of the show! Choose boneless, skinless breasts for a tender texture.
  • 1/4 cup honey – This natural sweetener adds a rich, sticky glaze that caramelizes beautifully in the oven.
  • 3 cloves garlic, minced – Fresh garlic infuses the dish with a robust flavor that complements the sweetness of the honey.
  • 2 tablespoons soy sauce – Adds a salty, umami depth that balances the sweetness perfectly.
  • 1 tablespoon olive oil – For that perfect sear and golden crust.
  • Salt and pepper to taste – Essential for enhancing all the flavors.
  • Chopped green onions for garnish – A fresh, bright finish that adds color and a hint of sharpness.

Step-by-Step Guide to Creating This Delight

A beautifully plated portion of honey garlic chicken breasts, showcasing its shiny glaze and texture with soft shadows.

Ready to embark on a culinary adventure? Follow these simple steps to create a dish that will leave everyone asking for seconds:

  1. Preheat your oven to 375°F (190°C). This ensures a perfectly cooked chicken that’s juicy on the inside and golden outside.
  2. Mix the honey garlic sauce: In a bowl, combine the honey, minced garlic, soy sauce, olive oil, salt, and pepper. Whisk until well blended.
  3. Prepare the chicken: Place the chicken breasts in a baking dish and pour the honey garlic mixture over them, ensuring they are well coated.
  4. Bake to perfection: Pop the dish in the preheated oven and bake for 25-30 minutes. Halfway through, baste the chicken with the sauce for an extra layer of flavor.
  5. Rest your chicken: Once done, remove it from the oven and let it rest for a few minutes. This locks in the juices.
  6. Garnish and serve: Sprinkle chopped green onions on top for a fresh finish and serve hot!

Exploring Variations to Elevate Your Dish

While Honey Garlic Chicken Breasts is a star on its own, don’t hesitate to experiment and make it your own. Here are some fun variations:

  • Add a spicy kick: Incorporate red pepper flakes or a splash of sriracha to the sauce for those who crave heat.
  • Switch up the protein: Try using chicken thighs for a juicier option, or substitute turkey or even tofu for a vegetarian twist.
  • Veggie infusion: Toss in some colorful bell peppers or snap peas during the last 10 minutes of baking for added nutrition and crunch.
  • Herb it up: Fresh herbs like thyme or rosemary can add a fragrant twist. Just sprinkle them in before baking!

Tips for Perfecting Your Honey Garlic Chicken

To ensure your dish turns out perfectly every time, keep these tips in mind:

  • Don’t skip the basting: Basting halfway through cooking helps to keep the chicken moist and flavorful.
  • Use a meat thermometer: The chicken is safe to eat when it reaches an internal temperature of 165°F (75°C).
  • Let it rest: Don’t rush to cut into your chicken. Allowing it to rest helps the juices redistribute, resulting in a tender bite.
  • Serve it right: Pair this dish with steamed rice or roasted vegetables to soak up that delicious sauce!

Storage and Freezing Tips

If you find yourself with leftovers (a rare occurrence with this dish, I assure you!), here’s how to store them:

  • Refrigerate: Let the chicken cool completely, then transfer it to an airtight container. It will last in the fridge for up to three days.
  • Freeze: For longer storage, freeze the chicken and sauce in a freezer-safe container for up to two months. Simply thaw overnight in the fridge before reheating.

Common Questions Answered

Can I use chicken thighs instead of breasts?

Absolutely! Chicken thighs are a great choice and will yield a richer flavor. Just adjust the cooking time as they may take a little longer to cook through.

How do I know when the chicken is done?

Use a meat thermometer to check for an internal temperature of 165°F (75°C). The chicken should be golden brown on the outside and no longer pink inside.

What can I serve with Honey Garlic Chicken?

This dish pairs beautifully with rice, steamed vegetables, and even noodles. For a lighter option, consider a fresh salad.

Can I prepare the sauce ahead of time?

Yes, you can make the sauce up to two days in advance. Store it in the fridge and reheat before using.

Key Takeaways

Honey Garlic Chicken Breasts is more than just a recipe; it’s an experience that brings the family together around the dinner table. Its easy preparation makes it a favorite for all skill levels, whether you’re a seasoned chef or a kitchen novice. With its perfect balance of sweetness and savory depth, this dish is sure to become a staple in your home. So, gather your ingredients, embrace the adventure of cooking, and get ready to enjoy a meal that’s delicious and unforgettable!

Now that you’re equipped with all the tips and tricks, it’s time to put on your apron, turn up the heat, and create a dish that will not only satisfy your hunger but also ignite your passion for cooking. Happy cooking!

Honey Garlic Chicken Breasts

Prep Time 10 minutes
Cook Time 25 minutes
Total Time 35 minutes
Servings 4 pieces
Calories 350
A quick and flavorful dish featuring tender chicken breasts glazed with a sweet and savory honey garlic sauce.

Ingredients

Main Ingredients

  • 2 pieces chicken breasts
  • 1/4 cup honey
  • 3 cloves garlic, minced
  • 2 tablespoons soy sauce
  • 1 tablespoon olive oil
  • to taste salt and pepper (for seasoning)
  • chopped green onions for garnish

Instructions 

  • Preheat oven to 375°F (190°C).
  • Mix honey, garlic, soy sauce, olive oil, salt, and pepper.
  • Place chicken in a baking dish and pour sauce over.
  • Bake for 25-30 minutes, basting halfway.
  • Let rest, then garnish with green onions before serving.

Notes

For extra flavor, marinate the chicken for 30 minutes before baking.
Calories: 350kcal
Cost: $12
Course: Main Course
Cuisine: American
Keyword: chicken, garlic, honey

Nutrition

Calories: 350kcal | Carbohydrates: 40g | Protein: 30g | Fat: 10g | Sodium: 700mg

Loved this recipe? Save it to your favorite Pinterest board so you can easily find it later! It’s the perfect way to keep all your sweet ideas in one place. ✨

Tender chicken breasts coated in honey garlic sauce, captured in warm natural light, accentuating the dish’s appeal.

Unleash the Flavor: The Cheesy Cauliflower Casserole That Will Set Your Taste Buds Ablaze

Welcome to the ultimate culinary adventure! If you think of cauliflower as just a bland vegetable, think again. This cheesy cauliflower casserole is your ticket to a world of bold flavors and creamy textures that will redefine your perception of this humble vegetable. With each bite, you’ll experience the perfect balance of spicy, cheesy goodness that will have your taste buds dancing! Get ready to spice up your comfort food game with a dish that warms both the heart and the palate.

Why You’ll Love This Recipe

This isn’t just any casserole; this is a celebration of flavor! Here are five reasons why this cheesy cauliflower casserole will become a staple in your kitchen:

  • Rich and Creamy Delight: The combination of heavy cream, cream cheese, and two types of cheese creates a sauce that’s decadently creamy without overwhelming your taste buds.
  • Flavor-Packed: Infused with garlic, onion powder, and a hint of paprika, each bite bursts with flavor, turning your side dish into the star of the meal.
  • Low Carb Option: Perfect for those following low-carb diets, this casserole is a satisfying replacement for traditional pasta or rice dishes.
  • Quick and Easy: With straightforward steps and common ingredients, this recipe is perfect for weeknight dinners or last-minute gatherings.
  • Versatile: This cheesy delight pairs beautifully with various main courses, making it a versatile addition to your meal rotation.

Ingredients Breakdown: What You Need

Let’s dive into the ingredients that make this casserole shine! Here’s what you’ll need:

  • 1 large head of cauliflower: Cut into florets. Look for fresh, firm heads with tightly packed, creamy-white florets.
  • 1 cup heavy cream: This adds a rich creaminess to the dish.
  • 2 cups shredded cheddar cheese: Choose a sharp variety for added flavor.
  • 1/2 cup grated Parmesan cheese: For a nutty, salty kick.
  • 1/4 cup cream cheese: Softened for easy mixing and extra creaminess.
  • 2 cloves garlic: Minced to infuse a robust flavor.
  • 1 teaspoon onion powder: For depth of flavor without the crunch of fresh onions.
  • Salt and pepper to taste: Essential for enhancing all the flavors.
  • 1/2 teaspoon paprika (optional): Adds a smoky dimension.
  • Fresh parsley for garnish (optional): A pop of color on your plate!

Pro Tips for Casserole Perfection

Side view of a creamy cauliflower casserole, showing layers of cheese and cauliflower florets.

Ready to elevate your cooking? Here are some expert insights to ensure your casserole is nothing short of perfection:

  • Choose the right cauliflower: Opt for cauliflower heads that feel heavy for their size, with no blemishes.
  • Don’t overcook the cauliflower: Aim for tender but still firm florets to prevent a mushy casserole.
  • Whip the cream cheese: For a smoother sauce, beat the cream cheese until fluffy before mixing.
  • Experiment with cheeses: Feel free to mix in Gruyère or mozzarella for a unique flavor profile.
  • Use fresh garlic: Freshly minced garlic packs a more potent punch compared to pre-minced options.
  • Let it rest: Allow the casserole to sit for a few minutes after baking for easier serving.
  • Top with breadcrumbs: For added crunch, sprinkle some seasoned breadcrumbs or panko on top before baking.
  • Make ahead: Prepare the casserole a day in advance and refrigerate it. Just bake it before serving!

Avoid Common Mistakes and Troubleshooting

Even the best chefs face challenges! Here are some common pitfalls and how to avoid them:

  • Mushy texture: Ensure you steam the cauliflower just until tender; overcooking will ruin the dish.
  • Runny sauce: If your cheese sauce is too thin, try reducing the heavy cream slightly before mixing.
  • Not enough flavor: Always taste and adjust seasoning! Don’t be shy with the salt and pepper.
  • Cheese clumping: Gradually add shredded cheese to the warm cream mixture to prevent clumping.

Delicious Variations to Try

Feeling adventurous? Here are some fun variations to keep this recipe fresh:

  • Spicy Kick: Add chopped jalapeños or a pinch of cayenne pepper for a fiery twist.
  • Herbed Delight: Mix in fresh herbs like thyme or rosemary for an aromatic experience.
  • Bacon Lovers: Fold in crispy bacon bits for an indulgent flavor boost.
  • Veggie Medley: Toss in other vegetables like broccoli or bell peppers for added nutrition and color.

Storage and Make-Ahead Instructions

Got leftovers? Here’s how to store them properly:

  • Refrigerate: Store in an airtight container for up to 3-4 days. Reheat in the oven for best results.
  • Freeze: You can freeze the casserole for up to 2 months. Thaw overnight in the fridge before baking.
  • Make-Ahead: Assemble the casserole up to a day in advance, cover, and refrigerate until you’re ready to bake.

Frequently Asked Questions

Got questions? Here’s what you need to know:

  • Can I use frozen cauliflower? Yes, but be sure to thaw and drain well to prevent excess moisture.
  • Is this casserole suitable for a low-carb diet? Absolutely! This cheesy delight is perfect for low-carb and keto diets.
  • How can I make this recipe dairy-free? Substitute the cheeses with dairy-free alternatives and use coconut cream instead of heavy cream.
  • Can I add meat to this dish? Yes! Cooked chicken or turkey can be added for a heartier meal.
  • How do I know when it’s done baking? Look for a bubbly, golden top; a toothpick should come out clean when inserted.
  • What can I serve this casserole with? It pairs wonderfully with grilled meats, salads, or as a standalone dish.
  • Can I adjust the spice level? Absolutely! Modify the amount of paprika or skip the spice altogether for a milder version.
  • What’s a good side for this casserole? A crisp green salad or steamed vegetables complement it perfectly.

Nutritional Tips and Dietary Adaptations

This casserole is not just delicious; it can be nutritious too! Here are some tips to enhance its health benefits:

  • Choose low-fat cheese: For a lighter version, opt for low-fat versions of cream cheese and cheddar.
  • Increase fiber: Add beans or lentils into the mix for an extra fiber boost.
  • Make it gluten-free: Ensure all ingredients are certified gluten-free, especially the cheese.

Essential Equipment

To make this casserole a success, here are some must-have kitchen tools:

  • 9×13-inch baking dish: Perfect for even baking.
  • Large mixing bowl: Ideal for combining your creamy sauce and cauliflower.
  • Steamer basket or pot: For steaming the cauliflower to perfection.
  • Measuring cups and spoons: Accuracy in ingredients is key to success!

Serving Suggestions

When it comes to serving this cheesy delight, consider these options:

  • Garnish with parsley: A sprinkle of fresh parsley not only adds color but also a fresh taste.
  • Pair with a protein: Serve alongside roasted chicken or grilled steak for a complete meal.
  • Perfect for potlucks: This casserole is always a hit at gatherings, so don’t hesitate to bring it along!

In conclusion, this cheesy cauliflower casserole is more than just a side dish; it’s a flavorful journey that transforms the ordinary into the extraordinary. Embrace the adventure of cooking and let each bite remind you of the joy that comes from experimenting with spices and flavors. So grab your skillet, preheat that oven, and prepare to savor a dish that’s sure to become a favorite at your table. Happy cooking!

Cheesy Cauliflower Casserole Recipe

Prep Time 10 minutes
Cook Time 30 minutes
Total Time 40 minutes
Servings 6 servings
Calories 350
A creamy, cheesy cauliflower casserole that's perfect as a side dish or comfort food. Easy to prepare and full of flavor.

Ingredients

Cauliflower

  • 1 large head cauliflower, cut into florets
  • 1 cup heavy cream
  • 2 cups shredded cheddar cheese
  • 1/2 cup grated Parmesan cheese
  • 1/4 cup cream cheese, softened
  • 2 cloves garlic, minced
  • 1 teaspoon onion powder
  • to taste Salt and pepper
  • 1/2 teaspoon paprika (optional)
  • for garnish Fresh parsley (optional)

Instructions 

  • Preheat oven to 375°F (190°C). Steam cauliflower for 5-7 minutes, drain well.
  • Mix heavy cream, cream cheese, garlic, onion powder, salt, pepper, and paprika until smooth.
  • Fold in cheddar and half of Parmesan into the mixture. Add cooked cauliflower and coat evenly.
  • Transfer to a greased 9×13-inch dish, top with remaining Parmesan, and bake for 25-30 minutes until bubbly and golden.
  • Garnish with parsley if desired. Serve warm.

Notes

For a richer flavor, add a pinch of nutmeg or a dash of hot sauce.
Calories: 350kcal
Cost: $15
Course: Side Dish
Cuisine: American
Keyword: Cauliflower

Nutrition

Calories: 350kcal | Carbohydrates: 20g | Protein: 15g | Fat: 25g | Sodium: 600mg

Why You’ll Love These Zesty Bites

Ah, the magic of a good snack! It’s a little burst of joy that can turn a mundane moment into something special. Enter the Zesty Lemon Bliss Balls — a delightful treat that captures the sunny essence of lemon in every bite! These little gems are not just a snack; they are a celebration of zest, energy, and a hint of sweetness that keeps your taste buds dancing. Perfect for any occasion, whether you need a quick pick-me-up in the afternoon or a refreshing dessert after dinner, these bliss balls are your new best friend.

Made with wholesome ingredients, they offer a guilt-free indulgence that aligns with your health goals while satisfying your cravings. With the bright tang of lemon, the nutty flavor of almond flour, and the natural sweetness of dates, each bite is a refreshing experience that will uplift your spirits. Let’s dive deeper into this recipe and explore the vibrant world of Zesty Lemon Bliss Balls!

Ingredients to Spark Your Culinary Creativity

Gathering the right ingredients is the first step in any culinary adventure. Here’s what you’ll need to create these zesty delights:

  • 1 cup almond flour: This nutty base adds a wonderful texture and a dose of healthy fats.
  • 1/2 cup pitted dates: These natural sweeteners bring a caramel-like sweetness to the mix.
  • 1/4 cup shredded coconut: For a tropical twist and a chewy texture that complements the lemon perfectly.
  • 2 tablespoons lemon juice: Freshly squeezed lemon juice is essential for that zesty punch.
  • Zest of 1 lemon: Adds an extra layer of lemon flavor that’s simply irresistible.
  • 1 tablespoon maple syrup: This sweet addition enhances the overall flavor while keeping it natural.
  • 1/4 teaspoon salt: A pinch of salt balances the sweetness and elevates the flavors.
  • 1 tablespoon coconut oil (melted): This helps bind everything together and adds a subtle richness.

Crafting Your Zesty Lemon Bliss Balls

A delicious arrangement of Zesty Lemon Bliss Balls, showcasing their bright lemon color and coconut topping.

Now that you have your ingredients, let’s roll up our sleeves and get to work on these bliss balls! The process is as easy as it is satisfying.

Step-by-Step Instructions

  1. In a food processor, combine the almond flour, pitted dates, shredded coconut, lemon juice, lemon zest, maple syrup, salt, and melted coconut oil.
  2. Blend the mixture until it’s well combined and sticky. You want it to hold together when you press it with your fingers.
  3. Using your hands, roll the mixture into small balls, about 1 inch in diameter. Feel free to get creative with the size — go smaller for bite-sized snacks or larger for a more substantial treat!
  4. Place the balls on a parchment-lined tray to keep things tidy.
  5. Refrigerate the tray for at least 30 minutes to firm up the bliss balls. This step is crucial for achieving the perfect texture.
  6. Once they’re chilled, enjoy your Zesty Lemon Bliss Balls as a refreshing snack that’s bursting with flavor!

Tips for Perfect Bliss Balls

Making these bliss balls is a breeze, but here are some tips to ensure your experience is smooth and delicious:

  • Use fresh ingredients: Fresh lemons and high-quality dates will enhance the flavor of your bliss balls.
  • Don’t skip the chilling: Chilling the balls not only helps them firm up but also intensifies the flavors.
  • Experiment with textures: If you prefer a coarser texture, pulse the mixture less in the food processor.
  • Make a big batch: These bliss balls are perfect for meal prep. Make a double batch, and you’ll have snacks ready for the week!

Flavor Variations to Explore

The beauty of these bliss balls is their versatility. Once you’ve mastered the basic recipe, consider these fun variations:

  • Add nuts: Throw in some chopped walnuts or pecans for an extra crunch.
  • Boost the protein: Mix in some protein powder for a post-workout snack.
  • Spice it up: Add a pinch of cayenne or ground ginger for a surprising kick!
  • Change the fruit: Swap lemon for lime or orange to explore different citrus flavors.

Substitutions to Fit Your Needs

Don’t have all the ingredients on hand? No problem! Here are some substitutions you can make:

  • Almond flour: You can replace it with oat flour or cashew flour for a different nutty flavor.
  • Pitted dates: If you’re out of dates, try using raisins or dried apricots.
  • Shredded coconut: For a nut-free version, omit the coconut or replace it with sunflower seeds.

Essential Equipment for Success

Before you begin, gather these essential tools to streamline your cooking process:

  • Food processor: This is crucial for blending your ingredients into a sticky, cohesive mixture.
  • Parchment paper: Line your tray with parchment to prevent sticking and make cleanup a breeze.
  • Measuring cups and spoons: Accurate measurements are key to achieving the perfect flavor balance.

Storage and Freezing Tips

Once you’ve made your Zesty Lemon Bliss Balls, you’ll want to know how to keep them fresh:

  • Refrigeration: Store any leftovers in an airtight container in the fridge for up to a week.
  • Freezing: If you want to make them last longer, freeze the bliss balls in a single layer on a baking sheet. Once frozen, transfer them to a freezer-safe bag. They’ll keep for up to three months!

Frequently Asked Questions

Can I make these bliss balls vegan?

Absolutely! This recipe is already vegan-friendly as it uses natural sweeteners and plant-based ingredients.

What if I don’t have a food processor?

If you don’t have a food processor, you can finely chop the dates and mix the ingredients by hand. Just make sure to mash the dates well to achieve a sticky consistency.

Are these bliss balls gluten-free?

Yes! Made with almond flour and other gluten-free ingredients, these bliss balls are safe for those avoiding gluten.

Troubleshooting Common Issues

Even the best of us can run into challenges in the kitchen. Here’s how to tackle some common problems:

  • Too crumbly: If your mixture is too dry and crumbly, add a bit more coconut oil or lemon juice to help it stick together.
  • Too sticky: If the mixture is too sticky to roll, chill it for a bit longer in the fridge before shaping.

Wrapping Up Your Zesty Adventure

Cooking is all about exploration, and these Zesty Lemon Bliss Balls are the perfect canvas for your culinary creativity. With their vibrant flavors and simple preparation, they invite you to indulge your adventurous spirit while keeping health in mind.

Whether you’re snacking on them during a movie night, sharing them at a birthday party, or simply enjoying a peaceful moment with a cup of tea, these bliss balls deliver joy in every bite. So, roll up your sleeves, embrace the zest of life, and let these delightful treats inspire your culinary journey. Happy cooking, and remember — every meal is an adventure waiting to be had!

Zesty Lemon Bliss Balls

Prep Time 10 minutes
Total Time 10 minutes
Servings 12 pieces
Calories 150
These refreshing lemon bliss balls are a perfect healthy snack, combining zesty citrus flavor with natural sweetness.

Ingredients

Base

  • 1 cup almond flour
  • 1/2 cup pitted dates
  • 1/4 cup shredded coconut
  • 2 tablespoons lemon juice
  • zest of 1 lemon lemon zest
  • 1 tablespoon maple syrup
  • 1/4 teaspoon salt
  • 1 tablespoon coconut oil (melted)

Instructions 

  • Combine all ingredients in a food processor until sticky and well mixed.
  • Roll mixture into 1-inch balls and place on parchment-lined tray.
  • Refrigerate for at least 30 minutes to set.
  • Enjoy your zesty lemon bliss balls as a refreshing snack!

Notes

Store in the refrigerator for best freshness.
Calories: 150kcal
Cost: $8
Course: Snack
Cuisine: Healthy
Keyword: lemon

Nutrition

Calories: 150kcal | Carbohydrates: 20g | Protein: 3g | Fat: 8g | Sodium: 50mg

Loved this recipe? Save it to your favorite Pinterest board so you can easily find it later! It’s the perfect way to keep all your sweet ideas in one place. ✨

Soft, warm-lit image of Zesty Lemon Bliss Balls, emphasizing their round shape and inviting texture.

Why You’ll Love These Muffins

Cooking is all about passion, and these Deliciously Easy Air Fryer Banana Bread Muffins embody that spirit. Imagine waking up to the sweet, inviting aroma of freshly baked muffins wafting through your kitchen, igniting your morning with a burst of flavor and warmth. These muffins are not just your average breakfast; they’re a delightful embrace of comfort and creativity that will elevate your mornings and fill your home with a sense of joy.

Made in the air fryer, they offer a hassle-free alternative to traditional baking methods, ensuring you get perfectly moist and fluffy muffins every time. The beauty of using the air fryer is that it cooks faster and more evenly, which means less waiting and more indulging. With just a handful of simple ingredients, you’ll create a treat that’s not only delicious but also incredibly easy to whip up. So, grab your ripened bananas, and let’s dive into this culinary adventure!

Ingredients for Your Muffins

Let’s get right to the heart of the matter! Here’s what you need to gather for these scrumptious muffins:

  • 3 ripe bananas, mashed
  • 1/3 cup melted butter
  • 1/2 cup sugar
  • 1 large egg, beaten
  • 1 teaspoon vanilla extract
  • 1 teaspoon baking soda
  • Pinch of salt
  • 1 cup all-purpose flour

How to Prepare Your Muffins

Deliciously baked Banana Bread Muffins, featuring a moist interior and a golden crust.

Now that you have your ingredients ready, let’s roll up our sleeves and get baking! Follow these simple steps to create the most delightful muffins:

  1. In a mixing bowl, combine the mashed bananas and melted butter until well mixed.
  2. Stir in the sugar, beaten egg, and vanilla extract until smooth.
  3. Add the baking soda and salt, mixing until combined.
  4. Gradually fold in the flour until just incorporated; do not overmix.
  5. Preheat your air fryer to 320°F (160°C).
  6. Line a muffin tin with paper liners or spray with cooking spray.
  7. Spoon the batter evenly into the muffin cups, filling each about 2/3 full.
  8. Place the muffin tin in the air fryer basket and cook for 12-15 minutes, or until a toothpick inserted comes out clean.
  9. Allow muffins to cool for a few minutes before transferring to a wire rack to cool completely.

Tips for Success with Air Fryer Banana Bread Muffins

To guarantee that your muffins turn out perfectly every time, here are some tried-and-true tips:

  • Use Overripe Bananas: The riper the bananas, the sweeter and more flavorful your muffins will be. Look for bananas with brown spots for maximum sweetness.
  • Don’t Overmix: When folding in the flour, mix until just combined. Overmixing can lead to dense muffins. You want light and fluffy!
  • Check Doneness Early: Every air fryer is different, so keep an eye on your muffins. Start checking for doneness at the 12-minute mark.
  • Let Them Cool: Allowing the muffins to cool slightly in the tin will help them set and make them easier to remove without falling apart.

Variations on Air Fryer Banana Bread Muffins

Feeling adventurous? Here are some fun variations to take your muffins to the next level:

  • Chocolate Chip Banana Muffins: Stir in 1/2 cup of semi-sweet chocolate chips for a decadent twist.
  • Nuts Galore: Add 1/2 cup of chopped walnuts or pecans for a satisfying crunch.
  • Cinnamon Swirl: Mix 1 teaspoon of cinnamon into the dry ingredients, or create a cinnamon-sugar swirl by adding a mixture of sugar and cinnamon to the batter.
  • Fruity Add-ins: Toss in some blueberries or chopped strawberries for a fruity explosion!

Substitutions to Consider

Life happens, and sometimes you might not have everything on hand. Here are a few substitutions you can make:

  • Butter Substitute: You can use melted coconut oil or applesauce instead of butter for a lighter option.
  • Gluten-Free Option: Swap all-purpose flour with a gluten-free flour blend to cater to dietary restrictions.
  • Vegan Alternative: Replace the egg with a flax egg (1 tablespoon flaxseed meal mixed with 2.5 tablespoons water) and use a plant-based butter alternative.

Equipment Needed

You don’t need a fancy kitchen to make these muffins. Here’s what you’ll need:

  • Mixing bowl
  • Measuring cups and spoons
  • Air fryer
  • Muffin tin (preferably silicone or metal)
  • Spatula or wooden spoon

Storage & Freezing Instructions

These muffins are perfect for meal prep and can be stored to enjoy later:

  • Room Temperature: Store in an airtight container for up to 3 days.
  • Refrigerator: For longer freshness, keep them in the fridge for up to a week.
  • Freezer: Seal muffins in a freezer-safe bag or container. They can be frozen for up to 3 months. When you’re ready to enjoy, simply thaw at room temperature or pop them in the microwave for a quick warm-up!

FAQs About Air Fryer Banana Bread Muffins

Got questions? I’ve got answers! Here are some common queries:

  • Can I make mini muffins? Absolutely! Just reduce the cooking time to around 8-10 minutes.
  • What if my batter is too thick? If your batter seems too thick, add a splash of milk or water for better consistency.
  • Can I double this recipe? Yes! Just make sure your air fryer can accommodate the larger muffin tin, or bake in batches.

Troubleshooting Common Issues

If things don’t go as planned, don’t worry! Here’s how to troubleshoot:

  • Muffins are too dense: This can happen from overmixing. Be gentle with the batter.
  • Muffins are too dry: Ensure your bananas are sufficiently ripe and moist. If you’re using a different flour, it might absorb moisture differently.
  • Muffins are not cooking through: Check your air fryer’s temperature calibration and adjust cooking time as needed.

Embracing Your Culinary Adventure

There you have it! With these Deliciously Easy Air Fryer Banana Bread Muffins, you’re not just making breakfast; you’re creating an experience. These muffins are a celebration of flavor, warmth, and the sheer joy of cooking. Whether you enjoy them on a busy weekday morning or as a treat for brunch with friends, they are bound to brighten your day.

So don’t hold back! Embrace the adventure of baking with heat and the thrill of experimenting in your kitchen. Each muffin tells a story, and I can’t wait for you to create memories around the table with these delightful treats. Happy baking, and may your mornings be filled with bliss!

Deliciously Easy Air Fryer Banana Bread Muffins You'll Love!

Prep Time 10 minutes
Cook Time 15 minutes
Total Time 25 minutes
Servings 12 muffins
Calories 180
Enjoy moist and flavorful banana bread muffins made effortlessly in your air fryer, perfect for a quick snack or breakfast.

Ingredients

Bananas

  • 3 pieces ripe bananas, mashed
  • 1/3 cup melted butter
  • 1/2 cup sugar
  • 1 large egg, beaten
  • 1 teaspoon vanilla extract
  • 1 teaspoon baking soda
  • pinch salt
  • 1 cup all-purpose flour

Instructions 

  • Mix mashed bananas and melted butter until combined.
  • Stir in sugar, beaten egg, and vanilla extract.
  • Add baking soda and salt, mix well.
  • Fold in flour until just combined.
  • Preheat air fryer to 320°F (160°C). Fill muffin cups 2/3 full.
  • Cook for 12-15 minutes, cool before serving.

Notes

Use ripe bananas for best flavor and sweetness.
Calories: 180kcal
Cost: $10
Course: Breakfast, Snack
Cuisine: American
Keyword: air fryer, Banana, Muffins

Nutrition

Calories: 180kcal | Carbohydrates: 30g | Protein: 3g | Fat: 6g | Sodium: 150mg

Loved this recipe? Save it to your favorite Pinterest board so you can easily find it later! It’s the perfect way to keep all your sweet ideas in one place. ✨

Arrangement of fluffy Air Fryer Banana Bread Muffins with a rich, inviting color.

Unleash the Flavor: The Ultimate Broccoli Casserole Recipe

Welcome to a culinary adventure that transforms the humble broccoli into a star-studded casserole! This Broccoli Casserole with Ritz Crackers is not just a dish; it’s a celebration of flavors that dance together in perfect harmony. Whether you’re hosting a festive gathering or just want to spice up your weeknight dinner, this recipe is here to wow your taste buds and warm your heart.

In this article, we’ll walk through the ins and outs of creating this mouthwatering casserole that features sharp cheddar, savory mushrooms, and a crunchy topping that will have everyone coming back for seconds. Ready to dive in? Let’s get cooking!

Why You’ll Love This Recipe

  • Irresistible Flavor: The combination of sharp cheddar and savory mushrooms creates a depth of flavor that elevates this dish beyond the ordinary.
  • Crowd-Pleaser: Perfect for holidays, potlucks, or cozy family dinners, this casserole is sure to impress your guests.
  • Easy to Prepare: With just a few simple steps, you can whip up this delicious side dish without spending all day in the kitchen.
  • Versatile Ingredient Options: You can easily customize the recipe to fit your dietary needs or preferences, making it a go-to for everyone.
  • Perfect Make-Ahead Dish: This casserole stores well, making it the ideal choice for meal prep or leftovers.

Ingredient Breakdown

Let’s dive into the ingredients that make this broccoli casserole a beloved classic. Here’s what you’ll need:

  • 12 oz frozen broccoli florets: Provides the star ingredient, but feel free to use fresh broccoli if you prefer a crunchier texture.
  • 1 small yellow onion (diced): Adds sweetness and depth to the dish.
  • 5 cloves garlic (minced): Because garlic makes everything better, right?
  • 8 oz mushrooms (diced): Their umami flavor complements the broccoli beautifully.
  • 1/4 teaspoon salt: To enhance all the flavors.
  • 1 tablespoon olive oil (or butter): For sautéing the vegetables to perfection.
  • 2/3 cup sour cream: Adds creaminess and tang!
  • 10.5 oz cream of mushroom soup: A classic ingredient that binds everything together.
  • 2 cups sharp cheddar cheese (freshly grated): The more cheese, the better! It offers a rich, sharp flavor.
  • 1 sleeve of Ritz crackers (crushed): This is the topping that gives your casserole that irresistible crunch.

Expert Tips for the Best Broccoli Casserole

Side angle of Broccoli Casserole featuring melted cheese and a crunchy cracker topping.
  • Quality Ingredients: Use fresh ingredients whenever possible for the best flavor and texture.
  • Don’t Overcook the Broccoli: If you’re using fresh broccoli, blanch it lightly to keep it crisp in the casserole.
  • Mix the Cheese: For an extra flavor kick, mix different types of cheese like mozzarella or gouda with the sharp cheddar.
  • Adjust the Creaminess: If you prefer a creamier casserole, add more sour cream or cream of mushroom soup.
  • Layering is Key: Make sure to spread the mixture evenly in the dish for consistent cooking.
  • Watch the Bake Time: Keep an eye on the casserole while it bakes to avoid over-browning the crackers.
  • Leftovers are Gold: This casserole tastes even better the next day, making it perfect for meal prep!
  • Experiment with Spices: Add a pinch of cayenne or smoked paprika for a delightful twist!

Common Mistakes to Avoid

Even seasoned cooks can have mishaps! Here are some common pitfalls to watch out for:

  • Using Frozen Broccoli Cuts: Always opt for florets; they hold their shape better in the casserole.
  • Not Sautéing the Vegetables: Sautéing brings out flavors; don’t skip this step!
  • Overbaking: If the casserole is baked too long, it may dry out. Keep it moist and bubbly!
  • Forgetting the Cheese: Yes, this is a cheese casserole! Don’t skimp on the cheese topping!

Variations to Try

Like to mix things up? Here are some fun variations you can try:

  • Meat Lover’s Casserole: Add cooked and crumbled sausage or shredded chicken for a heartier dish.
  • Vegan Option: Substitute dairy ingredients with vegan sour cream, cheese, and use vegetable broth instead of cream of mushroom soup.
  • Cheesy Spinach and Broccoli: Mix in fresh spinach for an extra nutritional boost!
  • Spicy Kick: Add diced jalapeños or a dash of hot sauce for those who crave heat.

Make-Ahead and Storage Instructions

This dish is ideal for meal prep and entertaining. Here’s how to do it:

  • Make Ahead: Prepare the casserole up to the baking point, cover it, and store it in the refrigerator for up to 24 hours before baking.
  • Freezing: Assemble the casserole and freeze it unbaked. To bake, just add an extra 10-15 minutes to the cooking time.
  • Leftover Storage: Store leftovers in an airtight container in the fridge for up to 3 days.

Frequently Asked Questions

  • Can I use fresh broccoli instead of frozen? Absolutely! Just blanch it lightly first.
  • What if I don’t have Ritz crackers? You can use any buttery cracker or even breadcrumbs as a topping.
  • Can I make this casserole gluten-free? Yes! Use gluten-free crackers or breadcrumbs.
  • How can I add protein to this dish? Consider adding shredded chicken or cooked bacon for a hearty twist.
  • Can I prepare this in advance? Yes! It stores well in the fridge and can also be frozen.
  • Is there a vegetarian option? Yes! Simply omit any meat and enjoy the rich flavors of the vegetables and cheese.
  • What sides pair well with broccoli casserole? This dish works beautifully with roasted meats, salads, or even a light soup.
  • How do I prevent the casserole from being too dry? Ensure ingredients are mixed well and monitor the baking time closely.

Nutrition Tips and Dietary Adaptations

For those watching their diet, here are some options to make this casserole healthier:

  • Low-Fat Dairy: Use low-fat sour cream and cheese to reduce calories.
  • Increase Vegetables: Add more veggies like bell peppers or zucchini for added nutrients.
  • Whole Grain Crackers: Opt for whole grain or seed-based crackers for more fiber.

Essential Equipment

Here’s what you’ll need to create this delicious casserole:

  • Large Skillet: For sautéing your vegetables perfectly.
  • Mixing Bowl: To combine all the ingredients seamlessly.
  • Casserole Dish: A 2-quart dish is ideal for this recipe.
  • Sharp Knife and Cutting Board: For prepping your veggies with ease.

Serving Suggestions

When it’s time to serve this beauty, consider these delightful pairings:

  • Roast Chicken: The flavors meld beautifully, making a complete meal.
  • Simple Green Salad: A refreshing salad complements the richness of the casserole.
  • Garlic Bread: Perfect for scooping up every last bite!

Conclusion

In conclusion, this Broccoli Casserole with Ritz Crackers is more than just a side dish; it’s a delicious journey into the world of flavor. With its creamy texture, cheesy goodness, and crunchy topping, it’s bound to become a staple in your kitchen. So grab your ingredients, unleash your inner chef, and let’s create something unforgettable together! Remember, cooking is an adventure, so add your unique twist, and most importantly, enjoy every bite!

Broccoli Casserole With Ritz Crackers

Prep Time 10 minutes
Cook Time 30 minutes
Total Time 40 minutes
Servings 4 servings
Calories 450
A creamy, cheesy broccoli casserole topped with crunchy Ritz crackers, perfect for a comforting family dinner.

Ingredients

Vegetables

  • 12 oz frozen broccoli florets
  • 1 small yellow onion (diced)
  • 5 cloves garlic (minced)
  • 8 oz mushrooms (diced into small pieces)
  • 1/4 teaspoon salt
  • 1 tablespoon olive oil (or butter)
  • 2/3 cup sour cream
  • 10.5 oz cream of mushroom soup
  • 2 cups sharp cheddar cheese (freshly grated)
  • 1 sleeve ritz crackers (crushed)

Instructions 

  • Sauté mushrooms, garlic, onion, olive oil, and salt in a skillet for 10 minutes.
  • Mix 1 cup of cheddar, mushroom soup, sour cream, broccoli, and mushroom mixture in a bowl.
  • Pour into greased casserole, top with remaining cheddar, and sprinkle crushed crackers.
  • Bake at 350°F (175°C) for 25-35 minutes until golden and bubbly.

Notes

For extra flavor, add a dash of pepper or paprika before baking.
Calories: 450kcal
Cost: $15
Course: Main Course
Cuisine: American
Keyword: Broccoli

Nutrition

Calories: 450kcal | Carbohydrates: 40g | Protein: 20g | Fat: 25g | Sodium: 900mg

Why You’ll Love This Recipe

When the days grow shorter and the evenings turn chilly, there’s nothing quite like the warm embrace of a hearty meal simmering away in your kitchen. Enter my High Protein Slow Cooker Garlic Butter Beef Bites—a dish that promises not only to tantalize your taste buds but also to fill your home with the irresistible aroma of roasted garlic and rich beef. This recipe is a celebration of comfort food that nourishes both body and soul, making it perfect for family gatherings, cozy dinners, or a simple night in with a good book.

Imagine sinking your fork into tender, juicy beef, each bite perfectly coated in a luscious garlic butter sauce. This dish is not just a meal; it’s an experience that invites you to savor every moment. Plus, with all that protein packed in, it’s a healthy option that keeps you feeling satisfied and energized.

Gather These Ingredients

Before you embark on this culinary adventure, let’s make sure you have all the necessary ingredients ready to go. Here’s what you’ll need for my High Protein Slow Cooker Garlic Butter Beef Bites:

  • 2 pounds beef sirloin: Cut into bite-sized pieces. Look for well-marbled cuts for maximum flavor.
  • 1/2 cup unsalted butter: This will create that rich, buttery sauce we all crave.
  • 5 cloves garlic: Minced. Garlic is the star here, infusing the dish with incredible flavor.
  • 1 tablespoon soy sauce: Adds depth and umami to the beef.
  • 1 teaspoon salt: A crucial seasoning to enhance the flavors.
  • 1/2 teaspoon black pepper: For a touch of heat.
  • 1 teaspoon paprika: Adds a mild smokiness and vibrant color.
  • 1 teaspoon dried thyme: A fragrant herb that complements the beef beautifully.
  • 1/2 teaspoon red pepper flakes (optional): For those who like a little kick!
  • Fresh parsley: Chopped, for garnish. A pop of color and freshness to finish the dish.

Preparing High Protein Slow Cooker Garlic Butter Beef Bites

Tender beef pieces coated in garlic butter, garnished with parsley on a plate.

Cooking this dish is not only easy but incredibly satisfying. The slow cooker does all the hard work for you, allowing the flavors to meld and intensify. Here’s how to bring it all together:

  1. Layer the Beef: In your slow cooker, add the beef sirloin pieces. Make sure they’re spread out evenly for even cooking.
  2. Make the Garlic Butter: In a saucepan, melt the unsalted butter over medium heat. Once it’s bubbling and frothy, add the minced garlic and sauté for 1-2 minutes until fragrant but not burnt. This step is crucial as it unlocks the flavor of the garlic.
  3. Season It Up: Stir in the soy sauce, salt, black pepper, paprika, dried thyme, and if desired, the red pepper flakes. Mix well to ensure all the ingredients are incorporated.
  4. Combine Everything: Pour that aromatic garlic butter mixture over the beef in the slow cooker, ensuring every piece is coated in that delicious sauce.
  5. Time to Cook: Cover your slow cooker and set it to cook on low for 6-8 hours, or on high for 3-4 hours. The goal is to have the beef tender and melt-in-your-mouth.
  6. Finish and Serve: Once cooked, give the beef a gentle stir to mix in all the flavors and garnish with chopped parsley before serving. Enjoy this dish hot, and watch as your family gathers around the table, drawn in by the mouthwatering aroma.

Best Way to Enjoy It

The beauty of this dish lies in its versatility. While the garlic butter beef bites are delightful on their own, consider pairing them with:

  • Crusty Bread: Perfect for soaking up every last drop of that luscious sauce.
  • Rice or Quinoa: Serve it over a bed of fluffy rice or nutty quinoa for a wholesome meal.
  • Fresh Salad: A light, crunchy salad on the side can balance the richness of the beef.

Storage and Reheating Tips

If you’re lucky enough to have leftovers, you’re in for a treat! Here’s how to store and reheat your garlic butter beef bites:

  • Refrigeration: Store any leftovers in an airtight container in the fridge for up to 3-4 days.
  • Freezing: Want to save some for later? This dish freezes beautifully! Allow it to cool completely before transferring it to a freezer-safe container. It can last up to 3 months in the freezer.
  • Reheating: When you’re ready to enjoy your leftovers, reheat them in a saucepan over low heat. Add a splash of broth or water to revive that creamy garlic butter sauce.

Pro Chef Tips

Ready to take your cooking game to the next level? Here are some expert tips to enhance your High Protein Garlic Butter Beef Bites:

  • Browning the Beef: If you have the time, sear the beef in a skillet before adding it to the slow cooker. This extra step develops a deeper flavor.
  • Experiment with Herbs: Don’t be afraid to play with the herbs! Fresh thyme or rosemary can add a beautiful aromatic touch.
  • Customize the Spices: Feel free to adjust the seasoning to your liking. Want it spicier? Add more red pepper flakes or toss in some diced jalapeños.
  • Add Veggies: Sneak in some carrots, bell peppers, or mushrooms for an extra serving of veggies. They’ll soak up the flavors beautifully!

Creative Twists

If you’re feeling adventurous, why not put your unique spin on this classic recipe? Here are some fun variations to consider:

  • Garlic Parmesan: Stir in some grated parmesan cheese at the end for a rich, cheesy finish.
  • Asian Fusion: Swap the soy sauce for teriyaki sauce and add some sesame seeds for an Asian-inspired twist.
  • Herb-Infused: Use fresh herbs like basil or cilantro for a refreshing take on the dish.

Common Questions

As with any beloved recipe, you may have some questions. Here are answers to a few common queries:

  • How long does it take to prep? Prep time is quick, taking about 15 minutes to get everything into the slow cooker.
  • Can I make this ahead of time? Absolutely! You can prep the ingredients the night before and store them in the fridge. Just toss them in the slow cooker in the morning.
  • What side dishes pair well? A simple green salad or crusty bread for dipping makes a lovely complement. You can also serve it over rice or quinoa.
  • Is it freezer-friendly? Yes! You can freeze the leftovers for up to 3 months. Just make sure to cool them completely before sealing them up tight.
  • How can I adjust the seasoning? Taste before cooking; if you like it bolder, add more soy sauce, salt, or pepper as needed.

Use Your Leftovers

Don’t let those delicious leftovers go to waste! Here are a few innovative ideas to transform your High Protein Garlic Butter Beef Bites:

  • Beef Tacos: Shred the beef and serve it in warm tortillas with your favorite taco toppings.
  • Stir-Fry: Toss the leftovers in a hot skillet with some veggies for a quick stir-fry.
  • Pasta Dish: Mix the beef with cooked pasta and a splash of cream for a luxurious pasta dish.

Conclusion

Cooking is not just about the food; it’s about the experience, the love, and the stories we create around the table. My High Protein Slow Cooker Garlic Butter Beef Bites encapsulate that spirit—bringing people together over a dish that’s both comforting and nourishing. So, grab your slow cooker and embrace the magic of cooking bold flavors that will leave everyone asking for seconds! Whether you’re feeding a crowd or indulging in a cozy dinner for one, this recipe is sure to become a staple in your kitchen. Enjoy the journey, and remember: every meal is a chance to tell a story. Happy cooking!

High Protein Slow Cooker Garlic Butter Beef Bites - Easy Healthy Dinner Recipe!

Prep Time 10 minutes
Cook Time 4 hours
Total Time 4 hours 10 minutes
Servings 4 servings
Calories 350
Enjoy tender, flavorful beef bites cooked to perfection in a garlic butter sauce, perfect for a healthy and satisfying dinner.

Ingredients

Meat

  • 2 pounds beef sirloin, cut into bite-sized pieces
  • 1/2 cup unsalted butter
  • 5 cloves garlic, minced
  • 1 tablespoon soy sauce
  • 1 teaspoon salt
  • 1/2 teaspoon black pepper
  • 1 teaspoon paprika
  • 1 teaspoon dried thyme
  • 1/2 teaspoon red pepper flakes (optional)
  • fresh parsley, chopped for garnish

Instructions 

  • Add beef to slow cooker.
  • Melt butter and sauté garlic for 1-2 minutes.
  • Mix in soy sauce, salt, pepper, paprika, thyme, and red pepper flakes.
  • Pour sauce over beef, cover, and cook on low for 6-8 hours.
  • Stir beef bites and garnish with parsley before serving.

Notes

For extra flavor, add a splash of fresh parsley before serving.
Calories: 350kcal
Cost: $15
Course: Dinner
Cuisine: American
Keyword: beef, garlic, Slow Cooker

Nutrition

Calories: 350kcal | Carbohydrates: 4g | Protein: 45g | Fat: 20g | Sodium: 600mg

Loved this recipe? Save it to your favorite Pinterest board so you can easily find it later! It’s the perfect way to keep all your sweet ideas in one place. ✨

A delicious serving of beef bites, showcasing a rich sauce and soft textures.

Why You’ll Love This Dish

Let’s face it: life gets busy, and finding the time to whip up an exciting, flavorful meal can sometimes feel like a daunting task. But when you dive into the world of Black Pepper Chicken, you’re not just cooking; you’re embarking on a vibrant culinary adventure! This dish is the perfect fusion of tender chicken, crisp vegetables, and a bold black pepper sauce that will ignite your taste buds and leave you craving more.

What I love about Black Pepper Chicken is its versatility. It’s not just a meal; it’s a canvas where you can paint with flavors, textures, and colors. Whether you serve it over steaming rice or toss it with some noodles, this dish is a guaranteed crowd-pleaser, making it a fantastic choice for family dinners or casual gatherings. And let’s be honest, once you taste the homemade version, you might find yourself saying goodbye to takeout!

Ingredients You Need

Gathering the right ingredients is essential for creating the magic that is Black Pepper Chicken. Here’s what you’ll need to get started:

  • 500g chicken breast, sliced
  • 2 tablespoons black pepper, freshly ground
  • 2 tablespoons soy sauce
  • 1 tablespoon cornstarch
  • 2 tablespoons vegetable oil
  • 3 cloves garlic, minced
  • 1 inch ginger, grated
  • 1 bell pepper, sliced
  • 1 onion, sliced
  • Salt to taste
  • Spring onions, chopped (for garnish)

The Cooking Process: Crafting Your Masterpiece

A delicious serving of Black Pepper Chicken with vegetables, showcasing the dish's intricate details and garnishes.

Now that you have all your ingredients ready, let’s dive into the cooking process. This is where the real fun happens!

Step 1: Marinate the Chicken

Start by taking a bowl and combining the sliced chicken with soy sauce, cornstarch, and half of the freshly ground black pepper. Mix well and let it marinate for about 15-20 minutes. This step is crucial as it not only infuses the chicken with flavor but also helps tenderize it, ensuring every bite is juicy and succulent.

Step 2: Heat Things Up

In a large pan, heat the vegetable oil over medium-high heat. Once the oil is shimmering, it’s time to add the minced garlic and grated ginger. Sauté them for about 30 seconds until fragrant. This aromatic duo is the foundation of flavor that will elevate your dish to new heights.

Step 3: Cook the Chicken

Add the marinated chicken to the pan and stir-fry until it starts to brown. The sizzling sound is music to any home cook’s ears! Keep an eye on it; you want the chicken to be cooked through but still tender. After a few minutes, you’ll notice the chicken taking on a beautiful golden hue.

Step 4: Toss in the Veggies

Now, it’s time to add the sliced bell pepper and onion. Continue stir-frying for another 5-7 minutes until the vegetables are tender and vibrant. This is where you get to enjoy the colors of your ingredients, creating a dish that is as pleasing to the eye as it is to the palate.

Step 5: Season to Perfection

As the cooking process nears its end, season with salt and the remaining black pepper to taste. Remember, you’re looking for a balance that enhances the natural flavors of the chicken and vegetables. A final touch of freshly chopped spring onions will add a pop of freshness and color before serving.

Tips for the Perfect Black Pepper Chicken

  • Use Fresh Ingredients: Fresh garlic, ginger, and vegetables make a world of difference in flavor.
  • Don’t Overcrowd the Pan: If you’re making a larger batch, consider cooking in batches to ensure even cooking.
  • Prep Ahead: Having all your ingredients prepped and ready to go will help you keep the pace up during the stir-frying process.
  • Experiment with Heat: If you’re feeling adventurous, add in some red pepper flakes or a splash of chili sauce to kick things up a notch!

Variations and Substitutions

Black Pepper Chicken is incredibly adaptable! Here are a few variations and substitutions to consider:

  • Protein Options: Feel free to swap out the chicken for beef, shrimp, or tofu for a different twist.
  • Vegetable Medley: Add in other veggies like broccoli, snap peas, or carrots for more color and nutrition.
  • Sauce Twist: Want a little sweetness? A dash of honey or a splash of hoisin sauce can add a delightful contrast to the heat of black pepper.

Equipment You’ll Need

To make this dish, you’ll need some basic kitchen equipment:

  • A large frying pan or wok for stir-frying
  • A good knife for slicing your ingredients
  • A cutting board for prep
  • Measuring spoons for accuracy in seasoning
  • A mixing bowl for marinating

Storage and Freezing Tips

If you happen to have leftovers (which I doubt because it’s that good!), you can store them in an airtight container in the refrigerator for 3-4 days. For longer storage, freeze the dish in a freezer-safe container for up to two months. Just be sure to thaw it in the fridge overnight before reheating.

Frequently Asked Questions

Can I make this dish ahead of time?

While stir-fries are best enjoyed fresh, you can prep the chicken and vegetables in advance. Just keep them separate until you’re ready to cook.

Is this dish gluten-free?

To make a gluten-free version, simply use tamari instead of soy sauce.

What can I serve with Black Pepper Chicken?

This dish pairs wonderfully with steamed rice, fried rice, or even noodles. You can also serve it alongside a simple green salad for a lighter meal.

Troubleshooting Common Issues

It’s normal to encounter a few hiccups in the kitchen. Here are some troubleshooting tips:

  • My chicken is tough: This can happen if it’s overcooked. Keep a close eye on it while cooking.
  • The sauce is too salty: If you find it too salty, add a splash of water or a squeeze of lemon juice to balance it out.

Final Thoughts

Cooking is all about exploration, and Black Pepper Chicken is a fantastic starting point for those looking to add some excitement to their dinner routine. With its bold flavors and vibrant colors, this dish is sure to impress your family and friends. So grab your skillet, turn up the heat, and let’s make some magic happen in your kitchen! Remember, the world of spice is vast and welcoming, so don’t hesitate to experiment and make this dish your own. Happy cooking!

Black Pepper Chicken

Prep Time 10 minutes
Cook Time 15 minutes
Total Time 25 minutes
Servings 4 servings
Calories 350
A flavorful stir-fry featuring tender chicken and bold black pepper, perfect for a quick and satisfying meal.

Ingredients

Protein

  • 500 g chicken breast, sliced
  • 2 tablespoons black pepper, freshly ground
  • 2 tablespoons soy sauce
  • 1 tablespoon cornstarch
  • 2 tablespoons vegetable oil
  • 3 cloves garlic, minced
  • 1 inch ginger, grated
  • 1 bell pepper sliced
  • 1 onion sliced
  • to taste salt
  • spring onions for garnish chopped

Instructions 

  • Marinate chicken with soy, cornstarch, and half of black pepper for 15 minutes.
  • Heat oil, sauté garlic and ginger until fragrant.
  • Add chicken and stir-fry until browned.
  • Mix in bell pepper and onion, cook until tender.
  • Season with salt and remaining black pepper, garnish with spring onions, and serve hot.

Notes

Adjust seasoning to taste and serve with rice or noodles.
Calories: 350kcal
Cost: $12
Course: Main Course
Cuisine: Asian
Keyword: Black Pepper, chicken

Nutrition

Calories: 350kcal | Carbohydrates: 20g | Protein: 40g | Fat: 10g | Sodium: 900mg

Loved this recipe? Save it to your favorite Pinterest board so you can easily find it later! It’s the perfect way to keep all your sweet ideas in one place. ✨

Eye-level view of Black Pepper Chicken, displaying tender chicken pieces and sautéed bell peppers in natural light.

Ignite Your Culinary Adventure: Discover the Turkey Sausage Spaghetti Squash Baked Ziti

Are you ready to take your taste buds on a wild ride? This Turkey Sausage Spaghetti Squash Baked Ziti is not just another casserole; it’s a symphony of flavors that brings together the heartiness of turkey sausage and the vibrant crunch of spaghetti squash. With a kick of red pepper flakes and a medley of fresh herbs, this dish will ignite your plate and your passion for cooking. Let’s dive into the deliciousness!

Why You’ll Love This Recipe

This Turkey Sausage Spaghetti Squash Baked Ziti isn’t just a meal; it’s an experience! Here are five reasons to embrace this dish:

  • Healthier alternative: Using spaghetti squash instead of pasta cuts carbs while maintaining that comforting baked ziti feel.
  • Packed with flavor: Sweet Italian turkey sausage brings a savory richness, complemented by fresh herbs and aromatic garlic.
  • Easy prep and cook time: Whip this up in under an hour, perfect for busy weeknights or impressing guests.
  • Customizable to your taste: Adjust the spice level or throw in your favorite veggies for a unique twist.
  • Meal prep friendly: Make ahead and freeze for an easy, satisfying dinner on a busy night.

Ingredient Breakdown

Let’s get into the good stuff! Here’s what you’ll need:

  • 1 1/2 tablespoons extra virgin olive oil: For sautéing and adding richness.
  • 12 ounces sweet Italian turkey sausage: The star of the show! You can substitute with ground chicken or beef if you prefer.
  • 1 large shallot (minced): A milder onion flavor that adds depth.
  • 2 large cloves garlic (minced): Because garlic makes everything better!
  • 1 bunch swiss chard (cleaned and roughly chopped): A nutritious green that wilts beautifully in the dish.
  • 12 ounces white button mushrooms (sliced): For an earthy flavor that complements the sausage.
  • Salt and pepper: Essential for seasoning.
  • Flesh from 1 small spaghetti squash (cooked): The game changer in this recipe, providing fiber and a unique texture.
  • 14 ounces crushed tomatoes: Adds moisture and a tangy sweetness. I recommend using Redpack tomatoes for their robust flavor.
  • 1 tablespoon chopped fresh herbs (rosemary and thyme): Fresh herbs elevate this dish to a new level.
  • Pinch red pepper flakes: For a gentle heat that teases the palate.
  • 12 ounces whole milk ricotta (divided): Creamy goodness that melds beautifully with the other ingredients.
  • 5.5 ounces shredded part-skim mozzarella (divided): To create that irresistible cheesy crust.

Expert Tips for Cooking Success

Juicy turkey sausage spaghetti squash baked ziti served in a rustic dish, garnished with herbs.

Let’s make sure you nail this recipe! Here are some pro tips to keep in mind:

  • Choosing the right squash: Look for a firm, heavy spaghetti squash with a smooth skin. This indicates freshness.
  • Perfectly cooked squash: Roast the spaghetti squash whole for a sweeter flavor, then shred the flesh after it cools.
  • Balance the flavors: Taste as you go! Adjust salt, pepper, and red pepper flakes to fit your preference.
  • Don’t skip the herbs: Fresh herbs bring a bright flavor that cuts through the richness of the dish.
  • Layer your flavors: Allow the sausage to brown nicely to develop deep flavors before adding the vegetables.
  • Perfectly melted cheese: For a golden-brown topping, finish under the broiler for a couple of minutes.
  • Rest before serving: Let the dish cool for a few minutes after baking; this helps the flavors meld and makes serving easier.
  • Garnish generously: Fresh parsley or basil will brighten the dish and enhance the presentation.

Common Mistakes & Troubleshooting

Even the best of us make mistakes in the kitchen! Here’s how to avoid common pitfalls:

  • Overcooking the squash: This will lead to mushy noodles. Roast just until tender.
  • Soggy casserole: Ensure you drain excess moisture from the cooked vegetables before mixing.
  • Too much cheese: While cheese is great, too much can overpower the dish. Stick to the recommended amounts.
  • Skipping the resting time: Serving immediately can lead to a messy plate; waiting allows the flavors to settle.

Variations to Spice Things Up

Feeling adventurous? Here are some variations to consider:

  • Vegetarian Delight: Replace turkey sausage with a mix of sautéed veggies like zucchini and bell peppers.
  • Spicy Kick: Add chopped jalapeños or increase the red pepper flakes for a fiery twist.
  • Cheesy Basil Bliss: Mix in fresh basil and swap mozzarella for provolone or gouda for a different flavor profile.
  • Italian Classics: Layer in some pepperoni or Italian seasoning for an authentic pizza-inspired twist.

Storage & Make-Ahead Instructions

This dish is perfect for meal prep! Here’s how to store it:

  • Refrigerate: Store leftovers in an airtight container for up to 4 days.
  • Freeze: Freeze portions in a freezer-safe container for up to 3 months. Thaw overnight in the fridge before baking.
  • Make-ahead: Prepare the casserole up to the baking step and refrigerate for 24 hours before baking.

Frequently Asked Questions

Still have questions? Let’s clear them up!

  • Can I use other types of sausage? Absolutely! Chicken, beef, or even plant-based sausages work well.
  • How can I make this gluten-free? This recipe is naturally gluten-free with spaghetti squash; just ensure your sausage and other ingredients are certified gluten-free.
  • What if I don’t have ricotta? Cream cheese or cottage cheese can be a great substitute!
  • How do I know when it’s done baking? The top should be golden brown, and a knife inserted in the center should come out hot.
  • Can I use fresh tomatoes instead of canned? Yes! Just make sure to peel and crush them before adding.
  • Is this dish freezer-friendly? Yes! Just store in a freezer-safe container before baking.
  • Can I add more veggies? Go for it! Spinach, kale, or bell peppers would all be delightful additions.
  • How do I reheat leftovers? Reheat in the oven at 350°F covered with foil to prevent drying out, or microwave in individual servings.

Nutrition Tips & Dietary Adaptations

This dish is not only delicious but can also fit a variety of dietary needs:

  • Low-carb option: The spaghetti squash provides low-carb satisfaction without sacrificing flavor.
  • High-protein boost: Turkey sausage offers a lean protein source without excessive fat.
  • Vegetarian-friendly: Easily adaptable by swapping out the sausage for plant-based options.

Equipment Recommendations

Here’s what you’ll need for this recipe:

  • Large pot or Dutch oven: For sautéing the sausage and veggies.
  • Baking dish: A 9×13 inch dish is ideal for this casserole.
  • Sharp knife and cutting board: Essential for chopping your ingredients efficiently.
  • Oven mitts: Don’t forget these when pulling your dish out of the oven!

Serving Suggestions

To round out your meal, consider these serving options:

  • Simple salad: A fresh green salad drizzled with vinaigrette complements the richness of the baked ziti.
  • Garlic bread: Crunchy garlic bread makes for a delightful side to soak up those delicious flavors.
  • Wine pairing: A glass of Chianti or a light Pinot Grigio pairs beautifully with this dish.

There you have it! This Turkey Sausage Spaghetti Squash Baked Ziti is a dish that doesn’t just satisfy hunger; it ignites passion in the kitchen. So grab your skillet, embrace the heat, and let’s create something unforgettable!

Turkey Sausage Spaghetti Squash Baked Ziti

Prep Time 15 minutes
Cook Time 25 minutes
Total Time 40 minutes
Servings 4 servings
Calories 550
A hearty and healthy baked ziti featuring turkey sausage, spaghetti squash, and fresh herbs, perfect for a comforting yet nutritious meal.

Ingredients

Main ingredients

  • 1.5 tablespoons extra virgin olive oil
  • 12 ounces sweet Italian turkey sausage
  • 1 large shallot (minced)
  • 2 large cloves garlic (minced)
  • 1 bunch swiss chard (cleaned and roughly chopped)
  • 12 ounces white button mushrooms (sliced)
  • to taste salt and pepper
  • flesh from 1 small cooked spaghetti squash (see note on how to cook)
  • 14 ounces crushed tomatoes
  • 1 tablespoon chopped fresh herbs (rosemary and thyme)
  • pinch red pepper flakes
  • 12 ounces whole milk ricotta (divided)
  • 5.5 ounces shredded part-skim mozzarella (divided)

Instructions 

  • Preheat oven to 400°F and grease a baking dish.
  • Cook sausage until browned; add shallots and garlic, cook 1 min.
  • Add chard and mushrooms; season and cook until wilted, 5-7 min.
  • Mix in spaghetti squash, tomatoes, herbs, and red pepper flakes; simmer.
  • Combine ricotta and half the mozzarella; stir into mixture.
  • Transfer to baking dish, top with remaining ricotta and mozzarella, then bake 25 min.

Notes

For best results, finish under the broiler for a golden top.
Calories: 550kcal
Cost: $15
Course: Main Course
Cuisine: American
Keyword: baked ziti, pasta, turkey sausage

Nutrition

Calories: 550kcal | Carbohydrates: 60g | Protein: 40g | Fat: 20g | Sodium: 900mg