Author

Avery Collins

Browsing

Why You’ll Love This Dish

If you’re on the hunt for a comforting meal that warms the soul and tantalizes the taste buds, look no further than this Mushroom and Spinach Lasagna recipe. It’s not just any lasagna; it’s a celebration of rich flavors, creamy textures, and the earthy goodness of mushrooms paired with the fresh vibrancy of spinach. This dish is perfect for anyone who craves adventure in their culinary journey — whether you’re a seasoned home cook or just starting out.

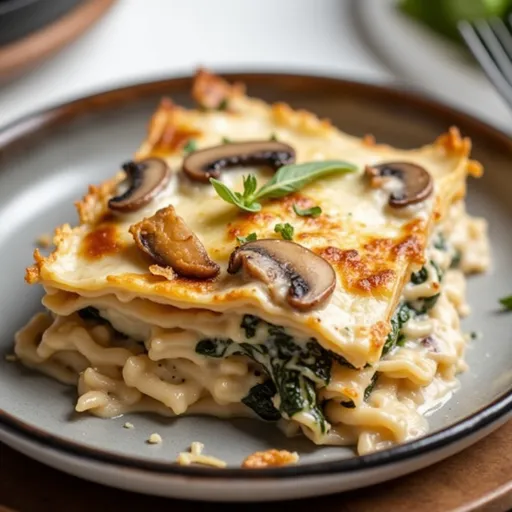
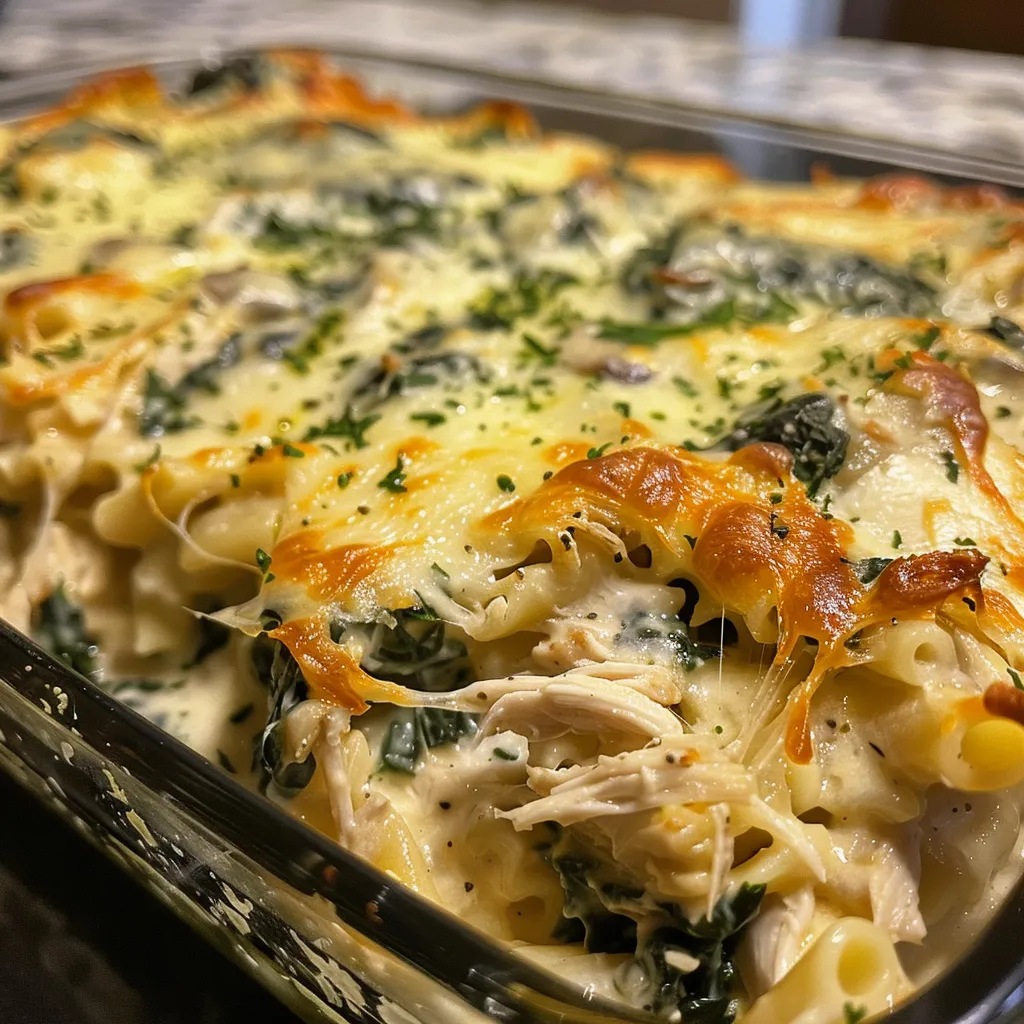
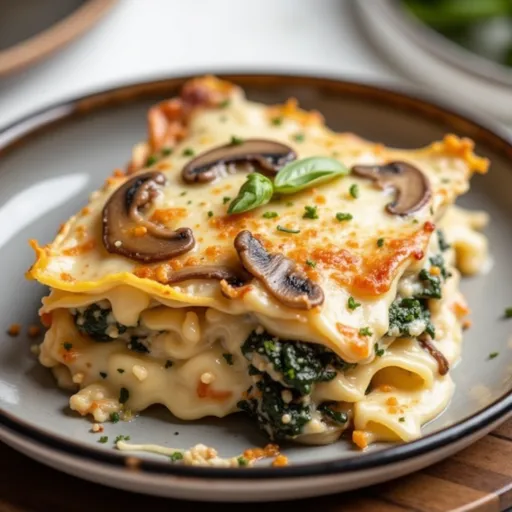
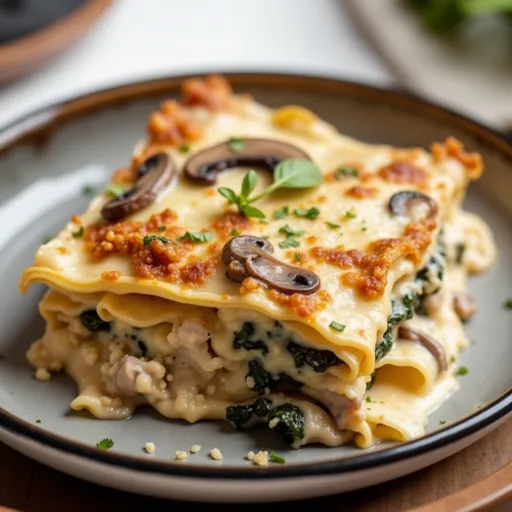
Imagine layers of tender lasagna noodles enveloped in a luscious marinara sauce, crowned with a medley of sautéed mushrooms and spinach, and finished off with a blanket of gooey cheese that melts into perfection. Each bite is not just about flavor; it’s about the experience of creating something magical in your kitchen. So roll up your sleeves and let’s dive into how to make this culinary masterpiece!

Ingredients You’ll Need

To create this delightful mushroom and spinach lasagna, gather the following ingredients:

  • 9 lasagna noodles
  • 2 tablespoons olive oil
  • 1 onion, finely chopped
  • 3 cloves garlic, minced
  • 1 pound mushrooms (such as cremini or button), sliced
  • 1/2 teaspoon dried thyme
  • Salt and pepper to taste
  • 3 cups marinara sauce
  • 2 cups ricotta cheese
  • 1 cup shredded mozzarella cheese
  • 1/2 cup grated parmesan cheese
  • 2 cups fresh spinach leaves, chopped
  • Fresh basil leaves for garnish

Let’s Get Cooking!

Eye-level view of a delicious Mushroom and Spinach Lasagna, highlighting its rich tomato sauce and melted cheese.

Now that you’ve gathered your ingredients, it’s time to unleash your inner chef. Follow these steps to create your lasagna:

Preheat the Oven

First things first, preheat your oven to a toasty 375°F (190°C). This temperature is key to achieving that perfectly baked lasagna with a golden crust and gooey, melted cheese.

Cook the Lasagna Noodles

While your oven is warming up, grab a large pot and fill it with water. Don’t forget to season it generously with salt — this is your chance to infuse flavor into the noodles. Bring the water to a rolling boil, and once it’s bubbling away, add in your lasagna noodles. Cook them according to the package instructions until they’re gloriously al dente — tender yet firm enough to hold their shape when layered. Once cooked, drain them and set them aside to cool slightly.

Prepare the Mushroom Filling

Next, let’s get to the heart of our lasagna: the savory mushroom filling. Heat a large skillet over medium heat and add a splash of olive oil to get things sizzling. Toss in your finely chopped onion and let it dance in the pan until it turns translucent and fragrant, about 3–4 minutes. The aroma will start to fill your kitchen, drawing everyone closer.

Now, sprinkle in the minced garlic and let it work its magic for another minute. Add in your sliced mushrooms, along with a sprinkle of dried thyme, salt, and pepper for seasoning. Cook them until they’re tender and any excess liquid has evaporated. This step is crucial for concentrating the flavors. Finally, toss in the chopped spinach leaves and cook until they wilt, about 2–3 minutes. Remove from heat and set this tantalizing mixture aside.

Assemble the Lasagna

With your filling ready, it’s time to layer this beauty. Start by ladling a thin blanket of marinara sauce onto the bottom of a greased 9×13-inch baking dish. This ensures that each bite of your lasagna is packed with flavor and prevents sticking.

Now, lay down three lasagna noodles on top of the sauce to create a solid foundation. Spread half of the creamy ricotta cheese over the noodles, followed by a generous dollop of the mushroom mixture, spreading it out evenly. Sprinkle a third of the mozzarella and Parmesan cheeses over the mushrooms to add that cheesy goodness.

Repeat these layers with the remaining noodles, ricotta, mushrooms, and cheeses. Finish with a final flourish of marinara sauce on top, making sure to cover the noodles well. This will keep everything moist and flavorful during baking.

Bake to Perfection

Once your masterpiece is assembled, cover your baking dish with aluminum foil and slide it into the preheated oven. Let it bake for a tantalizing 25 minutes, allowing all the flavors to meld together beautifully.

After this initial bake, it’s time for the grand reveal. Remove the foil and let your lasagna continue to bake for an additional 10–15 minutes, or until the cheese on top is bubbly and golden brown. The anticipation will be palpable as the scent wafts through your home!

Serve and Enjoy

Once out of the oven, let your lasagna sit for a few minutes to allow the layers to settle. This is crucial for achieving clean slices. Garnish your creation with fresh basil leaves, adding a vibrant pop of color and flavor. Now, slice into that glorious lasagna and serve it up to eager diners. Watch as their faces light up with joy with each bite!

Tips for Making the Best Mushroom and Spinach Lasagna

To elevate your lasagna experience, consider these helpful tips:

  • Don’t Overdo the Sauce: While sauce is essential for flavor and moisture, using too much can result in a watery lasagna. Aim for a balanced amount between layers to prevent sogginess.
  • Layer Wisely: When layering, make sure to spread the ingredients evenly. This ensures every bite is delicious and well-balanced.
  • Let It Rest: Allow your lasagna to rest after baking. This helps the layers set and makes serving easier.
  • Make Ahead: This dish can be prepared in advance and stored in the fridge overnight. It often tastes even better the next day as the flavors continue to meld!

Variations and Substitutions

Feel free to get creative with this recipe! Here are some variations you might enjoy:

  • Protein Boost: Add cooked ground beef, turkey, or sausage for a heartier version.
  • Cheese Lovers: Mix different cheeses like gouda or feta into the layers for a unique twist.
  • Veggie Power: Add other vegetables like zucchini, bell peppers, or carrots for more flavor and nutrition.

Equipment You’ll Need

To whip up this delicious lasagna, you’ll need:

  • A large pot for boiling the noodles
  • A skillet for cooking the filling
  • A 9×13-inch baking dish
  • Aluminum foil
  • A spatula or spoon for layering

Storage and Freezing

If you have leftovers (which is rare, but it happens!), you can store them in an airtight container in the fridge for up to 3 days. To freeze, wrap the lasagna tightly in plastic wrap and then in aluminum foil. It can be frozen for up to 3 months. When you’re ready to enjoy, simply thaw in the fridge overnight and reheat in the oven.

Frequently Asked Questions

Can I use no-boil lasagna noodles?
Absolutely! Just adjust the baking time according to the instructions on the package.

How can I make this dish gluten-free?
You can substitute traditional lasagna noodles with gluten-free varieties. Just make sure to check the cooking instructions as they may vary.

Can I add more vegetables?
Yes! Feel free to incorporate any vegetables you love. Just sauté them as you would the mushrooms before layering.

Troubleshooting Common Issues

If you encounter any issues, here are some solutions:

  • Dry Lasagna: This can happen if there’s not enough sauce. Ensure you have a good amount of sauce between the layers.
  • Cheese Not Melting: If your cheese doesn’t melt as expected, ensure your oven is preheated properly, and consider covering the lasagna with foil for the first part of baking.

In Closing

Cooking this Mushroom and Spinach Lasagna is more than just preparing a meal; it’s a journey that brings flavors together in a way that’s both comforting and exciting. As you savor each bite, let it remind you that cooking is an adventure, a chance to explore your palate and share joy with those around you. So, gather your ingredients, bring your passion to the kitchen, and enjoy this delightful dish that’s sure to become a staple in your home. Don’t forget to share your culinary triumphs with family and friends, and let the love of cooking flourish in your life!

Mushroom And Spinach Lasagna Recipe

Prep Time 20 minutes
Cook Time 40 minutes
Total Time 1 hour
Servings 6 servings
Calories 450
A hearty and flavorful vegetarian lasagna layered with mushrooms, spinach, and cheeses, baked to perfection.

Ingredients

Noodles

  • 9 pieces lasagna noodles

Vegetables and oils

  • 2 tablespoons olive oil
  • 1 piece onion, finely chopped
  • 3 cloves garlic, minced
  • 1 pound mushrooms (sliced)
  • 1/2 teaspoon dried thyme
  • to taste salt and pepper

Sauces and cheeses

  • 3 cups marinara sauce
  • 2 cups ricotta cheese
  • 1 cup shredded mozzarella cheese
  • 1/2 cup grated parmesan cheese
  • 2 cups fresh spinach leaves, chopped

Garnish

  • as needed fresh basil leaves for garnish

Instructions 

  • Preheat oven to 375°F (190°C). Cook noodles, then drain and set aside.
  • Sauté onion and garlic in olive oil until translucent. Add mushrooms, thyme, salt, and pepper; cook until tender. Stir in spinach until wilted.
  • Layer sauce, noodles, ricotta, mushroom mixture, and cheeses in a baking dish. Repeat layers and top with marinara sauce.
  • Cover with foil and bake for 25 minutes. Remove foil and bake an additional 10-15 minutes until bubbly and golden.

Notes

Let the lasagna rest for 10 minutes before serving for best slicing.
Calories: 450kcal
Cost: $15
Course: Main Course
Cuisine: Italian
Keyword: Lasagna, Vegetarian

Nutrition

Calories: 450kcal | Carbohydrates: 60g | Protein: 20g | Fat: 15g | Sodium: 800mg

Loved this recipe? Save it to your favorite Pinterest board so you can easily find it later! It’s the perfect way to keep all your sweet ideas in one place. ✨

Textured Mushroom and Spinach Lasagna in a cozy setting, with warm lighting enhancing its appetizing appearance.

Why This Dish Will Bring Your Family Together

When it comes to family dinners, the magic often lies in the simplicity of the meal. Imagine gathering around the table, the air thick with the aroma of fresh green beans and mushrooms, all enveloped in a creamy sauce that dances with flavor. This dish is more than just a meal; it’s an experience that transforms ordinary evenings into extraordinary family feasts. Each bite is a journey through sweet and savory notes, a delightful balance that invites everyone to savor the moment and engage in hearty conversations.

What I love most about this recipe is its versatility. Whether you’re planning a cozy weeknight dinner or a festive gathering, it adapts beautifully. With a few quick steps, you can create something that feels special yet is incredibly easy to prepare. So, grab your apron, and let’s dive into this culinary adventure!

Ingredients You’ll Need

To create this flavor-packed dish, gather the following ingredients:

  • Fresh green beans
  • Mushrooms
  • Creamy sauce
  • Crispy onions
  • Sweet pineapple glaze
  • Brown sugar
  • Honey
  • Sweet apples
  • Caramel

Additionally, for a delightful breakfast bake, we’ll include:

  • Cinnamon rolls
  • No-bake Fruit Loop bars
  • Marshmallows
  • Butter

And to round out your meal:

  • Buttery crust
  • Spiced apples
  • Streusel
  • Candy corn
  • Creamy white chocolate

And let’s not forget those heavenly peppermint ganache truffles coated in chocolate with an Andes mint topping!

Steps to Prepare This Flavorful Feast

Eye-level view of appetizing dishes featuring green beans, mushrooms, and sweet dessert items on a cozy table.

Ready to create some magic in your kitchen? Follow these simple steps:

  1. Combine Fresh Ingredients: Start by mixing the fresh green beans and mushrooms in a large bowl. Toss them with your creamy sauce until everything is well coated.
  2. Prepare the Pineapple Glaze: In a small saucepan, combine brown sugar and honey over medium heat. Stir until the brown sugar dissolves, then add the sweet pineapple glaze and allow it to simmer for a few minutes.
  3. Make the Breakfast Bake: For a delightful morning treat, mix together sweet apples, caramel, and cinnamon rolls in a baking dish. Bake until golden brown and bubbly.
  4. No-Bake Fruit Loop Bars: In a separate bowl, melt butter and mix with marshmallows until smooth. Stir in Fruit Loops and press the mixture into a lined baking pan. Let it cool before cutting into bars.
  5. Prepare the Buttery Crust: For dessert, create a buttery crust using flour, butter, and sugar. Top it with spiced apples and streusel for that comforting finish.
  6. Warm Drinks: Serve a warm drink made with candy corn and creamy white chocolate for that extra touch of sweetness.
  7. Layer the Puff Pastry: Roll out flaky puff pastry and layer it with juicy apples and a golden streusel topping. Bake until the pastry is puffed and golden.
  8. Finish with Ganache Truffles: Dip your peppermint ganache truffles in melted chocolate and sprinkle with Andes mint topping for a cool, minty finish.

Tips for a Flawless Family Feast

Cooking should be fun and stress-free! Here are some tips to ensure your dinner goes off without a hitch:

  • Prep Ahead: Chop your vegetables and prepare your sauces in advance. This will save you time and make the cooking process smoother.
  • Taste as You Go: Don’t be afraid to taste your dishes as you cook. Adjust flavors to suit your family’s preferences.
  • Involve Everyone: Get your family involved in the cooking process! Let the kids mix the ingredients or set the table. It’s a great way to bond.

Variations to Explore

Feel free to get creative! Here are some variations that can spice things up:

  • Swap the Veggies: Try adding bell peppers or carrots for additional color and crunch.
  • Change the Protein: For a heartier dish, consider adding shredded rotisserie chicken or diced ham.
  • Make it Spicy: If your family enjoys heat, add a pinch of cayenne pepper or some diced jalapeños to the creamy sauce.

Substitutions for Dietary Needs

Cooking for different dietary needs? No problem! Here are some easy substitutions:

  • Dairy-Free: Substitute the creamy sauce with coconut cream or cashew cream for a rich, dairy-free option.
  • Gluten-Free: Use gluten-free flour for the buttery crust and ensure your sauces are gluten-free.
  • Lower Sugar: Replace brown sugar with a sugar substitute like monk fruit sweetener for a lower-calorie option.

Essential Equipment

To whip up this delicious meal, you’ll need:

  • Large mixing bowl
  • Small saucepan
  • Baking dish
  • Baking pan
  • Sharp knife and cutting board
  • Measuring cups and spoons

Storage and Freezing Tips

Leftovers are a blessing, and this dish stores beautifully!

  • Refrigeration: Store leftovers in an airtight container in the fridge for up to three days.
  • Freezing: You can freeze portions for up to two months. Just make sure to cool them completely before packing them away.
  • Reheating: When ready to enjoy again, simply reheat in the oven or microwave. A splash of broth or cream can help refresh the creamy sauce.

Frequently Asked Questions

Got questions? I’ve got answers!

  • Can I make this dish vegetarian? Absolutely! Skip the meat and load up on more vegetables.
  • How can I make it spicier? Add your favorite hot sauce or fresh jalapeños to the creamy sauce.
  • What’s the best way to serve this dish? It’s fantastic on its own but pairs beautifully with a crisp green salad or warm crusty bread.

Troubleshooting Common Issues

If you encounter any hiccups, don’t worry! Here are some common issues and how to fix them:

  • Too Thick: If your sauce is too thick, add a little broth or cream to loosen it up.
  • Burnt Bottom: If you notice some sticking, make sure to deglaze your pan with broth before adding other ingredients.
  • Flavor Lacking: Adjust seasonings as necessary; sometimes a pinch of salt or a squeeze of lemon can elevate the dish.

Wrap-Up: A Feast to Remember

This family feast is more than just a meal; it’s an opportunity to create lasting memories around the dinner table. The blend of fresh ingredients, creamy textures, and sweet notes makes it a delightful experience for everyone involved. Whether you’re cooking for a special occasion or a regular weeknight, this dish is adaptable and approachable, making it a staple in your culinary repertoire. Embrace the process, enjoy the flavors, and most importantly, savor the time spent with your loved ones. So, gather your ingredients, unleash your inner chef, and let this recipe spice up your dinner table!

Quick and Easy Recipes for Your Whole Family

Prep Time 20 minutes
Cook Time 30 minutes
Total Time 50 minutes
Servings 4 people
Calories 850
Delight your family with a variety of quick, tasty dishes and treats that are easy to prepare and perfect for any occasion.

Ingredients

Vegetables

  • 200 grams fresh green beans
  • 150 grams mushrooms

Sauces and Toppings

  • 1 cup creamy sauce
  • 0.5 cup crispy onions
  • 0.5 cup sweet pineapple glaze
  • 2 tablespoons brown sugar
  • 2 tablespoons honey

Fruits and Sweets

  • 2 apples sweet apples
  • 1/2 cup caramel
  • 1 roll cinnamon rolls

Bars and Cookies

  • 1 batch fruit loop bars
  • 2 cups marshmallows
  • 1/2 cup butter

Pastry and Toppings

  • 1 sheet buttery crust
  • 2 cups spiced apples
  • 1/2 cup streusel
  • 1/2 cup golden streusel topping

Confectionery

  • 1/2 cup candy corn
  • 1/2 cup creamy white chocolate
  • 1 sheet flaky puff pastry
  • 2 cups juicy apples
  • 1/2 cup golden streusel topping
  • 1/2 cup peppermint ganache truffles
  • 1/2 cup chocolate
  • 1/4 cup andes mint topping

Instructions 

  • Combine green beans, mushrooms, creamy sauce, and crispy onions.
  • Prepare pineapple glaze with brown sugar and honey for baked ham.
  • Mix apples, caramel, and cinnamon rolls for a breakfast bake.
  • Make no-bake Fruit Loop bars with marshmallows and butter.
  • Create crust with spiced apples, streusel, and caramel.
  • Serve warm with candy corn and white chocolate.

Notes

Feel free to customize ingredients for dietary preferences.
Calories: 850kcal
Cost: $15
Course: Dessert, Main Course
Cuisine: Mixed
Keyword: easy, family, quick

Nutrition

Calories: 850kcal | Carbohydrates: 150g | Protein: 20g | Fat: 30g | Sodium: 900mg

Loved this recipe? Save it to your favorite Pinterest board so you can easily find it later! It’s the perfect way to keep all your sweet ideas in one place. ✨

Detailed food photography highlighting quick recipes with vibrant fruits and rich sauces, set in a warm atmosphere.

Unleash the Flavor: The Irresistible Creamy Chicken and Spinach Casserole

Welcome to the culinary adventure that is my Creamy Chicken and Spinach Casserole! This dish is the epitome of comfort food, blending tender chicken, vibrant spinach, and rich cheeses to create a meal that’s not just delicious, but also a celebration of flavors. Whether you’re a seasoned chef or just starting out, this casserole is sure to light up your dinner table and warm your heart. Let’s dive into why this dish deserves a spot in your kitchen.

Why You’ll Love This Recipe

This casserole isn’t just a meal; it’s an experience! Here’s why you’ll keep coming back for more:

  • Quick Preparation: Perfect for busy weeknights, this dish can be assembled in under 30 minutes, allowing you to enjoy a home-cooked meal without the hassle.
  • Nutritious Ingredients: Packed with lean protein from chicken and the goodness of fresh spinach, this casserole is a wholesome choice for the whole family.
  • Customizable Flavors: Feel free to add your favorite veggies or tweak the spices to suit your palate, making it your own delicious creation.
  • Comforting and Satisfying: The creamy texture and rich flavors create a cozy dish that’s perfect for family gatherings or a quiet night in.
  • Leftover Friendly: This casserole stores well, making it an excellent choice for meal prep or leftovers that taste even better the next day!

Ingredients You’ll Need

Gathering the right ingredients is key to making this casserole shine. Here’s what you need:

  • 2-3 cups cooked and shredded chicken: Breasts or thighs work great; use what you have on hand for that tender, savory bite.
  • 4 cups fresh spinach: Or 1 package frozen spinach, thawed and drained; either option adds vibrant color and nutrients.
  • 8 ounces cream cheese: Make sure it’s softened for easy mixing, creating that creamy base.
  • 1/2 cup sour cream: This adds additional creaminess and tang, enhancing the dish’s flavor.
  • 1 cup shredded mozzarella cheese: For a gooey, melty topping that elevates your casserole.
  • 1/4 cup grated Parmesan cheese: A sprinkle of this gives a nice salty kick and depth of flavor.
  • 2 cloves garlic: Minced, to infuse the dish with aromatic goodness.
  • 1 small onion: Finely chopped for sweetness and texture.
  • 1/2 teaspoon salt: To enhance all the flavors.
  • 1/4 teaspoon black pepper: For a touch of heat.
  • Pinch of nutmeg (optional): This secret ingredient adds warmth and complexity.
  • Sliced mushrooms, artichoke hearts, or cooked pasta: Optional add-ins to customize your casserole further!

How to Make Creamy Chicken and Spinach Casserole

Close-up view of a steaming Creamy Chicken and Spinach Casserole dish.

Now, let’s get cooking! Follow these simple steps to create your masterpiece.

  • Step 1: Preheat the Oven: Set your oven to 350°F (175°C) to ensure it’s hot and ready for your casserole.
  • Step 2: Prepare the Creamy Mixture: In a large mixing bowl, combine the softened cream cheese, sour cream, garlic, onion, salt, pepper, and nutmeg. Mix until smooth and creamy.
  • Step 3: Mix in Chicken and Spinach: Fold in the shredded chicken and fresh spinach until well combined, ensuring every bite is packed with flavor.
  • Step 4: Transfer to Baking Dish: Pour the mixture into a greased 9×13 inch baking dish, spreading it evenly.
  • Step 5: Add Cheese Toppings: Sprinkle the mozzarella and Parmesan cheeses on top, creating a deliciously cheesy crust.
  • Step 6: Bake to Perfection: Place in the oven and bake for 25-30 minutes, or until the cheese is bubbly and golden brown.
  • Step 7: Serve and Enjoy: Let it cool for a few minutes before serving. Pair with a fresh salad or crusty bread for a complete meal!

Expert Tips for the Best Casserole

To elevate your casserole game, consider these pro tips:

  • Use Rotisserie Chicken: For a quick and easy option, rotisserie chicken is a fantastic time-saver.
  • Don’t Overcook the Spinach: If using fresh spinach, sauté it lightly before adding to the mixture to retain its vibrant color and nutrients.
  • Mix Up the Cheeses: Experiment with different cheeses like cheddar or gouda for a unique flavor profile.
  • Layer the Ingredients: For a more rustic look, layer the chicken and spinach mix with cheese instead of mixing them together.
  • Adjust the Seasoning: Taste the mixture before baking and adjust seasoning as needed to ensure robust flavor.
  • Try Different Veggies: Add bell peppers, zucchini, or asparagus for a colorful twist.
  • Make it Spicy: Add a dash of red pepper flakes or a chopped jalapeño for a spicy kick!

Common Mistakes and Troubleshooting

Even the best chefs can make mistakes! Here’s how to avoid them:

  • Overmixing: Don’t overmix the creamy base; it can become too dense and lose its light texture.
  • Using Cold Ingredients: Make sure your cream cheese is at room temperature for easy blending.
  • Not Greasing the Dish: Ensure your baking dish is well-greased to prevent sticking and make serving easier.
  • Skipping the Cooling Period: Allow the casserole to cool for a few minutes before serving; it helps set the layers and makes it easier to scoop.

Delicious Variations to Try

This recipe is versatile, so feel free to experiment! Here are a few variations:

  • Mexican Twist: Add black beans, corn, and a sprinkle of taco seasoning for a southwestern flair.
  • Italian Style: Incorporate sun-dried tomatoes, basil, and a mix of Italian cheeses for a Mediterranean touch.
  • Vegetarian Delight: Swap chicken for chickpeas or lentils and load it up with your favorite vegetables.
  • Cheesy Broccoli Addition: Mix in steamed broccoli florets for an extra dose of nutrients and flavor.

Storage and Make-Ahead Instructions

Want to prep ahead? Here’s how to store your casserole:

  • Refrigerate: Store leftovers in an airtight container in the fridge for up to 3 days.
  • Freeze: You can freeze the uncooked casserole for up to 3 months. Just assemble it, cover tightly with foil, and freeze. Bake from frozen, adding an extra 10-15 minutes to the cooking time.
  • Make Ahead: Prepare the casserole a day in advance and refrigerate it before baking. Just pop it in the oven when you’re ready to eat!

Frequently Asked Questions

Got questions? I’ve got answers! Here’s a roundup of the most common inquiries:

  • Can I use frozen spinach? Absolutely! Just make sure to thaw and drain it properly to avoid excess moisture.
  • Is this casserole gluten-free? Yes, as long as you ensure all the ingredients (especially sauces) are gluten-free, this dish can be enjoyed by those with gluten sensitivities.
  • Can I substitute the chicken? Yes! Feel free to use cooked turkey or shredded pork for a different protein option.
  • How do I reheat leftovers? Reheat in the oven at 350°F until warmed through, or microwave in individual portions for a quick meal.
  • What can I serve with this casserole? Serve it with a fresh green salad or some garlic bread for a complete meal.
  • Can I make this dairy-free? Substitute the cream cheese and sour cream with dairy-free alternatives for a delicious dairy-free version.
  • What if I don’t have sour cream? Greek yogurt is a great substitute that adds creaminess and tang!
  • Is it okay to add more cheese on top? Go for it! More cheese equals more flavor. Just keep an eye on it to prevent burning.

Nutrition Tips and Dietary Adaptations

To make this casserole fit your dietary needs:

  • Lower Fat Option: Use low-fat cream cheese and sour cream to reduce calories without sacrificing flavor.
  • Increase Fiber: Mix in cooked quinoa or brown rice to boost fiber content and make it heartier.
  • Protein Boost: Add beans or lentils for a plant-based protein option that still satisfies.

Essential Equipment

Here’s what you’ll need to make this delicious casserole:

  • 9×13 inch baking dish: Ideal for baking and serving this hearty meal.
  • Mixing bowls: For combining your ingredients smoothly.
  • Measuring cups and spoons: Accurate measurements lead to perfect results.
  • Spatula: Great for mixing and spreading the casserole evenly.

Serving Suggestions

To elevate your dining experience, consider these serving suggestions:

  • Garnish with Fresh Herbs: A sprinkle of fresh parsley or basil adds a pop of color and freshness.
  • Serve with a Side Salad: A simple green salad drizzled with vinaigrette balances the richness of the casserole.
  • Pair with Bread: Serve with crusty bread or garlic knots to soak up all that creamy goodness.

So there you have it, folks! This Creamy Chicken and Spinach Casserole is not just another recipe; it’s an invitation to a flavorful journey. Embrace the heat, enjoy the adventure, and most importantly, happy cooking! Remember, cooking should be about having fun and experimenting without fear. Grab your skillet, gather your ingredients, and let’s turn up the flame on this culinary masterpiece!

Creamy Chicken and Spinach Casserole

Prep Time 10 minutes
Cook Time 30 minutes
Total Time 40 minutes
Servings 4 servings
Calories 550
A delicious and comforting casserole combining tender chicken, fresh spinach, and creamy cheeses for a satisfying meal.

Ingredients

Protein

  • 2-3 cups cooked and shredded chicken (Breasts or thighs)

Vegetables

  • 4 cups fresh spinach or frozen spinach (Thawed and drained)

Dairy

  • 8 ounces cream cheese (Softened)
  • 1/2 cup sour cream
  • 1 cup shredded mozzarella cheese
  • 1/4 cup grated Parmesan cheese

Seasonings

  • 2 cloves garlic (Minced)
  • 1 small onion (Finely chopped)
  • 1/2 teaspoon salt
  • 1/4 teaspoon black pepper

Optional Spices

  • Pinch of nutmeg (Optional)

Additional ingredients

  • Sliced mushrooms, artichoke hearts, or cooked pasta Sliced mushrooms, artichoke hearts, or cooked pasta

Instructions 

  • Preheat oven to 375°F (190°C).
  • Mix cooked chicken, spinach, cream cheese, sour cream, mozzarella, Parmesan, garlic, onion, salt, pepper, and nutmeg (if using).
  • Transfer mixture to a baking dish and top with optional ingredients if desired.
  • Bake for 25-30 minutes until bubbly and golden.
  • Serve hot and enjoy!

Notes

For a lighter version, use reduced-fat cheese and Greek yogurt instead of sour cream.
Calories: 550kcal
Cost: $15
Course: Main Course
Cuisine: American
Keyword: chicken, Cream Cheese, Spinach

Nutrition

Calories: 550kcal | Carbohydrates: 20g | Protein: 45g | Fat: 30g | Sodium: 900mg

Why You’ll Love These Breakfast Bowls

Picture this: the sun peeks through your kitchen window, and the aroma of sizzling sausage, golden-brown potatoes, and fluffy scrambled eggs fills the air. You can already feel the energy surging through you, ready to tackle the day ahead. That’s exactly what these Sausage Egg Potato Meal Prep Bowls deliver — a hearty, protein-packed breakfast that doesn’t just fill your belly but ignites your spirit. Ideal for busy mornings or lazy weekends, they’re as versatile as they are delicious. Plus, you can whip them up in advance, so every morning feels like a fresh start without the stress of cooking from scratch.

What Are Sausage Egg Potato Meal Prep Bowls?

These meal prep bowls are a delightful fusion of savory breakfast staples that come together in one convenient package. Think of crispy potatoes, spicy breakfast sausage, and creamy scrambled eggs, all mingling with colorful bell peppers and onions. It’s not just breakfast; it’s a flavor explosion that will keep you energized and satisfied. Whether you’re rushing out the door or lounging on a Sunday morning, these bowls are a game changer.

Ingredients for Your Breakfast Adventure

Eye-level shot of a meal prep bowl featuring sausage, eggs, and diced potatoes, highlighted by natural light.
  • 1 pound breakfast sausage (pork or turkey, depending on your preference)
  • 4 large eggs
  • 2 medium potatoes, diced (Yukon Gold or russet are my favorites)
  • 1 bell pepper, diced (any color you fancy)
  • 1 small onion, diced
  • 1 tablespoon olive oil
  • Salt and pepper to taste
  • Optional toppings: shredded cheese, hot sauce, fresh herbs

Essential Kitchen Equipment

To create these breakfast bowls, you’ll need:

  • A large skillet for sautéing
  • A mixing bowl for whisking the eggs
  • Meal prep containers for storing your delicious creations

How to Make Your Sausage Egg Potato Meal Prep Bowls

Step-by-Step Instructions

Let’s break down the process, so you can embrace the heat with confidence:

  1. Preheat your oven: Get that oven up to 400°F (200°C) — the perfect temperature for cooking those potatoes.
  2. Cook the sausage: In a skillet over medium heat, brown the breakfast sausage until fully cooked. This usually takes about 5-7 minutes. Remove from the skillet and set aside.
  3. Sauté the potatoes: In the same skillet, add a tablespoon of olive oil and toss in the diced potatoes. Sauté until they’re golden brown and tender, which should take about 10-15 minutes. Add the diced bell pepper and onion during the last 5 minutes of cooking for that perfect mix of flavors.
  4. Scramble the eggs: In a bowl, whisk the eggs with a pinch of salt and pepper. Pour the mixture into the skillet, scrambling until fully cooked through.
  5. Combine everything: Mix the cooked sausage back into the skillet with your eggs, potatoes, and veggies. Stir well to combine all those glorious flavors.
  6. Portion it out: Divide the mixture into meal prep containers. Allow them to cool before sealing and storing in the refrigerator.

Tips for Making the Best Breakfast Bowls

  • Don’t rush the potatoes: Allow them to cook until they’re crispy on the outside and tender on the inside. This adds texture and flavor.
  • Experiment with spices: If you’re feeling adventurous, throw in some paprika, garlic powder, or even a pinch of cayenne to spice things up.
  • Customize your toppings: Whether it’s a sprinkle of cheese, a drizzle of hot sauce, or fresh herbs, don’t shy away from personalizing your bowls!

Make-Ahead Instructions

These bowls are perfect for meal prep! Make a batch on Sunday, and you’ll have breakfast ready for the week. Store them in the fridge for up to 4 days, or freeze them for up to 2 months. If you freeze them, just remember to thaw them overnight in the fridge before reheating.

Serving Size

This recipe yields approximately 4 servings, making it ideal for a family breakfast or meal prep for the week.

Prep Time

Prep time is about 15 minutes, with a cooking time of around 20 minutes — perfect for a quick, hearty breakfast.

Nutritional Information (per serving)

Calories: 450 | Protein: 30g | Carbohydrates: 30g | Fat: 25g | Fiber: 3g

Delicious Variations to Try

Once you’ve mastered the basics, feel free to get creative! Here are some variations:

  • Veggie Lovers: Add spinach, mushrooms, or zucchini for extra nutrients and flavor.
  • Make It Southwest: Incorporate black beans, corn, and diced jalapeños for a spicy twist.
  • Cheesy Delight: Mix in your favorite cheese, like pepper jack or feta, for an extra creamy texture.

Storage and Freezing Tips

To keep your breakfast bowls fresh and flavorful:

  • Refrigeration: Store in airtight containers in the fridge for up to 4 days.
  • Freezing: For longer storage, freeze in individual portions. When ready to eat, thaw in the fridge overnight and reheat in the microwave until hot.

Frequently Asked Questions

Can I use different proteins?

Absolutely! Feel free to swap the breakfast sausage for turkey sausage, chicken, or even a plant-based alternative. The key is to ensure it’s fully cooked before adding it to the bowls.

What if I don’t have a skillet?

No worries! You can use a baking dish to roast the potatoes and cook the sausage in the oven. Just keep an eye on the cooking time to ensure everything is perfectly done.

How can I make these bowls vegetarian?

Substitute the sausage with a hearty veggie option like mushrooms, tempeh, or a mix of your favorite beans. Just remember to season well!

Troubleshooting Common Issues

Potatoes not crispy?

Make sure to give them plenty of room in the skillet. If they’re crowded, they’ll steam instead of crisping up. You can also try finishing them under the broiler for a couple of minutes to get that golden finish.

Eggs overcooked?

Keep a close eye on the eggs as they scramble. They should be soft and creamy, so remove them from the heat just as they’re set.

Final Thoughts

Cooking should be an adventure, and with these Sausage Egg Potato Meal Prep Bowls, you can set the stage for a deliciously bold start to your day. Packed with flavor and protein, they’re your ticket to conquering whatever lies ahead. So, roll up your sleeves, embrace the heat, and let your kitchen be your playground. Every bowl tells a story, and I can’t wait to hear yours. Happy cooking!

Sausage Egg Potato Meal Prep Bowls – Quick, Delicious & Protein-Packed Breakfast!

Prep Time 10 minutes
Cook Time 25 minutes
Total Time 35 minutes
Servings 4 bowls
Calories 550
A hearty and nutritious breakfast option that can be prepared ahead of time, packed with protein and flavor.

Ingredients

Meat

  • 1 pound breakfast sausage
  • 4 large eggs
  • 2 medium potatoes, diced
  • 1 diced bell pepper
  • 1 small onion, diced
  • 1 tablespoon olive oil
  • to taste salt and pepper (seasoning)
  • optional toppings shredded cheese, hot sauce, fresh herbs (for serving)

Instructions 

  • Preheat oven to 400°F (200°C). Cook sausage until browned; set aside.
  • Sauté diced potatoes in olive oil until golden, then add bell pepper and onion; cook 5 more minutes.
  • Whisk eggs with salt and pepper. Add eggs to skillet and scramble until cooked.
  • Mix cooked sausage with egg and vegetable mixture. Divide into containers and cool.
  • Reheat in microwave when ready to eat; add optional toppings as desired.

Notes

This meal prep is perfect for busy mornings and can be customized with your favorite toppings.
Calories: 550kcal
Cost: $15
Course: Breakfast
Cuisine: American
Keyword: sausage

Nutrition

Calories: 550kcal | Carbohydrates: 45g | Protein: 35g | Fat: 30g | Sodium: 900mg

Loved this recipe? Save it to your favorite Pinterest board so you can easily find it later! It’s the perfect way to keep all your sweet ideas in one place. ✨

Delicious Sausage Egg Potato Bowl presented in a close-up with soft shadows and vibrant colors.

Why You’ll Fall in Love with These Guilt-Free Brownies

Let’s face it — brownies have a way of making even the toughest of days feel a little better. The rich, fudgy texture, the intoxicating aroma of chocolate wafting through the air, and the sheer joy that comes from biting into a decadent dessert are hard to beat. But what if I told you that you could indulge in all this bliss without the guilt? Enter the Zero Sugar Greek Yogurt Brownies, a game-changer in the world of healthy indulgence!

These brownies are not just a healthier alternative; they redefine the very essence of dessert. By incorporating Greek yogurt, we achieve that luscious, fudgy texture while slashing the sugar content and adding a protein punch. Trust me, these brownies are so rich and flavorful that no one will ever suspect they’re sugar-free! So, grab your mixing bowl and let’s dive into these guilt-free delights that will awaken your inner dessert enthusiast!

The Secret Ingredient: Greek Yogurt

Greek yogurt is the unsung hero in this recipe. It not only provides moisture but also adds a delightful creaminess that elevates the brownies to a whole new level. Plus, it’s packed with protein, making these brownies a satisfying treat that won’t leave you crashing after a sugar high. When selecting your yogurt, aim for the full-fat version for the best texture, but non-dairy alternatives work just as well. Just make sure they’re unsweetened to keep the sugar in check.

Ingredients You’ll Need

Deliciously textured brownies made with Greek yogurt, displayed with a cozy blurred background.

Here’s what you’ll need to whip up these delicious brownies:

  • 1 cup unsweetened cocoa powder – for that rich chocolate flavor
  • 1/2 cup almond flour – adds a nutty depth and keeps the brownies gluten-free
  • 1/2 cup unsweetened applesauce – a natural sweetener that keeps everything moist
  • 1/2 cup Greek yogurt – our secret weapon for fudginess
  • 2 large eggs – for structure and richness
  • 1 teaspoon vanilla extract – enhances all those wonderful flavors
  • 1/2 teaspoon baking powder – helps the brownies rise a bit
  • 1/4 teaspoon salt – balances sweetness and enhances flavor
  • Optional: 1/2 cup sugar-free chocolate chips – for an extra chocolatey kick

Step-by-Step Instructions

Let’s get cooking! Follow these simple steps to create your very own batch of Zero Sugar Greek Yogurt Brownies.

Step 1: Preheat and Prep

First things first, preheat your oven to 350°F (175°C) and grease an 8×8 inch baking pan. This ensures that your brownies slide out easily after baking. You can also line the pan with parchment paper for even easier removal. Just make sure to leave some overhang for easy lifting!

Step 2: Mix Dry Ingredients

In a large bowl, combine the cocoa powder, almond flour, baking powder, and salt. Whisk them together until they’re well mixed. This step is crucial; it helps to evenly distribute the leavening agent and salt throughout the batter.

Step 3: Combine Wet Ingredients

In another bowl, whisk together the Greek yogurt, applesauce, eggs, and vanilla extract until everything is smooth and creamy. The yogurt and applesauce work wonders in keeping the brownies moist, so don’t skimp on this step!

Step 4: Bring It All Together

Now, it’s time to combine your wet and dry mixtures. Pour the wet ingredients into the bowl with the dry ingredients and stir until just combined. Be careful not to overmix; a few lumps are perfectly fine. If you’re feeling indulgent, fold in those sugar-free chocolate chips for an extra layer of chocolate heaven.

Step 5: Bake to Perfection

Pour the batter into your prepared baking pan, spreading it evenly. Bake the brownies in your preheated oven for 20-25 minutes. Keep an eye on them — you want a toothpick inserted into the center to come out clean but with a few moist crumbs attached. This ensures they’re perfectly fudgy!

Step 6: Cool and Serve

Once baked, allow the brownies to cool in the pan for a few minutes before transferring them to a wire rack to cool completely. This cooling step is important, as it allows the brownies to set and makes cutting them into squares much easier. Once cooled, cut them into squares and get ready to indulge!

Tips for Success

Here are a few tips to ensure your brownies turn out perfectly every time:

  • Use quality cocoa powder: The better the cocoa, the richer your brownies will taste.
  • Don’t skip the salt: A pinch of salt enhances the chocolate flavor significantly.
  • Let them cool: Patience is key for the perfect texture. Letting them cool completely will yield fudgy brownies.

Variations to Try

Want to shake things up? Here are some fun variations you can try!

  • Nutty Brownies: Add 1/2 cup of chopped nuts like walnuts or pecans for a delightful crunch.
  • Mint Chocolate: Stir in 1/2 teaspoon of peppermint extract for a refreshing twist.
  • Spicy Kick: Add a pinch of cayenne pepper or chili powder for a surprising, delicious heat!

Storage and Freezing

Wondering how to keep your brownies fresh?

  • Keep Fresh: These brownies can be stored in an airtight container at room temperature for up to 5 days. If you live in a warmer climate, it’s best to refrigerate them, where they’ll stay good for about a week.
  • Freeze: For longer storage, cut the brownies into squares, wrap them in plastic wrap or parchment paper, and place them in a freezer bag. They can last up to 3 months in the freezer!
  • To Enjoy Later: Simply let frozen brownies thaw at room temperature for about an hour. For that freshly baked taste, warm them up in the microwave for about 10-15 seconds.

FAQs About Zero Sugar Brownies

Here are some common questions about these delicious treats:

Why is my brownie batter thicker than usual?

This is normal! The Greek yogurt creates a thicker batter compared to traditional recipes, contributing to that dense, fudgy texture we all love.

Do I need to let the brownies cool completely?

Yes! Allowing them to cool in the pan for about 10 minutes and then on a wire rack is crucial for achieving the perfect brownie texture.

Why did my brownies sink in the middle?

A slight dip in the middle is common due to the Greek yogurt and lower sugar content. Don’t worry; it won’t affect the taste, and that fudgy center is often the best part!

Final Thoughts on Guilt-Free Indulgence

There you have it — a comprehensive guide to making Zero Sugar Greek Yogurt Brownies that will not only satisfy your sweet tooth but also keep you feeling good about what you’re eating. By embracing the power of Greek yogurt and a few simple ingredients, you can create a dessert that’s both rich and healthy. So, roll up your sleeves, unleash your inner chef, and indulge without guilt. Remember, cooking is an adventure, and every great dish starts with a little courage and creativity. Happy baking!

Zero Sugar Greek Yogurt Brownies

Prep Time 10 minutes
Cook Time 25 minutes
Total Time 35 minutes
Servings 9 pieces
Calories 180
Enjoy these delicious and healthy brownies made with Greek yogurt and no added sugar, perfect for a guilt-free treat.

Ingredients

Dry ingredients

  • 1 cup unsweetened cocoa powder
  • 1/2 cup almond flour
  • 1/2 teaspoon baking powder
  • 1/4 teaspoon salt

Wet ingredients

  • 1/2 cup unsweetened applesauce
  • 1/2 cup greek yogurt
  • 2 large eggs
  • 1 teaspoon vanilla extract

Optional

  • 1/2 cup sugar-free chocolate chips (optional)

Instructions 

  • Preheat oven to 350°F (175°C) and grease an 8x8 inch pan.
  • Mix dry ingredients in a bowl.
  • Whisk wet ingredients until smooth.
  • Combine wet and dry, then fold in chocolate chips if using.
  • Pour batter into pan, bake 20-25 minutes, cool before slicing.

Notes

For best results, use high-quality cocoa powder and Greek yogurt.
Calories: 180kcal
Cost: $15
Course: Dessert
Cuisine: American
Keyword: brownies, healthy, sugar free

Nutrition

Calories: 180kcal | Carbohydrates: 20g | Protein: 6g | Fat: 9g | Sodium: 50mg

Loved this recipe? Save it to your favorite Pinterest board so you can easily find it later! It’s the perfect way to keep all your sweet ideas in one place. ✨

Appetizing brownie squares featuring a glossy top, showcasing the ingredients and texture.

Ignite Your Kitchen with This Chicken Zucchini Bake

Welcome to a culinary adventure where the heart of the home meets the flavor of fire! My Chicken Zucchini Bake is not just a recipe; it’s a celebration of bold flavors and hearty textures that come together in a symphony of taste. If you’re ready to elevate your weeknight dinners, you’re in for a treat. This dish combines tender chicken breasts, vibrant zucchini, and a melty, cheesy finish that will leave you craving more. Let’s dive into the world of Mediterranean-inspired cooking and discover why this chicken zucchini bake is a must-try!

Why You’ll Love This Recipe

  • Quick and Easy Prep: With just a handful of ingredients and minimal prep time, this chicken zucchini bake is perfect for busy weeknights.
  • Health-Conscious Choice: Low in carbs and high in flavor, this dish is a fantastic option for those watching their diet.
  • Versatile Ingredients: The ingredients can easily be swapped out. Don’t have chicken? Try turkey or even a plant-based protein!
  • Meal Prep Hero: This chicken zucchini bake is ideal for meal prepping; it reheats beautifully and is perfect for lunch the next day.
  • Flavor Explosion: Packed with Italian seasoning and fresh ingredients, it’s a dish that will wake up your taste buds!

Ingredients Breakdown

Before we get into the cooking, let’s talk about the ingredients that will make this chicken zucchini bake a standout:

  • 4 boneless, skinless chicken breasts (about 1.5 lbs): The star of the show, providing lean protein and a base for the dish.
  • 2 medium zucchinis, sliced into ½ inch rounds: These fresh zucchinis add a delightful texture and moisture to the bake.
  • 2 tbsp olive oil: A drizzle of this liquid gold enhances flavor and helps keep everything moist.
  • 1 cup shredded mozzarella cheese: For that gooey, cheesy goodness that melts beautifully.
  • 2 tsp Italian seasoning: A blend of herbs that elevates the dish and brings that Mediterranean flair.
  • 1 tsp garlic powder: Adds a punch of flavor without the fuss of chopping fresh garlic.
  • Salt and pepper to taste: Essential for seasoning and enhancing all the flavors.

How to Make Chicken Zucchini Bake

A side view of a baked dish featuring sliced zucchinis and chicken topped with melted cheese.

Let’s roll up our sleeves and get cooking! Follow these simple steps to create your masterpiece:

  • Preheat oven to 400°F (200°C). Grease a baking dish with nonstick spray.
  • Season chicken breasts with salt, pepper, and half of the Italian seasoning.
  • Arrange seasoned chicken in the baking dish and surround with zucchini slices.
  • Drizzle with olive oil, then sprinkle garlic powder and remaining Italian seasoning on top.
  • Cover generously with shredded mozzarella cheese.
  • Bake for 30-35 minutes until chicken reaches an internal temperature of 165°F (75°C) and is golden brown.

Expert Tips for Success

Here are some pro tips to ensure your chicken zucchini bake turns out perfectly:

  • Don’t Overcrowd the Dish: To ensure even cooking, make sure your chicken and zucchini aren’t stacked too closely together.
  • Use Fresh Ingredients: Fresh zucchini and high-quality chicken will deepen the flavor of your dish.
  • Experiment with Cheese: Try adding a mix of cheeses like provolone or Parmesan for a richer flavor.
  • Let It Rest: Allow the dish to rest for a few minutes after baking to help the flavors meld together.
  • Adjust Seasoning: Taste before serving and adjust seasoning if necessary; every ingredient can vary in strength.
  • Use a Meat Thermometer: To avoid overcooking, use a meat thermometer to ensure your chicken is perfectly cooked.
  • Garnish with Fresh Herbs: A sprinkle of fresh basil or parsley before serving adds a pop of color and freshness.
  • Make It a One-Pan Wonder: Add other veggies like bell peppers or cherry tomatoes for a complete meal.

Avoid Common Mistakes

Even the best of us can face challenges in the kitchen. Here are some common mistakes to avoid:

  • Overcooking the Chicken: Keep an eye on the time and use a thermometer to check doneness.
  • Using Soggy Zucchini: If your zucchini is too watery, try salting it beforehand to draw out moisture.
  • Skipping the Cheese: Don’t omit the cheese! It’s what makes this dish creamy and satisfying.

Variations to Spice Things Up

Want to mix it up? Here are some delicious variations to try:

  • Mexican Twist: Add black beans, corn, and a sprinkle of taco seasoning for a southwestern flair.
  • Herb-Infused: Swap out Italian seasoning for fresh herbs like thyme or rosemary for a different flavor profile.
  • Spicy Kick: Add jalapeños or a sprinkle of red pepper flakes to elevate the heat.
  • Vegetarian Version: Substitute chicken with chickpeas or lentils for a hearty plant-based option.

Storage and Make-Ahead Instructions

This chicken zucchini bake is perfect for meal prep! Here’s how to store it:

  • Refrigerate: Store leftovers in an airtight container in the fridge for up to 3 days.
  • Reheat: Warm in the oven at 350°F (175°C) until heated through, or microwave in individual portions.
  • Make Ahead: Prepare the dish up to the baking step, cover, and refrigerate for up to 24 hours before baking.

Frequently Asked Questions

Got questions? I’ve got answers! Here are some common inquiries about this dish:

  • Can I use frozen chicken?: Yes, but ensure it’s fully thawed before cooking for even results.
  • What if I don’t have mozzarella?: You can substitute with any melty cheese like cheddar or Monterey Jack.
  • How do I keep zucchini from getting soggy?: Salt the zucchini slices before baking to draw out excess moisture.
  • Can I add other vegetables?: Absolutely! Bell peppers, mushrooms, and spinach would all be great additions.
  • Is this dish gluten-free?: Yes, all the ingredients are naturally gluten-free!
  • Can I freeze the bake?: Yes, freeze before baking for up to 3 months. Thaw and bake as directed.
  • What can I serve with this dish?: Pair it with a fresh salad or crusty bread for a complete meal.
  • How do I ensure my chicken stays juicy?: Don’t overcook it and let it rest before slicing to retain moisture.

Nutritional Insights

This chicken zucchini bake is not only delicious but also packed with nutritional benefits:

  • Low Carb: A great option for those following a low-carb lifestyle.
  • High Protein: Each serving provides a solid amount of protein, perfect for muscle repair and energy.
  • Rich in Vitamins: Zucchini is high in vitamins A and C, contributing to overall health.

Essential Equipment

To make this chicken zucchini bake, you’ll need:

  • Baking Dish: A 9×13 inch dish works perfectly for this recipe.
  • Meat Thermometer: Ensures your chicken is cooked to perfection.
  • Sharp Knife: For slicing vegetables and chicken with ease.

Serving Suggestions

Serve your chicken zucchini bake with:

  • Fresh Salad: A light arugula or spinach salad can balance the flavors.
  • Crusty Bread: Perfect for soaking up any cheesy goodness left on your plate!
  • White Wine: A chilled glass pairs beautifully with the Mediterranean flavors.

Conclusion

Your cooking journey doesn’t end here! This Chicken Zucchini Bake is just the beginning of a world filled with flavor, heat, and creativity. Embrace the thrill of cooking with spices, and let this dish inspire you to explore new culinary horizons. Remember, cooking is not just about feeding the body; it’s about igniting the soul. So grab your skillet, turn up the heat, and let’s make magic happen in the kitchen!

Chicken Zucchini Bake

Prep Time 10 minutes
Cook Time 35 minutes
Total Time 45 minutes
Servings 4 servings
Calories 450
A delicious and healthy baked chicken dish with zucchini and melted mozzarella cheese, perfect for a quick weeknight dinner.

Ingredients

Protein

  • 4 pieces boneless, skinless chicken breasts (about 1.5 lbs)

Vegetables

  • 2 medium zucchinis (sliced into ½ inch rounds)

Oils & Seasonings

  • 2 tbsp olive oil
  • 2 tsp Italian seasoning
  • 1 tsp garlic powder

Cheese

  • 1 cup shredded mozzarella cheese

Salt and Pepper

  • to taste Salt and pepper

Instructions 

  • Preheat oven to 400°F (200°C). Grease a baking dish.
  • Season chicken with salt, pepper, and half of the Italian seasoning. Arrange in dish with zucchini.
  • Drizzle with olive oil, sprinkle garlic powder and remaining Italian seasoning. Cover with mozzarella.
  • Bake for 30-35 minutes until chicken reaches 165°F and cheese is golden.

Notes

Use fresh mozzarella for best flavor. Serve hot and enjoy!
Calories: 450kcal
Cost: $15
Course: Main Course
Cuisine: Italian
Keyword: bake, chicken, zucchini

Nutrition

Calories: 450kcal | Carbohydrates: 20g | Protein: 55g | Fat: 15g | Sodium: 700mg

Unleashing Flavor: Your Ultimate Guide to Crispy Air Fryer Chicken & Mozzarella Wraps

Welcome, fellow flavor adventurers! If you’re ready to take your cooking game up a notch and embrace the vibrant world of spices and textures, you’re in for a treat. Today, we’re diving deep into the mouthwatering realm of Crispy Air Fryer Chicken & Mozzarella Wraps. This dish isn’t just a meal; it’s a culinary journey, blending savory chicken, melting mozzarella, and fresh spinach nestled in a warm tortilla. Let’s spark your cooking passion and transform your weeknight dinners into an unforgettable experience!

Why You’ll Love This Recipe

These wraps are not just delicious; they come with a host of benefits that make them a perfect addition to your kitchen repertoire:

  • Quick & Easy: Ready in under 30 minutes, perfect for busy weeknights.
  • Healthier Alternative: Air frying means less oil without sacrificing that delightful crunch.
  • Customizable: Change up the ingredients and flavors to fit your family’s preferences or dietary needs.
  • Meal Prep Friendly: Great for batch cooking; store extras for quick lunches or dinners.
  • Kid-Friendly: A fun and engaging way to get your little ones involved in the kitchen!

Ingredient Breakdown: The Heart of Your Wraps

Let’s talk about the star players in this dish and how you can tweak them for your taste:

  • Chicken Breasts: Use boneless, skinless chicken breasts for a lean protein source. Substitution: Turkey breast works well for a lighter option.
  • Garlic Powder: Adds aromatic flavor depth. Substitution: Fresh minced garlic can provide a stronger kick.
  • Paprika: Contributes a mild smokiness. Tip: Try smoked paprika for an extra layer of flavor.
  • Whole Wheat Tortillas: A healthier wrap base that holds the filling beautifully. Substitution: Corn tortillas for a gluten-free option.
  • Shredded Mozzarella Cheese: Melts to perfection, adding creaminess. Substitution: Try pepper jack for a spicy twist!
  • Fresh Spinach: Adds color and nutrients. Tip: Kale or arugula can be great alternatives.
  • Ranch Dressing: Complements the flavors perfectly. Optional: Use a yogurt-based dressing for a lighter version.

Steps to Crispy Perfection

Side view of juicy chicken and mozzarella wraps filled with fresh ingredients.

Let’s roll up our sleeves and get cooking! Follow these steps for the ultimate crispy air fryer experience:

  1. Cut the chicken breasts into thin strips. In a mixing bowl, combine the garlic powder, paprika, salt, and black pepper. Add the chicken strips to the bowl and toss to coat evenly with the seasoning.
  2. Preheat the air fryer to 375°F (190°C) for about 3-5 minutes.
  3. Spray the air fryer basket with cooking spray. Place the seasoned chicken strips in a single layer in the basket. Cook for 8 minutes, flipping halfway through, until the chicken is golden brown and cooked through.
  4. Remove the cooked chicken from the air fryer. On each tortilla, place a layer of fresh spinach, followed by a generous amount of shredded mozzarella cheese, and the cooked chicken strips.
  5. Roll the tortillas tightly to enclose the filling. Spray the outside of each wrap lightly with olive oil spray. Place the wraps in the air fryer basket seam-side down.
  6. Air fry the wraps at 375°F (190°C) for an additional 2-3 minutes, or until the tortillas are crispy and golden.
  7. Remove the wraps from the air fryer and let them cool slightly. Slice each wrap in half and serve with ranch dressing if desired.

Pro Tips for Ultimate Flavor

Want to elevate your wraps? Here are some expert insights to take your dish to the next level:

  • Don’t overcrowd the basket: Cook chicken in batches if necessary to ensure even crispiness.
  • Experiment with spices: Add cayenne for heat or Italian seasoning for a Mediterranean flair.
  • Let the chicken rest: Allow cooked chicken to sit for a minute before slicing to retain juices.
  • Spritz for crunch: A light spray of oil before air frying can enhance crunchiness.
  • Use a meat thermometer: Ensure chicken reaches an internal temperature of 165°F (75°C) for safety.
  • Store properly: Keep leftovers in an airtight container in the fridge for up to 3 days.
  • Reheat wisely: Use the air fryer to reheat wraps for the best texture.
  • Get creative with dips: Pair with salsa, guacamole, or your favorite dipping sauces for added flavor.

Avoid These Common Mistakes

Even seasoned cooks can make missteps. Here are some common pitfalls to avoid:

  • Skipping the preheat: Preheating the air fryer is crucial for even cooking.
  • Not seasoning adequately: Don’t be shy with spices; they’re the soul of your dish!
  • Using cold ingredients: Let your chicken come to room temperature for more even cooking.
  • Neglecting to flip: Flipping chicken halfway ensures both sides get that glorious golden color.

Variations to Spice Up Your Wraps

Feel like mixing things up? Here are some delicious variations to try:

  • Buffalo Chicken Wraps: Toss the chicken in buffalo sauce before air frying for a spicy kick.
  • Italian Style: Use pesto instead of ranch dressing, and add sun-dried tomatoes.
  • Veggie Delight: Replace chicken with grilled veggies like bell peppers and zucchini.
  • Breakfast Wrap: Swap chicken for scrambled eggs and add diced tomatoes and cheese.

Storage & Make-Ahead Instructions

Planning ahead can save you time and stress. Here’s how to make your wraps last:

  • Refrigeration: Store leftover wraps in an airtight container for up to 3 days.
  • Freezing: Wrap individually in foil and freeze for up to a month. Reheat in the air fryer from frozen.
  • Make-Ahead: Prepare chicken strips and store them in the fridge. Assemble wraps just before cooking for freshness.

FAQs: Your Burning Questions Answered

Got questions? Let’s tackle some common queries:

  • Can I use frozen chicken? Yes, but ensure it’s fully thawed before seasoning and cooking.
  • What’s the best dipping sauce? Ranch is a classic, but barbecue sauce or honey mustard also work well!
  • How do I make my wraps extra crispy? Ensure they are sprayed with oil and avoid overstuffing them.
  • Can I cook more than two wraps at once? Yes, but it may require adjusting cooking time and ensuring they’re not overcrowded.
  • What if I don’t have an air fryer? You can bake them in a conventional oven at 400°F (200°C) for about 10-15 minutes.
  • Are these wraps gluten-free? Use gluten-free tortillas and ensure all ingredients are gluten-free.
  • Can I add more veggies? Absolutely! Bell peppers, onions, or mushrooms would be fantastic additions.
  • How do I know when the chicken is done? Use a meat thermometer to check for an internal temperature of 165°F (75°C).

Nutritional Tips & Dietary Adaptations

Staying health-conscious? Here are some tips to make your wraps even healthier:

  • Opt for low-fat cheese: Use low-fat mozzarella to reduce calories without sacrificing flavor.
  • Try whole grain tortillas: They add fiber and nutrients compared to regular tortillas.
  • Add more veggies: Incorporate additional greens or roasted vegetables for added nutrition.
  • Substitute dressings: Use a yogurt-based dressing or homemade vinaigrette for a healthier dip.

Essential Equipment for Your Cooking Adventure

Before you get started, make sure you have the right tools:

  • Air Fryer: A reliable air fryer is key for achieving that crispy texture.
  • Mixing Bowls: Use these for seasoning your chicken and prepping your ingredients.
  • Cooking Spray: Essential for preventing sticking and enhancing crispiness.
  • Meat Thermometer: To ensure your chicken is cooked to perfection.

Serving Suggestions: Elevate Your Experience

These wraps are fantastic on their own, but here are some ideas to elevate your meal:

  • Side Salads: Pair with a fresh garden salad or coleslaw for a refreshing crunch.
  • Fries or Sweet Potato Fries: A classic pairing for a satisfying meal.
  • Dips Galore: Serve with a variety of dips like guacamole, salsa, or tzatziki.
  • Garnish: Fresh herbs like cilantro or parsley can add a beautiful finish.

In closing, these Crispy Air Fryer Chicken & Mozzarella Wraps are more than just a recipe; they’re an invitation to explore your culinary creativity. Embrace the warmth of the spices, the joy of cooking, and the excitement of sharing bold flavors with loved ones. So grab your air fryer, unleash your inner chef, and let’s create some magic in the kitchen! Remember, every great dish starts with a sprinkle of adventure. Happy cooking!

Crispy Air Fryer Chicken & Mozzarella Wraps

Prep Time 10 minutes
Cook Time 15 minutes
Total Time 25 minutes
Servings 4 servings
Calories 450
Enjoy these crispy, cheesy chicken wraps made effortlessly in the air fryer, perfect for a quick and delicious meal.

Ingredients

Chicken

  • 2 large chicken breasts (Approximately 1 pound total)
  • 1 teaspoon garlic powder
  • 1 teaspoon paprika
  • 1/2 teaspoon salt
  • 1/2 teaspoon black pepper
  • 4 whole wheat tortillas tortillas
  • 1 cup shredded mozzarella cheese
  • 1 cup fresh spinach leaves
  • 1/4 cup ranch dressing (Optional, for serving)

Instructions 

  • Slice chicken breasts into thin strips and season with garlic powder, paprika, salt, and pepper.
  • Preheat air fryer to 375°F (190°C). Cook chicken for 8 minutes, flipping halfway.
  • Place cooked chicken, spinach, and cheese on tortillas, roll up tightly.
  • Spray wraps with olive oil and air fry at 375°F (190°C) for 2-3 minutes until crispy.
  • Let cool slightly, slice in half, and serve with ranch dressing if desired.

Notes

For extra flavor, add your favorite herbs or spices to the chicken seasoning.
Calories: 450kcal
Cost: $15
Course: Main Course
Cuisine: American
Keyword: air fryer, chicken, Wrap

Nutrition

Calories: 450kcal | Carbohydrates: 40g | Protein: 45g | Fat: 15g | Sodium: 900mg

Why You’ll Adore These Chicken Thighs

There’s something undeniably magical about the aroma that wafts through your kitchen when you bake chicken thighs. As the savory scent mingles with hints of smoked paprika and garlic, it creates a symphony of flavors that beckons everyone to gather around the table. This recipe for Addictively Good Baked Chicken Thighs isn’t just a dish; it’s a culinary experience that transforms your weeknight dinners into celebrations of flavor.

Imagine crispy skin giving way to juicy, tender meat while a sweet and savory glaze dances on your taste buds. These baked chicken thighs are not just about satisfying hunger; they’re about igniting your passion for cooking and bringing a little fire into your kitchen. Whether you’re cooking for a crowd or just for yourself, this recipe is perfect for any occasion.

What You’ll Need

Main Ingredients

Golden-brown chicken thighs on a plate, illuminated by soft natural light.
  • 4 bone-in, skin-on chicken thighs
  • 2 tablespoons olive oil
  • 1 teaspoon garlic powder
  • 1 teaspoon onion powder
  • 1 teaspoon smoked paprika
  • 1 teaspoon dried oregano
  • 1 teaspoon salt
  • 1/2 teaspoon black pepper
  • 1 tablespoon honey
  • 1 tablespoon soy sauce
  • Fresh parsley for garnish

Optional Extras

  • Fresh lemon slices
  • Chili flakes for added heat
  • Other herbs like rosemary or thyme

How to Make the Perfect Baked Chicken Thighs

Prep Your Chicken Like a Pro

The first step to achieving those crispy baked chicken thighs is all in the preparation. Pat your chicken thighs dry with paper towels. This might seem like a trivial step, but trust me, it’s crucial! Moisture is the enemy when it comes to crispiness. The drier the skin, the better the crunch.

Marinade and Flavor Explosion

In a large mixing bowl, combine the olive oil, garlic powder, onion powder, smoked paprika, dried oregano, salt, black pepper, honey, and soy sauce. This blend of spices and sauces is where the magic happens. Each ingredient plays a role in creating an irresistible flavor profile that penetrates the chicken. It’s a beautiful dance of sweet, savory, and smoky notes that will sing to your taste buds.

Add the chicken thighs to the bowl and toss them until they’re thoroughly coated in the marinade. Don’t be shy—give them a good rub down! This is your chance to infuse every inch of that chicken with the bold flavors you’ve just created.

Arrange for Maximum Success

Now it’s time to place the chicken thighs skin-side up on a baking sheet lined with parchment paper. Spacing is key here; make sure the thighs aren’t crowded together. This allows hot air to circulate freely around the chicken, ensuring even cooking and that coveted crispy skin.

Perfect the Oven Technique

Preheat your oven to 425°F (220°C). This high temperature is essential for achieving the perfect balance between crispy skin and juicy meat. Place the baking sheet on the middle rack of your oven to ensure even heat distribution. Bake for about 30-35 minutes, or until the skin is beautifully golden brown and the internal temperature reaches 165°F (75°C).

Rest Before Serving

Once out of the oven, let the chicken rest for about 5 minutes. This step is often overlooked, but it’s crucial for keeping your chicken juicy. Resting allows the juices to redistribute throughout the meat, ensuring that every bite is as flavorful as the last.

Marcus’ Pro Tip

For extra crispy skin, let your chicken sit uncovered in the refrigerator for about 30 minutes before you season it. This additional drying time works wonders! It’s a trick I learned from my grandmother, and it’s never failed me. Trust me, your friends and family will think you’ve stepped up your culinary game!

Ingredient Substitutions & Variations

One of the best parts about this recipe is its versatility. Here are some substitutions and variations to keep things interesting:

  • Swap the honey for maple syrup for a different flavor profile.
  • Use balsamic vinegar instead of soy sauce for a tangy twist.
  • Fresh herbs can replace dried ones; just remember to use three times the amount!
  • If you’re looking for a kick, add cayenne pepper or chili powder to your spice mix.

Storage & Reheating Instructions

If you have any leftovers (though I doubt you will!), store them in an airtight container in the refrigerator for up to four days. For reheating, the oven is your best friend. Preheat it to 350°F (175°C) and warm the chicken for about 10-12 minutes. This will help keep the skin crispy. If you use a microwave, the skin can become soggy, so avoid it if you can.

What to Serve With Baked Chicken Thighs

These baked chicken thighs are incredibly versatile and can be paired with a variety of sides. Here are some of my favorite accompaniments:

  • Roasted Brussels sprouts and creamy mashed potatoes
  • Fluffy rice with steamed broccoli
  • Grilled corn on the cob during summer months
  • Crisp Caesar salad for a lighter option

FAQs About Baked Chicken Thighs

Can I use boneless chicken thighs instead?

Absolutely! Just reduce the cooking time to about 25-30 minutes, as they will cook faster without the bone.

How do I know when they’re perfectly done?

The best way to check is by using a meat thermometer. The internal temperature should reach 165°F (75°C). The juices should run clear, not pink or red.

Why is my chicken skin not getting crispy enough?

Make sure your chicken is thoroughly dried before seasoning. Also, avoid overcrowding the pan, as this can trap steam and result in soggy skin.

Can I marinate these ahead of time for more flavor?

Yes! Marinating for anywhere between 2 to 24 hours will enhance the flavor even more. Just remember to pat dry before baking.

More Recipes You’ll Love

If you enjoyed this recipe, why not explore more culinary adventures? Consider trying my garlic herb roasted chicken breast for a lighter option, or honey glazed chicken drumsticks that the kids will devour. For a comforting dish, my chicken and rice casserole is a must-try. Each recipe is designed to help you embrace the art of cooking boldly.

Wrap Up

Cooking isn’t just about feeding yourself; it’s about creating memories, sparking joy, and sharing love through food. With these Addictively Good Baked Chicken Thighs, you’re not just preparing a meal; you’re crafting an experience that will have your loved ones coming back for seconds. So, grab your apron, embrace the heat, and let’s get cooking! Your kitchen awaits its next masterpiece.

Addictively Good Baked Chicken Thighs

Prep Time 10 minutes
Cook Time 35 minutes
Total Time 45 minutes
Servings 4 pieces
Calories 350
Juicy, flavorful chicken thighs baked to perfection with a simple marinade and crispy skin. Perfect for a quick and satisfying meal.

Ingredients

Main ingredients

  • 4 pieces bone-in, skin-on chicken thighs
  • 2 tablespoons olive oil
  • 1 teaspoon garlic powder
  • 1 teaspoon onion powder
  • 1 teaspoon smoked paprika
  • 1 teaspoon dried oregano
  • 1 teaspoon salt
  • 0.5 teaspoon black pepper
  • 1 tablespoon honey
  • 1 tablespoon soy sauce
  • fresh parsley for garnish fresh parsley (for garnish)

Instructions 

  • Preheat oven to 425°F (220°C).
  • Mix olive oil, garlic powder, onion powder, paprika, oregano, salt, pepper, honey, and soy sauce.
  • Toss chicken with marinade and place on a baking sheet.
  • Bake for 30-35 minutes until crispy and cooked through.
  • Rest for 5 minutes, garnish with parsley, and serve.

Notes

Ensure chicken skin is crispy for the best flavor.
Calories: 350kcal
Cost: $15
Course: Main Course
Cuisine: American
Keyword: baked, chicken, easy

Nutrition

Calories: 350kcal | Carbohydrates: 12g | Protein: 30g | Fat: 20g | Sodium: 900mg

Loved this recipe? Save it to your favorite Pinterest board so you can easily find it later! It’s the perfect way to keep all your sweet ideas in one place. ✨

Juicy, baked chicken thighs presented in a rustic setting, highlighted by shadows.

Why You’ll Love These Energy Bites

If you’re anything like me, you know that life can get pretty hectic. With work, family, and all the little surprises that come your way, finding the time to whip up a healthy snack can feel like an Olympic event. But what if I told you that you could have the sweet, comforting flavor of banana bread at your fingertips in just a few minutes? Enter the Quick & Wholesome Banana Bread Energy Bites! These little gems are not only delicious but also bursting with wholesome ingredients that will fuel your day without weighing you down.

Imagine biting into a soft, chewy energy bite that tastes just like your favorite banana bread, with hints of cinnamon and a satisfying crunch from nuts. And the best part? You can whip these up in a flash, making them the perfect addition to your meal prep routine. Trust me, once you try these, you’ll wonder how you ever lived without them!

Ingredients That Pack a Punch

Let’s talk about what makes these energy bites so phenomenal. The ingredients are simple, yet they come together to create a powerhouse of flavor and nutrition.

  • 2 ripe bananas: The star of the show! Ripe bananas not only lend sweetness but also provide moisture, making these bites irresistibly chewy.
  • 1 cup rolled oats: A great source of fiber, oats help keep you feeling full and satisfied. Plus, they add a nice texture to the bites.
  • 1/2 cup peanut butter or almond butter: Nut butter is where the magic happens. It brings creaminess, healthy fats, and a protein punch to keep your energy levels high.
  • 1/4 cup honey or maple syrup: A touch of sweetness to balance out the flavors and help bind everything together.
  • 1/2 teaspoon vanilla extract: A splash of this fragrant extract elevates the overall flavor, giving it that comforting, baked-good vibe.
  • 1/2 teaspoon cinnamon: A warm spice that pairs perfectly with bananas, adding a hint of warmth and nostalgia.
  • 1/4 cup chopped nuts (walnuts or pecans): For that delightful crunch and an extra layer of nutrition.
  • 1/4 cup chocolate chips (optional): Because who doesn’t love a little indulgence? Add them if you want to turn these bites into a decadent treat!

Let’s Get Cooking!

Delicious energy bites made from bananas, oats, and chocolate chips, captured in warm natural light.

Now that we have our ingredients ready, let’s dive into the steps for creating these delicious energy bites. Get your favorite mixing bowl and let’s get to work!

  1. Mash the bananas: In a large bowl, take those ripe bananas and mash them until they’re smooth. This is where the fun begins – you’ll feel like a kid again, squishing those bananas with a fork!
  2. Mix it all together: Add the rolled oats, peanut butter (or almond butter), honey, vanilla extract, and cinnamon to the mashed bananas. Stir everything until it’s well combined. You want a cohesive mixture that holds together without being too sticky.
  3. Fold in the nuts and chocolate chips: If you’re using chopped nuts and chocolate chips, now’s the time to fold them into the mix. This is where you can really customize your bites to your liking!
  4. Chill for easier handling: Pop the mixture in the refrigerator for about 30 minutes. This step makes it much easier to form those little energy balls.
  5. Roll into bites: Once chilled, take small portions of the mixture and roll them into bite-sized balls. Aim for about one inch in diameter – they should be easy to pop in your mouth!
  6. Prepare for storage: Place the energy bites on a parchment-lined baking sheet. This will prevent them from sticking together while they chill.
  7. Store wisely: Store these energy bites in an airtight container in the refrigerator for up to a week or freeze them for longer storage. Trust me, they won’t last long – they’re just that good!

Tips for Perfect Energy Bites

Creating the perfect energy bite is all about experimentation and finding what works best for you. Here are some tips to ensure your bites come out just right:

  • Use very ripe bananas: The riper, the better! Overripe bananas are sweeter and easier to mash, which means a better texture for your energy bites.
  • Adjust sweetness to taste: If you prefer a sweeter bite, feel free to add a little extra honey or maple syrup. Just remember that the more you add, the stickier your mixture will be!
  • Get creative with mix-ins: Don’t hesitate to swap out the nuts or chocolate chips for other favorites like dried fruits, seeds, or even a sprinkle of shredded coconut.

Variations to Try

If you’re feeling adventurous, consider these fun variations:

  • Nut-Free Version: Substitute the nut butter with sunflower seed butter for a nut-free alternative, perfect for schools or allergy-friendly environments.
  • Protein-Packed Bites: Add a scoop of your favorite protein powder to the mix for an extra muscle-building boost.
  • Spiced Up Bites: Experiment with different spices like nutmeg or pumpkin spice to give your bites a seasonal flair.

Storage and Freezing Tips

These energy bites are perfect for meal prep, and knowing how to store them will ensure you have a delicious snack on hand at all times:

  • Refrigeration: Keep the energy bites in an airtight container in the fridge for up to a week. This way, they’re always ready for a quick snack!
  • Freezing: For longer storage, freeze the bites in a single layer on a baking sheet. Once frozen, transfer them to a freezer-safe bag or container. They can last for up to three months in the freezer.

FAQs About Energy Bites

Let’s tackle some common questions about these delightful bites:

  • Can I make these vegan? Absolutely! Use maple syrup instead of honey and opt for almond butter or sunflower seed butter.
  • What if my mixture is too dry? If the mixture feels crumbly, add a touch more nut butter or a splash of almond milk until it reaches your desired consistency.
  • Can I use quick oats instead of rolled oats? Yes, quick oats will work, but they may yield a slightly different texture. Rolled oats provide a heartier bite.

Troubleshooting Common Issues

Sometimes, things don’t go as planned in the kitchen. Here are solutions to common energy bite mishaps:

  • Too Sticky: If your mixture is too sticky to handle, try chilling it for a bit longer or adding a few more oats to help absorb the moisture.
  • Too Dry: Adding a bit more nut butter or a drizzle of honey can help fix a dry mixture.
  • Flavor Lacking: If the flavors aren’t shining through, a pinch more cinnamon or a drop of vanilla can enhance the taste.

Conclusion: Snack Boldly!

Now that you have the lowdown on these Quick & Wholesome Banana Bread Energy Bites, it’s time to unleash your inner chef and get cooking! These bites are perfect for busy days, after-school snacks, or whenever you need a little pick-me-up. They embody the spirit of adventure in cooking, proving that healthy eating can be both fun and satisfying. So gather your ingredients, channel that kitchen magic, and let these energy bites fuel your next culinary adventure. Happy snacking!

Quick & Wholesome Banana Bread Energy Bites for Meal Prep

Prep Time 10 minutes
Total Time 40 minutes
Servings 12 pieces
Calories 150
These easy-to-make energy bites are perfect for meal prep, combining bananas, oats, and nuts for a healthy snack.

Ingredients

Main ingredients

  • 2 pieces ripe bananas
  • 1 cup rolled oats
  • 0.5 cup peanut butter or almond butter
  • 0.25 cup honey or maple syrup
  • 0.5 teaspoon vanilla extract
  • 0.5 teaspoon cinnamon
  • 0.25 cup chopped nuts (walnuts or pecans)
  • 0.25 cup chocolate chips (optional) (optional)

Instructions 

  • Mash bananas until smooth, then mix with oats, nut butter, honey, vanilla, and cinnamon.
  • Fold in chopped nuts and chocolate chips if using.
  • Refrigerate for 30 minutes, then roll into bite-sized balls.
  • Place on a parchment-lined sheet and store in an airtight container in the fridge.

Notes

Store these energy bites in the fridge for up to a week or freeze for longer storage.
Calories: 150kcal
Cost: $10
Course: Snack
Cuisine: American
Keyword: Banana, Energy Bites

Nutrition

Calories: 150kcal | Carbohydrates: 20g | Protein: 4g | Fat: 8g | Sodium: 20mg

Loved this recipe? Save it to your favorite Pinterest board so you can easily find it later! It’s the perfect way to keep all your sweet ideas in one place. ✨

A plate of banana bread energy bites highlighting their texture and ingredients, with soft shadows.

Unleashing Flavor: The Magic of Green Chile Cauliflower Casserole

If you’re like me, the kitchen is more than just a place to cook; it’s a canvas for culinary creativity, a stage for flavor exploration. My Green Chile Cauliflower Casserole is not just a dish; it’s an adventure, a celebration of heat and harmony that invites everyone to the table. With its creamy textures and a fiery kick from the green chiles, this casserole is a low-carb delight that will make your taste buds dance. Ready to embrace the heat? Let’s dive into this mouthwatering recipe!

Why You’ll Love This Recipe

  • Comforting and Satisfying: This casserole is the ultimate comfort food, warming your heart with every bite while keeping it low-carb!
  • Flavor Explosion: The combination of creamy cheeses and zesty green chiles creates a flavor profile that’s simply irresistible.
  • Quick and Easy: With just a handful of ingredients and straightforward steps, you can whip this up in no time!
  • Versatile Base: Perfect as a main dish or a side, this casserole complements a variety of meals — making it a versatile kitchen staple.
  • Family-Friendly: Even the pickiest eaters will love this dish! It’s a hit with kids and adults alike, making mealtime a breeze.

Ingredient Breakdown: What You’ll Need

Let’s take a closer look at the ingredients that make this casserole a winner:

  • Butter: 2 tbsp for sautéing, lending a rich flavor to the veggies.
  • Chopped Onion: ¾ cup adds sweetness and depth, balancing the dish perfectly.
  • Chopped Celery: ¾ cup for a hint of crunch and freshness that brightens the casserole.
  • Cauliflower Rice: 2 cups serve as the base, providing a tender, low-carb alternative to traditional grains.
  • Monterey Jack Cheese: 1 cup brings creaminess and a mild flavor that melts beautifully.
  • Sharp Cheddar Cheese: 1 cup adds that bold cheese flavor we all crave.
  • Canned Green Chiles: 4 oz, drained, for that signature kick that makes this casserole unforgettable.
  • Full-Fat Sour Cream: ½ cup for creaminess, making every bite indulgently rich.
  • Heavy Cream: ½ cup to enhance the creamy texture and flavor.
  • Salt: 1½ tsp for seasoning; adjust to taste.
  • Black Pepper: ½ tsp for a touch of warmth.
  • Granulated Garlic: ½ tsp adds that irresistible garlicky goodness.

Pro Tips for the Perfect Casserole

A delicious Green Chile Cauliflower Casserole in a baking dish, showcasing layers of cheese and vegetables.

Ready to elevate your cooking game? Here are some expert insights to ensure your casserole shines:

  • Choose Fresh Ingredients: Whenever possible, opt for fresh vegetables and high-quality cheeses — it makes a difference!
  • Don’t Skip the Sauté: Sautéing the onions and celery not only softens them but also enhances their flavors.
  • Mix Cheese Wisely: Fold half the cheese into the mixture before baking; this keeps the casserole creamy and cheesy throughout.
  • Bake Until Golden: Keep an eye on baking time — you want the top to be bubbly and golden brown for that perfect finish.
  • Experiment with Spice: Adjust the heat by using mild or hot green chiles, depending on your preference.
  • Let It Rest: Allow the casserole to cool for a few minutes before serving; it helps the flavors meld beautifully.
  • Make-Ahead Magic: Prepare the casserole ahead of time and bake it just before serving for easy entertaining.
  • Garnish for Flair: Top with fresh herbs or a dollop of sour cream before serving for a beautiful presentation.

Common Mistakes and Troubleshooting

Even seasoned chefs can make mistakes; here’s how to avoid the most common pitfalls:

  • Too Watery? Ensure you drain the cauliflower rice thoroughly to prevent a soggy casserole.
  • Overcooked Cauliflower? Keep an eye on cooking times to avoid mushy vegetables; they should be tender yet firm.
  • Not Cheesy Enough? If you love cheese, don’t hesitate to add more! Just keep it balanced with the other ingredients.
  • Too Spicy? If it turns out too hot, balance it with a little extra sour cream or cheese to cool it down.

Delicious Variations to Try

Why not switch things up? Here are some variations to keep your casserole game strong:

  • Meat Lover’s Delight: Add cooked ground beef, chicken, or turkey for a protein-packed meal.
  • Veggie Booster: Incorporate spinach, bell peppers, or mushrooms for added nutrients and flavor.
  • Spicy Southwest Twist: Mix in jalapeños or a dash of cayenne for an extra kick!
  • Dairy-Free Option: Use cashew cream and dairy-free cheese for a lactose-free casserole.

Storage and Make-Ahead Instructions

Planning ahead? Here’s how to store and prepare this casserole:

  • Storage: Keep leftovers in an airtight container in the fridge for up to 3 days.
  • Freezing: You can freeze the casserole before baking for up to 2 months! Just thaw it overnight in the fridge before baking.
  • Reheating: Reheat in the oven at 350°F (175°C) until heated through, about 20-25 minutes.

FAQs: Your Questions Answered

  • Can I use fresh cauliflower instead of cauliflower rice? Yes! Just chop it finely and steam it until tender before adding to the casserole.
  • Is this casserole gluten-free? Absolutely! All the ingredients are naturally gluten-free.
  • Can I make this dairy-free? Yes! Substitute dairy-free cheese and use coconut cream instead of sour cream and heavy cream.
  • What can I serve with this casserole? It pairs wonderfully with a simple side salad or some roasted vegetables.
  • Can I prepare this casserole in advance? Definitely! Assemble it and store in the fridge overnight before baking.
  • How do I reheat leftovers? Reheat in the oven for best results, or microwave individual servings.
  • What if I want a milder flavor? Use mild green chiles and reduce the garlic to suit your taste.
  • Can I add more spices? Absolutely! Feel free to experiment with your favorite spices to find your perfect blend.

Nutritional Tips and Dietary Adaptations

This casserole not only tastes great but can also fit into various dietary needs:

  • Low Carb: Made with cauliflower rice, this dish is perfect for keto and low-carb diets.
  • High Protein: Adding chicken or turkey can boost the protein content.
  • Vegetarian Friendly: Keep it meatless for a wholesome vegetarian meal.
  • High Fiber: The addition of vegetables ensures you get a healthy dose of fiber with every serving.

Equipment Recommendations

Here’s what you’ll need to whip up this delicious casserole:

  • Large Skillet: Essential for sautéing your vegetables to perfection.
  • Baking Dish: A medium-sized dish is perfect for this recipe.
  • Mixing Bowl: For combining all your delicious ingredients.
  • Spatula: A sturdy spatula will help you mix and serve with ease.

Serving Suggestions

This casserole is versatile and can be served in many ways:

  • As a Main Dish: Serve it hot, right out of the oven, for a hearty and satisfying meal.
  • As a Side: Pair it with grilled meats or a fresh salad for a balanced plate.
  • Garnished: Top with fresh cilantro or a dollop of sour cream to add a pop of color and flavor.

In conclusion, my Green Chile Cauliflower Casserole is more than just a recipe; it’s a journey into the heart of flavor, comfort, and creativity. So grab your skillet, unleash your inner chef, and dare to embrace the heat. Happy cooking!

Green Chile Cauliflower Casserole

Prep Time 10 minutes
Cook Time 25 minutes
Total Time 35 minutes
Servings 4 servings
Calories 350
A cheesy, flavorful casserole combining cauliflower, green chiles, and rich cheeses for a satisfying low-carb meal.

Ingredients

Dairy

  • 2 tbsp butter
  • ¾ cup chopped onion
  • ¾ cup chopped celery
  • 1 cup shredded Monterey Jack cheese
  • 1 cup shredded sharp cheddar cheese
  • 4 oz canned green chiles, drained
  • ½ cup full-fat sour cream
  • ½ cup heavy cream
  • tsp salt
  • ½ tsp black pepper
  • ½ tsp granulated garlic

Instructions 

  • Preheat oven to 375°F (190°C) and grease a baking dish.
  • Melt butter in a skillet; sauté onion and celery until soft.
  • Add cauliflower rice; cook 3–4 minutes. Mix in chiles, sour cream, cream, salt, pepper, and garlic.
  • Fold in half of each cheese, transfer to dish, top with remaining cheese, and bake 20–25 minutes.

Notes

For extra flavor, add a pinch of paprika or cayenne pepper.
Calories: 350kcal
Cost: $15
Course: Main Course
Cuisine: American
Keyword: Cauliflower, Cheese, Green Chiles

Nutrition

Calories: 350kcal | Carbohydrates: 15g | Protein: 20g | Fat: 25g | Sodium: 800mg