Author

Avery Collins

Browsing

Unleashing Flavor in Every Bite

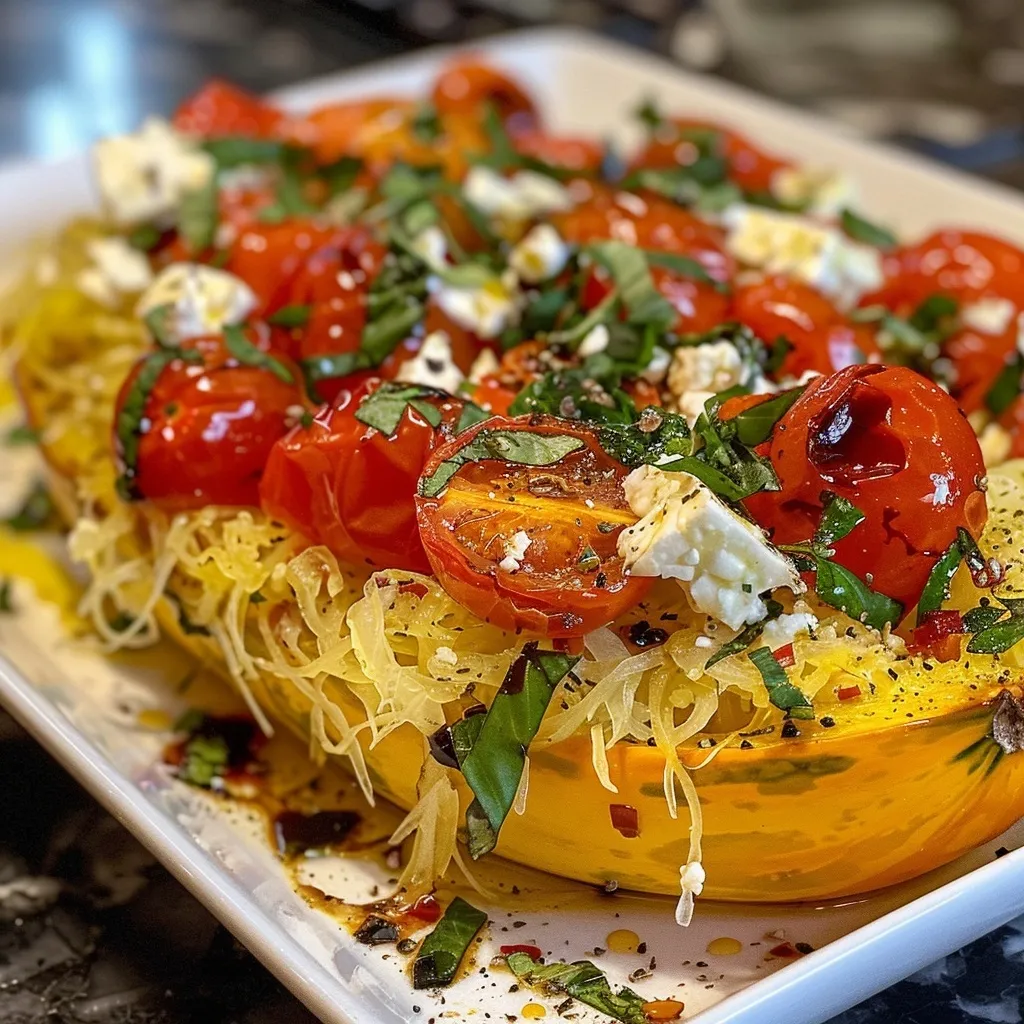
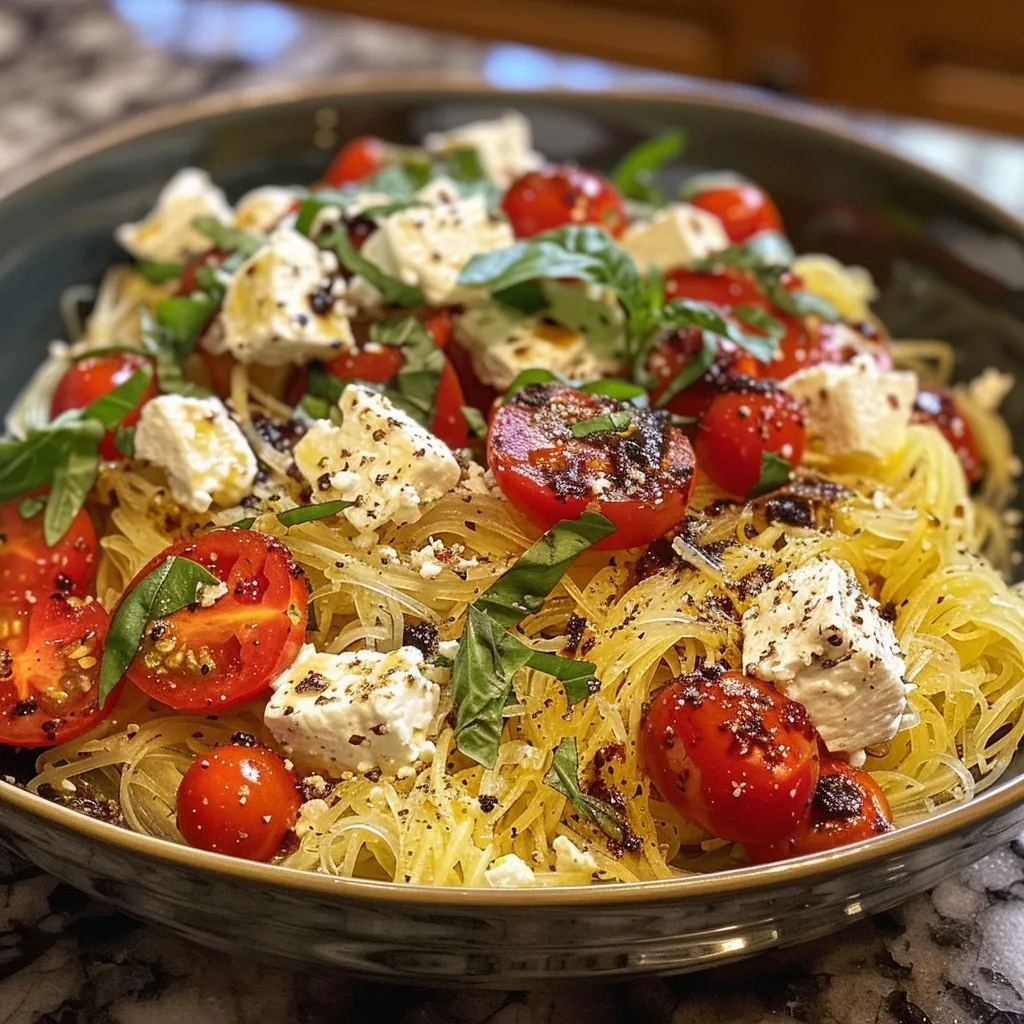
Welcome to the bold and vibrant world of Baked Feta & Tomato Spaghetti Squash, where culinary magic happens! This dish is not just a meal; it’s an adventure for your taste buds. Combining the creamy tang of feta with the juicy burst of cherry tomatoes, all nestled in a tender, roasted spaghetti squash, this recipe is a celebration of flavor and spice. Whether you’re looking for a low-carb option, a vegetarian delight, or simply a dish that makes you feel alive, you’ve hit the jackpot!

Why You’ll Love This Recipe

  • Flavor Explosion: The combination of roasted feta, tomatoes, and fresh herbs creates a creamy, cheesy sauce that will leave you wanting more.
  • Healthy and Low-Carb: Perfect for those watching their carb intake, spaghetti squash is a fantastic alternative to traditional pasta.
  • Quick and Easy: With minimal prep and only a handful of ingredients, this dish can be on your table in under an hour.
  • Versatile Base: This recipe serves as a blank canvas — customize it with your favorite spices, proteins, or vegetables.
  • Meal Prep Friendly: Make it ahead of time and enjoy leftovers throughout the week without sacrificing flavor.

Ingredients Breakdown

This recipe calls for a few simple ingredients that come together to create a symphony of flavors. Here’s what you’ll need:

  • 1 medium spaghetti squash (3- to 3½-lb.): A nutritious, low-carb base for your meal.
  • 3 tablespoons extra-virgin olive oil: For drizzling and adding richness.
  • 1/4 teaspoon crushed red pepper: Adds a kick of heat; adjust to your liking!
  • 1/4 teaspoon ground pepper: Freshly ground for optimal flavor.
  • 1/8 teaspoon salt: Enhances all the flavors.
  • 1 (4-oz.) block feta cheese: The star of the show, creamy and tangy.
  • 8 ounces cherry tomatoes (about 1½ cups): Bursting with sweetness, these add a juicy contrast.
  • 3 tablespoons chopped fresh basil: For that aromatic lift.
  • 1 tablespoon minced garlic: Essential for depth of flavor.
  • 1 1/2 teaspoons chopped fresh oregano: A fragrant herb that complements the other ingredients.
  • 1 tablespoon balsamic glaze: For a touch of sweetness and acidity at the finish.

Step-by-Step Instructions

Side view of a bowl filled with baked feta and cherry tomatoes on spaghetti squash.

Creating this dish is a breeze with these simple steps:

  1. Preheat your oven to 400°F. Line a large rimmed baking sheet with parchment paper or foil.
  2. Place the spaghetti squash halves, cut-sides up, on the prepared baking sheet. Drizzle with 1 tablespoon of olive oil, then sprinkle with crushed red pepper, ground pepper, and salt.
  3. In each squash half, place a piece of feta, ¾ cup of cherry tomatoes, 1½ tablespoons of basil, 1½ teaspoons of garlic, and ¾ teaspoon of oregano. Drizzle with another 1½ teaspoons of olive oil.
  4. Bake in the preheated oven until the squash flesh is tender and the tomatoes burst, about 50 to 55 minutes.
  5. Once done, remove from the oven. Using a fork and tongs, scrape the squash contents and long strands into a medium bowl. Stir in the remaining tablespoon of olive oil.
  6. Return the mixture to the squash shells, cut each in half widthwise, and transfer to plates. Drizzle with balsamic glaze and serve warm.

Pro Tips for the Perfect Dish

  • Choose the Right Squash: Look for a firm, heavy spaghetti squash with a smooth skin. The heavier, the better!
  • Prep Ahead: Roast the squash and prepare the filling in advance for a quick weeknight meal.
  • Experiment with Spices: Don’t hesitate to add your favorite spices like smoked paprika or Italian seasoning for extra flair.
  • Adjust the Heat: If you love heat, add more crushed red pepper or even a pinch of cayenne.
  • Perfectly Roasted Tomatoes: For a more caramelized taste, roast the tomatoes separately before adding them to the dish.
  • Fresh Herbs Matter: Use fresh herbs instead of dried ones for a brighter flavor.
  • Let It Rest: Allow the dish to cool slightly before serving to enhance the flavors.
  • Leftover Magic: Use leftovers to make a delicious frittata or grain bowl.

Common Mistakes & Troubleshooting

Even the best chefs can have off days. Here are common pitfalls and how to avoid them:

  • Overcooking the Squash: Keep an eye on your squash. If it’s mushy, it will lose its texture. Aim for tender but firm strands.
  • Undercooked Tomatoes: Make sure your tomatoes burst for maximum flavor. If they don’t, give them a few extra minutes in the oven.
  • Dry Dish: If your dish feels dry, drizzle with extra olive oil or balsamic glaze before serving.
  • Lack of Flavor: Taste and season as you go. Don’t be shy with salt and pepper!

Recipe Variations

Feeling adventurous? Try these fun twists on the classic recipe:

  • Mexican Fiesta: Add black beans, corn, and a sprinkle of taco seasoning for a southwestern flair.
  • Italian Herb Delight: Incorporate sun-dried tomatoes, olives, and a mix of Italian herbs for a Mediterranean experience.
  • Protein-Packed: Top with grilled chicken or shrimp for a filling meal.
  • Cheesy Goodness: Mix in mozzarella or Parmesan cheese for an extra cheesy bite.

Storage and Make-Ahead Instructions

This dish is perfect for leftovers! Here’s how to store it:

  • Refrigerator: Store any leftovers in an airtight container in the fridge for up to 3 days.
  • Freezer: Freeze portions in airtight containers for up to 3 months. Reheat in the oven or microwave.
  • Make-Ahead: Roast the squash and prepare the filling a day in advance. Assemble and bake right before serving.

FAQs

Here are some common questions about this dish:

  • Can I use a different cheese? Yes, goat cheese or mozzarella can also be delicious alternatives.
  • Is spaghetti squash gluten-free? Absolutely! It’s a fantastic gluten-free substitute for traditional pasta.
  • How do I know when the squash is done? The flesh should be fork-tender, and you should be able to scrape it into strands easily.
  • Can I add meat to this recipe? Definitely! Ground turkey or chicken can be mixed in for a heartier meal.
  • What’s the best way to cut a spaghetti squash? Microwave it for 5 minutes to soften before cutting to make it easier!
  • Can I reheat leftovers? Yes, gently reheat in the microwave or oven until warmed through.
  • What can I serve it with? It pairs wonderfully with a fresh salad or crusty bread to soak up the flavors.
  • How do I enhance the flavor? Don’t hesitate to adjust herbs and spices to your taste — cooking is all about personalization!

Nutritional Tips and Dietary Adaptations

This recipe is not only delicious but also packed with nutrients:

  • Low-Calorie: Spaghetti squash is low in calories yet high in fiber, making it a great choice for weight management.
  • Rich in Vitamins: Tomatoes are rich in antioxidants and vitamins A and C, promoting overall health.
  • Vegetarian-Friendly: A perfect meal for vegetarians; just ensure your cheese is rennet-free if you’re strictly vegan.
  • Customizable to Diets: Easily adaptable for keto, paleo, and other dietary preferences by adjusting ingredients.

Essential Equipment Recommendations

To make this dish, you’ll need:

  • Sharp Knife: For cutting the spaghetti squash.
  • Baking Sheet: A large rimmed baking sheet to hold the squash and toppings.
  • Parchement Paper: To make cleanup easy and avoid sticking.
  • Fork: For scraping the squash into strands.

Serving Suggestions

Make your meal even more delightful with these serving ideas:

  • Garnish: Top your dish with extra fresh basil or a sprinkle of crushed red pepper for a pop of color and flavor.
  • Side Salad: Pair with a mixed green salad drizzled with a light vinaigrette for a refreshing contrast.
  • Crusty Bread: Serve with crusty bread or garlic bread to soak up the creamy sauce.

Conclusion

Cooking should be an adventure that excites your senses, and this Baked Feta & Tomato Spaghetti Squash recipe embodies that spirit! Embrace the warmth of the oven, the inviting aroma of fresh herbs, and the thrill of tasting something truly special. Whether you’re enjoying this dish alone or sharing it with friends, let every bite remind you that food is not just fuel; it’s a story waiting to be told. So grab your skillet, bring on the spice, and let’s get cooking! Your taste buds will thank you.

Baked Feta & Tomato Spaghetti Squash

Prep Time 10 minutes
Cook Time 55 minutes
Total Time 1 hour 5 minutes
Servings 4 servings
Calories 350
A delicious and healthy baked spaghetti squash topped with feta, cherry tomatoes, and fresh herbs, perfect for a flavorful vegetarian meal.

Ingredients

Main

  • 1 medium spaghetti squash (halved lengthwise and seeded)
  • 3 tablespoons extra-virgin olive oil (divided)
  • 1/4 teaspoon crushed red pepper
  • 1/4 teaspoon ground pepper
  • 1/8 teaspoon salt
  • 4 oz. feta cheese (halved)
  • 8 ounces cherry tomatoes (about 1½ cups)
  • 3 tablespoons chopped fresh basil (plus more for garnish)
  • 1 tablespoon minced garlic
  • 1.5 teaspoons chopped fresh oregano
  • 1 tablespoon balsamic glaze

Instructions 

  • Preheat oven to 400°F (200°C). Prepare a baking sheet with parchment or foil.
  • Place squash halves on the sheet, drizzle with 1 tbsp oil, and season with red pepper, pepper, and salt. Add feta, tomatoes, basil, garlic, and oregano to each half. Drizzle with 1½ tsp oil.
  • Bake for 50-55 minutes until flesh is tender and tomatoes burst.
  • Scrape out the flesh and strands into a bowl, stir in remaining oil. Return to shells, cut in half, and plate. Drizzle with balsamic glaze and serve.

Notes

For extra flavor, sprinkle with additional basil before serving.
Calories: 350kcal
Cost: $15
Course: Main Course
Cuisine: American
Keyword: baked, pasta, Vegetarian

Nutrition

Calories: 350kcal | Carbohydrates: 45g | Protein: 12g | Fat: 15g | Sodium: 600mg

Why You’ll Love This Lettuce Wrap Sandwich

Let’s be real: sandwiches can sometimes feel a bit heavy, bogging you down instead of lifting you up. That’s where the Healthy Lettuce Wrap Sandwich steps in like a breath of fresh air! This vibrant dish celebrates the crunchiness of crisp lettuce, the satisfaction of protein-packed chicken, and the zesty kick of fresh vegetables. It’s a culinary adventure that’s not only healthy but also bursting with flavor, proving that light meals can be exciting and fulfilling.

Imagine biting into a wrap where the cool crunch of lettuce meets the savory warmth of shredded chicken, all harmoniously blended with colorful veggies. Each bite is a celebration of textures and tastes, making it the perfect choice for lunch, a quick dinner, or even an energizing snack. Plus, this recipe invites you to get creative, tailoring it to your taste buds and dietary needs.

What You’ll Need

Before we dive into the preparation, let’s gather our ingredients to make this delicious wrap:

  • 1 head of romaine or iceberg lettuce
  • 1 cup cooked chicken breast, shredded
  • 1/2 cup diced bell peppers
  • 1/4 cup diced cucumbers
  • 1/4 cup shredded carrots
  • 1/4 cup hummus or Greek yogurt
  • 1 tablespoon olive oil
  • Salt and pepper to taste
  • Optional: sliced avocado or tomatoes

These ingredients come together to create a delightful and nutritious meal, perfect for any time of day!

Steps to Create Your Lettuce Wraps

Delicious lettuce wrap sandwich featuring vibrant fillings of chicken, bell peppers, and cucumbers, shot in natural light.

Step 1: Prepare the Lettuce

Start with the star of the show: the lettuce. Whether you choose romaine or iceberg, carefully wash the leaves under cold water. Pat them dry with a clean kitchen towel or paper towels. Make sure to select sturdy, intact leaves that can cradle your fillings without tearing—this is crucial for the perfect wrap!

Step 2: Mix Up the Filling

In a large bowl, combine the shredded chicken, diced bell peppers, cucumbers, and carrots. These vibrant ingredients not only add flavor but also make your wrap visually appealing. The combination of colors is a feast for the eyes! Then, drizzle in the olive oil, season with salt and pepper, and stir until everything is well coated and evenly mixed.

Step 3: Assemble Your Wraps

Now comes the fun part! Take a lettuce leaf and spread a thin layer of hummus or Greek yogurt on it. This not only adds creaminess but also acts as a glue to hold everything together. Spoon a generous amount of your chicken and vegetable mixture onto the leaf, leaving some space at the edges for wrapping.

Step 4: Wrap It Up

Fold the sides of the lettuce leaf over the filling, then roll it from the bottom up. You want to keep it tight enough so that all the deliciousness stays inside but not so tight that the leaf tears. If you’re feeling fancy, you can wrap it in parchment paper to keep things neat and tidy, especially if you’re packing it for lunch.

Tips for the Perfect Lettuce Wrap

Before you dive in, here are a few tips to ensure your wraps turn out amazing:

  • Choose Fresh Ingredients: Fresh veggies and poultry make all the difference. Opt for organic if possible.
  • Don’t Overstuff: It’s tempting to pile on the fillings, but keeping it modest will make wrapping easier and prevent messes.
  • Layer Wisely: Spread ingredients evenly to ensure every bite is bursting with flavor!
  • Chill Before Serving: If you have time, let the filled wraps sit in the fridge for about 15-30 minutes. This allows the flavors to meld and makes for a refreshing bite.

Variations to Try

One of the beauties of this recipe is its versatility. Feel free to play around with your ingredients! Here are some variations to consider:

  • Protein Swaps: Substitute the chicken with shredded turkey, tofu, or even a flavorful canned tuna for a different protein punch.
  • Add Some Spice: For those who love a kick, toss in some diced jalapeños or a sprinkle of red pepper flakes for added heat.
  • Herbs and Greens: Add fresh herbs like cilantro, basil, or mint for an extra layer of flavor. You can also use spinach or arugula in addition to the lettuce.

Storage and Freezing Instructions

While these wraps are best enjoyed fresh, you can prep components ahead of time for quick assembly. Here’s how to store them:

  • Refrigeration: Store the shredded chicken and chopped veggies in airtight containers separately. They’ll keep well in the fridge for up to 3 days.
  • Assembled Wraps: If you’ve made wraps ahead of time, wrap them tightly in parchment paper and store them in the fridge for up to 4 hours. This helps maintain crunch.
  • Freezing: While I don’t recommend freezing assembled wraps, you can freeze cooked chicken and chopped veggies separately for future use. Just thaw and assemble when you’re ready!

Frequently Asked Questions

Can I use different lettuce types?

Absolutely! While romaine and iceberg are popular choices, butter lettuce or even collard greens can work beautifully. Just ensure they’re sturdy enough to hold your fillings.

What can I serve with my lettuce wraps?

These wraps pair wonderfully with a light side salad, homemade soup, or even some baked sweet potato fries for a satisfying meal.

Can I make these wraps vegan?

Yes! Just omit the chicken and add more veggies or plant-based protein options like chickpeas or lentils. You can also use avocado or a nut-based spread for creaminess!

Troubleshooting Common Issues

If you find yourself facing some challenges while making your lettuce wraps, don’t worry! Here are some common issues and how to fix them:

  • Tear in the Lettuce: If your lettuce tears, simply use a larger piece or patch it up with smaller leaves as necessary.
  • Filling Falls Out: Ensure you’re not overstuffing your wraps, and consider rolling them tighter.

Conclusion

Cooking should be an adventure, and with this Healthy Lettuce Wrap Sandwich, you’re not just preparing a meal; you’re creating an experience. With fresh ingredients, bold flavors, and the thrill of wrapping it all up in crisp lettuce, you’ll find yourself craving these delightful wraps again and again. So grab your lettuce, unleash your creativity, and dive into a world where healthy eating meets exciting flavors. Happy cooking!

Healthy Lettuce Wrap Sandwich

Prep Time 10 minutes
Total Time 10 minutes
Servings 2 servings
Calories 250
A light and nutritious sandwich alternative using fresh lettuce and colorful fillings, perfect for a healthy lunch.

Ingredients

Lettuce

  • 1 head romaine or iceberg lettuce
  • 1 cup cooked chicken breast, shredded
  • 1/2 cup diced bell peppers
  • 1/4 cup diced cucumbers
  • 1/4 cup shredded carrots
  • 1/4 cup hummus or Greek yogurt
  • 1 tablespoon olive oil
  • to taste salt and pepper (Adjust as preferred)
  • optional sliced avocado or tomatoes (For topping)

Instructions 

  • Wash and dry the lettuce leaves and set aside.
  • Mix shredded chicken, bell peppers, cucumbers, and carrots in a bowl.
  • Add olive oil, salt, and pepper; stir well.
  • Spread hummus or Greek yogurt on each lettuce leaf.
  • Spoon the chicken mixture onto the lettuce leaves, add optional toppings, and wrap.

Notes

Use fresh, crisp lettuce for best results and customize toppings as desired.
Calories: 250kcal
Cost: $12
Course: Lunch
Cuisine: Healthy
Keyword: chicken, Lettuce, vegetables

Nutrition

Calories: 250kcal | Carbohydrates: 20g | Protein: 25g | Fat: 8g | Sodium: 300mg

Loved this recipe? Save it to your favorite Pinterest board so you can easily find it later! It’s the perfect way to keep all your sweet ideas in one place. ✨

An appetizing Healthy Lettuce Wrap Sandwich showcasing fresh ingredients, with soft shadows enhancing the textures.

Why This Dish Will Become Your New Favorite

When it comes to whipping up something special for dinner, many of us often find ourselves torn between flavor and health. Well, let me tell you, my friends, Low-Carb Garlic Chicken with Green Beans is here to bridge that gap. This dish doesn’t just deliver on taste—it’s a vibrant celebration of garlic, lemon, and fresh green beans that will have your taste buds dancing with joy. And the best part? It’s a feast for the senses that won’t weigh you down. In a world of heavy dinners that leave you sluggish, this low-carb delight will keep you light on your feet.

Imagine succulent chicken breasts, marinated in a bold garlic and lemon infusion, surrounded by crisp green beans—each bite is an explosion of flavor that sings of home-cooked goodness. Plus, it’s a breeze to prepare, making it perfect for busy weeknights or elegant gatherings alike. Whether you’re looking to cut carbs or simply want to enjoy a meal that feels decadent without the guilt, this recipe is your answer. So, let’s dive into the magic of cooking that can ignite your dinner table!

Ingredients That Pack a Punch

Before we roll up our sleeves and get cooking, let’s gather our ingredients. This dish is all about simplicity, yet each component plays a vital role in creating a symphony of flavors:

  • 4 boneless, skinless chicken breasts – the star of our show, juicy and tender.
  • 2 cups green beans, trimmed – fresh and vibrant, adding a crunchy texture.
  • 4 cloves garlic, minced – because what’s a garlic dish without plenty of garlic?
  • 3 tablespoons olive oil – for richness and moisture.
  • 1 teaspoon salt – to enhance all the flavors.
  • 1/2 teaspoon black pepper – for a little bite.
  • 1 teaspoon dried oregano – a hint of earthiness that complements the garlic.
  • 1 tablespoon lemon juice – brightening everything up!
  • Fresh parsley for garnish – because we eat with our eyes first!

Step-by-Step Cooking Instructions

Delicious Low-Carb Garlic Chicken served with vibrant green beans, illuminated by soft natural light.

Now that we have our ingredients, it’s time to embark on this culinary adventure. Follow these steps to create a dish that will make your kitchen smell divine:

Preheat the Oven

Start by preheating your oven to 400°F (200°C). This ensures your chicken will cook evenly and achieve that perfect golden brown finish.

Mix the Marinade

In a large mixing bowl, combine the olive oil, minced garlic, salt, black pepper, dried oregano, and lemon juice. Give it a good stir until fully blended. This marinade is where the magic begins, so don’t rush it!

Marinate the Chicken

Add the chicken breasts to the bowl and ensure they are thoroughly coated with the garlic mixture. Let them soak up those flavors for at least 15 minutes. If you have more time, marinating for up to 2 hours in the refrigerator will only deepen the flavor.

Prepare the Baking Sheet

Line a baking sheet with parchment paper for easy cleanup and to keep everything from sticking. This step is crucial for a successful bake.

Add the Chicken and Green Beans

Once the chicken is well-marinated, place the breasts on the prepared baking sheet. In the same bowl, toss the trimmed green beans with any remaining garlic mixture. Spread them around the chicken on the baking sheet, creating a lovely, colorful scene.

Bake to Perfection

Bake in the preheated oven for 20-25 minutes, or until the chicken is cooked through and the green beans are tender-crisp. The chicken should reach an internal temperature of 165°F (75°C). Pro tip: Use a meat thermometer to get it just right!

Garnish and Serve

Once out of the oven, let everything rest for a few minutes. This allows the juices to redistribute, ensuring your chicken is juicy and tender. Finish with a sprinkle of freshly chopped parsley for a pop of color and flavor before serving.

Tips for a Perfect Dish

Here are some insider tips to ensure your garlic chicken turns out beautifully every time:

  • Don’t Skimp on the Garlic: More garlic means more flavor, so feel free to adjust the amount to your liking.
  • Let It Rest: Allowing the chicken to rest after baking is crucial for keeping it juicy.
  • Experiment with Flavors: This recipe is a great base to get creative! Add a splash of balsamic vinegar for a tangy twist or a pinch of red pepper flakes for some heat.

Variations to Spice Things Up

If you’re feeling adventurous, don’t hesitate to modify the recipe. Here are some delicious variations:

  • Swap the Veggies: While green beans are a fantastic choice, feel free to use asparagus, zucchini, or bell peppers for a vibrant medley.
  • Add Cheese: Sprinkle some grated Parmesan or feta cheese over the top during the last few minutes of baking for a cheesy finish.
  • Herb it Up: Fresh herbs like thyme or rosemary can also be used in place of oregano for a different flavor profile.

Substitutions for Dietary Needs

Got specific dietary requirements? No problem! Here are some easy substitutions:

  • Low-Fat Option: Choose skinless chicken thighs for an even juicier result.
  • Vegan Version: Substitute chicken with firm tofu or tempeh, and adjust the cooking time accordingly.
  • Gluten-Free: This recipe is naturally gluten-free, so you can enjoy without worry!

Essential Equipment

To make this dish, you’ll need:

  • A large mixing bowl for marinating.
  • A baking sheet lined with parchment paper for easy cleanup.
  • A meat thermometer to ensure your chicken is cooked perfectly.

Storage and Freezing Tips

If you want to prepare in advance or have leftovers, here’s how to store your chicken:

  • Refrigeration: Store leftovers in an airtight container in the fridge for up to 3 days.
  • Freezing: You can freeze the cooked chicken and green beans for up to 3 months. Just make sure to let them cool before transferring to a freezer-safe container.

FAQs: Your Questions Answered

Can I use frozen green beans?

Absolutely! Just make sure to thaw them first and pat them dry to avoid excess moisture.

What if I don’t have fresh lemons?

Bottled lemon juice works in a pinch, but fresh lemons provide the best flavor. Don’t forget to zest them if you can!

How do I know when the chicken is fully cooked?

Using a meat thermometer is the best way to ensure your chicken is cooked through. It should read 165°F (75°C) when inserted into the thickest part of the breast.

Can I marinate the chicken overnight?

Yes! Marinating overnight enhances the flavor even more, making it a great option for meal prep.

Final Thoughts: Celebrate the Joy of Cooking

There you have it! Low-Carb Garlic Chicken with Green Beans is more than just a recipe; it’s a way to connect with your kitchen and celebrate the joy of cooking. As you gather around the table with family or friends, remember that every meal shared is a moment created. So, don’t shy away from experimenting with flavors and techniques. Embrace the adventure of cooking, and let each dish tell a story. Here’s to many flavorful dinners ahead—grab your skillet and let’s get cooking!

Low-Carb Garlic Chicken with Green Beans

Prep Time 10 minutes
Cook Time 20 minutes
Total Time 30 minutes
Servings 4 servings
Calories 350
A flavorful low-carb dish featuring tender garlic chicken breasts roasted with fresh green beans, perfect for a healthy meal.

Ingredients

Protein

  • 4 pieces boneless, skinless chicken breasts

Vegetables

  • 2 cups green beans, trimmed

Aromatics & Oils

  • 4 cloves garlic, minced
  • 3 tablespoons olive oil
  • 1 teaspoon salt
  • 1/2 teaspoon black pepper
  • 1 teaspoon dried oregano
  • 1 tablespoon lemon juice

Garnish

  • fresh parsley fresh parsley for garnish

Instructions 

  • Preheat oven to 400°F (200°C).
  • Mix olive oil, garlic, salt, pepper, oregano, and lemon juice. Coat chicken and toss green beans with remaining mixture.
  • Arrange chicken and green beans on a baking sheet and bake for 20-25 minutes.
  • Let rest briefly, then garnish with parsley before serving.

Notes

Ensure chicken is cooked through for safety.
Calories: 350kcal
Cost: $15
Course: Main Course
Cuisine: American
Keyword: chicken, garlic, Green Beans

Nutrition

Calories: 350kcal | Carbohydrates: 10g | Protein: 45g | Fat: 15g | Sodium: 700mg

Loved this recipe? Save it to your favorite Pinterest board so you can easily find it later! It’s the perfect way to keep all your sweet ideas in one place. ✨

Mouthwatering Low-Carb Garlic Chicken alongside crisp green beans, showcasing rich textures and colors.

Ignite Your Culinary Adventure with This Keto Ground Beef Skillet!

Welcome to a flavor-packed journey that will awaken your taste buds and inspire your next meal! This Keto Ground Beef Skillet with Broccoli is not only a delightful combination of textures and tastes, but it’s also an easy way to whip up a satisfying dinner in no time. Perfect for busy weeknights or lazy weekends, this dish brings together the hearty richness of ground beef with the vibrant crunch of broccoli, all coated in a creamy, spicy sauce. It’s time to embrace the heat and dive into the cooking adventure ahead!

Why You’ll Love This Recipe

Here are five irresistible reasons to make this keto ground beef skillet your next go-to meal:

  • Quick and Easy: With just a handful of simple ingredients and minimal prep time, you’ll have a delicious meal on the table in under 30 minutes.
  • Low-Carb Goodness: This dish is perfect for anyone following a low-carb or keto diet, allowing you to indulge without the guilt.
  • One-Pan Wonder: Enjoy the convenience of cooking everything in one skillet! Less mess means more time to savor your culinary creation.
  • Flavor Explosion: The combination of spices, creamy cheese, and savory beef creates a mouthwatering experience that you won’t forget.
  • Customizable: Feel free to experiment with different vegetables, spices, or protein swaps to make this dish your own!

Ingredient Breakdown

Before we get cooking, let’s take a closer look at the ingredients you’ll need for this hearty dish, along with some handy substitutions to suit your taste.

  • 1 pound ground beef: The star of the show! You can use any ground meat, such as turkey, chicken, or pork, for a lighter option.
  • 2 cups broccoli florets: These vibrant green gems are nutrient-rich and add a delightful crunch. If you’re not a fan of broccoli, feel free to substitute with bell peppers or green beans.
  • 1 medium onion, diced: Adds sweetness and depth to the dish. Red or yellow onions work beautifully here.
  • 3 cloves garlic, minced: For that aromatic kick! Don’t skimp on the garlic – it brings the entire dish to life.
  • 1 tablespoon olive oil: A healthy fat to sauté your ingredients. Avocado oil is also a great alternative.
  • 1 teaspoon salt: Enhances all the flavors in the dish. Adjust to taste based on your dietary needs.
  • 1/2 teaspoon black pepper: Adds a subtle heat. You can increase this if you prefer a spicier kick!
  • 1 teaspoon smoked paprika: Offers a smoky depth that complements the beef perfectly. Try using chipotle powder for an extra fiery twist.
  • 1/2 teaspoon red pepper flakes (optional): For those who like it hot! Adjust based on your heat tolerance.
  • 1/2 cup shredded cheddar cheese: This creamy addition melts beautifully over the skillet. Feel free to swap in mozzarella, gouda, or even a dairy-free cheese if you’re lactose intolerant.
  • 1/4 cup heavy cream: Creates a luscious sauce that brings the whole dish together. For a lighter version, use coconut cream or cashew cream.
  • 2 tablespoons soy sauce or coconut aminos: Adds umami flavor. Coconut aminos are a fantastic gluten-free alternative.
  • 1 tablespoon fresh parsley, chopped (for garnish): A fresh touch to liven up the plate.

How to Make Your Keto Ground Beef Skillet

Juicy ground beef mixed with broccoli in a skillet, garnished with cheddar cheese, viewed from the side.

Let’s dive into the cooking process! Follow these simple steps to create your delicious skillet:

  1. In a large skillet, heat the olive oil over medium heat. Add the diced onion and sauté for about 3-4 minutes until translucent.
  2. Add the minced garlic and cook for an additional minute until fragrant, filling your kitchen with that irresistible aroma.
  3. Increase the heat to medium-high and add the ground beef. Cook until browned, breaking it apart with a spatula, about 5-7 minutes. Drain excess fat if necessary.
  4. Stir in the salt, black pepper, smoked paprika, and red pepper flakes (if using). Mix well, allowing the spices to coat the beef thoroughly.
  5. Add the broccoli florets to the skillet, then pour in the heavy cream and soy sauce. Stir to combine. Cover the skillet and let it cook for about 5-7 minutes, or until the broccoli is tender.
  6. Remove the lid and sprinkle the shredded cheddar cheese over the top. Cover again for 2-3 minutes until the cheese is melted and bubbly.
  7. Garnish with fresh parsley before serving, and get ready to dig into a flavorful meal!

Pro Tips for Cooking Success

Want to elevate your ground beef skillet game? Check out these expert insights:

  • Prep Ahead: Chop your vegetables and measure out your spices before you start cooking. This will streamline the process and make cooking a breeze.
  • Don’t Overcook the Broccoli: You want it to retain some crunch! Keep an eye on it while it cooks to avoid mushiness.
  • Adjust Spice Levels: If you’re sensitive to heat, start with less red pepper flakes and add more as desired. Remember, you can always add spice but you can’t take it away!
  • Mix Up the Cheese: Experiment with different types of cheese for unique flavors. A sprinkle of feta or crumbled goat cheese can add a delightful twist.
  • Meal Prep Friendly: This dish can be made ahead of time and reheated for quick lunches or dinners throughout the week. Store in airtight containers for best results.
  • Watch the Fat Content: If you’re using lean ground beef, you might need to add a bit more oil to prevent the dish from being too dry.
  • Use Fresh Ingredients: Fresh herbs and vegetables can make a world of difference in flavor. Don’t underestimate their impact!
  • Experiment with Sauces: Try adding a splash of hot sauce or a sprinkle of lime juice for an extra zing!
  • Engage Your Senses: Cooking is about more than just following a recipe; it’s about feeling the texture, smelling the aromas, and tasting as you go!

Common Mistakes and Troubleshooting

Even seasoned cooks can run into a hiccup or two. Here are some common mistakes and how to avoid them:

  • Too Much Liquid: If your skillet ends up too soupy, try cooking it uncovered for a few minutes to allow excess liquid to evaporate.
  • Overcooked Beef: Keep a close eye while browning the beef. Overcooking can lead to a dry texture. Aim for a nice brown color without charring.
  • Flavorless Dish: If your dish lacks flavor, it might need more seasoning or a splash of vinegar or citrus to brighten it up.
  • Not Enough Cheese: If you love cheese, don’t be shy! Add more to your liking for an extra creamy finish.

Delicious Variations to Try

Want to switch things up? Here are some tasty variations to consider:

  • Spicy Southwestern: Add diced jalapeños and a sprinkle of taco seasoning for a fiery kick!
  • Cheesy Italian: Toss in some Italian seasoning and swap the cheddar for mozzarella. Finish with fresh basil for an aromatic touch.
  • Asian-Inspired: Replace the soy sauce with teriyaki sauce and add snap peas or bell peppers for a colorful twist.
  • Veggie-Loaded: Amp up the nutrition by adding additional vegetables like zucchini, mushrooms, or spinach.

Storage and Make-Ahead Instructions

This skillet dish is perfect for meal prep! Here’s how to store and reheat:

  • Refrigeration: Store leftovers in an airtight container in the refrigerator for up to 4 days.
  • Freezing: You can freeze this dish for up to 2 months. Just make sure to cool it completely before transferring to a freezer-safe container.
  • Reheating: To reheat, simply warm it up in a skillet over medium heat or microwave until heated through. Stir occasionally to ensure even heating.

Frequently Asked Questions

Got questions? Check out these FAQs about making your keto ground beef skillet:

  • Can I use frozen broccoli? Yes, but make sure to thaw it and drain any excess moisture before adding it to the skillet.
  • What can I substitute for ground beef? Ground turkey, chicken, or even plant-based meat alternatives work well in this recipe.
  • Can I make this dish dairy-free? Absolutely! Simply omit the cheese and use coconut cream instead of heavy cream.
  • How do I know when the beef is cooked? Ground beef should be browned and no longer pink in the center. Use a meat thermometer for best results; it should reach 160°F.
  • Can I add more vegetables? Definitely! Feel free to add any low-carb veggies you enjoy.
  • What if I don’t have smoked paprika? Regular paprika will work, but if you want that smoky flavor, try adding a dash of liquid smoke!
  • How spicy is this dish? The spice level can be adjusted based on your preferences. Start with less red pepper flakes and add more as desired.
  • Can I make this in advance? Yes! This dish can be prepared ahead of time and reheated for a quick meal.

Nutritional Tips and Dietary Adaptations

Here are some tips to keep your meal aligned with your dietary goals:

  • Low-Carb Options: This recipe is naturally low in carbs, making it perfect for keto dieters. Focus on non-starchy vegetables to keep it light.
  • Protein Boost: If you’re looking to up your protein intake, consider adding some beans or legumes (if they fit your dietary plan) alongside the beef.
  • Healthy Fats: Incorporating healthy fats from sources like avocado or nuts can enhance the nutritional profile of your meal.
  • Whole Foods Focus: Whenever possible, opt for whole, unprocessed ingredients to maximize flavor and nutrition.

Essential Equipment Needed

To make this keto ground beef skillet, you’ll need a few kitchen essentials:

  • Large Skillet: A non-stick or cast iron skillet works best for even cooking and easy cleanup.
  • Spatula: A sturdy spatula for browning the beef and stirring the ingredients.
  • Chopping Board: For prepping your vegetables and ingredients.
  • Knife: A sharp chef’s knife will make chopping and dicing a breeze.

Serving Suggestions

This dish is fantastic on its own, but here are a few ideas to make it even more special:

  • Serve Over Cauliflower Rice: For a low-carb alternative to traditional rice, serve your skillet over cauliflower rice for a filling meal.
  • Pair with a Side Salad: A fresh salad with a tangy vinaigrette complements the rich flavors of the skillet.
  • Top with Avocado: Creamy avocado slices add a delicious and nutritious topping.
  • Garnish with Fresh Herbs: A sprinkle of fresh herbs like cilantro or basil can elevate the flavors and presentation.

In conclusion, this Keto Ground Beef Skillet with Broccoli is not just a meal; it’s an adventure waiting to happen in your kitchen. With its rich flavors, creamy texture, and ease of preparation, it invites you to make every meal an exciting culinary experience. So grab your skillet, unleash your creativity, and let the spices lead you on a flavorful journey. Happy cooking, and may your kitchen always be filled with the warmth of delicious meals!

Keto Ground Beef Skillet with Broccoli: Easy Recipe Awaits!

Prep Time 10 minutes
Cook Time 20 minutes
Total Time 30 minutes
Servings 4 servings
Calories 550
A quick and flavorful keto-friendly dish combining ground beef, broccoli, and cheese for a satisfying meal.

Ingredients

Meat and Vegetables

  • 1 pound ground beef
  • 2 cups broccoli florets
  • 1 medium onion, diced
  • 3 cloves garlic, minced
  • 1 tablespoon olive oil
  • 1 teaspoon salt
  • 1/2 teaspoon black pepper
  • 1 teaspoon smoked paprika
  • 1/2 teaspoon red pepper flakes (optional)
  • 1/4 cup shredded cheddar cheese
  • 1/4 cup heavy cream
  • 2 tablespoons soy sauce or coconut aminos
  • 1 tablespoon fresh parsley, chopped (for garnish)

Instructions 

  • Heat olive oil in a skillet, sauté onion for 3-4 minutes.
  • Add garlic and cook for 1 minute.
  • Cook ground beef until browned, then drain excess fat.
  • Stir in spices, add broccoli, cream, and soy sauce; cook until tender.
  • Top with cheese, cover until melted, then garnish with parsley.

Notes

This dish is perfect for a quick keto dinner with rich flavors and low carbs.
Calories: 550kcal
Cost: $15
Course: Main Course
Cuisine: American
Keyword: Broccoli, ground beef, Keto

Nutrition

Calories: 550kcal | Carbohydrates: 12g | Protein: 45g | Fat: 35g | Sodium: 1200mg

Why You’ll Love This Dish

Welcome to a culinary journey that takes your taste buds on an adventure! If you’re looking for a dish that combines the comforting creaminess of pasta with a bold kick of Cajun spice, then look no further than this Creamy Cajun Sausage Pasta. Imagine a steaming bowl of perfectly cooked penne, enveloped in a rich, velvety sauce that’s bursting with flavor. It’s the kind of meal that brings people together, whether you’re hosting friends for dinner or just looking to treat yourself after a long day.

This one-pot wonder makes cooking feel effortless, minimizing cleanup while maximizing flavor. You’ll appreciate how quickly it comes together—perfect for any busy weeknight. Plus, the smoky sausage paired with the aromatic blend of spices creates a symphony of flavors that will have you coming back for seconds. So, let’s dive into the magic of Cajun cooking and ignite those taste buds!

Ingredients You’ll Need

Gather these ingredients to whip up your delicious Cajun delight:

  • 12 oz penne pasta
  • 1 lb smoked sausage, sliced
  • 1 tbsp olive oil
  • 1 onion, diced
  • 3 cloves garlic, minced
  • 1 bell pepper, diced
  • 2 cups chicken broth
  • 1 cup heavy cream
  • 2 tsp Cajun seasoning
  • 1 cup shredded cheese (cheddar or mozzarella)
  • Salt and pepper to taste
  • Chopped parsley for garnish

Step-by-Step Instructions

A delicious serving of Cajun sausage pasta in a bowl, revealing its creamy texture and vibrant vegetables.

Ready to get cooking? Let’s walk through the steps to make your Creamy Cajun Sausage Pasta:

  1. In a large pot, heat the olive oil over medium heat.
  2. Add the sliced sausage and cook until browned, about 5 minutes, allowing the oils and flavors to mingle and create a rich base.
  3. Next, toss in the diced onion, bell pepper, and minced garlic. Sauté them for another 3-4 minutes until softened—this is where the aroma begins to fill your kitchen!
  4. Stir in the Cajun seasoning, allowing it to toast for about a minute. This step is crucial for awakening those spices and enhancing their flavor.
  5. Now, add the penne pasta and chicken broth to the pot. Bring it to a boil, then reduce the heat and cover. Let it simmer for about 12-15 minutes, stirring occasionally, until the pasta is al dente.
  6. Once the pasta is cooked, stir in the heavy cream and shredded cheese. Watch as it transforms into a creamy, dreamy sauce that clings to every piece of pasta.
  7. Season with salt and pepper to taste. Don’t be shy—taste as you go!
  8. Finally, garnish with chopped parsley before serving, adding a fresh pop of color and flavor.

Tips for Customizing Your Cajun Sausage Pasta

Part of the fun in cooking is making a dish your own. Here are some tips and suggestions to elevate your Cajun Pasta experience:

  • Add Seafood: For a surf-and-turf twist, consider tossing in some shrimp or crawfish during the last few minutes of cooking. They’ll add a delightful sweetness that complements the spices.
  • Vegetarian Version: Swap the sausage for a plant-based alternative or even canned chickpeas for a hearty vegetarian option. You can also load up on veggies like zucchini, spinach, or mushrooms.
  • Spice Level: Adjust the heat by adding more Cajun seasoning or incorporating a pinch of cayenne pepper for those who crave more fire.
  • Cheese Options: While cheddar and mozzarella are classic choices, feel free to experiment with pepper jack for an extra kick or parmesan for a nuttier flavor.

What to Serve with Cajun Sausage Pasta

This dish is hearty enough to stand alone, but it pairs beautifully with a variety of sides. Here are some suggestions to complete your meal:

  • Garlic Bread: A warm, crusty loaf is perfect for soaking up any leftover creamy sauce.
  • Simple Salad: A light green salad with a tangy vinaigrette can balance out the richness of the pasta.
  • Roasted Vegetables: Seasoned roasted veggies make a colorful and nutritious side that complements the flavors of the pasta.

Storage and Freezing Tips

Leftovers? Yes, please! Here’s how to store your delicious creation:

  • Store any leftovers in an airtight container in the refrigerator for up to three days.
  • To reheat, add a splash of cream or broth to maintain that creamy consistency. Heat gently on the stove or in the microwave.
  • If you want to freeze this dish, let it cool completely before transferring it to a freezer-safe container. It can be frozen for up to three months. Just remember that the texture may change slightly after thawing.

FAQs

Can I make this recipe ahead of time?

Absolutely! You can prepare the sausage and veggie mixture ahead of time and store it in the fridge. When you’re ready to eat, just add the broth, pasta, and cream to finish cooking.

Can I use a different type of pasta?

Definitely! While penne works wonderfully, feel free to substitute with any short pasta like fusilli, farfalle, or even shells. Just be mindful of cooking times, as different pasta shapes may require variations.

What’s the best way to store leftovers?

As mentioned earlier, store your leftovers in an airtight container in the fridge for up to three days. If you want to enjoy it later, freezing is also an option, but be sure to reheat carefully to avoid separating the sauce.

Troubleshooting Common Issues

Sometimes, things don’t go as planned in the kitchen. Here are a few common issues and how to fix them:

  • Too Salty: If you find your dish is too salty, try adding a splash of cream or a bit of sugar to balance the flavors.
  • Too Thick: If the sauce becomes too thick, simply stir in a little more chicken broth or cream until you reach your desired consistency.
  • Overcooked Pasta: To avoid mushy pasta, keep an eye on the cooking time and taste test before it’s done. Remember, the pasta will continue to cook slightly after you remove it from heat.

Conclusion

Your culinary adventure with Creamy Cajun Sausage Pasta doesn’t just end here. With this dish, you have the power to create something extraordinary in your kitchen. Embrace the bold flavors, experiment with spices, and make it your own. Whether you share it with family and friends or savor it solo, each bite is a reminder that cooking is an art filled with joy and passion. So grab your skillet, let the flavors dance, and enjoy the delicious adventure that awaits you!

Creamy Cajun Sausage Pasta (One Pot)

Prep Time 10 minutes
Cook Time 20 minutes
Total Time 30 minutes
Servings 4 servings
Calories 650
A flavorful one-pot pasta dish combining smoky sausage, Cajun spices, and creamy cheese for a satisfying meal.

Ingredients

Pasta

  • 12 oz penne pasta

Sausage

  • 1 lb smoked sausage, sliced

Vegetables & Aromatics

  • 1 tbsp olive oil
  • 1 unit onion, diced
  • 3 cloves garlic, minced
  • 1 diced bell pepper

Broth & Cream

  • 2 cups chicken broth
  • 1 cup heavy cream

Seasonings & Cheese

  • 2 tsp cajun seasoning
  • 1 cup shredded cheese (cheddar or mozzarella)

Seasoning & Garnish

  • to taste salt and pepper
  • chopped parsley for garnish chopped parsley

Instructions 

  • Heat olive oil in a large pot, cook sausage until browned.
  • Add onion, bell pepper, and garlic; sauté until softened.
  • Stir in Cajun seasoning, then add pasta and broth; simmer until pasta is cooked.
  • Mix in heavy cream and cheese until creamy; season with salt and pepper.
  • Garnish with parsley before serving.

Notes

For extra flavor, sprinkle additional cheese or herbs on top.
Calories: 650kcal
Cost: $15
Course: Main Course
Cuisine: American
Keyword: creamy, pasta, sausage

Nutrition

Calories: 650kcal | Carbohydrates: 80g | Protein: 30g | Fat: 30g | Sodium: 1500mg

Loved this recipe? Save it to your favorite Pinterest board so you can easily find it later! It’s the perfect way to keep all your sweet ideas in one place. ✨

Eye-level shot of creamy pasta dish with sliced sausage, bell peppers, and sprinkled parsley on top.

Why You’ll Love These Brownies

Imagine sinking your teeth into a brownie that’s not only rich and fudgy but also kind to your waistline. These Low Calorie Greek Yogurt Brownies deliver a decadent experience with a mere 85 calories per serving! Yes, you read that right. Each bite is a celebration of chocolatey goodness that satisfies your sweet cravings without any guilt. With a blend of wholesome ingredients, these brownies redefine indulgence while keeping your health goals in check.

As someone who’s spent years dancing with flavors and learning the nuances of cooking, I can assure you that these brownies will not only impress your taste buds but also those of your friends and family. Whether you’re hosting a gathering or enjoying a quiet night in, these brownies are the perfect sweet treat. Let’s delve into what makes this recipe so special and how you can whip up a batch that will leave everyone craving more!

Decadent Yet Wholesome Ingredients

Before we dive into the recipe, let’s take a closer look at the ingredients that make these brownies both delicious and nutritious. Each component plays a vital role in creating that perfect brownie texture and flavor:

  • 1 cup unsweetened cocoa powder: This is the star of the show, bringing deep chocolate flavor and richness without the added sugars.
  • 1/2 cup whole wheat flour: This provides structure while adding fiber, making the brownies more filling and nutritious.
  • 1/2 cup granulated sweetener: You can use stevia or erythritol here to keep the calories low while still achieving that sweet satisfaction.
  • 1 tsp baking powder: This is essential for that light, airy texture we all crave.
  • 1/4 tsp salt: A pinch of salt enhances the sweetness and balances the flavors.
  • 1 cup Greek yogurt (non-fat): This adds moisture and a creamy texture while boosting the protein content.
  • 1/2 cup unsweetened applesauce: A fantastic natural sweetener that keeps the brownies moist.
  • 1 tsp vanilla extract: This adds a warm, aromatic flavor that rounds out the profile beautifully.
  • 1/4 cup dark chocolate chips (optional): For those who crave an extra burst of chocolatey goodness, this is the perfect addition!

How to Bake Your Brownies

Delicious, fudgy brownies displayed on a rustic table, featuring a rich cocoa color and soft texture.

Now that we’ve covered the ingredients, let’s get into the nitty-gritty of making these delicious brownies. Follow these simple steps to achieve brownie perfection:

  1. Preheat your oven: Set it to 350°F (175°C) and grease an 8×8 inch baking pan to ensure your brownies come out effortlessly.
  2. Mix the dry ingredients: In a mixing bowl, combine the cocoa powder, whole wheat flour, sweetener, baking powder, and salt. Whisk them together until well blended.
  3. Combine the wet ingredients: In a separate bowl, mix the Greek yogurt, applesauce, and vanilla extract until smooth and creamy.
  4. Combine wet and dry ingredients: Pour the wet mixture into the dry ingredients and stir until just combined. Remember, do not over-mix; we want to keep that fudgy texture!
  5. Fold in chocolate chips: If you’re using dark chocolate chips, gently fold them into the batter.
  6. Spread the batter: Pour the brownie mixture into the prepared baking pan, spreading it evenly.
  7. Bake: Place the pan in the preheated oven and bake for 20-25 minutes, or until a toothpick inserted in the center comes out clean.
  8. Cool and serve: Once baked, let the brownies cool in the pan for about 10 minutes before cutting them into squares. Serve warm or at room temperature, and enjoy every bite!

Tips for Brownie Success

To ensure your brownies turn out perfectly every time, here are some helpful tips:

  • Don’t over-mix: Over-mixing can lead to dense brownies. Mix just until combined for that light, fudgy texture!
  • Check for doneness: Ovens can vary, so keep an eye on your brownies. A toothpick should come out with a few moist crumbs but not wet batter.
  • Let them cool: Patience is a virtue! Allow the brownies to cool before cutting for cleaner edges and a better texture.

Variations to Try

Feeling adventurous? Here are some fun variations to elevate your brownie game:

  • Nuts: Add chopped walnuts or pecans for an added crunch and richness.
  • Swirls: Incorporate a layer of peanut butter or cream cheese for a delightful swirl effect.
  • Fruity: Toss in some fresh or dried fruit, like raspberries or cherries, for a burst of flavor.

Substitutions You Can Make

If you’re looking to customize the recipe further, here are some substitutions:

  • Flour: Feel free to use almond flour or gluten-free flour blends for a gluten-free option.
  • Sweetener: Coconut sugar or honey can be used if you prefer natural sweeteners, but be mindful of the calorie count.
  • Applesauce: Unsweetened mashed bananas can work as a substitute for applesauce for a different flavor profile.

Equipment You’ll Need

To make the baking process smooth, gather the following equipment:

  • Mixing bowls
  • Whisk
  • Spatula or wooden spoon
  • 8×8 inch baking pan
  • Parchment paper (optional for easier removal)

Storage and Freezing Tips

These brownies can be a great make-ahead treat! Here’s how to store them:

  • Storing: Keep them in an airtight container at room temperature for up to 3 days, or in the refrigerator for up to a week.
  • Freezing: For long-term storage, freeze individual squares wrapped in plastic wrap and then placed in a freezer-safe container. They’ll last for up to 3 months. Simply thaw at room temperature when you’re ready to enjoy!

FAQs About Brownies

Can I use regular yogurt instead of Greek yogurt?
Absolutely! Just ensure that it’s a thick variety to maintain the brownie’s texture.

Are these brownies really healthy?
Yes! With low calories and no refined sugars, these brownies are a guilt-free indulgence.

Can I make these brownies vegan?
You may substitute the Greek yogurt with a plant-based yogurt and use a flax egg in place of the applesauce for a vegan twist.

Troubleshooting Common Issues

If your brownies don’t turn out as expected, here are a few common issues and solutions:

  • Brownies are too dry: This can occur from over-baking or using too much flour. Make sure to measure accurately and keep an eye on the bake time!
  • Brownies are too gooey: If they’re undercooked, pop them back in the oven for a few more minutes. Always check with a toothpick to ensure they’re set.

Conclusion

There you have it! A delightful recipe for Low Calorie Greek Yogurt Brownies that proves you don’t have to sacrifice taste for health. These brownies are not just a treat; they’re a testament to the idea that indulgence can be healthy, too. So, gather your ingredients and get ready to create a batch of these gooey, fudgy squares that will make your heart sing. Happy baking, and remember — cooking is all about embracing the adventure!

Low Calorie Greek Yogurt Brownies (Only 85 Calories!) - TheFab20s

Prep Time 10 minutes
Cook Time 20 minutes
Total Time 30 minutes
Servings 9 pieces
Calories 85
Enjoy these delicious low-calorie brownies packed with protein and flavor, perfect for a healthy treat.

Ingredients

dry ingredients

  • 1 cup unsweetened cocoa powder
  • 1/2 cup whole wheat flour
  • 1/2 cup granulated sweetener (like stevia or erythritol)
  • 1 tsp baking powder
  • 1/4 tsp salt

wet ingredients

  • 1 cup greek yogurt (non-fat)
  • 1/2 cup unsweetened applesauce
  • 1 tsp vanilla extract

optional add-ins

  • 1/4 cup dark chocolate chips ((optional))

Instructions 

  • Preheat oven to 350°F (175°C) and grease an 8x8 inch pan.
  • Mix dry ingredients in a bowl.
  • Combine wet ingredients until smooth.
  • Mix wet into dry, fold in chocolate chips if using.
  • Spread batter in pan and bake 20-25 mins. Cool before slicing.

Notes

For best results, do not over-mix the batter.
Calories: 85kcal
Cost: $10
Course: Dessert
Cuisine: American
Keyword: brownies, healthy, yogurt

Nutrition

Calories: 85kcal | Carbohydrates: 10g | Protein: 4g | Fat: 3g | Sodium: 50mg

Loved this recipe? Save it to your favorite Pinterest board so you can easily find it later! It’s the perfect way to keep all your sweet ideas in one place. ✨

A tempting slice of low-calorie brownies showcasing a glossy surface and warm light illuminating its details.

Unleash Your Inner Chef: A Deep Dive into Keto Beef Stroganoff

Welcome to the culinary adventure of a lifetime! If you’re on a quest for a dish that marries the richness of flavors with the heartiness of comfort food, look no further than Keto Beef Stroganoff. This recipe is not just low-carb; it’s a flavor-packed journey that invites you to embrace boldness in the kitchen. Whether you’re a seasoned chef or a curious beginner, this dish will ignite your passion for cooking and spice up your dining table.

In this article, we’ll guide you through not just how to make this delicious meal, but also why it’s worth your time. So, grab your apron, and let’s dive into the luscious world of beef stroganoff!

Why You’ll Love This Recipe

  • Low-Carb Delight: Perfect for those on a keto journey, this recipe keeps carbs low while maximizing flavor. Enjoy a satisfying meal without the guilt!
  • Rich and Creamy: The combination of sour cream and cream cheese creates a velvety sauce that clings beautifully to the beef and mushrooms.
  • Quick and Easy: With a cook time of less than 30 minutes, you can whip this up even on your busiest days.
  • Versatile Ingredients: Use ground beef, steak, or even chicken! This recipe adapts to your pantry and preferences.
  • Impressive Presentation: Serve it over spaghetti squash or zucchini noodles for a stunning plate that’ll impress your guests.

Ingredients Breakdown

Gathering your ingredients is the first step to culinary success. Here’s what you’ll need to create this masterpiece, along with some smart substitutions:

  • 2 tbsp Olive oil: For sautéing; can substitute with avocado oil for a higher smoke point.
  • 1/2 large Onion (sliced into thin quarter moons): Sweet onions add depth. Yellow onions work too.
  • 8 oz Cremini mushrooms (sliced): Their umami flavor elevates the dish. Feel free to swap with button mushrooms if needed.
  • 1 lb Ground beef: Choose lean ground beef or even turkey for a lighter option.
  • 1/2 tsp Sea salt: Essential for enhancing flavor.
  • 1/4 tsp Black pepper: Freshly ground is best for a more robust profile.
  • 2 cloves Garlic (minced): Adds aromatic richness; shallots can be a lovely substitute.
  • 1 cup Beef bone broth: For depth and richness; chicken broth works too.
  • 2 tbsp Coconut aminos (optional): A soy sauce alternative that brings a hint of sweetness.
  • 1/2 cup Sour cream: For creaminess; Greek yogurt can also be used for a lighter twist.
  • 2 oz Cream cheese: This thickens the sauce beautifully; mascarpone is a delicious alternative.

How to Make Keto Beef Stroganoff

Side view of a bowl of Keto Beef Stroganoff, showcasing ground beef and onions.

Ready to get cooking? Follow these straightforward steps to create your very own Keto Beef Stroganoff:

  1. Heat the olive oil in a large sauté pan over medium heat. Add the onions and mushrooms. Sauté for about 10 minutes, until onions and mushrooms are soft and browned, and extra liquid has evaporated.
  2. Increase heat to medium-high. Push the mushrooms and onions to the sides, and add the ground beef to the center of the pan. Season with salt and pepper. Cook for 8-10 minutes, stirring occasionally and breaking the beef apart with a spatula, until cooked through.
  3. Make a well in the center of the pan and add the minced garlic. Sauté for about a minute, until fragrant, then stir it in with the meat.
  4. Add the beef bone broth and coconut aminos, if using. Bring to a boil, then simmer for 5 minutes, until most of the liquid is reduced.
  5. Stir in the sour cream and cream cheese until smooth and creamy.
  6. Serve over spaghetti squash or your preferred low-carb noodle for a delightful finish.

Pro Tips for Perfect Stroganoff

  • Don’t Rush the Sauté: Allow the onions and mushrooms to brown properly; this step builds flavor.
  • Choose Quality Meat: Grass-fed beef not only tastes better but is also healthier.
  • Control the Heat: Make sure to adjust your stove’s heat accordingly to avoid burning the garlic.
  • Taste as You Go: Season incrementally; you can always add more salt and pepper, but you can’t take it back!
  • Experiment with Herbs: Fresh thyme or parsley can elevate the dish; sprinkle some before serving for a fresh kick.
  • Make it Ahead: This dish reheats beautifully, so consider making a double batch for easy meals.
  • Use a Non-Stick Pan: This makes cleanup a breeze and helps prevent sticking.
  • Don’t Forget the Garnish: A sprinkle of fresh herbs or a dollop of sour cream on top can make all the difference.

Common Mistakes and Troubleshooting

Even the best chefs can run into hiccups. Here are some common pitfalls and how to avoid them:

  • Too Watery Sauce: If your sauce is too runny, let it simmer a bit longer to reduce the liquid.
  • Overcooked Meat: Keep an eye on your beef to avoid a tough texture; cook just until browned.
  • Flavorless Dish: Always taste before serving; adjust seasoning as needed to elevate flavors.
  • Burnt Garlic: Add garlic later in the cooking process to prevent it from burning.

Variations to Spice Things Up

Get creative with these variations to customize your Beef Stroganoff:

  • Chicken Stroganoff: Swap out beef for diced chicken for a lighter version.
  • Vegetarian Option: Replace the meat with sautéed tofu or a mix of your favorite vegetables.
  • Mushroom Medley: Use a variety of mushrooms, such as shiitake or portobello, for a more complex flavor profile.
  • Spicy Kick: Add crushed red pepper flakes or diced jalapeños to bring some heat to the dish.

Storage and Make-Ahead Instructions

This dish keeps well for meal prep. Here’s how to store it:

  • Refrigerate: Store in an airtight container for up to 4 days.
  • Freeze: For longer storage, freeze in portions for up to 3 months. Thaw overnight in the fridge before reheating.
  • Reheat Gently: Heat on the stove over low heat, stirring occasionally, or microwave in short intervals.

Frequently Asked Questions

  • Can I use different types of meat? Absolutely! Ground turkey or chicken can work well too.
  • Is this recipe gluten-free? Yes, as long as you use gluten-free broth and coconut aminos.
  • Can I substitute the sour cream? Yes, Greek yogurt or cashew cream are great alternatives.
  • How do I serve this dish? It’s fantastic over spaghetti squash, zucchini noodles, or even cauliflower rice.
  • Can I make this dish dairy-free? Yes, use coconut cream instead of sour cream and cream cheese.
  • What can I pair with Keto Beef Stroganoff? Green beans, a fresh salad, or roasted vegetables are excellent sides.
  • How spicy is this recipe? It’s mild, but you can always adjust the heat level to your preference!
  • Can I meal prep this dish? Definitely! It stores well and is perfect for quick lunches or dinners.

Nutritional Tips and Dietary Adaptations

This Keto Beef Stroganoff is not just about flavor; it’s also about nourishing your body. Here are some nutritional insights:

  • Healthy Fats: The olive oil and cream cheese provide healthy fats essential for a keto diet.
  • Protein Power: Lean ground beef offers high-quality protein, helping to keep you full and satisfied.
  • Fiber Boost: Serve over veggies like spaghetti squash or zucchini to up the fiber content.

Essential Equipment Recommendations

Equip your kitchen for success with these must-have tools:

  • Non-Stick Skillet: For easy cooking and cleanup.
  • Wooden Spoon: Ideal for stirring and breaking up the meat.
  • Measuring Cups and Spoons: Precision is key in cooking!
  • Sharp Chef’s Knife: For slicing your onions and mushrooms effortlessly.

Serving Suggestions

Elevate your presentation with these serving ideas:

  • Fresh Herbs: A sprinkle of parsley or chives adds a pop of color and freshness.
  • Garnish with Sour Cream: A dollop on top enhances creaminess and visual appeal.
  • Side Salad: A crisp green salad complements the richness of the stroganoff.
  • Low-Carb Breads: Serve with a slice of keto bread for a complete meal experience.

In conclusion, this Keto Beef Stroganoff is not just a meal; it’s a celebration of flavor, comfort, and creativity. So don your apron, fire up that skillet, and let the magic happen. Remember, cooking is an adventure—embrace it with passion and let your taste buds guide you. Thank you for joining me on this flavorful journey, and I hope you enjoy every bite!

Keto Beef Stroganoff

Prep Time 10 minutes
Cook Time 20 minutes
Total Time 30 minutes
Servings 4 servings
Calories 550
A creamy, low-carb beef stroganoff perfect for a keto diet, featuring tender ground beef and mushrooms in a rich sour cream sauce.

Ingredients

olive oil

  • 2 tbsp Olive oil

vegetables

  • 1/2 large Onion (sliced into thin quarter moons)
  • 8 oz Cremini mushrooms (sliced)

meat

  • 1 lb Ground beef

seasonings

  • 1/2 tsp Sea salt
  • 1/4 tsp Black pepper
  • 2 cloves Garlic (minced)

liquids

  • 1 cup Beef bone broth
  • 2 tbsp Coconut aminos (optional)

dairy

  • 1/2 cup Sour cream
  • 2 oz Cream cheese

Instructions 

  • Heat olive oil in a large pan, then sauté onions and mushrooms until soft and browned (~10 min).
  • Add ground beef to the pan, season with salt and pepper, cook until browned (~8-10 min), then mix with vegetables.
  • Add garlic, cook for 1 min, then stir into the meat mixture.
  • Pour in bone broth and coconut aminos, bring to a boil, then simmer for 5 min to reduce liquid.
  • Stir in sour cream and cream cheese until smooth, then serve over spaghetti squash.

Notes

Use full-fat sour cream and cream cheese for best flavor and texture.
Calories: 550kcal
Cost: $15
Course: Main Course
Cuisine: Russian
Keyword: beef, Keto, Mushrooms

Nutrition

Calories: 550kcal | Carbohydrates: 12g | Protein: 40g | Fat: 35g | Sodium: 900mg

Why You’ll Fall in Love with This Cake

Imagine walking into your kitchen on a crisp autumn afternoon, the air infused with the tantalizing aroma of cinnamon and baked apples. That’s the magic of my Warm Apple Spice Snacking Cake — a delightful fusion of sweetness and spice that captures the essence of fall in every bite. With its moist texture and vibrant flavors, this cake is not just a dessert; it’s an experience that beckons you to embrace the season with open arms.

This snacking cake is a versatile treat that fits perfectly into any occasion, from a cozy family gathering to a casual afternoon tea with friends. The combination of warm spices like cinnamon, nutmeg, and ginger creates a comforting aroma that fills your home, making it an inviting space for laughter and connection.

Ingredients: A Symphony of Flavors

Before diving into the recipe, let’s gather our ingredients. This cake is not only delicious but also simple to prepare. Here’s what you’ll need:

  • 2 cups all-purpose flour
  • 1 teaspoon baking powder
  • 1/2 teaspoon baking soda
  • 1 teaspoon ground cinnamon
  • 1/2 teaspoon ground nutmeg
  • 1/4 teaspoon ground ginger
  • 1/2 teaspoon salt
  • 1/2 cup unsalted butter, softened
  • 1 cup brown sugar, packed
  • 2 large eggs
  • 1 teaspoon vanilla extract
  • 1 cup unsweetened applesauce
  • 1 cup diced apples (peeled and cored)
  • 1/2 cup chopped walnuts or pecans (optional)

Steps to Heaven: Baking Your Cake

Deliciously textured apple spice snacking cake with soft shadows against a cozy blurred background.

Now that we have our ingredients ready, let’s get baking! Follow these simple steps to create a cake that’s sure to impress:

  1. Preheat your oven to 350°F (175°C) and grease a 9×13 inch baking pan.
  2. In a medium bowl, whisk together the flour, baking powder, baking soda, cinnamon, nutmeg, ginger, and salt.
  3. In a large bowl, cream the softened butter and brown sugar together until light and fluffy — this step is crucial for achieving that tender texture!
  4. Add the eggs one at a time, mixing well after each addition. Stir in the vanilla extract, letting its sweet aroma fill your kitchen.
  5. Mix in the applesauce until well combined, infusing the batter with moisture and flavor.
  6. Gradually add the dry ingredients to the wet mixture, stirring until just combined. Be careful not to overmix — we want that cake to be light and airy!
  7. Fold in the diced apples and nuts, if using. Each bit of apple will bring a burst of juicy sweetness that complements the spices beautifully.
  8. Pour the batter into the prepared baking pan and spread it evenly.
  9. Bake for 25-30 minutes or until a toothpick inserted into the center comes out clean. The aroma wafting from your oven will be a sure sign that you’re on the right track!
  10. Allow the cake to cool slightly before slicing. Serve it warm for the ultimate cozy experience.

Tips for the Perfect Snacking Cake

Here are some tips to elevate your baking game:

  • Use Fresh Apples: For the best flavor, opt for tart apples like Granny Smith or Honeycrisp. Their natural acidity balances the sweetness of the cake perfectly.
  • Don’t Skip the Spices: The spices are what make this cake sing! Feel free to experiment with additional spices like allspice or cardamom for a unique flavor profile.
  • Let It Rest: Allow the cake to sit for a few minutes after baking before slicing. This helps the flavors meld and ensures each slice holds together beautifully.

Variations to Spice Things Up

While this Warm Apple Spice Snacking Cake is divine as is, consider these variations to switch things up:

  • Gluten-Free Option: Substitute all-purpose flour with a gluten-free blend for a delicious gluten-free version of this cake.
  • Add a Frosting: Top with a simple cream cheese frosting or a vegan frosting for an extra layer of indulgence.
  • Flavor Add-Ins: Consider adding raisins or dried cranberries for an extra burst of flavor and texture.

Substitutions: Making It Your Own

Don’t have a specific ingredient on hand? Here are some easy substitutions:

  • Butter: Swap unsalted butter for coconut oil or vegan butter for a dairy-free version.
  • Brown Sugar: Use coconut sugar or maple syrup for a different sweetness profile.
  • Applesauce: Replace applesauce with mashed bananas for a unique twist and added moisture.

Essential Equipment for Success

To make this recipe, you’ll need:

  • A mixing bowl
  • A whisk
  • A spatula for folding
  • A 9×13 inch baking pan
  • An oven
  • A toothpick for testing doneness

Storage and Freezing Tips

This cake is great for meal prep or making ahead of time. Here’s how to store it:

  • At Room Temperature: Store the cake covered at room temperature for up to 3 days.
  • In the Refrigerator: For longer freshness, keep it in the fridge for up to a week.
  • Freezing: Cut the cake into slices and freeze in an airtight container for up to 3 months. Thaw in the refrigerator overnight when you’re ready to enjoy!

Frequently Asked Questions

Here are some common queries you might have:

  • Can I make this cake vegan? Absolutely! Substitute the eggs with flax eggs (1 tablespoon ground flaxseed mixed with 2.5 tablespoons water per egg) and use a vegan butter alternative.
  • What kind of apples work best? Tart apples like Granny Smith or Fuji apples work wonderfully, but feel free to mix different varieties for complexity.
  • Can I add other fruits? You can mix in other fruits like pears or berries for a delightful twist!

Troubleshooting: Common Issues and Solutions

If you encounter any challenges, here’s how to troubleshoot:

  • Dry Cake: Ensure you’re not overbaking. Keep an eye on it, and remember ovens vary; check for doneness a few minutes early.
  • Dense Texture: Overmixing can create a denser cake. Mix until just combined and fold in ingredients gently.

Conclusion: The Heart of Autumn in Every Slice

As you take that first bite of your Warm Apple Spice Snacking Cake, let the flavors transport you to a cozy autumn day, where the leaves crunch underfoot and the scent of warm spices fills the air. This cake is more than just a delicious dessert; it’s a celebration of fall, a gathering of flavors that invites you to share and savor the moment with loved ones. So grab your apron, turn up the heat, and let your kitchen be the heart of warmth and joy this season. Happy baking!

Warm Apple Spice Snacking Cake

Prep Time 15 minutes
Cook Time 30 minutes
Total Time 45 minutes
Servings 8 slices
Calories 250
A cozy, spiced cake perfect for a warm treat with apples and nuts, combining comforting flavors in every bite.

Ingredients

Dry ingredients

  • 2 cups all-purpose flour
  • 1 teaspoon baking powder
  • 1/2 teaspoon baking soda
  • 1 teaspoon ground cinnamon
  • 1/2 teaspoon ground nutmeg
  • 1/4 teaspoon ground ginger
  • 1/2 teaspoon salt

Wet ingredients

  • 1/2 cup unsalted butter, softened
  • 1 cup brown sugar, packed
  • 2 large eggs
  • 1 teaspoon vanilla extract
  • 1 cup unsweetened applesauce
  • 1 cup diced apples (peeled and cored)
  • 1/2 cup chopped walnuts or pecans (optional)

Instructions 

  • Preheat oven to 350°F (175°C). Grease a 9x13 inch pan.
  • Mix dry ingredients in a bowl. Cream butter and sugar, then add eggs and vanilla.
  • Stir in applesauce, then combine with dry ingredients.
  • Fold in diced apples and nuts, pour into pan, and bake 25-30 minutes.
  • Cool slightly, slice, and serve warm.

Notes

For extra flavor, sprinkle with cinnamon before baking.
Calories: 250kcal
Cost: $15
Course: Dessert
Cuisine: American
Keyword: apple

Nutrition

Calories: 250kcal | Carbohydrates: 40g | Protein: 4g | Fat: 10g | Sodium: 150mg

Loved this recipe? Save it to your favorite Pinterest board so you can easily find it later! It’s the perfect way to keep all your sweet ideas in one place. ✨

Eye-level shot of a spiced apple cake, highlighting its moist interior and warm hues.

Why You’ll Love This Dish

Imagine coming home after a long day, the aroma of something warm and comforting wafting through the air, wrapping around you like a hug. This is what the Creamy Crock Pot Ranch Chicken offers — a delightful blend of flavors that whisks you away to your happy place with just one bite. Not only is it incredibly easy to prepare, but it also transforms simple, everyday ingredients into a creamy, dreamy masterpiece that will leave your family asking for seconds. Whether you’re a busy parent or someone who just wants a stress-free dinner, this recipe is your culinary secret weapon.

Overview of the Recipe

The beauty of this Creamy Crock Pot Ranch Chicken Recipe for Stress-Free Dinners lies in its simplicity. With minimal prep work and just a few ingredients, you can set it and forget it while your slow cooker does all the heavy lifting. This dish is ideal for dinners with the family, especially when you need something quick yet satisfying. It’s a meal that requires little fuss but delivers big on flavor. And trust me, once you’ve tasted it, you’ll wonder how you ever lived without it.

Ingredients

Delicious bowl of ranch chicken featuring shredded cheese and garnished with parsley.
  • 4 boneless, skinless chicken breasts
  • 1 packet ranch seasoning mix
  • 1 cup cream of chicken soup
  • 1 cup chicken broth
  • 1 cup sour cream
  • 1 cup shredded cheddar cheese
  • Salt and pepper to taste
  • Chopped parsley for garnish (optional)

Steps to Culinary Bliss

Let’s get cooking! Follow these simple steps to create a meal that will tantalize your taste buds:

  1. Start by placing the chicken breasts in the bottom of your crock pot. This is where the magic begins!
  2. In a separate bowl, combine the ranch seasoning mix, cream of chicken soup, chicken broth, and sour cream. Mix until everything is beautifully incorporated.
  3. Pour this luscious mixture over the chicken in the crock pot. Don’t be shy; make sure every piece of chicken is coated.
  4. Cover the crock pot and set it to cook on low for 6-8 hours or on high for 3-4 hours. You want the chicken to be fork-tender and infused with flavor.
  5. About 30 minutes before serving, stir in the shredded cheddar cheese and let it melt into that creamy goodness.
  6. Season with salt and pepper to taste, adjusting according to your personal preference.
  7. Serve hot, garnished with freshly chopped parsley for that pop of color and flavor.

Tips for the Perfect Crock Pot Chicken

To ensure your Creamy Crock Pot Ranch Chicken turns out perfectly every time, here are some pro tips:

  • Choose Quality Chicken: Opt for fresh, high-quality chicken breasts. They will yield the best flavor and texture.
  • Don’t Skip the Cheese: The cheddar cheese adds a rich creaminess that elevates the dish. If you’re feeling adventurous, try using pepper jack for a spicy kick!
  • Use Low Sodium Options: If you’re watching your sodium intake, look for low-sodium chicken broth and cream of chicken soup.

Delicious Variations

One of the joys of cooking is the ability to experiment. Here are some fun variations to try:

  • Salsa Ranch Chicken: Add a cup of your favorite salsa to the mixture for a zesty twist.
  • Vegetable Boost: Toss in some chopped bell peppers, onions, or even spinach for added nutrition.
  • Spicy Kick: If you like things hot, sprinkle in some red pepper flakes or diced jalapeños.

Storage and Freezing Tips

Planning ahead? This dish is perfect for meal prep and leftovers:

  • Refrigerate: Store any leftovers in an airtight container in the fridge for up to 3 days.
  • Freeze: For longer storage, freeze the casserole in an airtight container for up to 3 months. Thaw it overnight in the refrigerator before reheating.
  • Reheat: Reheat gently in the microwave or on the stovetop, adding a splash of chicken broth if necessary to keep it creamy.

Serving Suggestions

This Creamy Crock Pot Ranch Chicken is versatile and pairs beautifully with a variety of side dishes:

  • Rice or Quinoa: Serve it over a bed of fluffy rice or nutty quinoa to soak up that delicious sauce.
  • Green Salad: A fresh green salad with a vinaigrette adds a nice crunch and balances the richness of the chicken.
  • Mac and Cheese: For a comforting twist, serve it alongside a creamy mac and cheese.

FAQs About This Recipe

Got questions? Let’s clear up some common queries:

  • Can I use chicken thighs instead of breasts? Absolutely! Chicken thighs are juicier and will work wonderfully in this recipe.
  • Is this dish spicy? No, it’s quite mild. However, you can add hot sauce or chili flakes if you prefer some heat.
  • Can I use ranch dressing instead of seasoning mix? Yes, but you may need to adjust the other ingredients to balance the flavors.
  • How can I make this dairy-free? Substitute the cream of chicken soup with a non-dairy alternative and use a plant-based sour cream.

Troubleshooting Tips

If you encounter any issues, here’s how to troubleshoot:

  • Too Thick: If your sauce turns out too thick, simply stir in a bit more chicken broth to loosen it up.
  • Too Salty: If it’s too salty, balance it out with a bit of sugar or more sour cream.

Conclusion

There you have it! The Creamy Crock Pot Ranch Chicken is more than just a recipe; it’s a gateway to easy, flavorful dinners that will impress your family and friends. With its creamy texture and rich flavor, this dish is sure to become a staple in your culinary repertoire. So grab your crock pot, gather your ingredients, and let’s make some magic happen in the kitchen. Remember, cooking is an adventure. Don’t be afraid to explore and make this dish your own. Enjoy every bite and the joy it brings to your table!

Creamy Crock Pot Ranch Chicken Recipe for Stress-Free Dinners

Prep Time 10 minutes
Cook Time 4 hours
Total Time 4 hours 10 minutes
Servings 4 servings
Calories 450
This easy crock pot recipe combines tender chicken with a creamy, flavorful sauce, perfect for a hassle-free dinner.

Ingredients

Protein

  • 4 pieces boneless, skinless chicken breasts

Seasoning

  • 1 packet ranch seasoning mix

Sauces & Broth

  • 1 cup cream of chicken soup
  • 1 cup chicken broth

Dairy

  • 1 cup sour cream

Cheese

  • 1 cup shredded cheddar cheese

Seasoning & Garnish

  • to taste salt and pepper
  • chopped parsley for garnish (optional) chopped parsley (optional)

Instructions 

  • Place chicken breasts in the crock pot.
  • Mix ranch, cream of chicken soup, chicken broth, and sour cream; pour over chicken.
  • Cook on low for 6-8 hours or high for 3-4 hours until tender.
  • Stir in shredded cheddar cheese and let melt for 30 minutes.
  • Season with salt and pepper, garnish with parsley if desired, and serve hot.

Notes

This dish is perfect for busy weeknights and can be easily customized with your favorite toppings.
Calories: 450kcal
Cost: $15
Course: Dinner
Cuisine: American
Keyword: chicken

Nutrition

Calories: 450kcal | Carbohydrates: 20g | Protein: 50g | Fat: 20g | Sodium: 900mg

Loved this recipe? Save it to your favorite Pinterest board so you can easily find it later! It’s the perfect way to keep all your sweet ideas in one place. ✨

Succulent chicken breasts in a creamy sauce, presented in a rustic setting.

Unlock the Flavor: A Zesty Chicken Zucchini Bake You’ll Love

Welcome to the culinary adventure of a lifetime! This Zesty Chicken Zucchini Bake is more than just a dish; it’s a celebration of flavors that transports you right to the heart of the Mediterranean. Packed with juicy chicken, tender zucchini, and a delightful blend of herbs, this recipe is designed to excite your taste buds and elevate your everyday meals. Whether you’re a seasoned chef or a kitchen novice, this recipe will empower you to embrace the thrill of cooking with heat and spice. Let’s dive in!

Why You’ll Love This Recipe

  • Quick and Easy: Ready in just 40 minutes, this zucchini bake is perfect for busy weeknights when you want a nutritious meal without spending hours in the kitchen.
  • Flavor Explosion: The combination of seasoned chicken, fresh zucchini, and melty cheese creates a dish that bursts with flavor in every bite.
  • Healthy and Nutritious: Packed with lean protein and vegetables, this dish is not only delicious but also a healthy choice for your family.
  • Versatile and Adaptable: Feel free to experiment with different ingredients and spices according to your taste or what you have on hand.
  • Perfect for Meal Prep: Make a big batch and enjoy the leftovers for lunch or dinner throughout the week!

Ingredient Breakdown

Here’s what you’ll need to craft this flavorful dish:

  • Chicken Breasts (2 cups, shredded): Use rotisserie chicken for ease and extra flavor, or cook your own for a fresh touch.
  • Zucchini (3 medium, sliced): Opt for thin slices for tender bites that cook evenly.
  • Cherry Tomatoes (1 cup, halved): These add a pop of brightness and juicy flavor to the dish.
  • Olive Oil (2 tablespoons): A staple in Mediterranean cooking, it enhances flavor and adds healthy fats.
  • Cheese (1 cup, shredded mozzarella or parmesan): Melty cheese is a must for that creamy, indulgent finish.
  • Seasonings: Italian seasoning, garlic powder, salt, and pepper to taste.

**Substitutions**: You can easily swap ingredients based on dietary needs or preferences. For example, use turkey instead of chicken, or substitute bell peppers for zucchini if you’re looking for a different veggie profile.

Cooking Instructions

Side view of Chicken Zucchini Bake, highlighting the colorful layers of zucchini and chicken with a golden crust.

Follow these steps to create your masterpiece:

  1. Preheat the Oven: Start by preheating your oven to 375°F (190°C).
  2. Prepare the Dish: Lightly grease a baking dish with olive oil to prevent sticking.
  3. Mix the Ingredients: In a large bowl, combine shredded chicken, sliced zucchini, halved cherry tomatoes, and seasonings. Drizzle with olive oil and mix well.
  4. Arrange in Dish: Pour the mixture into the prepared baking dish, spreading it evenly.
  5. Add Cheese: Sprinkle the shredded cheese over the top, ensuring every bite will be cheesy!
  6. Bake: Place the dish in the oven and bake for 25-30 minutes or until the zucchini is tender and the cheese is bubbly and golden.

Pro Tips for the Perfect Chicken Zucchini Bake

  • Don’t Overcrowd: Ensure the chicken and zucchini are spread out in the dish to allow for even cooking.
  • Fresh Herbs: Consider adding fresh basil or parsley before serving for an extra flavor boost.
  • Experiment with Cheese: Try different cheeses like feta or goat cheese for a unique flavor twist.
  • Make It Spicy: Add some crushed red pepper flakes or sliced jalapeños for an added kick!
  • Check Doneness: Use a meat thermometer to ensure chicken is cooked through (165°F or 74°C).
  • Layering Flavors: For deeper flavor, sauté the zucchini and chicken with garlic before baking.
  • Let It Rest: Allow the dish to sit for 5 minutes after baking to let the flavors meld.
  • Pair with a Salad: A fresh arugula or spinach salad pairs beautifully with this bake.

Common Mistakes and Troubleshooting

Even the best chefs have off days. Here are some common pitfalls and how to avoid them:

  • Soggy Zucchini: Ensure your zucchini is sliced thinly and not overcrowded in the dish to keep it from becoming mushy.
  • Dry Chicken: If using chicken breasts, make sure they are not overcooked. Opt for thighs if you prefer a juicier option.
  • Uneven Cooking: Stir the ingredients well before baking to ensure even distribution of flavors and heat.

Variations to Try

Ready to get creative? Here are a few delicious variations:

  • Mexican Twist: Add black beans, corn, and taco seasoning for a fiesta in your dish.
  • Vegetarian Version: Swap chicken for chickpeas and add more veggies like bell peppers and spinach.
  • Italian Style: Incorporate sun-dried tomatoes and Italian sausage for a heartier take.
  • Asian Inspiration: Use teriyaki sauce and sesame oil for an Asian flair, adding broccoli and bell peppers.

Storage and Make-Ahead Instructions

This dish is great for meal prep! Here’s how to store it:

  • Refrigeration: Store leftovers in an airtight container for up to 4 days.
  • Freezing: Freeze portions in freezer-safe containers for up to 3 months. Thaw overnight in the fridge before reheating.
  • Make Ahead: Assemble the dish a day in advance, cover, and refrigerate. Bake when ready to serve.

FAQ: Your Chicken Zucchini Bake Questions Answered

  • Can I use frozen zucchini? Yes, but be aware that it may release more moisture during cooking.
  • What can I serve with this dish? Serve it alongside a crisp salad or some crusty bread to soak up the flavors.
  • How do I keep leftovers fresh? Store in an airtight container in the fridge to maintain quality.
  • Can this be made gluten-free? Absolutely! Just ensure your seasonings and any added sauces are gluten-free.
  • What if I don’t have cherry tomatoes? Substitute with diced regular tomatoes or even sun-dried tomatoes for a different flavor.
  • Is this dish suitable for kids? Yes! The flavors are mild and you can adjust the spice level.
  • Can I add other vegetables? Definitely! Bell peppers, spinach, or mushrooms would work beautifully.
  • How do I know when it’s done? The dish is ready when the cheese is bubbly and the chicken reaches an internal temperature of 165°F (74°C).

Nutritional Tips and Dietary Adaptations

This Chicken Zucchini Bake is packed with nutrients. Here are some tips to make it even healthier:

  • Lean Protein: Opt for chicken thighs for more flavor or go for plant-based proteins to suit vegetarian diets.
  • Low-Fat Cheese: Use low-fat cheese options to reduce calories without sacrificing flavor.
  • Opt for Whole Grains: Serve this dish with whole grain bread or brown rice for added fiber.

Essential Equipment for Success

Make your baking experience seamless with these tools:

  • Baking Dish: A 9×13 inch dish is perfect for this recipe.
  • Mixing Bowls: Have a few sizes on hand for mixing ingredients.
  • Measuring Cups and Spoons: Precision is key in cooking!
  • Chef’s Knife: For easy slicing of veggies and chicken.

Serving Suggestions

Elevate your meal with these serving ideas:

  • Fresh Herbs: Garnish with chopped basil or parsley for a bright finish.
  • Side Salad: A simple salad with lemon vinaigrette complements this dish beautifully.
  • Crusty Bread: Serve with warm, crusty bread to soak up the delicious flavors.

Now that you’re armed with all the knowledge to create the ultimate Zesty Chicken Zucchini Bake, it’s time to roll up your sleeves and get cooking! Remember, cooking is an adventure meant to be savored. Embrace the flavors, have fun, and share your creation with loved ones. Enjoy!

Chicken Zucchini Bake

Prep Time 10 minutes
Cook Time 30 minutes
Total Time 40 minutes
Servings 4 servings
Calories 350
A delicious and healthy baked dish combining tender chicken and fresh zucchini for a satisfying meal.

Ingredients

Protein

  • 1 pound chicken breasts (boneless, skinless)

Vegetables

  • 2 medium zucchini (sliced)

Dairy

  • 1/2 cup shredded cheese (optional, for topping)

Seasonings

  • 1 teaspoon garlic powder
  • 1 teaspoon paprika
  • to taste salt and pepper

Instructions 

  • Preheat oven to 375°F (190°C).
  • Season chicken with garlic powder, paprika, salt, and pepper.
  • Place chicken in a baking dish and top with sliced zucchini.
  • Sprinkle shredded cheese over the top.
  • Bake for 30 minutes until chicken is cooked through and cheese is melted.

Notes

You can add herbs like thyme or basil for extra flavor.
Calories: 350kcal
Cost: $12
Course: Main Course
Cuisine: American
Keyword: chicken, zucchini

Nutrition

Calories: 350kcal | Carbohydrates: 10g | Protein: 45g | Fat: 15g | Sodium: 600mg