Author

Avery Collins

Browsing

Unlock the Magic of Flavor with Sticky Tofu Bowls

Welcome to a culinary adventure that’s as thrilling as a firework show on a summer night! Today, we’re diving into the world of sticky tofu bowls, where crispy tofu meets a sweet and savory sauce, creating a dish that’s not just food but an experience. If you’re ready to ignite your taste buds and explore the limitless possibilities of vegan meals, you’re in the right place. Let’s get started!

Why You’ll Love This Sticky Tofu Recipe

This isn’t just another tofu dish; it’s a celebration of flavors and textures that will have you dancing in your kitchen. Here are some reasons why this sticky tofu recipe deserves a spot in your meal rotation:

  • Protein Powerhouse: With extra firm tofu and edamame, this recipe is packed with protein, perfect for fueling your day.
  • Quick and Easy: Ready in under 30 minutes, these sticky tofu bowls are a lifesaver for busy weeknights.
  • Flavor Explosion: The combination of soy sauce, maple syrup, and sesame oil creates a sticky sauce that’s downright addictive.
  • Customizable: Whether you want to add more veggies or switch up the grains, this recipe is versatile enough to fit any palate.
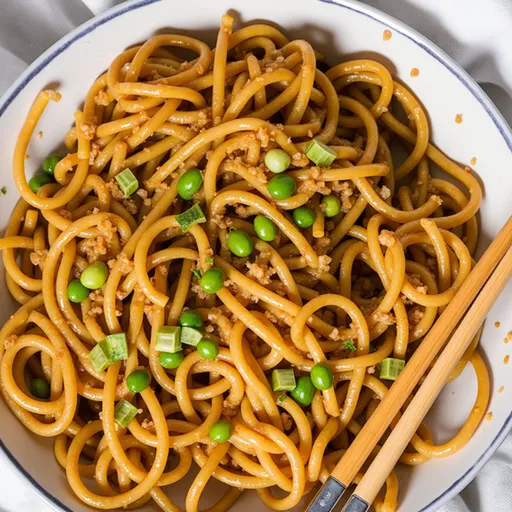
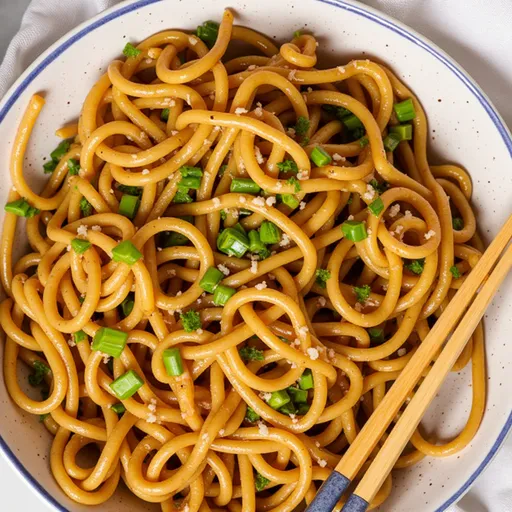
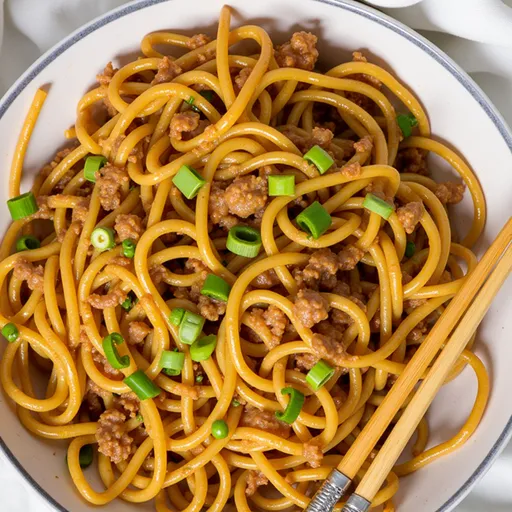
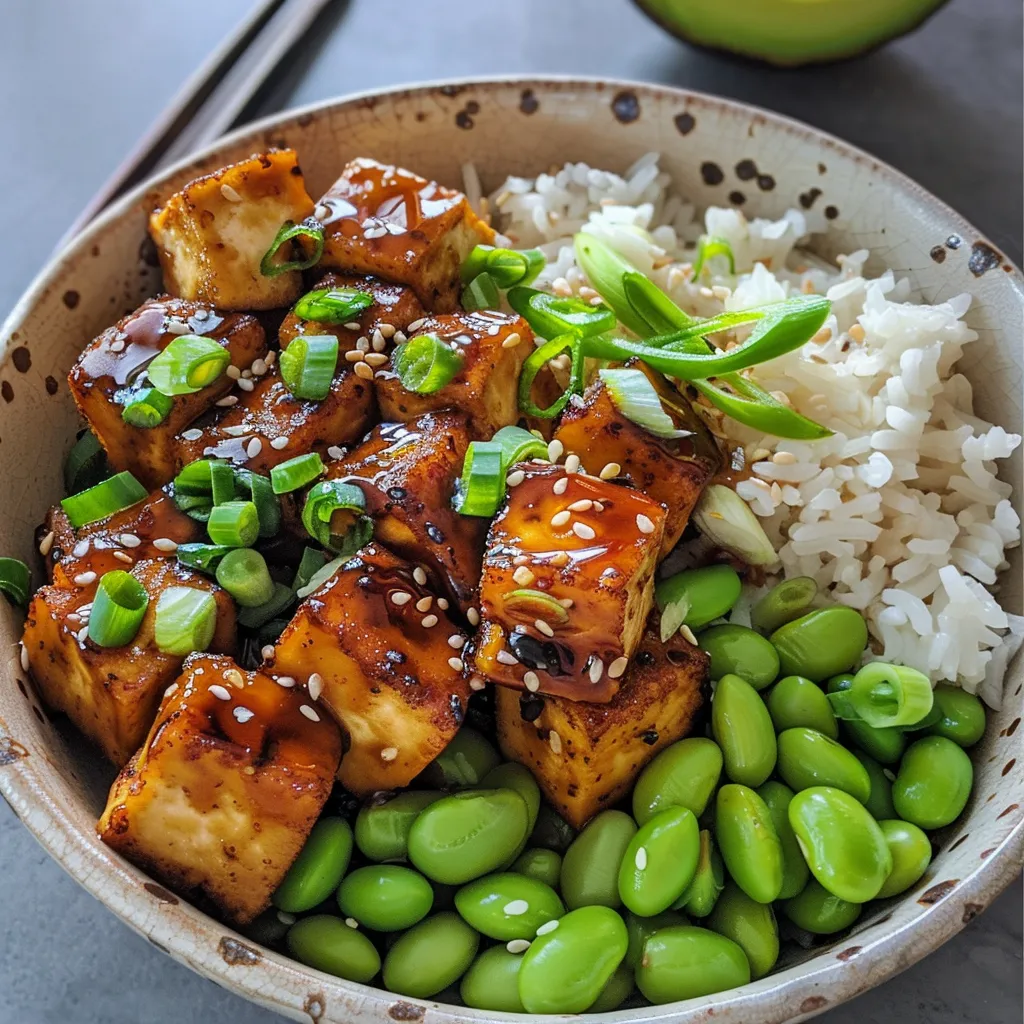
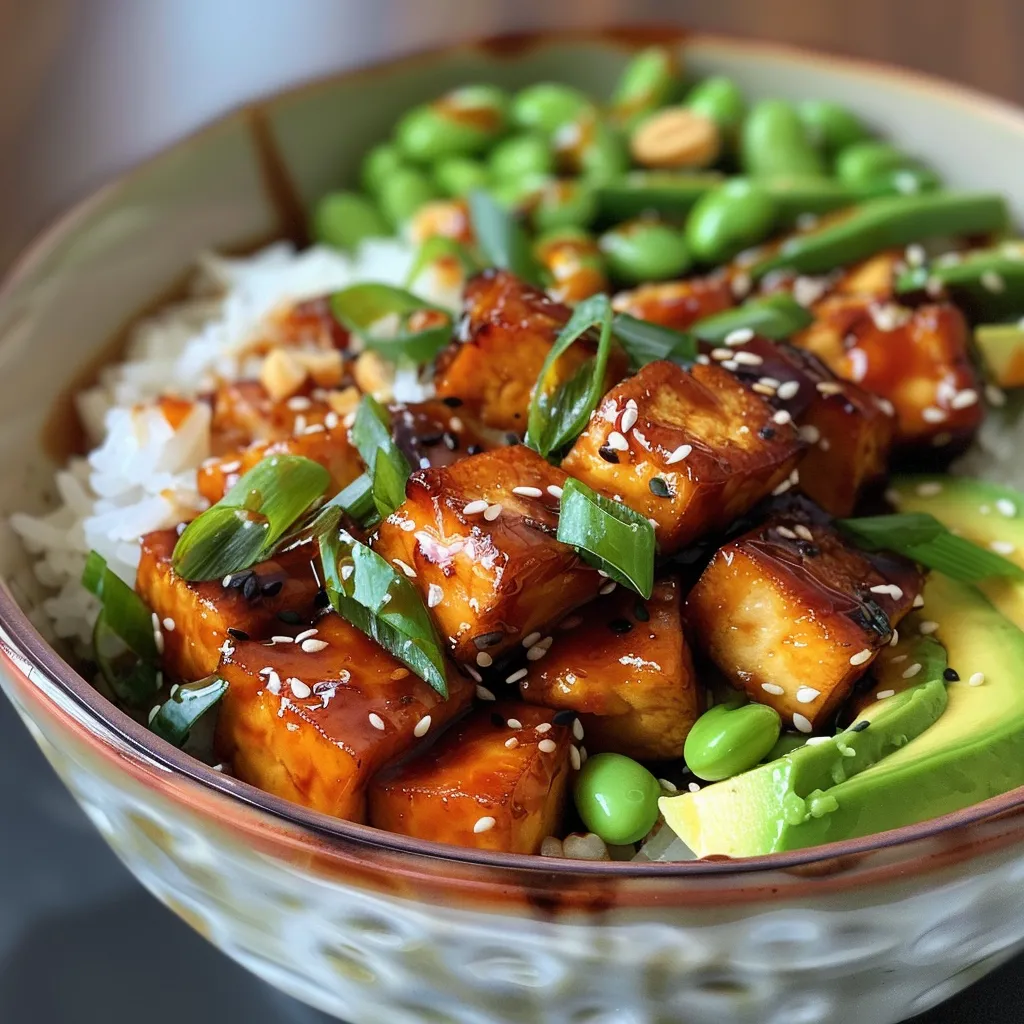
  • Vibrant Presentation: The colorful toppings of avocado, edamame, and sesame seeds make your bowl not only delicious but also Instagram-worthy!

Ingredients for Your Sticky Tofu Bowls

Before we dive into the cooking process, let’s gather our ingredients. Here’s what you’ll need to create these delectable bowls:

  • 1 (14-oz) package extra firm tofu: The star of the show, perfect for holding its shape and absorbing flavors.
  • 2 tbsp cornstarch: Essential for achieving that crispy texture.
  • ½ cup soy sauce (or coconut aminos): Adds savory depth; coconut aminos are a great gluten-free alternative.
  • 3 tbsp maple syrup: Sweetness that balances the salty soy sauce.
  • 2 tbsp sesame oil: Imparts a rich, nutty flavor.
  • 2 tbsp rice vinegar: Adds a tangy brightness to the sauce.
  • 3 cloves minced garlic: For that aromatic kick.
  • 1 tbsp grated ginger: A zesty addition that elevates the flavor profile.
  • 3 cups cooked rice: The perfect base for your bowls; feel free to use brown rice or quinoa for added nutrition.
  • 2 cups steamed edamame: These little green gems bring texture and a protein boost.
  • 1 avocado: Creamy and rich, a must for topping your bowls.
  • Optional: sesame seeds and spring onions: For garnish and an extra layer of flavor.

How to Make Sticky Tofu Bowls

Side view of a delicious sticky tofu bowl showcasing tofu, rice, and garnishes.

Let’s roll up our sleeves and get cooking! Follow these steps to create your sticky tofu bowls:

Step 1: Prepare the Tofu

Open the package of tofu, drain the excess water, and press the extra liquid out. This step is crucial for achieving that perfect crispy texture.

Step 2: Cut and Coat the Tofu

Cut the tofu into small to medium-sized cubes. Transfer the cubes to a container, sprinkle the cornstarch over them, close the lid, and shake until fully coated.

Step 3: Cook the Tofu

Drizzle a generous amount of olive oil in a pan over medium heat. Add the tofu and cook, stirring constantly. Flip the tofu to ensure it gets crispy on all sides. This will take about 8-10 minutes.

Step 4: Whisk Up the Sticky Sauce

In a bowl or blender, combine the soy sauce, maple syrup, sesame oil, rice vinegar, minced garlic, and grated ginger. Blend until smooth.

Step 5: Glaze the Tofu

Once the tofu is crispy, pour the sauce over it and cook for several minutes until it thickens. Don’t forget, you’ll want some sauce left over for the bowls!

Step 6: Assemble Your Bowls

To assemble, start with a base of rice. Top with the crispy tofu, steamed edamame, and sliced avocado. Drizzle with additional sticky sauce, and sprinkle sesame seeds and spring onions on top. Enjoy the explosion of flavors!

Pro Tips for Perfect Sticky Tofu

To take your sticky tofu bowls to the next level, consider these expert insights:

  • Press the Tofu Thoroughly: Ensure the tofu is well-pressed before cooking for maximum crispiness.
  • Experiment with Sauces: Try adding sriracha or chili flakes to the sauce for a spicy kick!
  • Use a Non-Stick Pan: This prevents the tofu from sticking, allowing for easier flipping and cooking.
  • Let the Sauce Thicken: Patience is key; let the sauce simmer longer for a stickier texture.
  • Garnish Generously: Don’t skimp on the toppings; they add flavor and visual appeal!

Common Mistakes and Troubleshooting

Even the best chefs can make mistakes. Here are some common pitfalls and how to avoid them:

  • Tofu Not Crispy Enough: Ensure you press it well and allow it to cook long enough in the pan.
  • Too Salty: If the sauce is too salty, add a touch more maple syrup to balance the flavors.
  • Sauce Won’t Thicken: Simmer the sauce longer, adding a cornstarch slurry if needed.
  • Overcooked Tofu: Keep an eye on your tofu; it cooks quickly and can become tough if overdone.

Variations to Spice Up Your Bowls

Feeling adventurous? Here are some variations on this sticky tofu recipe:

  • Spicy Tofu Bowls: Add chopped jalapeños or a splash of hot sauce to the sticky sauce for a fiery twist.
  • Rainbow Veggie Tofu Bowls: Top with colorful veggies like bell peppers, shredded carrots, and purple cabbage.
  • Peanut Sauce Tofu Bowls: Swap the sticky sauce for a creamy peanut sauce for a nutty flavor.
  • Quinoa Tofu Bowls: Use quinoa instead of rice for a protein-rich, gluten-free base.

Storage and Make-Ahead Instructions

Want to meal prep? Here’s how to store your sticky tofu bowls:

  • Refrigeration: Store in an airtight container in the fridge for up to 4 days.
  • Freezing: Tofu can be frozen before cooking; however, once cooked, the texture may change.
  • Make Ahead: Prepare the tofu and sauce separately and combine them just before serving to maintain crispiness.

Frequently Asked Questions

Got questions? I’ve got answers! Here are some FAQs about sticky tofu bowls:

  • Can I use firm tofu instead of extra firm? Yes, but it may not hold its shape as well during cooking.
  • What can I substitute for soy sauce? Coconut aminos, tamari for gluten-free, or liquid aminos are great alternatives.
  • Is this recipe gluten-free? Yes, if you use gluten-free soy sauce or coconut aminos.
  • Can I add more vegetables? Absolutely! Feel free to throw in any of your favorites.
  • How do I make it spicier? Add more garlic, ginger, or a splash of hot sauce to the sticky sauce.
  • What’s the best way to reheat? Reheat in a pan on the stove for best results, or in the microwave for convenience.
  • Can I make this vegan? Yes, this recipe is already 100% vegan!
  • How long does it take to cook? The entire process should take about 30 minutes.

Nutritional Tips and Dietary Adaptations

For those looking to tweak their meals for health, here are some nutritional tips:

  • Lower Sodium: Use low-sodium soy sauce to cut down on salt.
  • More Fiber: Add more vegetables or use brown rice for increased fiber content.
  • Healthy Fats: Avocado adds healthy fats, but you can also include nuts or seeds for added crunch.

Essential Equipment for Cooking Sticky Tofu

Before you start, here’s some equipment that will make your cooking experience smoother:

  • Non-Stick Pan: Ideal for cooking tofu without it sticking.
  • Blender: For quick and easy sauce preparation.
  • Knife and Cutting Board: Essential for prepping your ingredients efficiently.
  • Measuring Cups and Spoons: To ensure accuracy in your ingredients.

Serving Suggestions to Delight Your Guests

Finally, let’s talk about how to serve these beautiful bowls:

  • Layered Presentation: Build your bowls in layers for a stunning visual appeal that’s sure to impress.
  • Family Style: Serve everything separately and let your guests build their own bowls for a fun, interactive meal.
  • Pair with Drinks: Complement your sticky tofu bowls with a chilled green tea or a light, fruity drink.
  • Perfect for Gatherings: This dish is great for potlucks; it’s easy to transport and always a crowd-pleaser!

Conclusion: Ignite Your Culinary Adventure!

There you have it — a comprehensive guide to creating my irresistibly sticky tofu bowls! With the right ingredients and a dash of creativity, you can transform a simple meal into a flavor-packed adventure. So grab your skillet, embrace the heat, and dive into the joy of cooking. Your taste buds will thank you, and your friends will be begging for seconds!

Sticky Tofu Bowls

Prep Time 10 minutes
Cook Time 15 minutes
Total Time 25 minutes
Servings 4 servings
Calories 550
A flavorful and easy-to-make vegan dish featuring crispy tofu, savory sauce, and fresh toppings in a nourishing bowl.

Ingredients

Tofu

  • 1 package extra firm tofu (14 oz)
  • 2 tbsp cornstarch
  • 0.5 cup soy sauce (or coconut aminos)
  • 3 tbsp maple syrup
  • 2 tbsp sesame oil
  • 2 tbsp rice vinegar
  • 3 cloves minced garlic
  • 1 tbsp grated ginger
  • 3 cups cooked rice
  • 2 cups steamed edamame
  • 1 avocado avocado
  • optional sesame seeds and spring onions to garnish

Instructions 

  • Press and cube the tofu, then coat with cornstarch.
  • Cook the tofu in oil until crispy, stirring constantly.
  • Whisk together soy sauce, maple syrup, sesame oil, vinegar, garlic, and ginger to make the sauce.
  • Pour sauce over tofu and cook until thickened, then assemble bowls with rice, tofu, edamame, and sliced avocado. Garnish with sesame seeds and spring onions.

Notes

For extra flavor, toast sesame seeds before garnishing.
Calories: 550kcal
Cost: $15
Course: Main Course
Cuisine: Asian
Keyword: Tofu

Nutrition

Calories: 550kcal | Carbohydrates: 70g | Protein: 22g | Fat: 20g | Sodium: 1500mg

Why You’ll Fall in Love with These Grilled Chickpea Veggie Pitas

Are you ready to awaken your taste buds and ignite your culinary creativity? Let me introduce you to a dish that’s not just a meal but an experience — Grilled Chickpea Veggie Pitas! Imagine the satisfying crunch of perfectly grilled vegetables, the hearty goodness of chickpeas, and the creamy richness of hummus, all tucked inside warm, soft pita bread. This isn’t just food; it’s a celebration of flavor, texture, and the joy of cooking.

Inspired by the vibrant street food of the Mediterranean and infused with the warmth of home-cooked meals, these veggie pitas are bound to become a staple in your kitchen. They are not only delicious but also packed with protein, making them a perfect option for a healthy lunch or dinner. Whether you’re a seasoned chef or a curious kitchen novice, this recipe will empower you to embrace the thrill of cooking with bold flavors and fresh ingredients.

Key Ingredients That Make This Dish Shine

Let’s dive into the ingredients that transform humble chickpeas into a star-studded dish. Each component plays a crucial role in creating layers of flavor and texture.

  • Chickpeas: The foundation of our filling, these legumes are loaded with protein and fiber, providing a satisfying base.
  • Olive Oil: A drizzle of this liquid gold enhances the flavors of the spices and helps achieve that perfect char on the grill.
  • Smoked Paprika: This aromatic spice adds a depth of flavor that’s both smoky and slightly sweet, giving the chickpeas a kick.
  • Garlic Powder: A must-have in any spice cabinet, it brings a savory undertone that complements the other ingredients beautifully.
  • Fresh Vegetables: Red bell pepper, zucchini, and red onion not only add color but also provide a delicious crunch and sweetness when grilled.
  • Whole Wheat Pitas: These pitas are the perfect vessel for our filling, providing a hearty and wholesome element.
  • Hummus: This creamy spread adds a luxurious texture and flavor, elevating the entire dish.
  • Lemon Wedges: A squeeze of fresh lemon juice brightens up the flavors, making every bite sing.

How to Create Your Grilled Chickpea Veggie Pitas

A plate of grilled chickpea veggie pitas stacked with fresh veggies and lemon wedges.

Now that we have our ingredients ready, let’s get cooking! Follow these simple steps to create your own delicious grilled chickpea veggie pitas.

  1. Preheat the Grill: Start by preheating your grill to medium-high heat. A hot grill will give your veggies and chickpeas that desirable char.
  2. Prepare the Chickpeas: In a mixing bowl, combine the drained and rinsed chickpeas with olive oil, smoked paprika, garlic powder, salt, and pepper. Toss everything together until the chickpeas are well-coated.
  3. Grill the Chickpeas: Place the seasoned chickpeas in a grill basket or on a sheet of aluminum foil. Grill them for about 10 minutes, stirring occasionally, until they are heated through and slightly crispy.
  4. Grill the Vegetables: While the chickpeas are grilling, toss your sliced bell pepper, zucchini, and red onion in olive oil, seasoning them with salt and pepper. Grill the veggies for about 5-7 minutes until they are tender and have nice grill marks.
  5. Warm the Pitas: Place your whole wheat pitas on the grill for 1-2 minutes on each side, just until they are warm and slightly toasted.
  6. Assemble the Pitas: Spread a generous layer of hummus inside each pita. Add the grilled chickpeas and vegetables, then top with fresh lettuce or spinach for a crunchy finish.
  7. Serve: Serve your pitas with lemon wedges on the side for that extra zing. Enjoy every fiery bite!

Expert Tips for Perfect Pitas

Cooking is all about experimentation, but a few tried-and-true tips can elevate your dish. Here are some expert tips to ensure your grilled chickpea veggie pitas turn out spectacularly.

  • Don’t Overstuff: It’s tempting to fill your pitas to the brim, but overstuffing can lead to tears and spills. Keep it balanced!
  • Fresh Ingredients: Use the freshest veggies you can find. Seasonal produce not only tastes better but also has more nutrients.
  • Adjust the Spice: If you like it spicy, feel free to add some chili powder or fresh jalapeños to the chickpeas for an extra kick.
  • Grill Marks Matter: Don’t rush the grilling process. Allow enough time for the grill to do its magic, creating beautiful char marks on your vegetables.
  • Customize Your Hummus: Experiment with different hummus flavors like roasted red pepper or garlic for varied tastes.

Possible Variations and Substitutions

One of the beautiful things about cooking is the endless possibilities for creativity. Here are some variations and substitutions you can try with this recipe:

  • Different Proteins: Swap out chickpeas for black beans or lentils for a different flavor profile.
  • Vegan Cheese: Add a sprinkle of vegan feta or shredded cheese to the filling for extra creaminess.
  • Wrap It Up: If pitas aren’t your thing, try using large lettuce leaves or a tortilla for a refreshing wrap.
  • Vegetable Variations: Feel free to mix in other vegetables like eggplant, mushrooms, or asparagus based on what you have on hand.
  • Spice Blends: Experiment with different spice blends like curry powder or Italian seasoning for unique flavor twists.

Equipment You’ll Need

Having the right tools can make cooking more enjoyable. Here’s a list of equipment that will help you on your culinary adventure:

  • Grill or Grill Pan: Essential for achieving that smoky flavor and perfect grill marks.
  • Grill Basket: Useful for grilling small items like chickpeas to prevent them from falling through the grates.
  • Mixing Bowls: For preparing and mixing your ingredients.
  • Tongs: Handy for flipping veggies and pitas with ease.
  • Cutting Board and Knife: For slicing your veggies to perfection.

Storage and Freezing Tips

Want to prep ahead of time? Here’s how to store and freeze your grilled chickpea veggie pitas:

Storage: Store any leftover filling in an airtight container in the fridge for up to 3 days. Keep the pitas separate to prevent them from getting soggy.

Freezing: You can freeze the chickpea filling in a freezer-safe container for up to a month. Thaw overnight in the fridge before reheating.

Frequently Asked Questions

Can I make this recipe gluten-free? Absolutely! You can use gluten-free pitas or tortillas to make this dish suitable for a gluten-free diet.

How can I make this dish spicier? Add some cayenne pepper or diced jalapeños to the chickpea mixture for an extra kick of heat.

Can I grill these pitas in the oven? Yes! If you don’t have a grill, you can use a broiler to achieve similar results. Just keep an eye on them to avoid burning.

Troubleshooting Common Issues

Even the most seasoned cooks can run into a few hiccups. Here’s how to troubleshoot common issues:

  • Pitas Falling Apart: If your pitas are too thin, try using less filling or switching to a sturdier flatbread.
  • Chickpeas Not Crisping: Ensure your grill is hot enough. A good heat will help achieve the perfect texture.
  • Vegetables Overcooked: Keep an eye on your veggies while grilling. They should be tender but still have a bit of bite to them.

Conclusion: A Culinary Adventure Awaits

There you have it — an exciting journey into the world of flavor with these Grilled Chickpea Veggie Pitas! This dish is a testament to the power of fresh ingredients, bold spices, and the joy of cooking. Whether you’re enjoying a cozy dinner at home or impressing friends at your next gathering, these pitas will undoubtedly steal the spotlight.

So, gather your ingredients, fire up that grill, and take the plunge into this delicious culinary adventure. Remember, cooking is about embracing creativity and having fun. I can’t wait for you to try this recipe and add your unique spin. Happy grilling!

Grilled Chickpea Veggie Pitas Recipe

Prep Time 10 minutes
Cook Time 15 minutes
Total Time 25 minutes
Servings 4 pitas
Calories 350
A delicious and healthy vegetarian meal featuring grilled chickpeas and vegetables stuffed in whole wheat pitas, perfect for a quick lunch or dinner.

Ingredients

Canned Goods

  • 1 can chickpeas, drained and rinsed
  • 2 tablespoons olive oil
  • 1 teaspoon smoked paprika
  • 1 teaspoon garlic powder
  • to taste salt and pepper
  • 1 red bell pepper sliced
  • 1 zucchini sliced
  • 1 red onion sliced
  • 1 cup lettuce or spinach
  • 1/2 cup hummus
  • lemon wedges for serving

Instructions 

  • Preheat the grill to medium-high heat.
  • Mix chickpeas with olive oil, smoked paprika, garlic powder, salt, and pepper. Grill for 10 minutes, stirring occasionally.
  • Toss sliced vegetables in olive oil, salt, and pepper, then grill for 5-7 minutes until tender and charred.
  • Warm pitas on the grill for 1-2 minutes each side.
  • Spread hummus inside pitas, add grilled chickpeas and vegetables, then top with lettuce or spinach. Serve with lemon wedges.

Notes

For extra flavor, add fresh herbs or a drizzle of tahini.
Calories: 350kcal
Cost: $15
Course: Main Course
Cuisine: Mediterranean
Keyword: Chickpeas

Nutrition

Calories: 350kcal | Carbohydrates: 50g | Protein: 15g | Fat: 12g | Sodium: 600mg

Loved this recipe? Save it to your favorite Pinterest board so you can easily find it later! It’s the perfect way to keep all your sweet ideas in one place. ✨

Delicious grilled chickpea stuffed pitas with a side of lettuce and sliced bell peppers.

Why You’ll Crave These Burrito Wraps

There’s a certain magic that happens when you bring together vibrant flavors, colorful ingredients, and a touch of creativity in the kitchen. These Quick & Healthy Vegan Burrito Wraps embody that very essence, making them the perfect meal for anyone looking to spice up their dinner routine. Imagine sinking your teeth into a soft tortilla, bursting with a delightful mix of black beans, quinoa, fresh veggies, and creamy avocado. What sets these wraps apart is not just their taste but also their versatility — they’re a canvas for culinary expression!

Whether you’re a seasoned chef or a kitchen newbie, these wraps invite you to play with flavors and textures. They are not just quick to prepare but also pack a nutritional punch, making them a guilt-free indulgence. Let’s dive into this culinary adventure and explore how to make these vibrant vegan burritos that will not only satisfy your hunger but also awaken your taste buds.

Ingredient Highlights

Before we get our hands dirty in the kitchen, let’s take a moment to appreciate the star players in our burrito wraps:

  • Whole Wheat Tortillas: These are the sturdy and nutritious base for our wraps. Whole wheat tortillas bring a nutty flavor and an extra dose of fiber to the table.
  • Black Beans: The heart of our burrito, black beans are packed with protein and fiber, making them a staple in healthy vegan meals.
  • Quinoa: This superfood adds texture and a protein boost, complementing the beans beautifully.
  • Corn Kernels: Whether fresh or frozen, corn adds a sweet crunch that elevates the overall flavor profile.
  • Bell Pepper: Diced bell peppers bring a splash of color and a mild sweetness that rounds out the savory ingredients.
  • Avocado: Creamy and rich, avocado not only adds a luxurious mouthfeel but also healthy fats that keep you satisfied.
  • Fresh Spinach or Kale: These leafy greens provide a fresh, vibrant contrast to the hearty fillings.
  • Spices: A sprinkle of cumin and chili powder infuses the entire dish with warmth and depth.

Crafting Your Burrito Wraps

Delicious Vegan Burrito Wrap displayed on a rustic surface, showcasing fresh ingredients.

Ready to unleash your inner culinary artist? Here’s how to create these delicious wraps step-by-step:

Ingredients

Here’s what you’ll need:

  • 4 large whole wheat tortillas
  • 1 can black beans, rinsed and drained
  • 1 cup cooked quinoa
  • 1 cup corn kernels (fresh or frozen)
  • 1 bell pepper, diced
  • 1 avocado, sliced
  • 1 cup fresh spinach or kale
  • 1 teaspoon cumin
  • 1 teaspoon chili powder
  • Salt and pepper to taste
  • Lime wedges for serving

Instructions

Let’s get cooking! Follow these simple steps:

  1. In a large bowl, combine the black beans, cooked quinoa, corn, diced bell pepper, cumin, chili powder, salt, and pepper. Mix well to ensure the flavors marry beautifully.
  2. Lay out the whole wheat tortillas on a flat surface, ready for assembly.
  3. Spread a generous amount of the bean and quinoa mixture onto the center of each tortilla, being careful not to overfill.
  4. Top the mixture with fresh spinach or kale and slices of avocado for that creamy texture.
  5. Fold in the sides of the tortilla and roll it up tightly from the bottom to create a wrap that holds all the deliciousness inside.
  6. Serve immediately with lime wedges on the side, or wrap in foil for a quick on-the-go meal.

Tips for Perfect Burrito Wraps

To ensure your burritos are not just good but great, consider these handy tips:

  • Don’t Overfill: While it’s tempting to pile on the ingredients, leaving some space will help you roll them up tightly without bursting.
  • Warm the Tortillas: If you warm your tortillas in a skillet for a minute or two, they’ll be more pliable and easier to roll.
  • Experiment with Spices: Feel free to add your favorite spices or hot sauce to the bean mixture for a little extra heat!

Storage and Freezing Tips

These wraps are perfect for meal prep! Here’s how to store them:

  • Refrigerator: Store the assembled burritos wrapped in foil or in airtight containers for up to 3 days.
  • Freezer: Wrap burritos tightly in foil, place them in a freezer bag, and freeze for up to 2 months. When you’re ready to enjoy, simply thaw in the fridge overnight and reheat!

Variations to Explore

One of the best things about these burrito wraps is their adaptability. Here are some fun variations to try:

  • Breakfast Burrito: Add scrambled tofu, hash browns, and your favorite salsa for a hearty breakfast option.
  • High-Protein Version: Swap quinoa for lentils or tempeh for an even bigger protein boost.
  • Low-Carb Twist: For a low-carb option, use large collard green leaves instead of tortillas.
  • Seasonal Additions: Incorporate roasted sweet potatoes in the fall or fresh mango salsa in the summer for seasonal flair.

FAQs About Vegan Burrito Wraps

Got questions? Here are some common queries answered:

  • Can I make these burritos ahead of time? Absolutely! Prep and roll them in advance, then store them in the fridge or freezer.
  • Can I use canned beans instead of cooking from scratch? Yes! Canned beans save time and work perfectly in this recipe.
  • What tortillas are best for burritos? Large flour or whole wheat tortillas hold fillings best. For gluten-free options, try cassava or brown rice wraps.
  • Can I add sauce inside? Definitely! Salsa, vegan sour cream, or cashew queso will enhance the flavor.

Troubleshooting Tips

If you encounter any hiccups while making your burritos, don’t worry! Here are some solutions:

  • Wrap Falling Apart: Ensure you don’t overfill, tuck the sides in firmly, and roll tightly. Toasting helps seal it, too!
  • Too Dry: If your filling feels dry, add a splash of vegetable broth or a bit of salsa to moisten it.

Conclusion: Let the Flavor Ignite!

Cooking is an adventure, and these Quick & Healthy Vegan Burrito Wraps are the perfect opportunity to ignite your culinary passion. With their bold flavors, vibrant ingredients, and endless customization possibilities, they truly encapsulate the spirit of good food. So, gather your ingredients, roll up your sleeves, and let the kitchen become your playground. Whether you’re whipping up a quick weeknight meal or impressing friends at a gathering, these burritos are sure to steal the show. Enjoy every bite, and don’t forget to share your creations — I can’t wait to see how you bring this recipe to life!

Quick & Healthy Vegan Burrito Wraps

Prep Time 10 minutes
Total Time 10 minutes
Servings 4 servings
Calories 350
Enjoy these quick, nutritious vegan burrito wraps packed with beans, quinoa, and fresh veggies for a satisfying meal.

Ingredients

Tortillas

  • 4 large whole wheat tortillas
  • 1 can black beans, rinsed and drained
  • 1 cup cooked quinoa
  • 1 cup corn kernels (fresh or frozen)
  • 1 diced bell pepper
  • 1 sliced avocado
  • 1 cup fresh spinach or kale
  • 1 teaspoon cumin
  • 1 teaspoon chili powder
  • to taste salt and pepper salt and pepper
  • for serving lime wedges

Instructions 

  • Mix black beans, quinoa, corn, bell pepper, cumin, chili powder, salt, and pepper.
  • Lay out tortillas and spread the mixture onto each.
  • Add spinach and avocado slices, then roll up tightly.
  • Serve immediately with lime wedges or wrap for on-the-go.

Notes

Feel free to customize with your favorite veggies or add hot sauce for extra flavor.
Calories: 350kcal
Cost: $15
Course: Main Course
Cuisine: Vegan
Keyword: Burrito, healthy, Vegan

Nutrition

Calories: 350kcal | Carbohydrates: 60g | Protein: 15g | Fat: 8g | Sodium: 600mg

Loved this recipe? Save it to your favorite Pinterest board so you can easily find it later! It’s the perfect way to keep all your sweet ideas in one place. ✨

An appetizing Vegan Burrito Wrap cut in half, revealing layers of quinoa, beans, and greens.

Ignite Your Taste Buds with a Buffalo Cauliflower & Chickpea Casserole

Welcome to the bold culinary journey of Buffalo Cauliflower & Chickpea Casserole! This dish is not just a meal; it’s a celebration of flavors that will make your kitchen come alive. Imagine the heat of buffalo sauce mingling with the earthiness of chickpeas and the tender crunch of cauliflower. If you’re ready to transform humble ingredients into a dish that dazzles, you’ve come to the right place. In this article, we’ll explore every inch of this recipe, from its vibrant ingredients to expert tips that will elevate your cooking game. Let’s dive in!

Why You’ll Love This Recipe

  • Flavor Explosion: Each bite is a symphony of spicy, savory, and nutty flavors that will leave your taste buds dancing.
  • Effortless Preparation: This is a dump and bake casserole, meaning less time prepping and more time savoring.
  • Vegan & Healthy: Packed with plant-based protein and fiber, this dish is both nourishing and satisfying.
  • Meal Prep Friendly: Make a big batch and enjoy leftovers for days, perfect for busy weeknights.
  • Customizable: Add your favorite veggies or adjust the spice level to match your palate.

Ingredients Breakdown

Let’s take a closer look at the ingredients that make this casserole a standout:

  • 2 cups (470 ml) low-sodium vegetable broth: The base of the dish, providing moisture and depth.
  • 1/2 cup (118 ml) buffalo hot sauce: This is where the magic happens—spice it up!
  • 1/4 cup (22 g) nutritional yeast: This adds a cheesy flavor without the dairy.
  • 1 teaspoon onion powder: Enhances the savory notes of the dish.
  • 1 rib of celery, finely sliced: For crunch and freshness.
  • 2 cups (374 g) chickpeas, cooked: The protein powerhouse that makes this casserole satisfying.
  • 1/2 medium head of cauliflower, chopped: Adds texture and absorbs the flavors beautifully.
  • 1 cup (182 g) uncooked brown rice: The hearty base that soaks up all the delicious juices.
  • 2-3 cloves garlic, minced: A must-have for that aromatic kick.
  • Nut Free Vegan Ranch and chopped green onions: Optional garnishes that add a finishing touch.

Step-by-Step Instructions

Juicy Buffalo Cauliflower & Chickpea Casserole served in a dish, showcasing vibrant colors and textures.

Ready to unleash the flavor? Here’s how to bring your casserole to life:

  1. Preheat the oven to 400°F (200°C).
  2. In a medium pot, mix the vegetable broth, buffalo sauce, nutritional yeast, and onion powder. Bring it to a boil over high heat.
  3. While the liquid heats, pour the chickpeas into a 9×13″ pan or casserole dish. Evenly sprinkle the cauliflower and celery over the chickpeas, then add the uncooked brown rice on top.
  4. Once the broth mixture is boiling, stir in the minced garlic. Pour this hot liquid evenly over the casserole dish, ensuring all ingredients are coated. Cover the casserole tightly with aluminum foil.
  5. Bake in the middle rack of the oven for 60 minutes. Remove from the oven, uncover, and top with green onions and/or vegan ranch if desired.
  6. Serve hot, or store leftovers in a sealed container for up to a week or freeze for a month.

Pro Tips for Perfecting Your Casserole

  • Broth Balance: Ensure your vegetable broth is low-sodium to control saltiness and let the buffalo sauce shine.
  • Rice Choice: Using brown rice is key for texture; white rice may cook unevenly in this casserole.
  • Spice Level: If you’re sensitive to heat, start with less buffalo sauce and add more to taste.
  • Layering Flavors: Consider adding spices like cumin or smoked paprika for an additional flavor dimension.
  • Fresh Herbs: Top with fresh cilantro or parsley for an added burst of freshness.
  • Even Cooking: Stir the casserole halfway through baking to ensure uniform cooking.
  • Garnish Wisely: A drizzle of vegan ranch can help balance the heat of the buffalo sauce.
  • Storage Tips: For easy storage, portion out leftovers into single-serving containers.

Common Mistakes to Avoid

Even the best recipes can go awry. Here are some pitfalls to watch for:

  • Not Preheating: Always preheat your oven to ensure even cooking.
  • Forgetting to Cover: Covering the casserole prevents excess drying and helps cook the rice properly.
  • Using Old Ingredients: Fresh ingredients yield better flavor—check your spices and broth!
  • Ignoring Cooking Times: Every oven is different; check for doneness by tasting the rice.

Delicious Variations

Want to switch things up? Here are some variations to try:

  • Mexican Flair: Substitute buffalo sauce with salsa and add black beans for a southwestern twist.
  • Cheesy Delight: Mix in vegan cheese or cashew cream for a richer flavor.
  • Veggie Medley: Toss in spinach or kale for added nutrition and color.
  • Quinoa Swap: Replace brown rice with quinoa for a gluten-free option that’s still hearty.

Storage and Make-Ahead Instructions

This casserole is perfect for meal prep!

  • Refrigerator Storage: Keep leftovers in an airtight container for up to a week.
  • Freezer Storage: Freeze for up to one month. Thaw overnight in the fridge before reheating.
  • Make-Ahead Tip: Assemble the casserole in advance and store it in the fridge before baking.

Frequently Asked Questions

Here are answers to some common questions:

  • Can I make this gluten-free? Yes! Ensure your broth and hot sauce are gluten-free.
  • How can I adjust the heat level? Start with a milder hot sauce and gradually increase to suit your taste.
  • Can I use frozen cauliflower? Yes, just be sure to thaw and drain it well to avoid excess moisture.
  • What can I serve with this casserole? A fresh green salad pairs perfectly, or serve with crusty bread for a complete meal.
  • Is this recipe good for meal prep? Absolutely! It stores well and reheats beautifully.
  • Can I add protein? Yes! Consider mixing in tofu or tempeh for an extra protein boost.
  • What if my rice isn’t cooked? If you find the rice isn’t done after 60 minutes, cover and bake for an additional 10-15 minutes.
  • How do I make it creamier? Stir in some coconut milk or a vegan cream before baking for a creamier texture.

Nutrition Tips and Dietary Adaptations

This casserole is not just delicious; it’s packed with nutrients!

  • High Fiber: Chickpeas and brown rice provide a healthy dose of fiber, aiding digestion.
  • Low in Saturated Fat: This dish is naturally low in saturated fat, making it heart-healthy.
  • Rich in Vitamins: Cauliflower is a powerhouse of vitamins C and K, promoting overall health.
  • Customizable for Dietary Needs: Easily make adjustments for gluten-free, nut-free, or low-carb diets.

Recommended Equipment

Here’s what you’ll need to make this casserole:

  • 9×13-inch casserole dish: Perfect for even cooking and easy serving.
  • Medium pot: For boiling your sauce and broth mixture.
  • Measuring cups and spoons: Accuracy is key in cooking!
  • Aluminum foil: Essential for covering the casserole while it bakes.

Serving Suggestions

This casserole shines on its own, but here are some pairing ideas:

  • Fresh Green Salad: A crisp salad with a tangy vinaigrette balances the richness of the casserole.
  • Crusty Bread: Serve with warm, crusty bread to soak up all that delicious sauce.
  • Roasted Vegetables: Pair with seasonal roasted veggies for added flavor and texture.
  • Simple Vegan Ranch Dressing: Drizzle over the top for added creaminess and flavor contrast.

As we wrap up this flavor-packed adventure through the Buffalo Cauliflower & Chickpea Casserole, I hope you’re feeling inspired to bring some heat into your kitchen! Remember, cooking is all about experimentation and finding your own balance of flavors. So, grab those spices, get cooking, and let your culinary story unfold. Here’s to the next delicious challenge – happy cooking!

Buffalo Cauliflower & Chickpea Casserole

Prep Time 10 minutes
Cook Time 1 hour
Total Time 1 hour 10 minutes
Servings 4 servings
Calories 350
A flavorful vegan casserole combining spicy buffalo cauliflower and hearty chickpeas, baked to perfection with brown rice.

Ingredients

Broth & Sauces

  • 2 cups low-sodium vegetable broth
  • 1/2 cup buffalo hot sauce
  • 1/4 cup nutritional yeast
  • 1 teaspoon onion powder

Vegetables & Grains

  • 1 rib celery, finely sliced
  • 2 cups cooked chickpeas
  • 1/2 medium head cauliflower, chopped into florets (about 2 cups; 200 g)
  • 1 cup uncooked brown rice
  • 2-3 cloves garlic, minced

Garnish & Optional

  • to taste Nut Free Vegan Ranch and chopped green onions (for garnish)

Instructions 

  • Preheat oven to 400°F (200°C).
  • Mix broth, hot sauce, nutritional yeast, and onion powder; bring to a boil.
  • Pour chickpeas into a casserole dish, add cauliflower, celery, and rice. Pour hot liquid over everything.
  • Cover with foil and bake for 60 minutes. Garnish with green onions or vegan ranch before serving.

Notes

Ensure cauliflower is evenly distributed for consistent cooking.
Calories: 350kcal
Cost: $15
Course: Main Course
Cuisine: American
Keyword: Buffalo, Cauliflower, Vegan

Nutrition

Calories: 350kcal | Carbohydrates: 60g | Protein: 15g | Fat: 5g | Sodium: 800mg

Dive into Creamy Goodness

Welcome to a culinary adventure that promises to elevate your dinner game! This Creamy Rotisserie Chicken Broccoli Pasta is not just a meal; it’s a celebration of flavors, textures, and the joy of cooking. With tender rotisserie chicken, vibrant broccoli, and a luscious, creamy sauce, this dish effortlessly combines comfort and excitement in every bite. Let’s embark on this flavorful journey together!

Why You’ll Love This Recipe

This recipe isn’t just about convenience; it’s about indulging in deliciousness while reaping multiple benefits. Here’s why this creamy rotisserie chicken broccoli pasta should be on your dinner table:

  • Time-Saving Delight: Using rotisserie chicken cuts down prep time significantly, making it perfect for busy weeknights.
  • Nutritious Balance: Packed with protein from the chicken and nutrients from broccoli, this dish is as wholesome as it is tasty.
  • Comfort Food at Its Best: The creamy sauce envelops the pasta and chicken, creating a rich, satisfying experience that warms the soul.
  • Customizable: Easily adapt this dish to suit your taste or dietary needs with various ingredients and spices.
  • Impress and Delight: Perfect for family dinners or casual gatherings, this dish will have everyone asking for seconds!

Ingredient Breakdown

Let’s delve into the ingredients that make this dish a winner. Here’s what you’ll need:

  • 1 lb penne pasta: Holds sauce beautifully while providing a hearty base.
  • 1 whole rotisserie chicken (3-4 lbs, shredded): About 4 cups of tender, flavorful meat.
  • 4 cups broccoli florets: Fresh or frozen, they add color and nutrients.
  • 2 tbsp olive oil: Adds richness and helps sauté the aromatics.
  • 3 cloves garlic (minced fine): Infuses the dish with a fragrant kick.
  • 1 medium yellow onion (diced small): Adds sweetness and depth to the sauce.
  • 2 tbsp butter: For richness and a glossy finish.
  • 1 cup heavy cream: The star of the creamy sauce, making it luscious and indulgent.
  • 1/2 cup chicken broth (low-sodium): Enhances flavor without overpowering.
  • 1 cup Parmesan cheese (freshly grated): Adds a nutty, salty depth to the sauce.
  • 1/2 cup mozzarella cheese (whole milk, shredded): For that gooey, melty goodness.
  • 1 tsp Italian seasoning: A blend of herbs that enhances the flavor profile.
  • 1/2 tsp garlic powder: Boosts the garlic flavor.
  • 1/4 tsp red pepper flakes (optional): Adds just a touch of heat for those who like a kick.

Pro Tips for Success

A side view of a hearty bowl of pasta, featuring chicken, broccoli, and a rich sauce.

Want to level up your cooking game? Here are some expert insights to ensure your creamy rotisserie chicken broccoli pasta is a hit:

  • Don’t Overcook the Pasta: Aim for al dente! This ensures the pasta retains its shape and texture.
  • Reserve Pasta Water: The starchy water helps adjust the sauce’s consistency, making it creamy without being too thick.
  • Incorporate Cheese Off Heat: To prevent graininess, remove the skillet from heat before adding cheeses.
  • Season Gradually: Taste as you go! Adjust the seasoning to suit your palate.
  • Experiment with Cheese: Try different cheeses like Gruyère or Gouda for a unique flavor twist.
  • Mix Up the Vegetables: Feel free to add bell peppers, spinach, or even peas for extra color and nutrients.
  • Try Different Pasta Shapes: While penne is great, other shapes like fusilli or farfalle work beautifully too!
  • Finish with Fresh Herbs: A sprinkle of fresh basil or parsley adds a pop of color and freshness.

Common Mistakes and Troubleshooting

Even the best chefs make mistakes! Here’s how to avoid common pitfalls:

  • Too Thick Sauce: If your sauce is too thick, gradually stir in reserved pasta water until smooth.
  • Grainy Cheese: Always add cheese off heat. If it’s grainy, whisk vigorously to incorporate air.
  • Overcooked Broccoli: Add broccoli during the last 3 minutes of pasta cooking to keep it vibrant and tender.
  • Flavorless Dish: Don’t forget to taste and adjust seasonings throughout the cooking process.

Recipe Variations

Feel free to get creative! Here are some variations to try:

  • Spicy Kick: Add more red pepper flakes or a dash of hot sauce to the sauce for a fiery twist.
  • Cheesy Delight: Mix in a blend of cheeses, like feta or cheddar, for a richer flavor.
  • Vegetarian Version: Substitute rotisserie chicken with sautéed mushrooms or chickpeas for a savory meatless option.
  • Pesto Twist: Stir in a couple of tablespoons of pesto into the sauce for a fresh, herby flavor.

Storage and Make-Ahead Instructions

Prep your meals like a pro! Here’s how to store and make ahead:

  • Refrigeration: Store leftovers in an airtight container for up to 3 days.
  • Freezing: Freeze in portions for up to 2 months. Thaw before reheating.
  • Make Ahead: Prepare the sauce and cook pasta in advance. Combine just before serving for freshness.

Frequently Asked Questions

Got questions? I’ve got answers! Here are some common queries about this dish:

  • Can I use frozen broccoli?: Absolutely! Just add it directly to the boiling pasta water.
  • What can I substitute for heavy cream?: Use half-and-half or coconut cream for a lighter option.
  • Is this dish gluten-free?: Substitute pasta with gluten-free varieties for a gluten-free version.
  • How do I adjust the spiciness?: Modify the amount of red pepper flakes to your spice preference.
  • Can I make this vegetarian?: Yes! Replace chicken with hearty vegetables or plant-based protein.
  • What side dishes pair well?: A crisp salad or garlic bread complements this pasta beautifully.
  • Can I use other pasta shapes?: Definitely! Use any pasta shape you love.
  • How do I reheat leftovers?: Reheat gently on the stove, adding a splash of broth or cream to revive the sauce.

Nutritional Insights

This creamy rotisserie chicken broccoli pasta isn’t just delicious; it’s packed with nutrients:

  • Protein Power: Each serving contains a significant amount of protein, making it a filling meal.
  • Vitamins and Minerals: Broccoli adds vitamins C and K, along with fiber for digestive health.
  • Calcium Boost: The cheese contributes to your daily calcium intake, vital for strong bones.

Equipment Recommendations

Here’s what you’ll need to whip up this delicious dish:

  • Large Pot: For boiling pasta and broccoli.
  • Skillet: A large skillet for making the creamy sauce and combining ingredients.
  • Measuring Cups and Spoons: Essential for accurate ingredient measurements.
  • Whisk: To ensure a smooth, creamy sauce without lumps.

Serving Suggestions

How to present this dish? Here are my favorite serving ideas:

  • Garnish with Fresh Herbs: Sprinkle chopped parsley or basil on top for a fresh finish.
  • Serve with Garlic Bread: A side of garlic bread complements the creamy sauce beautifully.
  • Pair with a Salad: A light, crisp salad balances the richness of the pasta.

Conclusion

So there you have it! This Creamy Rotisserie Chicken Broccoli Pasta is more than just a recipe; it’s an invitation to explore the world of flavors. Whether it’s a quick weeknight meal or a special occasion, this dish will never disappoint. Embrace your inner chef, grab your skillet, and get ready to indulge in a creamy, comforting delight that’s sure to impress. Happy cooking!

Creamy Rotisserie Chicken Broccoli Pasta

Prep Time 10 minutes
Cook Time 20 minutes
Total Time 30 minutes
Servings 4 servings
Calories 850
A rich and creamy pasta dish featuring shredded rotisserie chicken and fresh broccoli, perfect for a quick and satisfying meal.

Ingredients

Pasta and Broccoli

  • 1 lb penne pasta
  • 4 cups broccoli florets (fresh or frozen)

Chicken

  • 4 cups shredded rotisserie chicken (about 4 cups meat)

Sauce and flavorings

  • 2 tbsp olive oil
  • 3 cloves garlic (minced fine)
  • 1 medium yellow onion (diced small)
  • 2 tbsp butter
  • 1 cup heavy cream
  • 1/2 cup chicken broth (low-sodium)
  • 1 cup Parmesan cheese (freshly grated)
  • 1/2 cup mozzarella cheese (shredded) (whole milk)
  • 1 tsp Italian seasoning
  • 1/2 tsp garlic powder
  • 1/4 tsp red pepper flakes (optional)

Instructions 

  • Cook pasta in salted boiling water until al dente, adding broccoli in last 3 minutes. Reserve 1 cup pasta water, then drain.
  • In a large skillet, heat olive oil and butter, cook onion until softened, then add garlic for 30 seconds.
  • Pour in heavy cream and chicken broth, simmer for 2-3 minutes. Remove from heat, whisk in cheeses, and season.
  • Add pasta, broccoli, and shredded chicken to the sauce, tossing to coat. Gradually add reserved pasta water for desired creaminess.
  • Stir in a cold knob of butter before serving for a glossy finish.

Notes

Use freshly grated cheese for best flavor and texture.
Calories: 850kcal
Cost: $15
Course: Main Course
Cuisine: American
Keyword: Broccoli, chicken, pasta

Nutrition

Calories: 850kcal | Carbohydrates: 100g | Protein: 50g | Fat: 35g | Sodium: 700mg

Why You’ll Love This Recipe

Welcome to a culinary adventure that will ignite your taste buds and awaken your inner chef! This Pin on Chicken recipe is not just another dish; it’s an experience that marries bold flavors, mouthwatering heat, and the satisfying thrill of grilling. Born from my love for vibrant spices and the joy of cooking, this dish is your passport to a world of flavor that will make you feel alive and eager to share with friends and family.

Imagine succulent chicken breasts marinated in a luscious blend of soy sauce, honey, and garlic, kissed by the warmth of sesame oil and black pepper. Each bite delivers a perfect balance of sweet and savory that dances on your palate, inviting you to take another bite. Whether you’re looking for a quick weeknight dinner or a show-stopping dish for your next gathering, this recipe is bound to impress. So, grab your apron, and let’s dive deep into the world of flavor with this unforgettable dish!

Ingredients You’ll Need

Before we get our hands dirty, let’s gather the ingredients that will transform simple chicken breasts into a delightful culinary masterpiece. Here’s what you’ll need:

  • 2 chicken breasts
  • 1/2 cup soy sauce
  • 1/4 cup honey
  • 2 cloves garlic, minced
  • 1 tablespoon sesame oil
  • 1/2 teaspoon black pepper
  • Green onions, chopped (for garnish)
  • Sesame seeds (for garnish)

These ingredients are not just staples; they are the building blocks of a dish that celebrates flavor in every bite. Each component plays a crucial role in creating the perfect marinade that will infuse the chicken with incredible taste.

Steps to Culinary Glory

Beautifully plated Pin on Chicken, showcasing its tender texture and rich sauce, with a soft blurred background.

Now that we have our ingredients, it’s time to embrace the magic of cooking! Follow these simple steps to create your very own Pin on Chicken:

  1. In a bowl, mix together the soy sauce, honey, minced garlic, sesame oil, and black pepper. This marinade is where the magic begins!
  2. Place the chicken breasts in a zip-top bag or a shallow dish and pour the marinade over them. Seal or cover and refrigerate for at least 30 minutes to let the flavors meld and penetrate the chicken.
  3. Preheat your grill or stovetop pan over medium-high heat. We want that sizzle!
  4. Once the grill is hot, remove the chicken from the marinade and discard the marinade. This step is crucial to avoid any food safety issues.
  5. Grill the chicken for about 6-7 minutes on each side, or until fully cooked and the internal temperature reaches 165°F (75°C). You want a beautiful char on the outside, with juicy tenderness on the inside.
  6. Remove the chicken from the heat and let it rest for a few minutes. This allows the juices to redistribute, ensuring every bite is packed with flavor.
  7. Slice the chicken and serve it garnished with chopped green onions and sesame seeds for that extra pop of flavor and color!

Tips for Perfecting Your Pin on Chicken

While the steps are straightforward, here are some expert tips to elevate your culinary game:

  • Marinating Time: The longer you marinate, the more flavor your chicken will absorb. Aim for at least 30 minutes, but if you can let it sit for 2-4 hours, even better!
  • Grilling Temperature: Ensure your grill is preheated properly. A hot grill creates those lovely grill marks and locks in the juices.
  • Resting Time: Do not skip the resting time after grilling. It makes a world of difference in keeping your chicken juicy!
  • Garnishes: Don’t underestimate the power of garnishes! Green onions and sesame seeds not only add flavor but also enhance the presentation.

Variations to Spice It Up

Cooking should be fun and full of creativity! Here are some variations to consider for your Pin on Chicken:

  • Spicy Kick: Add a pinch of red pepper flakes or a dash of Sriracha to the marinade for a fiery twist.
  • Herbaceous Flair: Incorporate fresh herbs like cilantro or basil into the marinade for an aromatic lift.
  • Citrus Zing: Squeeze in some fresh lime or lemon juice for an extra layer of brightness and acidity.

Substitutions for Flexibility

Sometimes, you might not have all the ingredients on hand. No worries! Here are some smart substitutions:

  • Soy Sauce: If you’re looking for gluten-free options, tamari works beautifully without sacrificing flavor.
  • Honey: Maple syrup or agave nectar can be used as a natural sweetener if you prefer.
  • Sesame Oil: For a different flavor profile, try olive oil or avocado oil in the marinade.

Essential Equipment

To make this dish, you’ll need some basic kitchen tools:

  • Mixing bowl
  • Zip-top bag or shallow dish for marinating
  • Grill or stovetop pan
  • Meat thermometer to check doneness
  • Cutting board and knife for slicing

Storage and Freezing Tips

If you find yourself with leftovers (though I doubt it!), here’s how to store them:

  • Refrigeration: Store any leftover chicken in an airtight container in the fridge for up to 3 days.
  • Freezing: You can freeze the cooked chicken for up to 2 months. Just make sure to wrap it tightly to prevent freezer burn.

Frequently Asked Questions

Let’s address some common questions about this dish:

  • Can I use chicken thighs instead of breasts? Absolutely! Chicken thighs will add extra juiciness and flavor.
  • Is the marinade safe to use on vegetables? Yes! Feel free to toss some veggies like bell peppers and zucchini in the leftover marinade for an amazing side dish.
  • What should I serve with Pin on Chicken? This dish pairs beautifully with steamed rice, quinoa, or a fresh salad for a balanced meal.

Troubleshooting Common Issues

If you encounter any hiccups while cooking, here are some solutions:

  • Chicken Not Grilling Properly: Ensure your grill is preheated sufficiently. If the chicken is sticking, it might need more time or oil on the grill.
  • Overcooked Chicken: Always use a meat thermometer to avoid dryness, and let it rest after cooking to enhance juiciness.

Bring the Fire to Your Kitchen

This Pin on Chicken recipe is a celebration of flavor, creativity, and the sheer joy of cooking. With each bite, you’re not just tasting the food; you’re experiencing a blend of cultures, traditions, and a little bit of fire that makes cooking such an adventure. So, whether you’re a seasoned chef or a kitchen newbie, I encourage you to embrace the thrill of cooking boldly.

Gather your ingredients, unleash your creativity, and let this dish inspire you to explore the vibrant world of flavors. Remember, cooking is more than just a task; it’s a journey. Share this recipe with your loved ones, and let’s make the kitchen a place of joy and connection. Now, go forth and grill up some magic! Your taste buds will thank you!

Pin on Chicken

Prep Time 10 minutes
Cook Time 15 minutes
Total Time 25 minutes
Servings 4 servings
Calories 250
A flavorful and easy-to-make chicken dish with a savory soy-honey marinade, perfect for a quick dinner.

Ingredients

Main Ingredients

  • 2 pieces chicken breasts
  • 1/2 cup soy sauce
  • 1/4 cup honey
  • 2 cloves garlic, minced
  • 1 tablespoon sesame oil
  • 1/2 teaspoon black pepper
  • green onions, chopped green onions (for garnish)
  • sesame seeds sesame seeds (for garnish)

Instructions 

  • Mix soy sauce, honey, garlic, sesame oil, and black pepper to make marinade.
  • Marinate chicken in mixture for at least 30 minutes.
  • Preheat grill or pan over medium-high heat.
  • Grill chicken 6-7 minutes per side until cooked through.
  • Rest, then slice and garnish with green onions and sesame seeds.

Notes

Serve with steamed rice or vegetables for a complete meal.
Calories: 250kcal
Cost: $12
Course: Main Course
Cuisine: Asian
Keyword: chicken

Nutrition

Calories: 250kcal | Carbohydrates: 20g | Protein: 30g | Fat: 8g | Sodium: 1500mg

Loved this recipe? Save it to your favorite Pinterest board so you can easily find it later! It’s the perfect way to keep all your sweet ideas in one place. ✨

Tempting image of Pin on Chicken, featuring warm lighting that highlights the chicken’s glaze and garnishes.

Why You’ll Fall for These Noodles

In the world of quick and satisfying meals, few can rival the allure of a steaming plate of 15-Minute Vegan Garlic Noodles. Imagine this: tender noodles enveloped in a rich, garlicky sauce that sings with flavor, all while fitting snugly into your busy weeknight routine. This isn’t just a meal; it’s a culinary adventure waiting to unfold on your plate.

These noodles are not only a delight to your taste buds but also incredibly easy to whip up. With just a handful of ingredients and a mere 15 minutes of your time, you can create a dish that feels luxurious yet is incredibly accessible. Whether you’re a seasoned chef or just starting your cooking journey, this recipe encourages you to embrace bold flavors while keeping things simple. Let’s dive into what makes these noodles so special!

Ingredients You’ll Need

To embark on this flavor-packed journey, gather the following ingredients:

  • 8 oz noodles (spaghetti or linguine)
  • 4 cloves garlic, minced
  • 3 tablespoons soy sauce
  • 2 tablespoons sesame oil
  • 1 tablespoon olive oil
  • 1 teaspoon red pepper flakes (optional)
  • 2 green onions, chopped
  • Salt to taste
  • Fresh cilantro for garnish (optional)

A Flavorful Start

A vibrant plate of vegan garlic noodles garnished with cilantro and served with soft, warm lighting.

What sets these noodles apart is the harmony of flavors. The garlic is the star of the show, lending its bold character to every bite. The combination of soy sauce and sesame oil creates a savory backdrop that complements the garlic beautifully. If you’re feeling adventurous, the red pepper flakes add a kick that can take this dish from comforting to exhilarating.

How to Craft Your Garlic Noodles

Ready to get cooking? Here’s how to make these 15-Minute Vegan Garlic Noodles in just a few easy steps:

  1. Cook the noodles according to package instructions until al dente. Drain and set aside.
  2. In a large skillet, heat the olive oil and sesame oil over medium heat.
  3. Add the minced garlic and sauté for about 1-2 minutes until fragrant, being careful not to burn it.
  4. Stir in the soy sauce and red pepper flakes (if using). Cook for another minute.
  5. Add the cooked noodles to the skillet and toss to coat them in the garlic sauce.
  6. Cook for an additional 2-3 minutes, stirring frequently, until everything is heated through.
  7. Remove from heat, season with salt to taste, and mix in the chopped green onions.
  8. Serve hot, garnished with fresh cilantro if desired.

Quick Tips for Perfect Noodles

While the recipe is straightforward, a few tips can elevate your dish:

  • Don’t Rush the Garlic: Sautéing garlic requires attention. Too little time and it loses flavor; too much and it can become bitter. Aim for that sweet spot of 1-2 minutes!
  • Choose Your Noodles Wisely: Spaghetti or linguine work wonderfully, but feel free to experiment with your favorite pasta type. Rice noodles or udon can also add a delightful twist.
  • Adjust the Spice: If you love heat, don’t shy away from the red pepper flakes. For milder palates, consider starting with just a pinch.
  • Garnish for Color: A sprinkle of fresh cilantro not only adds a pop of color but also a fresh, herbal note that balances the dish beautifully.

Variations to Explore

If you’re feeling adventurous, here are some variations to consider:

  • Add Protein: Tofu or tempeh can be fantastic additions for extra heartiness. Simply sauté them in the skillet before adding the garlic.
  • Throw in Veggies: Broccoli, bell peppers, or snap peas can add crunch and nutrients. Stir-fry them along with the garlic for a vibrant, nutritious twist.
  • Make it Creamy: For a richer sauce, consider adding a splash of coconut milk or a dollop of vegan cream cheese.

Substitutions if You’re in a Pinch

Cooking is all about flexibility! Here are some substitutions you can make:

  • No Soy? No Problem: Use tamari for a gluten-free option or coconut aminos for a soy-free alternative.
  • Oils Optional: If you prefer an oil-free recipe, you can sauté the garlic in vegetable broth instead of oil.
  • Fresh Herbs: If cilantro isn’t your thing, try parsley or basil for a different flavor profile.

Equipment You’ll Need

While you can make this dish with basic kitchen tools, having the right equipment can make the process smoother:

  • A large pot for boiling the noodles
  • A large skillet to sauté the garlic and combine the noodles
  • A wooden spoon or spatula for stirring

Storing and Freezing Your Noodles

If you find yourself with leftovers (which is rare because they’re so good!), here’s how to store them:

  • Refrigeration: Store in an airtight container in the fridge for up to 3 days. Reheat in a skillet with a splash of water to revive the sauce.
  • Freezing: While not ideal for this dish, if you must, freeze in an airtight container for up to a month. Thaw in the fridge overnight before reheating.

FAQs About Your Garlic Noodles

Got questions? I’ve got answers!

  • Can I make this dish gluten-free? Absolutely! Just use gluten-free noodles and tamari instead of soy sauce.
  • How can I make this dish spicier? Add more red pepper flakes or even a dash of sriracha for a fiery kick!
  • What other sauces can I add? A splash of hoisin or a drizzle of vegan oyster sauce can take this dish to the next level.

Troubleshooting Common Issues

Even the best cooks have mishaps. Here are some common issues and how to fix them:

  • Noodles too sticky? Make sure they’re adequately coated in sauce as they cook. A bit of added water can help loosen them up.
  • Too garlicky? If you find the garlic flavor overwhelming, balance it with a little more soy sauce or a splash of coconut milk.
  • Not enough flavor? Don’t hesitate to add more seasoning—taste as you go! A pinch of salt or an extra drizzle of soy sauce can work wonders.

In Conclusion: A Dish Worth Sharing

The 15-Minute Vegan Garlic Noodles are more than just a quick meal; they’re an invitation to explore the vibrant world of flavors and ingredients. Cooking should be a joyful adventure, and this dish embodies that philosophy. So grab your skillet, embrace the garlic, and let this recipe inspire you to create and experiment in your own kitchen. With every bite, you’ll not only satisfy your hunger but also awaken your passion for cooking. Enjoy your culinary journey, and don’t forget to share your delicious creations with friends and family!

15 Minutes Vegan Garlic Noodles

Prep Time 5 minutes
Cook Time 10 minutes
Total Time 15 minutes
Servings 2 servings
Calories 400
A quick and flavorful vegan garlic noodle dish perfect for a fast weeknight dinner.

Ingredients

Noodles

  • 8 oz noodles (spaghetti or linguine)
  • 4 cloves garlic, minced
  • 3 tablespoons soy sauce
  • 2 tablespoons sesame oil
  • 1 tablespoon olive oil
  • 1 teaspoon red pepper flakes (optional)
  • 2 green onions chopped green onions
  • to taste salt
  • for garnish fresh cilantro (optional)

Instructions 

  • Cook noodles until al dente, then drain.
  • Heat olive and sesame oils in a skillet over medium heat.
  • Sauté garlic for 1-2 minutes until fragrant.
  • Add soy sauce and red pepper flakes, cook for 1 minute.
  • Mix in noodles, toss to coat, cook 2-3 minutes, then season with salt and green onions.
  • Serve hot, garnished with cilantro if desired.

Notes

Feel free to add more vegetables or adjust spice levels to taste.
Calories: 400kcal
Cost: $10
Course: Main Course
Cuisine: Vegan
Keyword: garlic, noodles

Nutrition

Calories: 400kcal | Carbohydrates: 70g | Protein: 12g | Fat: 14g | Sodium: 1500mg

Loved this recipe? Save it to your favorite Pinterest board so you can easily find it later! It’s the perfect way to keep all your sweet ideas in one place. ✨

Delicious vegan garlic noodles topped with green onions, shot in natural light with a blurred background.

Unleashing the Flavor: A Baked Spaghetti Squash Adventure

Welcome to a culinary journey that will transform your perception of spaghetti squash! This humble vegetable, often overlooked, can be a superstar in your kitchen—especially when it’s baked to perfection. In the next few minutes, we’ll dive deep into how to create a dish that’s not just about filling your stomach, but igniting your passion for cooking and adventure. Get ready to embrace the thrill of cooking with my oven-baked spaghetti squash recipe!

Why You’ll Love This Recipe

Before we roll up our sleeves, let’s talk about why this dish is a game-changer:

  • Versatile base: Spaghetti squash acts as a wonderful substitute for pasta, making it perfect for those looking to cut carbs or gluten.
  • Flavor enhancer: The baking method caramelizes the natural sugars in the squash, enriching its flavor while keeping the texture tender.
  • Easy to prepare: With minimal ingredients and effort, you can serve a dish that feels gourmet—ideal for busy weeknights.
  • Health benefits: Packed with vitamins A and C, fiber, and antioxidants, this dish is not just delicious but also nourishing.
  • Engaging experience: Cooking spaghetti squash is a delightful process—you’ll love transforming it from a whole squash to beautiful strands!

Ingredients Breakdown

Let’s gather our ingredients, and I promise, it’s as simple as it gets! Here’s what you’ll need:

  • 1 spaghetti squash: Aim for a small one, around 2 pounds. If you buy larger, adjust cooking time accordingly.
  • Olive oil spray: This helps in achieving that golden, crispy cut side. You can also brush on melted butter for added richness.
  • 1/4 teaspoon salt: Essential for bringing out the flavor; feel free to adjust based on your taste.
  • 1/4 teaspoon black pepper: A dash of pepper adds a delightful warmth without overpowering the squash’s natural taste.

Pro Tips for Perfect Spaghetti Squash

Before we jump into the cooking process, here are some expert insights that will elevate your spaghetti squash game:

  • Selecting the squash: Look for a squash with a firm skin, deep yellow color, and no blemishes. This indicates ripeness!
  • Microwave method: If you find cutting the squash intimidating, microwaving it for a minute can soften it slightly, making it easier to cut.
  • Cutting technique: Use a sturdy knife and a flat surface to safely cut the squash in half. Always cut away from your body!
  • Don’t rush the baking: Allow the squash to bake until fork-tender—this enhances its sweetness and flavor.
  • Flipping the halves: For crispy edges, place the squash cut side down on the baking sheet to allow for even caramelization.
  • Creative toppings: After baking, consider mixing in melted butter, garlic granules, or even cheese for an extra layer of flavor.
  • Experiment with spices: Don’t be afraid to sprinkle in your favorite herbs or spices before baking for a flavor boost.
  • Storage tips: Store any leftovers in an airtight container in the fridge for up to 5 days. Reheat them in the microwave for a quick meal!

Common Mistakes and Troubleshooting

Even the best of us can make mistakes in the kitchen! Here are some common pitfalls to avoid:

  • Overcooking: Keep an eye on your squash—it should be tender but not mushy. If it’s too soft, it may lose its texture.
  • Undercooking: If the strands are hard to pull apart with a fork, it’s a sign you need to bake it longer.
  • Skipping seasoning: Don’t neglect the salt and pepper. They’re crucial for enhancing the squash’s natural flavors.
  • Choosing the wrong squash: Avoid squash with soft spots or blemishes; they indicate spoilage.

Variations to Try

Once you’ve mastered the basics, feel free to get creative! Here are some mouthwatering variations:

  • Italian-inspired: After baking, toss the strands with marinara sauce, fresh basil, and mozzarella cheese for a comforting dish.
  • Mexican twist: Mix in black beans, corn, diced tomatoes, and top with avocado and cilantro for a vibrant meal.
  • Asian flair: Sauté the strands with soy sauce, ginger, and garlic, then toss in some stir-fried vegetables.
  • Breakfast bowl: Serve the strands topped with eggs and avocado for a nutrient-packed breakfast.

Storage and Make-Ahead Instructions

One of the beauties of spaghetti squash is its versatility, allowing you to prepare it ahead of time:

  • Cooked strands: Store cooked spaghetti squash in an airtight container in the refrigerator for up to 5 days. Reheat in the microwave or sauté with a bit of olive oil.
  • Uncooked squash: You can keep whole spaghetti squash in a cool, dark place for several weeks, making it a great meal prep option.
  • Pre-prepped ingredients: Cut the squash in half and remove the seeds ahead of time, storing them in the fridge until you’re ready to bake.

FAQ: Your Burning Questions Answered

Let’s tackle some of the most common questions about spaghetti squash:

  • How do I know when spaghetti squash is ripe? Look for a firm squash with a hard rind and a deep yellow color. It should feel heavy for its size.
  • Can I cook spaghetti squash in the microwave? Yes! Microwave it for 5-10 minutes, flipping halfway through, to soften before cutting.
  • What should I do if my spaghetti squash isn’t tender after baking? Simply return it to the oven for an additional 10-15 minutes, checking regularly until tender.
  • Can I freeze spaghetti squash? Yes, but it’s best to freeze the strands after cooking. Store in airtight containers for up to 3 months.
  • What can I serve with spaghetti squash? It pairs well with protein like chicken, shrimp, or your favorite plant-based options, along with a fresh salad.
  • Is spaghetti squash low in calories? Yes, it’s a low-calorie alternative to traditional pasta, making it a favorite among health-conscious eaters.
  • How do I prevent spaghetti squash from being watery? Bake it cut-side down, and don’t skip the step of salting it before serving to draw out excess moisture.
  • What are some creative uses for spaghetti squash? Use it in casseroles, salads, or even as a base for soups and stews!

Nutritional Tips and Dietary Adaptations

This dish is a nutritional powerhouse! Here’s a breakdown:

  • Low-carb option: With lower carbs than traditional pasta, it’s perfect for keto or paleo diets.
  • Vegan-friendly: Naturally plant-based, you can enhance flavors with vegan toppings like nutritional yeast or avocado.
  • Gluten-free: Ideal for those with gluten sensitivities or celiac disease.
  • High in fiber: Supports digestive health and helps keep you feeling full.

Essential Equipment for Success

Here’s what you’ll need in your kitchen to create this masterpiece:

  • Sharp chef’s knife: For safely cutting the squash in half.
  • Baking dish: A rimmed baking pan to catch any juices.
  • Parchment paper: For easy cleanup and to prevent sticking.
  • Fork: Essential for scraping out those beautiful strands after baking!

Serving Suggestions to Impress

Once your spaghetti squash is ready, it’s time to serve! Here are some ideas to make your dish shine:

  • Garnish with herbs: Fresh parsley, basil, or thyme add a pop of color and flavor.
  • Pair with proteins: Serve alongside grilled chicken or shrimp for a complete meal.
  • Mix in sauces: Consider pesto, marinara, or alfredo for a rich, comforting dish.
  • Top with cheese: A sprinkle of parmesan or feta can take your dish to the next level!

Now that you have all the tools and tips, it’s time to unleash the flavor of your oven-baked spaghetti squash! Embrace this adventurous cooking experience, and remember: spice up your life, one forkful at a time. Happy cooking!

Oven Baked Spaghetti Squash

Prep Time 10 minutes
Cook Time 40 minutes
Total Time 50 minutes
Servings 4 servings
Calories 150
A simple and healthy way to enjoy spaghetti squash baked to perfection, perfect as a side or base for various dishes.

Ingredients

Main

  • 1 small spaghetti squash (about 2 pounds)
  • 1 spray olive oil spray
  • 0.25 teaspoon salt
  • 0.25 teaspoon black pepper

Instructions 

  • Preheat oven to 425°F and line a baking dish with parchment paper.
  • Pierce squash, microwave for 1 minute, then cut in half lengthwise.
  • Remove seeds, spray cut sides with olive oil, season with salt and pepper, then bake for 40 minutes.
  • Cool for 10 minutes, then scrape flesh into strands with a fork.
  • Use the strands as a side dish or base for other recipes.

Notes

For extra flavor, mix in melted butter, garlic, or cheese.
Calories: 150kcal
Cost: $15
Course: Side Dish
Cuisine: American
Keyword: Spaghetti Squash

Nutrition

Calories: 150kcal | Carbohydrates: 35g | Protein: 3g | Fat: 1g | Sodium: 150mg

Welcome to a Flavor Explosion

Are you ready to spice up your summer with a dish that dances on your taste buds? Dive into the vibrant world of the Chickpea Avocado Quinoa Summer Bowl, where freshness meets flavor and every bite ignites your senses! This bowl is not just a meal; it’s an experience — a celebration of textures and tastes that brings the warmth of the sun right onto your plate. Whether you’re meal prepping for the week or hosting a summer gathering, this recipe is designed to be both healthy and delicious, making it the perfect choice for any occasion.

Why You’ll Love This Recipe

This Chickpea Avocado Quinoa Summer Bowl is a culinary masterpiece that offers more than just good looks. Here are five reasons why this recipe will become a staple in your kitchen:

  • Quick and Easy: This meal can be prepared in under 30 minutes, making it perfect for those busy summer days.
  • Nutritious and Filling: Packed with protein from chickpeas and quinoa, this bowl ensures you feel satisfied without the heaviness.
  • Customizable: Feel free to mix and match ingredients based on what you have on hand or what flavors you crave!
  • Vibrant Flavors: The combination of fresh vegetables, creamy avocado, and zesty dressing makes for a dish that bursts with taste.
  • Make-Ahead Friendly: Prepare it in advance for easy lunches or dinners throughout the week, and enjoy it chilled or at room temperature.

Ingredients Needed for Your Quinoa Summer Bowl

To create this refreshing dish, gather the following ingredients:

  • 1/2 cup quinoa, rinsed
  • 1 cup cooked chickpeas
  • 1 ripe avocado, diced
  • 1/2 cup cherry tomatoes, halved
  • 1/4 cup red onion, finely chopped
  • 1/4 cup cucumber, diced
  • 2 tbsp olive oil
  • 1 tbsp lemon juice
  • 1/2 tsp salt
  • 1/4 tsp black pepper
  • 1/4 cup fresh cilantro, chopped

Ingredient Substitutions

Don’t have all the ingredients? No problem! Here are some easy substitutions:

  • Quinoa: Swap it with brown rice, couscous, or farro for a different grain experience.
  • Chickpeas: Use black beans or lentils for a unique twist.
  • Avocado: Try adding guacamole or a dollop of Greek yogurt for creaminess.
  • Vegetables: Experiment with bell peppers, corn, or even roasted veggies!

Step-by-Step Instructions for Your Chickpea Quinoa Bowl

Let’s get cooking! Follow these steps to whip up your summer bowl:

  1. Cook the quinoa according to package instructions. Let it cool to room temperature.
  2. In a large bowl, combine the cooked quinoa, chickpeas, avocado, cherry tomatoes, red onion, and cucumber.
  3. In a small bowl, whisk together the olive oil, lemon juice, salt, and black pepper.
  4. Pour the dressing over the quinoa mixture and gently toss to combine.
  5. Sprinkle with fresh cilantro before serving.
  6. Serve chilled or at room temperature.

Pro Tips for Perfecting Your Summer Bowl

Want to ensure your Chickpea Avocado Quinoa Summer Bowl shines? Here are some expert insights:

  • Let it chill: Allow the bowl to sit in the refrigerator for 30 minutes before serving to enhance the flavors.
  • Toast your quinoa: For a nuttier flavor, toast the quinoa in a dry skillet before cooking.
  • Dress it up: Feel free to add a splash of balsamic vinegar or a sprinkle of feta cheese for an extra flavor dimension.
  • Mix in nuts or seeds: Add a handful of toasted nuts or seeds for a crunchy texture contrast.
  • Layer it: Create a beautiful layered bowl for presentation by stacking ingredients instead of mixing.
  • Go bold: Use fresh herbs like basil or parsley to elevate the freshness.
  • Spice it up: Add a pinch of cayenne or red pepper flakes for an extra kick!
  • Mind your portions: Adjust the serving sizes based on your dietary needs and preferences.

Common Mistakes and Troubleshooting

Even the best chefs make mistakes! Here’s how to avoid common pitfalls:

  • Overcooking quinoa: Aim for fluffy quinoa, not mushy! Rinse thoroughly and use the right water-to-quinoa ratio.
  • Too much dressing: Start with less dressing and adjust to your taste to avoid overpowering the dish.
  • Unripe avocado: Ensure your avocado is ripe for the best texture and flavor — it should yield slightly when pressed.
  • Frozen chickpeas: If using frozen, be sure to thaw and drain them well before adding.

Variations to Keep It Exciting

Here are some fun twists to keep your summer bowl fresh:

  • Mediterranean Style: Add olives, feta cheese, and a splash of red wine vinegar.
  • Tex-Mex Spin: Toss in corn, black beans, and a sprinkle of taco seasoning for a fiesta flavor.
  • Asian Fusion: Incorporate edamame, sesame oil, and a drizzle of soy sauce for a unique twist.
  • Breakfast Bowl: Top with a poached egg and a sprinkle of chili flakes for breakfast vibes.

Storage and Make-Ahead Instructions

This bowl is perfect for meal prep! Here’s how to store it:

  • Refrigerate in an airtight container for up to 3 days.
  • For best results, store the dressing separately until serving to keep ingredients fresh.
  • It can also be frozen for up to a month; just thaw overnight in the fridge before serving.

Nutrition Tips and Dietary Adaptations

This Chickpea Avocado Quinoa Summer Bowl is not only delicious but also packed with nutrients:

  • Plant-Based Protein: Chickpeas and quinoa provide a complete protein source, perfect for vegans and vegetarians.
  • High Fiber: The combination of quinoa, chickpeas, and vegetables adds fiber, promoting digestive health.
  • Healthy Fats: Avocado and olive oil offer heart-healthy monounsaturated fats.
  • Gluten-Free: This recipe is naturally gluten-free, making it suitable for those with dietary restrictions.

Equipment Recommendations

To make the cooking process smoother, here’s a list of useful kitchen tools:

  • Medium Pot: For cooking quinoa perfectly.
  • Large Mixing Bowl: To combine all your fresh ingredients.
  • Whisk: Essential for mixing the dressing.
  • Knife and Cutting Board: For chopping vegetables efficiently.
  • Airtight Containers: For storing leftovers and meal prep.

Serving Suggestions

Looking to pair this bowl with something special? Here are a few ideas:

  • Grilled Chicken or Fish: Serve alongside for a protein boost.
  • Fresh Herbs: Garnish with additional herbs like dill or parsley for freshness.
  • Crusty Bread: A slice of artisan bread on the side makes for a complete meal.
  • Refreshing Drinks: Pair with lemonade, iced tea, or a crisp white wine for a perfect summer feast.

Frequently Asked Questions

Got questions? Here are some common inquiries about this bowl:

  • Can I use canned chickpeas? Yes! They’re a great time-saver — just rinse and drain them before using.
  • Is this bowl vegan? Absolutely! It’s filled with plant-based ingredients.
  • How do I make it spicy? Incorporate diced jalapeños or sprinkle red pepper flakes for heat!
  • Can I make this gluten-free? Yes, quinoa is naturally gluten-free, making this dish suitable for all!
  • How long does it last in the fridge? This bowl can be stored for up to 3 days in the refrigerator.
  • Can I add fruits? Definitely! Sliced strawberries or mango would add a delightful sweetness.
  • What can I substitute for lemon juice? Lime juice or vinegar can work as tasty alternatives.
  • Is it suitable for meal prep? Yes! This bowl holds up well, making it perfect for meal prepping.

Embrace the Adventure of Cooking

Cooking should be an adventure, not a chore. With this Chickpea Avocado Quinoa Summer Bowl, you’re not just making a dish; you’re creating a culinary experience that invites you to explore flavors and textures. Remember, the kitchen is your canvas, and every ingredient is a brushstroke in your masterpiece. So roll up your sleeves, grab your skillet, and embrace the thrill of cooking with heat, flavor, and a dash of adventure. Enjoy your cooking journey!

Chickpea, Avocado, and Quinoa Summer Bowl

Prep Time 10 minutes
Cook Time 15 minutes
Total Time 25 minutes
Servings 2 servings
Calories 350
A fresh and nutritious summer bowl combining protein-rich chickpeas, creamy avocado, and fluffy quinoa for a satisfying meal.

Ingredients

Grains

  • 0.5 cup quinoa, rinsed

Legumes

  • 1 cup cooked chickpeas

Fruits & Vegetables

  • 1 ripe avocado avocado, diced
  • 0.5 cup cherry tomatoes, halved
  • 0.25 cup red onion, finely chopped
  • 0.25 cup cucumber, diced

Oils & Condiments

  • 2 tbsp olive oil
  • 1 tbsp lemon juice
  • 0.5 tsp salt
  • 0.25 tsp black pepper

Herbs

  • 0.25 cup fresh cilantro, chopped

Instructions 

  • Cook the quinoa according to package instructions. Let it cool.
  • Combine cooked quinoa, chickpeas, avocado, cherry tomatoes, red onion, and cucumber in a large bowl.
  • Whisk together olive oil, lemon juice, salt, and black pepper to make the dressing.
  • Pour dressing over the salad and toss gently.
  • Sprinkle with chopped cilantro and serve.

Notes

Feel free to add other fresh herbs or vegetables for variation.
Calories: 350kcal
Cost: $15
Course: Main Course
Cuisine: International
Keyword: Avocado, Chickpeas, quinoa

Nutrition

Calories: 350kcal | Carbohydrates: 45g | Protein: 12g | Fat: 15g | Sodium: 400mg

Why You’ll Love This Recipe

There’s something magical about turning overripe bananas into something delicious, isn’t there? You see, in my kitchen, each spotted banana tells a story of sweet potential waiting to be unlocked. With just three simple ingredients, you can craft a moist, flavorful banana oatmeal bread that will have your taste buds singing. Whether you’re looking for a quick breakfast option, a snack to fuel your afternoon, or a delightful dessert, this recipe is your golden ticket.

What makes this banana oatmeal bread so incredible is its simplicity. No fancy ingredients or convoluted steps here. Just pure, wholesome goodness that not only satisfies your cravings but also helps you reduce food waste. So, grab those neglected bananas sitting on your counter and let’s turn them into something extraordinary!

Ingredient Spotlight

Before we dive into the recipe, let’s take a closer look at the star players:

  • Ripe Spotty Bananas: These beauties are key to achieving a naturally sweet and moist bread. The more spots, the better! They bring that rich flavor that makes every bite a delight.
  • Rolled Oats: Not just for breakfast anymore! Oats add texture and heartiness to the bread, making it a satisfying treat. They’re also packed with fiber, which is always a plus.
  • Baking Powder: This little leavening agent is what gives your bread that fluffy rise, ensuring it’s light and airy while still holding together beautifully.

Let’s Get Baking: Step-by-Step Instructions

Aerial view of freshly baked banana oatmeal bread with a soft, moist interior and scattered oats on top.

Ready to awaken the chef inside you? Here’s how to whip up your banana oatmeal bread:

1. Preheat Your Oven

Start by preheating your oven to 350°F (175°C). This ensures that your bread bakes evenly.

2. Mash the Bananas

In a mixing bowl, take your ripe bananas and mash them until smooth. You can use a fork or a potato masher—get creative! The goal is to break down the bananas so their natural sugars can shine through.

3. Mix in the Oats and Baking Powder

Next, add the rolled oats and baking powder to your banana mash. Stir until everything is well combined. You want a cohesive mixture—thick but pourable.

4. Pour into a Loaf Pan

Grease a small loaf pan to prevent sticking, then pour the banana-oat mixture into the pan. Spread it evenly with a spatula or the back of a spoon, smoothing out the top.

5. Bake to Perfection

Pop the loaf pan into your preheated oven and bake for 25-30 minutes. You’ll know it’s done when the top is golden brown and a toothpick inserted into the center comes out clean. The aroma wafting through your kitchen will be utterly irresistible!

6. Cool and Enjoy!

Once out of the oven, let the bread cool for a few minutes before slicing. This will help it hold its shape and make it easier to cut. Then, dig in and enjoy the delightful flavor of your homemade banana oatmeal bread!

Tips for Success

To ensure your banana oatmeal bread turns out perfectly every time, check out these handy tips:

  • Use Really Ripe Bananas: The more spots, the sweeter your bread will be. If they’re starting to get brown, they’re perfect!
  • Don’t Overmix: Once you combine the ingredients, mix just until they’re blended. Overmixing can lead to a denser texture.
  • Check Your Oven: Every oven is different. Keep an eye on your bread towards the end of the baking time to avoid over-baking.

Variations to Spice Things Up

This recipe is incredibly versatile. Here are some fun variations you might consider:

  • Add Nuts: Chopped walnuts or pecans can add a delightful crunch and nutty flavor.
  • Incorporate Spices: A sprinkle of cinnamon or nutmeg can elevate the flavor profile and provide warmth.
  • Mix in Chocolate Chips: For a sweet twist, fold in some dark chocolate chips. Who can resist the allure of chocolate?

Substitutions You Can Make

If you’re missing an ingredient, don’t fret! Here are some substitutions:

  • Oats: If you don’t have rolled oats, quick oats can work in a pinch, but avoid steel-cut oats as they won’t yield the same result.
  • Baking Powder: If you’re out, you can make a substitute using 1/4 teaspoon of baking soda and 1/2 teaspoon of vinegar or lemon juice.

Essential Equipment

Before you start baking, make sure you have the following tools on hand:

  • Mixing bowl
  • Loaf pan
  • Fork or potato masher
  • Spatula
  • Oven mitts

Storage and Freezing Tips

Wondering how to store your delicious banana oatmeal bread? Here’s how:

  • Room Temperature: Store in an airtight container for up to 3 days.
  • Refrigeration: If you want it to last a bit longer, it can be kept in the fridge for about a week.
  • Freezing: This bread freezes beautifully! Wrap slices in plastic wrap and place them in a freezer-safe bag. It can last for up to 3 months. Just thaw at room temperature or pop it in the toaster for a quick reheat!

FAQs

Can I use flour instead of oats? While oats are essential for the texture of this recipe, you can experiment with flour, but the flavor and consistency will differ.

What if my bananas aren’t spotty enough? If they’re not quite ripe, place them in a brown paper bag for a day or two to speed up the ripening process.

Can I add other fruits? Absolutely! Chopped apples, blueberries, or even dried fruits like cranberries can add a lovely twist.

Troubleshooting Common Issues

If your banana oatmeal bread doesn’t turn out as expected, here are some common issues and solutions:

  • Dry Bread: This can happen if you overbake it. Make sure to check for doneness a few minutes early.
  • Dense Texture: Overmixing can lead to density. Mix until just combined for best results.

Final Thoughts

There you have it! A simple yet satisfying recipe for banana oatmeal bread that’s perfect for using up those overripe bananas. The next time you find yourself with a bunch of neglected fruit, don’t let them go to waste. Instead, turn them into a delightful treat that family and friends will love.

So, what are you waiting for? Get in that kitchen and unleash your inner culinary artist. This banana oatmeal bread is more than just a recipe; it’s a celebration of flavors and a testament to the beauty of simple cooking. Enjoy every slice, and remember: cooking is about finding joy in the process. Happy baking!

Don't throw out those spotty bananas! Make these quick and easy 3 ingredient banana oatmeal bread

Prep Time 5 minutes
Cook Time 25 minutes
Total Time 30 minutes
Servings 4 slices
Calories 180
This simple banana oatmeal bread is a delicious way to use ripe bananas with just three ingredients. Perfect for a quick snack or breakfast!

Ingredients

Main ingredients

  • 2 pieces ripe spotty bananas
  • 1 cup rolled oats
  • 1 teaspoon baking powder

Instructions 

  • Preheat oven to 350°F (175°C) and grease a loaf pan.
  • Mash bananas until smooth in a bowl.
  • Mix in oats and baking powder until combined.
  • Pour batter into pan and spread evenly.
  • Bake for 25-30 minutes until golden and cooked through.
  • Cool slightly, then slice and serve.

Notes

Use ripe bananas for best flavor and sweetness.
Calories: 180kcal
Cost: $5
Course: Breakfast, Snack
Cuisine: American
Keyword: Banana, Oatmeal, quick

Nutrition

Calories: 180kcal | Carbohydrates: 35g | Protein: 4g | Fat: 2g | Sodium: 50mg

Loved this recipe? Save it to your favorite Pinterest board so you can easily find it later! It’s the perfect way to keep all your sweet ideas in one place. ✨

Delicate presentation of banana oatmeal bread on a rustic wooden board, emphasizing the warm lighting and soft shadows.