Author

Avery Collins

Browsing

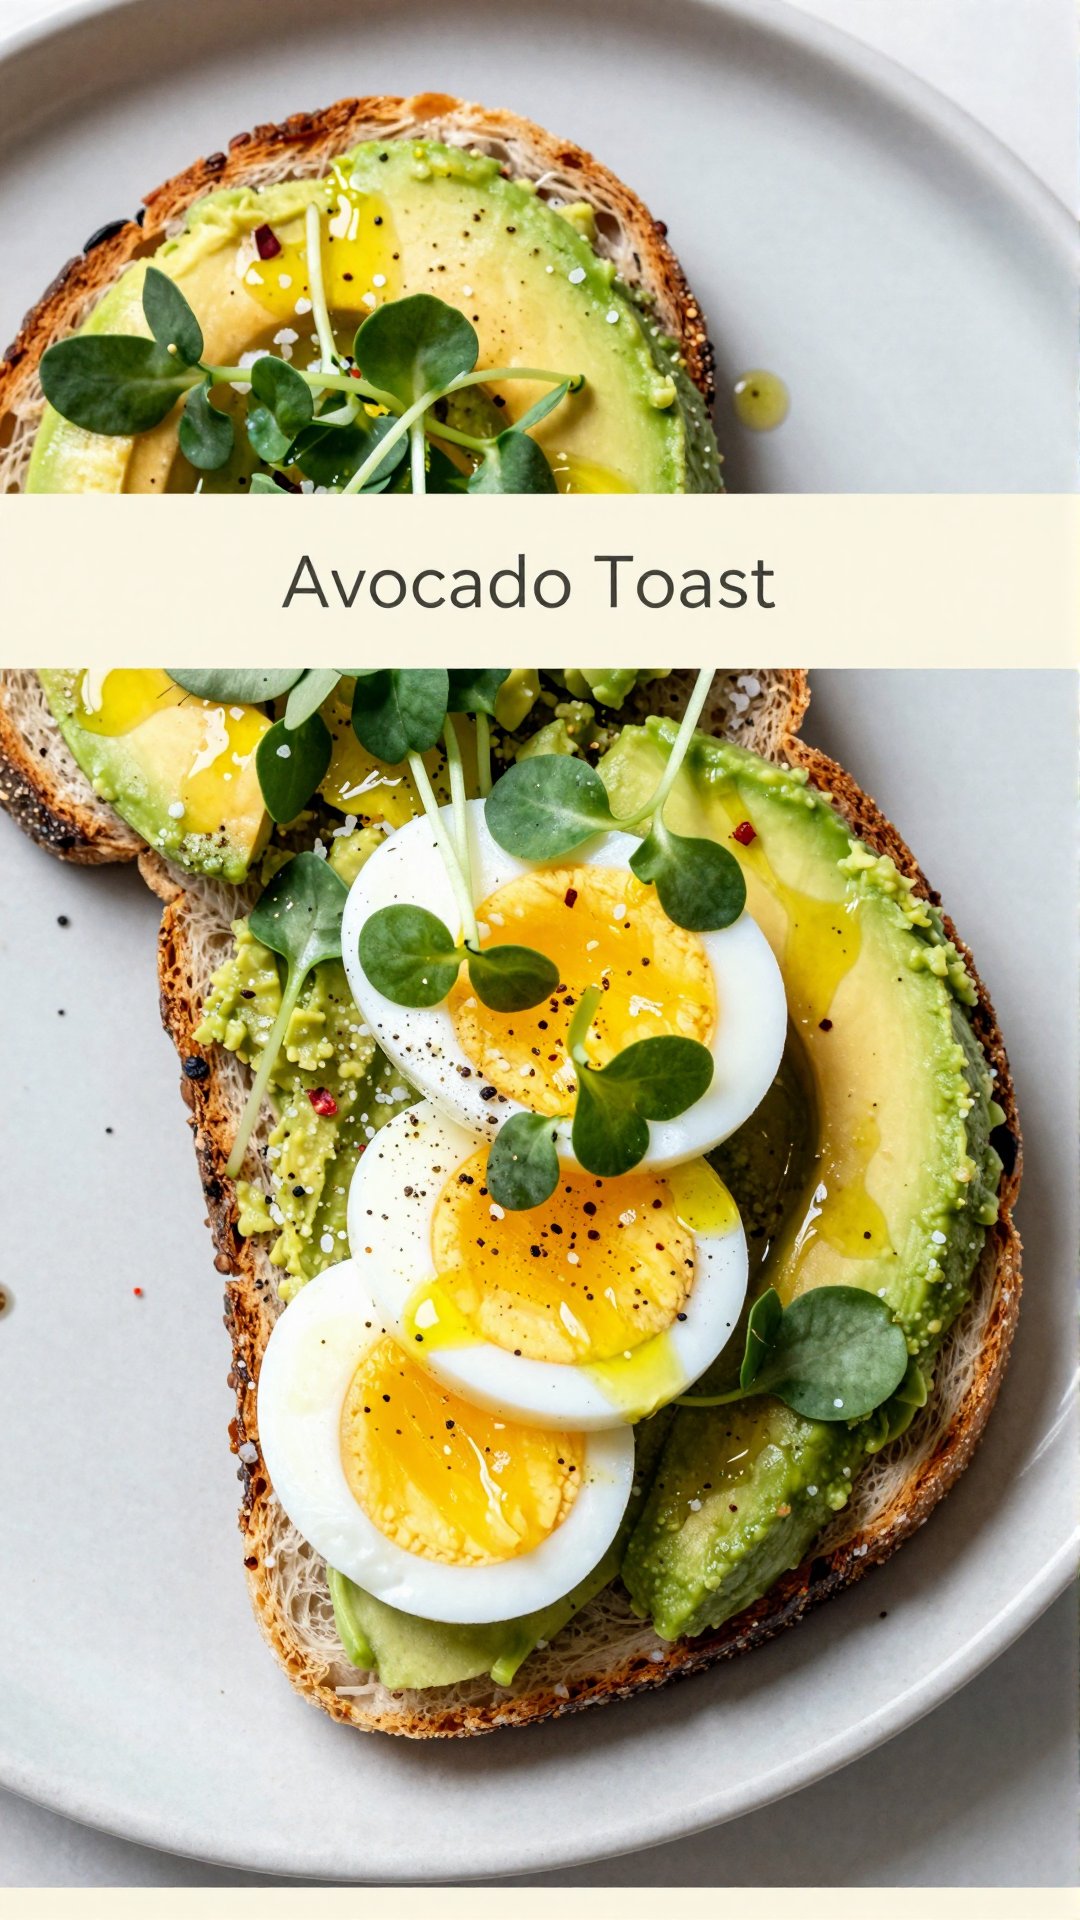
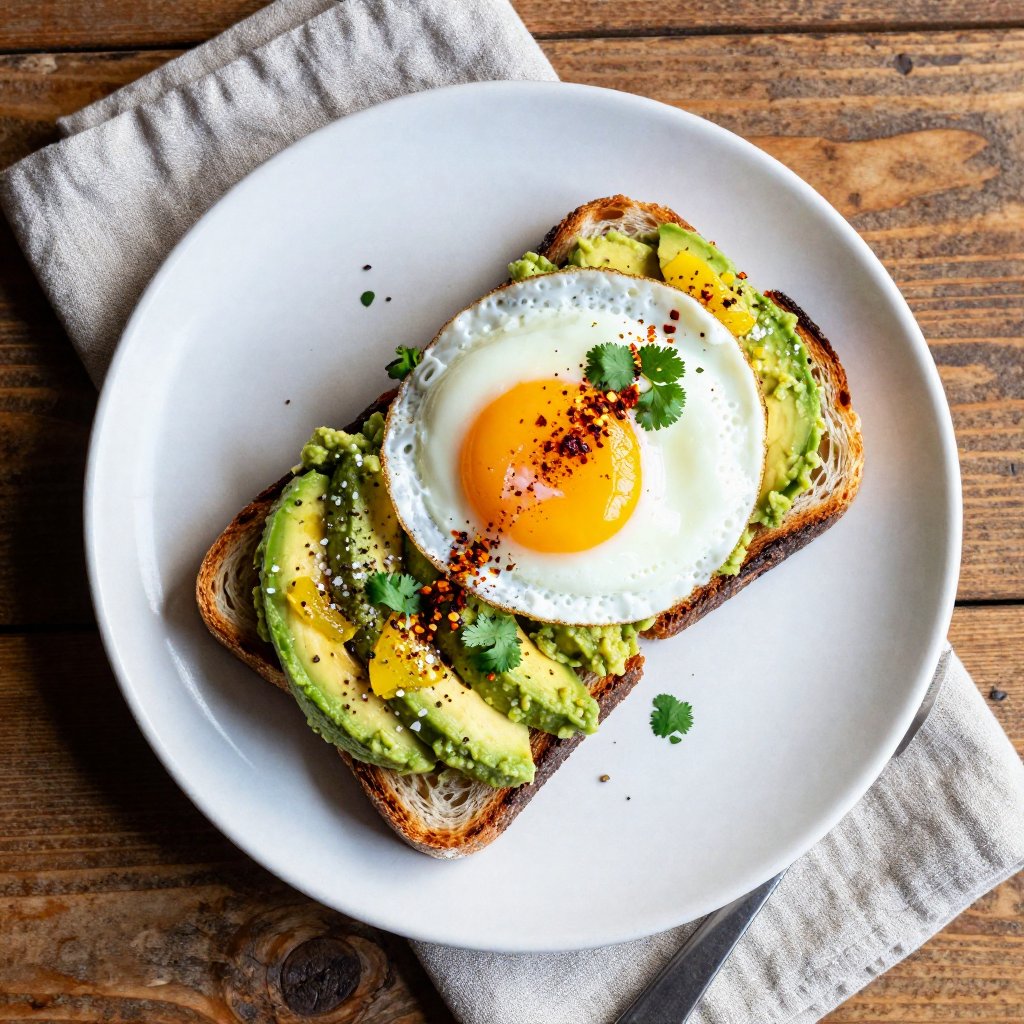
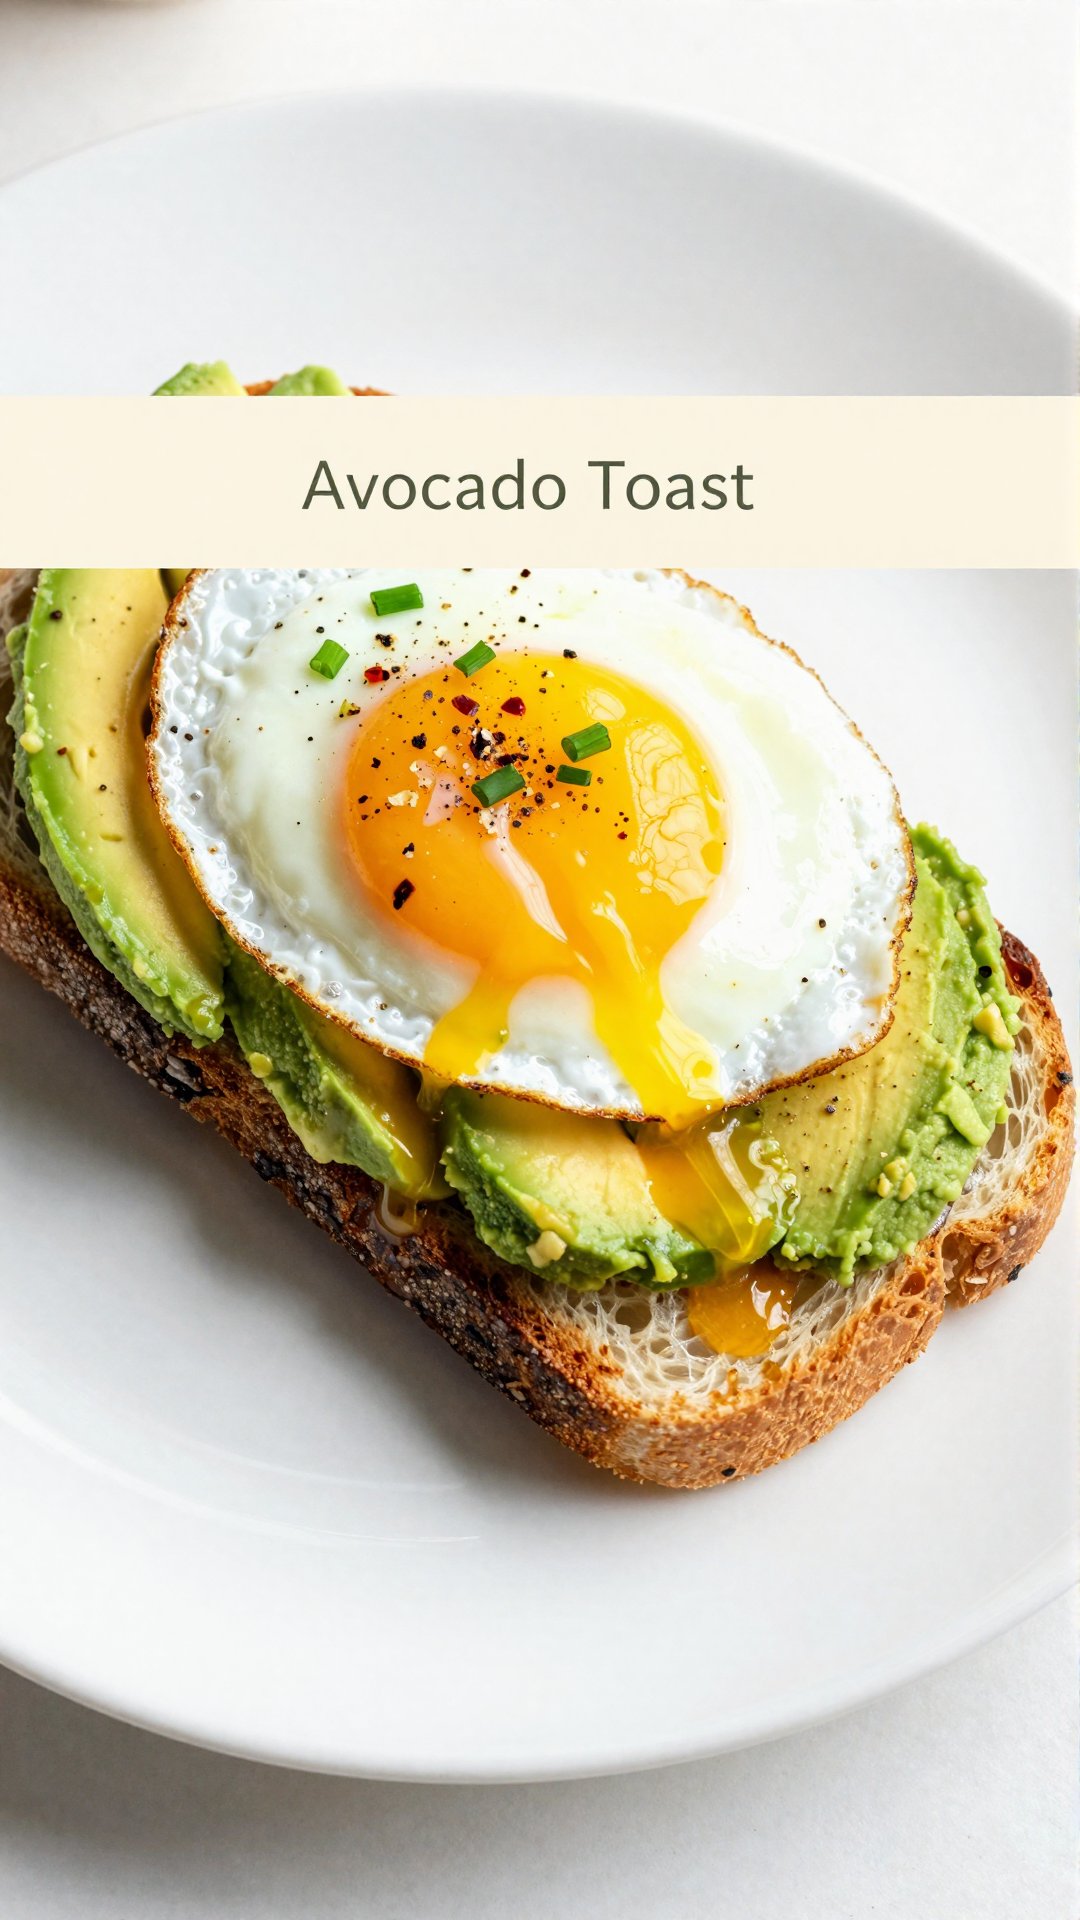
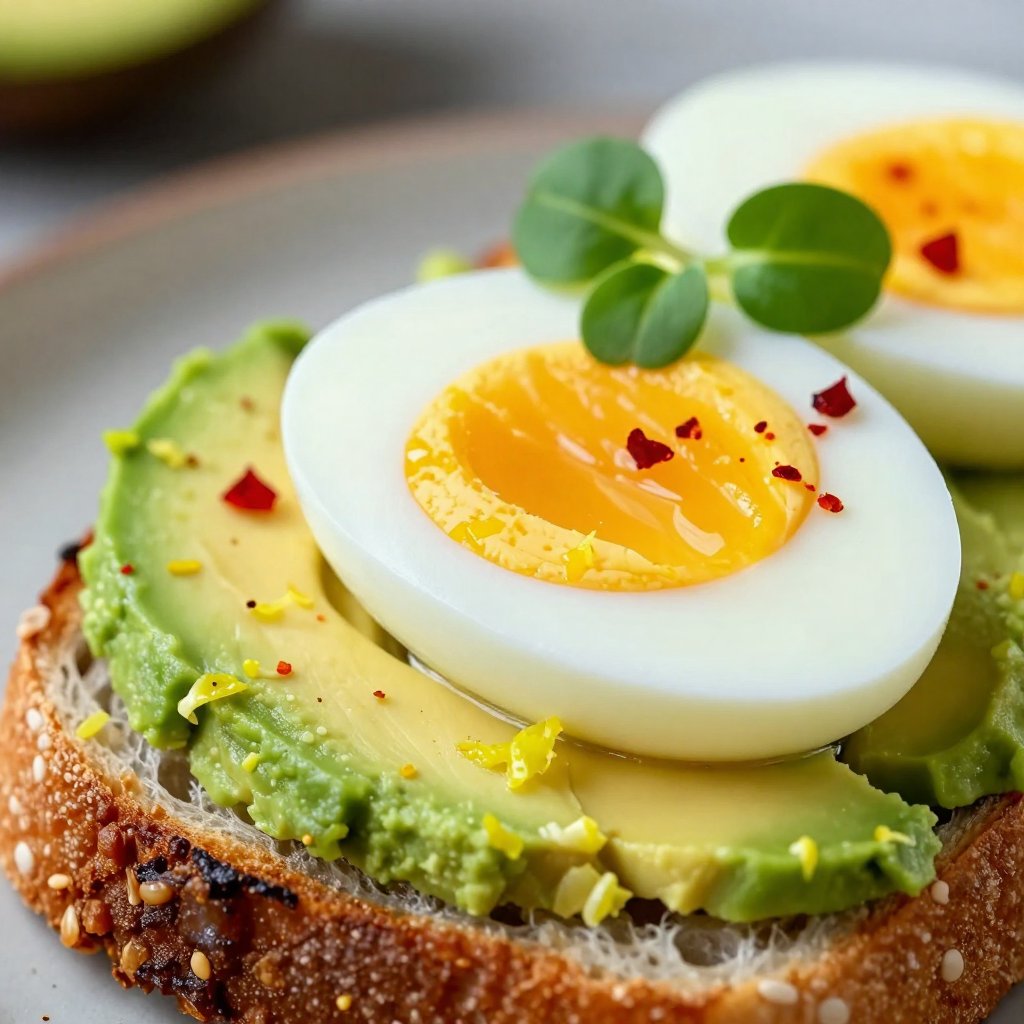
Hey friends! Avery here, from my little kitchen in Portland. Today, we’re making something that’s become a staple in my life: Avocado Toast with a Perfectly Soft-Boiled Egg. It’s more than just a trendy breakfast; it’s a little act of self-care that tastes absolutely divine. This isn’t about complicated cooking; it’s about celebrating simple, wholesome ingredients. Let’s get started!

Why You’ll Love This Avocado Toast

This isn’t just any avocado toast recipe; it’s *the* avocado toast recipe that will become your go-to. I promise! Here’s why:

  • Quick and Easy: Ready in under 15 minutes, perfect for busy mornings.
  • Healthy and Delicious: Packed with good fats, protein, and nutrients.
  • Customizable: Easily adaptable to your taste and dietary needs.
  • Simple Ingredients: Uses everyday ingredients you can find at your local market.
  • Satisfying: Keeps you full and energized until lunchtime.

Ingredients for the Perfect Avocado Toast

  • 2 slices whole grain bread: Provides a hearty base and healthy carbs.
  • 1 ripe avocado: Creamy, healthy fats are the star of the show. Make sure it’s perfectly ripe for easy mashing.
  • 1 teaspoon fresh lemon juice: Adds brightness and prevents browning of the avocado.
  • 1/8 teaspoon sea salt: Enhances the flavors and brings everything together.
  • Freshly ground black pepper to taste: Adds a touch of spice and depth.
  • 2 large eggs: Source of protein and creates that luxurious soft-boiled yolk.
  • 1/2 cup assorted microgreens: Adds freshness, nutrients, and visual appeal.
  • 1 teaspoon extra virgin olive oil: Adds richness and a drizzle of healthy fats, and that beautiful shine.
  • Pinch of red pepper flakes: Optional, but adds a delightful kick.
Recipe Image

How to Make Avocado Toast with a Soft-Boiled Egg: Step-by-Step

Making this avocado toast is so easy, it’s almost therapeutic. Here’s how I do it:

  1. Boil the Eggs: Bring a small saucepan of water to a gentle boil. Carefully lower in the eggs and cook for 6-7 minutes for perfectly soft-boiled centers. Remember, altitude affects cooking time! Start with 6 minutes and adjust as needed. We want that glorious, runny yolk!
  2. Toast the Bread: While the eggs are cooking, toast the whole grain bread slices to your desired crispness. I prefer mine golden brown and slightly crunchy. Feel free to use your favorite type of bread; sourdough or multigrain are also delicious options.
  3. Prepare the Avocado: Halve and pit the avocado. Mash the flesh in a bowl with lemon juice, sea salt, and black pepper until mostly smooth. I like to leave some chunks for texture, but you can make it as smooth as you like. This is where the magic happens!
  4. Cool and Peel the Eggs: When the eggs are done, transfer them to a bowl of cold water. This stops the cooking process and makes them easier to peel. Peel gently once cool enough to handle. Patience is key here to avoid tearing the delicate whites.
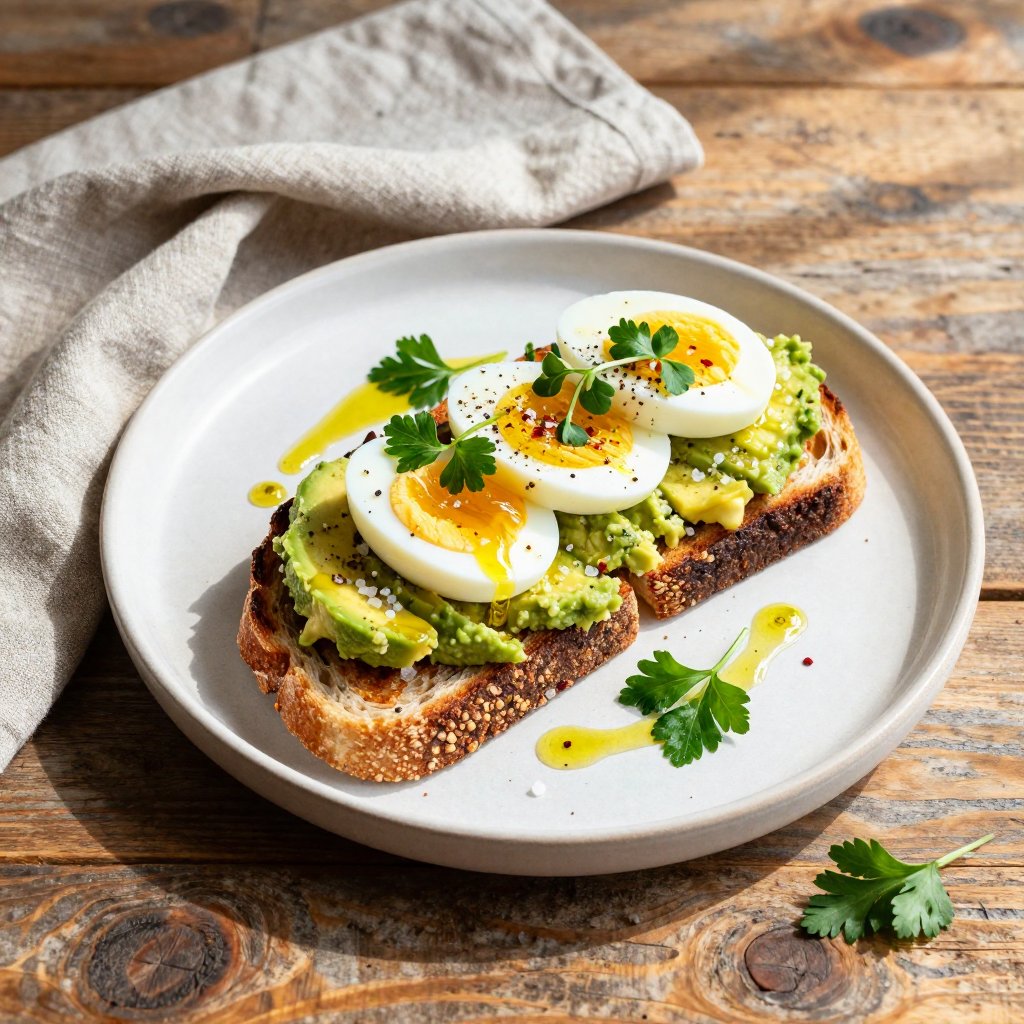
  5. Assemble the Toast: Spread the mashed avocado evenly over each toast slice. Don’t be shy! We want a generous layer of creamy avocado goodness.
  6. Add the Egg: Slice each soft-boiled egg in half and place on top of the avocado toast. Watch that yolk ooze out – pure perfection!
  7. Garnish and Enjoy: Top with fresh microgreens. Drizzle with olive oil and sprinkle with red pepper flakes if desired. That little drizzle of olive oil brings out the flavors of flavor and adds such richness to your toast. Serve immediately while toast is still warm.

Pro Tips for the Best Avocado Toast

Here are a few tricks I’ve learned along the way to elevate your avocado toast game:

  • Ripe Avocado is Key: Choose an avocado that yields to gentle pressure. It should be firm but not hard.
  • Don’t Overcook the Eggs: For that perfect runny yolk, aim for 6-7 minutes of cooking time. Adjust based on your stove and altitude.
  • Toast to Perfection: The toast should be golden brown and crispy, providing a nice contrast to the creamy avocado and soft egg.
  • Season Generously: Don’t be afraid to season your avocado with salt, pepper, and lemon juice. These simple ingredients make a big difference.
  • Get Creative with Toppings: Experiment with different toppings like everything bagel seasoning, feta cheese, or a drizzle of hot sauce.

Common Mistakes to Avoid

Even with such a simple recipe, there are a few pitfalls to watch out for:

  • Using an Underripe Avocado: This will result in a hard, flavorless toast.
  • Overcooking the Eggs: Say goodbye to that runny yolk!
  • Not Seasoning the Avocado: This is a crucial step for adding flavor.
  • Letting the Toast Get Soggy: Serve immediately after assembling to prevent the toast from becoming soggy.
  • Skipping the Olive Oil: A drizzle of good quality extra virgin olive oil adds richness and flavor.

Avocado Toast Variations

The beauty of avocado toast is its versatility. Here are some fun variations to try:

  • Spicy Avocado Toast: Add a pinch of cayenne pepper or a drizzle of sriracha to your mashed avocado.
  • Everything Bagel Avocado Toast: Sprinkle everything bagel seasoning on top for added flavor and texture.
  • Mediterranean Avocado Toast: Top with crumbled feta cheese, sliced cherry tomatoes, and a drizzle of balsamic glaze.
  • Smoked Salmon Avocado Toast: Add slices of smoked salmon for a protein-packed and flavorful breakfast.
  • Caprese Avocado Toast: Top with fresh mozzarella, sliced tomatoes, and a drizzle of balsamic glaze.
  • Radish and Hemp Seed Avocado Toast: Add sliced radishes cherry tomatoes or tomatoes or hemp seeds, seeds for a peppery crunch and added nutrients.

How to Store Leftover Avocado

Avocado browns quickly, so it’s best to use it immediately. However, if you have leftover mashed avocado, here’s how to store it:

  • In the Refrigerator: Place the mashed avocado in an airtight container. Press a piece of plastic wrap directly onto the surface to prevent browning. Store in the refrigerator for up to 24 hours.
  • With Lemon Juice: Adding extra lemon juice can help slow down the browning process.

Frequently Asked Questions (FAQ)

Here are some common questions about making avocado toast:

  • Can I use frozen avocado?: While fresh avocado is best, you can use frozen avocado in a pinch. Thaw it completely and drain any excess water before using.
  • Can I make avocado toast ahead of time?: It’s best to assemble the toast right before serving to prevent the toast from getting soggy. However, you can boil the eggs and mash the avocado ahead of time.
  • What kind of bread is best for avocado toast?: Whole grain, sourdough, and multigrain bread are all great options. Choose a bread that you enjoy and that has a sturdy texture. I love to use a hearty grain toast for this recipe.
  • How do I know if my avocado is ripe?: A ripe avocado should yield to gentle pressure. It should be firm but not hard.
  • Can I add other toppings to my avocado toast?: Absolutely! Feel free to get creative and add your favorite toppings.

Serving Suggestions

Avocado toast is delicious on its own, but here are some ways to make it a complete meal:

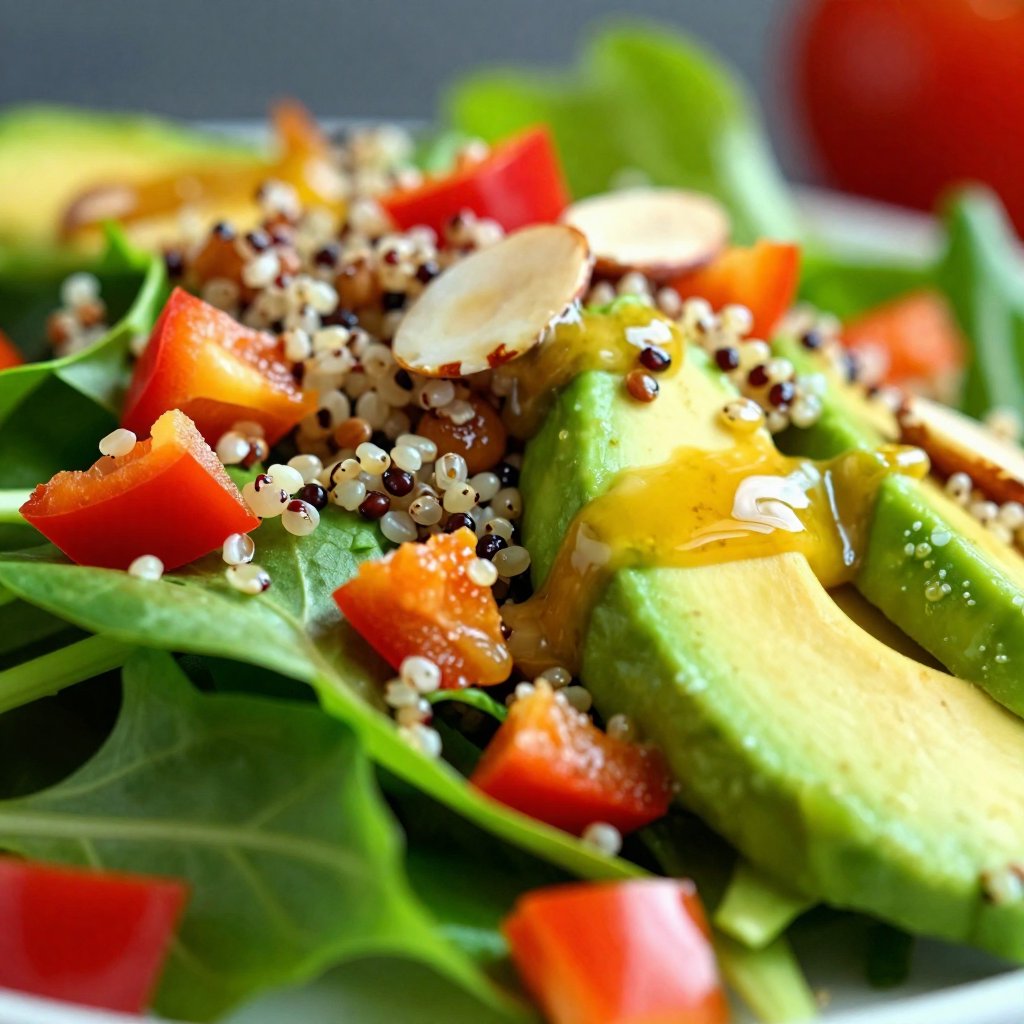
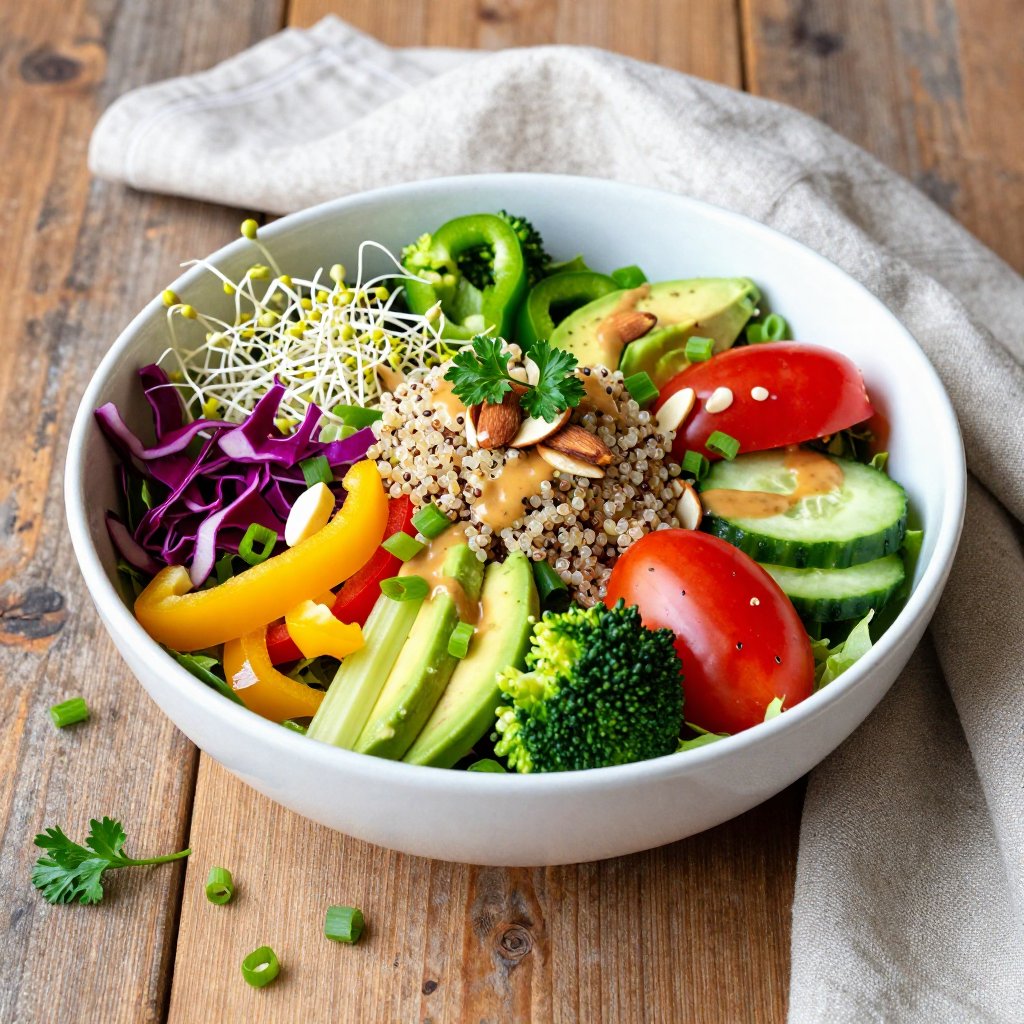
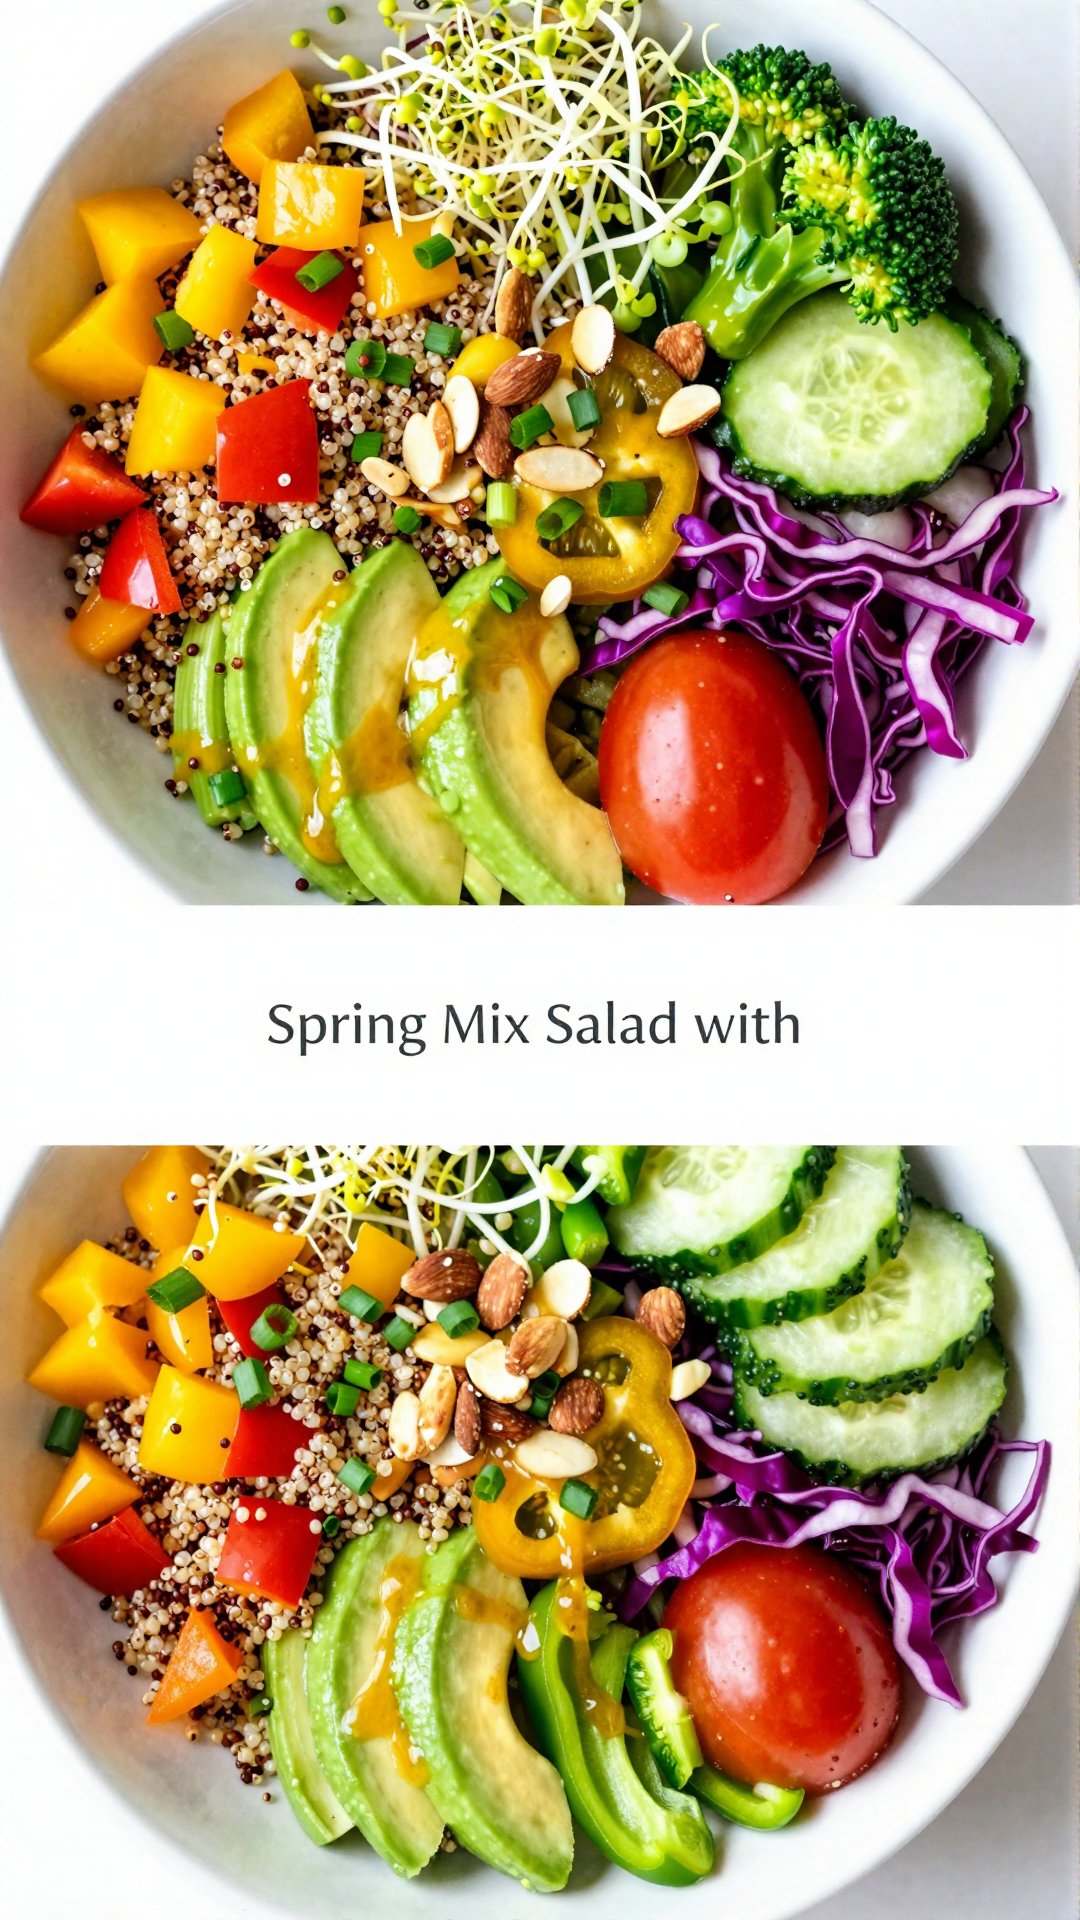
  • Pair with a Side Salad: A simple green salad with a light vinaigrette is a perfect complement.
  • Add a Smoothie: A green smoothie or fruit smoothie is a great way to boost your nutrient intake.
  • Serve with Coffee or Tea: A warm beverage is the perfect accompaniment to a cozy breakfast.

I hope you enjoy this simple yet satisfying avocado toast recipe as much as I do. It’s a little taste of Portland sunshine, no matter where you are. Happy cooking!

Avocado Toast with Soft-Boiled Egg

Prep Time 5 minutes
Cook Time 7 minutes
Total Time 12 minutes
Servings 2 slices
Calories 350
A simple yet satisfying breakfast or brunch option featuring creamy avocado and perfectly soft-boiled eggs on whole grain toast. This recipe is quick, healthy, and customizable to your liking.

Ingredients

Base

  • 2 slices whole grain bread

Avocado Mixture

  • 1 ripe avocado
  • 1 teaspoon fresh lemon juice
  • 1/8 teaspoon sea salt
  • Freshly ground black pepper (to taste)

Egg & Toppings

  • 2 large eggs
  • 1/2 cup assorted microgreens
  • 1 teaspoon extra virgin olive oil
  • Pinch red pepper flakes

Instructions 

  • Boil eggs for 6-7 minutes for soft-boiled centers.
  • Toast bread to desired crispness.
  • Mash avocado with lemon juice, salt, and pepper.
  • Cool eggs in cold water, then peel.
  • Spread avocado on toast.
  • Slice eggs and place on avocado toast.
  • Top with microgreens, olive oil, and red pepper flakes.
  • Serve immediately.

Notes

Adjust cooking time for eggs to achieve your preferred level of doneness. Add other toppings like everything bagel seasoning for extra flavor.
Calories: 350kcal
Cost: $6
Course: Breakfast, Brunch
Cuisine: American
Keyword: Avocado

Nutrition

Calories: 350kcal | Carbohydrates: 30g | Protein: 15g | Fat: 22g | Sodium: 300mg
pin

Hey friends, Avery here! Let’s talk about those nights, shall we? The ones where you’re craving something comforting, but the thought of a complicated recipe sends shivers down your spine. That’s where this Lemon Ricotta Pasta with Spinach comes in. It’s a hug in a bowl, ready in under 30 minutes, and bursting with fresh, vibrant flavors. This isn’t just a recipe; it’s a lifeline for busy weeknights and a celebration of simple, good food. It’s a meal that feels indulgent but is secretly packed with goodness.

My journey to this dish started, like many of my recipes, with a need for something nourishing and quick. I wanted to use the abundance of fresh greens from the Portland farmers market. The rain had been particularly kind to the spinach crops. I’m excited to share this recipe with you!

Why You’ll Love This Lemon Ricotta Pasta

Honestly, what’s not to love? This Lemon Ricotta Pasta with Spinach is more than just a quick dinner; it’s an experience. It’s the kind of meal that makes you close your eyes and savor each bite. Here’s why this recipe will become a staple in your home:

  • Speedy Gonzales: Seriously, from start to finish, you’re looking at about 20-30 minutes. Perfect for those “hangry” moments.
  • Creamy Dreamy: The ricotta cheese creates a luscious, velvety sauce that clings beautifully to the pasta. It is so satisfying.
  • Bright & Zesty: The lemon zest and juice add a vibrant zing that cuts through the richness of the ricotta. It’s like sunshine in a bowl.
  • Veggie Power: Spinach adds a boost of nutrients and a lovely pop of color. Feel free to add other greens too!
  • Versatile Vibes: This recipe is a blank canvas! Add your favorite veggies, protein, or spices to make it your own.
  • Simple Ingredients, Big Flavor: You probably already have most of these ingredients in your pantry and fridge.

Lemon Ricotta Pasta with Spinach Ingredients

  • 12 oz Pasta (Choose your favorite type; gluten-free option available.)
  • 1 cup Ricotta Cheese (Consider using plant-based ricotta for a dairy-free version.)
  • 1 unit Lemon (Zest and Juice) (Fresh lemons maximize flavor.)
  • 3 tablespoons Olive Oil (Opt for extra virgin for the best taste.)
  • 2 cloves Garlic (Fresh minced garlic elevates the flavor.)
  • to taste Salt
  • to taste Pepper
  • 1/4 cup Pasta Water (Helps adjust the sauce’s consistency.)
  • optional to taste Parmesan Cheese (Feel free to skip for a dairy-free option.)
  • 2 cups Spinach (Fresh spinach adds color and nutrients; frozen works if thawed.)
Recipe Image

Making the Lemon Ricotta Pasta: Step-by-Step Guide

Alright, let’s get cooking! This is so easy, you’ll be amazed at how quickly it comes together. Remember, cooking should be fun, so don’t stress about perfection. Just enjoy the process!

  1. Cook the Pasta: Bring a large pot of salted water to a boil. Add the pasta and cook according to package directions until al dente. Remember to reserve about 1/4 cup of pasta water before draining. This pasta water is liquid gold!
  2. Sauté the Garlic: While the pasta is cooking, heat the olive oil in a large skillet over medium heat. Add the minced garlic and sauté for about 30 seconds, or until fragrant. Be careful not to burn the garlic!
  3. Wilt the Spinach: Add the spinach to the skillet and cook until it wilts, about 1-2 minutes. If using frozen spinach, make sure to squeeze out any excess water before adding it to the skillet.
  4. Make the Ricotta Sauce: In a bowl, combine the ricotta cheese, lemon zest, lemon juice, salt, and pepper. Mix well. This is the base of the ricotta sauce.
  5. Combine Everything: Add the cooked pasta to the skillet with the spinach. Pour the ricotta sauce over the pasta and toss to coat. Add a splash of pasta water at a time, until the sauce reaches your desired consistency.
  6. Serve: Serve immediately, garnished with Parmesan cheese (if using) and a drizzle of olive oil.

Avery’s Pro Tips for the Best Lemon Ricotta Pasta

Here are a few secrets I’ve learned along the way to make this Lemon Ricotta Pasta even more incredible:

  • Salt Your Pasta Water: This is crucial! The salted water seasons the pasta from the inside out. It should taste like the sea.
  • Don’t Overcook the Pasta: Al dente pasta is key for the best texture. It should be firm to the bite.
  • Fresh is Best: Use fresh lemon juice and zest for the brightest flavor. Bottled lemon juice just doesn’t compare.
  • Warm the Ricotta: Let the ricotta cheese sit at room temperature for about 15 minutes before using. This will make it easier to mix and create a smoother sauce.
  • Taste and Adjust: Taste the sauce before serving and adjust the seasoning as needed. You might want to add more lemon juice, salt, or pepper.
  • Pasta Water is Your Friend: Don’t be afraid to use pasta water to thin out the sauce and make it extra creamy. The starch in the water helps the sauce cling to the pasta.

Common Mistakes to Avoid

Even the simplest recipes can have a few pitfalls. Here’s what to watch out for when making this Lemon Ricotta Pasta:

  • Burning the Garlic: Burnt garlic is bitter and can ruin the whole dish. Keep the heat low and watch it carefully.
  • Overcooking the Pasta: Mushy pasta is a no-go. Cook it al dente!
  • Not Salting the Pasta Water: This is a big one! Don’t skip the salt.
  • Using Cold Ricotta: Cold ricotta can be lumpy and hard to mix. Let it warm up a bit first.
  • Not Using Enough Lemon: The lemon is what makes this dish sing! Don’t be shy with it.

Lemon Ricotta Pasta Variations

The beauty of this recipe is its versatility. Feel free to experiment and make it your own! Here are a few ideas to get you started:

  • Add Protein: Grilled chicken, shrimp, or sausage would be delicious additions.
  • Spice it Up: Add a pinch of red pepper flakes for a little heat.
  • More Veggies: Roasted vegetables like asparagus, zucchini, or bell peppers would be great.
  • Fresh Herbs: Add fresh basil, parsley, or chives for extra flavor.
  • Different Cheese: Try using goat cheese or mascarpone instead of ricotta.
  • Dairy-Free Delight: Use plant-based ricotta and nutritional yeast for a vegan version.

Storing Leftover Lemon Ricotta Pasta

If you have any leftovers (which is unlikely!), store them in an airtight container in the refrigerator. The pasta will keep for up to 3 days. When reheating, add a splash of water or broth to prevent it from drying out. You can reheat it in the microwave or in a skillet over low heat.

I often make a big batch of the ricotta sauce and store it separately from the cooked pasta. Then, I can quickly toss it with freshly cooked pasta for a quick and easy meal.

Lemon Ricotta Pasta FAQs

  • Can I use frozen spinach? Yes, you can! Just make sure to thaw it completely and squeeze out any excess water before adding it to the skillet.
  • Can I make this recipe dairy-free? Absolutely! Use plant-based ricotta cheese and skip the Parmesan cheese.
  • Can I add other vegetables? Of course! Roasted vegetables like asparagus, zucchini, or bell peppers would be delicious.
  • Can I make this recipe ahead of time? You can make the ricotta sauce ahead of time and store it in the refrigerator for up to 3 days. Cook the pasta fresh when you’re ready to eat.
  • What kind of pasta should I use? Any kind of pasta will work! I like using penne, rigatoni, or fusilli because they hold the sauce well.

Serving Suggestions for Lemon Ricotta Pasta

This Lemon Ricotta Pasta is delicious on its own, but here are a few ideas to make it a complete meal:

  • Side Salad: Serve with a simple green salad with a light vinaigrette.
  • Garlic Bread: Crusty garlic bread is always a good idea.
  • Roasted Vegetables: Serve with a side of roasted asparagus, zucchini, or bell peppers.
  • Grilled Chicken or Shrimp: Add some protein to make it a heartier meal.
  • Dessert: Finish the meal with a light dessert like fresh fruit or a scoop of sorbet.

I truly hope you enjoy this Lemon Ricotta Pasta as much as I do. It’s a simple, comforting, and delicious meal that’s perfect for any night of the week. Happy cooking!

Lemon Ricotta Pasta with Spinach: Quick, Creamy Comfort Tonight

Prep Time 10 minutes
Cook Time 15 minutes
Total Time 25 minutes
Servings 4 servings
Calories 450
Enjoy a comforting and quick Lemon Ricotta Pasta with Spinach. This creamy dish is perfect for a weeknight meal.

Ingredients

Pasta

  • 12 oz Pasta (Choose your favorite type; gluten-free option available.)

Sauce

  • 1 cup Ricotta Cheese (Consider using plant-based ricotta for a dairy-free version.)
  • 1 unit Lemon (Zest and Juice. Fresh lemons maximize flavor.)
  • 3 tablespoons Olive Oil (Opt for extra virgin for the best taste.)
  • 2 cloves Garlic (Fresh minced garlic elevates the flavor.)
  • to taste Salt
  • to taste Pepper
  • 1/4 cup Pasta Water (Helps adjust the sauce's consistency.)
  • optional to taste Parmesan Cheese (Feel free to skip for a dairy-free option.)
  • 2 cups Spinach (Fresh spinach adds color and nutrients; frozen works if thawed.)

Notes

Add a pinch of red pepper flakes for a little heat.
Calories: 450kcal
Cost: $12
Course: Main Course
Cuisine: Italian
Keyword: pasta

Nutrition

Calories: 450kcal | Carbohydrates: 60g | Protein: 20g | Fat: 15g | Sodium: 300mg
pin

Hey there, friends! Avery Collins here, from my cozy Portland kitchen where the aroma of rosemary hangs in the air, especially after a good rain. Today, I’m sharing a recipe that’s close to my heart: Creamy Lemon Chicken Pasta. This isn’t just a meal; it’s a hug in a bowl, perfect for those busy weeknights when you crave something comforting and delicious without spending hours in the kitchen. This creamy lemon chicken pasta is a quick and easy weeknight dinner recipe that’s packed with flavor. Learn how to make this delicious dish in under 30 minutes!

My journey into cooking started out of necessity. After years of takeout and stress, my body needed a reset. This recipe, or a variation of it, was one of the first dishes I mastered. It’s simple, adaptable, and always a crowd-pleaser. I hope it brings as much joy to your table as it has to mine.

Why You’ll Love This Creamy Lemon Chicken Pasta

This dish isn’t just about convenience; it’s about creating a moment of joy. Here’s why I think you’ll absolutely adore it:

  • Quick & Easy: Ready in under 30 minutes, making it perfect for busy weeknights.
  • Flavor Explosion: The bright, zesty lemon sauce complements the savory chicken beautifully.
  • Comfort Food: Creamy, cheesy, and oh-so-satisfying.
  • Versatile: Easily adaptable to your dietary needs and preferences.
  • Crowd-Pleaser: A guaranteed hit with both kids and adults.

I’ve been making this dish for years, and it’s become a staple in my repertoire. I’ve tweaked it, perfected it, and now I’m thrilled to share the best version with you. It’s more than just a recipe; it’s an invitation to create something delicious and nourishing for yourself and your loved ones.

Ingredients You’ll Need to Create This Dish

Here’s what you’ll need to whip up this delightful Creamy Lemon Chicken Pasta:

  • 1 lb boneless skinless chicken breast (sliced in half lengthwise to create thin cutlets)
  • 1/2 cup all-purpose flour
  • 2 teaspoons Italian seasoning (divided (1 tsp for chicken, 1 tsp for sauce))
  • 2 teaspoons lemon pepper seasoning
  • Kosher salt (to taste)
  • Freshly cracked black pepper (to taste)
  • 2 tablespoons olive oil (divided)
  • 1 lb spaghetti
  • 6 cloves garlic (finely minced)
  • 1 whole lemon (zested and juiced (about 3 tbsp juice))
  • 1.5 cups heavy cream
  • 1/2 cup freshly shaved Parmesan cheese
  • 1/2 cup reserved pasta water
  • Fresh parsley (chopped, for garnish)
  • Lemon wedges (for serving)
Recipe Image

How to Make Creamy Lemon Chicken Pasta: Step-by-Step

Alright, let’s get cooking! Here’s how to bring this creamy lemon chicken pasta to life:

  1. Bring a large pot of salted water to a boil and cook spaghetti until al dente, about 8-9 minutes. Before draining, reserve 1/2 cup pasta water. Drain pasta, toss with 1 tablespoon olive oil, and set aside.
  2. While pasta cooks, slice each chicken breast in half lengthwise to create thinner cutlets about 1/2-inch thick. Let chicken rest at room temperature for 15-20 minutes if time allows. In a shallow bowl, combine flour, 1 teaspoon Italian seasoning, lemon pepper seasoning, salt, and pepper. Dredge each chicken piece in flour mixture, shaking off excess.
  3. Heat 1 tablespoon olive oil in a large skillet over medium-high heat. Add chicken and cook 3-4 minutes per side until golden brown and cooked through to an internal temperature of 165°F. Remove to a plate and set aside.
  4. Reduce heat to medium and add remaining tablespoon olive oil to the same pan. Add finely minced garlic, remaining teaspoon Italian seasoning, salt, and pepper. Stir constantly for 30 seconds until fragrant but not browned.
  5. Add lemon zest, lemon juice, and heavy cream to the pan. Stir well and season with salt and pepper. Let sauce warm through and thicken for 2-3 minutes until it coats the back of a spoon and holds a line when you draw your finger through it.
  6. Stir in Parmesan cheese until melted and smooth.
  7. Add cooked spaghetti to the sauce and toss to coat, adding reserved pasta water 2 tablespoons at a time until sauce clings smoothly to pasta without pooling at the bottom of the pan.
  8. Slice cooked chicken into strips and return to pan, stirring until heated through. Adjust seasoning if needed.
  9. Serve immediately, garnished with fresh chopped parsley and lemon wedges on the side.

And there you have it! A simple yet elegant dish that’s sure to impress. The bright lemon juice cuts through the richness of the cream, creating a perfectly balanced flavor profile.

Pro Tips for the Best Creamy Lemon Chicken Pasta

Here are a few of my tried-and-true tips for making this dish even better:

  • Pound the Chicken: Thin, even chicken cutlets cook quickly and evenly.
  • Don’t Overcook the Garlic: Burnt garlic is bitter. Keep the heat medium and stir constantly.
  • Use Fresh Lemon Juice: Bottled juice just doesn’t compare. The flavor of fresh lemon is essential for this dish.
  • Reserve Pasta Water: This starchy water helps the sauce cling to the pasta, creating a silky texture.
  • Taste and Adjust: Seasoning is key! Taste the sauce and adjust salt, pepper, and lemon juice to your liking.

Making this creamy lemon chicken pasta should be enjoyable, not stressful! Follow these tips, and you’ll be well on your way to creating a restaurant-quality dish in your own kitchen.

Common Mistakes to Avoid When Making This Dish

Even the most seasoned cooks make mistakes! Here are a few common pitfalls to watch out for:

  • Overcooking the Chicken: Dry, rubbery chicken is a no-go. Use a meat thermometer to ensure it reaches 165°F.
  • Not Salting the Pasta Water: This is your chance to season the pasta from the inside out.
  • Adding Cold Cream: Cold cream can cause the sauce to seize up. Use room-temperature cream for a smooth, velvety texture.
  • Letting the Sauce Boil: Boiling the sauce can cause it to separate. Keep the heat low and simmer gently.
  • Forgetting to Reserve Pasta Water: This is liquid gold! Don’t skip this step.

Don’t be afraid to experiment and learn from your mistakes. Cooking is a journey, and every dish is a chance to improve.

Variations to Spice Things Up

One of the best things about this recipe is how easily you can customize it. Here are a few ideas to get you started:

  • Vegetarian: Skip the chicken and add sautéed mushrooms, spinach, or artichoke hearts.
  • Gluten-Free: Use gluten-free pasta and a gluten-free flour blend for dredging the chicken.
  • Spicy: Add a pinch of red pepper flakes to the sauce for a little heat.
  • Herby: Add fresh rosemary, thyme, or oregano to the sauce for extra flavor.
  • Cheesy: Use a blend of Parmesan, Romano, and Asiago cheese for a more complex flavor.

Feel free to get creative and add your own personal touch. The possibilities are endless!

How to Store and Reheat Creamy Lemon Chicken Pasta

Got leftovers? Here’s how to store and reheat your Creamy Lemon Chicken Pasta:

  • Storage: Store leftovers in an airtight container in the refrigerator for up to 3 days.
  • Reheating: Reheat gently in a skillet over medium-low heat, adding a splash of milk or cream to loosen the sauce. You can also microwave it in 30-second intervals, stirring in between.

Keep in mind that the sauce may thicken upon refrigeration. Adding a little liquid when reheating will restore its creamy consistency.

Frequently Asked Questions (FAQ)

Here are some common questions I get about this recipe:

  • Can I use chicken thighs instead of chicken breasts? Yes, absolutely! Just make sure to cook them until they reach an internal temperature of 175°F.
  • Can I use milk instead of heavy cream? While heavy cream provides the best flavor and texture, you can use milk or half-and-half. The sauce will be thinner, but still delicious.
  • Can I freeze this dish? I don’t recommend freezing it, as the sauce may separate upon thawing.
  • Can I make this ahead of time? You can cook the pasta and chicken ahead of time and store them separately. Then, when you’re ready to eat, simply heat the sauce and combine everything.
  • Is the sauce that makes this dish so amazing? It is! The sauce is really the heart of the dish, and it is what I ve spent so much time perfecting.

If you have any other questions, feel free to leave a comment below!

Serving Suggestions for Creamy Lemon Chicken Pasta

This dish is a complete meal on its own, but here are a few ideas to round out your dinner:

  • Side Salad: A simple green salad with a lemon vinaigrette.
  • Garlic Bread: Perfect for soaking up that delicious sauce.
  • Roasted Vegetables: Asparagus, broccoli, or Brussels sprouts.
  • Wine Pairing: A crisp white wine like Sauvignon Blanc or Pinot Grigio.

No matter how you choose to serve it, this Creamy Lemon Chicken Pasta is sure to be a hit. Enjoy!

I truly hope you enjoy making and eating this Creamy Lemon Chicken Pasta as much as I do. Remember, cooking should be fun and forgiving. Don’t be afraid to experiment, make mistakes, and most importantly, enjoy the process. From my kitchen to yours, happy cooking!

Creamy Lemon Chicken Pasta

Prep Time 15 minutes
Cook Time 25 minutes
Total Time 40 minutes
Servings 4 servings
Calories 650
A delightful pasta dish featuring tender chicken in a creamy lemon sauce. This recipe is quick, easy, and bursting with fresh flavors.

Ingredients

Chicken

  • 1 lb boneless skinless chicken breast (sliced in half lengthwise to create thin cutlets)

Pasta

  • 1 lb spaghetti

Sauce

  • 1/2 cup all-purpose flour
  • 2 teaspoons Italian seasoning (divided (1 tsp for chicken, 1 tsp for sauce))
  • 2 teaspoons lemon pepper seasoning
  • Kosher salt (to taste)
  • Freshly cracked black pepper (to taste)
  • 2 tablespoons olive oil (divided)
  • 6 cloves garlic (finely minced)
  • 1 whole lemon (zested and juiced (about 3 tbsp juice))
  • 1.5 cups heavy cream
  • 1/2 cup freshly shaved Parmesan cheese
  • 1/2 cup reserved pasta water
  • Fresh parsley (chopped, for garnish)
  • Lemon wedges (for serving)

Instructions 

  • Cook spaghetti until al dente, reserving 1/2 cup pasta water. Drain and toss with 1 tablespoon olive oil.
  • Slice chicken, dredge in flour, Italian seasoning, lemon pepper, salt, and pepper.
  • Cook chicken in 1 tablespoon olive oil until golden brown and cooked through. Set aside.
  • Add remaining olive oil, garlic, Italian seasoning, salt, and pepper to the pan. Stir until fragrant.
  • Add lemon zest, lemon juice, and heavy cream. Thicken for 2-3 minutes.
  • Stir in Parmesan cheese until melted.
  • Add spaghetti and pasta water, toss to coat.
  • Slice chicken, return to pan, and heat through. Adjust seasoning.
  • Serve garnished with parsley and lemon wedges.

Notes

For a richer flavor, use freshly grated Parmesan cheese. Adjust lemon juice to taste.
Calories: 650kcal
Cost: $18
Course: Main Course
Cuisine: Italian
Keyword: chicken

Nutrition

Calories: 650kcal | Carbohydrates: 65g | Protein: 45g | Fat: 30g | Sodium: 400mg
pin

Hey there, friends! Avery Collins here, straight from my cozy kitchen in Portland. Today, I’m so excited to share one of my go-to recipes: a vibrant Spring Mix Salad with Quinoa. This isn’t just any salad; it’s a bowl full of sunshine, packed with fresh flavors and nutrients that will leave you feeling energized and satisfied. It’s the perfect embodiment of my belief that healthy eating should be joyful, accessible, and, most importantly, delicious.

My journey into healthy eating started out of necessity, not passion. I was burnt out, stressed, and my body was screaming for a change. Cooking became my lifeline, a way to reconnect with myself and nourish my body from the inside out. And this salad? It’s a reflection of that journey – simple, wholesome, and bursting with life.

Why You’ll Love This Spring Mix Quinoa Salad

Trust me, this isn’t your average, boring salad. This Spring Mix Quinoa Salad is a game-changer. Here’s why you’ll absolutely adore it:

  • Flavor Explosion: The combination of sweet peppers, crunchy celery, creamy avocado, and the subtle earthiness of quinoa creates a symphony of flavors in every bite.
  • Nutrient Powerhouse: Packed with vitamins, minerals, and antioxidants from the mixed greens, colorful veggies, and superfood quinoa, this salad is a nutritional superstar.
  • Easy to Customize: Don’t like green peppers? Swap them for something else! This salad is incredibly versatile, allowing you to tailor it to your taste preferences and what you have on hand.
  • Quick and Convenient: Perfect for busy weeknights or a quick lunch, this salad comes together in minutes. You can even prep the ingredients ahead of time for an even faster meal.
  • Feels Good: Beyond the taste and nutrition, this salad simply makes you feel good. It’s light yet satisfying, leaving you energized and ready to tackle the day.

I truly believe that food should nourish both your body and your soul. And this Spring Mix Quinoa Salad does just that. It’s a celebration of fresh, wholesome ingredients, prepared with love and intention. So, let’s get cooking!

Ingredients for the Perfect Spring Mix Quinoa Salad

Here’s everything you’ll need to create this vibrant and delicious salad. Remember, feel free to adjust the quantities to your liking. Cooking should be an intuitive and enjoyable process!

  • ‘1/4 cup cooked quinoa, rinsed’
  • ‘2 cups mixed greens’
  • ‘2-3 diced sweet peppers (yellow and red)’
  • ‘1/4 diced green onion’
  • ‘1/2 diced avocado’
  • ‘1 chopped celery stalk’
  • ‘1 chopped roma tomato’
  • ‘1 cup broccoli slaw’
  • ‘A handful of broccoli sprouts’
  • ‘1/2 sliced cucumber’
  • ‘1 cup chopped red cabbage’
  • ‘1/4 diced green pepper’
  • ‘1/4 cup slivered almonds’
  • ‘1 teaspoon ground black pepper’
  • ‘2 tablespoons honey mustard dressing’
Recipe Image

Step-by-Step Instructions for Making This Quinoa Salad

Okay, let’s get down to business! Making this Spring Mix Salad with Quinoa is incredibly simple. Here’s a step-by-step guide to help you create the perfect bowl of goodness:

  1. Prepare the Quinoa: If you haven’t already, cook your quinoa according to package directions. Once cooked, rinse it under cold water and let it cool slightly. This prevents the quinoa from wilting the greens and helps the flavors meld together better.
  2. Prep the Veggies: Wash and chop all your vegetables. The key here is to aim for similar-sized pieces, which creates a more visually appealing salad and ensures that everything is evenly distributed.
  3. Assemble the Salad: In a large bowl, combine the mixed greens, sweet peppers, green onion, avocado, celery, tomato, broccoli slaw, broccoli sprouts, cucumber, red cabbage, and green pepper.
  4. Add the Quinoa: Sprinkle the cooked and rinsed quinoa over the vegetables.
  5. Dress It Up: Drizzle the honey mustard dressing over the salad. Start with a little and add more to taste.
  6. Toss Gently: Use tongs or your hands to gently toss everything together until well combined. Be careful not to over-mix, as this can bruise the greens.
  7. Garnish and Serve: Sprinkle the slivered almonds and ground black pepper over the salad. Serve immediately and enjoy!

That’s it! Your vibrant Spring Mix Quinoa Salad is ready to be devoured. I promise, once you taste it, you’ll be hooked.

Pro Tips for the Best Quinoa Salad Ever

Want to take your Spring Mix Quinoa Salad to the next level? Here are a few pro tips that I’ve learned over the years:

  • Use High-Quality Ingredients: The better the ingredients, the better the salad. Opt for fresh, organic produce whenever possible.
  • Don’t Overcook the Quinoa: Overcooked quinoa can become mushy and unappetizing. Cook it just until it’s tender and fluffy.
  • Rinse the Quinoa Well: Rinsing the cooked quinoa removes the bitter saponins and improves the flavor.
  • Prep Ahead of Time: To save time, you can chop the vegetables and cook the quinoa ahead of time. Store them separately in the fridge and assemble the salad just before serving.
  • Add a Protein Boost: For a more substantial meal, add grilled chicken, chickpeas, or tofu to the salad.
  • Toast the Almonds: Toasting the slivered almonds enhances their flavor and adds a delightful crunch.
  • Make Your Own Dressing: Homemade dressing is always better than store-bought. It’s easy to make and allows you to control the ingredients and flavors.

Remember, cooking is all about experimenting and having fun. Don’t be afraid to try new things and adjust the recipe to your liking.

Common Mistakes to Avoid When Making Spring Mix Salad

Even the simplest recipes can have a few pitfalls. Here are some common mistakes to avoid when making Spring Mix Quinoa Salad:

  • Using Wilted Greens: Make sure your mixed greens are fresh and crisp. Wilted greens will make the salad taste sad and unappetizing.
  • Overdressing the Salad: Too much dressing can make the salad soggy and overwhelm the other flavors. Start with a little and add more to taste.
  • Not Dicing the Vegetables Properly: Unevenly sized vegetables can make the salad difficult to eat and less visually appealing.
  • Adding Warm Quinoa: Adding warm quinoa to the salad can wilt the greens and make them soggy. Make sure the quinoa is cooled before adding it to the salad.
  • Skipping the Rinse: Forgetting to rinse the quinoa can result in a bitter taste.
  • Not Tossing Gently: Tossing the salad too vigorously can bruise the greens and make them taste bitter.

Delicious Variations to Try

The beauty of this Spring Mix Quinoa Salad is its versatility. Here are a few delicious variations to inspire you:

  • Mediterranean Twist: Add crumbled feta cheese, Kalamata olives, and a lemon-herb vinaigrette.
  • Asian-Inspired: Toss in some edamame, shredded carrots, and a sesame-ginger dressing.
  • Berry Blast: Add fresh blueberries, raspberries, and a poppy seed dressing.
  • Spicy Kick: Add a pinch of red pepper flakes or a drizzle of sriracha to the dressing.
  • Tropical Vibe: Add diced mango, pineapple, and a coconut-lime dressing.

Get creative and experiment with different flavors and textures to create your own signature Spring Mix Quinoa Salad!

How to Store Leftover Salad

If you have any leftover Spring Mix Quinoa Salad, here’s how to store it properly:

  • Store Dressing Separately: If possible, store the dressing separately from the salad to prevent it from becoming soggy.
  • Use an Airtight Container: Transfer the salad to an airtight container and store it in the refrigerator.
  • Eat Within 1-2 Days: The salad is best consumed within 1-2 days, as the greens may start to wilt after that.

Keep in mind that the salad may not be as crisp as when it was first made, but it will still be delicious.

Frequently Asked Questions (FAQ)

Here are some frequently asked questions about Spring Mix Quinoa Salad:

  • Can I make this salad ahead of time? Yes, you can prep the ingredients ahead of time and assemble the salad just before serving.
  • Can I use a different type of grain instead of quinoa? Absolutely! Farro, couscous, or brown rice would all work well in this salad.
  • Can I add cheese to this salad? Of course! Feta, goat cheese, or Parmesan would all be delicious additions.
  • Is this salad vegan? Yes, this salad is naturally vegan.
  • Is this salad gluten-free? Yes, this salad is gluten-free, as long as you use gluten-free quinoa and dressing.

Serving Suggestions

This Spring Mix Quinoa Salad is incredibly versatile and can be enjoyed in a variety of ways:

  • As a Light Lunch: Enjoy a bowl of this salad for a quick and healthy lunch.
  • As a Side Dish: Serve it alongside grilled chicken, fish, or tofu for a complete meal.
  • As a Potluck Dish: Bring this salad to your next potluck or gathering. It’s always a crowd-pleaser.
  • As a Topping for Grain Bowls: Add it to your favorite grain bowl for a boost of flavor and nutrients.

No matter how you choose to enjoy it, I hope this Spring Mix Quinoa Salad brings you as much joy as it brings me. Happy cooking, friends!

Dressing It Up: The Perfect Honey Mustard Vinaigrette

While you can use store-bought honey mustard dressing, trust me, making your own takes this salad to a whole new level. It’s incredibly easy and allows you to control the ingredients and sweetness. Here’s a simple recipe:

  • 2 tablespoons Dijon mustard
  • 2 tablespoons honey (or maple syrup for a vegan option)
  • 2 tablespoons apple cider vinegar
  • 4 tablespoons olive oil
  • Salt and pepper to taste

Simply whisk all the ingredients together in a small bowl until emulsified. Taste and adjust the seasonings as needed. This dressing can be stored in an airtight container in the refrigerator for up to a week.

The Importance of Fresh, Seasonal Ingredients

Living in Portland, I’m spoiled with access to incredible fresh produce year-round. But no matter where you live, prioritizing seasonal ingredients will make a huge difference in the flavor and vibrancy of your salads. In the spring, look for tender greens, sweet berries, and crisp vegetables. In the summer, tomatoes, cucumbers, and herbs are at their peak. In the fall, root vegetables and hearty greens take center stage. And in the winter, citrus fruits and hardy greens provide a welcome burst of flavor.

Shopping at your local farmer’s market is a great way to find fresh, seasonal ingredients and support your community. Plus, you’ll get to chat with the farmers and learn more about where your food comes from.

Quinoa: A Nutritional Powerhouse

Quinoa is often referred to as a superfood, and for good reason. It’s a complete protein, meaning it contains all nine essential amino acids. It’s also a good source of fiber, iron, and magnesium. Adding quinoa to your salads is a great way to boost their nutritional value and keep you feeling full and satisfied.

When cooking quinoa, be sure to rinse it thoroughly before cooking to remove the bitter saponins. You can cook quinoa on the stovetop, in a rice cooker, or even in the microwave. It’s a versatile grain that can be used in a variety of dishes.

Making Lunch a Joyful Experience

For so long, lunch was something I dreaded – a rushed, unsatisfying meal eaten at my desk. But now, I see lunch as an opportunity to nourish myself and take a break from the day’s stresses. This Spring Mix Quinoa Salad is the perfect example of a lunch that’s both healthy and delicious. It’s easy to make, packed with nutrients, and tastes amazing. And most importantly, it makes me feel good.

I encourage you to experiment with different ingredients and flavors to create your own joyful lunch experiences. Remember, healthy eating doesn’t have to be boring or restrictive. It can be a celebration of fresh, wholesome ingredients and a way to connect with yourself.

Embracing Imperfection in the Kitchen

One of the biggest lessons I’ve learned on my culinary journey is that perfection is overrated. In fact, it’s often the imperfections that make a dish truly special. A slightly burnt edge on a roasted vegetable, a sprinkle of salt that’s a little too generous, a drizzle of honey that’s a bit too sweet – these are the things that give food character and make it memorable.

So, don’t be afraid to make mistakes in the kitchen. Embrace the mess, experiment with flavors, and most importantly, have fun! Cooking should be a joyful and creative process, not a stressful chore. And remember, even the most experienced chefs make mistakes. It’s all part of the learning process.

The Salad as a Canvas: Unleashing Your Inner Artist

Think of your salad bowl as a blank canvas, waiting to be filled with vibrant colors, textures, and flavors. This Spring Mix Quinoa Salad is just a starting point – a foundation upon which you can build your own culinary masterpiece. Don’t be afraid to experiment with different ingredients and create a salad that’s uniquely yours.

Add grilled chicken or tofu for a protein boost, sprinkle on some toasted nuts or seeds for added crunch, or drizzle with your favorite dressing for a burst of flavor. The possibilities are endless. So, unleash your inner artist and create a salad that’s both beautiful and delicious.

Healthy Eating Plan Integration

This salad fits seamlessly into any healthy eating plan. It provides a balanced mix of carbohydrates, protein, and healthy fats. You can adjust the portion size to meet your individual calorie needs. It’s also a great option for meal prepping, as you can make a large batch of the salad on Sunday and enjoy it throughout the week.

To make this salad even healthier, consider using organic ingredients whenever possible. You can also swap out the honey mustard dressing for a lighter vinaigrette or a squeeze of lemon juice. The key is to make it work for you and your individual needs.

Spring Mix: A Symphony of Greens

Spring mix isn’t just a random assortment of leaves; it’s a carefully curated blend of flavors and textures. From the peppery bite of arugula to the mild sweetness of baby spinach, each green contributes its unique character to the overall experience. That s why choosing a high-quality spring mix is so important. Look for a mix that’s fresh, vibrant, and free of wilted or yellowing leaves.

You can also create your own spring mix by combining different types of greens. Try adding some baby kale, romaine lettuce, or even some edible flowers for a touch of elegance. The possibilities are endless.

And finally, remember that this colorful salad isn’t just about the ingredients; it’s about the intention. It’s about taking the time to nourish yourself, to connect with the earth, and to savor the simple pleasures of life. So, gather your ingredients, put on some music, and let’s make some magic in the kitchen!

So there you have it! My go-to Spring Mix Quinoa Salad recipe. I hope you love it as much as I do. Remember, cooking is all about experimentation and having fun. So, don’t be afraid to try new things and make this recipe your own. And most importantly, enjoy the process!

Happy cooking, friends! And remember to come back and let me know what you think of the recipe. I love hearing from you!

If you’re looking for another delicious and healthy recipe, check out my potato-cucumber-salad!

Vibrant Spring Mix Salad with Quinoa

Prep Time 20 minutes
Total Time 20 minutes
Servings 4 servings
Calories 250
A refreshing and colorful salad packed with nutrients and vibrant flavors. Perfect for a light lunch or a healthy side dish.

Ingredients

Salad Ingredients

  • 1/4 cup cooked quinoa, rinsed
  • 2 cups mixed greens
  • 2-3 diced sweet peppers (yellow and red)
  • 1/4 diced green onion
  • 1/2 diced avocado
  • 1 chopped celery stalk
  • 1 chopped roma tomato
  • 1 cup broccoli slaw
  • A handful broccoli sprouts
  • 1/2 sliced cucumber
  • 1 cup chopped red cabbage
  • 1/4 diced green pepper
  • 1/4 cup slivered almonds
  • 1 teaspoon ground black pepper

Dressing

  • 2 tablespoons honey mustard dressing

Notes

Adjust the amount of dressing to your liking. For a vegan option, use maple syrup or agave instead of honey in the dressing.
Calories: 250kcal
Cost: $8
Course: Salad
Cuisine: Healthy
Keyword: quinoa

Nutrition

Calories: 250kcal | Carbohydrates: 30g | Protein: 10g | Fat: 12g | Sodium: 150mg
pin

Balsamic Strawberry Spinach Salad: A Symphony of Summer on Your Plate

Hey there, friends! Avery Collins here, coming to you from my cozy Portland kitchen, where the scent of rosemary hangs in the air, even on the sunniest days. Today, I want to share a recipe that’s become a staple in my life – a Balsamic Strawberry Spinach Salad that’s quick, easy, and absolutely bursting with fresh flavors. This isn’t just a salad; it’s a little slice of summer, no matter the season.

My journey into healthy eating started as a necessity, a way to reclaim my well-being after years of neglecting my body. And let me tell you, this salad embodies everything I’ve learned along the way. It’s about nourishing yourself with real, whole foods, finding joy in the process, and letting go of the pressure to be perfect. Because honestly, who needs more pressure?

Why You’ll Absolutely Love This Balsamic Strawberry Spinach Salad

I know, I know, another salad recipe. But trust me, this one is special. Here’s why I think you’ll fall head-over-heels for this Balsamic Strawberry Spinach Salad, just like I did:

  • Simplicity at its Finest: Seriously, this salad comes together in minutes. Perfect for those busy weeknights when you want something healthy and delicious without spending hours in the kitchen.
  • A Flavor Explosion: The combination of sweet strawberries, tangy balsamic vinegar, salty feta, and crunchy walnuts is simply divine. It’s a party in your mouth!
  • Nourishing and Delicious: Packed with vitamins, antioxidants, and healthy fats, this salad is a powerhouse of goodness. It’s a meal that makes you feel good from the inside out.
  • Versatile and Adaptable: Feel free to customize this salad to your liking. Swap out the feta for goat cheese, add some grilled chicken or chickpeas for protein, or use a different type of nut. The possibilities are endless!
  • That Balsamic Vinaigrette: Oh, the dressing! A simple honey balsamic vinaigrette is the star of the show. It’s the perfect balance of sweet and tangy, and it brings all the flavors together beautifully.

Ingredients: Your Palette of Flavors

Here’s what you’ll need to create this delightful salad. I always encourage you to use the freshest, highest-quality ingredients you can find. It really makes a difference!

  • ‘4 cups fresh spinach, washed and dried’
  • ‘2 cups strawberries, hulled and sliced’
  • ‘1/2 red onion, thinly sliced’
  • ‘1/4 cup feta cheese, crumbled’
  • ‘1/4 cup walnuts, chopped’
  • ‘1/4 cup balsamic vinegar’
  • ‘1/4 cup olive oil’
  • ‘1 tablespoon honey’
  • ‘Salt and pepper to taste’
Recipe Image

Let’s Make Magic: Assembling Your Salad

Ready to get started? Here’s how to bring this salad to life. It’s so easy, you’ll be enjoying it in no time!

  1. Combine the Goodness: In a large bowl, gently combine the fresh spinach, sliced strawberries, red onion, feta cheese, and walnuts. Toss lightly to ensure everything is evenly distributed.
  2. Whisk the Dressing: In a separate small bowl, whisk together the balsamic vinegar, olive oil, and honey. Season with salt and pepper to your liking. This is where you can really play with the flavors – add a pinch of Dijon mustard for extra tang, or a clove of minced garlic for a little kick.
  3. Dress and Serve: Drizzle the balsamic dressing over the salad and toss lightly to coat all the ingredients. Serve immediately and enjoy!

Pro Tips for the Perfect Salad

Here are a few little secrets I’ve learned over the years to take this salad from good to great:

  • Wash Your Greens: This seems obvious, but it’s crucial. Nobody wants a gritty salad! Use a salad spinner to thoroughly wash and dry your spinach.
  • Slice Strawberries Just Before Serving: Strawberries tend to get mushy if they sit for too long after being sliced. For the best texture, slice them right before you’re ready to assemble the salad.
  • Toast Your Nuts: Toasting the walnuts brings out their nutty flavor and adds a satisfying crunch. Simply spread them on a baking sheet and bake at 350°F (175°C) for 5-7 minutes, or until fragrant. Keep a close eye on them, as they can burn easily.
  • Don’t Overdress: A little dressing goes a long way. Start with a small amount and add more as needed, until the salad is lightly coated.
  • Use High-Quality Balsamic Vinegar: The quality of your balsamic vinegar will greatly impact the flavor of the dressing. Look for a thick, syrupy balsamic with a rich, complex flavor.

Common Mistakes to Avoid

Even the simplest recipes can go wrong if you’re not careful. Here are a few common mistakes to watch out for:

  • Overdressing the Salad: This can make the salad soggy and overwhelm the other flavors.
  • Using Wilted Spinach: Fresh, crisp spinach is essential for a good salad. Avoid using spinach that is wilted or slimy.
  • Skipping the Red Onion: The red onion adds a wonderful sharpness and complexity to the salad. Don’t be afraid to use it! Just make sure to slice it thinly.
  • Using Pre-Shredded Cheese: Pre-shredded cheese often contains cellulose, which can prevent it from melting properly. For the best flavor and texture, use a block of feta and crumble it yourself.
  • Forgetting to Season: Salt and pepper are essential for bringing out the flavors of the salad. Don’t forget to season the dressing to your liking.

Variations: Make it Your Own!

One of the best things about this salad is how easily you can customize it. Here are a few ideas to get you started:

  • Add Protein: Grilled chicken, shrimp, chickpeas, or lentils would all be delicious additions.
  • Swap the Cheese: Goat cheese, blue cheese, or even a vegan feta alternative would work well.
  • Add Other Fruits: Blueberries, raspberries, or blackberries would be a lovely addition.
  • Try Different Nuts: Pecans, almonds, or sunflower seeds would be a great alternative to walnuts.
  • Add Some Greens: Arugula, kale, or mixed greens would add a different flavor profile.

Storage Tips: Keeping it Fresh

This salad is best enjoyed immediately, but if you have leftovers, here’s how to store them:

  • Store the Dressing Separately: If you’re not planning on eating the entire salad right away, store the dressing in a separate container. This will prevent the spinach from getting soggy.
  • Keep it in the Fridge: Store the salad and dressing in the refrigerator for up to 24 hours.
  • Don’t Freeze: This salad does not freeze well.

Frequently Asked Questions

Here are some common questions I get about this recipe:

  • Can I make this salad ahead of time? I recommend making the dressing ahead of time, but assembling the salad just before serving.
  • Can I use frozen strawberries? Fresh strawberries are best, but you can use frozen strawberries in a pinch. Just make sure to thaw them completely and drain off any excess liquid.
  • Can I make this salad vegan? Yes! Simply omit the feta cheese or use a vegan feta alternative.
  • How long will the dressing last? The dressing will last for up to a week in the refrigerator.
  • Is this salad gluten-free? Yes, this salad is naturally gluten-free.

Serving Suggestions: Complete the Meal

This Balsamic Strawberry Spinach Salad is delicious on its own, but it also pairs well with a variety of other dishes. Here are a few ideas:

  • Grilled Chicken or Fish: This salad makes a perfect side dish for grilled chicken or fish.
  • Sandwiches or Wraps: Add a scoop of this salad to your favorite sandwich or wrap for a healthy and flavorful lunch.
  • Soup: This salad is a great complement to a warm bowl of soup.
  • Pizza: Believe it or not, this salad is surprisingly delicious with pizza! The sweetness of the strawberries and the tanginess of the balsamic vinegar help to balance out the richness of the cheese and toppings.

And there you have it, friends! My go-to Balsamic Strawberry Spinach Salad recipe. I hope you love it as much as I do. Remember, cooking should be a joyful and nourishing experience. Don’t be afraid to experiment, have fun, and most importantly, listen to your body. Until next time, happy cooking!

If you give this salad a try, be sure to let me know what you think in the comments below! I love hearing from you.

This salad is truly a testament to how simple ingredients, when combined thoughtfully, can create something truly special. I love how the flavors dance together, the sweetness of the strawberries perfectly complementing the tang of the balsamic. The olive oil adds a richness, while the feta brings a salty, creamy element to the mix. Together the flavors create an experience that is both refreshing and satisfying.

When I first started making this salad, I was amazed at how easy it was to prepare. It’s the perfect dish for a quick lunch or a light dinner, and it’s always a crowd-pleaser. The balsamic vinegar is the key to the dressing, providing a depth of flavor that is both complex and delicious. The honey adds a touch of sweetness, balancing out the acidity of the balsamic.

For up to a week, you can keep the dressing in the fridge, making it even easier to whip up this salad on a moment’s notice. The combination of spinach and strawberries is not only delicious but also incredibly nutritious. This salad is packed with vitamins, minerals, and antioxidants, making it a healthy and satisfying meal.

If you are looking for a simple yet elegant salad that is both healthy and delicious, look no further. This Balsamic Strawberry Spinach Salad is the perfect choice. The salad is a symphony of flavors and textures that will leave you feeling refreshed and energized.

Balsamic Strawberry Spinach Salad

Prep Time 15 minutes
Total Time 15 minutes
Servings 4 servings
Calories 220
A refreshing and vibrant salad combining fresh spinach, sweet strawberries, and tangy balsamic dressing. Perfect as a light lunch or side dish.

Ingredients

Salad

  • 4 cups fresh spinach (washed and dried)
  • 2 cups strawberries (hulled and sliced)
  • 1/2 red onion (thinly sliced)
  • 1/4 cup feta cheese (crumbled)
  • 1/4 cup walnuts (chopped)

Dressing

  • 1/4 cup balsamic vinegar
  • 1/4 cup olive oil
  • 1 tablespoon honey
  • to taste Salt and pepper

Instructions 

  • Combine spinach, strawberries, red onion, feta, and walnuts in a bowl. Toss gently.
  • Whisk balsamic vinegar, olive oil, honey, salt, and pepper in a small bowl.
  • Drizzle dressing over salad and toss lightly. Serve immediately.

Notes

For a vegan option, omit the feta cheese or substitute with a plant-based alternative.
Calories: 220kcal
Cost: $8
Course: Salad
Cuisine: Mediterranean
Keyword: Spinach

Nutrition

Calories: 220kcal | Carbohydrates: 18g | Protein: 5g | Fat: 15g | Sodium: 150mg
pin

Hello, friend! Avery here, from my little kitchen in Portland. Let’s talk about mornings. Specifically, those mornings when you need something quick, healthy, and utterly soul-satisfying. That’s where this Easy Creamy Avocado Toast With Egg comes in. It’s more than just a trend; it’s a ritual, a tiny act of self-care that sets the tone for your entire day. I’ve been making this for years, tweaking it here and there, until I landed on what I truly believe is the best avocado toast recipe.

Why You’ll Love This Avocado Toast

Trust me; this isn’t your average avocado toast. This is your avocado toast, elevated. It’s a protein-packed breakfast that’s ready in minutes, making it perfect for busy weekdays or lazy weekend brunches. Here’s why you’ll keep coming back to this recipe:

  • Quick & Easy: From start to finish, this takes less than 10 minutes.
  • Healthy Fats: The creamy avocado provides healthy fats to keep you full and energized.
  • Customizable: Add your favorite toppings to make it your own.
  • Delicious: The combination of creamy avocado, perfectly cooked egg, and crusty bread is simply irresistible.

It’s the creamy texture of the avocado, the richness of the egg yolk, and the satisfying crunch of the toast that makes this so special. It’s a simple pleasure, but those are often the most meaningful, aren’t they?

Ingredients For The Best Avocado Toast

Here’s what you’ll need to create this morning masterpiece:

  • ‘2 slices sturdy bread (sourdough or whole grain)’
  • ‘1 tablespoon olive oil (for brushing bread)’
  • ‘1 medium ripe avocado’
  • ‘1 tablespoon fresh lemon juice (to prevent browning)’
  • ‘1/4 teaspoon salt (to taste)’
  • ‘2 large eggs (fresh)’
  • ‘1 teaspoon butter or oil (for frying)’
  • ‘1 pinch chili flakes (for heat)’
  • ‘1 tablespoon fresh herbs (cilantro, parsley, chives) (finely chopped)’
  • ‘to taste cracked black pepper (for seasoning)’
Recipe Image

How to Make Avocado Toast With Egg: Step-by-Step

Let’s get cooking! Here’s how to make the perfect avocado toast with egg:

  1. Toast the Bread: Brush both sides of the bread with olive oil and toast in a pan or toaster until golden brown and crispy.
  2. Prepare the Avocado: While the bread is toasting, halve the avocado, remove the pit, and scoop the flesh into a bowl.
  3. Mash the Avocado: Add lemon juice and salt to the avocado. Mash with a fork until creamy but still slightly chunky. This is your avocado spread.
  4. Fry the Egg: Heat butter or oil in a non-stick pan over medium heat. Crack the eggs into the pan and cook to your liking. For a runny yolk, cook for about 2-3 minutes.
  5. Assemble the Toast: Spread the mashed avocado evenly over the toasted bread.
  6. Top with Egg: Carefully place the fried egg on top of the avocado toast.
  7. Garnish: Sprinkle with chili flakes, fresh herbs, and cracked black pepper.
  8. Serve Immediately: Enjoy your delicious avocado toast with egg!

Pro Tips for Perfect Avocado Toast

Here are a few secrets I’ve learned over the years to make your avocado toast truly exceptional:

  • Ripe Avocado is Key: Make sure the avocado is ripe but not overly soft. It should yield to gentle pressure. This is important for achieving the creamy texture.
  • Don’t Skip the Lemon Juice: Lemon juice not only adds flavor but also prevents the avocado from browning quickly.
  • Use Good Quality Bread: Sturdy bread like sourdough or whole grain will hold up better under the weight of the avocado and egg.
  • Toast it Right: Toasting the bread with olive oil adds flavor and ensures a crispy base.
  • Season Generously: Don’t be afraid to season your avocado with salt, pepper, and any other spices you enjoy.

Common Mistakes to Avoid

Even something as simple as avocado toast can go wrong. Here are a few common mistakes to watch out for:

  • Using Unripe Avocado: This will result in a hard, flavorless toast.
  • Over-mashing the Avocado: You want some texture, not a completely smooth paste.
  • Soggy Toast: Make sure your bread is toasted enough to prevent it from getting soggy.
  • Bland Seasoning: Under-seasoning is a common mistake. Taste as you go and adjust accordingly.
  • Overcooking the Egg: For that perfect runny yolk, keep a close eye on the egg while it’s frying.

Avocado Toast Variations to Try

The beauty of avocado toast is its versatility. Here are some fun variations to try:

  • Everything Bagel Seasoning: Sprinkle everything bagel seasoning on top for added flavor and texture.
  • Smoked Salmon: Add a slice of smoked salmon for a protein boost and a touch of elegance.
  • Feta Cheese: Crumble feta cheese over the avocado for a salty, tangy twist.
  • Tomato & Basil: Top with sliced tomatoes and fresh basil for a Mediterranean-inspired toast.
  • Spicy Avocado Toast: Add a dash of hot sauce or a sprinkle of red pepper flakes for extra heat.

How to Store Leftover Avocado

If you have leftover mashed avocado, here’s how to store it to prevent browning:

  • Airtight Container: Place the avocado in an airtight container.
  • Lemon Juice: Add a little extra lemon juice on top.
  • Press Plastic Wrap: Press plastic wrap directly onto the surface of the avocado.
  • Refrigerate: Store in the refrigerator for up to 24 hours.

To keep your avocado toast ingredients fresh, store your bread in a bread box or an airtight container to keep it from going stale. The creamy avocado spread can be stored in an airtight container for up to a day, but it’s best when fresh. Remember, the egg isn’t suitable for storage after it’s cooked.

Frequently Asked Questions (FAQ)

Here are some common questions about making avocado toast:

  • Can I make avocado toast ahead of time? While you can mash the avocado ahead of time, it’s best to assemble the toast just before serving to prevent the bread from getting soggy.
  • How do I know if my avocado is ripe? A ripe avocado will yield to gentle pressure. It shouldn’t be too hard or too soft.
  • Can I use frozen avocado? While you can use frozen avocado, it won’t have the same creamy texture as fresh avocado.
  • What kind of bread is best for avocado toast? Sturdy bread like sourdough or whole grain works best.
  • Can I add other toppings to my avocado toast? Absolutely! Get creative and add your favorite toppings.

Serving Suggestions

This avocado toast is delicious on its own, but here are some serving suggestions to make it a complete meal:

  • Side Salad: Serve with a side salad for a light and refreshing lunch.
  • Soup: Pair with a bowl of soup for a comforting and satisfying meal.
  • Fruit Salad: Serve with a fruit salad for a healthy and balanced breakfast.
  • Smoothie: Enjoy with a smoothie for a quick and easy breakfast on the go.

So there you have it! Easy Creamy Avocado Toast With Egg – a simple, healthy, and delicious way to start your day. I hope you enjoy it as much as I do! Remember, healthy eating isn’t about perfection; it’s about finding joy in the process and nourishing your body with wholesome ingredients. Happy cooking!

Easy Creamy Avocado Toast With Egg That Brightens Your Morning

Prep Time 5 minutes
Cook Time 5 minutes
Total Time 10 minutes
Servings 2 servings
Calories 350
Start your day with this delicious and easy avocado toast topped with a perfectly cooked egg. It's a quick and nutritious breakfast that will keep you satisfied.

Ingredients

Toast

  • 2 slices sturdy bread (sourdough or whole grain)
  • 1 tablespoon olive oil (for brushing bread)

Avocado

  • 1 medium ripe avocado
  • 1 tablespoon fresh lemon juice (to prevent browning)
  • 1/4 teaspoon salt (to taste)

Egg

  • 2 large eggs (fresh)
  • 1 teaspoon butter or oil (for frying)

Garnish

  • 1 pinch chili flakes (for heat)
  • 1 tablespoon fresh herbs (cilantro, parsley, chives) (finely chopped)
  • to taste cracked black pepper (for seasoning)

Notes

For extra flavor, try adding a sprinkle of everything bagel seasoning.
Calories: 350kcal
Cost: $8
Course: Breakfast, Brunch
Cuisine: American
Keyword: Avocado, Egg

Nutrition

Calories: 350kcal | Carbohydrates: 25g | Protein: 15g | Fat: 22g | Sodium: 400mg
pin

Error: AI returned broken format. Invalid \escape: line 2 column 2530 (char 2531)

Recipe Image

Green Goddess Chicken Salad

Prep Time 15 minutes
Total Time 15 minutes
Servings 4 servings
Calories 450
A vibrant and flavorful chicken salad featuring a creamy green goddess dressing. Perfect for a light lunch or a refreshing snack.

Ingredients

Dressing

  • 1/2 cup mayonnaise
  • 1/2 cup Greek yogurt
  • 1/4 cup milk
  • 1/4 cup packed spinach
  • 1/4 cup torn fresh basil (plus some for garnish)
  • 1/4 cup fresh parsley (chopped, plus some for garnish)
  • 1 clove garlic
  • 1 Zest of 1 lemon
  • Kosher salt and freshly ground black pepper

Salad

  • 3 cups cubed rotisserie chicken
  • 2 cups green grapes
  • 1/2 cup chopped walnuts
  • 3 scallions (sliced)
  • 1 small cucumber (diced)

Serving

  • lettuce leaves, bread or wraps (Serving suggestions)

Instructions 

  • Blend dressing ingredients until smooth; adjust seasoning.
  • Combine salad ingredients, add dressing, and toss. Garnish and serve.

Notes

For a tangier flavor, add a squeeze of lemon juice to the dressing.
Calories: 450kcal
Cost: $18
Course: Dinner, Lunch
Cuisine: American
Keyword: chicken

Nutrition

Calories: 450kcal | Carbohydrates: 25g | Protein: 35g | Fat: 25g | Sodium: 300mg
pin

Hey there, friend! Avery Collins here, coming to you from my cozy kitchen in Portland, where it’s probably raining (but smelling wonderfully of rosemary, as always). Today, I’m beyond excited to share one of my absolute favorite feel-good recipes: Green Goddess Chicken Salad with Crunchy Quinoa. This isn’t just a salad; it’s a vibrant, nourishing hug in a bowl, packed with flavor and guaranteed to leave you feeling fantastic.

My journey to this recipe started years ago when I realized I needed to prioritize my health. I was tired of feeling sluggish and disconnected from what I was eating. This salad, in many ways, represents my commitment to finding joy and vitality through simple, wholesome ingredients. I hope it brings the same to you!

Why You’ll Love This Green Goddess Chicken Salad

Seriously, where do I even begin? This salad is more than just the sum of its parts. It’s a symphony of textures and tastes that will make your taste buds sing. But beyond the deliciousness, here’s why I think you’ll really fall in love with it:

  • It’s packed with nutrients: This salad is bursting with vitamins, minerals, and antioxidants from the greens, cucumber, avocado, and quinoa. It’s a nutritional powerhouse that will fuel your body and keep you feeling your best.
  • It’s incredibly flavorful: The creamy, herbaceous Green Goddess dressing perfectly complements the savory chicken and the nutty, crunchy quinoa. Every bite is an explosion of taste.
  • It’s satisfying and filling: Thanks to the protein from the chicken and the fiber from the quinoa and vegetables, this salad will keep you feeling full and satisfied for hours. No more mid-afternoon energy crashes!
  • It’s customizable: Feel free to swap out ingredients based on your preferences and what you have on hand. This salad is a blank canvas for your culinary creativity.
  • It’s perfect for meal prep: This salad holds up well in the fridge, making it ideal for meal prepping lunches or dinners for the week. You can even make the components separately and assemble them just before serving.

This salad with crunchy quinoa is a game changer. The creamy green goddess dressing is the star, perfectly coating the chicken and vegetables. If you are looking for a healthy, vibrant, and delicious meal, you’re in the right place!

Ingredients for Green Goddess Chicken Salad

Here’s what you’ll need to create this masterpiece. Don’t be intimidated by the list; most of these are staples you probably already have. And remember, feel free to adapt to what you have on hand. The most important thing is to use fresh, high-quality ingredients that you love.

  • 2 lbs. organic chicken breasts
  • 2 Tbsps Extra virgin olive oil
  • 1 tsp sea salt
  • 1 tsp black pepper
  • 1 tsp smoked paprika
  • 1 tsp Italian seasoning
  • 2 bunches Your favorite greens, roughly chopped (I used kale and baby lettuce)
  • 1 organic cucumber, peeled + chopped
  • 1 green tomato, diced
  • 2 cups crispy Lemon Herb Quinoa
  • 1 Haas avocado, pitted, + chopped into chunks
  • 1 cup freshly-grated parmesan
  • 1-2 cups Green goddess dressing
Recipe Image

How to Make Green Goddess Chicken Salad

Alright, let’s get cooking! Here’s a step-by-step guide to creating this delicious and healthy Green Goddess Chicken Salad. Don’t worry, it’s easier than it looks!

  1. Prepare the Chicken: Preheat your oven to 400°F (200°C). In a bowl, toss the chicken breasts with olive oil, sea salt, black pepper, smoked paprika, and Italian seasoning. Arrange the chicken on a baking sheet and bake for 20-25 minutes, or until cooked through. Let cool slightly, then shred or dice the chicken.
  2. Assemble the Salad: In a large bowl, combine the chopped greens, cucumber, green tomato, crispy Lemon Herb Quinoa, and avocado.
  3. Add the Chicken: Add the shredded or diced chicken to the salad bowl.
  4. Dress the Salad: Pour the Green Goddess dressing over the salad. Start with 1 cup and add more to taste, if needed. Gently toss everything together to ensure the dressing is evenly distributed.
  5. Garnish and Serve: Sprinkle the freshly-grated parmesan over the salad. Serve immediately and enjoy!

It’s that simple! Thisgreen goddess chicken salad is ready to be devoured.

Pro Tips for the Best Green Goddess Chicken Salad

Want to take your Green Goddess Chicken Salad to the next level? Here are a few of my favorite pro tips:

  • Use high-quality chicken: The better the chicken, the better the salad. Opt for organic, free-range chicken breasts for the best flavor and texture.
  • Don’t overcook the chicken: Overcooked chicken is dry and tough. Use a meat thermometer to ensure the chicken is cooked to a safe internal temperature of 165°F (74°C).
  • Make your own Green Goddess dressing: While store-bought dressing is convenient, homemade Green Goddess dressing is so much more flavorful and vibrant. Plus, you can control the ingredients and avoid any unwanted additives. There are tons of recipes online, so find one that suits your taste.
  • Toast the quinoa: Toasting the quinoa before cooking it adds a nutty, toasty flavor that elevates the entire salad. Simply toast the quinoa in a dry skillet over medium heat for a few minutes, until fragrant and lightly browned.
  • Don’t dress the salad too far in advance: The dressing can make the greens soggy if added too early. Wait until just before serving to dress the salad.

Common Mistakes to Avoid

Even the most experienced cooks make mistakes. Here are a few common pitfalls to avoid when making Green Goddess Chicken Salad:

  • Using soggy greens: Make sure your greens are thoroughly washed and dried before adding them to the salad. Soggy greens will make the salad watery and unappetizing.
  • Overdressing the salad: Too much dressing can overwhelm the other flavors and make the salad heavy. Start with a small amount of dressing and add more to taste.
  • Skipping the quinoa: The crunchy quinoa adds a unique texture and flavor that really makes this salad special. Don’t skip it!
  • Using unripe avocado: An unripe avocado will be hard and flavorless. Make sure your avocado is ripe and creamy for the best results.

Variations on Green Goddess Chicken Salad

One of the best things about this salad is how easy it is to customize. Here are a few ideas to get you started:

  • Add different vegetables: Try adding roasted bell peppers, cherry tomatoes, shredded carrots, or sliced radishes.
  • Swap the protein: Use grilled shrimp, baked tofu, or chickpeas instead of chicken.
  • Add some fruit: Add some sweetness with diced apples, grapes, or pomegranate seeds.
  • Make it spicy: Add a pinch of red pepper flakes or a drizzle of hot sauce.
  • Add some crunch: Try adding toasted nuts, seeds, or croutons.

If you’re feeling adventurous, you can even experiment with different types of greens. Spinach, arugula, and romaine lettuce all work well in this salad. The possibilities are endless!

How to Store Green Goddess Chicken Salad

This salad is best enjoyed fresh, but it can be stored in the refrigerator for up to 2 days. Store the salad in an airtight container to prevent the greens from wilting. If possible, store the dressing separately and add it just before serving. The dressing will keep for up to 5 days in the refrigerator.

Frequently Asked Questions (FAQ)

  • Can I make this salad ahead of time? Yes, you can prepare the components of the salad ahead of time and assemble it just before serving. The chicken can be cooked and shredded up to 2 days in advance, and the quinoa can be cooked and stored in the refrigerator for up to 3 days.
  • Can I freeze this salad? I don’t recommend freezing this salad, as the greens and avocado will become mushy when thawed.
  • Is this salad gluten-free? Yes, this salad is naturally gluten-free, as long as you use gluten-free quinoa.
  • Is this salad dairy-free? To make this salad dairy-free, simply omit the parmesan cheese or use a dairy-free alternative.
  • Can I use store-bought Green Goddess dressing? Yes, you can use store-bought Green Goddess dressing, but homemade is always best.

Serving Suggestions

This Green Goddess Chicken Salad is delicious on its own as a light lunch or dinner. But if you’re looking to make it a more substantial meal, here are a few serving suggestions:

  • Serve it with a side of crusty bread: Perfect for soaking up all that delicious Green Goddess dressing.
  • Wrap it in a tortilla: For a quick and easy lunch on the go.
  • Serve it over a bed of rice or pasta: For a heartier meal.
  • Add a side of roasted vegetables: For an extra boost of nutrients.

The goddess chicken salad is versatile and satisfying. This salad is perfect for a light lunch, a satisfying dinner, or even a potluck. It’s a crowd-pleaser that everyone will love. And the best part? It’s good for you too!

So there you have it, friend! My Green Goddess Chicken Salad with Crunchy Quinoa. I hope you give it a try and that it brings as much joy to your kitchen as it has to mine. Remember, cooking should be fun and nourishing, not stressful. Embrace the process, experiment with flavors, and most importantly, enjoy the delicious results. Happy cooking!

Green Goddess Chicken Salad with Crunchy Quinoa

Prep Time 20 minutes
Cook Time 25 minutes
Total Time 45 minutes
Servings 6 servings
Calories 450
A vibrant and flavorful chicken salad featuring a creamy green goddess dressing and crunchy quinoa. This recipe is packed with fresh greens, vegetables, and healthy fats, making it a satisfying and nutritious meal.

Ingredients

Chicken

  • 2 lbs. organic chicken breasts

Seasoning

  • 2 Tbsps Extra virgin olive oil
  • 1 tsp sea salt
  • 1 tsp black pepper
  • 1 tsp smoked paprika
  • 1 tsp Italian seasoning

Salad

  • 2 bunches Your favorite greens, roughly chopped (I used kale and baby lettuce)
  • 1 organic cucumber, peeled + chopped
  • 1 green tomato, diced
  • 2 cups crispy Lemon Herb Quinoa
  • 1 Haas avocado, pitted, + chopped into chunks
  • 1 cup freshly-grated parmesan
  • 1-2 cups Green goddess dressing

Notes

Adjust the amount of green goddess dressing to your liking. For a vegetarian option, omit the chicken and add chickpeas or white beans.
Calories: 450kcal
Cost: $25
Course: Dinner, Lunch
Cuisine: American
Keyword: chicken

Nutrition

Calories: 450kcal | Carbohydrates: 30g | Protein: 40g | Fat: 22g | Sodium: 500mg
pin

Hello, friends! Avery here, from my little kitchen in rainy Portland. Today, I’m so excited to share a recipe that’s become a staple in my life, especially as the days get longer and the sun (eventually!) peeks through the clouds: my go-to Strawberry Spinach Salad. This isn’t just any salad; it’s a vibrant celebration of fresh flavors and textures, a little burst of sunshine in every bite.

Like many good things in my life, this salad came about from a desire to feel better. Remember those days of takeout dinners and feeling utterly depleted? Yeah, me too. This salad? It’s the antidote to all of that. It’s quick, it’s easy, and most importantly, it makes me feel good from the inside out. I hope it does the same for you!

Why You’ll Love This Strawberry Spinach Salad

Honestly, there are so many reasons to adore this salad. It’s more than just a collection of ingredients; it’s an experience. Here’s why I think you’ll fall in love:

  • Fresh & Flavorful: The combination of sweet strawberries, tangy feta, and savory bacon is simply divine. It’s a party in your mouth!
  • Quick & Easy: From start to finish, this salad comes together in under 15 minutes. Perfect for busy weeknights or a last-minute potluck.
  • Healthy & Nourishing: Packed with vitamins, minerals, and antioxidants, this salad is a nutritional powerhouse. Baby spinach provides iron and vitamins, while strawberries are loaded with vitamin C.
  • Versatile: This salad is incredibly adaptable. Feel free to swap out ingredients based on what you have on hand or your personal preferences. More on variations later!
  • Perfect for Any Occasion: Whether you’re hosting a barbecue, packing a picnic lunch, or simply looking for a light and refreshing meal, this salad fits the bill. It’s a guaranteed crowd-pleaser at picnics.

I’m telling you, this salad is a winner. It’s one of those salads you can throw together without much thought, and it always impresses. It is truly a simple yet elegant dish.

Strawberry Spinach Salad Ingredients

Here’s what you’ll need to create this delightful Strawberry Spinach Salad:

  • 5 cups baby spinach: The base of our salad, providing a mild, slightly sweet flavor.
  • 1 pint strawberries (sliced, about 2 cups): The star of the show! Choose ripe, juicy strawberries for the best flavor.
  • 1 cup thinly sliced red onion: Adds a bit of bite and visual appeal.
  • ¾ cup crumbled feta cheese: Provides a salty, tangy counterpoint to the sweetness of the strawberries.
  • ½ cup cooked and crumbled turkey bacon: Adds a smoky, savory element. Feel free to use regular bacon if you prefer!
  • ¼ cup olive oil: The base of our simple, yet delicious dressing.
  • 3 Tbsp balsamic vinegar: Adds acidity and depth of flavor to the dressing. Maple balsamic is also an amazing choice!
  • 2 tsp maple syrup (or honey): A touch of sweetness to balance the acidity of the vinegar.
  • 1 tsp Dijon mustard: Adds a bit of tang and helps emulsify the dressing.
  • ¼ tsp salt: Enhances the flavors of all the ingredients.
  • ⅛ tsp ground black pepper: Adds a touch of spice.
Recipe Image

How to Make Strawberry Spinach Salad: Step-by-Step Instructions

Making this salad is a breeze. Here’s how it’s done:

  1. Make the Dressing: In a small bowl, whisk together the olive oil, balsamic vinegar, maple syrup, Dijon mustard, salt, and pepper. Whisk until well combined. The dressing is the key to this salad, so don’t skip this step!
  2. Combine the Salad Ingredients: In a large salad bowl, combine the spinach, strawberries, red onion, feta, and turkey bacon.
  3. Dress and Serve: Drizzle the dressing overtop just before serving and gently toss to coat. Serve immediately.

That’s it! Seriously, it’s that easy. This strawberry spinach salad is so easy to make, I sometimes wonder why I ever bothered with those complicated recipes back in the day.

Pro Tips for the Best Strawberry Spinach Salad

Here are a few extra tips to take your Strawberry Spinach Salad to the next level:

  • Use Fresh, High-Quality Ingredients: The better the ingredients, the better the salad will taste. Opt for ripe, juicy strawberries and fresh, vibrant spinach.
  • Don’t Overdress the Salad: Add the dressing just before serving to prevent the spinach from wilting. No one likes a soggy salad!
  • Toast Your Nuts: If you’re adding nuts (like toasted pecans or almonds), toast them lightly in a dry skillet to enhance their flavor and add a bit of crunch.
  • Chill Your Strawberries: Chilling the strawberries before slicing them can help them hold their shape and prevent them from becoming too soft.
  • Make the Dressing Ahead of Time: The dressing can be made up to a week in advance and stored in the refrigerator. This is a great time-saver if you’re prepping for a party or gathering.

Common Mistakes to Avoid

Even though this recipe is simple, here are a few common mistakes to watch out for:

  • Using Overripe Strawberries: Overripe strawberries can be mushy and detract from the overall texture of the salad. Choose strawberries that are firm and bright red.
  • Adding Too Much Red Onion: Red onion can be overpowering if used in excess. Thinly slice the red onion and use it sparingly, or soak it in cold water for a few minutes to mellow out its flavor.
  • Dressing the Salad Too Early: As mentioned earlier, dressing the salad too early can cause the spinach to wilt. Wait until just before serving to add the dressing.
  • Skipping the Salt: Salt is essential for bringing out the flavors of all the ingredients. Don’t be afraid to season the dressing and the salad itself.

I’m telling you, the dressing separately is a game changer. It keeps the salad fresh and vibrant until you’re ready to serve.

Strawberry Spinach Salad Variations

One of the things I love most about this salad is how easily it can be customized. Here are a few variations to try:

  • Add Nuts: Toasted pecans, almonds, or walnuts add a delicious crunch and nutty flavor.
  • Swap the Cheese: If you’re not a fan of feta, try goat cheese, blue cheese, or even mozzarella.
  • Add Avocado: Sliced avocado adds creaminess and healthy fats.
  • Make it Vegan: Omit the bacon and feta, and use maple syrup in the dressing to make this salad vegan-friendly. You can also add some toasted sunflower seeds for extra crunch and protein.
  • Grilled Chicken or Shrimp: Add grilled chicken or shrimp for a heartier meal.
  • Different Fruits: Add blueberries, raspberries, or blackberries for a mixed berry salad.

If you’re looking for healthy barbecue side dishes, this salad is a great choice! It’s also a fantastic option for strawberry lunch ideas. This salad both are a crowd-pleaser.

How to Store Strawberry Spinach Salad

This salad is best enjoyed immediately, but if you have leftovers, here’s how to store them:

  • Store the Salad and Dressing Separately: This is crucial to prevent the spinach from wilting. Store the salad in an airtight container in the refrigerator.
  • Store the Dressing in a Separate Container: Keep the dressing in a jar or airtight container in the refrigerator.
  • Consume Within 1-2 Days: The salad is best consumed within 1-2 days for optimal freshness.

If you’re making this salad for a crowd, consider prepping the ingredients ahead of time and assembling the salad just before serving. This will ensure that it stays fresh and vibrant.

Frequently Asked Questions (FAQ)

  • Can I make this salad ahead of time? It’s best to assemble the salad just before serving to prevent the spinach from wilting. However, you can make the dressing ahead of time and store it in the refrigerator.
  • Can I use frozen strawberries? Fresh strawberries are recommended for the best flavor and texture. Frozen strawberries can be used in a pinch, but be sure to thaw them completely and drain any excess liquid before adding them to the salad.
  • Can I use a different type of vinegar? Yes! Apple cider vinegar or red wine vinegar would also work well in this dressing.
  • Is this salad gluten-free? Yes, this salad is naturally gluten-free.
  • How can I make this salad more filling? Add grilled chicken, shrimp, or tofu for extra protein. You can also add quinoa or farro for a heartier salad.

Serving Suggestions

This Strawberry Spinach Salad is delicious on its own, but it also pairs well with a variety of dishes. Here are a few serving suggestions:

  • Grilled Chicken or Fish: Serve alongside grilled chicken or fish for a complete and healthy meal.
  • Sandwiches or Wraps: This salad makes a great side dish for sandwiches or wraps.
  • Soup: Pair with a light soup, such as tomato soup or vegetable soup, for a satisfying lunch.
  • Barbecue: Bring this salad to your next barbecue as a refreshing and healthy side dish.
  • Potluck: This salad is always a hit at potlucks and gatherings.

And there you have it! My go-to Strawberry Spinach Salad recipe. I hope you love it as much as I do. Remember, cooking should be fun and nourishing. Don’t be afraid to experiment and make this recipe your own. If you re looking for a salad both healthy and delicious, this is it!

Happy cooking, friends! And remember, even on the rainiest days, there’s always room for a little bit of sunshine on your plate. This salad is a colorful fruit and vegetable salad that brightens any day.

Strawberry Spinach Salad

Prep Time 15 minutes
Cook Time 5 minutes
Total Time 20 minutes
Servings 4 servings
Calories 250
A refreshing and healthy salad combining the sweetness of strawberries with the earthy flavor of spinach. Perfect as a light lunch or side dish.

Ingredients

Salad

  • 5 cups baby spinach
  • 1 pint strawberries (sliced (about 2 cups))
  • 1 cup thinly sliced red onion
  • 0.75 cup crumbled feta cheese
  • 0.5 cup cooked and crumbled turkey bacon

Dressing

  • 0.25 cup olive oil
  • 3 Tbsp balsamic vinegar
  • 2 tsp maple syrup (or honey)
  • 1 tsp Dijon mustard
  • 0.25 tsp salt
  • 0.125 tsp ground black pepper

Instructions 

  • Whisk together dressing ingredients in a small bowl.
  • Combine spinach, strawberries, red onion, feta, and turkey bacon in a large bowl.
  • Drizzle dressing over salad, toss gently, and serve immediately.

Notes

Add grilled chicken or nuts for extra protein and crunch.
Calories: 250kcal
Cost: $12
Course: Salad
Cuisine: American
Keyword: Spinach

Nutrition

Calories: 250kcal | Carbohydrates: 15g | Protein: 12g | Fat: 18g | Sodium: 400mg
pin

Hey there, friend! Avery here, from my little kitchen in rainy Portland. Today, I want to share a recipe that’s become a real staple in my house: Creamy Lemon Shrimp Pasta. It’s quick, it’s easy, and it’s absolutely bursting with flavor. Think sunshine in a bowl, even on the grayest days. This dish came about during one of those weeks where I was craving comfort but didn’t want to spend hours slaving away in the kitchen. And let me tell you, it’s a winner!

Why You’ll Love This Creamy Lemon Shrimp Pasta

Honestly, what’s not to love? This isn’t just another pasta recipe; it’s a hug in a bowl. It’s the kind of meal that makes you feel good from the inside out. But here’s why I think you’ll really adore it:

  • Quick and Easy: From start to finish, this dish is ready in about 30 minutes. Perfect for busy weeknights!
  • Flavor Explosion: The combination of lemon, garlic, and shrimp is simply divine. The creamy sauce ties everything together beautifully. The taste and texture are perfectly balanced.
  • Versatile: You can easily customize this recipe to suit your taste. Swap out the shrimp for chicken or veggies, use different types of pasta, or add a touch of spice. The possibilities are endless!
  • Comfort Food with a Healthy Twist: While it feels indulgent, this pasta is packed with protein and nutrients. It’s a satisfying meal that won’t leave you feeling guilty.

The Star Ingredients

Let’s talk about what makes this pasta so special. It all starts with simple, fresh ingredients. Here’s what you’ll need:

  • Shrimp: I prefer using large or jumbo shrimp, peeled and deveined. Fresh or frozen (thawed) both work great.
  • Pasta: Linguine and fettuccine are my go-to choices, but you can use any pasta you like. Spaghetti, penne, or even gluten-free pasta will work just fine.
  • Heavy Cream: This is what gives the sauce its luxurious creaminess. If you’re looking for a lighter option, you can use half-and-half or even coconut milk.
  • Parmesan Cheese: Freshly grated Parmesan adds a salty, nutty flavor that complements the lemon and shrimp perfectly.
  • Lemon Juice: Freshly squeezed lemon juice is a must! It adds a bright, zesty flavor that cuts through the richness of the cream.
  • Olive Oil: Extra virgin olive oil is my favorite for cooking. It adds a subtle fruity flavor to the dish.
  • Garlic: Minced garlic is essential for adding depth and aroma to the sauce.
  • Red Pepper Flakes: A pinch of red pepper flakes adds a touch of heat that balances the richness of the cream. This is optional, but highly recommended!
  • Salt and Pepper: To taste. Don’t be afraid to season generously!
  • Fresh Parsley: Chopped fresh parsley adds a pop of color and freshness to the finished dish.

Full Ingredient List:

  • 1 pound shrimp, peeled and deveined
  • 1 pound pasta (linguine or fettuccine)
  • 1/2 cup heavy cream
  • 1/4 cup grated Parmesan cheese
  • 1/4 cup lemon juice
  • 2 tablespoons olive oil
  • 2 cloves garlic, minced
  • 1/4 teaspoon red pepper flakes (optional)
  • Salt and pepper to taste
  • Fresh parsley, chopped (for garnish)
Recipe Image

Step-by-Step: Making the Magic Happen

Alright, let’s get cooking! Here’s how to make this delicious Creamy Lemon Shrimp Pasta:

  1. Cook the pasta: Bring a large pot of salted water to a boil. Add the pasta and cook according to package directions. Reserve 1 cup of pasta water before draining. The pasta of your choice will work great here!
  2. Sauté the garlic and red pepper flakes: While the pasta is cooking, heat olive oil in a large skillet over medium heat. Add garlic and red pepper flakes (if using) to the skillet and cook for about 30 seconds, until fragrant. Be careful not to burn the garlic!
  3. Cook the shrimp: Add shrimp to the skillet and cook for 2-3 minutes per side, until pink and cooked through. It’s important not to overcook the shrimp, or it will become rubbery. Remove shrimp from the skillet and set aside.
  4. Make the sauce: Pour heavy cream and lemon juice into the skillet and bring to a simmer. Stir in Parmesan cheese and season with salt and pepper to taste. If the sauce is too thick, add some of the reserved pasta water until it reaches your desired consistency. The sauce should be creamy and luscious.
  5. Combine everything: Add the cooked pasta and shrimp to the skillet and toss to coat. Make sure the pasta is evenly coated in the sauce.
  6. Garnish and serve: Garnish with fresh parsley and serve immediately.

Avery’s Pro Tips for Perfect Pasta

Over the years, I’ve learned a few tricks that can take this dish from good to great. Here are some of my favorite pro tips:

  • Don’t overcook the shrimp: Overcooked shrimp is tough and rubbery. Cook it just until it’s pink and opaque.
  • Use freshly squeezed lemon juice: Bottled lemon juice just doesn’t have the same bright, zesty flavor.
  • Reserve pasta water: The starchy pasta water helps to thicken the sauce and create a creamy, emulsified texture.
  • Grate your own Parmesan cheese: Pre-shredded Parmesan cheese often contains cellulose, which can prevent it from melting properly.
  • Taste and adjust seasoning: Don’t be afraid to add more salt, pepper, or lemon juice to taste.

Common Mistakes to Avoid

We all make mistakes in the kitchen, especially when trying a new recipe. Here are a few common pitfalls to watch out for:

  • Burning the garlic: Burnt garlic tastes bitter and can ruin the flavor of the entire dish. Keep a close eye on it and cook it over medium heat.
  • Overcooking the pasta: Mushy pasta is never a good thing. Cook the pasta al dente, which means it should be firm to the bite.
  • Not seasoning properly: Salt and pepper are essential for bringing out the flavors of the dish. Don’t be afraid to season generously!
  • Adding cold cream to a hot pan: Cold cream can curdle when added to a hot pan. Let the cream come to room temperature before adding it to the skillet.

Variations: Make It Your Own!

One of the best things about this recipe is that it’s so versatile. Feel free to experiment and make it your own! Here are a few ideas to get you started:

  • Add vegetables: Sauté some spinach, asparagus, or cherry tomatoes along with the garlic.
  • Use different protein: Substitute the shrimp with chicken, scallops, or tofu.
  • Make it spicy: Add more red pepper flakes or a dash of hot sauce.
  • Add herbs: Fresh basil, oregano, or thyme would all be delicious additions.
  • Make it richer: Add a pat of butter to the sauce for extra richness.

For a Lemon Garlic Seafood Pasta variation, add some scallops and mussels to the shrimp. For a White Wine Linguine, add 1/4 cup of white wine to the sauce along with the lemon juice. A Lemon Garlic White Wine Sauce can elevate the dish even further! Try adding some sun-dried tomatoes for an extra burst of flavor.

Storing and Reheating Leftovers

If you have any leftovers (which is rare in my house!), you can store them in an airtight container in the refrigerator for up to 3 days. To reheat, simply microwave until heated through. You may need to add a splash of milk or water to loosen the sauce.

Frequently Asked Questions (FAQ)

  • Can I use frozen shrimp? Yes, you can use frozen shrimp. Just make sure to thaw it completely before cooking.
  • Can I make this dish ahead of time? I wouldn’t recommend making the entire dish ahead of time, as the pasta can become mushy. However, you can prepare the sauce ahead of time and store it in the refrigerator.
  • Can I use a different type of cheese? Yes, you can use a different type of cheese. Asiago or Romano cheese would both be good substitutes for Parmesan.
  • Can I make this dairy-free? Yes, you can make this dairy-free by using coconut milk instead of heavy cream and nutritional yeast instead of Parmesan cheese.

Serving Suggestions: Complete the Meal

This Creamy Lemon Shrimp Pasta is delicious on its own, but it’s even better when served with a side dish. Here are a few of my favorite serving suggestions:

  • Garlic bread: Perfect for soaking up the creamy sauce.
  • Side salad: A simple green salad with a lemon vinaigrette is a refreshing contrast to the richness of the pasta.
  • Roasted vegetables: Roasted asparagus, broccoli, or Brussels sprouts would all be delicious additions.

I hope you enjoy this recipe as much as my family and I do. It’s a simple, comforting meal that’s perfect for any occasion. Thank you for joining me in the kitchen today! Remember, cooking is about more than just following a recipe; it’s about creating something delicious and sharing it with the ones you love. So go ahead, get cooking, and enjoy the process! And your family will thank you for this lemon shrimp pasta. It’s so good, you’ll want to make it again and again!

Creamy Lemon Shrimp Pasta

Prep Time 10 minutes
Cook Time 20 minutes
Total Time 30 minutes
Servings 4 servings
Calories 450
A delightful and easy-to-make pasta dish featuring succulent shrimp in a creamy lemon sauce. Perfect for a quick weeknight dinner or an elegant weekend meal.

Ingredients

Ingredients

  • 1 pound shrimp, peeled and deveined
  • 1 pound pasta (linguine or fettuccine)
  • 1/2 cup heavy cream
  • 1/4 cup grated Parmesan cheese
  • 1/4 cup lemon juice
  • 2 tablespoons olive oil
  • 2 cloves garlic, minced
  • 1/4 teaspoon red pepper flakes (optional) (optional)
  • to taste Salt and pepper
  • Fresh parsley, chopped (for garnish) (for garnish)

Instructions 

  • Cook pasta, reserving 1 cup pasta water.
  • Heat olive oil, add garlic and red pepper flakes, cook until fragrant.
  • Add shrimp, cook 2-3 minutes per side, then remove.
  • Pour in cream and lemon juice, simmer.
  • Stir in Parmesan, salt, and pepper. Add pasta water if needed.
  • Add pasta and shrimp, toss to coat.
  • Garnish with parsley and serve.

Notes

Adjust lemon juice and red pepper flakes to your taste preference.
Calories: 450kcal
Cost: $20
Course: Main Course
Cuisine: Italian
Keyword: shrimp

Nutrition

Calories: 450kcal | Carbohydrates: 45g | Protein: 35g | Fat: 18g | Sodium: 500mg
pin