Author

Avery Collins

Browsing

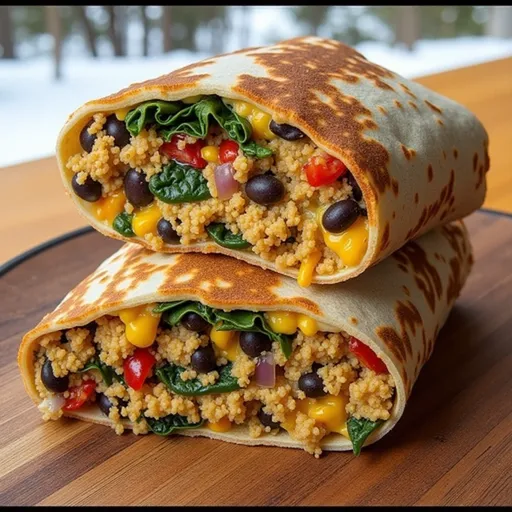
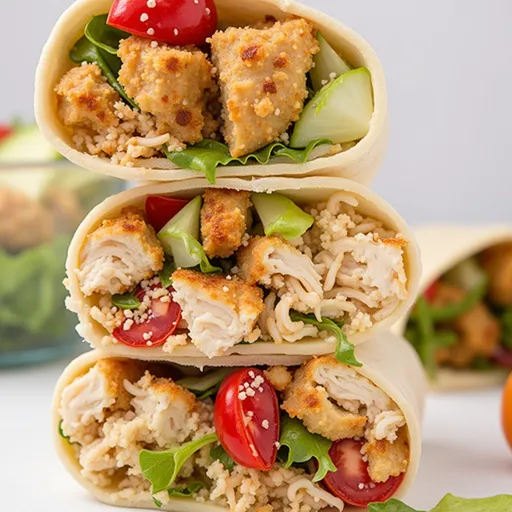
Why You’ll Love This Breakfast Wrap

Let’s face it: mornings can be a whirlwind of chaos, with little time to sit down for a nourishing breakfast. But what if I told you that you could kick-start your day with a meal that’s not only healthy but bursting with vibrant flavors and essential nutrients? Enter the High Protein Vegetarian Breakfast Wrap — your new go-to for mornings that need a little extra kick.

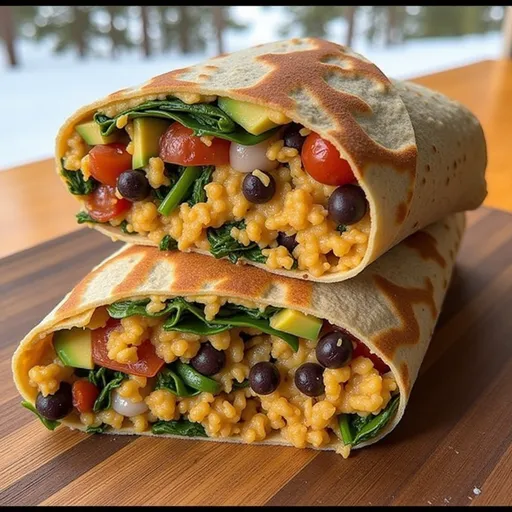
This wrap is not just about filling your stomach; it’s about fueling your morning adventures! Packed with protein from eggs or tofu, fiber from black beans, and a medley of colorful veggies, this wrap will leave you feeling satisfied and energized. Plus, it’s incredibly versatile, allowing you to mix and match ingredients based on what you have on hand or what you’re craving.

Ingredients You’ll Need

Let’s gather our ingredients and get ready to roll! The beauty of this recipe is its simplicity and the healthy components that come together to create something truly delicious. Here’s what you need:

  • 4 large whole wheat tortillas
  • 1 cup cooked black beans
  • 1 cup scrambled eggs or tofu scramble
  • 1 cup spinach, chopped
  • 1/2 cup bell pepper, diced
  • 1/4 cup red onion, diced
  • 1/2 cup shredded cheese (optional)
  • 1 avocado, sliced
  • Salt and pepper to taste
  • Olive oil or cooking spray

How to Make the Wrap

A delicious vegetarian wrap featuring black beans, spinach, and avocado, showcasing its vibrant ingredients.

Now, let’s dive into the cooking process. This is where the magic happens, transforming simple ingredients into a delightful breakfast wrap that will have you dancing in the kitchen!

Step-by-Step Instructions

  1. In a skillet, heat a splash of olive oil over medium heat. Once it’s shimmering, add the diced red onion and bell pepper. Sauté until they soften and become fragrant — about 3-4 minutes.

  2. Next, toss in the chopped spinach. Watch it wilt down as it cooks, soaking up all those beautiful flavors. Season with salt and pepper to keep it vibrant and lively!

  3. In a separate bowl, scramble your eggs or prepare your tofu scramble until fully cooked. Mix in the black beans and the sautéed vegetables until everything is well combined and heated through.

  4. Now, it’s time to assemble! Lay a tortilla flat on a clean surface and distribute the delicious mixture evenly across each wrap.

  5. Top it off with slices of creamy avocado and sprinkle cheese if you’re feeling indulgent. This is your moment to shine — feel free to add more spices or hot sauce if you like a little extra heat!

  6. Roll the tortilla tightly, tucking in the sides as you go to create a neat wrap. Don’t worry if it’s not perfect; it’s the flavor that counts!

  7. To make things easier for busy mornings, wrap each breakfast wrap in foil or parchment paper. This not only keeps them warm but also makes them perfect for grabbing on the go.

How to Serve Your Breakfast Wrap

Serving your High Protein Vegetarian Breakfast Wrap can be as simple or as elaborate as you want. For a classic breakfast experience, pair it with a side of fresh fruit, yogurt, or a light salad. If you’re feeling adventurous, drizzle some hot sauce or a dollop of salsa inside the wrap before rolling it up for an extra kick of flavor! You can even slice it in half and serve it with some zesty dipping sauce on the side.

Storage and Freezing Tips

Meal prep is a game-changer, and this wrap is perfect for it! Once you’ve made your wraps, allow them to cool completely before wrapping them up. They can be stored in the refrigerator for up to four days, making them a fantastic option for busy weeks. If you want to enjoy them for longer, consider freezing them. Just wrap each one tightly in plastic wrap and then in foil to prevent freezer burn. These wraps can be frozen for up to three months.

Tips for Making the Best Breakfast Wrap

Want to take your breakfast wrap to the next level? Here are some tips to elevate your creation:

  • Experiment with Spices: Don’t shy away from adding spices like cumin, paprika, or even a pinch of cayenne to your veggie mixture. This will enhance the flavors and give your wrap a delightful depth.
  • Fresh Ingredients: Use fresh, seasonal vegetables for the best taste and nutrition. The brighter the veggies, the more appealing your wrap will be!
  • Customize Your Protein: Whether you’re using eggs, tofu, or even quinoa, make it your own! Each protein brings unique flavors and textures to the table.
  • Make It Vegan: Swap out the eggs for a chickpea flour scramble or just load it up with extra veggies and beans for a satisfying vegan option.

Delicious Variations to Try

Why stop at one recipe? Here are a few variations that can keep your breakfast exciting:

  • Southwest Twist: Add corn, diced jalapeños, and use pepper jack cheese for a spicy kick. Don’t forget to top it off with fresh cilantro!
  • Greek-Inspired: Replace the black beans with chickpeas, add feta cheese, and sprinkle with oregano. Serve with tzatziki for a refreshing twist.
  • Breakfast Burrito: Add some scrambled potatoes or a splash of enchilada sauce before wrapping it up for a hearty burrito style breakfast.

FAQs about the Breakfast Wrap

Got questions? I’ve got answers! Here are some common queries about this recipe:

  • Can I make these wraps ahead of time? Absolutely! Prepare them in advance and store them in the fridge or freezer as previously described.
  • Can I substitute the eggs with something else? Yes! Tofu or chickpea flour can be used for a vegan version of the wrap.
  • How do I reheat the wraps? Just unwrap and microwave for 1-2 minutes or until heated through. If frozen, let them thaw in the fridge overnight before reheating.

Troubleshooting Common Issues

If you encounter any hiccups while making your breakfast wrap, here are some quick solutions:

  • Wraps Falling Apart: Make sure to roll them tightly, and consider using a bit of cheese as glue to hold everything together.
  • Too Dry: If your filling seems dry, consider adding a splash of hot sauce, salsa, or a dollop of Greek yogurt for moisture.

Conclusion

There you have it! The High Protein Vegetarian Breakfast Wrap is not just a meal; it’s an experience that fuels your day with flavor and nutrition. It invites you to embrace your culinary creativity and adapt it to your taste. Whether you’re rushing out the door or savoring it with a cup of coffee, this wrap will energize your mornings and awaken your palate. So grab your skillet, gather those ingredients, and let the adventure begin! Trust me, your taste buds will thank you. Don’t forget to share your creations with me on Instagram, Pinterest, or YouTube! Happy cooking!

High Protein Vegetarian Breakfast Wrap - Healthy Meal Prep for Busy Mornings

Prep Time 10 minutes
Cook Time 10 minutes
Total Time 20 minutes
Servings 4 wraps
Calories 450
A quick and nutritious vegetarian breakfast wrap packed with protein, perfect for busy mornings and easy to prepare ahead.

Ingredients

Tortillas

  • 4 large whole wheat tortillas
  • 1 cup cooked black beans
  • 1 cup scrambled eggs or tofu scramble
  • 1 cup spinach, chopped
  • 0.5 cup bell pepper, diced
  • 0.25 cup red onion, diced
  • 0.5 cup shredded cheese (optional)
  • 1 unit avocado, sliced
  • to taste salt and pepper
  • as needed olive oil or cooking spray

Instructions 

  • Sauté red onion and bell pepper in olive oil until softened.
  • Add spinach and cook until wilted; season with salt and pepper.
  • Mix scrambled eggs or tofu with black beans and cooked vegetables.
  • Distribute mixture on tortillas, add avocado and cheese, then roll into wraps.
  • Wrap in foil or parchment for storage; reheat in microwave when ready to eat.

Notes

Prepare wraps in advance for quick mornings; store in the fridge for up to 4 days.
Calories: 450kcal
Cost: $15
Course: Breakfast
Keyword: High Protein, Vegetarian

Nutrition

Calories: 450kcal | Carbohydrates: 50g | Protein: 25g | Fat: 15g | Sodium: 600mg

Loved this recipe? Save it to your favorite Pinterest board so you can easily find it later! It’s the perfect way to keep all your sweet ideas in one place. ✨

An appetizing breakfast wrap with a golden tortilla, filled with scrambled eggs, bell peppers, and cheese.

Why You’ll Love This Dish

If you’re looking for a recipe that combines comfort food with healthy eating, look no further than this Keto Cheesy Crockpot Chicken and Broccoli Casserole. It’s a dish that feels indulgent yet stays true to your low-carb lifestyle. The beauty of this casserole lies in its simplicity and the ability of the slow cooker to meld flavors beautifully over time. Imagine coming home after a long day to the smell of tender chicken and cheesy goodness wafting through your kitchen — it’s pure bliss!

Overview

This casserole is not just about satisfying your hunger; it’s about celebration! With just a handful of ingredients, you can create a meal that’s both filling and packed with flavor. Boneless, skinless chicken thighs provide the perfect protein base, while fresh broccoli adds a pop of color and nutrients. The creamy cheese sauce is rich and decadent, making it easy to forget that you’re eating low-carb. If you’re on a keto journey, this dish will quickly become a staple in your weekly meal rotation. Let’s dive into the details!

Ingredient Overview

A warm, cheesy casserole with chicken and broccoli, showcasing rich textures and colors.
  • Chicken: 2 pounds of boneless, skinless chicken thighs bring tenderness and flavor.
  • Broccoli: 2 cups of fresh or frozen broccoli florets add crunch and nutrients.
  • Cheese: 1 cup of shredded cheddar cheese and 1 cup of softened cream cheese create a luscious, creamy sauce.
  • Chicken Broth: 1/2 cup of chicken broth adds moisture and depth to the dish.
  • Seasonings: A blend of garlic powder, onion powder, and paprika, along with salt and pepper for that perfect flavor balance.
  • Heavy Cream: Optional for those who want an extra creamy finish.

Step-by-Step Instructions

Step 1: Prepare the Chicken

Begin by placing the chicken thighs at the bottom of your crockpot. These will serve as the flavorful base of your casserole. You can choose to trim any excess fat for a leaner dish, but remember, a little fat can add flavor!

Step 2: Mix the Creamy Cheese Sauce

In a mixing bowl, combine the softened cream cheese, chicken broth, garlic powder, onion powder, paprika, salt, and pepper. Mix well until you have a smooth, creamy consistency. This sauce is what makes your casserole so irresistibly indulgent.

Step 3: Coat the Chicken

Pour the cream cheese mixture over the chicken in the crockpot. Make sure the chicken is well-coated; you want every bite to be bursting with flavor!

Step 4: Cook Low and Slow

Cover the crockpot and set it to cook on low for 6-7 hours or on high for 3-4 hours. The slow cooking method allows the flavors to meld beautifully, resulting in tender chicken that practically falls apart.

Step 5: Add the Broccoli

About 30 minutes before serving, stir in your broccoli florets. This timing ensures that they will cook perfectly — tender yet still vibrant and crunchy.

Step 6: Enhance Creaminess

If you’re craving even more creaminess, now’s the time to stir in the heavy cream. It adds an extra layer of decadence to your already rich dish.

Step 7: Melt the Cheese

Once the broccoli is tender, add the shredded cheddar cheese. Stir it in until it melts and combines with the other ingredients, creating that gooey, cheesy texture we all love.

Tips for Perfecting Your Casserole

  • Use High-Quality Ingredients: Fresh ingredients yield the best flavor. Opt for organic chicken and fresh broccoli when possible.
  • Don’t Skip the Seasoning: Proper seasoning is key in this recipe. Taste as you go to ensure your dish has the perfect balance.
  • Adjust Cooking Times: Every crockpot is different. If you find your chicken isn’t as tender as you’d like, you can always cook it longer on low.

Variations and Substitutions

This casserole is incredibly versatile. Here are some ideas to make it your own:

  • Add Veggies: Consider adding mushrooms, bell peppers, or spinach for extra nutrition and flavor complexity.
  • Spice it Up: Want a kick? Add crushed red pepper flakes or diced jalapeños for some heat.
  • Cheese Swap: Feel free to experiment with different cheeses like Monterey Jack or Gouda for a different flavor profile.
  • Make it Ranch-Style: Stir in a packet of ranch seasoning for a creamy, herby flavor.

Essential Equipment

To whip up this delicious casserole, you’ll need:

  • A crockpot or slow cooker
  • Mixing bowls for preparing the sauce
  • A spatula for stirring

Storage and Freezing Tips

Have leftovers? This casserole stores beautifully! Here’s how to handle it:

  • Refrigeration: Store any leftovers in an airtight container in the fridge for up to 4 days.
  • Freezing: If you want to freeze it, allow it to cool completely before transferring to a freezer-safe container. It can be frozen for up to 3 months. To reheat, simply thaw overnight in the fridge and warm it up in the oven or microwave.

FAQs

Can I use chicken breasts instead of thighs?

Absolutely! Chicken breasts can be used but may require less cooking time. Ensure the internal temperature reaches 165°F.

Is this dish gluten-free?

Yes, this recipe is gluten-free as it contains no wheat or gluten-based ingredients.

Can I make this dish ahead of time?

Yes! You can prepare the ingredients the night before and keep them in the fridge until you’re ready to cook.

Troubleshooting Common Issues

If you run into any challenges, here are some quick fixes:

  • Too Watery: If your casserole is too watery, remove the lid and cook on high for an additional 15-30 minutes to thicken.
  • Chicken Not Tender: If the chicken isn’t as tender as you expected, cook it longer on low until it reaches the desired doneness.

Conclusion

Cooking is an adventure, and this Keto Cheesy Crockpot Chicken and Broccoli Casserole is a delicious way to embrace that spirit! With its rich flavors, creamy textures, and low-carb goodness, it’s sure to become a beloved dish in your home. So, gather your ingredients, fire up that crockpot, and let the magic happen. Your taste buds will thank you for it, and you’ll be one step closer to mastering the art of bold, flavorful cooking. Enjoy every cheesy bite of this fantastic casserole, and remember — food is not just about sustenance; it’s about joy, love, and connection. Happy cooking!

Keto Cheesy Crockpot Chicken and Broccoli Casserole Recipe

Prep Time 10 minutes
Cook Time 4 hours
Total Time 4 hours 10 minutes
Servings 4 servings
Calories 550
A delicious low-carb casserole combining tender chicken, broccoli, and cheesy goodness, perfect for a keto-friendly meal.

Ingredients

Protein

  • 2 pounds boneless, skinless chicken thighs

Vegetables

  • 2 cups broccoli florets (fresh or frozen)

Dairy

  • 1 cup shredded cheddar cheese
  • 1 cup cream cheese, softened
  • 1/2 cup heavy cream (optional for creaminess)

Liquids

  • 1/2 cup chicken broth

Spices & Seasonings

  • 1 teaspoon garlic powder
  • 1 teaspoon onion powder
  • 1 teaspoon paprika
  • to taste salt and pepper salt and pepper

Instructions 

  • Place chicken in crockpot. Mix cream cheese, broth, spices, salt, and pepper; pour over chicken.
  • Cook on low for 6-7 hours or high for 3-4 hours until chicken is tender.
  • Add broccoli 30 minutes before serving, stir in heavy cream if desired, then cook until tender.
  • Stir in cheddar cheese until melted, then serve warm.

Notes

This casserole is perfect for a quick, keto-friendly dinner with minimal prep.
Calories: 550kcal
Cost: $15
Course: Main Course
Cuisine: American
Keyword: Broccoli, chicken, Keto

Nutrition

Calories: 550kcal | Carbohydrates: 12g | Protein: 60g | Fat: 30g | Sodium: 900mg

Loved this recipe? Save it to your favorite Pinterest board so you can easily find it later! It’s the perfect way to keep all your sweet ideas in one place. ✨

Delicious Keto Chicken and Broccoli Casserole presented in a bowl, highlighting the creamy sauce and toppings.

Why This Dish Will Ignite Your Taste Buds

Welcome to a flavor adventure that’s destined to become a staple in your kitchen—the Honey Chipotle Chicken Rice Bowl. Imagine this: succulent chicken bathed in a smoky chipotle sauce, kissed with the sweetness of honey, all resting on a bed of fluffy rice and topped with vibrant, fresh ingredients. This dish is not just a meal; it’s an experience, a festival of flavors that invites you to embrace the heat and get creative! If you’re on the lookout for a recipe that balances indulgence with health, look no further. This bowl is a perfect fusion of spicy and sweet, making it an ideal choice for any weeknight dinner or meal prep.

Ingredients You’ll Need

Here’s what you’ll need to assemble this delightful dish:

  • 1 lb chicken breast, diced
  • 2 tablespoons honey
  • 2 tablespoons chipotle in adobo sauce, minced
  • 1 tablespoon olive oil
  • 1 teaspoon garlic powder
  • 1 teaspoon cumin
  • Salt and pepper to taste
  • 2 cups cooked rice
  • 1 cup black beans, rinsed and drained
  • 1 cup corn, drained
  • 1 avocado, sliced
  • 1/4 cup fresh cilantro, chopped
  • Lime wedges for serving

Step-by-Step: Making the Honey Chipotle Chicken Rice Bowl

A vibrant Honey Chipotle Chicken Rice Bowl featuring rice, black beans, and corn.

Let’s dive into the process of crafting this sensational dish. Follow these steps to create a meal that not only fills your belly but also fuels your spirit:

  1. Mix the Marinade: In a bowl, combine the honey, chipotle in adobo sauce, olive oil, garlic powder, cumin, salt, and pepper. This combination is the key to infusing your chicken with rich, smoky sweetness.
  2. Marinate the Chicken: Add the diced chicken to the marinade, ensuring every piece is coated. Let it sit for at least 30 minutes, allowing the flavors to meld beautifully. For those with a little more time, marinating it for a few hours or overnight in the refrigerator elevates the taste even further.
  3. Cook the Chicken: Heat a skillet over medium-high heat and add the marinated chicken. Cook for about 6-8 minutes, stirring occasionally, until the chicken is fully cooked and slightly caramelized, which gives it that beautiful golden crust.
  4. Assemble the Bowls: In serving bowls, layer the cooked rice at the bottom, followed by black beans, corn, and the savory chicken.
  5. Add Fresh Toppings: Top each bowl with avocado slices and a generous sprinkle of fresh cilantro for that burst of color and freshness.
  6. Garnish and Serve: Finish with lime wedges on the side, allowing guests to squeeze fresh lime juice over their bowls for an extra zesty kick.

Serving Suggestions to Elevate Your Bowl

This dish is versatile, making it easy to customize based on your mood or what you have on hand. Here are some suggestions to take your Honey Chipotle Chicken Rice Bowl to the next level:

  • Fresh Guacamole: A dollop of creamy guacamole adds a rich, buttery texture that balances the spice and enhances the overall flavor.
  • Crisp Side Salad: Pair with a refreshing side salad made of romaine lettuce, cherry tomatoes, and a zesty lime vinaigrette for a delightful contrast.
  • Tortilla Chips: Serve alongside crunchy tortilla chips for scooping up the chicken or simply adding a fun crunch to your meal.
  • Street-Style Corn (Elote): Roasted corn on the cob with mayo, cotija cheese, lime juice, and chili powder would be a fantastic side, offering creaminess and tang.
  • Cilantro Lime Rice: For an extra kick, add a side of cilantro lime rice to enhance your meal.
  • Refried Beans: Creamy refried beans seasoned with garlic and cumin provide a comforting element that pairs beautifully with the chicken.

Creative Variations to Try

Feeling adventurous? Here are some variations to keep your Honey Chipotle Chicken Rice Bowl exciting:

  • Vegetarian Option: Swap the chicken for seasoned black beans or roasted chickpeas. With a touch of smoky paprika and chipotle powder, this makes for a hearty vegetarian delight.
  • Seafood Twist: Substitute chicken with succulent shrimp, lightly seared and coated in the same honey-chipotle glaze for a fresh seafood take.
  • Vegan Delight: Use crispy baked tofu instead of chicken, and replace honey with agave nectar. Add grilled veggies like bell peppers and zucchini for a colorful and nutritious vegan bowl.

Tips for Perfecting Your Bowl

To ensure your Honey Chipotle Chicken Rice Bowl is nothing short of spectacular, keep these tips in mind:

  • Marinate Longer: If time allows, marinate the chicken for several hours or even overnight to deepen the flavor.
  • Use High-Quality Ingredients: Fresh, quality ingredients make all the difference. Opt for organic chicken and ripe avocados for the best results.
  • Control the Heat: If you’re sensitive to spice, start with less chipotle in adobo sauce and gradually add to suit your taste.

Equipment You’ll Need

For this recipe, you’ll need:

  • Large mixing bowl
  • Skillet or frying pan
  • Measuring spoons
  • Cutting board and knife

Storage and Freezing Tips

This dish can be made ahead of time, making it perfect for meal prep or leftovers:

  • Refrigeration: Store leftover chicken and rice bowls in airtight containers for up to three days in the refrigerator.
  • Freezing: If you want to freeze the components, do so before assembling the bowls. The chicken and rice can be frozen for up to three months. Thaw in the refrigerator before reheating.

FAQs About the Recipe

Here are some common questions about this exciting recipe:

  • Can I use chicken thighs instead of breasts? Absolutely! Chicken thighs are juicier and can add even more flavor to the dish.
  • What can I substitute for honey? If you’re looking for a vegan alternative, agave nectar works wonderfully in place of honey.
  • How can I make this dish spicier? Add extra chipotle peppers or a few slices of fresh jalapeño for an added kick!

Troubleshooting Common Issues

If you encounter any issues while preparing your Honey Chipotle Chicken Rice Bowl, here are some solutions:

  • Chicken is Dry: Make sure not to overcook the chicken. Remove it from heat as soon as it reaches an internal temperature of 165°F.
  • Too Spicy: If you find the dish too spicy, balance it out with more rice or add a dollop of sour cream or yogurt to cool it down.

Final Thoughts

The Honey Chipotle Chicken Rice Bowl is not just a meal; it’s an adventure into bold flavors and culinary creativity. This dish invites you to explore the balance of sweet and spicy, making every bite a celebration of taste. Whether you’re whipping it up for a casual family dinner or meal prepping for the week ahead, you can feel confident knowing this bowl will please everyone at the table. So roll up your sleeves, grab your skillet, and let’s get cooking! Your taste buds are in for a treat, and who knows? You just might discover your new favorite recipe!

Honey Chipotle Chicken Rice Bowl - Frau Virtin

Prep Time 10 minutes
Cook Time 15 minutes
Total Time 25 minutes
Servings 4 servings
Calories 550
A flavorful and easy-to-make rice bowl featuring marinated chicken, black beans, corn, and fresh toppings, perfect for a quick and satisfying meal.

Ingredients

Marinade

  • 1 lb chicken breast, diced
  • 2 tablespoons honey
  • 2 tablespoons chipotle in adobo sauce, minced
  • 1 tablespoon olive oil
  • 1 teaspoon garlic powder
  • 1 teaspoon cumin
  • to taste salt and pepper

Base

  • 2 cups cooked rice
  • 1 cup black beans, rinsed and drained
  • 1 cup corn, drained

Toppings

  • 1 avocado sliced
  • 1/4 cup fresh cilantro, chopped
  • lime wedges for serving lime wedges

Instructions 

  • Mix honey, chipotle, olive oil, garlic powder, cumin, salt, and pepper to make marinade.
  • Add chicken to marinade and let sit for 30 minutes.
  • Cook chicken in a skillet over medium-high heat for 6-8 minutes until caramelized.
  • Layer rice, beans, corn, and chicken in bowls, then top with avocado and cilantro.
  • Serve with lime wedges on the side.

Notes

For extra flavor, squeeze fresh lime juice over the bowl before serving.
Calories: 550kcal
Cost: $15
Course: Main Course
Cuisine: Fusion
Keyword: chicken, healthy, Rice

Nutrition

Calories: 550kcal | Carbohydrates: 70g | Protein: 40g | Fat: 15g | Sodium: 600mg

Loved this recipe? Save it to your favorite Pinterest board so you can easily find it later! It’s the perfect way to keep all your sweet ideas in one place. ✨

Colorful Honey Chipotle Chicken Rice Bowl with fresh ingredients and a cozy presentation.

Why You’ll Love It

Let’s talk about comfort food, shall we? When it comes to weeknight dinners, we all crave something that’s not only satisfying but also quick to whip up. Enter the creamy, dreamy world of Garlic Parm Instant Pot Chicken. This dish is like a warm hug after a long day—rich, savory, and just a touch indulgent. With each bite, you’re met with the bold flavors of garlic and Parmesan that dance elegantly over tender chicken breasts, all while being cooked in your trusty Instant Pot. Yes, that’s right! We’re taking the hassle out of dinner and putting the joy back in cooking.

This recipe embraces the essence of what it means to cook with passion. It’s fast, it’s flavorful, and it’s all about bringing people together around the dinner table. So, whether you’re feeding a family or just treating yourself, this dish is guaranteed to make your taste buds sing!

Ingredients You’ll Need

To create this culinary masterpiece, you’ll need a handful of simple yet powerful ingredients that pack a punch. Here’s what you’re going to gather:

  • 1.5 lbs chicken breasts – The stars of the show, juicy and ready to soak up all that flavor.
  • 2 tablespoons olive oil – For that beautiful browning and added richness.
  • 4 cloves garlic, minced – The aromatic backbone of this dish; more garlic equals more flavor!
  • 1 cup chicken broth – The liquid gold that keeps everything moist and tender.
  • 1 cup heavy cream – For a luscious, creamy texture that makes this dish irresistibly rich.
  • 1 cup grated parmesan cheese – The crowning glory that adds a nutty, salty kick.
  • 1 teaspoon Italian seasoning – A blend of herbs that elevates the flavor profile.
  • Salt and pepper to taste – Essential for bringing all the flavors together.
  • Fresh parsley for garnish – Because we eat with our eyes first!

Step-by-Step Cooking Guide

Eye-level shot of tender chicken breasts coated in garlic parmesan sauce, lit with warm natural light.

Ready to get cooking? Let’s dive into the step-by-step process that will turn your kitchen into a fragrant haven of flavor.

  1. Set the Stage: Start by setting your Instant Pot to ‘Sauté’ mode and heat the olive oil. You want it hot enough to shimmer but not smoking.
  2. Season with Love: Generously season the chicken breasts with salt, pepper, and that zesty Italian seasoning. Make sure every inch is coated because flavor is key!
  3. Brown the Chicken: Add the seasoned chicken to the pot, browning it on both sides for about 3-4 minutes. This step is vital for developing a rich flavor, so don’t rush it!
  4. Garlic Time: Remove the chicken and set it aside for a moment. Now, toss in the minced garlic and sauté for about a minute until it’s fragrant. You’ll want to keep stirring to avoid burning—garlic can go from hero to villain pretty quickly!
  5. Deglaze the Pot: Pour in the chicken broth, using a wooden spoon to scrape up all those lovely browned bits from the bottom. This is where the magic happens!
  6. Pressure Cook: Return the chicken to the pot, close the lid, and set it to ‘Manual’ mode for 10 minutes. Trust the process; this is where the chicken becomes tender and infused with all those delicious flavors.
  7. Release the Pressure: Once cooking is complete, do a quick release of the pressure. Stand back and let the steam escape!
  8. Make it Creamy: Remove the chicken again and set it aside. Now, stir in the heavy cream and Parmesan cheese, whisking until the sauce is smooth and creamy.
  9. Combine and Warm: Return the chicken to the pot, coating it in the luscious sauce, and let it warm through for a couple of minutes.
  10. Serve it Up: Plate your Garlic Parm Instant Pot Chicken hot, garnishing with fresh parsley for that pop of color.

Common Mistakes to Avoid

Even the best of us can fall into traps while cooking. Here are some pitfalls to dodge:

  • Skipping the Sear: Don’t skip browning the chicken! That golden crust adds depth and flavor.
  • Overcrowding the Pot: If your chicken breasts are too big or there are too many, sear them in batches. Crowding leads to steaming instead of browning.
  • Ignoring the Deglazing: Scraping the bottom of the pot is essential for avoiding the dreaded “BURN” notice during pressure cooking.

Tips for Customization

This recipe is versatile, and I encourage you to make it your own. Here are some ideas to get those creative juices flowing:

  • Swap the Cream: No heavy cream? No problem! Try using sour cream or Greek yogurt for a tangy twist.
  • Low-Carb Alternatives: For a keto-friendly option, you can substitute heavy cream with coconut milk.
  • Add Veggies: Toss in some fresh spinach or cherry tomatoes right at the end for a burst of color and nutrients.

Equipment You’ll Need

Let’s make sure you’re equipped for success. Here’s what you’ll need:

  • Instant Pot or any pressure cooker
  • Wooden spoon for deglazing
  • Meat thermometer to check chicken doneness
  • Measuring cups and spoons

Storage and Freezing Tips

Got leftovers? Lucky you! Here’s how to keep your Garlic Parm Instant Pot Chicken fresh:

  • Refrigeration: Store leftovers in an airtight container in the fridge for up to 3 days.
  • Freezing: You can freeze this dish in a freezer-safe container for up to 3 months. Just thaw overnight in the fridge before reheating.

Frequently Asked Questions

Can I use chicken thighs instead of breasts?
Absolutely! Just make sure they’re boneless and skinless. You might need to adjust the cooking time slightly.

Is this recipe spicy?
Nope, but you can add red pepper flakes if you want to kick it up a notch. Spice is always a personal choice!

How can I make this ahead of time?
This dish is perfect for meal prep! Just warm it up gently when you’re ready to eat.

Troubleshooting Tips

Sometimes things don’t go as planned. Here’s how to troubleshoot common issues:

  • Too Thick Sauce: If your sauce is too thick, add a splash of chicken broth to loosen it up while stirring.
  • Too Thin Sauce: If it’s too thin, mix a cornstarch slurry (1 tablespoon cornstarch mixed with 1 tablespoon cold water) and add it to the pot while sautéing.

Final Thoughts

And there you have it! Your guide to making a sumptuous Garlic Parm Instant Pot Chicken that will make any weeknight feel like a special occasion. This dish is not just a meal; it’s an experience—a chance to gather around the table, share stories, and savor every bite. So, grab your apron, unleash your inner chef, and let the magic unfold in your kitchen. You’ve got this, and I can’t wait to hear how your culinary adventure turns out!

Garlic Parm Instant Pot Chicken: Fast, Creamy Weeknight Meal

Prep Time 10 minutes
Cook Time 10 minutes
Total Time 20 minutes
Servings 4 servings
Calories 550
A quick and creamy chicken dish made in the Instant Pot, perfect for weeknights.

Ingredients

Protein

  • 1.5 lbs chicken breasts
  • 2 tablespoons olive oil
  • 4 cloves garlic, minced
  • 1 cup chicken broth
  • 1 cup heavy cream
  • 1 cup grated parmesan cheese
  • 1 teaspoon italian seasoning
  • to taste salt and pepper
  • for garnish fresh parsley

Instructions 

  • Set Instant Pot to 'Sauté' and heat olive oil.
  • Season chicken with salt, pepper, and Italian seasoning, then brown on both sides.
  • Add garlic, sauté 1 minute, then pour in chicken broth to deglaze.
  • Return chicken, close lid, cook on 'Manual' for 10 minutes, then quick release.
  • Stir in heavy cream and Parmesan until smooth, then coat chicken and warm through.
  • Serve hot, garnished with parsley.

Notes

For a richer flavor, let the sauce simmer a few extra minutes after adding the cheese.
Calories: 550kcal
Cost: $15
Course: Main Course
Cuisine: American
Keyword: chicken, creamy, garlic

Nutrition

Calories: 550kcal | Carbohydrates: 10g | Protein: 45g | Fat: 35g | Sodium: 600mg

Loved this recipe? Save it to your favorite Pinterest board so you can easily find it later! It’s the perfect way to keep all your sweet ideas in one place. ✨

Delicious Garlic Parm Instant Pot Chicken featuring a rich, creamy sauce and a blurred cozy background.

Why You’ll Love This Dish

Hey there, fellow culinary explorers! If you’re on the hunt for an exciting, flavorful meal that’s as nourishing as it is quick to whip up, look no further than this Easy Mediterranean Chicken Stir Fry Recipe. Imagine a vibrant dish bursting with color and flavor, where tender chicken dances with fresh vegetables, all harmonized by aromatic Mediterranean spices. It’s more than just a meal; it’s a celebration of everything that makes cooking an adventure.

As someone who grew up amidst the rich flavors of San Antonio, I can tell you that this dish embodies the essence of Mediterranean cooking — fresh, wholesome ingredients combined in a way that makes each bite sing. Plus, it’s ready in under 30 minutes, making it the perfect option for busy weeknights or impromptu gatherings. Let’s dive into the world of Mediterranean flavors and ignite those taste buds!

Ingredients You’ll Need

To create this delicious stir fry, gather the following ingredients:

  • 1 pound chicken breast, sliced
  • 2 tablespoons olive oil
  • 1 red bell pepper, sliced
  • 1 yellow bell pepper, sliced
  • 1 zucchini, sliced
  • 1 cup cherry tomatoes, halved
  • 2 cloves garlic, minced
  • 1 teaspoon dried oregano
  • 1 teaspoon dried basil
  • Salt and pepper to taste
  • Feta cheese for topping
  • Fresh parsley for garnish

This ensemble of ingredients not only provides a burst of flavors but also ensures a plate packed with nutrients. The chicken adds lean protein, while the array of colorful vegetables brings essential vitamins and antioxidants to the table.

Step-by-Step Instructions

Delicious Mediterranean Chicken Stir Fry featuring sliced chicken, bell peppers, and cherry tomatoes.

Step 1: Heat Things Up

Start by heating the olive oil in a large skillet over medium-high heat. The oil should shimmer but not smoke. This is where the magic begins!

Step 2: Sear the Chicken

Add the sliced chicken breast to the hot skillet. Sear it for about 5-7 minutes until it’s browned and cooked through. You want that golden crust, which not only enhances flavor but also adds a delightful texture.

Step 3: Infuse with Garlic

Once your chicken is cooked, toss in the minced garlic. Sauté it for about a minute until you can smell that heavenly aroma wafting through your kitchen. Trust me, this step is crucial for adding depth to your dish.

Step 4: Stir-Fry the Veggies

Now, it’s time to stir in those vibrant bell peppers, zucchini, and cherry tomatoes. Sprinkle the oregano, basil, salt, and pepper over the top, and stir-fry everything for another 5-7 minutes until the vegetables are tender yet still crisp. You want them to retain some bite for that perfect texture contrast!

Step 5: Garnish and Serve

Remove the skillet from heat and top your stir fry with crumbled feta cheese and fresh parsley. The feta adds a creamy, tangy finish that elevates this dish to new heights. Serve it warm, and watch your loved ones gather around the table!

Expert Cooking Tips

Nailing the Perfect Chicken Texture

To achieve that juicy, tender chicken, make sure not to overcrowd the pan while cooking. If necessary, work in batches. Also, using chicken breasts that are similar in size ensures even cooking.

Vegetable Cooking Secrets

Always add harder vegetables first. In this recipe, the bell peppers and zucchini need a little more time than the delicate cherry tomatoes. This way, everything finishes together perfectly.

Flavor-Building Tricks

Don’t skip the step of toasting your dried herbs in the pan for a few seconds before adding your liquids. This brings out their essential oils and enhances their flavors.

Variations & Substitutions

Spinach and Feta Bliss

For an added nutritional boost, toss in a couple of cups of fresh spinach during the last minute of cooking. It wilts beautifully and adds a lovely green color to your dish.

Sun-Dried Tomato and Artichoke Delight

Substituting fresh cherry tomatoes with sun-dried tomatoes and adding marinated artichoke hearts can deepen the flavors, giving your stir fry an elegant twist.

Low-Carb Cauliflower Rice Base

If you’re looking to cut carbs, serve this delightful stir fry over cauliflower rice instead of traditional grains. You’ll get to enjoy all the Mediterranean goodness without the extra carbs.

Essential Equipment

To create this dish, you’ll need:

  • A large skillet or wok
  • A chef’s knife for slicing
  • A cutting board
  • A spatula or wooden spoon for stirring

Having the right tools makes the process smoother, allowing you to focus on the joy of cooking!

Storage and Meal Prep Tips

Refrigerator Storage

Your Mediterranean chicken stir fry can be stored in an airtight container in the fridge for up to 3-4 days. The flavors actually improve as they mingle!

Freezing Your Creation

If you want to prep ahead, freeze your stir fry for up to 3 months. Just cool it down, transfer it to freezer-safe containers, and you’re all set! Thaw overnight in the fridge when you’re ready to enjoy it again.

Meal Prep Strategies

Consider prepping your vegetables at the beginning of the week. Store them in individual containers in the fridge so they are ready when you are. This makes cooking this dish even quicker and easier!

FAQs

What spices are good for Mediterranean chicken?

Classic Mediterranean spices include oregano, basil, thyme, and garlic. They create that signature flavor profile we all love!

What oil should I use for Mediterranean stir fry?

Extra virgin olive oil is your best bet. It not only adds flavor but also brings health benefits that are synonymous with Mediterranean cuisine.

How do I make my chicken tender for stir fry?

Slice your chicken into uniform pieces and avoid overcooking them. A meat thermometer can help you ensure it reaches 165°F without drying out.

Ready to Ignite Your Culinary Adventure?

This Easy Mediterranean Chicken Stir Fry Recipe is more than just a meal; it’s a passport to flavor exploration. With its vibrant ingredients and simple preparation, it’s an invitation to embrace the warmth of Mediterranean cooking right in your kitchen. So gather your ingredients, fire up that skillet, and get ready to create a dish that will not only satisfy your hunger but also awaken your passion for cooking.

Remember, the kitchen is an adventure waiting to unfold. Grab your spatula, and let’s make some magic happen!

Easy Mediterranean Chicken Stir Fry Recipe

Prep Time 10 minutes
Cook Time 15 minutes
Total Time 25 minutes
Servings 4 servings
Calories 350
A quick and flavorful stir fry combining tender chicken with fresh vegetables and Mediterranean herbs.

Ingredients

Protein

  • 1 pound chicken breast, sliced

Oil

  • 2 tablespoons olive oil

Vegetables

  • 1 red bell pepper red bell pepper, sliced
  • 1 yellow bell pepper yellow bell pepper, sliced
  • 1 zucchini zucchini, sliced
  • 1 cup cherry tomatoes, halved

Aromatics & Spices

  • 2 cloves garlic, minced
  • 1 teaspoon dried oregano
  • 1 teaspoon dried basil
  • to taste salt and pepper salt and pepper

Toppings

  • to taste feta cheese feta cheese for topping
  • to taste fresh parsley fresh parsley for garnish

Instructions 

  • Heat olive oil in a skillet over medium-high heat.
  • Add chicken and cook until browned, about 5-7 minutes.
  • Add garlic and cook for 1 minute.
  • Stir in vegetables and cook until tender, 5-7 minutes.
  • Top with feta and parsley before serving.

Notes

Use fresh herbs for best flavor and adjust seasoning to taste.
Calories: 350kcal
Cost: $15
Course: Main Course
Cuisine: Mediterranean
Keyword: chicken, Stir Fry, vegetables

Nutrition

Calories: 350kcal | Carbohydrates: 20g | Protein: 40g | Fat: 15g | Sodium: 600mg

Loved this recipe? Save it to your favorite Pinterest board so you can easily find it later! It’s the perfect way to keep all your sweet ideas in one place. ✨

A beautifully arranged plate of Mediterranean Chicken Stir Fry, showcasing fresh ingredients and feta cheese.

Why You’ll Love It

Let me tell you something about baking: it’s like alchemy. You take simple ingredients and transform them into something magical. And when it comes to effortless baking, nothing beats the 4 Ingredients Greek Yogurt Cake. This delightful dessert is not just a cake; it’s an experience that transports you straight to the sun-kissed shores of the Mediterranean with every bite. Imagine a cake that is rich, moist, and incredibly simple to whip up. Yes, you heard it right—only four ingredients! It’s perfect for beginners and seasoned bakers alike, and it’s so versatile that you can dress it up or down depending on the occasion.

But what makes this cake truly special is the Greek yogurt. It brings a creamy depth and tanginess that sets this cake apart from the usual suspects. Once you take that first luscious bite, you’ll understand why this recipe deserves a spot in your baking repertoire. So, gather your ingredients, and let’s dive into the art of baking this unforgettable Greek yogurt cake!

4 Ingredients Greek Yogurt Cake Recipe

If you’re ready to embark on this baking adventure, here’s what you’ll need to create this sensational cake:

  • 1 cup Greek yogurt – Choose full-fat for the richest flavor.
  • 1 cup granulated sugar – This will balance the tanginess of the yogurt nicely.
  • 1 cup all-purpose flour – The backbone of your cake.
  • 3 large eggs – These will add moisture and structure.

How To Make 4 Ingredients Greek Yogurt Cake

Delicious Greek Yogurt Cake featuring a light texture, illuminated by natural side lighting.

Now that you have your ingredients, let’s get down to business. This process is as straightforward as it gets, and I promise you’ll feel like a pro in no time. Here’s how to make it:

  1. Preheat your oven to 350°F (175°C) and grease a cake pan. I recommend using a 9-inch round pan, but any cake pan will do.
  2. In a mixing bowl, combine the Greek yogurt and sugar. Whisk them together until the mixture is creamy and well blended.
  3. Add the eggs one at a time, mixing thoroughly after each addition. You want to ensure that each egg is fully incorporated before moving on to the next one.
  4. Gradually fold in the flour until just combined. Be gentle here; we want a light and airy cake, not a dense one.
  5. Pour the batter into the prepared cake pan and smooth the top with a spatula.
  6. Bake for 30-35 minutes or until a toothpick inserted in the center comes out clean. Your kitchen will smell heavenly during this time!
  7. Let the cake cool in the pan for about 10 minutes before transferring it to a wire rack to cool completely.

Why This Recipe Works

Now, you might be wondering why this recipe is so effective and popular among home bakers. First off, the simplicity of the ingredient list is a huge plus. You don’t need a whole pantry full of exotic items to create something that tastes like it came straight from a gourmet bakery. Just four ingredients, and you can produce a cake that is both delicious and visually stunning.

The Greek yogurt not only provides moisture but also contributes to the cake’s tender crumb. It’s a secret weapon in the world of baking! Plus, using yogurt means you’re also sneaking in some additional protein and probiotics, making this treat just a bit healthier than your standard cake.

Baking Tips

To elevate your baking game, keep these tips in mind:

  • Room Temperature Ingredients: Make sure your eggs and yogurt are at room temperature before you start. This helps them blend better and creates a smoother batter.
  • Don’t Overmix: When adding the flour, mix until just combined. Overmixing can lead to a dense cake.
  • Test for Doneness: Ovens can vary, so start checking your cake a few minutes before the recommended baking time. You want a clean toothpick, not a wet one!

Variations and Customizations

While the classic Greek yogurt cake is undoubtedly delicious on its own, why not get creative? Here are a few ideas to customize it:

  • Add Zest: A teaspoon of lemon or orange zest can brighten up the flavor profile, giving your cake a refreshing twist.
  • Mix-Ins: Toss in some berries or chocolate chips to take your cake to the next level.
  • Glaze It: A simple glaze made of powdered sugar and lemon juice drizzled on top can add a touch of elegance.

Substitutions

Don’t have all the ingredients on hand? Here are some substitutions you can consider:

  • Yogurt: You can use regular yogurt, but Greek yogurt provides a creamier texture.
  • Flour: For a gluten-free version, try using almond flour or a gluten-free flour blend.
  • Sugar: If you’re looking to reduce sugar, you can experiment with alternatives like honey or maple syrup, but keep in mind this might affect the texture.

Equipment You’ll Need

Having the right tools makes baking easier and more enjoyable. Here’s what you’ll need for this recipe:

  • Mixing bowls
  • Whisk
  • Spatula
  • Cake pan (9-inch round recommended)
  • Wire rack for cooling

Storage and Freezing

Once your Greek yogurt cake is baked and cooled, you might be wondering how to store it. Here’s what you need to know:

  • At Room Temperature: If you plan to eat it within a day or two, you can cover it with plastic wrap or store it in an airtight container.
  • In the Refrigerator: For longer storage, keep the cake in the fridge, where it can last up to a week. Just ensure it’s well wrapped to prevent it from drying out.
  • Freezing: You can freeze the cake for up to three months. Wrap it tightly in plastic wrap and then in foil before placing it in the freezer. Thaw it in the refrigerator overnight before serving.

Frequently Asked Questions

Got questions? I’ve got answers! Here are some common queries about this delightful dessert:

  • Can I make this cake in advance? Absolutely! This cake stores well, making it perfect for prepping ahead of time.
  • Can I use a different type of yogurt? While Greek yogurt is recommended for its texture, you can use regular yogurt, but the cake may not be as rich and moist.
  • What can I serve with this cake? Fresh fruits, whipped cream, or a simple dusting of powdered sugar work beautifully. You can also pair it with a scoop of ice cream for a decadent dessert.

Troubleshooting

If things don’t go as planned, don’t fret! Here are some common issues and how to fix them:

  • My cake is too dense: This could be due to overmixing the batter. Remember, gentle folding is key!
  • The cake is dry: Make sure you’re measuring your ingredients accurately. Too much flour can lead to dryness.
  • It didn’t rise: Check your baking powder’s expiration date and ensure your oven is at the right temperature.

Conclusion

There you have it, my adventurous bakers! The 4 Ingredients Greek Yogurt Cake is more than just a dessert; it’s a celebration of simplicity and flavor. With its approachable recipe and endless possibilities for customization, this cake is sure to become a staple in your kitchen. So, roll up those sleeves, grab your whisk, and enjoy the sweet rewards of your culinary journey. Remember, every bite is a story waiting to be told, and I can’t wait to hear yours! If you try this recipe, please leave a comment and let me know how it turned out. Happy baking!

4 Ingredients Greek Yogurt Cake - Rasa Malaysia

Prep Time 10 minutes
Cook Time 35 minutes
Total Time 45 minutes
Servings 8 pieces
Calories 250
A simple and delicious Greek yogurt cake made with just four ingredients, perfect for a quick dessert or snack.

Ingredients

Main

  • 1 cup greek yogurt
  • 1 cup granulated sugar
  • 1 cup all-purpose flour
  • 3 large eggs

Instructions 

  • Preheat oven to 350°F (175°C). Grease a cake pan.
  • Mix Greek yogurt and sugar until smooth.
  • Add eggs one at a time, mixing well.
  • Fold in flour until just combined.
  • Pour batter into pan and bake for 30-35 minutes.
  • Cool before serving.

Notes

This cake is best enjoyed fresh. You can add lemon zest for extra flavor.
Calories: 250kcal
Cost: $10
Course: Dessert
Cuisine: Greek
Keyword: yogurt

Nutrition

Calories: 250kcal | Carbohydrates: 40g | Protein: 10g | Fat: 5g | Sodium: 60mg

Loved this recipe? Save it to your favorite Pinterest board so you can easily find it later! It’s the perfect way to keep all your sweet ideas in one place. ✨

An enticing slice of Greek Yogurt Cake showing its fluffy interior, captured in warm, natural light.

Why This Dish is a Must-Try

Gather around, folks! If you’re looking for a meal that’s not only comforting but also bursting with flavor, you’ve landed in the right place. This Instant Pot Homestyle Chicken & Veggies recipe is a love letter to the beauty of home cooking. In just about 30 minutes, you can serve up a heartwarming dish that brings the whole family together. It’s like a warm hug on a plate, ready to soothe even the busiest of days.

The magic of the Instant Pot transforms the ordinary into something extraordinary. Imagine tender chicken that practically melts in your mouth, paired with vibrant vegetables, all swimming in a rich broth that’s full of aromatic goodness. This dish is not just about filling your belly; it’s about creating moments and memories with every bite.

Table of Contents

What Makes This Recipe Absolutely Exceptional

A delicious serving of Instant Pot chicken and mixed vegetables, beautifully presented with soft shadows.

Let’s talk about what sets this recipe apart. First off, the combination of perfectly cooked chicken and fresh vegetables means you’re getting a well-rounded meal that’s as nutritious as it is delicious. Plus, the Instant Pot does all the heavy lifting for you. No more babysitting pots on the stove or worrying about burning anything!

The flavor profile is another star of the show. The earthy notes of thyme and rosemary mingle beautifully with the sweetness of sautéed onions and garlic, creating a depth of flavor that feels both familiar and exciting. Each ingredient plays its part in this culinary symphony, ensuring every bite is worth savoring. And with only one pot to clean? Count me in!

Ingredients: Your Shopping List Made Simple

Before diving into the cooking process, let’s gather our ingredients. Here’s what you’ll need for this delightful dish:

  • 2 lbs boneless, skinless chicken breasts
  • 1 cup chicken broth
  • 3 cups mixed vegetables (carrots, peas, corn, green beans)
  • 1 onion, chopped
  • 2 cloves garlic, minced
  • 1 teaspoon dried thyme
  • 1 teaspoon dried rosemary
  • Salt and pepper to taste
  • 2 tablespoons olive oil
  • 1 tablespoon butter

Essential Equipment and Smart Alternatives

To make this recipe shine, you’ll need an Instant Pot—specifically, a 6-quart model works perfectly for this meal. This kitchen powerhouse allows for pressure cooking, which locks in flavor and moisture, resulting in tender meat and perfectly cooked veggies.

Here’s a quick rundown of the essential equipment:

  • Instant Pot: Your main tool for this recipe. If you don’t have one, a stovetop pressure cooker will also do the trick, but you’ll need to adjust cooking times.
  • Sharp Knife and Cutting Board: For chopping vegetables and chicken. A sharp knife makes prep work easier and safer!
  • Measuring Cups and Spoons: For accuracy in your ingredients.

Step-by-Step Cooking Instructions

Let’s get cooking! Follow these steps to create your own masterpiece:

Step 1: Building Your Flavor Foundation

Press the ‘Sauté’ button on your Instant Pot and add the olive oil. Allow it to heat up until shimmering—this usually takes about 2-3 minutes.

Once hot, toss in the chopped onion and minced garlic. Sauté until softened and fragrant, about 2-3 minutes. This is where the magic begins! The aromas filling your kitchen will have everyone eagerly anticipating dinner.

Step 2: Seasoning the Chicken

Now it’s time to bring the chicken into the spotlight. Season the chicken breasts with salt, pepper, thyme, and rosemary. This pre-seasoning step is crucial—it ensures that every bite is flavorful from the inside out!

Add the seasoned chicken directly to the pot on top of the sautéed onions and garlic. Don’t worry about browning it; the pressure cooking will take care of that.

Step 3: Liquid and Vegetables

Pour the chicken broth into the pot and stir gently to combine with the other ingredients. The liquid will help deglaze the pot, lifting those flavorful bits stuck to the bottom—a little flavor booster!

Now, take your mixed vegetables and layer them on top of the chicken. It’s important not to stir them in; this keeps them from getting mushy and ensures they cook evenly.

Step 4: Pressure Cooking Perfection

Close the lid of your Instant Pot and make sure the valve is set to ‘Sealing’. Select ‘Manual’ or ‘Pressure Cook’ and set the timer for 10 minutes. The pressurization process may take 5-10 minutes, but that’s just a warm-up for the culinary magic about to happen!

Step 5: Pressure Release Strategy

When the cooking time is complete, allow the Instant Pot to naturally release pressure for 5 minutes. This gentle release helps keep your chicken tender and juicy. After 5 minutes, carefully perform a quick release for any remaining pressure.

Once it’s safe, open the lid away from your face to avoid steam burns. Give everything a gentle stir to combine the flavors. Finally, stir in the butter until it melts, adding a rich finish to your dish.

Expert Tips for Restaurant-Quality Results

Want to elevate your dish even further? Here are some expert tips:

  • Temperature Matters: Always ensure your chicken reaches an internal temperature of 165°F (74°C) for safety and perfect tenderness.
  • Adjust for Vegetable Texture: For firmer vegetables, reduce the cooking time to 8 minutes. For softer, kid-friendly veggies, you might want to increase it to 12 minutes.
  • Layering is Key: The order of ingredients matters! Start with chicken, then broth, and finally vegetables to ensure even cooking.

Creative Variations and Substitutions

This recipe is versatile and lends itself beautifully to experimentation. Here are some creative variations you might want to try:

  • Holiday Version: Add cranberries and sage for a festive twist, perfect for Thanksgiving flavors.
  • Mediterranean Style: Include kalamata olives and sun-dried tomatoes, and serve over rice for a Mediterranean feast.
  • Tex-Mex Twist: Spice things up with cumin, chili powder, and diced jalapeños. Top with fresh cilantro and a squeeze of lime for a zesty finish.
  • Asian-Inspired: Add ginger, soy sauce, and sesame oil for an Asian flair. Garnish with green onions and sesame seeds.

Storage, Make-Ahead Magic, and Freezing

This dish stores beautifully! You can refrigerate leftovers for up to four days, and believe me, it only gets better as the flavors meld. Want to prepare ahead of time? Chop your vegetables the night before and store them in separate containers in the fridge. This reduces your active cooking time to under 10 minutes!

If you want to freeze this dish, let it cool completely, then transfer it to freezer-safe containers. It will freeze well for up to three months. Just reheat gently on the stove or in the microwave when you’re ready to enjoy it again.

Instant Pot Homestyle Chicken and Veggies FAQs

Can I put raw chicken in the Instant Pot?

Absolutely! The Instant Pot is designed to cook raw chicken safely and effectively, ensuring it’s tender and juicy.

What should I avoid putting in the Instant Pot?

Avoid dairy products during the pressure cooking process, as they can curdle. Also, skip thickening agents like flour or cornstarch until after cooking.

Why is my Instant Pot chicken chewy?

Chewy chicken can result from overcooking or insufficient liquid. Always ensure you’re using enough liquid and sticking to recommended cooking times.

What are common mistakes when cooking chicken in an Instant Pot?

Common errors include not using enough liquid, overcooking, and neglecting natural pressure release, which is essential for keeping the chicken moist.

Conclusion: Your New Go-To Comfort Food

This Instant Pot Homestyle Chicken & Veggies recipe is more than just a meal; it’s an experience. It brings together the heart of home cooking with the convenience of modern technology, allowing you to create a dish that’s sure to impress. Whether it’s a busy weeknight or a cozy family gathering, this dish is your ticket to comfort food perfection. So, fire up that Instant Pot, embrace the flavors, and let this dish steal your heart. Your family will be grateful, and trust me, you’ll want to make this again and again.

Instant Pot Homestyle Chicken & Veggies – Easy Comfort Food Dinner Ready Fast and Full of Flavor

Prep Time 10 minutes
Cook Time 10 minutes
Total Time 20 minutes
Servings 4 servings
Calories 350
A hearty and flavorful chicken and vegetable dish cooked quickly in the Instant Pot, perfect for a comforting weeknight dinner.

Ingredients

Protein

  • 2 lbs boneless, skinless chicken breasts

Liquid

  • 1 cup chicken broth

Vegetables

  • 3 cups mixed vegetables (carrots, peas, corn, green beans)

Aromatics

  • 1 unit onion, chopped
  • 2 cloves garlic, minced

Seasonings

  • 1 teaspoon dried thyme
  • 1 teaspoon dried rosemary
  • to taste salt and pepper

Oils and Fats

  • 2 tablespoons olive oil
  • 1 tablespoon butter

Instructions 

  • Press 'Sauté' on the Instant Pot, add olive oil, then sauté onion and garlic until softened.
  • Season chicken with salt, pepper, thyme, and rosemary, then add to the pot.
  • Pour in chicken broth, add vegetables on top, close lid, set to 'Sealing', and cook on 'Pressure Cook' for 10 minutes.
  • Allow natural release for 5 minutes, then quick release remaining pressure.
  • Stir in butter until melted, then serve warm.

Notes

For extra flavor, add fresh herbs or a squeeze of lemon before serving.
Calories: 350kcal
Cost: $15
Course: Dinner
Cuisine: American
Keyword: chicken, vegetables

Nutrition

Calories: 350kcal | Carbohydrates: 30g | Protein: 45g | Fat: 10g | Sodium: 600mg

Loved this recipe? Save it to your favorite Pinterest board so you can easily find it later! It’s the perfect way to keep all your sweet ideas in one place. ✨

Eye-level shot of a hearty chicken and veggie dish, highlighting the texture and warmth of the meal.

Why This Yule Log Will Become Your Holiday Favorite

When the holiday season rolls around, our kitchens become the heart of our homes, buzzing with excitement and delicious aromas. The Holiday Yule Log Cake, or Bûche De Noël, is not just a dessert; it’s a celebration on a plate. My fiery take on this classic brings together a tender cocoa sponge cake, luxurious cocoa hazelnut whipped cream, and a decadent dark chocolate ganache bark that will have your taste buds dancing. Let’s dive into why this dessert is the perfect centerpiece for your festive gatherings.

Overview of the Ingredients

To create this enchanting cake, you’ll need:

  • Cocoa Sponge Cake: The foundation of our Yule Log, light and airy, with rich cocoa flavor.
  • Cocoa Hazelnut Whipped Cream: This filling adds a creamy texture and nutty sweetness that elevates the cake.
  • Dark Chocolate Ganache Bark: A crispy, glossy finish that brings a deep chocolate flavor and stunning presentation.

Steps to Create Your Holiday Masterpiece

An artistic shot of a festive Bûche De Noël with rich textures and warm lighting.

Let’s get to the fun part: the steps to craft your Yule Log Cake!

1. Prepare the Cocoa Sponge Cake: Start by preheating your oven and lining a baking sheet with parchment paper. Whisk together your dry ingredients, then beat your eggs and sugar until pale and fluffy. Carefully fold in the cocoa powder and flour mixture, ensuring you keep that light texture. Spread the batter evenly and bake until the cake springs back when touched.

2. Make the Cocoa Hazelnut Whipped Cream: While the cake is baking, whip your cream until soft peaks form. Gently fold in the cocoa powder and hazelnut spread, ensuring you maintain that airy quality. This filling is where the magic happens, bringing richness and flavor to your Yule log.

3. Assemble the Cake: Once the cake is cool, turn it out onto a clean kitchen towel dusted with cocoa powder. Spread a generous layer of the cocoa hazelnut whipped cream over the sponge and roll it up tightly. Don’t worry if it cracks a bit; that’s part of its rustic charm!

4. Create the Dark Chocolate Ganache Bark: Melt dark chocolate and cream together until smooth. Allow it to cool slightly before pouring it over the rolled cake. Use a spatula to smooth it out evenly, then use a fork to create bark-like textures.

5. Decorate and Serve: Once the ganache is set, slice the ends off the log to create clean edges. You can garnish with powdered sugar for a snowy effect, or even some festive sprigs of rosemary or edible glitter for that holiday sparkle.

Tips for a Perfect Yule Log

Creating the perfect Yule Log takes a little finesse, but with these tips, you’ll be well on your way:

  • Use Room Temperature Ingredients: This ensures even mixing and a better texture.
  • Don’t Overbake: Keep an eye on your sponge cake; it should be springy to the touch but not dry.
  • Chill the Whipped Cream: Cold cream whips better, so make sure your mixing bowl and beaters are chilled as well.
  • Experiment with Flavors: Feel free to add a splash of espresso or orange zest to your whipped cream for an extra flavor dimension.

Possible Variations to Try

Your Yule Log doesn’t have to be just cocoa-flavored. Here are a few variations to consider:

  • Matcha Yule Log: Swap cocoa for matcha powder for a vibrant green log.
  • Spiced Yule Log: Add cinnamon and nutmeg to the sponge cake for a warm, spiced flavor.
  • Fruit-Infused Whipped Cream: Incorporate crushed berries or a splash of liqueur for a fruity twist.

Substitutions for Dietary Needs

Don’t let dietary restrictions hold you back from enjoying this festive dessert. Here are some substitutions:

  • Gluten-Free: Use a gluten-free flour blend in place of all-purpose flour for the sponge cake.
  • Dairy-Free: Substitute coconut cream for the whipped cream and use dairy-free chocolate for the ganache.
  • Nut-Free: If you need to exclude nuts, simply omit the hazelnut spread and use a different flavor of whipped cream or chocolate.

Essential Equipment for Success

Having the right tools can make all the difference. Here’s what you’ll need:

  • Baking Sheet: A rimmed baking sheet for the sponge cake.
  • Parchment Paper: To prevent sticking and make clean-up a breeze.
  • Mixing Bowls: A set of mixing bowls for combining your ingredients.
  • Electric Mixer: For whipping cream and beating the batter.
  • Offset Spatula: To spread the ganache and whipped cream smoothly.

Storage and Freezing Tips

If you’re planning to make your Yule Log ahead of time, here’s how to store it:

  • In the Fridge: Wrap your Yule Log tightly in plastic wrap to keep it fresh. It can last in the fridge for up to 3 days.
  • Freezing: You can freeze the unglazed Yule Log for up to 2 months. Just thaw it overnight in the fridge before glazing.

FAQs About the Yule Log Cake

Let’s tackle some common questions you might have:

  • Can I make this in advance? Absolutely! The Yule Log can be made a day or two ahead, and it tastes even better as the flavors meld.
  • What if my sponge cake cracks? Don’t sweat it! A little crack adds to the rustic charm of your log. Just cover it with ganache and decorate.
  • Can I use store-bought components? Sure! If you’re short on time, feel free to use store-bought chocolate ganache or whipped cream.

Troubleshooting Common Issues

If things don’t go as planned, don’t lose heart. Here are some troubleshooting tips:

  • Spongy Cake: If your cake is too dense, it might be overmixed. Be gentle when folding in the dry ingredients.
  • Ganache Not Setting: If your ganache is too runny, try chilling it for a bit longer before pouring.

Final Thoughts and Invitation

The Holiday Yule Log Cake is more than just a dessert; it’s a labor of love that brings joy to any festive table. With a little practice and creativity, you’ll create a stunning centerpiece that delights both the eyes and the palate. So gather your ingredients, invite friends over, and let’s unlock the magic of cooking together! May your holiday season be filled with warmth, laughter, and, of course, delicious food. Happy baking!

Holiday Yule Log Cake (Bûche De Noël)

Prep Time 45 minutes
Cook Time 15 minutes
Total Time 1 hour
Servings 8 pieces
Calories 350
A festive and elegant dessert featuring a tender cocoa sponge cake filled with rich cocoa hazelnut whipped cream and coated in a decadent dark chocolate ganache bark.

Ingredients

Cake

  • 1 batch cocoa sponge cake

Filling

  • 1 cup cocoa hazelnut whipped cream

Topping

  • 200 grams dark chocolate ganache bark

Instructions 

  • Bake the cocoa sponge cake and let it cool.
  • Spread cocoa hazelnut whipped cream over the cooled cake.
  • Roll the cake into a log shape and chill.
  • Coat the rolled cake with dark chocolate ganache bark.
  • Decorate as desired and serve.

Notes

Chill the cake thoroughly before serving for best texture.
Calories: 350kcal
Cost: $15
Course: Dessert
Cuisine: French
Keyword: chocolate

Nutrition

Calories: 350kcal | Carbohydrates: 45g | Protein: 6g | Fat: 18g | Sodium: 70mg

Loved this recipe? Save it to your favorite Pinterest board so you can easily find it later! It’s the perfect way to keep all your sweet ideas in one place. ✨

A beautifully presented Yule Log Cake featuring cocoa sponge and fluffy cream.

Why You’ll Love This Recipe

Are you ready to wrap your taste buds in adventure? If you’re looking for a meal that combines the classic comfort of a Caesar salad with the excitement of a handheld wrap, look no further! These Chicken Caesar Wraps are not just your ordinary lunch; they are a celebration of flavors, textures, and that irresistible crunch that makes every bite a delight.

Imagine biting into a soft tortilla that encases juicy, shredded chicken, crisp romaine lettuce, and creamy Caesar dressing, all topped with a sprinkle of rich Parmesan cheese. It’s a dish that invites you to savor each mouthful, making it perfect for a quick lunch or a satisfying dinner. Plus, they’re so easy to make that you’ll want to whip them up again and again!

Ingredient Notes

Let’s dive into what makes these wraps sing with flavor. Here’s what you’ll need:

  • 2 cups cooked chicken, shredded: This could be leftover chicken, grilled, or rotisserie chicken. The more flavorful, the better!
  • 1 cup romaine lettuce, chopped: Crunchy and fresh, romaine provides a wonderful texture contrast.
  • 1/2 cup Caesar dressing: Opt for your favorite brand or homemade for a personal touch.
  • 1/4 cup grated Parmesan cheese: This adds a nutty, salty flavor that complements the dressing beautifully.
  • 4 large tortillas or wraps: Choose flour tortillas for a soft wrap or whole wheat for a healthier option.
  • Salt and pepper to taste: Simple seasonings that elevate the dish.
  • Optional: croutons for crunch: Add a delightful crunch to your wraps!

Step-by-Step Tutorial

Delicious Chicken Caesar Wrap showcasing layers of chicken, lettuce, and croutons on a tortilla.

Ready to get cooking? Let’s break down the process into simple steps that will have you enjoying these wraps in no time!

Step 1 | Combine the Filling

In a large bowl, combine the shredded chicken, chopped romaine lettuce, Caesar dressing, and grated Parmesan cheese. Toss them together gently, ensuring that every piece of chicken and lettuce is coated with that creamy goodness. Season the mixture with salt and pepper to taste. This is where you can adjust the flavor to your liking — make it bold or keep it subtle!

Step 2 | Prepare the Tortillas

Lay out the tortillas on a flat surface. If your tortillas are a bit stiff, warm them in the microwave for about 10-15 seconds to make them pliable. This will help you roll them up without breaking.

Step 3 | Assemble the Wraps

Divide the chicken Caesar mixture evenly among the tortillas. Be careful not to overfill them; you want to be able to wrap them snugly. Fold in the sides of the tortilla and then roll it from the bottom up, making sure to keep the filling tucked inside. Slice each wrap in half and serve immediately, or wrap them in foil for later. They make for an excellent meal prep option!

Many Ways to Cook the Chicken

While the recipe calls for shredded cooked chicken, the method you use to cook that chicken can vary greatly:

  • Grilled Chicken: For an added smoky flavor, grill the chicken breasts until perfectly charred and juicy.
  • Pan-Seared Chicken: Cook chicken breasts in a skillet with a bit of olive oil, seasoning them generously.
  • Air-Fried Chicken: If you’re short on time, an air fryer can cook your chicken quickly while keeping it moist.
  • Rotisserie Chicken: Don’t hesitate to use store-bought rotisserie chicken for a shortcut that still delivers great flavor.

Prep Ahead

One of the best parts about these Chicken Caesar Wraps is how well they lend themselves to meal prep. You can prepare all the filling ingredients ahead of time and refrigerate them for up to three days. Just remember to keep the dressing separate until you’re ready to eat, as it can make the wraps soggy.

Variations and Shortcuts

Feeling adventurous? Here are some variations you can try:

  • Spicy Kick: Add sliced jalapeños or a splash of hot sauce to the filling for an extra layer of heat.
  • Vegetarian Option: Swap out the chicken for chickpeas or grilled vegetables for a hearty meat-free meal.
  • Different Greens: Try using spinach, kale, or even arugula instead of romaine for a different flavor profile.
  • Additional Toppings: Consider adding avocado slices, cherry tomatoes, or even bacon bits for an extra crunch.

Pairing and Serving Ideas

These Chicken Caesar Wraps are versatile and can be paired with a variety of side dishes:

  • Chips or Fries: A classic side that never disappoints.
  • Soup: A warm tomato basil bisque or a hearty minestrone can complement the wraps beautifully.
  • Salad: Pair with a side salad for a refreshing balance.

Storage and Freezing

If you have leftovers (which is rare because they are so delicious), you can store them in the refrigerator for 1-2 days. Just wrap them tightly in plastic wrap or foil to keep them fresh. However, avoid adding the dressing until you’re ready to eat to maintain the wrap’s texture.

For longer storage, consider freezing the filling mixture (without dressing) in an airtight container. When you’re ready to enjoy, just thaw it in the refrigerator and assemble the wraps fresh!

Recipe FAQs

Here are some common questions about Chicken Caesar Wraps:

Can I use different types of tortillas?

Absolutely! Whole wheat, spinach, or even gluten-free wraps work perfectly. Just choose what fits your dietary needs best!

Is this recipe kid-friendly?

Definitely! Kids love the fun of wraps, and you can customize the ingredients to suit their tastes.

Can I make this vegan?

Sure! Replace the chicken with chickpeas or tofu and use a vegan Caesar dressing for a delicious vegan wrap.

Tips for Success

To make sure your Chicken Caesar Wraps are a hit every time, keep these tips in mind:

  • Warm the tortillas before wrapping to prevent tearing.
  • Don’t overfill your wraps; it makes rolling them up difficult.
  • Feel free to experiment with different herbs and spices in the chicken marinade for a unique flavor.

Conclusion

There you have it! An exciting, flavorful way to enjoy a classic Caesar salad wrapped up in a convenient tortilla. These Chicken Caesar Wraps are perfect for busy weekdays or leisurely weekends when you want something quick yet delicious. The beauty of this dish lies in its simplicity and versatility. So, grab your ingredients, roll up your sleeves, and dive into a culinary adventure that’s sure to impress your family and friends. Remember, cooking is about experimenting and enjoying the process, so don’t hold back. Happy wrapping!

Chicken Caesar Wraps

Prep Time 10 minutes
Total Time 10 minutes
Servings 4 wraps
Calories 450
Enjoy these quick and delicious Chicken Caesar Wraps, perfect for a satisfying lunch or dinner.

Ingredients

Protein

  • 2 cups cooked chicken, shredded

Vegetables

  • 1 cup romaine lettuce, chopped

Dressing

  • 1/2 cup caesar dressing

Cheese

  • 1/4 cup grated parmesan cheese

Wraps

  • 4 large tortillas large tortillas or wraps

Seasoning

  • to taste salt and pepper (for seasoning)

Optional

  • for crunch croutons (optional for added crunch)

Instructions 

  • Mix chicken, lettuce, dressing, and Parmesan in a bowl.
  • Season with salt and pepper.
  • Divide mixture onto tortillas and roll up.
  • Slice in half and serve immediately.

Notes

You can add croutons for extra crunch if desired.
Calories: 450kcal
Cost: $12
Course: Main Course
Cuisine: American
Keyword: chicken, Wraps

Nutrition

Calories: 450kcal | Carbohydrates: 40g | Protein: 35g | Fat: 15g | Sodium: 900mg

Loved this recipe? Save it to your favorite Pinterest board so you can easily find it later! It’s the perfect way to keep all your sweet ideas in one place. ✨

Eye-level shot of a Chicken Caesar Wrap with vibrant greens, creamy dressing, and soft tortillas.

Why You’ll Enjoy This Culinary Journey

Imagine walking into your kitchen at the end of a long day, the tantalizing aroma of sweet and savory honey garlic chicken wafting through the air, wrapping around you like a warm hug. That’s the magic of this Slow Cooker Honey Garlic Chicken and Veggies Recipe. It’s not just a meal; it’s an experience that transforms your evening into an adventure of flavors without requiring hours of your time. This dish is perfect for anyone who loves a wholesome and delicious meal that practically cooks itself. With just a handful of ingredients, you can create a masterpiece that brings everyone to the table, eager to dig in!

Ingredients You’ll Need

Before we dive into the cooking process, let’s gather our ingredients. This recipe is all about simplicity and flavor, using items you likely already have on hand. Here’s what you need:

  • 1.5 lbs boneless, skinless chicken breasts
  • 1/4 cup honey
  • 1/4 cup soy sauce
  • 4 cloves garlic, minced
  • 1 tbsp sesame oil
  • 1 cup broccoli florets
  • 1 cup bell peppers, sliced
  • 1 cup carrots, sliced
  • 1/2 cup onion, sliced
  • Salt and pepper to taste
  • Sesame seeds for garnish (optional)
  • Chopped green onions for garnish (optional)

How to Create This Flavorful Dish

Delicious Slow Cooker Honey Garlic Chicken garnished with green onions and sesame seeds.

Creating this dish is as easy as pie—think of it as a delicious symphony where every ingredient plays a role. Here’s a step-by-step guide to get you rocking in the kitchen:

Step 1: Whisk the Sauce

In a medium bowl, combine the honey, soy sauce, minced garlic, and sesame oil. Whisk these ingredients together until they’re well blended. This honey garlic sauce will be the star of our show, infusing the chicken and veggies with an incredible flavor.

Step 2: Prepare the Chicken

Next, place the chicken breasts at the bottom of your slow cooker. This positioning allows them to soak up all that glorious honey garlic sauce as they cook, ensuring maximum flavor.

Step 3: Add the Veggies

Now it’s time to layer on the love! Add the sliced onions, carrots, bell peppers, and broccoli on top of the chicken. These vibrant veggies not only add color but also bring texture and nutrients to the dish.

Step 4: Season It Right

Season everything with salt and pepper to taste. Remember, a little goes a long way, and these seasonings will help bring out the natural flavors of the chicken and vegetables.

Step 5: Set It and Forget It

Cover the slow cooker and set it to low for 6-7 hours or high for 3-4 hours. This hands-off cooking method allows all those flavors to meld beautifully without any fuss. You can head out to tackle those errands or kick back and relax; your slow cooker has got this!

Step 6: Shred the Chicken

Once cooked through, shred the chicken using two forks right in the slow cooker. Mixing it with the veggies ensures that every bite is bursting with flavor. It’s like a culinary hug in a bowl!

Step 7: Serve It Up!

Serve this delightful dish hot, garnished with sesame seeds and chopped green onions if desired. Pair it with steamed rice or quinoa for a complete meal that’s not only hearty but also incredibly satisfying.

Pro Tips for the Perfect Dish

Here are some pro tips to elevate your Slow Cooker Honey Garlic Chicken and Veggies Recipe:

  • Prep Ahead: Chop your veggies and prepare the sauce ahead of time. This can save you precious minutes on busy nights.
  • Experiment with Veggies: Feel free to mix and match your favorite vegetables. Snap peas, zucchini, or even cauliflower can add a delicious twist!
  • Thicker Sauce: If you prefer a thicker sauce, mix a tablespoon of cornstarch with water about 30 minutes before serving. Add it to the slow cooker to create a luscious coating for your chicken and veggies.

Variations to Try

While this recipe is fantastic as is, don’t hesitate to get creative. Here are some variations to inspire your culinary journey:

  • Spicy Honey Garlic Chicken: Add a teaspoon of red pepper flakes or a splash of sriracha to the sauce for a spicy kick.
  • Citrus Twist: Incorporate the juice of a lime or orange into the sauce for a refreshing citrus flavor.
  • Herb-Infused: Add fresh herbs like basil or cilantro just before serving for an aromatic finish.

Storing and Freezing

Planning to make this dish ahead of time? Here’s how to store and freeze your leftovers:

Storing Leftovers

Store any leftovers in an airtight container in the refrigerator for up to 4 days. This dish makes fantastic leftovers, and the flavors continue to meld together beautifully.

Freezing

If you want to freeze it, allow the dish to cool completely before transferring it to a freezer-safe container. It can be frozen for up to 3 months. Just remember to label it with the date!

Reheating

To reheat, simply thaw in the refrigerator overnight, then warm it in the microwave or on the stovetop until heated through. Add a splash of water or broth to loosen the sauce if needed.

FAQs

Can I use frozen chicken in this recipe?

Absolutely! You can use frozen chicken breasts; just increase the cooking time by about 1-2 hours. Ensure the chicken reaches a safe internal temperature of at least 165°F (75°C) before serving.

What vegetables work best?

Carrots, bell peppers, broccoli, and snap peas are great choices! You can also experiment with your favorites, just be mindful of cooking times as some may cook faster than others.

Can I make this without soy sauce?

Yes! Swap soy sauce for tamari for a gluten-free option, or use coconut aminos for a lighter alternative. Both will give you that desired flavor without soy.

Final Thoughts

Cooking should be an adventure, and with this Slow Cooker Honey Garlic Chicken and Veggies Recipe, you’re well on your way to creating something truly special. It’s easy, delicious, and packed with wholesome ingredients. So grab your slow cooker, gather your loved ones around the table, and enjoy a meal that’s not just food, but a celebration of flavors and togetherness. I can’t wait for you to try this recipe and experience the joy it brings. Happy cooking, and remember: always embrace the spice of life!

Slow Cooker Honey Garlic Chicken And Veggies Recipe: Easy Dinner Ideas for Healthy Weeknight Meals

Prep Time 10 minutes
Cook Time 6 hours 30 minutes
Total Time 6 hours 40 minutes
Servings 4 servings
Calories 350
A delicious and healthy slow cooker meal combining tender chicken with colorful vegetables, flavored with honey and garlic for a perfect weeknight dinner.

Ingredients

protein

  • 1.5 lbs boneless, skinless chicken breasts
  • 0.25 cup honey
  • 0.25 cup soy sauce
  • 4 cloves garlic, minced
  • 1 tbsp sesame oil
  • 1 cup broccoli florets
  • 1 cup bell peppers, sliced
  • 1 cup carrots, sliced
  • 0.5 cup onion, sliced
  • to taste salt and pepper
  • optional sesame seeds for garnish
  • optional chopped green onions for garnish

Instructions 

  • Whisk honey, soy sauce, garlic, and sesame oil in a bowl.
  • Place chicken in slow cooker and pour sauce over.
  • Add vegetables on top, season with salt and pepper.
  • Cook on low for 6-7 hours or high for 3-4 hours until cooked through.
  • Shred chicken, mix with veggies, and serve hot, garnished if desired.

Notes

For extra flavor, sprinkle with sesame seeds and chopped green onions before serving.
Calories: 350kcal
Cost: $15
Course: Dinner
Cuisine: American
Keyword: chicken, healthy, Slow Cooker

Nutrition

Calories: 350kcal | Carbohydrates: 40g | Protein: 40g | Fat: 8g | Sodium: 900mg

Loved this recipe? Save it to your favorite Pinterest board so you can easily find it later! It’s the perfect way to keep all your sweet ideas in one place. ✨

Eye-level view of honey garlic chicken with broccoli, bell peppers, and carrots.