Author

Avery Collins

Browsing

Discover the Sweet Potato Revelation That Will Ignite Your Culinary Passion

Welcome to a culinary adventure that celebrates the rich, sweet, and earthy flavors of Japanese sweet potatoes! Not just any sweet potatoes, but the magnificent Yaki Imo — a traditional Japanese baked sweet potato dish that transforms a humble ingredient into a mind-blowing experience. In this article, we’ll dive deep into the world of Japanese sweet potatoes, exploring their benefits, how to pick the best ones, and the secrets to baking them to perfection. Get ready to elevate your cooking game and embrace the delightful warmth and sweetness that these potatoes bring!

Why You’ll Love This Recipe

Not convinced yet? Let me share five compelling reasons why this recipe will become a staple in your kitchen:

  • Health Benefits: Japanese sweet potatoes are packed with essential vitamins and minerals, including vitamin A, vitamin C, and potassium. They also offer dietary fiber, aiding digestion and contributing to overall health.
  • Easy to Prepare: With just two main ingredients and minimal prep time, you can have a delicious dish that’s perfect for any occasion.
  • Versatile Serving Options: Enjoy them straight out of the oven, or use them in various recipes, from soups to desserts, enhancing every meal.
  • Unique Flavor: Experience a sweet, creamy texture and a subtle earthiness that sets Japanese sweet potatoes apart from their orange counterparts.
  • Visual Appeal: Their vibrant colors and appealing skins make them a feast for the eyes, turning any meal into a special occasion.

Ingredients You’ll Need

Two perfectly baked satsumaimo with a soft, caramelized exterior, showcased on a textured background.

Let’s gather the essentials to create the perfect baked Japanese sweet potatoes:

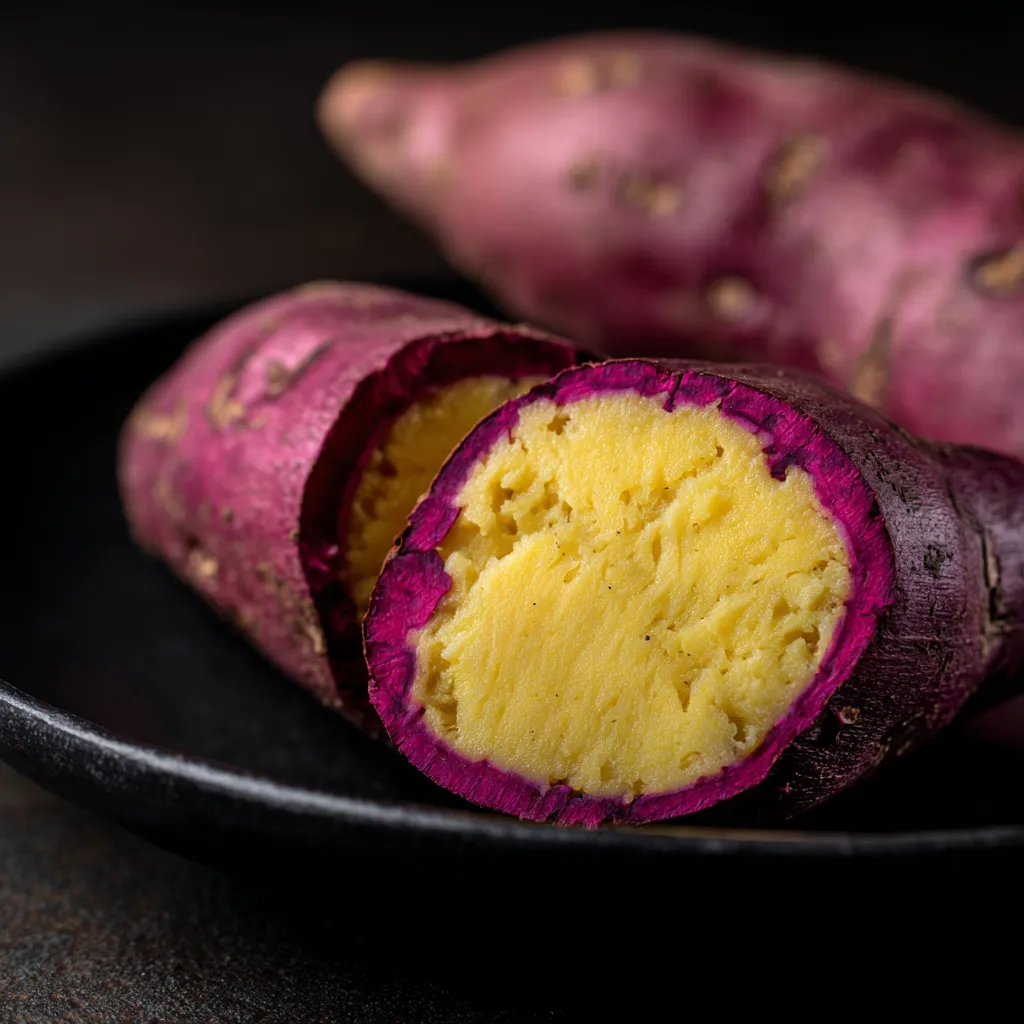
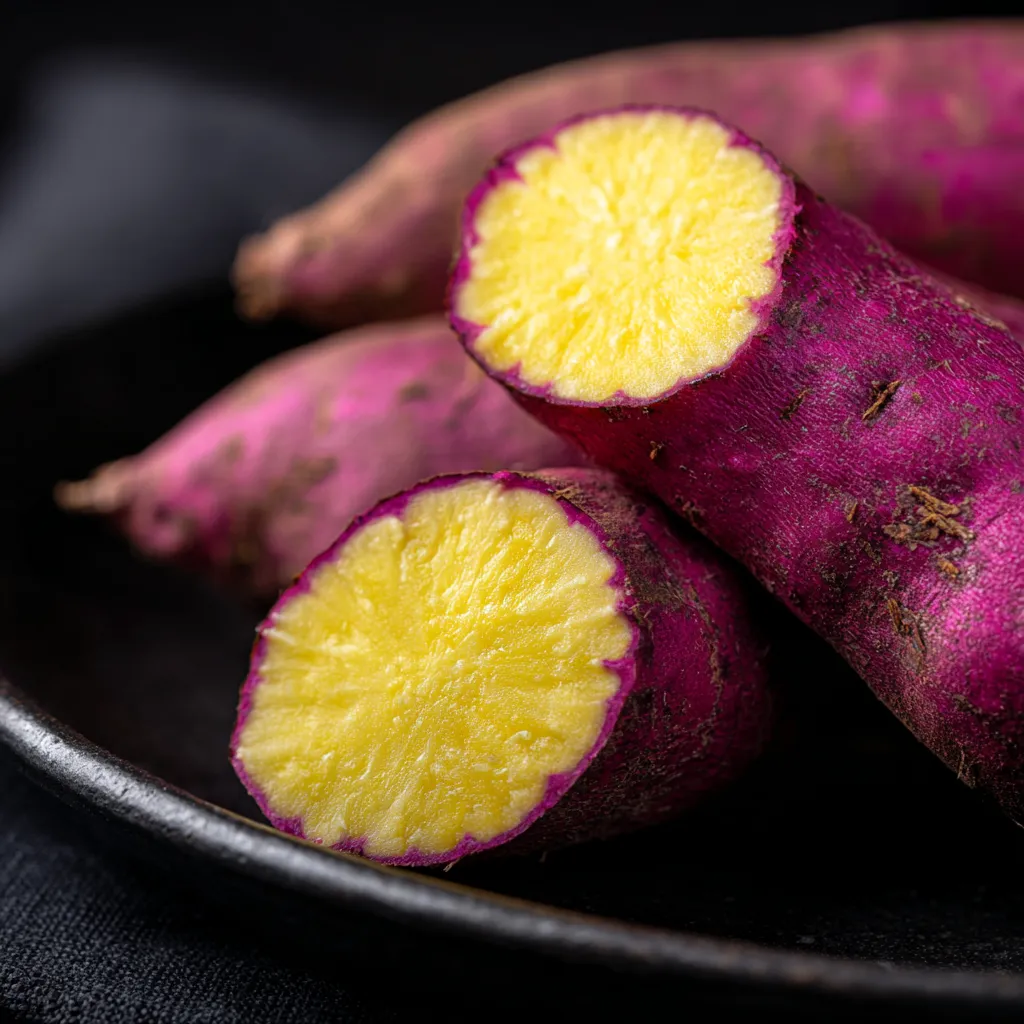
  • 2 medium Japanese sweet potatoes (preferably Satsumaimo): Look for those with smooth skin and a vibrant color.
  • Optional: Sea salt: A sprinkle enhances their natural sweetness and adds a delightful crunch.

Pro Tips for Perfectly Baked Japanese Sweet Potatoes

Before we dive into the cooking process, here are some pro tips to ensure your Yaki Imo turns out spectacular:

  • Choose Quality Potatoes: Opt for organic, fresh Japanese sweet potatoes. The flavor and texture will be superior.
  • Don’t Skip Washing: Always wash the skin thoroughly to remove any dirt or residue; it’s where a lot of the flavor resides!
  • Experiment with Temperature: Baking at 375°F (190°C) is ideal, but feel free to adjust based on your oven’s quirks.
  • Check for Doneness: Poke the potatoes after 45 minutes; they should be tender all the way through.
  • Rest Before Serving: Letting them cool for a few minutes allows the flavors to settle and intensify.
  • Use Parchment Paper: Lining your baking sheet can help with cleanup and prevent sticking.
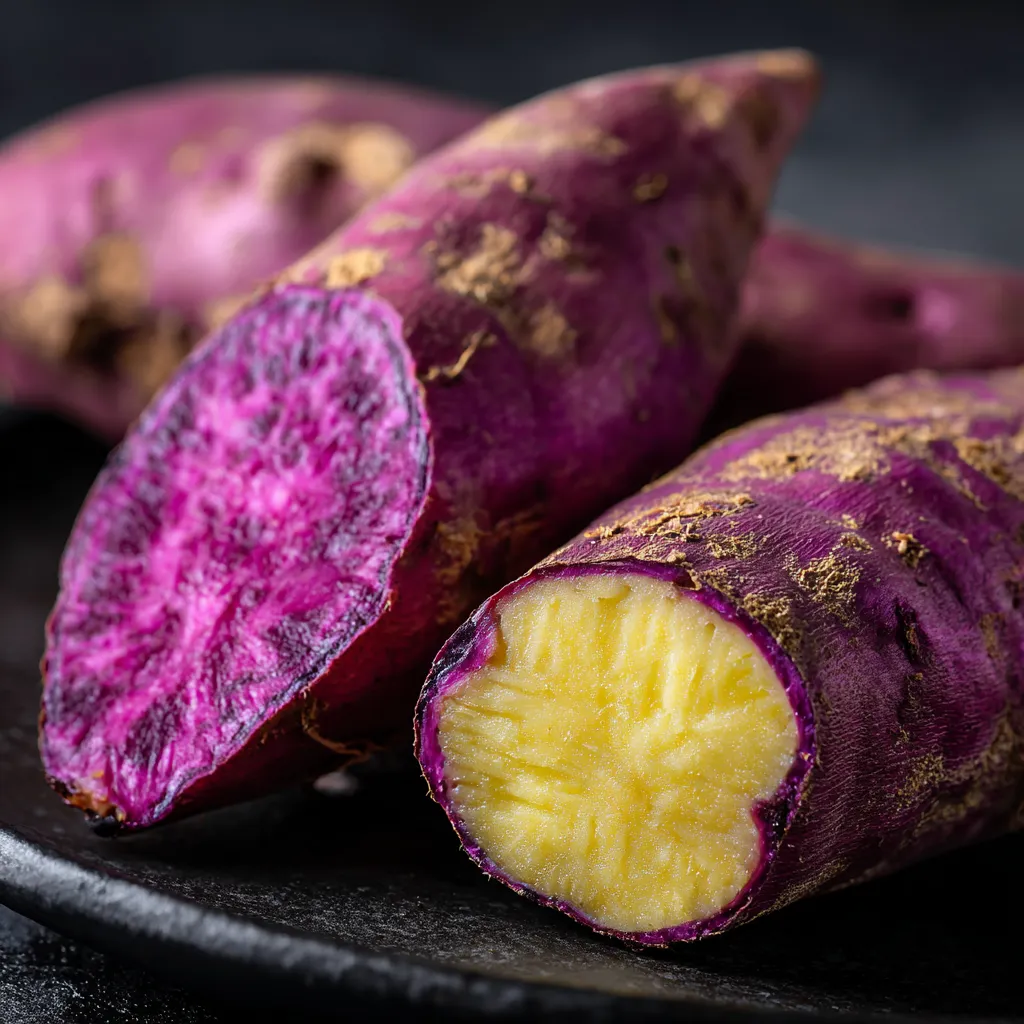
  • Try Different Varieties: While Satsumaimo is the classic choice, don’t hesitate to explore other types like Murasaki or Beni Haruka for varying flavors.
  • Save the Skins: They’re edible and delicious! Try them as a crispy snack.

Common Mistakes and Troubleshooting

Even the best chefs make mistakes! Here’s how to avoid common pitfalls:

  • Undercooking: If they’re not tender after the suggested baking time, simply return them to the oven for additional time.
  • Overcooking: Keep an eye on them; too long in the oven can lead to dry, unappetizing sweet potatoes.
  • Skipping the Salt: A little sea salt goes a long way in enhancing flavors; don’t skip it!
  • Ignoring Skin Quality: Choose smooth-skinned potatoes for the best taste; blemishes can indicate age or poor quality.

Variations to Spice Up Your Yaki Imo

Feeling adventurous? Here are a few creative ways to enjoy your baked Japanese sweet potatoes:

  • Yaki Imo with Miso Butter: Mix softened butter with miso paste and spread it on warm sweet potatoes for a savory twist.
  • Sweet Potato Fries: Cut your baked sweet potatoes into wedges, season, and bake until crispy for a fun snack.
  • Mashed Sweet Potatoes: Combine baked sweet potatoes with cream and spices for a creamy side dish.
  • Sweet Potato Salad: Dice baked sweet potatoes and toss them with greens, nuts, and a tangy vinaigrette.

How to Store and Make Ahead

Want to prep ahead? Here’s how to store your baked sweet potatoes:

  • Storage: Allow baked sweet potatoes to cool completely, then wrap them in plastic wrap or store in an airtight container in the fridge for up to five days.
  • Reheating: Microwave or return to the oven to heat through; they can also be enjoyed cold in salads!
  • Make Ahead Tips: You can bake them up to a day in advance. Just reheat before serving.

Frequently Asked Questions

Curious minds want to know! Here are some common questions about Japanese sweet potatoes:

  • Can I use orange sweet potatoes instead? Yes, but the flavor and texture will differ; Japanese sweet potatoes are creamier and sweeter.
  • How do I know when they’re done? They should be fork-tender and the skin slightly caramelized. A gentle squeeze will help!
  • Are Japanese sweet potatoes gluten-free? Absolutely! They’re a fantastic gluten-free option for any meal.
  • Can I freeze baked sweet potatoes? Yes, they can be frozen! Just ensure they’re wrapped well after cooling.
  • What’s the best way to eat them? Warm with a sprinkle of sea salt, but they’re also delicious in salads, soups, or even desserts!
  • Do they need to be peeled before baking? No, the skins are edible and delicious. Just wash them thoroughly.
  • What’s the nutritional value of Japanese sweet potatoes? They are rich in antioxidants, vitamins, and minerals, making them a healthful addition to any diet.
  • How can I add more flavor? Experiment with toppings like cinnamon, nutmeg, or even a drizzle of honey for an added sweet kick!

Nutritional Tips and Dietary Adaptations

Japanese sweet potatoes are not just delicious; they’re also a powerhouse of nutrition. Here’s how to adapt the recipe to fit various dietary needs:

  • For Vegan Options: The recipe is already vegan-friendly! Enjoy them as is or with plant-based toppings.
  • For Keto Dieters: While sweet potatoes are higher in carbs, you can enjoy them in moderation.
  • For Paleo Dieters: These sweet potatoes fit perfectly into a paleo diet, offering natural sweetness and nutrients.
  • For Gluten-Free Dieters: This dish is naturally gluten-free, making it a safe option for those with gluten sensitivities.

Essential Equipment Recommendations

To achieve the best results, here’s what you’ll need:

  • Baking Sheet: A sturdy sheet will ensure even cooking.
  • Parchment Paper: Great for easy clean-up and preventing sticking.
  • Oven Thermometer: Make sure your oven is at the right temperature for perfect baking.
  • Sharp Knife: Useful for slicing your sweet potatoes for serving or when making variations.

Serving Suggestions

Wondering how to serve your Yaki Imo? Here are some ideas:

  • As a Side Dish: Pair them with grilled meats or fish for a balanced meal.
  • In a Salad: Toss chunks of baked sweet potatoes into a fresh salad with greens, nuts, and vinaigrette.
  • With Dips: Serve with a creamy dip for a unique appetizer at your next gathering.
  • As a Dessert: Drizzle with honey or maple syrup for a sweet ending to your meal.

So, what are you waiting for? Grab those Japanese sweet potatoes and fire up your oven! Embrace the adventure of cooking and discover how a simple ingredient can transform into a culinary masterpiece. Remember, cooking is about experimenting and finding joy in every bite. Happy cooking!

Baked Japanese Sweet Potatoes (Authentic Yaki Imo) - Okonomi Kitchen

Prep Time 10 minutes
Cook Time 50 minutes
Total Time 1 hour
Servings 2 pieces
Calories 180
Enjoy tender, naturally sweet Japanese sweet potatoes baked to perfection for a simple and wholesome treat.

Ingredients

Main

  • 2 medium Japanese sweet potatoes (satsumaimo)
  • 1 pinch sea salt for serving (optional)

Instructions 

  • Preheat oven to 375°F (190°C).
  • Wash and dry the sweet potatoes.
  • Place directly on oven rack or on a lined baking sheet.
  • Bake for 45-60 minutes until tender and skin is caramelized.
  • Let cool slightly, then serve warm with sea salt if desired.

Notes

For extra flavor, sprinkle with a little sea salt before serving.
Calories: 180kcal
Cost: $10
Course: Side Dish
Cuisine: Japanese
Keyword: sweet potato

Nutrition

Calories: 180kcal | Carbohydrates: 41g | Protein: 3g | Sodium: 20mg

Loved this recipe? Save it to your favorite Pinterest board so you can easily find it later! It’s the perfect way to keep all your sweet ideas in one place. ✨

A detailed view of baked Japanese sweet potatoes, highlighting their rich color and inviting texture.

Ignite Your Culinary Passion with Easy Asado Chicken

Welcome, fellow food adventurers! Today, we’re diving into the vibrant world of spices with my beloved Easy Asado Chicken recipe, complemented by a zesty Lemon Zucchini Sauté. This dish is not just a meal; it’s an invitation to explore bold flavors and embrace the thrill of cooking with heat. As someone shaped by the rich culinary heritage of San Antonio, I believe that every dish should tell a story, and this one is no exception.

Asado, a cooking style that originated in South America, is all about grilling meat to perfection, and when you add a touch of lemon and spices, you transform a simple chicken into a culinary masterpiece. Let’s embark on this flavorful journey together!

Why You’ll Love This Recipe

This Easy Asado Chicken paired with Lemon Zucchini Sauté offers more than just taste; it brings a multitude of benefits that will have you coming back for seconds:

  • Quick and Easy: Perfect for busy weeknights, this recipe comes together in under an hour.
  • Health-Conscious: Packed with lean protein and fresh veggies, it’s a nutritious option for any meal.
  • Flavor Explosion: The combination of paprika, cumin, and lemon creates a dish that dances on your palate.
  • Versatile: Serve it with warm tortillas, over rice, or on a bed of greens — the options are endless!
  • Impress Your Guests: The vibrant colors and bold flavors will make you the star of your next gathering.

Ingredient Breakdown: What You’ll Need

Crispy-skinned Asado Chicken thigh on a plate, accompanied by vibrant lemon zucchini sauté, softly lit.

Let’s talk about the ingredients. Each one plays a crucial role in creating that unforgettable taste. Here’s what you need:

  • 4 chicken thighs: Bone-in, skin-on for maximum flavor and juiciness.
  • 2 tablespoons olive oil: A healthy fat that helps to marinate the chicken and adds richness.
  • 1 tablespoon soy sauce: Adds depth and umami, enhancing the overall flavor.
  • 1 tablespoon vinegar: White or apple cider vinegar will do, adding a touch of acidity.
  • 1 tablespoon garlic powder: For that aromatic punch that complements the spices.
  • 1 tablespoon paprika: This spice brings warmth and a beautiful color to the dish.
  • 1 teaspoon cumin: Adds an earthy depth, perfectly balancing the spices.
  • Salt and pepper: Essential for seasoning to taste.
  • 2 medium zucchinis: Sliced for the sauté, they soak up the lemon flavor beautifully.
  • 1 lemon: Both the zest and juice elevate the dish, giving it a fresh zing.
  • Fresh parsley: For garnish, adding a pop of color and freshness.

Expert Tips for Perfecting Your Asado Chicken

Now, let’s ensure you nail this recipe. Here are some pro tips to keep in mind:

  • Marinate Longer: For deeper flavor, marinate the chicken for up to 8 hours. The longer, the better!
  • Check the Grill Temperature: If grilling, aim for medium-high heat to achieve that perfect char without drying the chicken.
  • Rest Your Chicken: Let the chicken rest for at least 5 minutes after cooking; this keeps it juicy.
  • Experiment with Spices: Don’t be afraid to add a pinch of chili powder or a dash of cayenne for extra heat.
  • Use Fresh Ingredients: Fresh lemon juice and zest make a world of difference in flavor.
  • Don’t Skip the Zucchini: Its tender crispness adds a delightful contrast to the juicy chicken.
  • Garnish Generously: A sprinkle of fresh parsley not only looks great but enhances the dish’s freshness.
  • Serve Hot: This dish is best enjoyed immediately after cooking, while the flavors are vibrant.

Common Mistakes & Troubleshooting

Even the best of us make mistakes in the kitchen. Here’s how to avoid common pitfalls:

  • Underseasoning: Always taste and adjust seasoning before serving to ensure the flavors pop.
  • Overcooking the Chicken: Use a meat thermometer; chicken should reach an internal temperature of 165°F (75°C).
  • Skipping the Marinade: Don’t rush this step — it’s crucial for flavor!
  • Not Preheating: Make sure your oven or grill is hot enough before cooking; this helps seal in juices.

Flavor Variations & Add-Ins

Feel free to get creative! Here are some variations to try:

  • Spicy Asado: Add diced jalapeños to the marinade for an extra kick.
  • Citrus Twist: Incorporate lime juice along with lemon for a refreshing flavor profile.
  • Herb Infusion: Experiment with fresh herbs like cilantro or thyme in the marinade for added depth.
  • Sweet and Spicy: Add a touch of honey or brown sugar to the marinade for a sweet glaze.

Storage and Make-Ahead Instructions

If you’re planning ahead, here’s how to store and reheat:

  • Refrigeration: Store leftovers in an airtight container in the fridge for up to 4 days.
  • Freezing: Freeze the cooked chicken for up to 3 months. Thaw overnight in the fridge before reheating.
  • Reheating: Warm in the oven at 350°F (175°C) until heated through, about 15-20 minutes.
  • Make-Ahead: Marinate the chicken a day in advance for an even bolder flavor.

Comprehensive FAQ

Let’s address some common questions:

  • Can I use chicken breasts instead of thighs? Yes, but adjust cooking time; breasts cook faster and can dry out.
  • What can I serve with this dish? Try serving with warm tortillas, rice, or a fresh salad.
  • Can I grill instead of bake? Absolutely! Grilling adds a wonderful smoky flavor.
  • What’s the best way to cut zucchini? Slice them into 1/4-inch rounds for even cooking.
  • Can I use other vegetables? Yes, bell peppers or asparagus make great substitutes.
  • How do I know when the chicken is done? Use a meat thermometer; it should reach 165°F (75°C).
  • Is this recipe gluten-free? Yes, as long as you use gluten-free soy sauce.
  • Can I make this dish ahead of time? Yes, the chicken can be marinated in advance and cooked when ready.

Nutritional Tips and Dietary Adaptations

This recipe is not just delicious; it can easily fit various dietary needs:

  • Low Carb: Pair with a side salad instead of rice or tortillas for a low-carb meal.
  • Dairy-Free: This dish is naturally dairy-free, making it suitable for lactose-intolerant eaters.
  • Gluten-Free: Use gluten-free soy sauce to keep this dish celiac-friendly.
  • Low Sodium: Reduce soy sauce and salt to make it lower in sodium.

Essential Equipment Recommendations

Here’s what you’ll need:

  • Oven-safe skillet: Ideal for marinating and then baking the chicken.
  • Meat thermometer: To ensure your chicken is cooked to perfection.
  • Mixing bowl and whisk: For combining your marinade ingredients.
  • Spatula or tongs: For easy flipping and serving of chicken and veggies.

Serving Suggestions to Elevate Your Dish

Finally, let’s talk about how to present your masterpiece:

  • Plate beautifully: Serve the chicken on a bed of sautéed zucchini with lemon wedges on the side.
  • Garnish generously: A sprinkle of fresh parsley adds color and freshness.
  • Pair wisely: Serve with a crisp white wine or a refreshing iced tea to complement the flavors.
  • Offer sides: Warm tortillas and your favorite salsa make for delightful additions!

Conclusion: Your Culinary Adventure Awaits

There you have it! A complete guide to not just making Easy Asado Chicken, but fully embracing the culinary journey that comes with it. Cooking is an adventure, and with each spice, you’re painting a delicious picture on your plate. So grab your skillet, gather your ingredients, and let the magic unfold. Remember, food with spice is more than just fuel; it’s a story waiting to be told. Happy cooking, my friends!

Easy Asado Chicken with Lemon Zucchini Sauté

Prep Time 10 minutes
Cook Time 40 minutes
Total Time 50 minutes
Servings 4 servings
Calories 450
A flavorful and easy-to-make dish combining tender roasted chicken thighs with a fresh lemon zucchini sauté, perfect for a quick weeknight dinner.

Ingredients

Meat

  • 4 pieces chicken thighs (bone-in, skin-on)
  • 2 tablespoons olive oil
  • 1 tablespoon soy sauce
  • 1 tablespoon vinegar (white or apple cider)
  • 1 tablespoon garlic powder
  • 1 teaspoon paprika
  • 1 teaspoon cumin
  • to taste salt and pepper
  • 2 medium zucchinis (sliced)
  • 1 lemon lemon (zest and juice)

Garnish

  • to taste fresh parsley (for garnish)

Instructions 

  • Preheat oven to 400°F (200°C). Mix olive oil, soy sauce, vinegar, garlic powder, paprika, cumin, salt, and pepper.
  • Rub the mixture over chicken thighs and bake for 35-40 minutes until cooked through.
  • While baking, sauté sliced zucchinis in olive oil for 5 minutes, then add lemon zest and juice, cooking for 2 more minutes.
  • Let the chicken rest briefly, then serve with lemon zucchini, garnished with parsley.

Notes

Adjust seasoning to taste and enjoy!
Calories: 450kcal
Cost: $15
Course: Main Course
Cuisine: Fusion
Keyword: chicken, lemon, zucchini

Nutrition

Calories: 450kcal | Carbohydrates: 20g | Protein: 40g | Fat: 20g | Sodium: 800mg

Loved this recipe? Save it to your favorite Pinterest board so you can easily find it later! It’s the perfect way to keep all your sweet ideas in one place. ✨

Eye-level shot of juicy Asado Chicken and lemon-infused zucchini, showcasing delectable textures in warm lighting.

Unleash the Flavors of Comfort: Paula Deen’s Classic Broccoli Casserole

Welcome to a culinary journey where comfort meets adventure! Today, we’re diving into the heart of southern cooking with Paula Deen’s Classic Broccoli Casserole—a dish that ignited my passion for cooking and transformed my kitchen escapades. This broccoli casserole isn’t just a side dish; it’s a vibrant medley of flavors that celebrates the beauty of fresh ingredients and the joy of home cooking. Whether you’re hosting a family gathering or simply craving something warm and cheesy, this recipe is your ticket to culinary bliss!

Why You’ll Love This Recipe

Let me tell you why this broccoli casserole is a must-try:

  • Comforting and Satisfying: This casserole offers a creamy texture and cheesy goodness that will warm your soul.
  • Easy to Prepare: With just a few simple ingredients and steps, you can whip up this dish in no time.
  • Versatile Meal Option: Serve it as a side or make it the star of your dinner table! It pairs wonderfully with grilled meats or roasted vegetables.
  • Perfect for Any Occasion: Whether it’s a holiday feast or a casual weeknight dinner, this casserole shines.
  • Make-Ahead Friendly: Prep it in advance and pop it in the oven when you’re ready to serve—easy peasy!

Ingredient Breakdown

Delicious broccoli casserole in a baking dish, featuring golden cheese and fresh green broccoli.

Here’s what you’ll need to create this delicious dish, along with some handy substitutions:

  • 2 (10-ounce) packages frozen chopped broccoli: Thawed and drained. You can use fresh broccoli if you prefer a crunchier texture.
  • 1 cup mayonnaise: For a lighter option, substitute with Greek yogurt.
  • 1 cup sour cream: Cream cheese can be a fantastic alternative for a richer flavor.
  • 1 can (10.5 ounces) cream of mushroom soup: If you’re looking for a healthier option, try a homemade version or use cream of chicken soup.
  • 1 cup shredded cheddar cheese: Feel free to mix it up with a blend of your favorite cheeses, like Monterey Jack or Gouda.
  • 1/2 cup chopped onion: Sweet onions add a lovely flavor; shallots can work as a great substitute.
  • 1/4 cup melted butter: Olive oil is a suitable alternative for a healthier twist.
  • 1 cup crushed crackers (such as Ritz): Panko breadcrumbs make for a delightful and crunchy topping.
  • Salt and pepper to taste: Don’t forget to season well for the best flavor!

Pro Tips for Perfecting Your Casserole

Here are some expert insights to elevate your broccoli casserole:

  • Thaw Thoroughly: Ensure your frozen broccoli is completely thawed and drained; excess moisture can make your casserole soggy.
  • Mix Well: Don’t skimp on mixing! Ensuring all ingredients are well-combined enhances the flavor throughout the dish.
  • Experiment with Cheese: Different cheeses can add unique flavors; try adding a bit of blue cheese or feta for an unexpected kick.
  • Top with Crunch: Consider mixing in some toasted nuts or seeds for added texture and nutrition.
  • Don’t Rush the Baking: Allow the casserole to bake until bubbly and golden brown for that perfect finish.
  • Let it Rest: Allow the casserole to cool for a few minutes before serving; this helps it set and makes for easier serving.
  • Adjust the Seasoning: Taste before baking and adjust salt and pepper to suit your preferences.
  • Use Leftover Veggies: Feel free to toss in any leftover vegetables you have—it’s a great way to reduce waste!
  • Try Different Crackers: Switch up the topping with different types of crackers or even crushed tortilla chips for a fun twist.

Avoid These Common Mistakes

Here are some pitfalls to watch out for:

  • Skipping the Drainage: Not draining your broccoli can lead to a watery casserole.
  • Overbaking: Keep an eye on your casserole as it bakes; overbaking can dry it out.
  • Not Tasting: Always taste your mixture before baking; it’s your chance to adjust flavors!
  • Using Cold Ingredients: For a smoother mix, let your ingredients come to room temperature before combining.

Delicious Variations

If you’re feeling adventurous, here are some variations to try:

  • Broccoli Cheddar Casserole: Add extra cheddar cheese for a cheesier experience.
  • Mexican Style: Mix in some diced jalapeños and top with crushed tortilla chips for a spicy twist.
  • Meat Lovers: Add cooked and crumbled bacon or diced ham for a hearty addition.
  • Vegan Option: Substitute all dairy ingredients with plant-based alternatives and use nutritional yeast for cheese flavor.

Storage and Make-Ahead Instructions

This casserole is fantastic for meal prep! Here’s how to store and make it ahead of time:

  • Make Ahead: Prepare the casserole and store it covered in the refrigerator for up to 24 hours before baking.
  • Freezing: You can freeze the assembled casserole for up to 3 months. Thaw in the fridge overnight before baking.
  • Storing Leftovers: Store any leftovers in an airtight container in the fridge for up to 4 days—simply reheat before serving.

Frequently Asked Questions

Here are some common questions about broccoli casserole:

  • Can I use fresh broccoli instead of frozen? Absolutely! Just steam it until tender before adding it to the mixture.
  • Can I make this dish without mayonnaise? Yes, substituting with Greek yogurt or sour cream works beautifully!
  • Is this casserole gluten-free? To make it gluten-free, use gluten-free crackers or breadcrumbs.
  • How long does it take to bake? Bake at 350°F (175°C) for 30-35 minutes, or until the top is golden brown.
  • Can I add other vegetables? Yes! Feel free to add mushrooms, bell peppers, or spinach for extra nutrition.
  • What can I serve with this casserole? It pairs wonderfully with grilled chicken, pork chops, or even a simple green salad.
  • How do I know when it’s done? The casserole is done when it’s bubbly and the top is golden brown.
  • Can I reheat leftovers? Yes! Reheat in the oven or microwave until heated through.

Nutritional Tips and Dietary Adaptations

This broccoli casserole is not only delicious but can be made healthier with a few tweaks:

  • Lower Fat Content: Use low-fat mayonnaise and sour cream to reduce calories.
  • Add Whole Grains: Use whole grain crackers for added fiber and nutrients.
  • Increase Veggies: Toss in additional vegetables to boost the nutritional profile.

Essential Equipment for Success

Here’s what you’ll need to whip up this broccoli casserole:

  • Mixing Bowls: A large mixing bowl is essential for combining all your ingredients.
  • Measuring Cups and Spoons: Ensure accurate measurements for perfect results.
  • Casserole Dish: A 2-quart casserole dish is ideal for this recipe.
  • Spatula: Great for mixing and serving your delicious casserole.

Serving Suggestions

Now that your casserole is ready, here are some creative serving ideas:

  • Top with Fried Onions: Add a crispy layer of French fried onions for extra crunch.
  • Serve with a Side Salad: A light salad balances the richness of the casserole.
  • Pair with Protein: This casserole pairs beautifully with roasted chicken or grilled fish.

In conclusion, this Classic Broccoli Casserole is more than just a recipe; it’s a celebration of flavors, textures, and the joy of cooking. So grab your ingredients, embrace the heat, and let’s create a dish that will leave your taste buds dancing! Remember, every bite tells a story, and with this casserole, you’re bound to create some unforgettable memories around the dinner table.

Paula Deen’s Classic Broccoli Casserole Recipe

Prep Time 10 minutes
Cook Time 35 minutes
Total Time 45 minutes
Servings 6 servings
Calories 350
A creamy, cheesy broccoli casserole perfect for family dinners and gatherings.

Ingredients

Broccoli

  • 2 cups frozen chopped broccoli, thawed and drained
  • 1 cup mayonnaise
  • 1 cup sour cream
  • 1 can cream of mushroom soup (10.5 ounces)
  • 1 cup shredded cheddar cheese
  • 1/2 cup chopped onion
  • 1/4 cup melted butter
  • 1 cup crushed crackers (such as Ritz)
  • to taste salt and pepper

Instructions 

  • Preheat oven to 350°F (175°C).
  • Mix broccoli, mayonnaise, sour cream, mushroom soup, cheese, onion, and butter.
  • Season with salt and pepper, then pour into a greased dish.
  • Sprinkle crushed crackers on top.
  • Bake for 30-35 minutes until bubbly and golden.
  • Let cool slightly before serving.

Notes

This casserole is a comforting side dish that pairs well with many main courses.
Calories: 350kcal
Cost: $15
Course: Side Dish
Cuisine: American
Keyword: Broccoli

Nutrition

Calories: 350kcal | Carbohydrates: 25g | Protein: 15g | Fat: 25g | Sodium: 800mg

Loved this recipe? Save it to your favorite Pinterest board so you can easily find it later! It’s the perfect way to keep all your sweet ideas in one place. ✨

An appetizing broccoli casserole with a crusty top, surrounded by a softly blurred kitchen background.

Ignite Your Taste Buds with a Low-Calorie Chicken Burrito Bowl

Are you ready to embark on a culinary journey that tantalizes your taste buds while keeping your health goals in check? Welcome to the world of the low-calorie chicken burrito bowl, where every bite bursts with flavor and vibrant zest! Packed with nutrient-rich ingredients and a medley of spices, this dish doesn’t just satisfy your cravings; it transforms your mealtime into a bold culinary adventure. Let’s dive into why this recipe should become a staple in your kitchen!

Why You’ll Love This Recipe

This low-calorie chicken burrito bowl is not just a meal; it’s a celebration of flavor and nutrition. Here are five compelling reasons to embrace this dish:

  • Flavor explosion: The harmonious blend of spices and fresh ingredients creates a fiesta for your palate.
  • Health-conscious: Low in calories but high in nutrients, this bowl supports your wellness journey without sacrificing taste.
  • Customizable: Tailor the ingredients to your taste and dietary preferences, making each bowl uniquely yours.
  • Quick and easy: Perfect for busy weeknights, this recipe comes together in just 30 minutes.
  • Meal prep friendly: Make a big batch for easy lunches or dinners throughout the week, ensuring you always have a healthy option on hand.

Ingredient Breakdown

Let’s get into the heart of our low-calorie chicken burrito bowl—the ingredients! Each component contributes not just flavor, but also texture and nutrition. Here’s what you’ll need:

  • 1 cup cooked brown rice: Provides a hearty base rich in fiber.
  • 1 cup grilled chicken breast, diced: Lean protein that adds substance while keeping calories low.
  • 1/2 cup black beans: A fantastic source of plant-based protein and fiber.
  • 1/2 cup corn: Adds a touch of sweetness and crunch.
  • 1/2 cup diced tomatoes: Fresh and juicy, they bring acidity and brightness.
  • 1/4 cup diced red onion: For a zesty bite that complements the other flavors.
  • 1/4 cup chopped fresh cilantro: A herbaceous note that elevates the dish.
  • 1 avocado, diced: Creamy and rich, it brings healthy fats to the mix.
  • 1 lime, juiced: Adds a refreshing zing that ties everything together.
  • Salt and pepper to taste: Essential for enhancing all the flavors.
  • Optional: salsa or hot sauce: A finishing touch for those who crave extra heat!

If you’re looking for substitutions, consider quinoa instead of brown rice for a protein boost or swap out the chicken for grilled shrimp or tofu for a vegetarian option.

How to Make Your Low-Calorie Chicken Burrito Bowl

Creating this vibrant bowl is as simple as it is satisfying. Follow these easy steps to whip up your meal:

  1. In a large bowl, combine the cooked brown rice, grilled chicken, black beans, corn, diced tomatoes, red onion, and cilantro.
  2. Drizzle the lime juice over the mixture and season with salt and pepper to taste.
  3. Toss everything together until well combined, making sure the flavors meld beautifully.
  4. Serve the mixture in individual bowls, topped with diced avocado.
  5. Add salsa or hot sauce if desired, and dig in!

Pro Tips for Perfecting Your Burrito Bowl

Want to elevate your dish even further? Here are some expert insights to ensure your low-calorie chicken burrito bowl is nothing short of spectacular:

  • Quality ingredients: Use fresh, high-quality ingredients for the best flavor impact.
  • Cook your chicken perfectly: Marinate your chicken in lime juice and spices for added flavor and tenderness.
  • Balance your flavors: Taste as you go and adjust seasonings to suit your palate.
  • Experiment with spices: Don’t hesitate to add spices like cumin or smoked paprika for an extra layer of depth.
  • Layer your ingredients: Assemble your bowl with the rice at the bottom and toppings on top for an appealing presentation.
  • Chill before serving: Let the bowl sit for a few minutes after assembling to allow the flavors to meld.
  • Make it colorful: Incorporate a variety of colorful vegetables for visual appeal and added nutrients.
  • Prep ahead: Cook and store ingredients separately for quick assembly during busy days.

Common Mistakes and Troubleshooting

Even the best chefs have a few mishaps in the kitchen. Here’s how to avoid some common pitfalls:

  • Overcooking the chicken: Ensure you don’t dry out the chicken—cook until just done and let it rest before dicing.
  • Too much liquid: Drain beans and corn well to prevent a soggy bowl. Excess moisture can dilute flavors.
  • Under-seasoning: Don’t be shy with your spices and seasoning; they’re key to flavor!
  • Skipping the lime juice: This ingredient brightens the dish; don’t leave it out!

Variations to Spice Things Up

Your low-calorie chicken burrito bowl is a canvas—feel free to experiment! Here are some variations to consider:

  • Southwest Turkey Burrito Bowl: Swap chicken for ground turkey seasoned with taco spices.
  • Vegetarian Delight: Replace chicken with roasted vegetables and extra beans for a hearty, meat-free option.
  • Spicy Shrimp Bowl: Use shrimp marinated in hot sauce for a fiery seafood twist.
  • Greek-Inspired Bowl: Substitute brown rice with quinoa and add feta, olives, and tzatziki for a Mediterranean flair.

Storage and Make-Ahead Instructions

Planning ahead? Here’s how to make your low-calorie chicken burrito bowl last:

  • Chill before storing: Allow the bowl components to cool before placing them in airtight containers.
  • Store separately: Keep ingredients like avocado and lime juice separate to maintain freshness.
  • Refrigerate for up to 4 days: Properly stored, your meal can last several days for easy grab-and-go lunches.
  • Freezing tips: Cooked chicken and rice can be frozen in portions for up to 3 months, making future meals a breeze!

Nutrition Tips and Dietary Adaptations

This low-calorie chicken burrito bowl is naturally nutritious, but here are some tips to enhance its health benefits:

  • Gluten-free option: All ingredients are naturally gluten-free; just ensure all packaged items are certified gluten-free.
  • Low-carb variation: Substitute cauliflower rice for brown rice to cut down on carbs.
  • High-protein boost: Add more chicken or consider incorporating Greek yogurt for extra protein.
  • Vegan-friendly swaps: Use tofu or tempeh instead of chicken and skip the cheese and yogurt.

Frequently Asked Questions

Got questions? We’ve got answers! Here are some common inquiries about the low-calorie chicken burrito bowl:

  • Can I use frozen chicken? Yes, just ensure it’s fully thawed before cooking.
  • How do I make it spicier? Add jalapeños or your favorite hot sauce for a kick!
  • Can I make this vegan? Absolutely! Substitute chicken with beans or tofu.
  • What can I serve alongside this bowl? Consider a side of tortilla chips or a fresh salad.
  • How do I keep avocados fresh? Add a squeeze of lime juice to prevent browning.
  • Is this meal suitable for meal prep? Yes, it’s perfect! Just store components separately for freshness.
  • Can I use brown rice substitutes? Quinoa, cauliflower rice, or even farro work well!
  • What’s the best way to reheat leftovers? Use the microwave or stovetop, adding a splash of water to keep things moist.

Equipment Recommendations

To create your culinary masterpiece, you’ll need some essential kitchen tools:

  • Large mixing bowl: For combining all your ingredients with ease.
  • Grill pan or skillet: Ideal for cooking the chicken to perfection.
  • Cutting board and knife: Essential for chopping your fresh ingredients.
  • Measuring cups and spoons: To ensure accurate ingredient portions.

Serving Suggestions

Now that you’ve created your stunning low-calorie chicken burrito bowl, let’s talk about how to serve it:

  • Garnish: Sprinkle with extra cilantro or a dollop of Greek yogurt for added flair.
  • Side dishes: Pair with a light salad or grilled vegetables to round out your meal.
  • Presentation: Layer ingredients in clear bowls to showcase the colorful components.

In conclusion, this low-calorie chicken burrito bowl is more than just a meal; it’s an invitation to explore flavors, build confidence in the kitchen, and celebrate the joy of cooking. Whether you’re meal prepping for a busy week or looking for a quick dinner solution, this recipe is your ticket to a culinary adventure. So grab your skillet, embrace the heat, and let’s make mealtime fun again!

Kickstart Your Kitchen Adventure with Crockpot Mac and Cheese

Welcome to the velvety world of Crockpot Mac and Cheese, where comfort food meets culinary creativity! In this recipe, creamy Velveeta joins forces with just the right touch of spice to elevate a classic dish into a flavor explosion. Perfect for family gatherings or a cozy night in, this dish is more than just a meal — it’s an experience that will have you savoring each bite and inviting others to join in.

Ready to dive into a pot of creamy goodness? Let’s get cooking!

Why You’ll Love This Crockpot Mac and Cheese

  • Effortless Preparation: Just dump the ingredients into your crockpot, set it, and forget it! This recipe is perfect for busy weeknights.
  • Ultimate Comfort Food: With its cheesy, creamy texture, this dish is the epitome of comfort food that warms the soul.
  • Perfect for Any Occasion: Whether it’s a family BBQ, holiday feast, or cozy movie night, this mac and cheese adapts to any event.
  • Customizable Flavor: Add your favorite spices or ingredients to make it uniquely yours — the sky’s the limit!
  • Feeds a Crowd: This recipe easily serves a large group, making it perfect for potlucks or gatherings.

Ingredients Breakdown and Substitutions

Warm bowl of Mac and Cheese with a golden hue and melted Velveeta.

Here’s what you’ll need to create this creamy masterpiece:

  • 16 oz elbow macaroni: The classic choice for mac and cheese, but feel free to substitute with gluten-free pasta for a healthier option.
  • 4 cups water: Essential for cooking the pasta — you can use chicken or vegetable broth for added flavor.
  • 1 cup milk: Whole milk works best for creaminess, but almond or oat milk can be used for a dairy-free version.
  • 1 lb Velveeta cheese, cubed: This is the star of the show, creating that gooey texture. You can swap it for a combination of your favorite cheeses if you prefer.
  • 1 cup shredded cheddar cheese: A must for that classic mac and cheese flavor. Experiment with sharp cheddar for an extra kick!
  • 1/2 cup sour cream: Adds creaminess and tang. Greek yogurt is a fantastic substitute.
  • 1/2 teaspoon salt: Adjust to taste — remember that cheese can be salty!
  • 1/4 teaspoon black pepper: For a hint of spice.
  • 1/4 teaspoon garlic powder: Elevates the flavor profile.
  • 1/4 teaspoon onion powder: Complements the garlic for a well-rounded taste.

How to Make Crockpot Mac and Cheese

Follow these simple steps for a deliciously creamy mac and cheese:

  1. In a large crockpot, combine the elbow macaroni and water.
  2. Add the cubed Velveeta cheese, shredded cheddar cheese, milk, sour cream, salt, pepper, garlic powder, and onion powder to the crockpot.
  3. Stir all the ingredients together until well combined.
  4. Cover the crockpot and cook on low for 2 to 3 hours, stirring occasionally to ensure even cooking.
  5. Once the macaroni is tender and the cheese is melted, serve warm and enjoy!

Pro Tips for the Perfect Crockpot Mac and Cheese

  • Stir Regularly: To prevent sticking, make sure to stir the mixture every 30-45 minutes.
  • Use Fresh Ingredients: Freshly shredded cheese melts better than pre-packaged shredded cheese, giving you that perfect creamy consistency.
  • Add a Kick: Spice it up with jalapeños or crushed red pepper flakes for an exciting twist!
  • Don’t Overcook: Keep an eye on the cooking time; overcooked pasta can turn mushy.
  • Experiment with Cheeses: Try mixing in mozzarella, gouda, or pepper jack for different flavor profiles.
  • Make it Ahead: This dish can be made a day in advance and reheated in the crockpot or oven.
  • Top It Off: For a crunchy topping, sprinkle some panko breadcrumbs on top before serving.
  • Pair it Right: Serve alongside grilled meats or a fresh salad for a balanced meal.

Common Mistakes and Troubleshooting

Even the best chefs can run into hiccups. Here’s how to avoid common mistakes:

  • Too Thick: If your mac and cheese is too thick, add a splash of milk to loosen it up.
  • Not Creamy Enough: Consider adding more cheese or sour cream for extra creaminess.
  • Sticking to the Pot: Ensure you stir regularly to prevent the pasta from sticking to the bottom of the crockpot.
  • Uneven Cooking: If your pasta is unevenly cooked, try mixing it well and checking the heat settings.

Delicious Variations to Try

Looking to mix things up? Here are some fun variations to try:

  • Buffalo Chicken Mac and Cheese: Add shredded cooked chicken and buffalo sauce for a spicy kick.
  • Vegetable Medley Mac and Cheese: Toss in steamed broccoli, peas, or spinach for a healthy twist.
  • BBQ Pulled Pork Mac: Stir in some BBQ pulled pork for a hearty, smoky flavor.
  • Truffle Mac and Cheese: Drizzle with truffle oil for an upscale twist that will impress your guests.

Storage and Make-Ahead Instructions

Want to enjoy this scrumptious dish later? Here’s how to store and reheat:

  • Refrigerate: Store leftovers in an airtight container in the fridge for up to 4 days.
  • Freeze: For longer storage, freeze in a freezer-safe container for up to 2 months.
  • Reheat: Gently reheat in the crockpot on low, adding a splash of milk to restore the creaminess.

Frequently Asked Questions

Got questions? We’ve got answers!

  • Can I use uncooked pasta? Yes, simply adjust the water quantity accordingly.
  • Can I make this recipe vegetarian? Absolutely! Just skip the meat and use vegetable broth.
  • What cheese works best? Velveeta is the creamiest option, but feel free to mix in your favorites.
  • How can I make it spicier? Add jalapeños or cayenne pepper to the mix for heat.
  • Can I double the recipe? Yes, just ensure your crockpot has enough capacity.
  • What’s the best way to serve leftovers? Mix in a bit of milk and reheat gently to revive the creamy texture.
  • Can I add meat? Certainly! Cooked bacon or sausage can add a fantastic flavor.
  • How long does it take to cook? On low, it takes about 2-3 hours; on high, around 1-2 hours.

Nutritional Tips and Dietary Adaptations

Want to make this dish a bit healthier? Here are some tips:

  • Swap for Whole Grains: Use whole wheat pasta for added fiber and nutrients.
  • Low-Fat Options: Opt for low-fat cheese and milk to lighten up the dish.
  • Gluten-Free Pasta: Use gluten-free macaroni for those with dietary restrictions.
  • Add Protein: Mix in cooked chicken, turkey, or beans to boost the protein content.

Essential Equipment Recommendations

To make this recipe a breeze, here’s what you’ll need:

  • Crockpot: A reliable, programmable crockpot is essential for even cooking.
  • Measuring Cups and Spoons: For precise ingredient measurements.
  • Spatula: For stirring and combining ingredients.

Serving Suggestions

Now that your Crockpot Mac and Cheese is ready, here are some delicious serving suggestions:

  • Grilled Chicken: Serve alongside grilled chicken for a complete meal.
  • Salad: Pair with a light green salad to balance the richness of the mac and cheese.
  • Garlic Bread: Offer some crunchy garlic bread for added texture.

Cooking is all about embracing the adventure, and my Crockpot Mac and Cheese is just the beginning. Whether you’re a seasoned chef or a kitchen newbie, this dish will ignite your passion for cooking with spice and flavor. So roll up your sleeves, grab your ingredients, and let’s make some magic happen in the kitchen!

Remember, food is best enjoyed when shared. Invite your friends and family to partake in the deliciousness, and watch as your kitchen transforms into a hub of laughter and joy. Thank you for sharing in this culinary journey, and happy cooking!

Crockpot Mac and Cheese Recipe with Velveeta

Prep Time 10 minutes
Cook Time 3 hours
Total Time 3 hours 10 minutes
Servings 6 servings
Calories 650
A creamy and cheesy crockpot mac and cheese that's easy to prepare and perfect for a comforting meal.

Ingredients

Main ingredients

  • 16 oz elbow macaroni
  • 4 cups water
  • 1 cup milk
  • 1 lb velveeta cheese, cubed
  • 1 cup shredded cheddar cheese
  • 1/2 cup sour cream
  • 1/2 teaspoon salt
  • 1/4 teaspoon black pepper
  • 1/4 teaspoon garlic powder
  • 1/4 teaspoon onion powder

Instructions 

  • Combine macaroni and water in the crockpot.
  • Add cheeses, milk, sour cream, and seasonings; stir well.
  • Cover and cook on low for 2-3 hours, stirring occasionally.
  • Once tender and melted, serve warm.

Notes

Stir occasionally during cooking for even melting.
Calories: 650kcal
Cost: $15
Course: Main Course
Cuisine: American
Keyword: Mac and Cheese

Nutrition

Calories: 650kcal | Carbohydrates: 80g | Protein: 30g | Fat: 25g | Sodium: 900mg

Loved this recipe? Save it to your favorite Pinterest board so you can easily find it later! It’s the perfect way to keep all your sweet ideas in one place. ✨

Deliciously cheesy Mac and Cheese in a Crockpot, showcasing its rich texture.

Unleash Your Culinary Adventure with Ground Beef Pasta

Welcome to a culinary journey that promises to ignite your taste buds and spark your creativity in the kitchen! If you’re looking for a quick, flavorful, and satisfying meal, this One Pan Healthy Ground Beef Pasta is your ticket to deliciousness. With a symphony of spices and wholesome ingredients, this dish is not just about nourishment; it’s about creating an experience that you and your loved ones will savor. Let’s dive into the bold flavors that will transform your dinner into an unforgettable adventure!

Why You’ll Love This Recipe

This recipe is more than just a meal; it’s a celebration of flavor, convenience, and health. Here are the top reasons why this One Pan Healthy Ground Beef Pasta deserves a place in your kitchen:

  • Quick and Easy: Ready in just 30 minutes, making it perfect for busy weeknights when you’re looking for a satisfying meal without the fuss.
  • One-Pan Wonder: Say goodbye to the mountain of dishes! Everything is cooked in one skillet, simplifying cleanup while maximizing flavor.
  • Nutritious Ingredients: Packed with protein from ground beef and vibrant veggies like spinach, this recipe ensures you’re fueling your body with wholesome goodness.
  • Customizable: Feel free to experiment! Swap in your favorite vegetables or adjust the spices to suit your palate – the possibilities are endless.
  • Kid-Approved: This dish’s creamy texture and savory flavors make it a hit with children and adults alike, turning mealtime into a joyous occasion.

Ingredient Breakdown and Substitutions

A vibrant serving of One Pan Healthy Ground Beef Pasta, showcasing ground beef and whole wheat pasta.

Let’s take a closer look at the ingredients that make this dish sing. Each component plays a vital role in building layers of flavor and nutrition.

  • Ground Beef: Use 1 pound of lean ground beef for a hearty base. If you want a lighter option, consider ground turkey or chicken.
  • Whole Wheat Pasta: Opt for 8 ounces of whole wheat pasta for added fiber, or use gluten-free pasta if you are avoiding gluten.
  • Onion: A small diced onion adds sweetness and depth. Yellow or white onions work best, but shallots can also add a gourmet touch.
  • Garlic: Two cloves of minced garlic are essential for flavor; feel free to add more if you’re a garlic lover!
  • Diced Tomatoes: One 14.5-ounce can brings acidity and moisture to the dish. You can substitute with fresh tomatoes or use crushed tomatoes for a different texture.
  • Low-Sodium Beef Broth: Two cups of broth enhances the flavor. Vegetable broth is a great alternative for a vegetarian version.
  • Spinach: One cup of chopped spinach not only adds nutrients but also a pop of color. Kale or Swiss chard can work as substitutes.
  • Italian Seasoning: A teaspoon of this blend brings the essence of Italy to your dish. You can make your own mix or use dried oregano and basil.

Pro Tips for Perfect Ground Beef Pasta

Now that you’ve got your ingredients ready, here are some expert tips to elevate your cooking game:

  • Don’t Rush the Sauté: Allow the onion and garlic to cook until fragrant and translucent; this builds a flavor foundation for your dish.
  • Drain the Fat: After browning the ground beef, drain excess fat to keep the dish healthy and prevent greasiness.
  • Monitor Pasta Texture: Check for al dente before draining; you want the pasta to have a slight bite, which will enhance the overall dish.
  • Use Fresh Ingredients: Whenever possible, use fresh herbs and produce for maximum flavor and nutrients.
  • Adjust Seasoning: Taste as you go! Adjust salt, pepper, and seasoning levels according to your preference.
  • Let It Rest: After cooking, let the dish sit for a few minutes before serving. This helps the flavors meld together beautifully.
  • Garnish Wisely: A sprinkle of freshly grated Parmesan cheese adds a touch of richness and elevates presentation.

Avoid Common Mistakes

Every chef has had their share of mishaps in the kitchen. Here are some common mistakes and how to avoid them:

  • Overcooking Pasta: Keep an eye on your pasta; overcooked pasta becomes mushy and doesn’t hold up well in the dish.
  • Skipping Seasoning: Don’t be shy with the seasoning! A pinch of salt and pepper can make a significant difference in flavor.
  • Neglecting to Taste: Always taste your dish before serving. This allows you to make last-minute adjustments for perfection.
  • Rushing Cleanup: Take a moment to clean as you cook. It makes the process smoother and more enjoyable.

Delicious Variations to Try

Feeling adventurous? Here are some tasty variations to switch things up:

  • Mexican Twist: Add taco seasoning, black beans, and corn for a south-of-the-border flair.
  • Italian Sausage Delight: Swap ground beef for Italian sausage for an extra kick of flavor and spice.
  • Vegetarian Version: Replace the beef with lentils or chickpeas for a fulfilling plant-based option.
  • Cheesy Goodness: Stir in cream cheese or a blend of shredded cheeses at the end for an ultra-creamy texture.

Storage and Make-Ahead Instructions

This dish is perfect for meal prep! Here’s how to store it:

  • Refrigeration: Store leftovers in an airtight container in the fridge for up to 4 days.
  • Freezing: This meal freezes well! Portion it into freezer-safe containers for up to 3 months.
  • Reheating: Reheat gently on the stovetop or in the microwave, adding a splash of broth if it seems dry.

Frequently Asked Questions

Got questions? We’ve got answers! Here are some FAQs to help you navigate your cooking adventure:

  • Can I use different types of pasta? Absolutely! Any pasta shape will work; just adjust the cooking time as needed.
  • Is this recipe gluten-free? Yes, by using gluten-free pasta and broth, you can easily adapt it for gluten intolerance.
  • What’s the best way to add spice? For a kick, add red pepper flakes or a dash of hot sauce during cooking.
  • Can I make this vegetarian? Yes! Substitute ground beef with lentils, mushrooms, or a meat alternative.
  • How can I make it creamy? Stir in cream cheese or heavy cream at the end for a luxurious texture.
  • What sides pair well with this dish? A simple green salad or garlic bread complements the pasta beautifully.
  • How long does it take to prepare? The total time is about 30 minutes, making it perfect for a quick dinner.
  • Can I store leftovers? Yes! Store in the fridge for up to 4 days or freeze for up to 3 months.

Nutritional Tips and Dietary Adaptations

Want to make this dish even healthier? Here are some tips:

  • Lean Meats: Use lean ground beef or turkey to reduce fat content while still enjoying protein.
  • Whole Grains: Whole wheat pasta provides more fiber than regular pasta, enhancing satiety.
  • Load Up on Veggies: Feel free to add more vegetables like bell peppers, zucchini, or broccoli for added nutrition and flavor.

Essential Equipment Recommendations

To make this dish successfully, here are some handy tools:

  • Large Skillet: A deep skillet or sauté pan is essential for cooking everything in one pan.
  • Wooden Spoon: For stirring and mixing ingredients without scratching your cookware.
  • Measuring Cups and Spoons: Accurate measurements ensure the best flavor balance.
  • Cutting Board and Knife: Essential for prepping your vegetables and meat.

Serving Suggestions

When it comes to serving, presentation is key! Here are some suggestions:

  • Garnish: Top with freshly grated Parmesan cheese and a sprinkle of parsley for a touch of color.
  • Pair with Bread: Serve alongside crusty garlic bread or a light salad for a complete meal.
  • Family Style: Serve in a large bowl and let everyone help themselves, encouraging a communal dining experience.

In conclusion, this One Pan Healthy Ground Beef Pasta is not only a meal; it’s a delightful journey that invites you to explore flavors and textures. Embrace the joy of cooking with spice, and let this dish become a staple in your culinary repertoire. So grab your skillet, gather your ingredients, and embark on this tasty adventure today!

One Pan Healthy Ground Beef Pasta

Prep Time 10 minutes
Cook Time 15 minutes
Total Time 25 minutes
Servings 4 servings
Calories 550
A quick and nutritious one-pan meal combining lean ground beef, whole wheat pasta, and fresh vegetables for a wholesome dinner.

Ingredients

Meat and Pasta

  • 1 pound ground beef
  • 8 ounces whole wheat pasta

Vegetables and Seasonings

  • 1 small onion, diced
  • 2 cloves garlic, minced
  • 1 can (14.5 ounces) can diced tomatoes
  • 2 cups low-sodium beef broth
  • 1 cup spinach, chopped
  • 1 teaspoon italian seasoning
  • salt and pepper to taste salt and pepper
  • 1 tablespoon olive oil

For Serving

  • to taste parmesan cheese (optional)

Instructions 

  • Heat olive oil in a large skillet over medium heat.
  • Sauté diced onion and minced garlic until translucent.
  • Add ground beef, cook until browned; drain excess fat.
  • Stir in diced tomatoes, beef broth, Italian seasoning, and pasta; simmer until pasta is al dente.
  • Mix in chopped spinach until wilted; season with salt and pepper.

Notes

Use fresh spinach for best flavor and nutrition.
Calories: 550kcal
Cost: $15
Course: Main Course
Cuisine: American
Keyword: ground beef, healthy, pasta

Nutrition

Calories: 550kcal | Carbohydrates: 70g | Protein: 40g | Fat: 15g | Sodium: 900mg

Loved this recipe? Save it to your favorite Pinterest board so you can easily find it later! It’s the perfect way to keep all your sweet ideas in one place. ✨

Delicious One Pan Healthy Ground Beef Pasta in a bowl, garnished with parmesan cheese and herbs.

Unlock the Flavor: Your Ultimate Guide to Green Bean Casserole

Welcome to a culinary adventure that transforms a classic dish into a flavor explosion! Green bean casserole, typically seen as a humble side dish, can be so much more. With the right ingredients and techniques, you’ll discover how to elevate this dish into the star of your holiday table or family gathering. Are you ready to embrace the crunch and savor every bite? Let’s dive into the heart of this recipe!

Why You’ll Love This Recipe

  • Quick and Easy: This green bean casserole is simple to whip up, making it perfect for weeknight dinners or holiday feasts.
  • Comforting and Satisfying: The creamy texture combined with crispy fried onions creates a comforting dish that warms the soul.
  • Versatile and Adaptable: Whether you want to stick to tradition or explore new flavors, this recipe allows for plenty of variations.
  • Perfect for Any Occasion: This casserole is not just for Thanksgiving; it shines at potlucks, barbecues, and family gatherings.
  • Kid-Friendly: With its crunchy topping and creamy base, even the pickiest eaters will love this dish!

Ingredient Breakdown: What You Need

Delicious Green Bean Casserole in a dish, showcasing creamy texture and golden onions.

Before we start cooking, let’s take a closer look at the essential ingredients that make this green bean casserole a beloved classic. Here’s what you’ll need:

  • 2 cans (14.5 oz each) green beans, drained: Opt for fresh or frozen if you prefer. Make sure they’re cooked until tender-crisp for the best texture.
  • 1 can (10.5 oz) cream of mushroom soup: This is the creamy base of your casserole. Feel free to experiment with homemade versions for a gourmet twist.
  • 1/2 cup milk: This adds a silky texture. You can substitute with plant-based milk for a dairy-free option.
  • 1 cup French fried onions: These add the perfect crunch on top. For a gourmet touch, try homemade crispy onions.
  • 1/4 teaspoon black pepper: A simple seasoning that enhances flavor without overpowering the dish.
  • 1/2 teaspoon garlic powder: This aromatic spice elevates the dish to new heights. You can also use fresh garlic for a bolder flavor.

Step-by-Step Instructions: Let’s Get Cooking!

Now that we have our ingredients ready, let’s walk through the cooking process. It’s time to embrace your inner chef!

  1. Preheat the oven to 350°F (175°C).
  2. Mix the ingredients: In a large mixing bowl, combine the drained green beans, cream of mushroom soup, milk, black pepper, and garlic powder. Stir until well mixed.
  3. Transfer to casserole dish: Pour the mixture into a 1.5-quart casserole dish.
  4. First bake: Bake in the preheated oven for 25 minutes.
  5. Add crispy onions: Remove from the oven and stir in half of the French fried onions.
  6. Top and final bake: Sprinkle the remaining onions on top and return to the oven for an additional 10 minutes, until the onions are golden brown and crispy.
  7. Serve and enjoy!: Let it cool slightly before serving. Enjoy the deliciousness!

Pro Tips for Casserole Mastery

  • Quality beans: Always choose fresh or high-quality canned green beans for the best flavor.
  • Make it creamy: For a richer taste, consider adding a dollop of sour cream or cream cheese to the mixture.
  • Experiment with spices: Don’t hesitate to add a dash of cayenne pepper or smoked paprika for a kick of heat!
  • Layering flavors: Mix in sautéed mushrooms or cooked bacon pieces for a depth of flavor.
  • Don’t skip the crunch: For an extra crispy topping, broil the casserole for the last 2-3 minutes of cooking.
  • Personalize your dish: Add shredded cheese to the top for a cheesy twist. Cheddar, mozzarella, or Gruyère work beautifully!
  • Go gluten-free: If you’re catering to gluten sensitivities, use gluten-free fried onions and a gluten-free cream of mushroom soup.
  • Make-ahead option: Assemble the casserole ahead of time and refrigerate it until you’re ready to bake.

Common Mistakes and Troubleshooting

Even the best of us can have a hiccup in the kitchen. Here are some common pitfalls and how to avoid them:

  • Watery casserole: Make sure to drain the green beans well to prevent excess moisture.
  • Overcooked beans: If using fresh beans, cook them just until tender-crisp before mixing to maintain texture.
  • Burnt topping: Keep an eye on the casserole during the final bake, as the fried onions can burn quickly.
  • Mushy casserole: Avoid overmixing to keep the texture intact.

Creative Variations to Try

If you’re feeling adventurous, here are some unique twists to elevate your green bean casserole:

  • Cheesy Green Bean Casserole: Add 1 cup of shredded cheese (like cheddar or mozzarella) to the mix for a gooey delight.
  • Spicy Southwestern Casserole: Incorporate diced jalapeños and top with crushed tortilla chips instead of fried onions.
  • Mushroom Medley Casserole: Mix in a variety of sautéed mushrooms for an earthier flavor profile.
  • Vegan Casserole: Substitute the cream of mushroom soup with a homemade cashew cream and use vegan fried onions.

Storage and Make-Ahead Instructions

Want to prepare your green bean casserole in advance? Here’s how:

  • Make-Ahead: Assemble the casserole, cover it tightly with plastic wrap, and refrigerate for up to 24 hours before baking.
  • Storage: Leftovers can be stored in an airtight container in the refrigerator for up to 4 days. Reheat in the oven until warmed through.
  • Freezing: While it’s best fresh, you can freeze baked casserole for up to 2 months. Thaw in the fridge overnight before reheating.

FAQs: Your Green Bean Casserole Questions Answered

  • Can I use fresh green beans? Yes! Fresh green beans will add a wonderful crunch if cooked properly before assembling.
  • How do I make this dish gluten-free? Use gluten-free fried onions and a gluten-free cream of mushroom soup.
  • What can I substitute for cream of mushroom soup? You can use homemade mushroom soup or any creamy soup like cream of celery.
  • Can I add meat to the casserole? Absolutely! Cooked bacon or chicken can add a savory element.
  • Is this casserole suitable for freezing? Yes, it freezes well, though the texture of the onions may change slightly.
  • How do I reheat leftovers? Reheat in the oven at 350°F until warm, or microwave in short intervals.
  • Can I use frozen green beans? Yes, just make sure to thaw and drain them well before using.
  • What’s the best way to serve this dish? Serve it hot as a side dish alongside roasted meats or as part of a holiday feast.

Nutritional Tips and Dietary Adaptations

With a few tweaks, your green bean casserole can fit various dietary needs:

  • Low-Calorie Option: Use low-fat milk and reduced-fat soup for a lighter version.
  • Vegan-Friendly: Substitute dairy ingredients with plant-based alternatives for a vegan casserole.
  • Heart-Healthy: Use whole grain breadcrumbs on top instead of fried onions for a healthier crunch.
  • Packed with Nutrients: Green beans are rich in vitamins A, C, and K — making this casserole a nutritious addition to any meal.

Equipment Recommendations

To create your green bean casserole masterpiece, here’s what you’ll need:

  • Mixing bowl: A large bowl for combining ingredients.
  • Casserole dish: A 1.5-quart dish works best for even baking.
  • Baking sheets: Useful if you opt to make homemade crispy onions.
  • Measuring cups and spoons: Essential for accurate ingredient proportions.
  • Wooden spoon or spatula: Perfect for mixing your casserole ingredients thoroughly.

Serving Suggestions

To make your meal complete, consider pairing your green bean casserole with:

  • Roast turkey or chicken: A classic pairing that never disappoints.
  • Mashed potatoes: Creamy potatoes complement the crunch of the casserole.
  • Stuffing: A flavorful stuffing rounds out the traditional holiday plate.
  • Crusty bread: Perfect for soaking up any delicious gravy or sauce.

Final Thoughts: A Casserole to Remember

There you have it! With this ultimate guide, you’re now equipped to create a green bean casserole that’s bursting with flavor and texture. Remember, cooking is about experimentation and joy, so don’t hesitate to make this dish your own. Whether you stick to the classic recipe or add your unique twist, you’ll discover that this casserole is more than just a side dish — it’s a celebration of flavor that brings people together. So grab your skillet, embrace the crunch, and get ready to make some unforgettable memories around the table!

Easy Classic Green Bean Casserole

Prep Time 10 minutes
Cook Time 35 minutes
Total Time 45 minutes
Servings 6 servings
Calories 180
A simple and delicious green bean casserole perfect for holiday gatherings or weeknight dinners.

Ingredients

Canned Goods

  • 2 cans green beans, drained
  • 1 can cream of mushroom soup
  • 1/2 cup milk
  • 1 cup french fried onions
  • 1/4 teaspoon black pepper
  • 1/2 teaspoon garlic powder

Instructions 

  • Preheat oven to 350°F (175°C). Combine green beans, soup, milk, pepper, and garlic in a bowl.
  • Transfer mixture to a casserole dish and bake for 25 minutes.
  • Stir in half of the fried onions, top with remaining onions, and bake for 10 more minutes.
  • Serve warm and enjoy!

Notes

For extra crunch, add more fried onions on top before the final bake.
Calories: 180kcal
Cost: $10
Course: Side Dish
Cuisine: American
Keyword: Green Beans

Nutrition

Calories: 180kcal | Carbohydrates: 20g | Protein: 4g | Fat: 8g | Sodium: 600mg

Loved this recipe? Save it to your favorite Pinterest board so you can easily find it later! It’s the perfect way to keep all your sweet ideas in one place. ✨

Eye-level shot of Green Bean Casserole, highlighting the rich sauce and green beans.

Unleashing Flavor: Discover the Magic of Carrot Cake Oatmeal Cookies

Dive into the world of flavor with my Carrot Cake Oatmeal Cookies recipe! These delightful treats blend the warmth of spiced carrots with the chewy goodness of oats, inspiring a new passion for baking. If you’re looking for a way to satisfy your sweet tooth and eat healthier, this recipe is your golden ticket. Let’s embark on this delicious journey and unleash your inner cookie connoisseur!

Why You’ll Love This Recipe

  • Healthy indulgence: These cookies are packed with wholesome ingredients like oats and carrots, making them a guilt-free treat.
  • Perfectly balanced flavors: The warm spices like cinnamon and nutmeg dance with the natural sweetness of carrots, creating a symphony of taste.
  • Easy to make: With simple steps and accessible ingredients, you’ll whip these cookies up in no time, even on a busy day!
  • Versatile options: Customize your cookies with mix-ins like nuts or raisins, or try gluten-free alternatives for dietary needs.
  • Great for meal prep: These cookies store beautifully, making them an ideal snack for the week ahead.

Key Ingredients for Carrot Cake Oatmeal Cookies

Soft and chewy Carrot Cake Oatmeal Cookies displayed on a rustic wooden surface.

Let’s break down the ingredients you’ll need to craft these delicious cookies:

  • 1 cup rolled oats: Provides a chewy texture and hearty base.
  • 1 cup whole wheat flour: Adds fiber and nutrients, but feel free to swap with almond or gluten-free flour if you need.
  • 1/2 teaspoon baking powder: Helps the cookies rise and achieve that perfect puff.
  • 1/2 teaspoon baking soda: Balances the acidity of the applesauce and adds lift.
  • 1/2 teaspoon cinnamon: Infuses warmth and flavor, essential for that carrot cake essence.
  • 1/4 teaspoon nutmeg: Adds a hint of sweetness and depth.
  • 1/4 teaspoon salt: Enhances all the flavors and balances sweetness.
  • 1/2 cup unsweetened applesauce: Acts as a natural sweetener and keeps the cookies moist.
  • 1/4 cup honey or maple syrup: Sweetens the batch, with maple syrup adding a unique flavor twist.
  • 1 teaspoon vanilla extract: A must for rounding out the flavor profile.
  • 1 cup grated carrots: The star of the show, adding moisture and a subtle sweetness.
  • 1/2 cup raisins or chopped walnuts (optional): For added texture and flavor, these are delicious mix-ins.

How to Make Healthy Carrot Cake Oatmeal Cookies

Ready to embrace your inner baker? Here’s a step-by-step guide to crafting these cookies:

  1. Preheat your oven to 350°F (175°C) and line a baking sheet with parchment paper.
  2. Mix the dry ingredients: In a large bowl, combine the rolled oats, whole wheat flour, baking powder, baking soda, cinnamon, nutmeg, and salt.
  3. Blend the wet ingredients: In another bowl, mix together the applesauce, honey (or maple syrup), and vanilla extract until smooth.
  4. Combine: Pour the wet mixture into the dry ingredients and stir until just combined.
  5. Add the carrots: Fold in the grated carrots and raisins or walnuts if using.
  6. Scoop and bake: Drop tablespoon-sized scoops of dough on the prepared baking sheet, spacing them about 2 inches apart. Bake for 10-12 minutes or until the edges are lightly golden.
  7. Cool down: Allow the cookies to cool on the baking sheet for 5 minutes before transferring them to a wire rack to cool completely.

Pro Tips for Perfect Cookies

  • Use fresh spices: Fresh spices can significantly enhance the flavor, so check the expiration dates on your jars.
  • Don’t overmix: When combining wet and dry ingredients, mix just until incorporated to keep the cookies tender.
  • Measure flour correctly: Spoon flour into your measuring cup and level it off with a knife to avoid dense cookies.
  • Experiment with sweetness: Adjust the honey or maple syrup to your taste, especially if you prefer a sweeter cookie.
  • Chill the dough: For a thicker cookie, chill the dough for 30 minutes before baking.
  • Use a cookie scoop: A cookie scoop ensures evenly sized cookies for consistent baking.
  • Check for doneness: Look for lightly golden edges; they’ll continue to firm up as they cool.
  • Store properly: Keep cookies in an airtight container to maintain freshness.

Common Mistakes and Troubleshooting

Even the best bakers face challenges! Here’s how to avoid common pitfalls:

  • Too dry or crumbly: Ensure you’re measuring flour correctly and not overbaking. A little extra applesauce can help!
  • Too sweet: If the cookies turn out overly sweet, reduce the honey or maple syrup in your next batch.
  • Flat cookies: This might be due to expired baking powder or soda; always check freshness!
  • Uneven baking: Rotate your baking sheet halfway through to ensure even heat distribution.

Delicious Variations

Make each batch unique with these fun alterations:

  • Chocolate Chip Twist: Add 1/2 cup of dark chocolate chips for a rich, indulgent flavor.
  • Spicy Kick: Incorporate a pinch of cayenne pepper for a surprising warmth in every bite!
  • Coconut Delight: Stir in 1/2 cup of shredded coconut for a tropical flair.
  • Nutty Crunch: Swap raisins for chopped almonds or pecans for an extra crunch.

Storage and Make-Ahead Instructions

Want to enjoy these cookies throughout the week? Here’s how to store them:

  • Room Temperature: Keep cookies in an airtight container at room temperature for up to 5 days.
  • Refrigerator: For longer freshness, store in the fridge for up to a week.
  • Freezer: Freeze baked cookies in a single layer, then transfer to a freezer-safe bag for up to 3 months. Thaw at room temperature before enjoying.
  • Make-Ahead Dough: Prepare the dough in advance and refrigerate for up to 3 days. Bake when ready for fresh cookies!

Comprehensive FAQ

Have questions? I’ve got answers!

  • Can I use quick oats instead of rolled oats? Yes, but the texture will be different — quick oats may yield softer cookies.
  • Is there a gluten-free option? Absolutely! Substitute whole wheat flour with almond flour or a gluten-free blend.
  • What can I use instead of applesauce? You can replace it with mashed bananas or yogurt for similar moisture.
  • How do I know when the cookies are done? Look for a golden edge; they will continue to firm up as they cool.
  • Can I add protein powder? Yes, but reduce the flour slightly to maintain texture.
  • How can I make these cookies vegan? Use flax eggs instead of regular eggs and maple syrup instead of honey.
  • What’s the best way to reheat these cookies? Microwave for a few seconds or enjoy them at room temperature.
  • Can I use other vegetables? Try zucchini or sweet potato for a different flavor twist!

Nutritional Tips and Dietary Adaptations

To make these cookies even healthier:

  • Add seeds: Incorporate chia or flaxseeds for extra nutrients.
  • Cut the sugar: Use ripe bananas instead of sweeteners to naturally sweeten the cookies.
  • Increase fiber: Mix in some ground flaxseed or oat bran.
  • Balance macros: Pair your cookies with a protein source, like Greek yogurt, for a balanced snack.

Essential Equipment Recommendations

Here’s what you’ll need to whip up these cookies:

  • Mixing bowls: A set of mixing bowls is essential for combining ingredients.
  • Baking sheet: Use a sturdy baking sheet lined with parchment paper for easy cleanup.
  • Measuring cups and spoons: Accurate measurements are key to perfect cookies.
  • Cookie scoop: For uniform cookies, a scoop makes all the difference.
  • Cooling rack: Allows cookies to cool evenly and prevents sogginess.

Serving Suggestions

Serve these delightful cookies in style:

  • With tea or coffee: A perfect pairing for your afternoon pick-me-up.
  • As a dessert: Serve warm with a scoop of vanilla ice cream or a dollop of whipped cream.
  • At gatherings: They make excellent treats for parties or potlucks, sure to impress your guests!

Conclusion

These Carrot Cake Oatmeal Cookies are not just a recipe; they’re an invitation to experiment and explore the vibrant world of baking. With every bite, you’ll taste the love and creativity that goes into making these cookies, turning a simple treat into a culinary adventure. So grab your ingredients, channel your inner chef, and let the baking begin! Remember, cooking is about embracing the journey and savoring the flavors. Happy baking!

Easy Carrot Cake Oatmeal Cookies Recipe | Amy's Healthy Baking

Prep Time 10 minutes
Cook Time 12 minutes
Total Time 22 minutes
Servings 12 cookies
Calories 120
These wholesome carrot cake oatmeal cookies are quick to make and perfect for a healthy snack or dessert.

Ingredients

Dry ingredients

  • 1 cup rolled oats
  • 1 cup whole wheat flour
  • 1/2 teaspoon baking powder
  • 1/2 teaspoon baking soda
  • 1/2 teaspoon cinnamon
  • 1/4 teaspoon nutmeg
  • 1/4 teaspoon salt

Wet ingredients

  • 1/2 cup unsweetened applesauce
  • 1/4 cup honey or maple syrup
  • 1 teaspoon vanilla extract
  • 1 cup grated carrots
  • 1/2 cup raisins or chopped walnuts (optional) (optional)

Instructions 

  • Preheat oven to 350°F (175°C) and line a baking sheet with parchment.
  • Mix dry ingredients in a large bowl; combine wet ingredients in another bowl.
  • Combine wet and dry mixtures; fold in carrots and optional nuts or raisins.
  • Drop spoonfuls onto baking sheet; flatten slightly.
  • Bake for 10-12 minutes; cool on wire rack.

Notes

For best results, use fresh grated carrots and adjust baking time as needed.
Calories: 120kcal
Cost: $15
Course: Dessert
Cuisine: Healthy
Keyword: Carrot, Cookies, Oatmeal

Nutrition

Calories: 120kcal | Carbohydrates: 20g | Protein: 3g | Fat: 3g | Sodium: 150mg

Loved this recipe? Save it to your favorite Pinterest board so you can easily find it later! It’s the perfect way to keep all your sweet ideas in one place. ✨

A plate of golden-brown Carrot Cake Oatmeal Cookies surrounded by blurred kitchen elements.

Embrace the Flavor: The Sweet Potato Soup That Dances with Delight

Welcome to the world of sweet potato soup — a dish that’s as vibrant as it is comforting. This isn’t just any soup; it’s a culinary adventure that combines the earthy sweetness of roasted sweet potatoes with a hint of heat and spice, creating a symphony of flavors that will awaken your taste buds. Whether you’re looking for a hearty meal to warm you up during chilly nights or a dish that impresses at your next gathering, this potato soup will have everyone asking for seconds. Let’s dive into the magic of this recipe!

Why You’ll Love This Recipe

Not convinced yet? Here are five compelling reasons to whip up this sweet potato soup:

  • Nutritious Powerhouse: Sweet potatoes are rich in vitamins A and C, fiber, and antioxidants, making this soup not only delicious but also a healthy choice.
  • Endless Versatility: This recipe serves as a blank canvas! You can easily customize it by adding your favorite spices or toppings.
  • Simple Preparation: With straightforward steps and minimal ingredients, this soup is perfect for both beginner cooks and seasoned chefs alike.
  • Meal Prep Friendly: Make a big batch and store it for later! This soup freezes beautifully, making it a go-to option for busy days.
  • Vegan & Gluten-Free: This recipe is naturally vegan and gluten-free, allowing everyone at the table to enjoy it without worry.

Ingredient Breakdown

A beautiful bowl of roasted sweet potato soup, showcasing its smooth texture and warm color, illuminated by natural light.

Let’s talk ingredients! Here’s what you’ll need for the perfect bowl of roasted sweet potato soup, along with some handy substitutions:

  • Sweet Potatoes: 2 large sweet potatoes, peeled and cubed. You can use butternut squash or pumpkin as a substitute for a different flavor.
  • Olive Oil: 1 tablespoon for roasting. Feel free to use avocado oil for a higher smoke point.
  • Onion: 1 onion, chopped. Red or yellow onions work best, but shallots can add a lovely sweetness too.
  • Garlic: 2 cloves, minced. Fresh is best, but you can use pre-minced garlic if you’re short on time.
  • Vegetable Broth: 4 cups for a rich base. Homemade broth or low-sodium store-bought options both work well.
  • Ground Cumin: 1 teaspoon to bring warmth. You can substitute with ground coriander for a different flavor profile.
  • Salt and Pepper: To taste, enhancing all the flavors.
  • Coconut Milk (optional): 1/2 cup for creaminess. Almond or cashew milk can be used if you’re looking for a lighter option.
  • Cilantro (optional): Fresh cilantro for garnish adds a pop of freshness!

Cooking Steps to Flavor Town

Now that we’ve got our ingredients ready, let’s get cooking! Follow these easy steps to create your own sweet potato soup masterpiece:

  1. Preheat the oven to 400°F (200°C).
  2. Toss the cubed sweet potatoes with olive oil, salt, and pepper, and spread them on a baking sheet.
  3. Roast the sweet potatoes in the preheated oven for about 25-30 minutes, or until tender and caramelized.
  4. In a large pot, sauté the chopped onion in a little olive oil over medium heat until translucent, about 5 minutes.
  5. Add the minced garlic and ground cumin, cooking for another minute until fragrant.
  6. Add the roasted sweet potatoes and vegetable broth to the pot, bringing it to a boil.
  7. Reduce heat and let it simmer for about 10 minutes.
  8. Use an immersion blender to puree the soup until smooth, or transfer to a blender in batches.
  9. Stir in the coconut milk (if using) and adjust seasoning with salt and pepper.
  10. Serve hot, garnished with fresh cilantro if desired.

Pro Tips for Soup Success

Want to take your soup to the next level? Here are some expert insights:

  • Roasting is Key: Roasting the sweet potatoes not only enhances their natural sweetness but also adds depth of flavor to the soup.
  • Layer Flavors: Don’t skip on sautéing the onions and garlic before adding the broth; this step builds a rich base.
  • Blend Carefully: If using a blender, let the soup cool for a few minutes before blending to avoid splatters.
  • Adjust Consistency: If the soup is too thick after blending, add more broth or water until you reach your desired consistency.
  • Spice It Up: For an extra kick, add a dash of cayenne pepper or a sprinkle of smoked paprika for a smoky depth.
  • Think Ahead: Make this soup in advance and let the flavors meld together overnight in the fridge for an even better taste.
  • Garnish Smartly: Toppings like roasted chickpeas or a drizzle of chili oil can elevate your bowl from ordinary to extraordinary.
  • Be Bold: Don’t be afraid to experiment with spices like nutmeg or ginger for a unique twist!

Common Mistakes and Troubleshooting

Even the best of us can make mistakes in the kitchen. Here are some common pitfalls and how to avoid them:

  • Overcooking the Sweet Potatoes: This can lead to a mushy texture. Aim for tender yet firm cubes for the best results.
  • Not Enough Seasoning: Be generous with salt and pepper. If the soup tastes bland, it needs more seasoning!
  • Too Thick?: Simply add a bit more broth or water to loosen the soup up to your liking.
  • Not Blending Enough: To achieve that ultra-creamy texture, blend until smooth without any lumps.
  • Skipping the Garnish: A fresh herb garnish can brighten the flavors and add visual appeal.

Variations to Spice Things Up

Want to switch things up? Here are four mouthwatering variations of this sweet potato soup:

  • Curried Sweet Potato Soup: Add 1 tablespoon of curry powder during the sautéing step for a warm, aromatic flavor.
  • Thai Coconut Sweet Potato Soup: Substitute vegetable broth with coconut milk and add lime juice and cilantro for a Thai twist.
  • Chipotle Sweet Potato Soup: Mix in one or two chipotle peppers in adobo sauce for a smoky, spicy kick.
  • Sweet Potato & Black Bean Soup: Add a can of black beans to the soup for added protein and fiber.

Storage and Make-Ahead Instructions

This soup is perfect for meal prep! Here’s how to store and reheat it:

  • Refrigerator: Store in an airtight container for up to 5 days. Let the soup cool completely before storing.
  • Freezer: Transfer to freezer-safe containers and freeze for up to 3 months. Thaw overnight in the fridge before reheating.
  • Reheating: Warm on the stovetop over medium heat, adding a splash of water or broth to loosen if necessary.

FAQs: Your Soup Questions Answered

Got questions about this soup? Here are some common queries answered:

  • Can I use yams instead of sweet potatoes? Yes, while yams have a different texture, they can work well in this soup.
  • What flavors pair well with sweet potato soup? Consider flavors like ginger, cinnamon, and nutmeg for a warm contrast.
  • Can I add protein? Absolutely! Shredded chicken or chickpeas make great additions.
  • How can I make it creamier? Use more coconut milk or a splash of heavy cream if you’re not dairy-free.
  • Is this soup spicy? Not unless you add spices, so feel free to adjust the heat level to your liking.
  • Can I use fresh sweet potatoes? Yes, fresh sweet potatoes are ideal, but canned versions can work in a pinch.
  • What’s a good side to serve with this soup? A simple side salad or crusty bread pairs beautifully.
  • How do I store leftovers? Store in the fridge in an airtight container for up to 5 days or freeze for longer storage.

Nutritional Insights and Dietary Adaptations

This sweet potato soup is not only delicious but also packed with nutrients:

  • Vegan Friendly: This recipe is naturally vegan, perfect for plant-based diets.
  • Low-Calorie Option: Sweet potatoes are low in calories and high in fiber, making this soup a filling choice.
  • Gluten-Free: All ingredients are gluten-free, ensuring it’s suitable for those with gluten intolerance.
  • High in Vitamins: Rich in vitamins A and C, this soup supports immune health and skin vitality.

Essential Equipment for Your Kitchen

Before you start cooking, ensure you have these essentials:

  • Sharp Knife: For easy peeling and chopping of sweet potatoes and onions.
  • Baking Sheet: For roasting the sweet potatoes evenly.
  • Large Pot: To cook and blend the soup.
  • Immersion Blender: Makes blending easy, but a countertop blender works too.

Serving Suggestions to Impress

Now that your soup is ready, here are some serving suggestions to elevate your dish:

  • Top with Fresh Herbs: A sprinkle of cilantro or parsley adds color and freshness.
  • Drizzle with Olive Oil: A swirl of high-quality olive oil adds richness and depth.
  • Add Crunch: Serve with roasted chickpeas or croutons for added texture.
  • Pair with Crusty Bread: A slice of sourdough or baguette is perfect for dipping.

With these tips and tricks, you’re not just making soup; you’re crafting a bowl of warmth and flavor that tells a story. So grab your ingredients, heat up the kitchen, and dive into the delicious world of sweet potato soup. Your adventure in cooking has just begun!

Roasted Sweet Potato Soup (easy+super tasty)

Prep Time 10 minutes
Cook Time 30 minutes
Total Time 40 minutes
Servings 4 servings
Calories 180
A warm, creamy soup combining roasted sweet potatoes and aromatic spices, perfect for a cozy meal.

Ingredients

Main

  • 2 large sweet potatoes, peeled and cubed
  • 1 tablespoon olive oil
  • 1 onion chopped onion
  • 2 garlic cloves minced garlic
  • 4 cups vegetable broth
  • 1 teaspoon ground cumin
  • to taste salt and pepper
  • 1/2 cup coconut milk (optional)
  • for garnish fresh cilantro (optional)

Instructions 

  • Preheat oven to 400°F (200°C). Toss sweet potatoes with olive oil, salt, and pepper, then roast for 25-30 minutes.
  • Sauté chopped onion in a little olive oil until translucent, about 5 minutes. Add garlic and cumin, cook for 1 minute.
  • Add roasted sweet potatoes and vegetable broth, bring to a boil, then simmer for 10 minutes.
  • Puree the soup until smooth using an immersion blender or in batches in a blender.
  • Stir in coconut milk if using, adjust seasoning, and serve hot garnished with cilantro if desired.

Notes

For a creamier texture, add more coconut milk or a splash of cream.
Calories: 180kcal
Cost: $12
Course: Soup
Cuisine: American
Keyword: sweet potato

Nutrition

Calories: 180kcal | Carbohydrates: 40g | Protein: 3g | Fat: 4g | Sodium: 600mg

Loved this recipe? Save it to your favorite Pinterest board so you can easily find it later! It’s the perfect way to keep all your sweet ideas in one place. ✨

A delicious serving of roasted sweet potato soup with a hint of coconut milk, surrounded by a cozy blurred background.

Transform Your Mornings with Creamy Avocado Bread

Are you tired of the same old breakfast routine? Let me introduce you to a game-changer that’s about to become your new favorite morning companion: 3-ingredient avocado bread. With its luscious, creamy texture and vibrant flavor, this quick and easy dish will not only ignite your breakfast routine but also keep you fueled with healthy fats and protein. This avocado bread is a low-carb delight that perfectly balances flavor and nutrition, making it the ultimate breakfast adventure!

Why You’ll Love This Recipe

This avocado bread isn’t just a treat for your taste buds; it offers a multitude of benefits that will have you reaching for the loaf repeatedly. Here are five reasons to fall in love with this recipe:

  • Quick Preparation: Ready in less than an hour, this recipe is perfect for busy mornings when you still want something delicious and homemade.
  • Nutritious Ingredients: Made with ripe avocados and whole wheat flour, this bread is packed with healthy fats and fiber, promoting sustained energy throughout the day.
  • Versatile Base: Whether you want to slather on some peanut butter, top it with eggs, or enjoy it plain, this bread serves as a versatile canvas for any topping.
  • Low Carb-Friendly: Perfect for those on a low-carb or keto diet, this avocado delight keeps your carb count low while satisfying your cravings.
  • Family-Friendly: Even the pickiest eaters will love this bread, making it a great option for families looking to incorporate healthier options.

Ingredient Breakdown

A vibrant piece of avocado bread displaying its green texture with a soft background.

Let’s dive deeper into the ingredients that make this avocado bread so special. Here’s what you’ll need:

  • 2 ripe avocados: Choose avocados that yield slightly to pressure for the best texture. Actively seek out the dark green Hass variety for maximum creaminess.
  • 2 ripe bananas: These not only add natural sweetness but also help bind the bread together. Look for bananas with plenty of brown spots for optimal sweetness.
  • 1 cup whole wheat flour: This ingredient is essential for structure. If you prefer gluten-free options, almond flour or oat flour can be substituted seamlessly.

Feel free to experiment with these ingredients! Adding spices like cinnamon or nutmeg can bring a new layer of flavor, while nuts or chocolate chips can elevate the texture.

Step-by-Step Instructions

Ready to bake? Follow these simple steps to create your own healthy avocado bread:

  1. Preheat your oven to 350°F (175°C) and grease a loaf pan with cooking spray or line it with parchment paper.
  2. In a mixing bowl, mash the ripe avocados and bananas together until smooth, creating a luscious base for your bread.
  3. Stir in the whole wheat flour until well combined, ensuring there are no dry pockets left.
  4. Pour the mixture into the prepared loaf pan and smooth the top with a spatula.
  5. Bake for 25-30 minutes or until a toothpick inserted into the center comes out clean. The aroma will be irresistible!
  6. Allow the bread to cool for a few minutes in the pan before transferring it to a wire rack for complete cooling.
  7. Slice and enjoy your new breakfast favorite!

Pro Tips for the Best Results

To take your avocado bread to the next level, consider these expert insights:

  • Ripe Avocados: Ensure your avocados are perfectly ripe for a smooth, creamy texture. If they’re too firm, they won’t blend well.
  • Banana Selection: The ripeness of bananas impacts sweetness and moisture. Overripe bananas are the secret to perfecting this recipe.
  • Don’t Overmix: Mix just until combined to avoid dense bread; overmixing can lead to a chewier texture.
  • Cooling Time: Allow the bread to cool completely before slicing to ensure clean cuts and better texture.
  • Serving Suggestions: Top with fresh fruits, yogurt, or spreadable cheeses to enhance flavor and presentation.
  • Storage: Store leftovers in an airtight container at room temperature for up to three days, or freeze for longer storage.

Common Mistakes and Troubleshooting

Even the best can make mistakes! Here are a few common pitfalls and how to avoid them:

  • Using Underripe Avocados: This can lead to a chunky texture. Always choose ripe avocados for a smooth bread.
  • Not Measuring Flour Properly: Too much flour can make the bread dense. Use a scale or spoon and level method for accuracy.
  • Skipping Cooling Time: Cutting into warm bread can lead to a gummy texture. Patience is key!

Variations to Spice Up Your Avocado Bread

Feeling adventurous? Here are four variations to consider:

  • Spicy Avocado Bread: Add a pinch of cayenne or red pepper flakes to the batter for a kick.
  • Chocolate Chip Avocado Bread: Fold in dark chocolate chips before baking for a delightful treat.
  • Nuts and Seeds: Mix in chopped walnuts or sunflower seeds for added crunch and nutrition.
  • Herbed Avocado Bread: Incorporate fresh herbs like cilantro or basil for a savory twist.

Storage and Make-Ahead Instructions

Want to prepare ahead of time? Here’s how to store and make this recipe conveniently:

  • Make-Ahead: You can mix the ingredients and store them in the refrigerator for up to 24 hours before baking. Just let it come to room temperature before baking.
  • Freezing: Slice the avocado bread and wrap individual pieces in plastic wrap. Store in a zip-top bag in the freezer for up to three months.

Frequently Asked Questions

Curious about this recipe? Here are some common questions:

  • Can I use different flours?: Yes! Almond flour or oat flour can be great alternatives for gluten-free options.
  • Does this recipe require eggs?: No, this recipe is egg-free, relying on the binding properties of bananas and avocados.
  • Can I add protein powder?: Absolutely! Adding protein powder can make this a more satisfying option and boost your nutrition.
  • How do I know when the bread is done?: A toothpick inserted should come out clean, and the bread will spring back when lightly pressed.
  • Can I bake this in an air fryer?: Yes! Preheat your air fryer to 320°F (160°C) and bake for about 20-25 minutes.
  • What can I serve with avocado bread?: Top with yogurt, nut butter, or enjoy with fresh fruit for a delightful breakfast.
  • How do I store leftovers?: Keep leftovers in an airtight container at room temperature for up to three days, or freeze for later.
  • Can I double the recipe?: Definitely! Just ensure your mixing bowl is large enough to accommodate the increased volume.

Nutrition Tips and Dietary Adaptations

This avocado bread is naturally packed with nutrition, but here are ways to maximize its health benefits:

  • Increase Fiber: Opt for whole grain flour or add chia seeds to enhance the fiber content.
  • Boost Protein: Incorporate Greek yogurt or cottage cheese as a topping for added protein.
  • Watch Portion Sizes: Even healthy options can add up; keep an eye on portion sizes if you’re monitoring your intake.

Equipment Recommendations

Here’s what you’ll need to get started:

  • Mixing Bowl: A large mixing bowl allows for easy mashing and mixing.
  • Loaf Pan: A standard 9×5 inch loaf pan is ideal for this recipe. Silicone pans work great too!
  • Whisk or Fork: Essential for mashing the avocados and bananas smoothly.
  • Oven or Air Fryer: Depending on your cooking method, ensure your equipment is preheated for best results.

Serving Suggestions

Ready to serve up this amazing avocado bread? Here are some tasty suggestions:

  • Breakfast Toast: Top with scrambled eggs, smoked salmon, and fresh herbs for a protein-packed breakfast.
  • Snack Time: Enjoy it with a spread of almond butter and banana slices for a delightful afternoon snack.
  • Brunch Delight: Serve with a side of fresh fruit and a dollop of Greek yogurt for a wholesome brunch option.

Conclusion

So there you have it! A simple, delicious, and nutritious way to elevate your breakfast game with this creamy avocado bread. With just three ingredients and a bit of love, you can create something extraordinary. Embrace the thrill of cooking with heat, and let this recipe inspire you to explore the world of flavors and textures. Your mornings will never be the same again!

Healthy 3 Ingredient Avocado Bread - Quick & Easy

Prep Time 10 minutes
Cook Time 30 minutes
Total Time 40 minutes
Servings 8 slices
Calories 250
This simple and nutritious avocado bread requires just three ingredients and minimal effort, perfect for a quick healthy snack or breakfast.

Ingredients

Main ingredients

  • 2 pieces ripe avocados
  • 2 pieces ripe bananas
  • 1 cup whole wheat flour

Instructions 

  • Preheat oven to 350°F (175°C) and grease a loaf pan.
  • Mash avocados and bananas until smooth.
  • Mix in flour until combined.
  • Pour batter into pan and smooth top.
  • Bake for 25-30 minutes, then cool before slicing.

Notes

Use ripe avocados and bananas for best flavor and texture.
Calories: 250kcal
Cost: $10
Course: Breakfast, Snack
Cuisine: Healthy
Keyword: Avocado, Banana, Whole Wheat Flour

Nutrition

Calories: 250kcal | Carbohydrates: 45g | Protein: 4g | Fat: 10g | Sodium: 50mg

Loved this recipe? Save it to your favorite Pinterest board so you can easily find it later! It’s the perfect way to keep all your sweet ideas in one place. ✨

A mouthwatering avocado bread slice with visible chunks of ripe avocado, set in natural light.