Author

Avery Collins

Browsing

Why You’ll Love This Dish

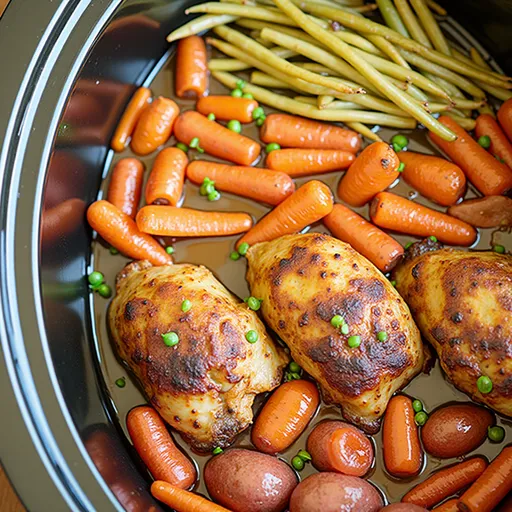
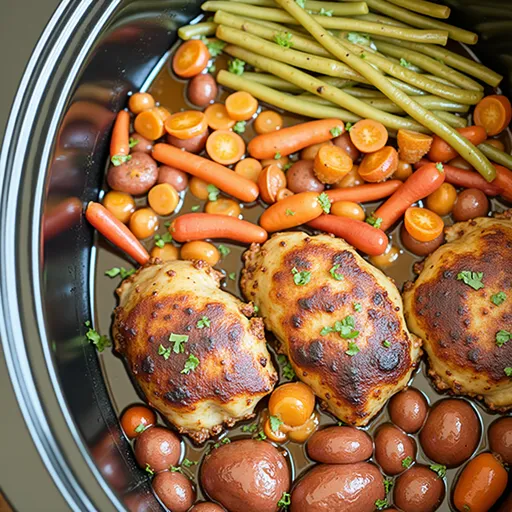
Imagine coming home after a long day, the aroma of sweet and savory goodness enveloping you like a warm hug. That’s the magic of this Slow Cooker Honey Garlic Chicken and Veggies. This recipe is more than just a meal; it’s an experience, a symphony of flavors that plays out in your mouth. Each bite of tender chicken, bathed in a luscious honey garlic sauce, complemented by a medley of vibrant vegetables, will transport you to culinary bliss. Whether you’re a novice in the kitchen or a seasoned chef, this dish is designed to delight your taste buds and warm your heart.

Ingredients That Shine

To create this delightful dish, you’ll need the following ingredients:

  • 8 bone-in, skin-on chicken thighs
  • 16 ounces baby red potatoes (halved)
  • 16 ounces baby carrots
  • 16 ounces green beans (trimmed)
  • 2 tablespoons chopped fresh parsley leaves
  • 1/2 cup reduced sodium soy sauce
  • 1/2 cup honey
  • 1/4 cup ketchup
  • 2 cloves garlic (minced)
  • 1 teaspoon dried basil
  • 1/2 teaspoon dried oregano
  • 1/4 teaspoon crushed red pepper flakes
  • 1/4 teaspoon ground black pepper

These ingredients are not just staples; they are the heart of the dish. The combination of soy sauce and honey creates a perfect balance of sweet and savory, while the fresh garlic and herbs elevate it to new heights.

Equipment You’ll Need

Delicious dish of Honey Garlic Chicken thighs surrounded by baby potatoes and green beans.

Before we dive into the cooking process, make sure you have the following equipment on hand:

  • 6-quart slow cooker
  • Large mixing bowl
  • Measuring cups and spoons
  • Cutting board
  • Knife
  • Baking sheet (for optional broiling)

Instructions to Perfect Your Meal

Now, let’s get cooking! Follow these steps to create your own slow cooker masterpiece:

  1. In a large bowl, combine the soy sauce, honey, ketchup, minced garlic, dried basil, dried oregano, crushed red pepper flakes, and ground black pepper. This sauce is the flavor bomb that will infuse your chicken and veggies with incredible taste.
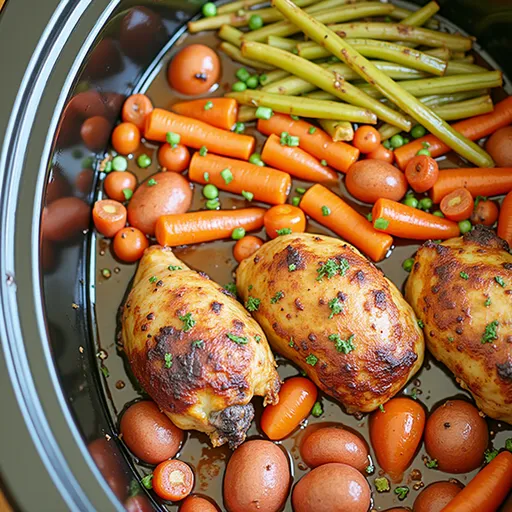
  2. Place the chicken thighs in the slow cooker, followed by the halved baby red potatoes and baby carrots. Pour the soy sauce mixture over everything, ensuring the chicken and vegetables are well-coated.
  3. Cover and cook on low heat for 7-8 hours or on high for 3-4 hours. If you’re using the low setting, make sure to baste the chicken and veggies every hour to keep them moist and flavorful.
  4. During the last 30 minutes of cooking, add the trimmed green beans. This timing ensures they remain crisp and vibrant, adding a lovely texture contrast to the dish.
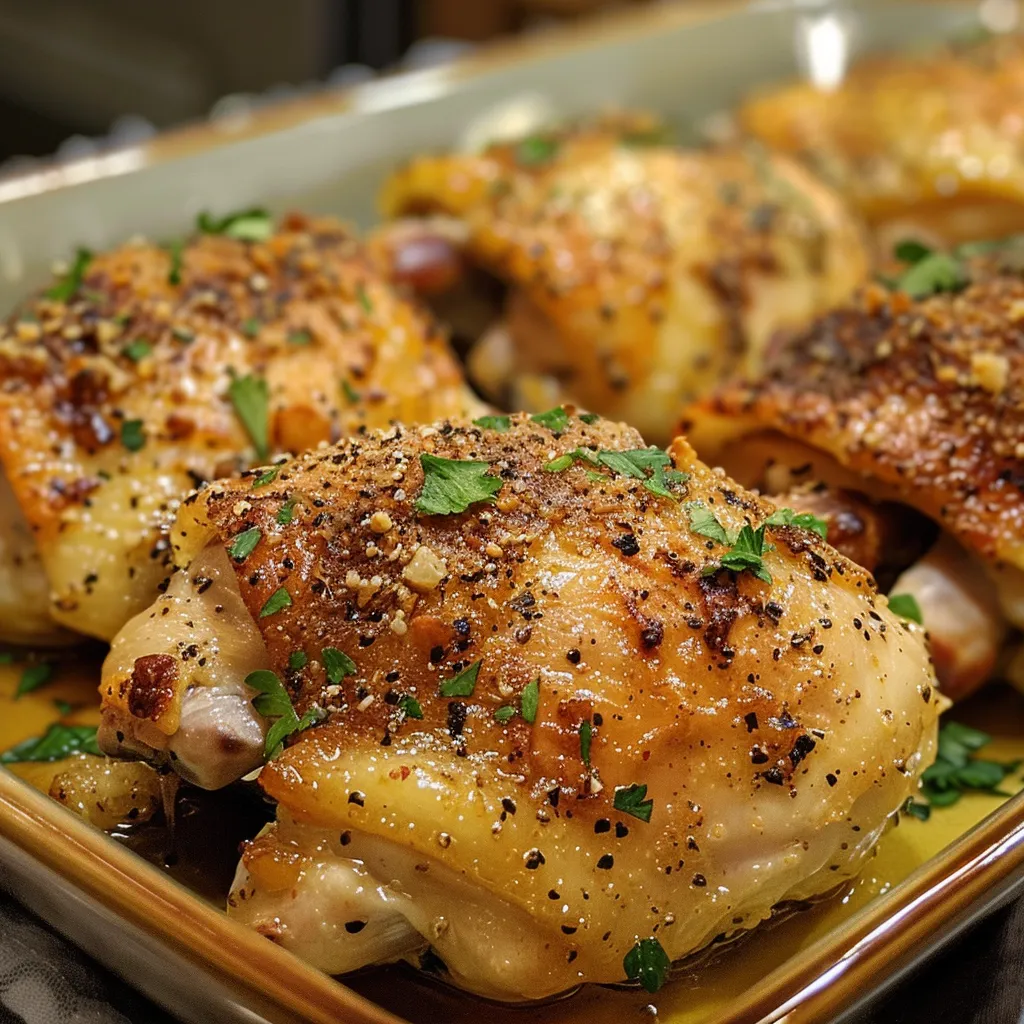
  5. Optional: If you want to add an extra layer of flavor and texture, preheat your oven to broil. Once the chicken is done in the slow cooker, place the thighs on a baking sheet, skin side up, and broil for about 3-4 minutes until the skin is crispy and golden.
  6. Serve immediately, garnished with fresh parsley if desired. Enjoy your delicious meal with family or friends, and watch as they savor each bite!

Tips for Success

Here are some tips to ensure your Slow Cooker Honey Garlic Chicken and Veggies turns out perfectly:

  • For the most tender chicken, opt for bone-in, skin-on thighs. They hold moisture better than boneless cuts.
  • Don’t skip basting! It helps to keep the chicken juicy and enhances the flavor of the vegetables.
  • If you prefer a thicker sauce, you can remove the chicken and vegetables after cooking and reduce the sauce on the stove for a few minutes.
  • Feel free to experiment with different veggies. Bell peppers, zucchini, or sweet potatoes can be great additions!

Variations to Try

Cooking is all about creativity! Here are some fun variations to consider:

  • Spicy Kick: Add a tablespoon of sriracha or your favorite hot sauce to the sauce mixture for an added kick.
  • Herb Infusion: Fresh herbs like thyme or rosemary can be swapped for dried basil and oregano for a different flavor profile.
  • Different Proteins: Try this recipe with chicken breasts, pork chops, or even tofu for a vegetarian option.

Substitutions You Can Make

If you’re missing an ingredient, don’t worry! Here are some substitutions:

  • Use maple syrup instead of honey for a different sweetness.
  • Swap out the soy sauce for tamari for a gluten-free version.
  • Tomato sauce can replace ketchup if you want to reduce sugars.

Storage and Freezing

Leftovers? Yes, please! Here’s how to store and freeze your meal:

  • Store leftovers in an airtight container in the fridge for up to 4 days.
  • To freeze, let the dish cool completely, then transfer it to a freezer-safe container. It will keep well for up to 3 months.
  • When ready to eat, thaw overnight in the fridge and reheat in the microwave or on the stove until warmed through.

FAQs

Here are some common questions about this recipe:

  • Can I use boneless chicken thighs? Yes, boneless thighs will work, but adjust the cooking time as they may cook faster.
  • What’s the best way to serve this dish? It pairs beautifully with rice or quinoa to soak up the extra sauce!
  • Can I double the recipe? Absolutely! Just ensure your slow cooker can accommodate the extra volume.

Troubleshooting Common Issues

If you encounter any hiccups, here are some troubleshooting tips:

  • If the chicken is dry, it may have cooked too long. Make sure to monitor the cooking time closely.
  • If the veggies are too mushy, consider adding them later in the cooking process next time.
  • For a sweeter sauce, add a touch more honey, or for a saltier flavor, a splash more soy sauce can help.

Conclusion

Your journey into the world of slow-cooked flavors has just begun! The Slow Cooker Honey Garlic Chicken and Veggies is not just a recipe; it’s a gateway to playful cooking and culinary exploration. With its unique blend of sweetness, savoriness, and heartiness, this dish will quickly become a family favorite. So, roll up your sleeves, embrace your inner chef, and let the slow cooker work its magic. Remember, cooking is about joy and adventure, and your kitchen is the perfect place to explore! Enjoy the symphony of flavors, and don’t forget to share your culinary creations with friends and family.

Slow Cooker Honey Garlic Chicken and Veggies

Prep Time 15 minutes
Cook Time 4 hours
Total Time 4 hours 15 minutes
Servings 4 servings
Calories 450
A flavorful and easy-to-make slow cooker dish featuring tender chicken thighs, sweet honey, and fresh vegetables, perfect for a comforting meal.

Ingredients

Protein

  • 8 pieces bone-in, skin-on chicken thighs
  • 16 ounces baby red potatoes (halved)
  • 16 ounces baby carrots
  • 16 ounces green beans (trimmed)
  • 2 tablespoons chopped fresh parsley leaves
  • 0.5 cup reduced sodium soy sauce
  • 0.5 cup honey
  • 0.25 cup ketchup
  • 2 cloves garlic (minced)
  • 1 teaspoon dried basil
  • 0.5 teaspoon dried oregano
  • 0.25 teaspoon crushed red pepper flakes
  • 0.25 teaspoon ground black pepper

Instructions 

  • Mix soy sauce, honey, ketchup, garlic, basil, oregano, red pepper flakes, and pepper in a bowl.
  • Place chicken, potatoes, carrots, and sauce into slow cooker; cook on low 7-8 hours or high 3-4 hours, adding green beans in last 30 minutes.
  • Optional: Broil chicken skin-side up until crisp, 3-4 minutes.
  • Serve hot, garnished with parsley if desired.

Notes

Ensure to baste the chicken during cooking for extra flavor.
Calories: 450kcal
Cost: $15
Course: Main Course
Cuisine: American
Keyword: chicken, honey, Slow Cooker

Nutrition

Calories: 450kcal | Carbohydrates: 50g | Protein: 40g | Fat: 10g | Sodium: 1500mg

Loved this recipe? Save it to your favorite Pinterest board so you can easily find it later! It’s the perfect way to keep all your sweet ideas in one place. ✨

Eye-level shot of Slow Cooker Honey Garlic Chicken and mixed vegetables with a warm glow.

Unlock the Secrets to Juicy, Crispy Baked Chicken Hindquarters

Welcome to a culinary adventure where we elevate the humble chicken hindquarter into a crispy, flavor-packed masterpiece! Whether you’re a seasoned chef or a kitchen newbie, understanding how to cook chicken hindquarters perfectly is a game changer. In this article, I’ll take you on a journey of taste, texture, and techniques that will not only make your taste buds dance but also empower you to embrace the thrill of cooking with heat. So grab your skillet, and let’s turn up the fire!

Why You’ll Love This Recipe

This isn’t just another chicken recipe; it’s the ultimate passport to flavor town. Here’s why you’re going to fall in love with my Ultimate Crispy Baked Chicken Hindquarters:

  • Budget-Friendly Delight: Chicken hindquarters are not only economical but also incredibly versatile. You get both the thigh and drumstick in one piece, making it a great choice for family meals.
  • Flavor Explosion: With a blend of spices, including smoked paprika and cayenne, each bite bursts with flavor, creating a symphony that’s anything but ordinary.
  • Perfectly Crispy Skin: Achieving that golden, crispy skin is an art. My method ensures the skin is perfectly rendered, giving you that satisfying crunch with every bite.
  • Customizable: Feel free to adapt the spice blend to your liking. Whether you want a kick of heat or a milder flavor, this recipe allows for delicious experimentation.
  • Simple Prep and Cook: With straightforward steps and minimal prep time, you can have a restaurant-quality dish on your dinner table without the hassle.

Ingredients for the Ultimate Crispy Baked Chicken Hindquarters

Before diving into the cooking process, let’s gather our ingredients for this flavorful dish. Here’s what you’ll need:

  • 4 large chicken leg quarters (hindquarters, bone-in, skin-on)
  • 2 tablespoons olive oil (or melted unsalted butter)
  • 1 tablespoon smoked paprika
  • 1.5 teaspoons granulated garlic
  • 1 teaspoon onion powder
  • 1 teaspoon dried oregano
  • 0.5 teaspoon cayenne pepper (optional, for a hint of heat)
  • 1.5 teaspoons coarse sea salt
  • 1 teaspoon freshly ground black pepper
  • Fresh parsley or cilantro (chopped, for garnish, optional)

Pro Tips for Perfectly Cooked Chicken Hindquarters

Close-up of seasoned baked chicken leg quarters resting on a wooden cutting board.

Ready to elevate your cooking game? Here are my top tips for achieving mouthwatering results:

  • Room Temperature Matters: Let your chicken sit at room temperature for about 30 minutes before cooking. This ensures even cooking and helps achieve that crispy skin.
  • Pat Dry for Crispiness: Dry the skin thoroughly with paper towels to remove excess moisture. Moisture is the enemy of crispy skin!
  • Season Generously: Don’t skimp on the seasoning! Rub the spice mixture generously over the chicken, including under the skin for maximum flavor.
  • Use a Rack: Baking on a wire rack allows air circulation around the chicken, promoting even cooking and crispiness.
  • Monitor Internal Temperature: Use a meat thermometer to check that the internal temperature reaches 165°F (75°C) for safe consumption.
  • Rest Before Serving: Let the chicken rest for at least 10 minutes after baking. This allows the juices to redistribute, ensuring juicy meat.
  • Experiment with Spices: Feel free to swap out spices based on your preferences. Try garlic powder, cumin, or even a dash of lemon zest for a unique twist!
  • Batch Cooking: Make extra chicken hindquarters and use leftovers in salads, sandwiches, or wraps throughout the week.

Common Mistakes and Troubleshooting

Even the best chefs make mistakes. Here’s how to avoid common pitfalls:

  • Too Much Moisture: If your chicken is not crispy, it may have been too wet. Always dry the skin well and avoid overcrowding the baking tray.
  • Underseasoned Chicken: Don’t be shy with the spices. Chicken can take a lot of flavor, so season liberally and taste as you go!
  • Overcooked or Undercooked: Use a meat thermometer to check the internal temperature. Remove the chicken from the oven as soon as it reaches 165°F (75°C).
  • Letting It Sit Too Long: While resting is important, don’t let the chicken sit too long before serving; otherwise, it may cool off and lose its appealing texture.

Delicious Variations of Crispy Baked Chicken Hindquarters

One of the joys of cooking is experimenting with flavors! Here are some delicious variations to try:

  • Spicy Honey Glaze: Mix honey with sriracha or your favorite hot sauce for a sweet and spicy finish.
  • Herb and Lemon Zest: Incorporate fresh herbs like rosemary or thyme and a sprinkle of lemon zest for a refreshing taste.
  • BBQ Style: Brush with your favorite BBQ sauce during the last 10 minutes of baking for a sticky, tangy finish.
  • Asian-Inspired: Use soy sauce, ginger, and sesame oil for a flavorful Asian twist. Serve with steamed rice and veggies!

Storage and Make-Ahead Instructions

Want to prepare ahead of time? Here’s how to manage your chicken hindquarters:

  • Make Ahead: You can marinate the chicken in the spice blend and oil the night before. Just cover and refrigerate until ready to bake.
  • Leftovers: Store any cooked chicken in an airtight container in the fridge for up to 4 days.
  • Freezing: For longer storage, freeze cooked chicken hindquarters for up to 3 months. Thaw in the refrigerator before reheating.

Comprehensive FAQ

Got questions? I’ve got answers! Here are some frequently asked questions about crispy baked chicken hindquarters:

  • What’s the best way to check for doneness? Use a meat thermometer, and ensure the internal temperature reaches 165°F (75°C).
  • Can I use skinless chicken? Yes, but it won’t be as crispy. Skin-on helps retain moisture and adds crunch.
  • How can I ensure crispy skin? Dry the chicken well and use a wire rack during baking to allow airflow.
  • What sides pair well with this dish? Serve with roasted vegetables, mashed potatoes, or a fresh salad to balance the flavors.
  • Can I use a different cut of chicken? Absolutely! Adjust cooking times for chicken breasts or thighs.
  • How do I reheat leftovers? Reheat in the oven at 350°F (175°C) for best results, ensuring they remain crispy.
  • Is this recipe suitable for meal prep? Definitely! Cooked chicken can be portioned out for easy meals throughout the week.
  • What’s the best way to store cooked chicken? Keep it in an airtight container in the fridge for up to 4 days or freeze for up to 3 months.

Nutritional Tips and Dietary Adaptations

This recipe can easily fit into various dietary needs. Here are some tips:

  • Low-Carb Option: This dish is naturally low in carbs, making it perfect for keto diets.
  • Gluten-Free: All ingredients are gluten-free, ensuring everyone can enjoy this dish.
  • Low-Sodium Adaptation: Reduce the salt content and use fresh herbs for flavor without added sodium.
  • Spice Level: Adjust the cayenne pepper to control heat levels based on your preference.

Equipment Recommendations

Here’s what you’ll need to get started:

  • Oven: Ensure your oven is calibrated correctly for even cooking.
  • Meat Thermometer: A reliable thermometer is essential for checking doneness.
  • Wire Rack: This helps achieve that perfect crispy skin while baking.
  • Baking Sheet: Line it with foil for easier cleanup and place the wire rack on top.

Serving Suggestions

Now that your chicken hindquarters are perfectly baked, let’s talk about how to plate them:

  • Garnish: Sprinkle with fresh parsley or cilantro for a pop of color and freshness.
  • Pairing: Serve alongside roasted seasonal vegetables or a vibrant salad for a complete meal.
  • Side Dishes: Consider creamy mashed potatoes, a tangy coleslaw, or grilled corn on the cob to complement the flavors.

Conclusion

Cooking with spice and flavor is an adventure, and my Ultimate Crispy Baked Chicken Hindquarters is the perfect start. With a blend of spices and techniques, this dish embodies the joy of cooking. So don’t just stick to the basics — embrace the fire, experiment, and make every meal a celebration of flavor. Now, go ahead and make this recipe your own, and may every bite be a story worth telling!

The Ultimate Crispy Baked Chicken Hindquarters

Prep Time 10 minutes
Cook Time 40 minutes
Total Time 50 minutes
Servings 4 pieces
Calories 450
Enjoy perfectly crispy, flavorful baked chicken hindquarters with minimal effort and maximum taste.

Ingredients

Main Ingredients

  • 4 pieces large chicken leg quarters (hindquarters, bone-in, skin-on)
  • 2 tablespoons olive oil (or melted unsalted butter)
  • 1 tablespoon smoked paprika
  • 1.5 teaspoons granulated garlic
  • 1 teaspoon onion powder
  • 1 teaspoon dried oregano
  • 0.5 teaspoon cayenne pepper (optional) (for a hint of heat)
  • 1.5 teaspoons coarse sea salt
  • 1 teaspoon freshly ground black pepper
  • Fresh parsley or cilantro (chopped, optional for garnish)

Instructions 

  • Preheat oven to 425°F (220°C).
  • Mix olive oil, paprika, garlic, onion powder, oregano, cayenne, salt, and pepper in a bowl.
  • Rub the spice mixture evenly over the chicken hindquarters.
  • Arrange chicken on a baking sheet and bake for 40 minutes until crispy and cooked through.
  • Garnish with chopped parsley or cilantro if desired. Serve hot.

Notes

For extra crispiness, broil for an additional 2-3 minutes at the end.
Calories: 450kcal
Cost: $15
Course: Main Course
Cuisine: American
Keyword: baked, chicken, crispy

Nutrition

Calories: 450kcal | Carbohydrates: 8g | Protein: 55g | Fat: 22g | Sodium: 950mg

Why This Fudge Will Change Your Dessert Game

As a self-proclaimed dessert aficionado, I can tell you that a great fudge can turn an ordinary day into a celebration. Now, imagine a fudge that not only satisfies your sweet tooth but also aligns with your health goals. Welcome to the world of Easy Healthy Fudge! This isn’t just any fudge; it’s a rich, creamy delight that’s so simple to whip up, you’ll wonder how you ever lived without it. With just a handful of wholesome ingredients, you can create a decadent treat that feels indulgent without the guilt. Let’s dive into this deliciously nutritious adventure!

Ingredients for the Perfect Healthy Fudge

Before we roll up our sleeves and get cooking, let’s gather our ingredients:

  • 1 cup almond butter – This is the creamy base that provides healthy fats and protein.
  • 1/4 cup honey or maple syrup – Choose your sweetener of choice to add just the right amount of sweetness.
  • 1/4 cup cocoa powder – For that essential chocolatey goodness.
  • 1/4 cup coconut oil, melted – This will help bind everything together and give the fudge its delightful texture.
  • 1 teaspoon vanilla extract – A touch of vanilla elevates the flavor profile.
  • A pinch of salt – This enhances the sweetness and balances the flavors.
  • Optional toppings: Chopped nuts, dried fruit, or dark chocolate chips for that finishing touch.

How to Create Your Healthy Fudge

Delicious Easy Healthy Fudge displayed on a rustic surface, showcasing its rich chocolate color.

Ready to embark on this sweet journey? Here’s how to make this Easy Healthy Fudge:

  1. In a medium mixing bowl, combine the almond butter, honey (or maple syrup), cocoa powder, melted coconut oil, vanilla extract, and a pinch of salt.
  2. Mix all the ingredients until smooth and well combined. Feel free to get in there with a spatula or whisk—just ensure everything is thoroughly blended!
  3. Line an 8×8-inch baking dish with parchment paper. This will make it easy to remove your fudge later.
  4. Pour the fudge mixture into the prepared baking dish and spread it evenly. Don’t be shy—give it a gentle tap on the counter to remove air bubbles!
  5. If desired, sprinkle optional toppings over the fudge. This is where you can get creative! Think about adding a sprinkle of chopped nuts or a few dark chocolate chips on top.
  6. Refrigerate for at least 1-2 hours until firm. The longer you let it chill, the better the texture will be.
  7. Once set, lift the fudge out of the dish using the parchment paper and cut it into squares. Enjoy your creation!

Tips for the Best Fudge

To ensure your fudge turns out perfectly every time, keep these tips in mind:

  • Use quality ingredients: The better the ingredients, the better the fudge. Opt for organic almond butter and pure maple syrup when possible.
  • Don’t skip the salt: A pinch of salt can elevate the flavor remarkably, balancing the sweetness and enhancing the chocolate.
  • Chill properly: Make sure to give your fudge enough time to set in the fridge. Rushing this step can lead to a softer texture.

Variations to Spice Things Up

Feeling adventurous? Here are some variations to try that can take your fudge to the next level:

  • Nutty Boost: Add in 1/4 cup of chopped nuts like walnuts or pecans for a crunchy texture.
  • Fruit Fusion: Mix in some dried fruits like cranberries or apricots for a sweet and chewy twist.
  • Mint Chocolate: Replace vanilla extract with peppermint extract for a refreshing minty fudge.
  • Spicy Kick: A dash of cayenne pepper can add a surprising kick that pairs beautifully with chocolate!

Substitutions You Can Make

If you don’t have all the ingredients on hand, don’t fret! Here are some easy substitutions:

  • Nut Butter: If almond butter isn’t your thing, peanut butter or cashew butter works just as well.
  • Sweetener: Agave syrup or brown rice syrup can replace honey or maple syrup without compromising taste.
  • Coconut Oil: If you’re out of coconut oil, melted butter or ghee can be a good alternative, although it may alter the flavor slightly.

Essential Equipment

For this recipe, you’ll need a few basic kitchen tools:

  • A medium mixing bowl
  • A whisk or spatula for mixing
  • An 8×8-inch baking dish
  • Parchment paper for easy removal

Storing and Freezing Your Fudge

This fudge is best stored in an airtight container in the refrigerator, where it can last up to two weeks. If you want to keep it longer, you can freeze it! Just cut it into squares, wrap each piece in parchment paper, and store them in a freezer-safe bag. They’ll be good for about three months, making it a great make-ahead treat that’s always ready when you need a sweet pick-me-up!

FAQs About Healthy Fudge

Let’s tackle some common questions about this recipe:

  • Can I make this fudge vegan? Yes! Just use maple syrup as your sweetener and ensure your almond butter is vegan-friendly.
  • What if my fudge is too soft? If your fudge doesn’t set properly, try adding a bit more cocoa powder or refrigerate it longer.
  • Can I double the recipe? Absolutely! Just make sure to use a larger baking dish or two separate dishes for even setting.

Troubleshooting Common Issues

If you encounter any hiccups along the way, don’t worry! Here’s how to troubleshoot:

  • Fudge not setting: Ensure your coconut oil was melted and thoroughly mixed. If it’s too warm when added to the almond butter, it may not set properly.
  • Separation in the mixture: This can happen if the oils don’t fully incorporate. Be sure to mix well and consider using a whisk for a smoother blend.

Final Thoughts

There you have it, folks! A deliciously simple Easy Healthy Fudge that’s ready to impress your taste buds without derailing your health goals. This recipe embodies the spirit of creating something extraordinary from simple ingredients. So, gather your supplies, unleash your inner chef, and enjoy the sweet satisfaction of homemade fudge. Remember, cooking is all about joy and exploration—so don’t hesitate to make this recipe your own. Happy cooking, and here’s to indulging in a little sweetness without the guilt!

Easy Healthy Fudge

Prep Time 10 minutes
Total Time 10 minutes
Servings 16 pieces
Calories 180
A simple, nutritious fudge recipe perfect for a quick treat or healthy snack.

Ingredients

Base

  • 1 cup almond butter
  • 1/4 cup honey or maple syrup
  • 1/4 cup cocoa powder
  • 1/4 cup coconut oil, melted
  • 1 teaspoon vanilla extract
  • a pinch salt

Optional toppings

  • to taste chopped nuts, dried fruit, or dark chocolate chips (for topping)

Instructions 

  • Mix almond butter, honey, cocoa powder, melted coconut oil, vanilla, and salt until smooth.
  • Line an 8x8-inch dish with parchment paper and pour the mixture in.
  • Spread evenly and add optional toppings if desired.
  • Refrigerate for 1-2 hours until firm, then cut into squares.
  • Store leftovers in an airtight container in the fridge.

Notes

Use natural almond butter for best flavor and texture.
Calories: 180kcal
Cost: $10
Course: Dessert
Cuisine: Healthy
Keyword: fudge

Nutrition

Calories: 180kcal | Carbohydrates: 15g | Protein: 4g | Fat: 14g | Sodium: 50mg

Loved this recipe? Save it to your favorite Pinterest board so you can easily find it later! It’s the perfect way to keep all your sweet ideas in one place. ✨

An inviting piece of Easy Healthy Fudge highlighted by natural lighting and soft shadows.

Why This Dip Will Steal the Show

Ah, the joy of gathering with friends and family, sharing laughter, stories, and of course, delicious food. If there’s one dish that can elevate any occasion from ordinary to extraordinary, it’s my Crockpot Crab Dip. This creamy, cheesy concoction is not just a dip; it’s a bold culinary experience that’s both simple to prepare and utterly delightful to savor. Whether you’re hosting a game night, a holiday party, or just a cozy evening at home, this dip will be the star of the show. Imagine a rich blend of cream cheese and cheddar, melded with the delicate sweetness of crab meat, all brought together by a hint of zesty lemon and a medley of spices. It’s an explosion of flavor that will leave your guests clamoring for more. Let’s dive deeper into what makes this dip so irresistible!

Ingredients That Make Magic Happen

Creating the ultimate Crockpot Crab Dip requires just a handful of ingredients, all of which work in harmony to craft that decadent flavor profile. Here’s what you’ll need:

  • 8 oz cream cheese: The base of our dip, providing that rich, creamy texture.
  • 1 cup shredded cheddar cheese: Adds a sharp, tangy flavor that pairs beautifully with crab.
  • 1/2 cup sour cream: For an extra layer of creaminess and a slight tang.
  • 1 teaspoon garlic powder: Infuses the dip with a warm, aromatic flavor.
  • 1 teaspoon Old Bay seasoning: A classic choice for seafood dishes that brings a savory depth.
  • Juice of 1 lemon: Brightens the dish and balances the richness with its acidity.

This combination results in a dip that’s not only flavorful but also packed with protein, making it a fantastic option for those looking to incorporate quick protein for salads into their diet.

Steps to Create Your Culinary Masterpiece

Creamy Crab Dip displayed in a slow cooker, showcasing rich textures and a warm color palette.

Now that we have our ingredients ready, let’s get to the fun part! Making this dip is as easy as tossing everything into the slow cooker. Here’s how:

  1. **Prepare Your Ingredients:** Start by softening the cream cheese. You can do this by letting it sit at room temperature for about 30 minutes.
  2. **Combine Everything:** In your slow cooker, add the softened cream cheese, shredded cheddar cheese, sour cream, garlic powder, Old Bay seasoning, and lemon juice.
  3. **Mix Well:** Use a spatula to combine all the ingredients until smooth and well blended. Don’t worry if it looks a bit chunky at first; it will melt beautifully as it cooks.
  4. **Cook Low and Slow:** Cover the slow cooker and set it to low heat. Allow the dip to cook for about 2 hours, stirring occasionally to ensure even melting.
  5. **Serve and Enjoy:** Once everything is bubbly and gooey, give it one last stir, then serve it warm with your favorite dippers—think crispy tortilla chips, fresh veggies, or toasted baguette slices.

Tips for the Perfect Dip

To ensure your Crockpot Crab Dip turns out perfectly every time, keep these tips in mind:

  • **Use Quality Ingredients:** When it comes to crab, fresh or high-quality canned crab meat will make a world of difference in flavor.
  • **Don’t Rush the Cooking:** Slow cooking allows the flavors to meld beautifully. Resist the urge to crank up the heat; low and slow is the way to go!
  • **Experiment with Add-Ins:** Feel free to add diced jalapeños for a spicy kick or some chopped green onions for freshness.

Variations to Spice Things Up

One of the joys of cooking is the freedom to experiment. Here are some fun variations of this classic dip:

  • Spicy Crab Dip: Add some diced jalapeños or a dash of hot sauce to kick up the heat level.
  • Cheesy Spinach Crab Dip: Stir in some fresh or frozen spinach for added nutrients and a pop of color.
  • Buffalo Crab Dip: Mix in some buffalo sauce for a tangy twist that pairs perfectly with celery sticks.

Substitutions for Dietary Needs

If you have dietary restrictions or simply want to switch things up, here are some substitutions you can make:

  • For a Lighter Version: Use low-fat cream cheese and Greek yogurt instead of sour cream.
  • For a Dairy-Free Option: Substitute cream cheese and cheddar with vegan alternatives. Just make sure they melt well!
  • For Gluten-Free Dippers: Pair with fresh veggies or gluten-free crackers instead of traditional chips.

Essential Equipment

To whip up this delightful dip, you’ll need:

  • Crockpot: The star of the show! A slow cooker is essential for perfectly melted cheese.
  • Spatula: For mixing everything together.
  • Serving Dish: To present your dip in style. A hollowed-out bread bowl always makes for a fun presentation!

Storage and Freezing Tips

If you happen to have leftovers (though I doubt it!), here’s how to store and reheat your dip:

  • Refrigeration: Store in an airtight container in the fridge for up to 3 days.
  • Freezing: You can freeze the dip in a freezer-safe container for up to 2 months. To reheat, thaw in the refrigerator overnight and then warm it up in the crockpot or microwave.

FAQs About Crockpot Crab Dip

Can I make this dip ahead of time?
Absolutely! You can prepare the dip and store it in the fridge a day in advance. Just pop it in the crockpot when you’re ready to serve.

What can I serve with this dip?
Pair it with tortilla chips, fresh veggie sticks, pita bread, or even crusty bread for dipping.

How can I make this dip spicier?
Add diced jalapeños or a splash of your favorite hot sauce to the mix before cooking.

Troubleshooting Common Issues

If you’re facing any hiccups, here’s how to troubleshoot:

  • Dip is too thick: Add a splash of milk or cream to thin it out to your desired consistency.
  • Dip is too salty: Balance it out with a touch of sugar or a squeeze of lemon juice.
  • Cheese isn’t melting well: Make sure your crockpot is set to low and allow more time for cooking.

A Final Word on Flavor

As you embark on your culinary adventure with this Crockpot Crab Dip, remember that cooking is all about joy, exploration, and a little bit of daring. This dip encapsulates that spirit, combining simple ingredients into something spectacular. So roll up your sleeves, gather your loved ones, and get ready to share not just a dish, but an experience that’s rich in flavor and warmth. Every bite is a celebration of the good things in life—shared moments, laughter, and the magic that happens when we come together around the table. Enjoy your culinary creation, and don’t forget to savor every delicious bite!

Crockpot Crab Dip

Prep Time 10 minutes
Cook Time 2 hours
Total Time 2 hours 10 minutes
Servings 8 people
Calories 350
A creamy and flavorful crab dip perfect for parties, made easily in a slow cooker.

Ingredients

Dairy

  • 8 oz cream cheese
  • 1.5 cups cheddar (shredded)
  • 1 cup sour cream

Spices & Seasonings

  • 1 tsp spices (to taste)

Fruits & Citrus

  • 1 lemon lemon (juiced)

Seafood

  • 1 lb crab meat (fresh or canned)

Instructions 

  • Toss all ingredients into the slow cooker.

Notes

Serve warm with crackers or bread for best flavor.
Calories: 350kcal
Cost: $15
Course: Appetizer
Cuisine: American
Keyword: crab

Nutrition

Calories: 350kcal | Carbohydrates: 10g | Protein: 25g | Fat: 25g | Sodium: 800mg

Loved this recipe? Save it to your favorite Pinterest board so you can easily find it later! It’s the perfect way to keep all your sweet ideas in one place. ✨

A tantalizing bowl of Crockpot Crab Dip with visible chunks of crab and cheese, set against a soft-focused background.

Unlock the Secret to Juicy Baked Chicken Breasts

Are you tired of dry, flavorless chicken breasts that make weeknight dinners a chore? Look no further! In this article, I’ll guide you through the art of crafting perfectly juicy baked chicken breasts that not only tantalize your taste buds but also bring adventure back to your dinner table. With the right spices and techniques, we’ll transform a simple piece of chicken into a culinary masterpiece that’s both satisfying and exciting.

Let’s dive into why this recipe will quickly become your new go-to option for weeknight meals!

Why You’ll Love This Recipe

  • Quick and Easy: Ready in just 30 minutes, making it perfect for busy weeknights.
  • Flavor Explosion: Infused with aromatic spices, each bite is bursting with flavor.
  • Perfectly Juicy: Our technique ensures that your chicken breasts remain moist and tender, avoiding the dreaded dryness.
  • Versatile: Ideal for salads, sandwiches, or main dishes, this chicken works well in various cuisines.
  • Healthy Option: Packed with protein and low in carbs, this recipe is perfect for those following a healthy diet.

Ingredients and Their Magic

Let’s break down what you’ll need to make this juicy baked chicken breast recipe:

  • 4 medium-sized chicken breasts (about 2 pounds, or 7-8 ounces each): Look for fresh, high-quality chicken for the best results.
  • 1 teaspoon garlic powder: Adds a savory depth that complements the chicken beautifully.
  • 1 teaspoon onion powder: Enhances the overall flavor profile.
  • 1 teaspoon paprika: Offers a subtle smokiness and vibrant color.
  • 1 teaspoon dried parsley: Freshens up the dish with a hint of earthiness.
  • 1/2 teaspoon dried mustard: Adds a tangy kick that brightens the dish.
  • 1/2 teaspoon chili powder (optional): For those who like a kick of heat!
  • 1 1/2 teaspoons kosher salt: Essential for bringing out the flavors in your chicken.
  • 1/4 teaspoon black pepper: A classic seasoning that rounds out the flavors.
  • 2 tablespoons olive oil or avocado oil: Keeps the chicken moist and helps the spices stick.

Pro Tips for Perfect Baked Chicken Breasts

Side view of succulent baked chicken breast with a golden crust.
  • Pound it out: Use a meat pounder or rolling pin to flatten your chicken breasts for even cooking.
  • Marinate for flavor: If you have time, marinate the chicken in the spice mixture for a few hours to deepen the flavor.
  • Use a meat thermometer: Always check for doneness; 165°F is the magic number for perfectly cooked chicken.
  • Let it rest: Allow your chicken to rest for a few minutes before slicing to retain juices.
  • Experiment with spices: Don’t be afraid to mix in your favorite spices or herbs!
  • Choose the right pan: Use a rimmed baking sheet to catch any juices and keep the oven clean.
  • Keep it spaced: Arrange the chicken breasts evenly on the baking sheet to ensure they cook evenly.
  • Brush with pan juices: Just before serving, brush the sliced chicken with the pan juices for added flavor.

Common Mistakes and Troubleshooting

Even the best chefs can run into hiccups. Here’s how to avoid common pitfalls:

  • Overcooking: Using a meat thermometer will help prevent dry chicken.
  • Underseasoning: Don’t skip the salt and spices; they are key to flavor.
  • Not resting: Skipping the resting step leads to dry chicken. Give it 5-10 minutes.
  • Using the wrong cut: Always use chicken breasts for this recipe; other cuts may require different cooking times.

Variations to Spice Things Up

Feeling adventurous? Here are some variations to keep your chicken game exciting:

  • Italian Herb Chicken: Add Italian seasoning and fresh basil for a Mediterranean twist.
  • Cajun Spice Chicken: Use Cajun seasoning for a fiery kick that’ll wake up your taste buds.
  • Lemon Garlic Chicken: Squeeze fresh lemon juice and add minced garlic for a zesty version.
  • Sweet and Spicy Chicken: Incorporate brown sugar and cayenne for a sweet heat that’s irresistible.

Storage and Make-Ahead Instructions

This baked chicken is perfect for meal prep! Here’s how to store it:

  • Refrigerate: Store cooked chicken in an airtight container for up to 4 days.
  • Freeze: For longer storage, freeze cooked chicken in a freezer-safe bag for up to 3 months.
  • Reheat: Warm it up in the oven or microwave until heated through; add a splash of chicken broth to keep it moist.

Frequently Asked Questions

Got questions? I’ve got answers!

  • Can I use frozen chicken breasts? Yes, but make sure to thaw them completely before cooking to ensure even cooking.
  • What side dishes pair well with baked chicken? Roasted vegetables, rice pilaf, or a fresh salad are fantastic options.
  • Can I use skin-on chicken breasts? Absolutely! Just adjust the cooking time as needed.
  • How can I make this recipe gluten-free? All ingredients listed are gluten-free, so you’re good to go!
  • What if I don’t have paprika? You can substitute with smoked paprika or omit it entirely.
  • Is this recipe suitable for meal prep? Yes! It’s perfect for meal prep and reheats well.
  • Can I grill this chicken instead? Yes, grilling is a fantastic option! Just adjust the cooking time accordingly.
  • How do I know when my chicken is cooked? Use a meat thermometer to check for an internal temperature of 165°F.

Nutritional Insights and Dietary Adaptations

This juicy baked chicken breast is not only delicious but also packed with nutrition:

  • High in Protein: Each serving contains around 30 grams of protein, making it a great choice for muscle repair and growth.
  • Low in Carbs: Perfect for low-carb and keto diets, as it contains minimal carbohydrates.
  • Rich in Micronutrients: Ingredients like garlic and paprika offer antioxidant properties.
  • Dairy-Free: This recipe is completely dairy-free, suitable for those with lactose intolerance.

Essential Equipment for Success

To make your cooking experience smoother, here are some recommended tools:

  • Meat Thermometer: Essential for checking doneness.
  • Baking Sheet: Use a rimmed baking sheet for even cooking and easy cleanup.
  • Meat Pounder or Rolling Pin: To ensure even thickness in chicken breasts.
  • Mixing Bowl: For tossing chicken with spices and oil.

Serving Suggestions to Impress

Now that you have your juicy baked chicken breasts ready, here are some ideas for serving:

  • Slice and Serve: Serve sliced chicken over a bed of mixed greens with a light vinaigrette.
  • Make a Sandwich: Use the chicken in sandwiches or wraps with your favorite toppings.
  • Top Your Pasta: Slice and toss the chicken with pasta and your choice of sauce for a quick meal.
  • Pair with Grains: Serve alongside quinoa or couscous for a hearty meal.

With all this in mind, you’re now equipped to tackle the world of baked chicken breasts like a pro! Embrace the flavors, experiment with spices, and most importantly, enjoy the process. After all, cooking is not just about feeding yourself; it’s about creating memories around the table. So grab your skillet, turn up the heat, and let’s get cooking!

Juicy 30-Minute Baked Chicken Breast

Prep Time 10 minutes
Cook Time 20 minutes
Total Time 30 minutes
Servings 4 pieces
Calories 250
This quick and easy baked chicken breast recipe delivers juicy, flavorful meat in just 30 minutes, perfect for a healthy weeknight dinner.

Ingredients

Protein

  • 4 pieces chicken breasts (about 2 pounds total, halved if large)
  • 1 teaspoon garlic powder
  • 1 teaspoon onion powder
  • 1 teaspoon paprika
  • 1 teaspoon dried parsley
  • 0.5 teaspoon dried mustard
  • 0.5 teaspoon chili powder (optional)
  • 1.5 teaspoons kosher salt (or to taste)
  • 0.25 teaspoon black pepper
  • 2 tablespoons olive oil or avocado oil

Instructions 

  • Preheat oven to 425°F (220°C) and lightly grease a baking dish.
  • Pound chicken to even thickness or cut in half horizontally.
  • Toss chicken with spices and oil, then place in baking dish.
  • Bake for 18-20 minutes until internal temperature reaches 165°F (74°C).
  • Rest briefly, then slice and serve.

Notes

Ensure chicken is cooked through for safety and juiciness.
Calories: 250kcal
Cost: $15
Course: Main Course
Cuisine: American
Keyword: chicken

Nutrition

Calories: 250kcal | Carbohydrates: 2g | Protein: 45g | Fat: 7g | Sodium: 900mg

Why You’ll Love This Dish

Let’s face it, the keto diet can sometimes feel like a culinary challenge. But fear not! With this deliciously creamy and satisfying recipe, you’ll be doing more than just surviving on your keto journey — you’ll be thriving. Imagine the rich and savory flavors of cheese, combined with the delightful texture of cauliflower, transforming your dinner table into a feast of flavor and satisfaction. This dish is not just a meal; it’s an experience that will leave your taste buds dancing and your belly full.

Overview of the Ingredients

The magic of this recipe lies in its simplicity and the delightful combination of ingredients. Each component plays a crucial role in creating a dish that is not only keto-friendly but also budget-friendly. Here’s what you’ll need:

  • 2 cups cauliflower florets: The star of the show! Cauliflower is a fantastic low-carb substitute that adds volume and creaminess.
  • 1 cup shredded cheddar cheese: This brings a sharp, tangy flavor and a gooey texture that makes every bite satisfying.
  • 1/2 cup cream cheese: Adds richness and helps create that creamy consistency we all crave.
  • 1/4 cup grated parmesan cheese: A sprinkle of this adds depth and umami to the dish.
  • 1/4 cup sour cream: Provides a subtle tang and contributes to the creamy texture.
  • 2 tablespoons olive oil: A healthy fat that enhances flavor and helps bind the ingredients together.
  • 1 teaspoon garlic powder: Because who doesn’t love a little garlic kick?
  • 1 teaspoon onion powder: Adds a depth of flavor that complements the other ingredients.
  • Salt and pepper to taste: Essential for bringing all the flavors together.
  • Chopped chives for garnish (optional): A fresh touch that adds color and a hint of onion flavor.

The Cooking Process

Delicious keto diet meal with cauliflower florets and a rich cheese sauce, softly lit for a warm effect.

Now that you know what you’ll need, let’s dive into the cooking process. Trust me, this dish comes together faster than you can say “keto delight!” Follow these simple steps to create your culinary masterpiece:

  1. Preheat your oven: Start by preheating your oven to 375°F (190°C). This ensures a perfectly baked dish that’s bubbly and golden.
  2. Boil the cauliflower: In a large pot, bring salted water to a boil and add the cauliflower florets. Cook for about 5-7 minutes until they’re tender. The goal here is to soften the cauliflower so it mashes easily.
  3. Drain and mix: Once the cauliflower is tender, drain it well to remove excess water. In a mixing bowl, combine the drained cauliflower, shredded cheddar cheese, cream cheese, grated parmesan cheese, sour cream, olive oil, garlic powder, onion powder, salt, and pepper. Mix well!
  4. Mash it up: Use a potato masher or a fork to mash the cauliflower mixture until well combined and creamy. Don’t be afraid to get in there and really mix it up — you want everything to be fully incorporated.
  5. Transfer to a baking dish: Grease a baking dish and transfer your creamy cauliflower mixture into it. Spread it evenly for a nice, even bake.
  6. Add extra cheese (optional): If you’re a cheese lover like me, sprinkle some extra cheddar cheese on top. It’s a small addition that makes a big difference!
  7. Bake to perfection: Place the dish in your preheated oven and bake for 20-25 minutes, or until it’s bubbly and golden on top. The aroma will fill your kitchen, and trust me, you’ll be counting down the minutes!
  8. Cool and garnish: Once out of the oven, let it cool slightly before serving. Garnish with chopped chives for a pop of color and flavor.

Tips for Success

Every great dish comes with its own set of tips to ensure you hit it out of the park. Here are some of my tried-and-true tips for making this keto delight:

  • Don’t overcook the cauliflower: You want it tender, but not mushy. Keep an eye on it while boiling!
  • Experiment with cheeses: Feel free to mix it up! Try adding pepper jack for a spicy kick or mozzarella for a classic cheesy texture.
  • Make it ahead: This dish can be prepared ahead of time and stored in the refrigerator. Just bake it when you’re ready to eat!

Variations to Try

Cooking is all about creativity, so don’t hesitate to make this recipe your own! Here are some variations you can explore:

  • Add protein: Stir in cooked shredded chicken or crumbled bacon for a heartier meal.
  • Spicy version: Add a pinch of cayenne pepper or diced jalapeños to the mixture for a fiery twist.
  • Herbs and spices: Fresh herbs like thyme or rosemary can elevate the flavor profile. Toss them in for an aromatic touch!

Substitutions You Can Make

We all have different tastes and dietary needs, so here are some substitutions you can make without sacrificing flavor:

  • Cauliflower: If you’re not a fan, swap it out for broccoli or even mashed turnips.
  • Cheese: Use dairy-free cheese alternatives if you’re avoiding dairy.
  • Sour cream: Greek yogurt can be a fantastic substitute for sour cream, adding creaminess with less fat.

Equipment You’ll Need

Before you start cooking, make sure you have the right tools on hand. Here’s a quick checklist:

  • Large pot for boiling
  • Mixing bowl
  • Potato masher or fork
  • Baking dish
  • Measuring cups and spoons

Storage and Freezing Tips

If you happen to have leftovers (and trust me, you might), here’s how to store them:

  • Refrigeration: Store leftovers in an airtight container in the refrigerator for up to 4 days.
  • Freezing: You can also freeze this dish! Just ensure it’s cooled completely before transferring to a freezer-safe container. It will last up to 2 months.
  • Reheating: When you’re ready to dig in again, reheat in the oven or microwave until warmed through.

FAQs

Here are some frequently asked questions that might help you on your culinary adventure:

  • Can I make this dish vegan? Absolutely! Use vegan cheese and substitute the cream cheese and sour cream with plant-based alternatives.
  • What can I serve this with? This dish pairs beautifully with grilled meats, salads, or even as a stand-alone comfort food.
  • Is this recipe suitable for meal prep? Yes! It’s perfect for meal prep and can be easily portioned out for the week.

Troubleshooting Common Issues

If you run into any hiccups while making this dish, here are some quick solutions:

  • Too watery: If your mixture is too watery, try adding a bit more cheese or baking it longer to evaporate excess moisture.
  • Not creamy enough: Blend in a bit more cream cheese or sour cream to achieve your desired creaminess.

Conclusion

Cooking doesn’t have to be intimidating, and with this creamy, cheesy keto delight, you have the perfect opportunity to embrace the flavors and joy of cooking. This dish is not just about nourishing your body; it’s about celebrating the art of culinary creativity. So grab your ingredients, roll up your sleeves, and let the kitchen become your playground. I can’t wait for you to experience the thrill of this recipe — it’s a game-changer that will elevate your keto meals from ordinary to extraordinary. Let’s get cooking!

Pin on keto diet for beginners

Prep Time 10 minutes
Cook Time 25 minutes
Total Time 35 minutes
Servings 4 servings
Calories 250
A delicious low-carb cauliflower bake perfect for keto beginners. Creamy, cheesy, and easy to prepare.

Ingredients

Vegetables

  • 2 cups cauliflower florets
  • 1 cup shredded cheddar cheese
  • 1/2 cup cream cheese
  • 1/4 cup grated parmesan cheese
  • 1/4 cup sour cream
  • 2 tablespoons olive oil
  • 1 teaspoon garlic powder
  • 1 teaspoon onion powder
  • to taste salt and pepper (to taste)
  • chopped chives for garnish chopped chives (optional)

Instructions 

  • Preheat oven to 375°F (190°C).
  • Boil cauliflower in salted water for 5-7 minutes, then drain.
  • Mix cauliflower, cheeses, sour cream, olive oil, garlic, onion, salt, and pepper until creamy.
  • Transfer to a greased baking dish, top with extra cheese if desired.
  • Bake for 20-25 minutes until bubbly and golden. Garnish with chives if using.

Notes

This dish is perfect as a low-carb side or snack. Feel free to add extra cheese on top before baking for a cheesier crust.
Calories: 250kcal
Cost: $15
Course: Side Dish
Cuisine: American
Keyword: Cauliflower, Cheese, Keto

Nutrition

Calories: 250kcal | Carbohydrates: 8g | Protein: 12g | Fat: 20g | Sodium: 300mg

Loved this recipe? Save it to your favorite Pinterest board so you can easily find it later! It’s the perfect way to keep all your sweet ideas in one place. ✨

Textured close-up of a keto-friendly dish made with cauliflower, cheddar cheese, and garnished with chives.

Why This Casserole is a Must-Try

Welcome to a culinary journey that’s not just about filling your belly, but igniting your taste buds! Today, we’re diving into a dish that embodies comfort while keeping those pesky carbs at bay: the Creamy Keto Broccoli Chicken Casserole. Trust me, this dish is a game changer! Whether you’re on a keto diet or just looking for a healthy, satisfying meal, this casserole will make you feel like a culinary rockstar in your own kitchen.

Why is this casserole so special? It brings together tender, shredded chicken and vibrant broccoli, all enveloped in a rich, creamy sauce that sings with flavor. Plus, it’s exceptionally easy to whip up, making it perfect for busy weeknights or meal prep sessions. So, grab your apron and let’s turn up the heat!

The Heart of the Dish: Ingredients Breakdown

At the core of every great recipe is a collection of ingredients that work harmoniously together. Here’s what you’ll need to create this creamy masterpiece:

  • 2 cups cooked chicken, shredded: The protein powerhouse that makes this dish hearty and satisfying.
  • 2 cups broccoli florets, steamed: Fresh and crisp, adding a delightful crunch and vibrant color.
  • 1 cup cream cheese, softened: The secret weapon for that luscious creaminess.
  • 1 cup shredded cheddar cheese: A melty, cheesy layer that adds depth of flavor.
  • 1/2 cup sour cream: For a tangy twist that complements the richness of the cream cheese.
  • 1 teaspoon garlic powder: A must-have for that aromatic punch!
  • 1 teaspoon onion powder: Perfect for layering in flavor without the fuss of chopping.
  • Salt and pepper to taste: Essential for making every flavor pop.
  • 1/2 teaspoon paprika (optional): For a hint of warmth and color.

How to Create This Flavorful Casserole

Delicious, bubbling chicken and broccoli casserole topped with cheddar cheese.

Ready to unleash your inner chef? Here’s how to make the Creamy Keto Broccoli Chicken Casserole step by step:

Step 1: Preheat and Prep

Start by preheating your oven to 350°F (175°C). This is crucial for ensuring that your casserole cooks evenly. While the oven warms up, grease a 9×13 inch baking dish. A well-greased dish ensures that your delicious creation won’t stick, allowing for easy serving!

Step 2: Mix the Creamy Base

In a large mixing bowl, combine the softened cream cheese, sour cream, garlic powder, onion powder, salt, pepper, and paprika. Using a hand mixer or a sturdy spoon, mix until everything is smooth and creamy. This is where the magic happens—creating a decadent base that will envelop your chicken and broccoli!

Step 3: Add Chicken and Broccoli

Next, add the shredded chicken and steamed broccoli to the creamy mixture. Stir gently until everything is well combined. You want to ensure that each bite will be a delightful mix of flavors and textures.

Step 4: Transfer to Baking Dish

Now it’s time to transfer this luscious mixture into your greased baking dish. Spread it out evenly so that every corner of the casserole gets that creamy goodness.

Step 5: Top with Cheddar

Sprinkle the shredded cheddar cheese evenly over the top of the casserole. This will create a deliciously gooey layer that’s impossible to resist once it’s baked!

Step 6: Bake to Perfection

Place the casserole in the preheated oven and let it bake for 25-30 minutes. The casserole will be ready when it’s hot and bubbly, with a golden cheese layer on top. The aroma will fill your kitchen, beckoning everyone to come and dig in!

Tips for the Ultimate Casserole

Want to elevate your casserole game? Here are some tips to ensure you create a mouthwatering dish every time:

  • Use Quality Chicken: Rotisserie chicken is a fantastic shortcut, but if you’re feeling adventurous, roast or grill your chicken for added flavor.
  • Don’t Skip the Steaming: Steaming the broccoli keeps it vibrant and crunchy, offering a perfect contrast to the creamy filling.
  • Cheese Choices: Feel free to experiment with different types of cheese. Monterey Jack, mozzarella, or even pepper jack can add unique flavors.
  • Texture Matters: If you prefer a more textured casserole, consider adding some sautéed mushrooms or a handful of spinach.

Variations to Spice It Up

This recipe is incredibly versatile! Here are some delicious variations to try:

  • Spicy Kick: Add diced jalapeños or a sprinkle of red pepper flakes for a spicy twist.
  • Herb Infusion: Incorporate fresh herbs like thyme or rosemary for a fragrant touch.
  • Cauliflower Swap: For an even lower-carb option, substitute broccoli with cauliflower florets.

Storage and Freezing Tips

Got leftovers? No problem! This casserole stores beautifully:

  • Refrigerator: Allow the casserole to cool completely, then cover tightly with plastic wrap or transfer to an airtight container. It will last in the fridge for up to 3 days.
  • Freezer: You can freeze this dish before baking. Just assemble the casserole, cover tightly, and freeze for up to 3 months. When ready to enjoy, thaw in the refrigerator overnight and bake as directed.

Frequently Asked Questions

Can I make this ahead of time?
Absolutely! You can prep this casserole a day in advance and store it in the fridge before baking. Just remember to add the cheese topping right before you pop it in the oven.

What can I serve with this casserole?
This dish is a meal on its own, but you could pair it with a fresh green salad or some roasted vegetables for a balanced dinner.

Is this casserole suitable for meal prep?
Yes! It’s perfect for meal prep and can be portioned out for lunches throughout the week.

Troubleshooting Tips

If your casserole doesn’t turn out as expected, don’t stress! Here are some tips to troubleshoot:

  • Too Dry: If it comes out dry, you may have overcooked it. Keep an eye on it during baking, especially if your oven runs hot.
  • Not Creamy Enough: If you prefer a creamier texture, consider adding an extra dollop of sour cream or cream cheese.

Final Thoughts

Cooking is all about adventure, and this Creamy Keto Broccoli Chicken Casserole is a delicious way to explore the rich world of flavors and textures. With its creamy base, tender chicken, and vibrant broccoli, it’s a dish that makes you feel good inside and out. So gather your loved ones, share a slice (or two), and let the flavors spark joy around your dinner table. Don’t forget to pin this recipe, and feel free to share your own twists on it! Remember, the best meals are those shared with love and passion. Happy cooking!

Creamy Keto Broccoli Chicken Casserole

Prep Time 10 minutes
Cook Time 30 minutes
Total Time 40 minutes
Servings 4 servings
Calories 550
A delicious low-carb casserole combining tender chicken, broccoli, and a creamy cheese sauce, perfect for a quick and satisfying meal.

Ingredients

Chicken and Broccoli

  • 2 cups cooked chicken, shredded
  • 2 cups broccoli florets, steamed

Dairy and Seasonings

  • 1 cup cream cheese, softened
  • 1 cup shredded cheddar cheese
  • 1/2 cup sour cream
  • 1 teaspoon garlic powder
  • 1 teaspoon onion powder
  • salt and pepper to taste salt and pepper (to taste)
  • 1/2 teaspoon paprika (optional)

Instructions 

  • Preheat oven to 350°F (175°C).
  • Mix cream cheese, sour cream, garlic powder, onion powder, salt, pepper, and paprika until smooth.
  • Add chicken and broccoli; stir to combine.
  • Transfer to a greased baking dish and top with cheddar cheese.
  • Bake for 25-30 minutes until bubbly. Cool slightly before serving.

Notes

This casserole is perfect for a quick keto-friendly dinner with minimal prep.
Calories: 550kcal
Cost: $15
Course: Main Course
Cuisine: American
Keyword: Broccoli, chicken, Keto

Nutrition

Calories: 550kcal | Carbohydrates: 12g | Protein: 45g | Fat: 35g | Sodium: 800mg

Loved this recipe? Save it to your favorite Pinterest board so you can easily find it later! It’s the perfect way to keep all your sweet ideas in one place. ✨

A warm bowl of creamy chicken casserole featuring broccoli florets and golden cheese.

Elevate Your Dinner Game with a Broccoli & Cauliflower Cottage Cheese Bake

Welcome to the flavor lab of your dreams! This Broccoli & Cauliflower Cottage Cheese Bake is not just a dish; it’s a journey that will revitalize your kitchen and awaken your taste buds. Imagine vibrant veggies enveloped in a creamy, cheesy hug, all baked to golden perfection. Trust me, this recipe will become a staple in your home, just like it is in mine. So, grab your apron and let’s dive into the magic of cooking boldly with heat and flavor!

Why You’ll Love This Recipe

  • Comfort Food Reinvented: A warm, cheesy bake that feels like a big hug from your grandma, combining nostalgia with modern flavors.
  • Nutritious and Wholesome: Packed with fresh broccoli and cauliflower, this dish not only tastes amazing but also delivers essential vitamins and minerals.
  • Kid-Approved: Even the pickiest eaters will be begging for seconds! The creamy texture and cheesy goodness make vegetables irresistible.
  • Effortless Preparation: With minimal ingredients and easy steps, you’ll have a delicious meal with hardly any fuss. Perfect for busy weeknights!
  • Versatile and Adaptable: Whether you’re gluten-free, vegetarian, or just looking to clean out your fridge, this recipe can be tweaked to suit your needs.

Ingredients You’ll Need

Here’s a breakdown of the ingredients that come together to create this dreamy bake:

  • 2 cups of fresh broccoli florets: Choose vibrant, green florets for the best flavor and nutrition.
  • 2 cups of tender cauliflower florets: A great partner to broccoli, adding creaminess and texture to the dish.
  • 1 cup (240 ml) of creamy cottage cheese: This is the secret to that rich, cheesy flavor while keeping it light!
  • 1 cup of shredded sharp cheddar cheese: For that melty goodness and bold flavor that everyone loves.
  • 1/2 cup of whole milk: Adds moisture and creaminess to the bake.
  • 1/4 cup of grated Parmesan cheese: A sprinkle of this adds a salty depth that elevates the dish.
  • 2 large eggs: These act as a binder, helping the bake hold together perfectly.
  • 1 tsp of garlic powder: Because who doesn’t love a hint of garlic?
  • 1 tsp of onion powder: Adds another layer of flavor that rounds out the dish.
  • Salt and pepper to taste: Essential seasonings to bring all the flavors to life.

How to Make Broccoli & Cauliflower Cottage Cheese Bake

Side view of a savory broccoli and cauliflower bake, showcasing its creamy texture and golden top.

Ready to make some kitchen magic? Follow these steps to create your masterpiece:

  • Prep the Vegetables: Preheat your oven to 375°F (190°C). Wash and chop the broccoli and cauliflower into bite-sized pieces.
  • Create the Creamy Mixture: In a large mixing bowl, combine cottage cheese, shredded cheddar, milk, eggs, garlic powder, and onion powder. Blend until creamy and smooth.
  • Combine and Assemble: Add the chopped broccoli and cauliflower to the creamy mixture, stirring until well coated.
  • Bake to Perfection: Pour the mixture into a greased baking dish and sprinkle grated Parmesan on top. Bake for 30-35 minutes, or until bubbly and golden brown.
  • Serve and Enjoy: Let it cool for a few minutes before serving. Dive in, and enjoy the creamy, cheesy goodness!

Pro Tips for the Perfect Bake

Before you get started, here are some expert insights to ensure your dish turns out flawlessly:

  • Use Fresh Ingredients: Opt for fresh broccoli and cauliflower for optimum flavor and texture. If using frozen, ensure they are thawed and drained well.
  • Customize Your Cheeses: Experiment with different types of cheese like mozzarella or Gruyère for a unique twist.
  • Prep Ahead: This bake can be assembled ahead of time. Just cover it and store in the fridge until you’re ready to bake!
  • Don’t Overbake: Keep an eye on the bake towards the end of the cooking time to prevent it from drying out.
  • Garnish with Fresh Herbs: Adding fresh parsley or chives after baking brightens the dish and adds a pop of color.
  • Pair with a Salad: A light salad on the side complements the richness of the bake perfectly.
  • Make it Gluten-Free: Substitute any breadcrumbs with gluten-free options or simply omit them for a gluten-free version.
  • Experiment with Spices: Add a pinch of cayenne or smoked paprika for a little kick!

Common Mistakes and Troubleshooting

Even the best chefs make mistakes. Here’s how to avoid common pitfalls:

  • Too Watery: If your bake turns out too watery, it may be because the vegetables were not drained properly. Always squeeze out excess moisture from frozen veggies before using.
  • Burnt Top: If the top is browning too quickly, cover it with foil halfway through baking to prevent burning.
  • Not Enough Flavor: Adjust your seasonings! Taste as you mix and don’t be afraid to add more salt, pepper, or spices.
  • Overcooked Vegetables: Aim for tender-crisp veggies before baking, as they will continue to cook in the oven.

Flavor Variations to Try

While this recipe is fantastic as is, here are some creative variations to switch things up:

  • Spicy Kick: Add diced jalapeños or crushed red pepper flakes for a spicy twist that will make your taste buds dance.
  • Herbed Delight: Mix in fresh herbs like thyme or rosemary for an aromatic touch.
  • Meat Lover’s Bake: Incorporate cooked chicken or bacon for a heartier version.
  • Quinoa Addition: Add cooked quinoa for added protein and texture, transforming this dish into a complete meal.

Storage and Make-Ahead Instructions

This dish is perfect for meal prep! Here’s how to store and reheat:

  • Refrigeration: Store any leftovers in an airtight container in the fridge for up to 4 days.
  • Freezing: This bake can be frozen for up to 2 months. Just thaw overnight in the fridge before reheating.
  • Reheating: To reheat, place in a preheated oven at 350°F (175°C) until heated through, about 20-25 minutes.

Comprehensive FAQ

  • Can I use frozen vegetables? Yes, just ensure they are thawed and excess water is removed before using.
  • Can I make this dish ahead of time? Absolutely! Assemble it and store it in the fridge until you’re ready to bake.
  • What can I substitute for cottage cheese? Greek yogurt or ricotta can be good alternatives if you’re looking for something different.
  • How do I know when it’s done? The top should be golden brown and the center should be set, not jiggly.
  • Can I add more cheese? Definitely! Feel free to load it up with your favorites.
  • Is this dish gluten-free? It can be made gluten-free by omitting any breadcrumbs and ensuring all ingredients are gluten-free.
  • How do I get a crispy top? Broil for a few minutes at the end of baking to achieve a golden, crispy top.
  • What should I serve it with? A simple green salad or garlic bread pairs wonderfully!

Nutritional Tips and Dietary Adaptations

This dish is not only delicious but can be easily adapted to fit various dietary needs:

  • Low-Calorie Option: Use low-fat cheese and reduce the amount of milk for a lighter version.
  • Vegan Adaptation: Substitute cottage cheese with tofu and use vegan cheese alternatives.
  • High-Protein Version: Add cooked lentils or chickpeas to the mixture for a protein boost.

Essential Equipment Recommendations

Before you start cooking, make sure you have the following tools on hand:

  • Mixing Bowls: For combining all your ingredients.
  • Baking Dish: A 9×13 inch dish works perfectly for this recipe.
  • Whisk: To blend the creamy mixture until smooth.
  • Measuring Cups and Spoons: Precision is key in any good recipe!

Serving Suggestions

This Broccoli & Cauliflower Cottage Cheese Bake is perfect on its own or paired with:

  • Mixed Greens Salad: A refreshing salad with a light vinaigrette balances the richness of the bake.
  • Garlic Bread: Soft, warm breadsticks brushed with garlic butter make for a delightful pairing.
  • Roasted Vegetables: A side of roasted seasonal veggies adds even more flavor and texture.

So there you have it! A comprehensive guide to creating a Broccoli & Cauliflower Cottage Cheese Bake that will wow your friends and family. Cooking should always be about exploration, and with this recipe, you’ll be diving into a sea of flavor and comfort. So get out there, embrace your inner chef, and let’s create some kitchen magic together!

Broccoli & Cauliflower Cottage Cheese Bake

Prep Time 10 minutes
Cook Time 30 minutes
Total Time 40 minutes
Servings 4 servings
Calories 350
A delicious and healthy baked dish combining fresh vegetables with creamy cheese for a satisfying meal.

Ingredients

Vegetables

  • 2 cups fresh broccoli
  • 2 cups tender cauliflower florets

Dairy

  • 1 cup creamy cottage cheese
  • 1 cup shredded sharp cheddar cheese
  • 1/2 cup whole milk
  • 1/4 cup grated Parmesan cheese

Eggs

  • 2 large eggs

Spices & Seasonings

  • 1 tsp garlic powder
  • 1 tsp onion powder
  • to taste Salt and pepper

Instructions 

  • Preheat oven to 375°F (190°C).
  • Steam or blanch broccoli and cauliflower until tender, then drain.
  • In a bowl, whisk eggs, cottage cheese, milk, garlic powder, onion powder, salt, and pepper.
  • Combine vegetables with the cheese mixture and transfer to a baking dish. Top with shredded cheddar and Parmesan.
  • Bake for 25-30 minutes until golden and bubbly. Serve warm.

Notes

You can add a pinch of paprika or herbs for extra flavor.
Calories: 350kcal
Cost: $12
Course: Main Course
Cuisine: American
Keyword: bake, Cheese, vegetables

Nutrition

Calories: 350kcal | Carbohydrates: 20g | Protein: 25g | Fat: 20g | Sodium: 600mg

Why You’ll Love These Cookies

Welcome, fellow food adventurers! If you’ve ever stared into your pantry, wondering how to create something delicious with just a handful of ingredients, you’re in for a treat. These Healthy 3-Ingredient Date Cookies are not only simple to whip up but also pack a flavorful punch that will satisfy your sweet tooth without the guilt. Imagine biting into a cookie that’s chewy, satisfying, and made entirely of wholesome ingredients. That’s exactly what these date cookies offer! They’re vegan, gluten-free, and devoid of added sugars, making them a perfect choice for a healthy snack, dessert, or even a post-workout boost.

Overview of the Ingredients

Let’s dive into the magic behind these cookies. You’ll need just three core ingredients:

  • 1 cup pitted dates: The star of the show! These natural sweeteners are rich in fiber and nutrients, giving your cookies that perfect sweetness and stickiness.
  • 1 cup rolled oats: A fantastic source of whole grains, these oats provide texture and heartiness while being gluten-free.
  • 1/2 cup nut butter (almond or peanut): This adds richness and healthy fats, making the cookies soft and indulgent.

These ingredients come together beautifully, allowing you to enjoy a homemade treat that’s as good for you as it is tasty.

The Art of Cookie-Making

Delicious date cookies featuring a textured surface, shot in soft natural light, highlighting their homemade appeal.

Ready to get started? Let’s break down the steps to create these delightful cookies.

Ingredients

Healthy 3-Ingredient Date Cookies Recipe in 2025

  • 1 cup pitted dates
  • 1 cup rolled oats
  • 1/2 cup nut butter (such as almond or peanut)

Directions

  1. Preheat your oven to 350°F (175°C).
  2. In a food processor, combine the pitted dates, rolled oats, and nut butter until a sticky dough forms.
  3. Scoop tablespoon-sized portions of the dough and place them on a lined baking sheet, flattening them slightly.
  4. Bake for 10-12 minutes or until the edges are golden brown.
  5. Allow to cool before serving. Enjoy your healthy cookies!

Tips for Perfect Cookies

Here are some tips to ensure your cookies turn out perfectly every time:

  • Blend Consistently: Ensure that your dates are well-blended with the oats and nut butter for an even dough texture.
  • Consistency is Key: If the dough feels too dry, add a splash of water or a bit more nut butter to help bind it.
  • Don’t Overbake: Keep an eye on the cookies! They will harden a bit more as they cool, so pull them out when the edges are golden.

Delicious Variations

Feeling adventurous? Here are some ideas to spice up your cookies:

  • Chocolate Chips: Fold in some dark chocolate chips to elevate the sweetness and add a rich flavor.
  • Nuts and Seeds: Toss in some chopped walnuts, almonds, or chia seeds for added crunch and nutrition.
  • Spices: Experiment with a dash of cinnamon or nutmeg for warm, comforting flavors.

Substitutions You Can Make

If you find yourself missing an ingredient, don’t fret! Here are some substitutions you can consider:

  • Nut Butter: If you have allergies or dietary restrictions, you can use sunflower seed butter or tahini as a nut-free alternative.
  • Oats: If you’re avoiding oats, try using ground almonds or coconut flour instead, adjusting the quantities accordingly.
  • Sweeteners: If you want a little extra sweetness, consider adding a tablespoon of maple syrup or agave nectar.

Essential Equipment

Before you dive in, ensure you have the following tools on hand:

  • A reliable food processor for blending the ingredients.
  • A baking sheet lined with parchment paper to prevent sticking.
  • A measuring cup and spoons for accurate ingredient quantities.

Storage and Freezing Tips

These cookies are fantastic for meal prep! Here’s how to store them:

  • At Room Temperature: Store in an airtight container for up to a week.
  • In the Fridge: They’ll last for about two weeks in the refrigerator, maintaining their chewy texture.
  • Freezing: For longer storage, freeze the cookies in a single layer on a baking sheet, then transfer to a freezer-safe bag. They’ll keep for up to three months!

FAQs About Date Cookies

Let’s tackle some common questions you might have:

  • Can I use fresh dates instead of dried? Fresh dates will have too much moisture and may lead to a sticky dough. Stick to dried, pitted dates for the best results.
  • Are these cookies suitable for kids? Absolutely! They’re perfect for little hands and packed with nutrients — a great way to introduce healthy snacking.
  • What if my dough is too sticky? If your dough is overly sticky, try chilling it in the fridge for 15-30 minutes before baking.

Troubleshooting Common Issues

If your cookies don’t quite turn out as expected, don’t worry! Here are some solutions:

  • Cookies are too dry: This could mean you overbaked them. Keep a close eye on the timer next time!
  • Too crumbly: Add a bit more nut butter or a splash of water to help bind the dough.
  • Not sweet enough: Consider adding a touch of maple syrup or more dates to amp up the sweetness.

The Joy of Healthy Baking

These Healthy 3-Ingredient Date Cookies are a celebration of simplicity and flavor. Baking doesn’t have to be complicated; it can be an enjoyable journey filled with creativity and joy. Sharing these cookies with friends and family not only satisfies cravings but also sparks conversations about the beauty of wholesome ingredients. So, gather your loved ones, put on your aprons, and dive into this easy and fulfilling recipe. Remember, cooking is an adventure, and with each batch of these cookies, you’re writing your own delicious story. Happy baking!

Healthy 3-Ingredient Date Cookies Recipe in 2025

Prep Time 10 minutes
Cook Time 12 minutes
Total Time 22 minutes
Servings 12 cookies
Calories 150
Enjoy these simple, nutritious cookies made with just three wholesome ingredients, perfect for a quick snack or healthy treat.

Ingredients

Main ingredients

  • 1 cup pitted dates
  • 1 cup rolled oats
  • 1/2 cup nut butter (such as almond or peanut)

Instructions 

  • Preheat oven to 350°F (175°C).
  • Combine dates, oats, and nut butter in a food processor until sticky dough forms.
  • Scoop and flatten tablespoon-sized portions on a lined baking sheet.
  • Bake for 10-12 minutes until edges are golden.
  • Cool before serving. Enjoy!

Notes

Store in an airtight container for freshness.
Calories: 150kcal
Cost: $5
Course: Dessert
Cuisine: Healthy
Keyword: dates

Nutrition

Calories: 150kcal | Carbohydrates: 22g | Protein: 3g | Fat: 7g | Sodium: 2mg

Loved this recipe? Save it to your favorite Pinterest board so you can easily find it later! It’s the perfect way to keep all your sweet ideas in one place. ✨

Eye-level view of fresh date cookies, showcasing their golden-brown color and natural ingredients.

Why You’ll Fall in Love with These Clusters

Have you ever had a treat that feels like a hug for your taste buds? Chocolate Strawberry Yogurt Clusters are that treat! Imagine biting into a creamy yogurt-coated strawberry, the rich chocolate melting away, revealing the sweet, juicy fruit beneath. They’re not just a snack; they’re a delightful experience that dances on your palate, a playful indulgence that invites you to savor every bite. In this recipe, we’ll combine the velvety goodness of Greek yogurt, the natural sweetness of strawberries, and the decadent allure of dark chocolate to create a treat that’s not only indulgent but also healthy. Yes, you can have your cake and eat it too, or at least your chocolate-covered strawberries!

Ingredients You’ll Need

Gathering the right ingredients is the first step to creating these delicious clusters. Here’s what you’ll need:

  • 1 cup Greek yogurt
  • 1 cup fresh strawberries, hulled and halved
  • 1/2 cup dark chocolate chips
  • 1 tablespoon honey (optional)
  • 1 teaspoon vanilla extract
  • Pinch of salt

This simple list is packed with flavor and nutrition! Greek yogurt is a powerhouse of protein, strawberries are bursting with vitamins, and dark chocolate adds that luxurious touch. You can even adjust the sweetness to your liking with honey.

Essential Equipment

Delicious clusters of yogurt mixed with strawberries, coated in dark chocolate, arranged artfully.

Before you dive into the cooking process, let’s make sure you have the right tools on hand:

  • Mixing bowl
  • Parchment paper
  • Baking sheet
  • Microwave-safe bowl
  • Spatula or spoon for mixing

With these kitchen essentials, you’ll be ready to whip up your clusters in no time!

The Joy of Making Chocolate Strawberry Yogurt Clusters

Let’s get down to the delicious business of crafting these sweet morsels! Follow these simple steps:

  1. Combine the Ingredients: In a mixing bowl, combine the Greek yogurt, honey (if using), vanilla extract, and a pinch of salt. Mix well until smooth. This creamy base is your canvas!
  2. Coat the Strawberries: Dip each strawberry half into the yogurt mixture, ensuring it’s completely coated. Don’t skimp on this step; the more yogurt, the creamier the bites!
  3. Prepare for Freezing: Place the yogurt-coated strawberries on a parchment-lined baking sheet. This not only prevents sticking but also makes for easy cleanup.
  4. Melt the Chocolate: In a microwave-safe bowl, melt the dark chocolate chips in 30-second intervals, stirring until smooth. Be patient here; chocolate can easily scorch!
  5. Decorate with Chocolate: Drizzle or dip each yogurt-coated strawberry in the melted chocolate. This is where the magic happens! Each strawberry becomes a work of art.
  6. Freeze: Once all strawberries are coated, place the baking sheet in the freezer for about 1-2 hours or until the yogurt clusters are firm. This is the hardest part—waiting!
  7. Enjoy: Remove from the freezer and indulge in your homemade Chocolate Strawberry Yogurt Clusters. Savor the sweet symphony of flavors!

There you have it! A quick and easy recipe that transforms simple ingredients into a delightful treat.

Optional Variations and Dietary Adaptations

One of the best things about this recipe is its versatility. Here are a few ideas to customize your clusters:

  • Change the Yogurt: Try using flavored yogurt, like vanilla or strawberry, for an extra burst of flavor.
  • Fruit Swap: Experiment with other fruits! Bananas, blueberries, or raspberries would all work beautifully.
  • Nutty Twist: Add crushed nuts on top of the chocolate for a crunchy texture. Almonds or pistachios would be fantastic!
  • Dairy-Free Option: Substitute Greek yogurt with a dairy-free alternative like coconut yogurt to make this a vegan-friendly treat.

With these variations, you can make the recipe uniquely yours, perfect for any occasion!

Expert Tips for Success

When crafting these clusters, keep these expert tips in mind to ensure you get it just right:

  • Fresh Ingredients: Always use fresh strawberries for the best flavor and texture. Overripe strawberries can become mushy once frozen.
  • Chocolate Melting: Stir the chocolate frequently while melting to prevent burning. If the chocolate is too thick, add a teaspoon of coconut oil to thin it out.
  • Freezing Time: Ensure the clusters are completely frozen before serving to maintain their shape and texture. No one wants a melty mess!

These tips will elevate your clusters from good to unforgettable!

Storage and Freezing

Once you’ve made your delightful treats, you’ll want to store them properly to keep them fresh:

  • Store any leftovers in an airtight container in the freezer. They’ll last for about a month, but I doubt they’ll last that long!
  • For the best texture, let them thaw for a few minutes at room temperature before enjoying. This gives the yogurt a creamy consistency.
  • Do not store in the fridge; they will turn into a gooey mess!

Frequently Asked Questions

To help you on your journey to deliciousness, let’s address some common questions:

  • Can I use different types of chocolate? Absolutely! Milk chocolate or white chocolate would work beautifully, depending on your preference.
  • How many clusters does this recipe make? This recipe yields about 12 clusters, depending on how generously you coat your strawberries.
  • Can I make these ahead of time? Yes! They’re perfect for meal prep. Just make sure to store them properly in the freezer.

Troubleshooting Common Issues

Even the best chefs encounter hiccups in the kitchen. Here’s how to solve common problems:

  • Chocolate Isn’t Melting Smoothly: If your chocolate is clumpy, it may have overheated. Try stirring in a bit of coconut oil to smooth it out.
  • Yogurt is Too Runny: If your yogurt mixture is too thin, consider adding a bit more yogurt or chilling it in the fridge before coating the strawberries.
  • Clusters are Melting: If they’re melting too quickly upon removal from the freezer, serve them immediately or keep them in the freezer until you’re ready to indulge!

In Conclusion: Your New Favorite Treat Awaits!

Chocolate Strawberry Yogurt Clusters are a celebration of flavor, texture, and creativity. They’re not just a snack; they’re a canvas for your culinary expression, a way to play with ingredients, and most importantly, a delicious way to treat yourself and your loved ones. With simple steps and a handful of ingredients, you’re on your way to whipping up a batch of these delightful clusters that will leave everyone wanting more. So, what are you waiting for? Grab your ingredients, unleash your inner chef, and dive into this sweet symphony of flavors today! And remember, cooking is all about adventure — so don’t be afraid to experiment and make this recipe your own!

Chocolate Strawberry Yogurt Clusters Recipe

Prep Time 10 minutes
Cook Time 15 minutes
Total Time 25 minutes
Servings 4 pieces
Calories 150
Enjoy these delicious and healthy chocolate-covered strawberry yogurt clusters, perfect for a quick treat or snack.

Ingredients

Dairy

  • 1 cup greek yogurt
  • 1 cup fresh strawberries, hulled and halved
  • 0.5 cup dark chocolate chips
  • 1 tablespoon honey (optional)
  • 1 teaspoon vanilla extract
  • pinch salt

Instructions 

  • Mix yogurt, honey (if using), vanilla, and salt until smooth.
  • Dip strawberries into the yogurt mixture and place on parchment.
  • Melt chocolate in 30-second intervals, stirring until smooth.
  • Dip or drizzle strawberries with melted chocolate.
  • Freeze for 1-2 hours until firm, then serve.

Notes

Use high-quality dark chocolate for best flavor.
Calories: 150kcal
Cost: $10
Course: Dessert
Cuisine: American
Keyword: chocolate, strawberry, yogurt

Nutrition

Calories: 150kcal | Carbohydrates: 20g | Protein: 6g | Fat: 7g | Sodium: 50mg

Loved this recipe? Save it to your favorite Pinterest board so you can easily find it later! It’s the perfect way to keep all your sweet ideas in one place. ✨

A mouthwatering display of yogurt and strawberry clusters, highlighted by warm natural lighting.