Author

Avery Collins

Browsing

Why You’ll Love This Recipe

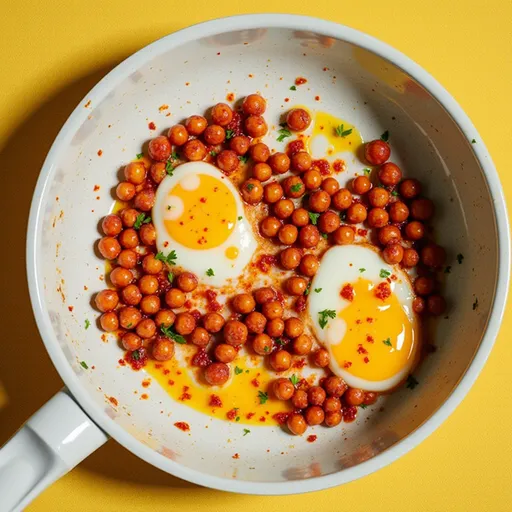
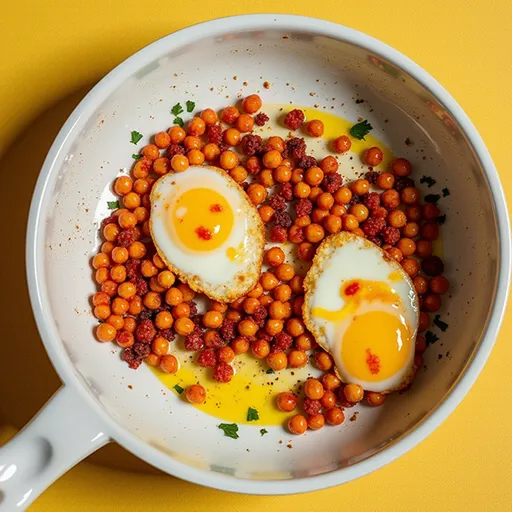
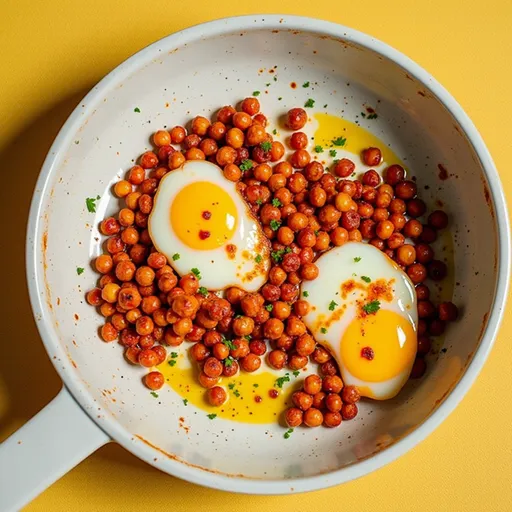
Welcome to the vibrant world of Chickpea Fried Eggs, where every bite is a delightful explosion of flavor and creativity. This dish isn’t just a meal; it’s an experience—a bold adventure for your taste buds that will have you rushing back to the kitchen for more. Imagine crispy chickpeas seasoned to perfection, cradling perfectly cooked eggs that ooze golden yolk with every bite. It’s a hearty, healthy, and protein-packed breakfast that will awaken your senses and set your day ablaze.

Growing up in San Antonio, I learned early on that food is more than just sustenance; it’s about bringing people together, expressing creativity, and celebrating the bold flavors of life. This Chickpea Fried Eggs recipe captures that spirit beautifully. It’s simple enough to whip up on a busy weekday morning yet impressive enough to serve at brunch gatherings. Let’s dive into this culinary journey together!

Overview of Ingredients

Before we roll up our sleeves and get cooking, let’s take a closer look at the ingredients that make this dish pop:

  • Chickpeas: A can of chickpeas forms the hearty base of this dish, bringing both protein and fiber to the table.
  • Eggs: Large eggs are the star of the show, adding richness and flavor.
  • Olive Oil: A splash of olive oil provides a beautiful golden crisp to the chickpeas and helps cook the eggs to perfection.
  • Cumin and Paprika: These spices add depth and warmth, making each bite an aromatic delight.
  • Salt and Pepper: Essential for balancing flavors.
  • Fresh Parsley: A sprinkle of parsley elevates the dish with a fresh finish.

Cooking Steps: Let’s Get Started

A plate of Chickpea Fried Eggs, highlighting the vibrant colors and soft shadows from natural light.

Ready to bring some fire into your kitchen? Here’s how to prepare these Chickpea Fried Eggs:

Ingredients

Here’s what you’ll need:

  • 1 can chickpeas, drained and rinsed
  • 4 large eggs
  • 2 tablespoons olive oil
  • 1 teaspoon cumin
  • 1 teaspoon paprika
  • Salt and pepper to taste
  • Fresh parsley for garnish (optional)

Steps

Now, let’s get cooking:

  1. In a skillet, heat the olive oil over medium heat.
  2. Add the chickpeas, cumin, paprika, salt, and pepper. Sauté for about 5-7 minutes until the chickpeas are slightly crispy.
  3. Make four small wells in the chickpeas and crack an egg into each well.
  4. Cover the skillet and cook for about 5-7 minutes, or until the egg whites are set but the yolks are still runny.
  5. Remove from heat and garnish with fresh parsley if desired.
  6. Serve immediately and enjoy your Chickpea Fried Eggs!

Tips for Success

To ensure your Chickpea Fried Eggs turn out perfectly, keep these tips in mind:

  • Use a non-stick skillet: This will prevent the eggs from sticking and make cleanup a breeze.
  • Control the heat: Cooking on medium heat allows the chickpeas to crisp up without burning, while ensuring the eggs cook evenly.
  • Experiment with spices: Don’t be shy! Add a pinch of cayenne or chili powder for an extra kick, or mix in some fresh herbs like cilantro or thyme.

Variations to Try

This recipe is a fantastic base that can be adapted to fit your taste preferences. Here are some variations to consider:

  • Veggie Boost: Add diced bell peppers, spinach, or kale to the chickpeas for a more nutritious kick.
  • Cheesy Goodness: Sprinkle some feta or goat cheese over the top before serving for a creamy finish.
  • Herbed Delight: Swap parsley for fresh basil or dill for a different flavor profile.

Substitutions

If you find yourself short on any of the main ingredients, here are some substitutions that work beautifully:

  • Chickpeas: If you don’t have canned chickpeas, cooked lentils or black beans can be a great alternative.
  • Eggs: For a vegan option, try using tofu or a chickpea flour scramble instead.
  • Olive Oil: Any neutral oil, like avocado or grapeseed, can be used for frying.

Equipment You’ll Need

To whip up this dish, you’ll need:

  • A non-stick skillet
  • A spatula for flipping
  • A lid to cover the skillet
  • A mixing bowl (if you’re mixing in veggies or spices)

Storage and Freezing Tips

If you happen to have leftovers (which I doubt, because they’re that good!), here’s how to store them:

  • Refrigeration: Store any leftovers in an airtight container in the fridge for up to 2 days. Reheat in the skillet or microwave before serving.
  • Freezing: While I recommend enjoying these fresh, you can freeze the chickpea mixture without eggs. Just cool it completely, then transfer it to a freezer-safe bag for up to 3 months. Thaw and reheat when ready to enjoy.

Frequently Asked Questions

Got questions? I’ve got answers! Here are some common inquiries about this dish:

  • Can I make this dish ahead of time? Yes! You can prepare the chickpea mixture in advance and cook the eggs fresh when you’re ready to serve.
  • What can I serve with Chickpea Fried Eggs? They pair beautifully with avocado toast, a side salad, or even some crusty bread for dipping.
  • Can I use fresh chickpeas? Absolutely! Just soak and cook your dried chickpeas beforehand.

Troubleshooting Common Issues

If your dish doesn’t turn out quite as expected, don’t worry! Here’s how to troubleshoot:

  • Eggs too runny: If you prefer firmer yolks, cook them a bit longer, keeping the lid on for even cooking.
  • Chickpeas not crispy: Ensure your skillet is hot enough before adding the chickpeas and give them enough time to cook.
  • Flavor lacking: Don’t be afraid to adjust the seasonings! A little more salt, pepper, or spice can elevate the dish significantly.

Final Thoughts

Cooking is an adventure, and this Chickpea Fried Eggs dish is a perfect way to ignite that passion! With its vibrant flavors and simple preparation, it’s a celebration of everything I love about cooking. So grab your skillet, embrace your inner chef, and dive into this deliciously bold recipe. Whether you’re serving it up for breakfast, brunch, or even a light dinner, I promise it will awaken your taste buds and spark joy in your kitchen. Happy cooking!

Chickpea Fried Eggs Recipe

Prep Time 5 minutes
Cook Time 10 minutes
Total Time 15 minutes
Servings 2 servings
Calories 250
A flavorful and nutritious breakfast combining crispy chickpeas with runny eggs, perfect for a quick and satisfying meal.

Ingredients

Canned Goods

  • 1 can chickpeas, drained and rinsed
  • 4 large eggs
  • 2 tablespoons olive oil
  • 1 teaspoon cumin
  • 1 teaspoon paprika
  • to taste salt and pepper
  • optional fresh parsley for garnish

Instructions 

  • Heat olive oil in a skillet over medium heat.
  • Add chickpeas, cumin, paprika, salt, and pepper; sauté until crispy (~5-7 mins).
  • Create wells in chickpeas and crack eggs into each; cover and cook until whites are set (~5-7 mins).
  • Remove from heat, garnish with parsley if desired, and serve immediately.

Notes

Use fresh parsley for best flavor, and adjust salt and pepper to taste.
Calories: 250kcal
Cost: $10
Course: Breakfast
Cuisine: International
Keyword: Chickpeas, Eggs

Nutrition

Calories: 250kcal | Carbohydrates: 20g | Protein: 12g | Fat: 14g | Sodium: 400mg

Loved this recipe? Save it to your favorite Pinterest board so you can easily find it later! It’s the perfect way to keep all your sweet ideas in one place. ✨

Delicious Chickpea Fried Eggs with a side of chickpeas, illuminated by warm, soft lighting.

Why You’ll Love This Zesty Dish

Imagine a dish that embodies the essence of a tropical getaway, where every bite is a burst of bright, vibrant flavor. That’s exactly what Vegan Coconut Lime Tofu delivers! It’s a stunning combination of creamy coconut milk, tangy lime, and the satisfying texture of tofu, all coming together to create a dish that’s not just food, but a culinary adventure. This recipe is perfect for those evenings when you want something quick, delicious, and packed with flavor. Whether you’re a seasoned chef or a kitchen novice, this dish invites you to explore the enchanting world of plant-based cooking.

Key Ingredients That Make This Dish Shine

Before we dive into the cooking process, let’s take a moment to appreciate the ingredients that elevate this dish:

  • Firm Tofu: The backbone of this recipe, tofu absorbs flavors beautifully and provides a protein-packed base.
  • Coconut Milk: Creamy and rich, it adds a luscious texture and a hint of sweetness that balances the dish perfectly.
  • Lime Juice and Zest: These zesty powerhouses provide that refreshing tartness that cuts through the richness of the coconut milk.
  • Soy Sauce: A touch of umami that deepens the flavor profile and adds a savory kick.
  • Maple Syrup: This natural sweetener brings harmony to the dish, balancing out the tangy and savory notes.
  • Garlic and Ginger: These aromatic ingredients infuse the dish with warmth and depth, creating an irresistible aroma as they cook.
  • Fresh Cilantro: A finishing touch that adds a burst of color and freshness, making every bite delightful.

How to Make Coconut Lime Tofu: Step by Step

Delicious Vegan Coconut Lime Tofu served in a cozy setting, highlighted by warm natural light, with a blurred background.

Ready to embark on this flavorful journey? Let’s break down the cooking process into simple steps:

Ingredients

  • 14 oz firm tofu, pressed and cubed
  • 1 cup coconut milk
  • 2 tablespoons lime juice
  • 1 tablespoon lime zest
  • 2 tablespoons soy sauce
  • 1 tablespoon maple syrup
  • 1 tablespoon olive oil
  • 2 cloves garlic, minced
  • 1 teaspoon ginger, grated
  • Salt and pepper to taste
  • Fresh cilantro for garnish

Equipment

  • Mixing bowl
  • Skillet
  • Spatula
  • Measuring cups and spoons

Instructions

  1. In a mixing bowl, whisk together the coconut milk, lime juice, lime zest, soy sauce, maple syrup, minced garlic, and grated ginger. This fragrant marinade is where the magic begins!
  2. Add the cubed tofu to the marinade, ensuring that every piece is well-coated. For the best flavor, let it sit for at least 30 minutes, preferably in the refrigerator.
  3. Heat the olive oil in a skillet over medium heat. Once hot, add the marinated tofu (make sure to reserve the marinade for later) and cook for about 5-7 minutes, flipping occasionally until golden brown. This step is crucial for achieving that desirable crispy texture!
  4. Pour the reserved marinade over the tofu and cook for an additional 3-5 minutes, allowing the sauce to thicken slightly. This will create a luscious coating that clings to your tofu.
  5. Season with salt and pepper to taste, adjusting the flavors as needed.
  6. Serve hot, garnished with fresh cilantro, and let the enticing aroma and vibrant colors draw everyone to the table!

Tips for Perfecting Your Tofu Dish

1. **Pressing Tofu:** Make sure to press your tofu for at least 15-30 minutes before cubing it. This removes excess moisture and allows it to absorb more flavor from the marinade.

2. **Marinating Time:** While 30 minutes is the minimum, if time allows, marinate your tofu for a few hours or overnight. This intensifies the flavors and makes the dish even more delicious.

3. **Crispy Tofu:** For an extra crispy texture, you can toss the tofu in cornstarch before cooking. This creates a delightful crust as it fries.

Variations to Spice Things Up!

Food is all about creativity, and this recipe is no exception. Here are a few ways to switch things up:

  • Veggie Boost: Add chopped bell peppers, snap peas, or broccoli to your skillet for an added crunch and nutrition boost.
  • Spice It Up: If you love heat, consider adding a pinch of red pepper flakes or a splash of sriracha to the marinade.
  • Nutty Flavor: A tablespoon of peanut butter or almond butter in the marinade will add a rich, nutty flavor that complements the coconut beautifully.

Substitutions You Can Make

If you’re missing an ingredient or want to make this dish your own, here are some substitutions:

  • **Tofu:** Tempeh or seitan can be used in place of tofu for a different protein option.
  • **Coconut Milk:** For a lighter version, use coconut cream or a non-dairy milk like almond or soy, but keep in mind the flavor profile will change.
  • **Maple Syrup:** Agave syrup or brown sugar can be used as an alternative sweetener.

Storage and Freezing Tips

This dish can be a lifesaver for meal prep. Here’s how to store it:

  • **Refrigeration:** Store leftover tofu in an airtight container in the refrigerator for up to 3 days.
  • **Freezing:** If you want to freeze it, let the tofu cool completely, then place it in a freezer-safe container. It will keep well for up to 3 months. When ready to eat, thaw in the fridge overnight and reheat in a skillet.

Frequently Asked Questions

Can I use other proteins besides tofu? Absolutely! This marinade works well with tempeh, seitan, or even chicken if you’re not sticking strictly to plant-based.

How do I make this dish spicier? Adding a diced chili or some chili powder can elevate the heat to your liking. Experiment with different spices!

What can I serve with this dish? Serve it over jasmine rice, quinoa, or even pasta for a delightful meal. Pair it with a fresh salad to balance the richness.

Troubleshooting Common Issues

If your tofu isn’t browning: Make sure your skillet is hot enough before adding the tofu. If it’s not sizzling, the tofu will steam instead of fry.

If the sauce is too thin: Allow it to simmer a little longer to thicken, or you can mix a teaspoon of cornstarch with a tablespoon of water and add it to the sauce for instant thickening.

More Plant-Based Inspiration

If you’re hungry for more plant-based recipes that pack a punch, check out these gems:

Wrap Up: A Dish Worth Sharing

As you savor your Vegan Coconut Lime Tofu, take a moment to appreciate the flavors and scents that fill your kitchen. Cooking is not just about feeding ourselves; it’s about creating memories and sharing experiences. This dish is a testament to the joy of cooking boldly. So grab your ingredients, put on your favorite playlist, and let your culinary adventure unfold. Remember, every great meal starts with a little bit of spice and a whole lot of heart. Enjoy your cooking journey!

Vegan Coconut Lime Tofu

Prep Time 10 minutes
Cook Time 15 minutes
Total Time 25 minutes
Servings 4 servings
Calories 350
A flavorful vegan dish featuring crispy tofu in a zesty coconut lime sauce, perfect for a quick and satisfying meal.

Ingredients

Protein

  • 14 oz firm tofu, pressed and cubed

Liquid

  • 1 cup coconut milk
  • 2 tablespoons lime juice
  • 1 tablespoon lime zest

Sauces & Condiments

  • 2 tablespoons soy sauce
  • 1 tablespoon maple syrup

Oils & Aromatics

  • 1 tablespoon olive oil
  • 2 cloves garlic, minced
  • 1 teaspoon ginger, grated

Seasonings

  • to taste salt and pepper

Garnish

  • for garnish fresh cilantro

Instructions 

  • Whisk coconut milk, lime juice, lime zest, soy sauce, maple syrup, garlic, and ginger.
  • Marinate tofu in the mixture for at least 30 minutes in the refrigerator.
  • Heat olive oil in a skillet over medium heat.
  • Cook tofu until golden, then pour marinade over and simmer until sauce thickens.
  • Season with salt and pepper, garnish with cilantro, and serve hot.

Notes

Press tofu well to remove excess moisture for better browning.
Calories: 350kcal
Cost: $12
Course: Main Course
Cuisine: Vegan
Keyword: Tofu

Nutrition

Calories: 350kcal | Carbohydrates: 25g | Protein: 15g | Fat: 22g | Sodium: 900mg

Loved this recipe? Save it to your favorite Pinterest board so you can easily find it later! It’s the perfect way to keep all your sweet ideas in one place. ✨

Eye-level shot of Vegan Coconut Lime Tofu cubes in a creamy coconut sauce, adorned with lime zest and cilantro.

Unleashing Flavor: The Ultimate Chicken Potato Bake Experience

Welcome to a culinary adventure that’s as vibrant as the spices that dance through my kitchen! Today, we’re diving into a dish that’s more than just a meal; it’s a celebration of comfort and flavor: the Savory Chicken Potato Bake. This recipe combines succulent chicken, hearty potatoes, and a melty cheese topping into one glorious baking dish. Perfect for family gatherings or a cozy night in, this potato bake is here to ignite your passion for cooking and fill your home with tantalizing aromas. Ready to get cooking? Let’s turn up the heat!

Why You’ll Love This Chicken Potato Bake

This dish isn’t just about filling your stomach; it’s about filling your soul. Here are just a few reasons why this Chicken Potato Bake will become a staple in your kitchen:

  • Effortless preparation: With just a handful of ingredients and simple steps, this dish comes together quickly, making it perfect for busy weeknights.
  • Versatile ingredients: You can easily customize the dish based on what you have on hand, whether it’s swapping out chicken for turkey or using different types of cheese.
  • Hearty and satisfying: This recipe is designed to fill you up without weighing you down, thanks to the wholesome combination of chicken and potatoes.
  • Kid-friendly: With its cheesy goodness and familiar flavors, even the pickiest eaters will be begging for seconds!
  • Meal prep hero: Make it ahead of time and simply reheat for an effortless meal whenever you need it.

Essential Ingredients for Your Chicken Potato Bake

Before we dive into the kitchen, let’s gather our ingredients. Each component adds its own magic to the dish:

  • 4 medium potatoes (russet, red, or white): Choose russets for fluffiness, reds for creaminess, or whites for crispiness. Wash and dice them into ¾ inch cubes without peeling.
  • 1 tablespoon minced garlic: Fresh garlic adds a fragrant kick that elevates the overall flavor.
  • 1 tablespoon olive oil: This can be reduced to ½ tablespoon if you’re watching your fat intake, but don’t skip it completely — it adds moisture.
  • ⅛ teaspoon salt: A pinch of salt enhances all the other flavors.
  • ⅛ teaspoon pepper: Adjust to your taste for that extra zing!
  • 1 ½ pounds boneless skinless chicken breasts or thighs: I recommend thighs for extra juiciness, but breasts work just as well.
  • 1 cup shredded mozzarella cheese: Freshly shredded is best for melting, but store-bought works too.
  • Fresh parsley for garnish (optional): A sprinkle of parsley adds a pop of color and freshness.

How to Prepare the Perfect Chicken Potato Bake: Step-by-Step Guide

Juicy Chicken Potato Bake showcasing tender chicken pieces and diced, baked potatoes in a hearty dish.

Now that we’ve got our ingredients, let’s get cooking! Follow this step-by-step guide to create your own savory masterpiece:

  1. Preheat the oven: Set your oven to 400°F (200°C) to ensure even baking.
  2. Prepare the potatoes: In a large mixing bowl, toss the diced potatoes with garlic, olive oil, salt, and pepper until well coated.
  3. Layer the potatoes: Spread the seasoned potatoes evenly in a greased 9×13 inch baking dish.
  4. Add the chicken: Place the chicken pieces on top of the potatoes, ensuring they’re evenly distributed.
  5. Season the chicken: Lightly season the chicken with salt and pepper, and top with shredded mozzarella cheese.
  6. Bake: Cover with foil and bake for 25 minutes. Then, remove the foil and bake for an additional 15-20 minutes until the chicken is cooked through and the cheese is bubbly and golden.
  7. Garnish and serve: Once done, let it sit for a few minutes. Garnish with fresh parsley before serving.

Mastering Your Chicken Potato Bake: Pro Tips

Here are some expert insights to elevate your baking game:

  • Uniform cuts: Cut your potatoes into uniform pieces to ensure they cook evenly.
  • Cheese choices: Experiment with different cheeses like cheddar or gouda for a unique flavor twist.
  • Marinate the chicken: For an extra boost of flavor, marinate your chicken in olive oil, lemon juice, and spices for a few hours before baking.
  • Veggie additions: Toss in seasonal vegetables like carrots or bell peppers for added nutrition and color.
  • Leftover magic: Use leftovers creatively! Shred the chicken and mix it into salads, wraps, or quesadillas.
  • Don’t rush it: Allow the dish to cool for a few minutes before serving to help the flavors meld.
  • Make it your own: Whether you add herbs, spices, or other ingredients, make this recipe uniquely yours!

Common Mistakes and Troubleshooting

Even the best chefs make mistakes! Here are some common pitfalls and how to avoid them:

  • Overcooking the chicken: Monitor the internal temperature; it should reach 165°F (75°C) to be safe and juicy.
  • Soggy potatoes: Use a baking dish that allows for even heat distribution. If potatoes aren’t crisping up, increase the oven temperature slightly.
  • Skipping the seasoning: Don’t be shy with the spices! They’re crucial for flavor.
  • Not letting it rest: Allow the dish to rest before serving to let the flavors settle and the cheese to firm up a bit.

Variations to Spark Your Creativity

Why stick to the classic when you can mix it up? Here are some fun variations of this Chicken Potato Bake:

  • Mexican Twist: Add black beans, corn, and taco seasoning for a fiesta in your mouth.
  • Italian Style: Incorporate sun-dried tomatoes, spinach, and Italian herbs for a Mediterranean flair.
  • Barbecue Chicken Bake: Use barbecue sauce instead of olive oil and top with cheddar cheese for a smoky flavor.
  • Vegan Delight: Substitute chicken with chickpeas or tofu, and use vegan cheese for a plant-based version.

Storage and Make-Ahead Instructions

This dish is perfect for meal prep! Here’s how to store and reheat:

  • Make ahead: Assemble the dish a day in advance, cover with foil, and refrigerate. Bake as directed when ready to eat.
  • Storage: Leftovers can be stored in an airtight container in the fridge for up to 3 days.
  • Freezing: You can freeze the baked dish for up to 2 months. Just make sure to cool it completely before wrapping tightly.
  • Reheating: Reheat in the oven at 350°F (175°C) until heated through, about 20 minutes.

Comprehensive FAQ: Your Questions Answered

Got questions? I’ve got answers! Here’s a roundup of common inquiries about this dish:

  • Can I use frozen potatoes? Yes! Just adjust the cooking time as needed.
  • What if I don’t have mozzarella? Feel free to substitute with any cheese that melts well.
  • Is this dish gluten-free? Absolutely! All the ingredients are naturally gluten-free.
  • Can I use chicken with skin? Yes, but be aware that it may require longer cooking time.
  • What’s the best way to reheat leftovers? Reheat in the oven for the best texture, or use a microwave if you’re in a hurry.
  • Can I add other vegetables? Certainly! Broccoli, carrots, or zucchini would all work beautifully.
  • How do I know when it’s done? The chicken should reach an internal temperature of 165°F (75°C), and the potatoes should be tender.
  • Can I halve the recipe? Yes! Just adjust the baking time accordingly.

Nutritional Insights

This Chicken Potato Bake is not just delicious but can also be part of a balanced diet. Here are some tips for making it even healthier:

  • Use skinless chicken: Reducing fat without compromising flavor.
  • Incorporate more veggies: Add a variety of colorful vegetables to boost fiber and nutrients.
  • Choose low-fat cheese: Opt for low-fat mozzarella to cut calories while still enjoying cheesy goodness.
  • Monitor portion sizes: Serve with a side salad to round out your meal without overindulging.

Essential Equipment You’ll Need

Before you start, make sure you have these kitchen essentials on hand:

  • 9×13 inch baking dish: Perfect size for this recipe.
  • Mixing bowls: For tossing ingredients together.
  • Knife and cutting board: Essential for prepping your ingredients.
  • Aluminum foil: Helps to keep your dish moist during the initial bake.

Serving Suggestions

How you serve it can elevate the experience! Here are some ideas:

  • Garnish with fresh herbs: A sprinkle of parsley or basil adds a fresh touch.
  • Pair with a salad: A crisp green salad balances the richness of the bake.
  • Serve with crusty bread: Perfect for sopping up any delicious juices.

Conclusion: Your Culinary Adventure Awaits!

There you have it — a comprehensive guide to crafting the ultimate Chicken Potato Bake! This dish isn’t just about satisfying your hunger; it’s about creating memories around the table. So grab your ingredients, embrace the thrill of cooking, and prepare to wow your friends and family with a dish that’s bursting with flavor. Remember, the kitchen is your playground, so don’t hesitate to experiment and make it your own. Let’s get cooking, and may every bite be a joyful reminder of the adventure it is to create and share food!

Chicken Potato Bake

Prep Time 15 minutes
Cook Time 45 minutes
Total Time 1 hour
Servings 4 servings
Calories 650
A hearty and cheesy baked dish combining tender chicken, crispy potatoes, and melted mozzarella for a satisfying meal.

Ingredients

Potatoes

  • 4 medium potatoes (russet, red, or white), washed and diced into ¾ inch cubes (no need to peel)
  • 1 tablespoon minced garlic
  • 1 tablespoon olive oil (can be reduced to ½ tablespoon if desired)
  • teaspoon salt
  • teaspoon pepper
  • 1.5 pounds boneless skinless chicken breasts or thighs
  • 1 cup shredded mozzarella cheese (freshly shredded recommended, but store-bought is fine)
  • Fresh parsley for garnish (optional)

Instructions 

  • Preheat oven to 400°F (200°C).
  • Toss diced potatoes with olive oil, garlic, salt, and pepper. Spread on a baking sheet and roast for 20 minutes.
  • While potatoes roast, cook chicken until fully cooked and shredded.
  • Combine roasted potatoes and shredded chicken in a baking dish. Top with shredded mozzarella cheese.
  • Bake for an additional 15 minutes until cheese is melted and bubbly. Garnish with parsley if desired.

Notes

For extra flavor, add herbs or spices of your choice.
Calories: 650kcal
Cost: $15
Course: Main Course
Cuisine: American
Keyword: bake, chicken, potato

Nutrition

Calories: 650kcal | Carbohydrates: 70g | Protein: 50g | Fat: 25g | Sodium: 900mg

Why You’ll Love This Zesty Dish

Are you ready to take your taste buds on a vibrant journey? This Lemon Chicken Recipe is not just a meal; it’s an experience that dances on your palate! The bright, zesty flavors meld perfectly with the richness of the butter and the savory notes of garlic, creating a symphony of taste that will have you craving more. Imagine succulent chicken breasts, golden brown and tender, drizzled in a silky lemon butter sauce, garnished with fresh parsley. Each bite is a burst of flavor that invites you to savor the moment.

What I love about this dish is its versatility — it’s perfect for a quick weeknight dinner or special occasions when you want to impress. Plus, it’s a breeze to make, taking only about 30 minutes from start to finish. So let’s dive into the ingredients and steps that will make this dish a favorite in your home!

Ingredients You Need for Lemon Chicken

To whip up this delightful Lemon Chicken, gather the following ingredients:

  • 4 boneless, skinless chicken breasts
  • Salt and pepper, to taste
  • 2 tablespoons olive oil
  • 1/2 cup chicken broth
  • 1/4 cup fresh lemon juice
  • 1 tablespoon lemon zest
  • 1/4 cup unsalted butter
  • 2 cloves garlic, minced
  • 1 tablespoon fresh parsley, chopped (for garnish)

These simple yet flavorful ingredients are what make this dish shine. Fresh lemon juice and zest are the stars here, providing that irresistible zing that elevates the chicken to new heights.

How to Make Lemon Chicken

A beautifully arranged lemon chicken breast topped with garlic and lemon sauce, served on a rustic plate.

Ready to cook? Follow these easy steps to achieve a perfectly cooked, flavorful lemon chicken:

  1. Season both sides of the chicken breasts with salt and pepper.
  2. In a large skillet, heat the olive oil over medium-high heat.
  3. Add the chicken breasts to the skillet and cook for 5-7 minutes on each side until they are cooked through and golden brown. Once done, remove the chicken from the skillet and set aside.
  4. In the same skillet, add the minced garlic and sauté for about 30 seconds until fragrant.
  5. Pour in the chicken broth, lemon juice, and lemon zest, scraping up any brown bits from the bottom of the skillet with a wooden spoon.
  6. Bring the mixture to a simmer and let it reduce for about 3-4 minutes.
  7. Remove the skillet from heat and stir in the butter until it melts and the sauce is smooth.
  8. Return the chicken to the skillet, spooning the sauce over the chicken to coat it well.
  9. Garnish with fresh parsley before serving.

There you have it! A dish bursting with flavor, ready to be devoured.

Tips for Perfect Lemon Chicken

Here are some tips to ensure your lemon chicken turns out perfectly every time:

  • Don’t rush the cooking: Allow the chicken to develop that beautiful golden crust by not overcrowding the pan.
  • Fresh is best: Use fresh lemons for the juice and zest to achieve the brightest flavor.
  • Adjust the sauce: If you prefer a thicker sauce, let it reduce a bit longer, but be careful not to let it burn!

Variations to Explore

Want to put your own spin on this classic? Here are a few variations you can experiment with:

  • Herb-Infused Chicken: Add fresh herbs like thyme or rosemary to the skillet while cooking for an aromatic twist.
  • Spicy Kick: For those who love heat, toss in red pepper flakes when sautéing the garlic.
  • Add Veggies: Feel free to include asparagus, zucchini, or cherry tomatoes in the skillet for a complete meal.

Substitutions You Can Make

Running low on some ingredients? Here are some easy substitutions:

  • Chicken thighs: If you prefer darker meat, chicken thighs work beautifully in this recipe.
  • Butter alternatives: Replace unsalted butter with ghee or olive oil for a dairy-free option.
  • Broth options: Vegetable broth can replace chicken broth if you’re looking for a lighter flavor.

Essential Equipment

Before you start cooking, make sure you have the right tools on hand:

  • A large skillet or frying pan for searing the chicken.
  • A wooden spoon to scrape up those flavorful bits from the bottom of the skillet.
  • A measuring cup and spoons for accuracy.
  • A chef’s knife for slicing and dicing.

Storage and Freezing Tips

If you find yourself with leftovers (which is rare, but it happens!), here’s how to store them:

  • Refrigeration: Store leftover lemon chicken in an airtight container in the fridge for up to 3 days.
  • Freezing: You can freeze the chicken in the sauce for up to 2 months. Just ensure it’s in an airtight container to prevent freezer burn.
  • Reheating: Thaw overnight in the refrigerator and reheat gently in a skillet over low heat to maintain its moisture.

FAQs About Lemon Chicken

Here are some common questions and answers that might help you out:

  • Can I use skin-on chicken? Absolutely! Skin-on chicken can add extra flavor, but be sure to adjust cooking times accordingly.
  • What should I serve with this dish? This lemon chicken pairs beautifully with rice, pasta, or a fresh garden salad. Consider serving it on a bed of fluffy quinoa for a nutritious twist.
  • Can I make this dish ahead of time? Yes! You can prepare the chicken and sauce, then store them separately before serving. Just reheat gently before enjoying.

Troubleshooting Common Issues

If something goes awry, don’t fret! Here are some troubleshooting tips:

  • Chicken is dry: Make sure not to overcook the chicken. Use a meat thermometer to ensure it reaches 165°F.
  • Sauce is too thin: Allow the sauce to simmer a bit longer to thicken it up.
  • Flavor is lacking: Always taste and adjust seasoning. A pinch of salt or a splash of lemon juice can work wonders!

Conclusion: Your Culinary Adventure Awaits

Cooking should be an adventure, and with this Lemon Chicken Recipe, you’re guaranteed to delight not only your taste buds but also those of your family and friends. The combination of zesty lemon, garlic, and buttery goodness creates a dish that’s simple yet sophisticated. So go ahead, grab those chicken breasts and let’s get cooking! Remember, the kitchen is your canvas, and with every dish, you paint a new story. I can’t wait for you to try this recipe and share your own culinary adventures with it. Happy cooking!

Lemon Chicken Recipe (with Lemon Butter Sauce) - NatashasKitchen.com

Prep Time 10 minutes
Cook Time 15 minutes
Total Time 25 minutes
Servings 4 servings
Calories 350
A flavorful lemon chicken dish with a rich lemon butter sauce, perfect for a quick and elegant meal.

Ingredients

Chicken

  • 4 pieces boneless, skinless chicken breasts
  • 2 tablespoons olive oil
  • 1/2 cup chicken broth
  • 1/4 cup fresh lemon juice
  • 1 tablespoon lemon zest
  • 1/4 cup unsalted butter
  • 2 cloves garlic, minced
  • 1 tablespoon fresh parsley, chopped (for garnish)

Instructions 

  • Season chicken with salt and pepper.
  • Cook chicken in heated olive oil until golden, 5-7 minutes per side. Remove and set aside.
  • Sauté garlic in the same skillet for 30 seconds.
  • Add broth, lemon juice, and zest; simmer 3-4 minutes. Stir in butter until smooth.
  • Return chicken to skillet, spoon sauce over, and garnish with parsley.

Notes

Serve with rice or vegetables for a complete meal.
Calories: 350kcal
Cost: $15
Course: Main Course
Cuisine: American
Keyword: chicken, lemon

Nutrition

Calories: 350kcal | Carbohydrates: 12g | Protein: 40g | Fat: 18g | Sodium: 400mg

Loved this recipe? Save it to your favorite Pinterest board so you can easily find it later! It’s the perfect way to keep all your sweet ideas in one place. ✨

Eye-level shot of juicy lemon chicken with a glossy butter sauce, complemented by fresh lemon slices.

Why This Broccoli Pasta Will Become Your New Favorite

There’s something magical about a simple pasta dish that pulls at your heartstrings and tantalizes your taste buds. This Easy Healthy Broccoli Pasta recipe combines the vibrant crunch of broccoli with the comforting embrace of whole grain pasta, creating a symphony of flavors that will elevate your pasta game to new heights. Not only is this dish bursting with wholesome ingredients, but it also celebrates the art of cooking with health and taste in mind. Ready to ignite your passion for cooking? Let’s dive in!

Ingredients to Gather

To whip up this delightful dish, here’s what you’ll need:

  • 8 oz whole grain pasta
  • 2 cups broccoli florets
  • 2 tablespoons olive oil
  • 3 cloves garlic, minced
  • 1/4 teaspoon red pepper flakes
  • Salt and pepper to taste
  • 1/4 cup grated Parmesan cheese (optional)
  • Fresh lemon juice (optional)

Each ingredient plays a vital role in bringing this dish to life. Whole grain pasta not only offers a nutty flavor but also provides more fiber than regular pasta, making it a healthier choice. Broccoli adds a burst of color and nutrition, while the garlic and red pepper flakes bring a punch of flavor that will leave your taste buds dancing.

Step-by-Step Instructions

Delicious whole grain pasta mixed with bright green broccoli florets, garlic, and olive oil.

Follow these simple steps to create your masterpiece:

  1. Cook the Pasta: In a large pot, bring salted water to a boil. Add the whole grain pasta and cook according to package instructions until al dente. Remember to reserve 1/2 cup of the pasta water before draining!
  2. Sauté the Garlic: While the pasta cooks, heat the olive oil in a large skillet over medium heat. Add the minced garlic and red pepper flakes, sautéing for 1-2 minutes until the aroma fills your kitchen — trust me, it’s a heavenly scent!
  3. Add the Broccoli: Toss in the broccoli florets and sauté for about 5-7 minutes. You want them tender yet bright green, retaining that delightful crunch that makes broccoli so irresistible.
  4. Combine Everything: Once the pasta is ready and drained, add it to the skillet with the broccoli. If the mixture seems a bit dry, pour in some of that reserved pasta water to help everything blend beautifully.
  5. Season and Serve: Finally, season with salt and pepper to taste. If you’re feeling fancy, toss in the grated Parmesan cheese and squeeze a bit of fresh lemon juice over the top for that extra zing. Serve immediately, garnished with more Parmesan and lemon wedges if desired!

Tips for Cooking Success

Cooking is all about experimentation and learning from each dish. Here are some tips to ensure your broccoli pasta turns out perfectly every time:

  • Don’t Overcook the Broccoli: The biggest mistake you can make is overcooking the broccoli until it turns mushy. Aim to sauté it just until it’s tender and bright green, ensuring you retain that lovely crunch.
  • Save the Pasta Water: That starchy pasta water is liquid gold! It helps to create a silky sauce that clings beautifully to your pasta and broccoli.
  • Balance Your Flavors: Don’t be afraid to adjust the seasoning. Taste as you go and add more salt, pepper, or lemon juice to achieve that perfect balance of flavors.

Variations to Try

One of the best things about pasta is its versatility. Here are some fun variations to consider:

  • Protein Boost: Add grilled chicken breast, shrimp, or chickpeas for a heartier meal.
  • Veggie Lovers: Feel free to toss in other vegetables like bell peppers, zucchini, or spinach to add even more color and flavor.
  • Cheesy Delight: Experiment with different cheeses like feta or goat cheese for a unique twist.

Substitutions You Can Make

If you’re missing some ingredients or want to make this dish your own, here are a few substitutions:

  • Pasta: Swap out whole grain pasta for gluten-free varieties or even spiralized vegetables like zucchini for a lighter option.
  • Cheese: If you’re avoiding dairy, nutritional yeast can give you that cheesy flavor without the calories.
  • Olive Oil: Use avocado oil or melted butter if you prefer a different fat base for sautéing.

Equipment You’ll Need

No complicated gadgets here! You’ll need:

  • A large pot for boiling pasta
  • A colander for draining
  • A large skillet for sautéing
  • A wooden spoon or spatula for mixing

Storage and Freezing Instructions

Got leftovers? You can store your broccoli pasta in an airtight container in the fridge for up to 4 days. The flavors will meld together beautifully, making it even tastier the next day!

If you want to freeze it, place the cooled pasta in a freezer-safe container and store for up to 3 months. When you’re ready to enjoy, simply thaw it in the fridge overnight and reheat in a skillet with a splash of water or olive oil.

FAQs About Broccoli Pasta

Here are some commonly asked questions about this dish:

  • Can I use frozen broccoli? Absolutely! Frozen broccoli works in a pinch, but remember it may be a bit softer than fresh.
  • Is this recipe vegan? You can easily make it vegan by omitting the Parmesan cheese or using a dairy-free alternative.
  • What can I serve with broccoli pasta? This dish pairs beautifully with a fresh green salad, garlic bread, or even some protein like grilled chicken or turkey meatballs.

Troubleshooting Common Issues

Cooking is an art, and sometimes things don’t go as planned. Here are some quick fixes:

  • Too Dry: If your pasta seems dry, add a splash of reserved pasta water or a drizzle of olive oil.
  • Overcooked Broccoli: If you accidentally overcook the broccoli, try adding a splash of lemon juice to brighten the flavors.
  • Bland Flavor: A pinch more salt, pepper, or a squeeze of lemon juice can elevate the taste significantly.

Conclusion: Your Next Culinary Adventure Awaits

This Easy Healthy Broccoli Pasta is more than just a meal; it’s a celebration of flavors, textures, and the joy of cooking. It invites you to embrace creativity in the kitchen, proving that with a few simple ingredients, you can craft a dish that’s both satisfying and nourishing. So grab your skillet, channel your inner chef, and let this recipe become a staple in your home. Remember, cooking is an adventure — so don’t be afraid to add your own twist and make it uniquely yours. Bon appétit!

Easy Healthy Broccoli Pasta

Prep Time 10 minutes
Cook Time 15 minutes
Total Time 25 minutes
Servings 4 servings
Calories 400
A quick and nutritious pasta dish featuring vibrant broccoli and flavorful garlic, perfect for a healthy weeknight dinner.

Ingredients

Pasta

  • 8 oz whole grain pasta

Vegetables

  • 2 cups broccoli florets

Oils & Condiments

  • 2 tablespoons olive oil

Garlic & Spices

  • 3 cloves garlic, minced
  • 1/4 teaspoon red pepper flakes

Seasonings

  • to taste salt and pepper

Cheese & Citrus

  • 1/4 cup grated parmesan cheese (optional)
  • fresh lemon juice (optional) lemon juice

Instructions 

  • Cook pasta until al dente, reserve 1/2 cup pasta water, then drain.
  • Heat olive oil, sauté garlic and red pepper flakes for 1-2 minutes.
  • Add broccoli and cook until tender, about 5-7 minutes.
  • Combine pasta with broccoli, add reserved water if needed, season with salt and pepper.
  • Stir in Parmesan and lemon juice if desired, serve immediately.

Notes

You can add more lemon juice or cheese to taste for extra flavor.
Calories: 400kcal
Cost: $12
Course: Main Course
Cuisine: Healthy
Keyword: Broccoli, pasta, Vegetarian

Nutrition

Calories: 400kcal | Carbohydrates: 70g | Protein: 15g | Fat: 10g | Sodium: 300mg

Loved this recipe? Save it to your favorite Pinterest board so you can easily find it later! It’s the perfect way to keep all your sweet ideas in one place. ✨

A visually appealing dish featuring sautéed broccoli and pasta illuminated by soft natural light.

Dive into the Zesty Zucchini Casserole Adventure

Welcome to a flavor-packed journey with my Buttery Zucchini Casserole featuring a crunchy Ritz cracker topping! This dish combines the freshness of zucchini with rich buttery goodness, creating a comfort food experience that’s anything but ordinary. Whether you’re hosting a gathering or simply looking for a delicious weeknight meal, this zucchini cheddar casserole is sure to become a staple in your cooking repertoire.

Why You’ll Love This Recipe

  • Versatile Dish: This casserole is perfect for any occasion, from family dinners to potlucks, and can be served hot or cold, making it incredibly adaptable.
  • Kid-Friendly: Even the pickiest eaters will be drawn in by the cheesy goodness and crunchy topping, making it an easy way to sneak in some veggies.
  • Quick Prep Time: With simple ingredients and minimal preparation, you can whip up this dish in no time, freeing you up to enjoy more time with your loved ones.
  • Make-Ahead Friendly: Prepare it in advance and bake it just before serving to save time and stress on busy days.
  • Rich Flavor Profile: The combination of melted cheddar and savory spices creates a mouthwatering experience that will leave everyone reaching for seconds.

Ingredients Breakdown

Let’s dive into what you’ll need to create this zesty delight:

  • 1 cup plain flour: Acts as the base for the casserole, giving it structure.
  • 1 1/2 teaspoons baking powder: Helps the casserole rise and achieve a fluffy texture.
  • 1 teaspoon dried parsley: Adds a touch of herbal flavor — feel free to substitute with fresh parsley if available.
  • 3/4 teaspoon salt: Enhances the overall flavors of the dish.
  • 1/2 teaspoon garlic salt: Infuses a savory depth — you can replace it with fresh garlic for a stronger punch.
  • 1/2 teaspoon dried oregano: Brings a Mediterranean touch to the casserole.
  • 1/2 teaspoon paprika: Adds a subtle smokiness and beautiful color.
  • 1/2 teaspoon ground black pepper: For that extra kick and flavor enhancement.
  • 1 cup shredded cheddar: Melts beautifully, creating a creamy texture — feel free to mix in other cheeses for a unique twist!
  • 4 large eggs, lightly beaten: Binds the casserole together, creating a rich, custard-like consistency.
  • 1/2 cup melted butter or cooking oil: Adds richness and moisture — olive oil is a great alternative for a healthier option.
  • 3 cups freshly grated zucchini: The star of the dish! Fresh zucchini provides moisture and flavor.
  • 1/4 to 1/2 cup diced onion: Adds sweetness and depth; you can use yellow or sweet onions based on preference.
  • 1 cup crushed Ritz crackers: Creates that irresistible topping, giving a buttery crunch.
  • 2 1/2 tablespoons melted butter: Drizzled over the Ritz topping for extra crispiness.

Pro Tips for a Perfect Casserole

Side angle of a cheesy zucchini casserole with a golden Ritz cracker crust.
  • Use Fresh Ingredients: Fresh zucchini and high-quality cheese make a huge difference in flavor.
  • Grate the Zucchini: Use a box grater for even size and quicker cooking. Make sure to squeeze out excess moisture to prevent a soggy casserole.
  • Customize Your Cheese: Try mixing cheddar with mozzarella for a gooey texture or a sharp cheese for more flavor.
  • Layer Wisely: Make sure to evenly distribute the zucchini and cheese for consistent flavor in every bite.
  • Control the Spice: Adjust the paprika and garlic salt based on your heat preference — it’s your dish, so make it your way!
  • Perfect the Cracker Topping: Don’t skimp on the melted butter for the Ritz topping — it’s what makes it crispy and delicious.
  • Rest Before Serving: Allow the casserole to rest for 10 minutes after baking. This helps the flavors meld and makes it easier to slice.
  • Experiment with Herbs: Add fresh herbs like thyme or basil for an additional flavor boost!

Common Mistakes and Troubleshooting

  • Soggy Casserole: Ensure the zucchini is squeezed dry before mixing it in. This is crucial to avoid a watery dish.
  • Overbaking: Keep an eye on the casserole during the last few minutes of baking to prevent it from drying out.
  • Too Dense: If your casserole is too heavy, consider adding an extra egg or reducing the flour.
  • Flavorless Topping: Don’t skip the butter on the Ritz topping; it’s essential for that crispy, flavorful finish.

Delicious Variations to Try

  • Mexican Twist: Add diced jalapeños and cumin for a spicy kick, and top with avocado after baking.
  • Meat Lover’s Delight: Stir in cooked, crumbled sausage or bacon into the mixture for a heartier version.
  • Herb-Infused: Mix in fresh basil and oregano for a Mediterranean flair that complements the zucchini beautifully.
  • Cheesy Spinach Zucchini Casserole: Add fresh spinach to the mix for added nutrients without sacrificing flavor.

Storage and Make-Ahead Instructions

This casserole can be prepped ahead of time, making it perfect for busy schedules. Here’s how to store it:

  • Refrigerator: Store leftovers in an airtight container for up to 3 days. Reheat in the oven at 350°F until warmed through.
  • Freezer: You can freeze the uncooked casserole. Just cover tightly with foil and freeze for up to 2 months. Bake directly from the freezer, adding an extra 10-15 minutes to the cooking time.

Frequently Asked Questions

  • Can I use yellow squash instead of zucchini?: Absolutely! Yellow squash works perfectly, adding a slightly different flavor.
  • Is it okay to add more cheese?: Yes! Feel free to up the cheese for a richer flavor, just be mindful of the overall moisture content.
  • How can I make this gluten-free?: Substitute the plain flour with a gluten-free flour blend and use gluten-free crackers.
  • What if I don’t have Ritz crackers?: Any buttery cracker will do, or you can make a homemade breadcrumb topping with butter and seasonings.
  • Can I make this vegan?: Yes! Use flax eggs and vegan cheese, and substitute melted coconut oil for butter.
  • How do I know when it’s done?: The casserole should be golden brown on top and set in the center. A toothpick inserted should come out clean.
  • Can I add other vegetables?: Definitely! Try adding bell peppers, corn, or even mushrooms for added flavor and texture.
  • What’s the best way to serve this casserole?: Serve it warm with a dollop of sour cream or a sprinkle of fresh herbs for a beautiful presentation.

Nutrition Tips and Dietary Adaptations

This dish is not only delicious but can also be tailored to meet various dietary needs:

  • Low-Carb Option: Use almond flour instead of plain flour for a low-carb version.
  • High-Protein Version: Add cooked quinoa or black beans to the mixture for an extra protein boost.
  • Low-Fat Alternative: Substitute low-fat cheese and use less butter or oil for a lighter dish.

Recommended Equipment

To make this casserole, you’ll need:

  • 9×13-inch baking dish: The perfect size for even cooking and serving.
  • Box grater: Essential for grating zucchini quickly and efficiently.
  • Mixing bowls: For mixing your ingredients without any hassle.
  • Whisk or fork: To beat the eggs and combine ingredients seamlessly.

Serving Suggestions

To elevate your dining experience, consider pairing this zucchini casserole with:

  • Fresh Salad: A light garden salad with a tangy vinaigrette complements the richness of the casserole.
  • Grilled Chicken or Fish: Adding a protein side balances the meal beautifully.
  • Garlic Bread: For those who love carbs, a side of garlic bread is always a hit!

Embrace the adventure of flavor that this Buttery Zucchini Casserole offers. Cooking is an art, and with this dish, you’ll not only impress your family and friends but also yourself. So grab your skillet, embrace your inner culinary artist, and let the zest of zucchini lead you to deliciousness! Happy cooking!

Buttery Zucchini Casserole with Ritz Crackers

Prep Time 15 minutes
Cook Time 45 minutes
Total Time 1 hour
Servings 6 servings
Calories 350
A delicious and cheesy zucchini casserole topped with crunchy Ritz crackers, perfect for a comforting meal.

Ingredients

Dried Ingredients

  • 1 cup plain flour
  • 1.5 teaspoons baking powder
  • 1 teaspoon dried parsley
  • 3/4 teaspoon salt
  • 1/2 teaspoon garlic salt
  • 1/2 teaspoon dried oregano
  • 1/2 teaspoon paprika
  • 1/2 teaspoon ground black pepper
  • 1 cup shredded cheddar
  • 4 large eggs (lightly beaten)
  • 1/2 cup melted butter or cooking oil
  • 3 cups freshly grated zucchini
  • 1/4 to 1/2 cup diced onion
  • 1 cup crushed Ritz crackers
  • 2.5 tablespoons melted butter

Instructions 

  • Preheat oven to 350°F (175°C). Mix dry ingredients and combine with zucchini, onion, eggs, and melted butter. Pour into a greased baking dish.
  • Top with shredded cheddar and crushed Ritz crackers, then drizzle with melted butter.
  • Bake for 45 minutes until golden and set. Serve warm.

Notes

For extra flavor, add a pinch of cayenne pepper or herbs.
Calories: 350kcal
Cost: $15
Course: Main Dish
Cuisine: American
Keyword: zucchini

Nutrition

Calories: 350kcal | Carbohydrates: 30g | Protein: 15g | Fat: 20g | Sodium: 600mg

Why You’ll Love This Dish

Are you ready to take your taste buds on a journey that marries health and flavor in a single pot? Welcome to the world of Serbian Chicken Rice! This dish isn’t just a meal; it’s an adventure waiting to unfold in your kitchen. With tender chicken, vibrant vegetables, and fluffy rice, every bite dances with the warmth of paprika and the earthy notes of oregano. Whether you’re a seasoned chef or a culinary novice, this one-pot wonder is designed to awaken your passion for cooking and spice up your weeknight dinners.

Unpacking the Ingredients

Before we dive into the cooking process, let’s talk about the star players in this recipe. Each ingredient adds its unique character, making this dish both nutritious and delicious. Here’s what you’ll need:

  • 400g chicken breast fillet, diced: Lean and packed with protein, chicken breast serves as the heart of this dish.
  • 200g rice (e.g., long-grain rice): The canvas that absorbs all the flavors, elevating the meal to new heights.
  • 1 onion, diced: Adds a sweet base flavor that complements the spices beautifully.
  • 2 garlic cloves, minced: A must-have for that aromatic kick that makes the kitchen smell heavenly.
  • 1 bell pepper, diced: Provides a pop of color and sweetness that balances the savory notes.
  • 2 carrots, sliced: Earthy and slightly sweet, carrots add texture and visual appeal.
  • 400ml chicken broth: The liquid gold that ties everything together, ensuring moist and flavorful rice.
  • 1 can of diced tomatoes: A splash of acidity and juiciness that enhances the overall flavor.
  • 2 tablespoons olive oil: For sautéing and infusing flavor; it’s the backbone of your cooking process.
  • 1 teaspoon paprika: The spice that brings warmth and smokiness to the dish.
  • 1 teaspoon oregano: Adds a hint of herbal freshness that complements the other ingredients.
  • Salt and pepper to taste: Essential for bringing out the natural flavors of your ingredients.
  • Fresh parsley for garnish: The finishing touch that adds brightness and freshness.

Cooking Steps That Ignite Flavor

Delicious dish of cooked rice with chicken and vegetables, highlighted with natural light.

Ready to unleash those flavors? Let’s walk through the steps to create this sensational Serbian Chicken Rice.

  1. Heat the Olive Oil: In a large pot, heat 2 tablespoons of olive oil over medium heat. The oil should shimmer but not smoke, creating a perfect environment for sautéing.
  2. Sauté the Aromatics: Add the diced onion and minced garlic to the pot. Sauté until the onion is translucent and fragrant, about 3-4 minutes. This step is crucial; it’s where your dish begins to come alive.
  3. Brown the Chicken: Toss in the diced chicken breast, stirring occasionally until it’s lightly browned on all sides. This usually takes about 5-7 minutes. Browning the chicken not only adds texture but also deepens the flavor.
  4. Add the Veggies: Next, add the diced bell pepper and sliced carrots. Stir and cook for another 3-4 minutes until the vegetables begin to soften.
  5. Incorporate the Rice: Now it’s time to add the rice, paprika, and oregano. Stir everything together, making sure the rice is well coated with the spices and oil. This step is vital for flavor infusion.
  6. Pour in the Liquid: Add the chicken broth and diced tomatoes to the pot. Season with salt and pepper to taste. Give it a good stir to combine all the ingredients.
  7. Bring to a Boil: Increase the heat and bring the mixture to a boil. Once boiling, reduce the heat to low and cover the pot with a lid.
  8. Let it Simmer: Allow the dish to simmer for about 20 minutes, or until the rice is cooked and has absorbed most of the liquid. Resist the urge to lift the lid too often; you want to keep that steam locked in!
  9. Rest and Garnish: Once cooked, remove the pot from heat and let it rest for a few minutes. Fluff the rice with a fork, then garnish with fresh parsley before serving.

Tips for Perfectly Cooked Rice

Achieving perfectly cooked rice can sometimes feel like a culinary art form. Here are a few tips to ensure your rice turns out fluffy and delicious:

  • Use the right rice: Long-grain rice tends to yield fluffier results compared to short-grain rice.
  • Don’t rush the sauté: Taking your time to properly sauté the onions and garlic builds a flavor foundation that enhances the entire dish.
  • Don’t skip the resting time: Allowing the dish to rest after cooking lets the flavors meld together and makes for a better overall taste.

Variations to Spice Things Up

This recipe is a fantastic base that you can customize to fit your palate. Here are some variations to consider:

  • Add Heat: If you like it spicy, toss in some crushed red pepper flakes or a chopped chili pepper when sautéing the vegetables.
  • Change the Protein: Substitute chicken with other proteins like diced turkey, beef, or even chickpeas for a vegetarian option.
  • Mix in Other Vegetables: Feel free to add peas, corn, or green beans for extra nutrition and color.

Substitutions for Flexibility

Don’t have everything on hand? No problem! Here are some substitutions you can make without sacrificing flavor:

  • Chicken broth can be replaced with vegetable broth for a vegetarian version.
  • Olive oil can be swapped with any neutral oil, such as canola or avocado oil.
  • If you’re out of fresh parsley, try basil or cilantro for a different herbaceous note.

Essential Equipment

To create this flavorful dish successfully, you’ll need a few kitchen essentials:

  • A large pot or Dutch oven for even cooking.
  • A cutting board and sharp knife for prepping your ingredients.
  • A wooden spoon or spatula for stirring.

Storage and Freezing Tips

Leftovers? No problem! Here’s how to store your Serbian Chicken Rice:

  • Refrigerate: Store in an airtight container in the fridge for up to 3 days.
  • Freeze: To freeze, let the dish cool completely, then transfer to a freezer-safe container. It can be stored for up to 3 months. When ready to eat, thaw overnight in the fridge and reheat on the stovetop.

Frequently Asked Questions

Before you get cooking, let’s address some common questions:

  • Can I make this dish ahead of time? Absolutely! It tastes even better the next day as the flavors develop.
  • What can I serve with this dish? It pairs beautifully with a simple green salad or crusty bread to soak up the delicious juices.
  • Can I use brown rice instead? Yes, but you’ll need to adjust the cooking time as brown rice takes longer to cook.

Troubleshooting Common Issues

If you encounter any hiccups while cooking, here are some troubleshooting tips:

  • Rice too mushy? Use less liquid next time, or make sure to measure your rice accurately.
  • Not enough flavor? Adjust your seasoning with more salt, pepper, or spices according to your taste preferences.

Conclusion: Your Culinary Adventure Awaits

As you finish cooking this Serbian Chicken Rice, take a moment to appreciate the intoxicating aromas wafting through your kitchen. This dish is more than just a meal; it’s a celebration of flavor, health, and the joy of cooking. Each bite tells a story, a dance of spices that invites you and your loved ones to gather around the table. So, grab your fork and dig in—your culinary adventure starts now. Don’t forget to share your delicious creations and inspire others to embrace the heat in their cooking journey!

Serbisches Reisfleisch mit Hähnchen | One Pot Reis | gesund kochen | kalorienarme Rezepte

Prep Time 10 minutes
Cook Time 20 minutes
Total Time 30 minutes
Servings 4 portionen
Calories 550
Ein leckeres und gesundes Gericht aus Hähnchen, Reis und frischem Gemüse, perfekt für eine schnelle Mahlzeit.

Ingredients

Protein

  • 400 g Hähnchenbrustfilet, gewürfelt

Grundzutaten

  • 200 g Reis (z.b. langkornreis)
  • 1 stück Zwiebel, gewürfelt
  • 2 zehen Knoblauchzehen, gehackt
  • 1 stück Paprika, gewürfelt
  • 2 st Karotten, in Scheiben geschnitten
  • 400 ml Hühnerbrühe
  • 1 dose stückige Tomaten
  • 2 EL Olivenöl
  • 1 TL Paprikapulver
  • 1 TL Oregano
  • nach Geschmack Salz und Pfeffer
  • frische Petersilie zum Garnieren

Instructions 

  • Olivenöl erhitzen und Zwiebel sowie Knoblauch glasig dünsten.
  • Hähnchen anbraten, dann Paprika und Karotten hinzufügen und mitdünsten.
  • Reis, Paprikapulver und Oregano untermischen, dann Brühe und Tomaten dazugeben.
  • Alles aufkochen, dann abdecken und 20 Minuten köcheln lassen.
  • Vom Herd nehmen, kurz ruhen lassen und mit Petersilie garnieren.

Notes

Für extra Geschmack kannst du frische Kräuter hinzufügen.
Calories: 550kcal
Cost: $12
Course: Hauptgericht
Cuisine: Serbisch
Keyword: gesund, Hähnchen, Reis

Nutrition

Calories: 550kcal | Carbohydrates: 65g | Protein: 45g | Fat: 15g | Sodium: 800mg

Loved this recipe? Save it to your favorite Pinterest board so you can easily find it later! It’s the perfect way to keep all your sweet ideas in one place. ✨

Bowl of Serbian rice with diced chicken and colorful vegetables, softly lit.

Why You’ll Love This Dish

Gather around, food lovers! Today, we’re diving into a culinary masterpiece that not only satisfies cravings but also brings a symphony of flavors to your table. The Vegan Teriyaki Noodle Bowl is a delightful blend of savory and sweet, making it a perfect meal for any occasion. Whether you’re looking for cheap vegan meal ideas or an easy healthy vegan dinner recipe, this dish has got you covered. It’s vibrant, colorful, and most importantly, it’s packed with plant-based goodness that tastes like a treat. So roll up your sleeves and get ready to experience a dish that dares you to savor every bite!

Ingredients

  • 200g rice noodles
  • 1 tablespoon sesame oil
  • 1 bell pepper, sliced
  • 1 carrot, julienned
  • 1 cup broccoli florets
  • 1 cup snap peas
  • 3 green onions, chopped
  • 1/4 cup teriyaki sauce
  • 2 tablespoons sesame seeds
  • Fresh cilantro for garnish

Instructions

A vibrant bowl of vegan teriyaki noodles showcasing rice noodles and fresh veggies.
  1. Cook the rice noodles according to package instructions, then drain and set aside.
  2. In a large skillet, heat the sesame oil over medium heat.
  3. Add the bell pepper, carrot, broccoli, and snap peas to the skillet and stir-fry for about 5 minutes until the vegetables are tender-crisp.
  4. Add the cooked noodles to the skillet and pour in the teriyaki sauce. Toss everything together until well combined and heated through.
  5. Remove from heat and sprinkle with sesame seeds and chopped green onions.
  6. Serve in bowls and garnish with fresh cilantro.

Prepare for Flavor Adventure

Now that you have the basic recipe down, let’s talk about elevating this Vegan Teriyaki Noodle Bowl into a flavor adventure. Cooking should be about exploration, and with a few tweaks and twists, you can make this dish your own. Here are some tips to get you started:

Tips for Perfection

  • Fresh Ingredients: Always opt for fresh, vibrant vegetables to enhance the dish’s flavor and nutrition. The crunch of fresh snap peas and the sweetness of bell peppers will make your dish sing.
  • Homemade Teriyaki Sauce: If you’re feeling adventurous, why not whip up your own teriyaki sauce? A simple mix of soy sauce, maple syrup, garlic, and ginger can transform the dish into something extraordinary.
  • Add Some Heat: If you like a little kick, throw in some red pepper flakes or sliced jalapeños when you’re stir-frying the veggies. This will add an exciting layer of flavor to your bowl.
  • Protein Boost: Feel free to incorporate protein sources like edamame, chickpeas, or tofu for a heartier meal. Just sauté your protein choice alongside the veggies.

Variations to Try

One of the joys of cooking is making a dish your own. Here are a few variations you can experiment with:

  • Switch Up the Noodles: While rice noodles are fantastic, consider trying soba or udon noodles for a different texture.
  • Seasonal Vegetables: Adapt the recipe based on what’s in season. Asparagus in spring or roasted butternut squash in fall can add unique flavors and nutrients.
  • Cashew or Peanut Sauce: For a different flavor profile, toss in a creamy cashew or peanut sauce instead of teriyaki for a rich, indulgent twist.

Substitutions You Can Make

Cooking should never be a chore — if you don’t have a specific ingredient, don’t sweat it! Here are some common substitutions:

  • Rice Noodles: Whole wheat spaghetti or zucchini noodles can work in a pinch.
  • Sesame Oil: Olive oil or avocado oil can be used if you don’t have sesame oil on hand.
  • Teriyaki Sauce: Soy sauce mixed with a bit of honey or agave can serve as a quick substitute.

Equipment You’ll Need

To whip up this Vegan Teriyaki Noodle Bowl, you’ll need a few essential kitchen tools:

  • A large skillet or wok for stir-frying.
  • A pot for boiling the noodles.
  • A spatula for tossing everything together.
  • A knife and cutting board for chopping your vegetables.

Storage and Freezing Tips

Leftovers? No problem! Here’s how to store them:

  • Refrigeration: Store any leftovers in an airtight container in the fridge for up to 3 days. Simply reheat in the skillet or microwave.
  • Freezing: You can freeze the stir-fried veggies and noodles separately for up to 2 months. Just be aware that freezing may alter the texture of the vegetables.

FAQs About the Vegan Teriyaki Noodle Bowl

Can I make this dish gluten-free?

Absolutely! Just use gluten-free rice noodles and ensure your teriyaki sauce is gluten-free as well.

What if I don’t like tofu?

No worries! You can switch it out for edamame, chickpeas, or simply load up on more veggies.

Is this dish suitable for meal prep?

Yes, it’s perfect for meal prep! Just keep the sauce separate until you’re ready to heat it up to maintain the best texture.

Troubleshooting Common Issues

Like any dish, sometimes things don’t go as planned. Here are some common issues and how to solve them:

  • Noodles sticking together: Make sure to rinse the cooked noodles in cold water to prevent them from clumping.
  • Too salty? If your dish turns out too salty, add a splash of lime juice or a bit of sugar to balance the flavors.
  • Veggies overcooked? Be sure to stir-fry only until tender-crisp; they should retain some crunch for the best texture.

Final Thoughts

Now that you’ve got the lowdown on preparing this mouthwatering Vegan Teriyaki Noodle Bowl, it’s time to unleash your inner chef. This dish is more than just a meal; it’s a canvas for you to explore flavors and create something truly special. Remember, cooking is an adventure, and every bite of your noodle bowl should ignite your senses. So gather your ingredients, fire up your skillet, and let the flavor adventure begin. Embrace the joy of cooking and share your creation with others — because a meal made with love is always worth sharing. Happy cooking!

Vegan Teriyaki Noodle Bowl

Prep Time 10 minutes
Cook Time 15 minutes
Total Time 25 minutes
Servings 4 servings
Calories 450
A quick and flavorful vegan dish featuring rice noodles and colorful vegetables in a savory teriyaki sauce.

Ingredients

Main ingredients

  • 200 g rice noodles
  • 1 tablespoon sesame oil
  • 1 piece bell pepper (sliced)
  • 1 piece carrot (julienned)
  • 1 cup broccoli florets
  • 1 cup snap peas
  • 3 green onions green onions (chopped)
  • 0.25 cup teriyaki sauce
  • 2 tablespoons sesame seeds
  • fresh cilantro cilantro for garnish

Instructions 

  • Cook the rice noodles according to package instructions, then drain and set aside.
  • Heat sesame oil in a large skillet over medium heat.
  • Add vegetables and stir-fry for 5 minutes until tender-crisp.
  • Add noodles and teriyaki sauce; toss to combine and heat through.
  • Sprinkle with sesame seeds and green onions, then serve garnished with cilantro.

Notes

For extra flavor, add a splash of lime juice before serving.
Calories: 450kcal
Cost: $15
Course: Main Course
Cuisine: Vegan
Keyword: noodles

Nutrition

Calories: 450kcal | Carbohydrates: 75g | Protein: 12g | Fat: 10g | Sodium: 900mg

Loved this recipe? Save it to your favorite Pinterest board so you can easily find it later! It’s the perfect way to keep all your sweet ideas in one place. ✨

Eye-level perspective of a vegan teriyaki noodle dish with a variety of ingredients.

Unleash the Flavor: Your New Favorite Eggplant Casserole

Welcome to a culinary adventure that’s about to take your taste buds on a joyous rollercoaster! If you think eggplant is just a humble vegetable, think again. This Eggplant Casserole will not only surprise you but also impress everyone at your dining table. Layered with rich tomato sauce, creamy cheeses, and a medley of spices, this dish is a celebration of flavors that will ignite your passion for cooking. Now, let’s dive into the world of vibrant tastes, textures, and aromas!

Why You’ll Love This Recipe

  • Versatile Delight: This eggplant casserole can serve as a hearty main dish or a scrumptious side, making it perfect for any occasion.
  • Rich and Flavorful: Combining the sweetness of roasted eggplant with savory tomato sauce and creamy cheeses creates a dish that dances on your palate.
  • Healthy Eating: Packed with vegetables, this casserole is not only delicious but also a nutritious choice for family-friendly meals.
  • Easy to Make: With simple steps and straightforward ingredients, you can whip this up even on a busy weeknight.
  • Perfect for Meal Prep: Make it ahead of time and reheat for a quick, satisfying dinner option.

Ingredients Breakdown

Let’s get right into the heart of our casserole! Here’s what you’ll need:

  • 2 medium Eggplants: Choose globe or Italian varieties for the best texture. Slice them evenly for uniform cooking.
  • 24 ounces Tomato Sauce: Opt for low-sodium or homemade for a richer flavor. You can add some extra herbs to elevate the taste.
  • 15 ounces Ricotta Cheese: This adds creaminess; for a vegan twist, substitute with vegan ricotta.
  • 8 ounces Mozzarella Cheese: Plenty of gooey goodness! Vegan mozzarella works just as well.
  • 1 cup Parmesan Cheese: Look for vegetarian-friendly options or use vegan Parmesan for a dairy-free alternative.
  • 2 tablespoons Olive Oil: Use your favorite cooking oil to enhance flavor.
  • 2 teaspoons Herbs (Basil, Oregano): Fresh or dried, these herbs are essential for that aromatic touch.
  • Salt and Pepper: Season to taste for that perfect balance.
  • 1 cup Optional Vegetables: Zucchini or mushrooms add extra depth and nutrition to your casserole.

Step-by-Step Instructions

Ready to bring this beauty to life? Follow these simple steps:

  • Preheat your oven to 375°F (190°C).
  • Slice the eggplants into rounds, sprinkle with salt, and let them sit for 30 minutes to draw out excess moisture.
  • Rinse and pat dry the eggplant slices, then drizzle with olive oil and roast them for about 20 minutes until tender.
  • In a baking dish, spread a layer of tomato sauce on the bottom.
  • Layer half of the roasted eggplant slices over the sauce, followed by dollops of ricotta, a sprinkle of mozzarella, and a pinch of herbs.
  • Repeat the layering process, finishing with a generous layer of tomato sauce and a sprinkle of Parmesan cheese on top.
  • Bake for 30-35 minutes until the cheese is bubbly and golden.
  • Let it cool for a few minutes before serving. Enjoy the aromatic delight!

Expert Tips for the Perfect Casserole

  • Salt Your Eggplant: Salting the slices helps to remove bitterness and excess water, leading to a better texture.
  • Experiment with Layers: Feel free to add layers of sautéed spinach or roasted bell peppers for added flavor and nutrition.
  • Cheese Choices: Mix different cheeses to create a more complex flavor profile; try adding goat cheese for tanginess.
  • Make it Ahead: Assemble the casserole a day before and refrigerate. Just pop it in the oven when you’re ready to eat!
  • Serve it Right: Let the casserole sit for a bit after baking to allow the flavors to meld beautifully.
  • Garnish with Fresh Herbs: A sprinkle of fresh basil or parsley on top just before serving adds a pop of color and freshness.
  • Consider Vegan Options: Use vegan cheeses and ensure your tomato sauce is plant-based for a delicious vegan version.
  • Pair with Wine: A nice red wine complements the rich flavors of this dish beautifully.

Common Mistakes to Avoid

Even seasoned cooks can make mistakes! Here are some pitfalls to watch out for:

  • Not Salting Eggplant: This can lead to a soggy casserole. Always salt and drain your eggplant slices.
  • Overbaking: Keep an eye on your casserole as it bakes. Overcooking can lead to dry textures.
  • Skipping the Resting Period: Allowing your casserole to rest helps it set and makes serving easier.
  • Ignoring Flavor Balancing: Be sure to taste and adjust seasoning throughout the cooking process.

Variations on a Classic

Ready to mix things up? Here are some exciting variations you can try:

  • Spicy Kick: Add crushed red pepper flakes or chopped jalapeños for a fiery twist.
  • Mediterranean Style: Incorporate olives, sun-dried tomatoes, and feta cheese for a Mediterranean flair.
  • Mexican Style: Layer in some black beans, corn, and taco seasoning for a zesty Mexican take.
  • Quinoa Boost: Mix cooked quinoa into the layers for extra protein and fiber.

Storage and Make-Ahead Instructions

Whether you’re meal prepping or just want to save leftovers, here’s how:

  • Refrigerate: Store in an airtight container for up to 4 days in the fridge.
  • Freeze: This casserole freezes well! Wrap it tightly in foil or plastic wrap for up to 3 months. Thaw in the fridge before reheating.
  • Reheat: Warm in the oven at 350°F (175°C) until heated through, about 20-30 minutes.

Frequently Asked Questions

Got questions? We’ve got answers! Here are some common queries regarding this eggplant casserole:

  • Can I use frozen eggplant? Yes, but make sure to thaw and drain it well before using.
  • How can I make this dish gluten-free? Use gluten-free breadcrumbs or omit them altogether for a moist casserole.
  • What can I serve with this casserole? Pair it with a fresh green salad, garlic bread, or a side of roasted veggies.
  • Can I use different cheeses? Absolutely! Feel free to experiment with your favorite cheese combinations.
  • How spicy is this recipe? It’s mild, but you can add spices to customize the heat level.
  • Is it necessary to peel the eggplant? No, but peeling can reduce bitterness if you’re using older eggplants.
  • Can I add meat to this recipe? Yes! Ground beef or turkey can be layered in for a heartier dish.
  • How do I know when it’s done? The casserole is ready when the cheese is golden and bubbly, and the edges are slightly crisp.

Nutritional Tips and Dietary Adaptations

This casserole is not just delicious but can also fit various dietary needs:

  • Vegetarian Friendly: It’s entirely vegetarian, making it suitable for meat-free diets.
  • Low-Carb Option: Substitute eggplant slices for traditional pasta layers to keep it low-carb.
  • High-Protein Twist: Add chickpeas or lentils for a protein boost.

Recommended Equipment

Here’s what you’ll need to make this dish:

  • 9×13-inch Baking Dish: Ideal for even baking and easy serving.
  • Cutting Board: Essential for slicing your eggplant and veggies.
  • Sharp Knife: A good knife makes prep a breeze.
  • Mixing Bowls: For mixing your cheeses and sauces together.
  • Measuring Cups and Spoons: To ensure perfect ingredient ratios.

Serving Suggestions

Let’s make your meal complete! Here are some ideas:

  • Fresh Salad: A light arugula or mixed greens salad pairs wonderfully.
  • Crusty Bread: Serve with garlic bread or a warm baguette to soak up the sauce.
  • Wine Pairing: A nice Chianti or a crisp Sauvignon Blanc will elevate the experience.

In conclusion, this Eggplant Casserole is not just a meal; it’s an experience bursting with flavors and textures. It’s your chance to explore the wonderful world of cooking, embracing the art of the kick. So roll up your sleeves, grab your skillet, and let’s make some magic happen in the kitchen!

Delicious Eggplant Casserole That Will Wow Your Guests

Prep Time 15 minutes
Cook Time 45 minutes
Total Time 1 hour
Servings 6 servings
Calories 350
This flavorful eggplant casserole combines rich cheeses and savory tomato sauce to create a comforting dish perfect for entertaining.

Ingredients

Vegetables

  • 2 medium Eggplant (Choose globe or Italian varieties.)
  • 24 ounces Tomato Sauce (Opt for low-sodium or homemade.)
  • 15 ounces Ricotta Cheese (Can substitute with vegan ricotta.)
  • 8 ounces Mozzarella Cheese (Consider vegan mozzarella.)
  • 1 cup Parmesan Cheese (Look for vegetarian-friendly or use vegan Parmesan.)
  • 2 tablespoons Olive Oil (Feel free to use your favorite cooking oil.)
  • 2 teaspoons Herbs (Basil, Oregano) (Use fresh or dried.)
  • to taste Salt Salt (For seasoning.)
  • to taste Pepper Pepper (For seasoning.)
  • 1 cup Vegetables (Optional) (Zucchini or mushrooms can be added.)

Instructions 

  • Slice the eggplant and roast or sauté until tender.
  • Mix tomato sauce with herbs and season with salt and pepper.
  • Layer eggplant slices, sauce, ricotta, and mozzarella in a baking dish.
  • Repeat layers and top with Parmesan cheese.
  • Bake at 375°F (190°C) for 45 minutes until bubbly and golden.

Notes

For a vegan version, substitute cheeses with plant-based alternatives.
Calories: 350kcal
Cost: $15
Course: Main Course
Cuisine: Mediterranean
Keyword: Eggplant

Nutrition

Calories: 350kcal | Carbohydrates: 30g | Protein: 20g | Fat: 18g | Sodium: 800mg

Why You’ll Love This Dish

Gather around, food lovers! If you’re on the hunt for a dish that embodies comfort, creativity, and a burst of flavor, look no further than this Easy Vegetarian Lasagna Recipe. This isn’t just another lasagna; it’s a vibrant celebration of fresh ingredients, layered love, and bold spices that will set your taste buds on fire. Imagine rich marinara sauce mingling with creamy ricotta, melted mozzarella, and a rainbow of vegetables — each bite is an invitation to indulge in the warmth of home-cooked comfort food.

What makes this lasagna truly special is its versatility. Whether you’re a seasoned chef or a kitchen novice, this recipe is easy to follow and perfect for meal prep. Plus, it’s a fantastic way to sneak in those veggies without sacrificing flavor. So roll up your sleeves, grab your apron, and let’s dive into the world of flavor!

Key Ingredients

To create this culinary masterpiece, you’ll need a handful of simple yet satisfying ingredients. Here’s what you’ll gather from your pantry and fridge:

  • 9 lasagna noodles
  • 2 cups ricotta cheese
  • 2 cups shredded mozzarella cheese
  • 1 cup grated parmesan cheese
  • 2 cups marinara sauce
  • 1 zucchini, sliced
  • 1 bell pepper, diced
  • 1 cup spinach
  • 1 teaspoon dried oregano
  • 1 teaspoon dried basil
  • Salt and pepper to taste

Making Veggie Lasagna Is Easy

A delicious serving of vegetarian lasagna with layers of cheese and colorful vegetables.

Now that we have our ingredients ready, let’s break down the steps to create this mouthwatering vegetarian lasagna. Trust me, every layer is worth the effort!

Step-by-Step Instructions

1. Preheat the Oven: Start by preheating your oven to 375°F (190°C). This ensures that your lasagna bakes evenly and comes out bubbling with that golden cheese top we all love.

2. Cook the Noodles: Cook the lasagna noodles according to package instructions. Usually, this means boiling them until al dente, as they will continue cooking in the oven. Once done, drain the noodles and set them aside.

3. Prepare the Ricotta Mixture: In a mixing bowl, combine the ricotta cheese with half of the shredded mozzarella, grated Parmesan, dried oregano, dried basil, and a sprinkle of salt and pepper. Mix until everything is well incorporated. This creamy blend is the heart of your lasagna!

4. Layer It Up: Spread a layer of marinara sauce on the bottom of a 9×13 inch baking dish. Place three lasagna noodles over the sauce, then spread half of the ricotta mixture on top. Next, layer half of the sliced zucchini, diced bell pepper, and spinach over the ricotta. Don’t be shy — pack those veggies in!

5. Repeat the Layers: Spread another layer of marinara sauce over the vegetables. Now, repeat the layering process with noodles, ricotta mixture, vegetables, and marinara sauce until all ingredients are used. Finish with a final layer of noodles, the remaining marinara sauce, and top with the remaining mozzarella cheese.

6. Bake: Cover the baking dish with foil to prevent the cheese from browning too quickly and bake for 25 minutes. Then, remove the foil and bake for an additional 15-20 minutes or until the cheese is bubbly and golden. Your kitchen will smell incredible by now!

7. Serve and Enjoy: Once baked, let it cool for a few minutes before slicing into squares. Serve warm, and watch as your friends and family dive into this comforting dish.

Tips for the Perfect Lasagna

  • Don’t Overcook the Noodles: If you’re using traditional lasagna noodles, cook them just until al dente. They will absorb some sauce while baking, which prevents them from becoming mushy.
  • Layering Matters: Make sure to evenly distribute the ingredients for balanced flavor in every slice. A good layering technique makes for a gorgeous presentation!
  • Add Spice: Feeling adventurous? Toss in some crushed red pepper flakes or a dash of cayenne pepper to the ricotta mixture for an extra kick.

Variations to Consider

One of the best parts of cooking is the opportunity to experiment. Here are some variations to inspire your creativity:

  • Different Veggies: Feel free to swap out the zucchini and bell pepper for other vegetables like mushrooms, eggplant, or even roasted butternut squash.
  • Herb Infusion: Fresh herbs can elevate your lasagna. Try adding fresh basil or parsley between the layers for a burst of freshness.
  • Cheese Swap: If you’re not a fan of ricotta, try a creamy goat cheese or even a vegan cream cheese for a dairy-free option.

Substitutions You Can Make

If you’re missing some ingredients, don’t fret! Here are some substitutions:

  • Ricotta Cheese: Cottage cheese can be used as a lower-calorie option. Just blend it a bit for a smoother texture.
  • Marinara Sauce: You can use store-bought sauce or make your own homemade marinara — it’s all about what you have on hand.
  • Vegetable Options: Don’t have spinach? Kale or Swiss chard can easily take its place.

Storage and Freezing

This lasagna is perfect for meal prep, and you can store any leftovers easily:

  • Refrigeration: Store leftover lasagna in an airtight container in the fridge for up to 4 days.
  • Freezing: To freeze, cover the assembled (but unbaked) lasagna tightly with plastic wrap and foil. It can be frozen for up to 3 months. Just thaw overnight in the fridge before baking.

Frequently Asked Questions

Can I use no-boil lasagna noodles?

Absolutely! Just layer them as directed and they will cook perfectly in the oven with the moisture from the marinara sauce.

Can I make this dish vegan?

Yes! Substitute ricotta with a vegan cream cheese, use dairy-free cheese, and ensure your marinara sauce is vegan-friendly.

How do I know when the lasagna is done?

The lasagna is done when the cheese is bubbly and golden brown, and the edges are starting to crisp. A knife inserted in the center should come out hot.

Troubleshooting

If your lasagna comes out too watery, it could be due to excess moisture from the veggies. To avoid this, consider sautéing your vegetables before layering them in the dish to release some moisture first.

Conclusion

This Easy Vegetarian Lasagna Recipe is more than just a meal; it’s a celebration of flavors that brings people together. Whether it’s a family dinner, a potluck, or a cozy night in, this dish is bound to impress. So gather your ingredients, embrace the art of layering love, and let each bite transport you to a world of warmth and satisfaction. Happy cooking, and may your kitchen always be filled with the enticing aroma of good food and laughter!

Easy Vegetarian Lasagna Recipe

Prep Time 20 minutes
Cook Time 40 minutes
Total Time 1 hour
Servings 6 servings
Calories 450
A delicious and easy-to-make vegetarian lasagna perfect for family dinners and gatherings.

Ingredients

Noodles

  • 9 pieces lasagna noodles
  • 2 cups ricotta cheese
  • 2 cups shredded mozzarella cheese
  • 1 cup grated parmesan cheese
  • 2 cups marinara sauce
  • 1 piece zucchini, sliced
  • 1 diced bell pepper
  • 1 cup spinach
  • 1 teaspoon dried oregano
  • 1 teaspoon dried basil
  • to taste salt and pepper salt and pepper

Instructions 

  • Preheat oven to 375°F (190°C). Cook noodles, then layer with ricotta, vegetables, sauce, and cheese in a baking dish. Cover and bake for 25 minutes, then uncover and bake 15-20 minutes until bubbly.

Notes

You can add more vegetables or cheese as desired for extra flavor.
Calories: 450kcal
Cost: $15
Course: Main Course
Cuisine: Italian
Keyword: Vegetarian

Nutrition

Calories: 450kcal | Carbohydrates: 50g | Protein: 25g | Fat: 15g | Sodium: 800mg

Loved this recipe? Save it to your favorite Pinterest board so you can easily find it later! It’s the perfect way to keep all your sweet ideas in one place. ✨

Eye-level view of a mouth-watering vegetarian lasagna on a plate, showcasing rich textures.