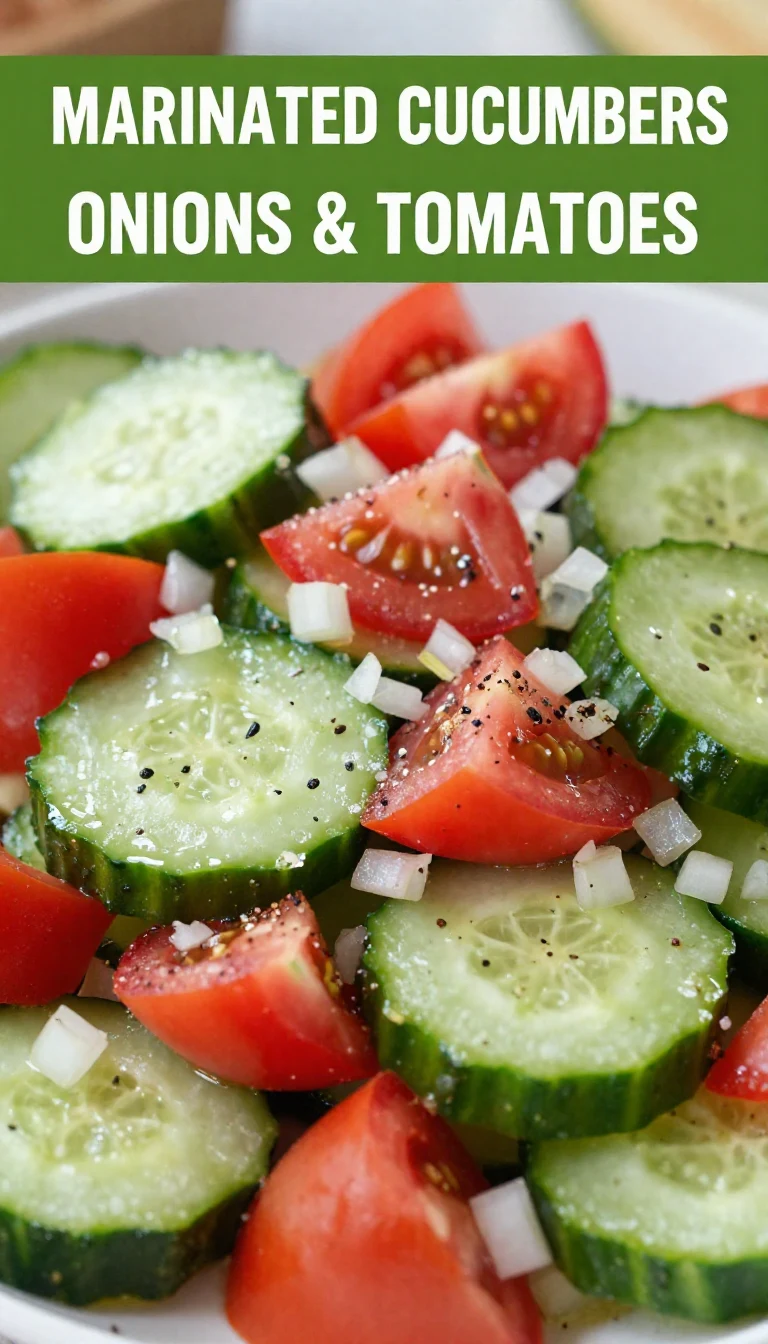
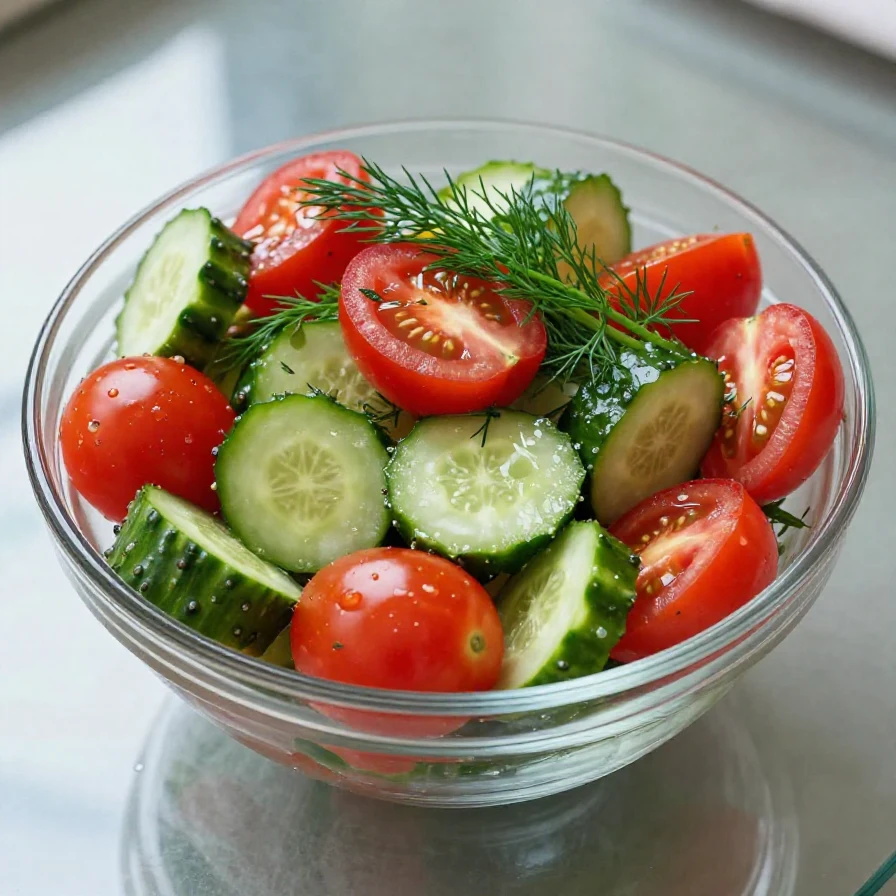
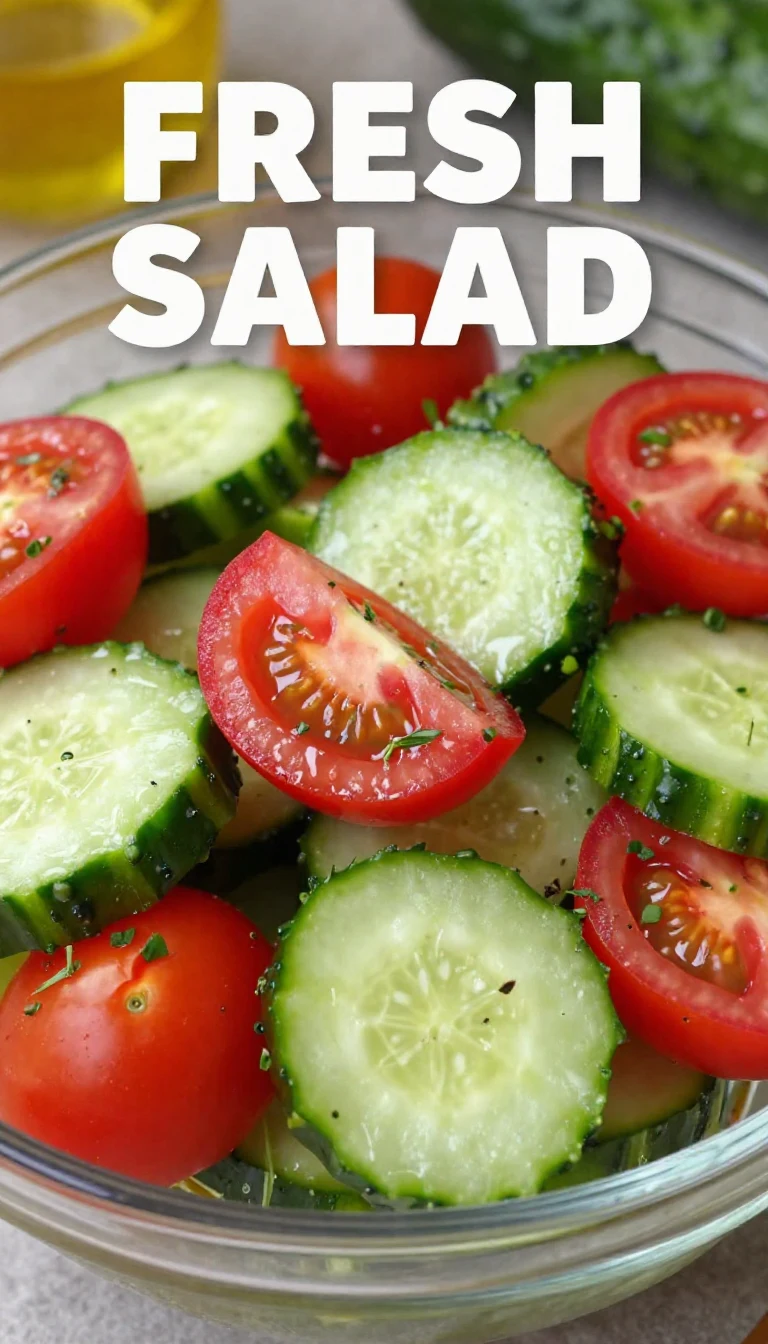
Marinated Cucumbers, Onions and Tomatoes is a vibrant, refreshing dish that combines crisp cucumbers, sweet onions, and juicy tomatoes with a tangy, herb-infused vinaigrette. The apple cider vinegar adds a distinct sharpness, while a hint of sugar balances the acidity, resulting in a perfectly harmonious flavor. Each bite delivers a satisfying crunch, making it the ultimate side dish for those craving something fresh yet full of depth.
The marinade transforms simple vegetables into a flavorful dish. The apple cider vinegar, olive oil, and oregano create a tangy and herbaceous dressing that highlights the freshness of cucumbers, onions, and tomatoes.
It’s quick and easy to make without compromising on flavor. With just a little prep time and a short marination period, this recipe fits right into a busy schedule.
This dish pairs effortlessly with a variety of meals. Its light, zesty nature complements grilled proteins, hearty grains, or even a glass of crisp white wine.
The ingredients are versatile and easy to find. Fresh produce and pantry staples like olive oil and vinegar ensure you can recreate this dish anytime.
Everything You Need for Marinated Cucumbers, Onions and Tomatoes
2 medium cucumbers, thinly sliced
1 medium red onion, thinly sliced
2 medium tomatoes, diced
1/4 cup apple cider vinegar
1/4 cup olive oil
2 tablespoons sugar
1 teaspoon salt
1/2 teaspoon black pepper
1 teaspoon dried oregano
1 tablespoon fresh parsley, chopped
The apple cider vinegar is the heart of the dressing, delivering a tangy punch that binds everything together. Meanwhile, the dried oregano adds a warm, earthy depth, perfectly balancing the acidity of the vinegar and the sweetness of sugar.
How To Make Marinated Cucumbers, Onions and Tomatoes Step by Step
In a large mixing bowl, combine the sliced cucumbers, red onion, and diced tomatoes. Toss gently to evenly distribute the vegetables.
In a separate small bowl, whisk together the apple cider vinegar, olive oil, sugar, salt, black pepper, and dried oregano until fully emulsified.
Pour the prepared vinaigrette over the vegetable mixture, ensuring every piece is coated evenly.
Cover the bowl with plastic wrap and refrigerate for at least 1 hour to allow the flavors to meld.
Before serving, sprinkle the salad with fresh parsley and give it a light toss to refresh the dressing.
Common Questions About This Recipe
Can I make this salad ahead of time? Yes! In fact, it’s best to let it marinate for at least an hour. Making it a day in advance enhances the flavors even more.
How should I store leftovers? Keep the salad in an airtight container in the refrigerator for up to 3 days. Stir it before serving to redistribute the marinade.
Can I use a different type of onion? Absolutely. Sweet onions or white onions also work well, though red onion provides a slightly sharper flavor and vibrant color.
Easy Ingredient Swaps and Substitutions
If you don’t have apple cider vinegar, substitute with white wine vinegar or rice vinegar. Both provide a gentle acidity that complements the vegetables.
Swap dried oregano for fresh oregano for a bolder, herbaceous note. Use about 1 tablespoon of fresh oregano leaves in place of the teaspoon of dried.
Out of tomatoes? Try halved cherry tomatoes for a sweeter bite and a fun presentation.
Avoid These Common Mistakes
Skipping the chilling step: The marination time is crucial for blending the flavors. Don’t rush this step or the salad may taste underwhelming.
Overdressing the salad: While the vinaigrette is delicious, too much can overpower the fresh vegetables. Stick to the measurements in the recipe for balance.
Using overripe vegetables: Crisp cucumbers and firm tomatoes are key to maintaining the salad’s texture. Avoid produce that is too soft or mushy.
Expert Tips for Perfect Results
Use a mandoline for slicing: Uniform slices not only look beautiful but also ensure even absorption of the marinade.
Marinate in glass or stainless steel bowls: These materials don’t react with the vinegar, preserving the freshness of the dressing.
Double the batch: This salad stores well and makes an excellent meal prep option for busy weeks.
Add extra herbs: A sprinkle of dill or basil can elevate the flavors, especially if serving with Mediterranean-inspired main courses.
Grandma B’s Cucumber Salad brings together crisp cucumbers, tender red onions, and a creamy, tangy dressing for a side dish that feels both refreshing and satisfying. The delicate bite of white vinegar balances the richness of sour cream and mayonnaise, making this salad perfect for summer gatherings or quiet dinners at home. Each bite offers a symphony of textures: crunch, creaminess, and a touch of sweetness.
Quick and simple to prepare — This recipe comes together in just 10 minutes, making it ideal for busy weeknights or last-minute gatherings.
Perfectly balanced flavor — The creamy dressing with a tangy vinegar kick complements the crunch of fresh cucumbers and the mild bite of red onion.
Versatile side dish — This salad pairs seamlessly with grilled meats, sandwiches, or even as a light salad on its own.
Customizable seasoning — Adjust the salt, pepper, or dill to fit your palate, creating a dish that truly feels like your own.
Everything You Need for Grandma B’s Cucumber Salad
3 medium cucumbers, thinly sliced
1 small red onion, thinly sliced
1/2 cup sour cream
1/4 cup mayonnaise
2 tablespoons white vinegar
1 tablespoon sugar
1 teaspoon dill weed
Salt and pepper to taste
The combination of sour cream and white vinegar creates a tangy base that perfectly enhances the natural sweetness of cucumbers. Dill weed adds a whisper of herby freshness that ties the dressing together beautifully.
How To Make Grandma B’s Cucumber Salad Step by Step
In a large bowl, combine the sliced cucumbers and red onion. Ensure they are evenly mixed for a consistent flavor in every bite.
In a separate bowl, whisk together the sour cream, mayonnaise, white vinegar, sugar, dill weed, salt, and pepper until smooth and well blended.
Pour the prepared dressing over the cucumber and onion mixture. Toss gently to coat all the vegetables evenly.
Cover the bowl with plastic wrap and refrigerate for at least 30 minutes to allow the flavors to meld together.
Before serving, give the salad a quick toss and adjust the seasoning if necessary. Serve chilled for the best taste and texture.
Storing and Prepping Your Salad
To store Grandma B’s cucumber salad, place it in an airtight container and refrigerate it for up to 2 days. While the flavors improve with time, the cucumbers may release some water — simply toss the salad again to redistribute the dressing.
This dish is not ideal for freezing due to the high water content of cucumbers and the cream-based dressing. To make it ahead, prepare the dressing separately and mix it with the vegetables just before serving.
A Brief History of This Dish
Variations of cucumber salad have been a staple in kitchens worldwide, thanks to their simplicity and refreshing ingredients. This creamy version with dill and vinegar hails from northern Europe, where such flavors are cherished for their balance and harmony.
Grandma B’s cucumber salad likely evolved from these traditions, blending classic techniques with a modern creamy twist to suit contemporary palates. The result is a timeless recipe that feels as fresh today as it must have decades ago.
Easy Ingredient Swaps and Substitutions
If you’re short on sour cream, Greek yogurt works as an excellent substitute, offering the same tang with a slight protein boost. For a lighter dressing, you can replace half the mayonnaise with plain yogurt, which retains creaminess while cutting down on fat.
Fresh dill can be swapped for 1/2 teaspoon dried dill if that’s what you have on hand. Additionally, apple cider vinegar can step in for white vinegar for a slightly sweeter, fruitier flavor profile.
Serving Ideas and Perfect Pairings
Grandma B’s cucumber salad complements grilled chicken or fish beautifully, as the creamy dressing offsets smoky flavors. Pair it with our lemon basil pasta salad for a vibrant, herbaceous side dish collection.
This salad also works well alongside sandwiches or wraps, cutting through the richness with its tangy freshness. For a simple summer meal, serve it with crusty bread and a light soup for a satisfying, balanced plate.
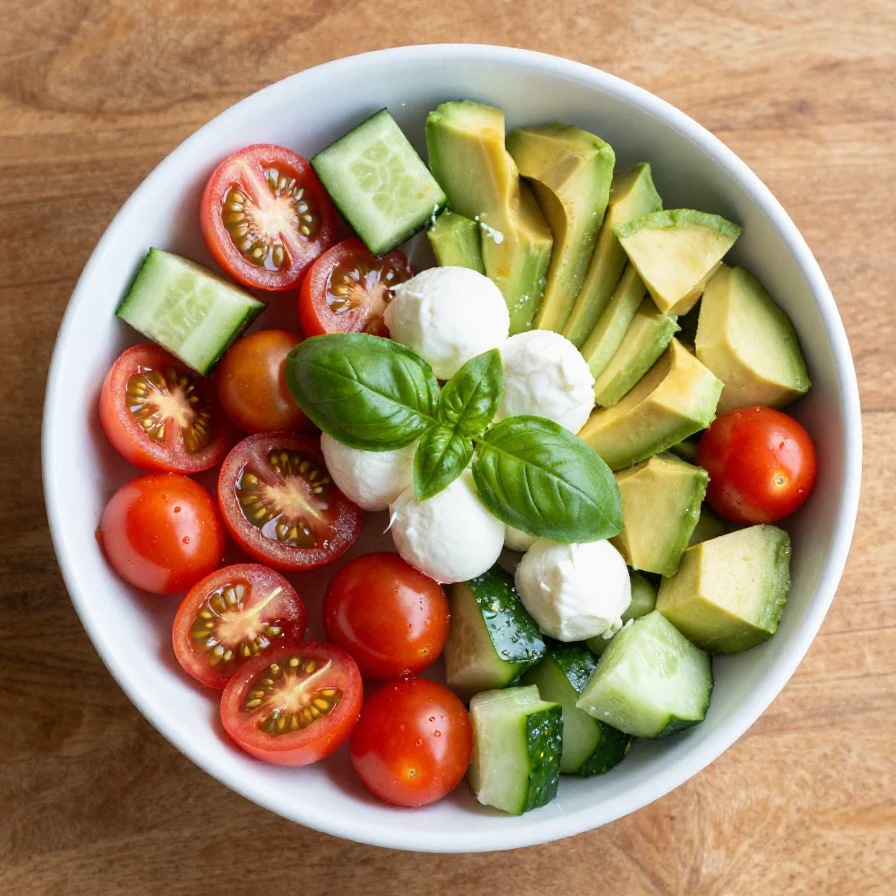
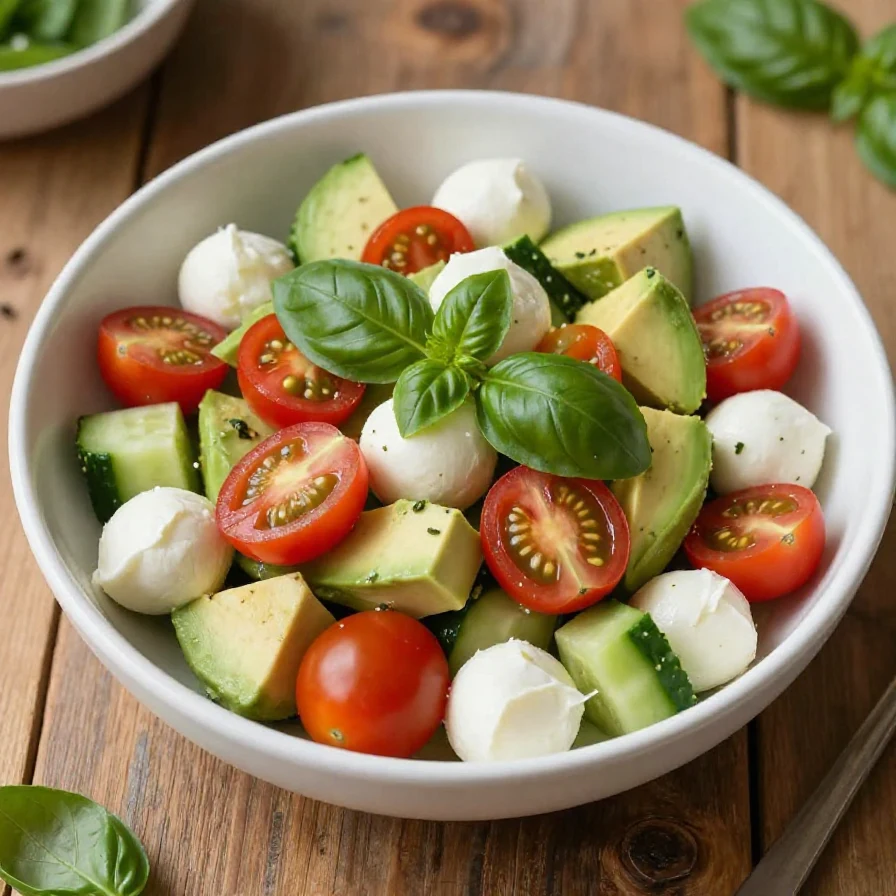
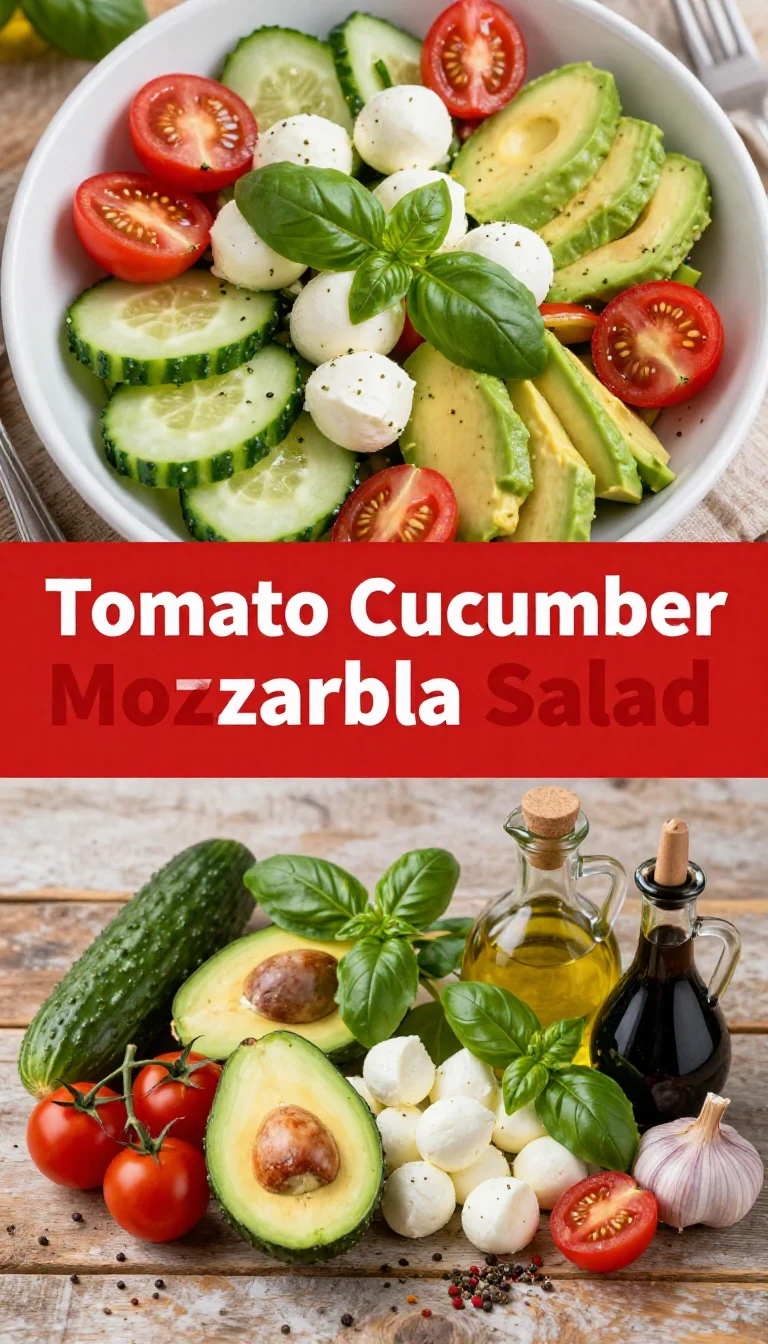
This Tomato Cucumber Mozzarella Salad is a celebration of fresh, summery ingredients combined into one irresistible dish. The juicy burst of cherry tomatoes, the satisfying crunch of cucumber, and the creamy indulgence of fresh mozzarella come together in every bite. A drizzle of olive oil and balsamic vinegar ties it all together, making this salad vibrant and balanced without being fussy.
Perfect for a quick side dish or a light, energizing meal, this salad is as simple as it is satisfying. It’s fresh, flavorful, and ready in just 10 minutes, making it ideal even for the busiest of days. Whether you’re heading to a picnic or just need a no-fuss recipe, this salad will find a place at your table.
Quick and effortless to make: With just 10 minutes of prep time, this Tomato Cucumber Mozzarella Salad fits easily into your busiest days. No cooking required—just fresh ingredients and simple steps.
Nutritionally balanced: Packed with hydrating vegetables and healthy fats from olive oil, it’s a guilt-free choice that nourishes you from the inside out. The fresh mozzarella adds protein to keep you satisfied.
Perfect for any occasion: Whether served as a side dish or a light meal, this salad adapts to your needs. Its vibrant flavors make it just as at home at a barbecue as it is on your weeknight dinner table.
Customizable to your taste: Swap in seasonal veggies or experiment with different dressings to make it your own. For example, try it with a lemon vinaigrette or a yogurt dressing for a twist.
Everything You Need for Tomato Cucumber Mozzarella Salad
2 cups cherry tomatoes, halved
1 large cucumber, diced
8 ounces fresh mozzarella balls, drained
1/4 cup fresh basil leaves, torn
3 tablespoons olive oil
2 tablespoons balsamic vinegar
Salt and pepper to taste
The fresh mozzarella balls bring a creamy richness to balance out the crispness of the cucumber and the sweetness of the tomatoes. Fresh basil adds a fragrant, herbaceous note that perfectly complements the salad’s light dressing.
How To Make Tomato Cucumber Mozzarella Salad Step by Step
In a large bowl, combine the halved cherry tomatoes and diced cucumber. Make sure to dice the cucumber evenly for consistent bites.
Add the fresh mozzarella balls and torn basil leaves to the bowl. The basil’s aroma will start to transform the dish at this stage.
In a small bowl, whisk together the olive oil, balsamic vinegar, salt, and pepper. Whisk until the dressing is completely emulsified for the best flavor.
Pour the dressing over the salad and gently toss to combine all the ingredients. Be careful not to break apart the mozzarella balls while tossing.
Serve immediately or refrigerate for 30 minutes to allow the flavors to meld. This resting time enhances the taste if you can spare it.
Common Questions About This Salad
Can I make this salad ahead of time? Yes, you can prepare the vegetables and dressing ahead of time, but combine them only right before serving to ensure freshness.
What can I substitute for fresh mozzarella? Try bocconcini or even cubed feta for a slightly saltier, tangier twist.
Can I use a different type of vinegar? While balsamic vinegar provides a rich, sweet acidity, red wine vinegar or apple cider vinegar are good options for a less sweet alternative.
Expert Tips for the Best Salad Every Time
Use the freshest ingredients: Ripe cherry tomatoes and crisp cucumbers make all the difference in both flavor and texture.
Let the flavors meld: If you have time, let the salad rest in the refrigerator for 30 minutes after tossing. This step allows the dressing to soak into the ingredients for a more harmonious taste.
Season appropriately: Adding salt and pepper to taste is crucial—taste as you go to ensure the perfect balance.
Serve chilled: This salad is most refreshing when served cold, making it especially delightful on hot days.
Meal Prep and Storage Tips
If you want to make this Tomato Cucumber Mozzarella Salad ahead, store the vegetables, mozzarella, and dressing separately. Mix them together just before serving to maintain their texture and flavor.
Leftovers can be stored in an airtight container in the refrigerator for up to two days, but the cucumber may lose some of its crunch over time. Avoid freezing this salad as the vegetables and mozzarella don’t freeze well and will lose their quality when thawed.
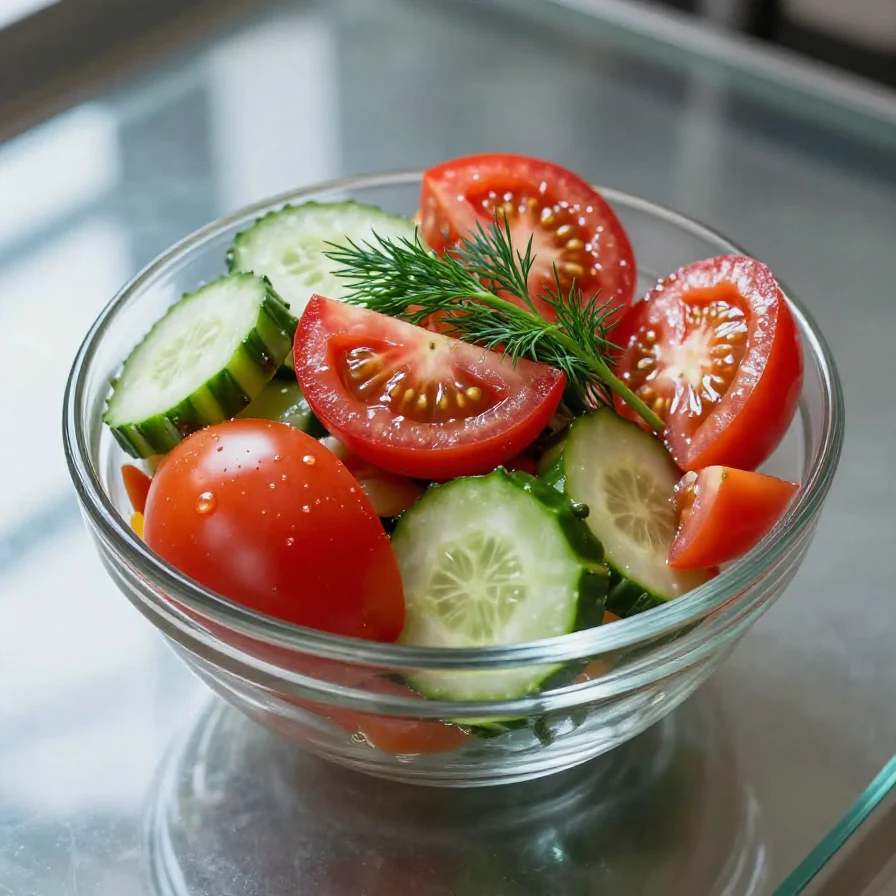
This Easy Tomato Salad Recipe combines the juicy sweetness of ripe tomatoes with the crisp bite of cucumber, tied together by a tangy balsamic olive oil dressing. The fresh basil adds an herby aroma that complements every bite. Perfect for a quick and healthy addition to your table, this salad is as vibrant in flavor as it is simple to prepare.
This recipe requires only 10 minutes, making it perfect for quick lunches or when you need a hassle-free side dish. No cooking is required, so it’s easy to throw together.
The combination of juicy tomatoes and crisp cucumber offers a refreshing contrast that hits the right balance of textures. Each bite brings vibrancy and crunch for an energizing meal.
Its simple olive oil and balsamic vinegar dressing enhances the natural flavors of the vegetables without overpowering them. You’ll enjoy a clean, balanced taste that highlights the ingredients.
With fresh basil adding an aromatic layer, this salad feels gourmet without requiring advanced skills or hard-to-find ingredients. It’s an effortless way to bring sophistication to your table.
Everything You Need for Easy Tomato Salad Recipe
4 ripe tomatoes, chopped
1/2 red onion, thinly sliced
1 cucumber, diced
1/4 cup fresh basil leaves, chopped
2 tablespoons olive oil
1 tablespoon balsamic vinegar
Salt and pepper to taste
Ripe tomatoes are the star ingredient, providing sweetness and juiciness that define the salad. Fresh basil elevates the dish with its bright, herbaceous flavor, making it irresistibly fragrant.
How To Make Easy Tomato Salad Recipe Step by Step
In a large mixing bowl, combine the chopped tomatoes, sliced red onion, and diced cucumber.
Add the chopped basil leaves to the bowl for an infusion of fresh, aromatic flavor.
In a small bowl, whisk together the olive oil and balsamic vinegar until well combined.
Pour the dressing over the salad and toss gently to coat evenly.
Season with salt and pepper to taste, adjusting based on your preference.
Serve immediately or let the salad sit for 10 minutes to allow the flavors to meld together beautifully.
Meal Prep and Storage Tips
This easy tomato salad recipe is best enjoyed fresh, but it can be stored in an airtight container in the refrigerator for up to two days. To keep the salad crisp, store the dressing separately and add it just before serving. If the salad has already been dressed, expect the vegetables to soften slightly as they marinate, which can deepen the flavors.
To refresh leftovers, add a touch more olive oil and basil before serving. Avoid freezing, as the fresh vegetables will lose their texture when thawed.
Common Questions About This Salad
Can I make this salad ahead of time? Yes, you can chop the vegetables and prepare the dressing up to a day in advance. Store them separately and combine just before serving to maintain freshness.
What can I pair this salad with? It works wonderfully alongside grilled proteins, crusty bread, or as part of a larger spread featuring fresh and vibrant dishes like our lemon basil pasta salad.
How do I keep the onions from overpowering the salad? If you prefer a milder onion flavor, soak the sliced red onion in cold water for 10 minutes before adding it to the salad.
Easy Ingredient Swaps
Swap out fresh basil for parsley or dill to give the salad a different herbal note. Dill adds a tangy, slightly sweet flavor perfect for fans of cucumber tomato dill salad.
If you don’t have balsamic vinegar, apple cider vinegar or red wine vinegar can be used for a subtler tang. Each will offer a slightly different acidity level but still complement the salad beautifully.
For a heartier option, add crumbled feta cheese or diced avocado. Both will contribute richness while maintaining the salad’s refreshing qualities.
Common Mistakes to Avoid
Using unripe tomatoes: Under-ripe tomatoes can taste bland and hard. Always choose juicy, ripe tomatoes for the best flavor and texture.
Overdressing the salad: Adding too much dressing can overwhelm the freshness of the vegetables. Start with the recommended amount and adjust gradually.
Skipping the seasoning: Salt and pepper are crucial to enhancing the natural flavors of the ingredients. Taste and season as you go to ensure a balanced finish.
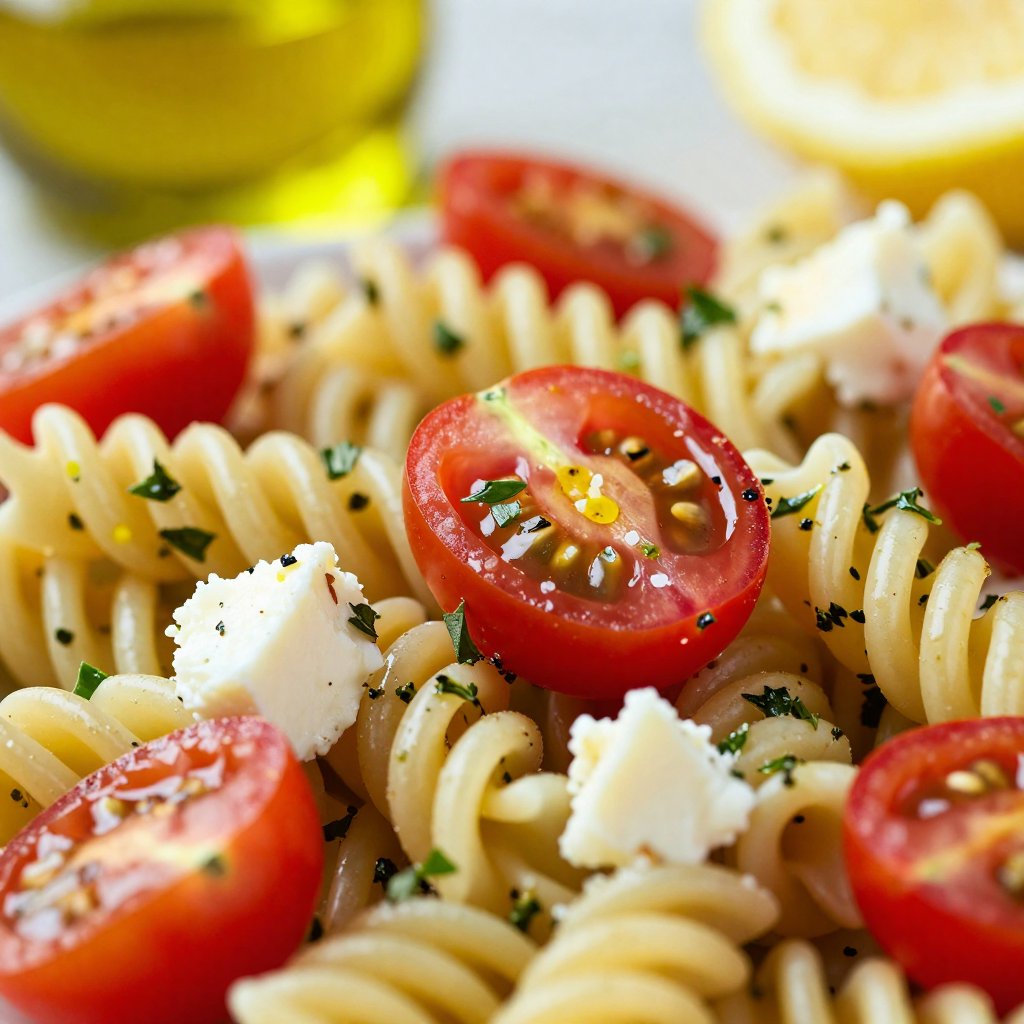
Hello, friends! Avery here, from my little kitchen in Portland. Today, I’m so excited to share one of my go-to recipes: Lemon Herb Mediterranean Pasta Salad. This isn’t just a recipe; it’s a little slice of sunshine on a plate, perfect for those days when you need something light, flavorful, and utterly satisfying. It’s the kind of dish that makes you feel good from the inside out, and that’s what healthy eating is all about, right?
My journey into healthy cooking started out of necessity. Years ago, I was burnt out and my body was begging for a change. This pasta salad, in many ways, embodies that change. It’s a reminder that nourishing your body can be a joyful, delicious experience, not a chore. It’s incredibly easy to make, and the flavors sing of the Mediterranean, transporting you to a sun-drenched coast with every bite.
Why You’ll Love This Mediterranean Pasta Salad
This isn’t just another pasta salad recipe; it’s a celebration of fresh, vibrant ingredients. Here’s why I think you’ll absolutely adore it:
Fresh Flavors: The combination of lemon, herbs, and salty feta is simply divine. It’s like a party in your mouth!
Easy to Make: Seriously, this recipe is a breeze. Perfect for busy weeknights or last-minute gatherings.
Versatile: You can easily customize this salad with your favorite veggies or protein. More on that later!
Healthy and Satisfying: Packed with whole grains, fresh vegetables, and healthy fats, this salad is a complete meal in itself.
Perfect for Meal Prep: It tastes even better after a day or two in the fridge, making it ideal for meal prepping.
Ingredients for Lemon Herb Mediterranean Pasta Salad
Here’s what you’ll need to create this masterpiece. I always encourage using the freshest ingredients you can find. The better the ingredients, the better the final dish!
For the Pasta Salad:
12 ounces pasta (rotini, penne, or farfalle): I prefer rotini because its twists and turns catch all the delicious dressing, but feel free to use your favorite shape.
1 cup cherry tomatoes, halved: Look for ripe, juicy tomatoes for the best flavor.
1/2 cup cucumber, diced: Adds a refreshing crunch. English cucumbers are great because they have fewer seeds.
1/3 cup red onion, finely sliced: Adds a bit of a bite. If you find red onion too strong, soak it in cold water for 10 minutes to mellow the flavor.
1/2 cup kalamata olives, sliced: The briny, salty flavor of kalamata olives is essential for that authentic Mediterranean taste.
1/2 cup crumbled feta cheese: Adds a creamy, tangy element. I love using a good quality feta that’s brined in whey.
1/4 cup fresh parsley, chopped: Fresh parsley brightens up the whole salad.
1/4 cup fresh basil, chopped (optional): If you have basil on hand, it adds a wonderful aromatic sweetness.
For the Lemon Herb Dressing:
1/4 cup olive oil: Use a good quality extra virgin olive oil for the best flavor.
2 tablespoons freshly squeezed lemon juice: Freshly squeezed is key! It makes all the difference.
1 teaspoon lemon zest: Adds a bright, zesty aroma.
1 clove garlic, minced: Adds a subtle garlicky kick.
1 teaspoon dried oregano: A classic Mediterranean herb.
1/2 teaspoon dried dill: Adds a delicate, slightly sweet flavor.
Salt and pepper, to taste: Seasoning is crucial! Don’t be afraid to taste and adjust as needed.
How to Make Lemon Herb Mediterranean Pasta Salad: Step-by-Step
Alright, let’s get cooking! Here’s how to bring this delicious salad to life:
Cook the Pasta: Bring a large pot of salted water to a boil. Add the pasta and cook according to the package instructions until al dente. Al dente means “to the tooth” – the pasta should be firm but not mushy.
Cool the Pasta: Drain the pasta and rinse under cold water to stop the cooking process. Set aside to cool completely. This is important, as warm pasta will wilt the fresh vegetables.
Make the Dressing: In a small mixing bowl or jar, whisk together the olive oil, lemon juice, lemon zest, garlic, oregano, and dill.
Season the Dressing: Season with salt and pepper to taste. Adjust lemon juice or olive oil for your preferred balance of acidity and richness. I like mine a little on the tangy side!
Combine the Ingredients: In a large bowl, combine the cooked pasta, cherry tomatoes, cucumber, red onion, kalamata olives, feta cheese, parsley, and basil (if using).
Dress the Salad: Pour the lemon herb dressing over the salad and toss until evenly coated.
Chill: Cover the pasta salad and refrigerate for at least 30 minutes to allow the flavors to meld together. This step is crucial for the best flavor.
Serve: Before serving, give it a quick toss and adjust seasoning if needed. Serve chilled or at room temperature.
And that’s it! You’ve just created a vibrant, delicious Lemon Herb Mediterranean Pasta Salad. Pat yourself on the back!
Pro Tips for the Best Pasta Salad
Here are a few tips and tricks I’ve learned over the years to make this pasta salad even better:
Don’t Overcook the Pasta: Al dente pasta holds its shape better and has a more pleasant texture.
Cool the Pasta Completely: This prevents the vegetables from wilting and keeps the salad fresh.
Use Fresh Herbs: Fresh herbs add a vibrant flavor that dried herbs simply can’t match.
Taste and Adjust: Don’t be afraid to taste the salad and adjust the seasoning to your liking. Add more lemon juice for tanginess, olive oil for richness, or salt and pepper for flavor.
Let it Marinate: Allowing the salad to sit in the fridge for at least 30 minutes allows the flavors to meld together and intensifies the taste.
Common Mistakes to Avoid
We all make mistakes in the kitchen, but here are a few common ones to watch out for when making pasta salad:
Overcooking the Pasta: Mushy pasta is a big no-no!
Not Cooling the Pasta: Warm pasta will wilt the vegetables and make the salad soggy.
Using Too Much Dressing: Overdressing can make the salad heavy and greasy. Start with a little and add more as needed.
Not Seasoning Properly: Salt and pepper are essential for bringing out the flavors of the ingredients.
Serving Immediately: Allowing the salad to marinate in the fridge is crucial for the flavors to meld together.
Variations and Add-Ins
One of the best things about this recipe is how versatile it is. Here are a few variations and add-ins to try:
Add Protein: Grilled chicken, shrimp, or chickpeas would be delicious additions.
Add More Veggies: Bell peppers, zucchini, or artichoke hearts would be great additions.
Use Different Cheese: Try using mozzarella balls or goat cheese instead of feta.
Add a Kick: A pinch of red pepper flakes or a drizzle of hot sauce would add a nice bit of heat.
Make it Gluten-Free: Use gluten-free pasta to make this salad gluten-free.
How to Store Leftover Pasta Salad
Leftover pasta salad can be stored in an airtight container in the refrigerator for up to 3-4 days. The flavors will actually intensify over time!
Frequently Asked Questions (FAQ)
Here are some common questions about making pasta salad:
Can I make this ahead of time? Absolutely! In fact, it tastes even better after a day or two in the fridge.
Can I freeze pasta salad? I don’t recommend freezing pasta salad, as the texture of the pasta and vegetables can change.
How long does pasta salad last? Pasta salad will last for up to 3-4 days in the refrigerator.
Can I use dried herbs instead of fresh? While fresh herbs are preferred, you can use dried herbs in a pinch. Use about 1 teaspoon of dried herbs for every tablespoon of fresh herbs.
Serving Suggestions
This Lemon Herb Mediterranean Pasta Salad is delicious on its own as a light lunch or dinner. It’s also a great side dish for:
Grilled chicken or fish
Sandwiches or wraps
BBQs and picnics
It’s truly a versatile and crowd-pleasing dish! I often serve this with a simple grilled chicken, and it’s the perfect light satisfying meal for a warm evening. The Mediterranean flavors really shine, and it’s easy to see why Mediterranean pasta recipes are so popular.
I hope you enjoy this recipe as much as I do! Remember, cooking should be fun and relaxing. Don’t be afraid to experiment and make it your own. Until next time, happy cooking!
P.S. If you’re looking for another refreshing salad recipe, you might also enjoy my potato-cucumber-salad!
A refreshing and flavorful pasta salad perfect for summer gatherings. This dish combines classic Mediterranean ingredients with a zesty lemon herb dressing.
Ingredients
For the Pasta Salad:
12ouncespasta(rotini, penne, or farfalle)
1cupcherry tomatoes(halved)
1/2cupcucumber(diced)
1/3cupred onion(finely sliced)
1/2cupkalamata olives(sliced)
1/2cupfeta cheese(crumbled)
1/4cupfresh parsley(chopped)
1/4cupfresh basil(chopped (optional))
For the Lemon Herb Dressing:
1/4cupolive oil
2tablespoonsfreshly squeezed lemon juice
1teaspoonlemon zest
1clovegarlic(minced)
1teaspoondried oregano
1/2teaspoondried dill
totasteSalt and pepper
Instructions
Cook pasta according to package directions.
Drain and rinse pasta with cold water; set aside.
Whisk together olive oil, lemon juice, lemon zest, garlic, oregano, and dill.
Season with salt and pepper; adjust lemon juice/oil to taste.
Combine pasta, tomatoes, cucumber, red onion, olives, feta, parsley, and basil (if using).
Pour dressing over salad and toss.
Refrigerate for at least 30 minutes.
Toss and adjust seasoning before serving chilled or at room temperature.
Notes
For a vegetarian option, ensure the feta cheese is vegetarian-friendly.
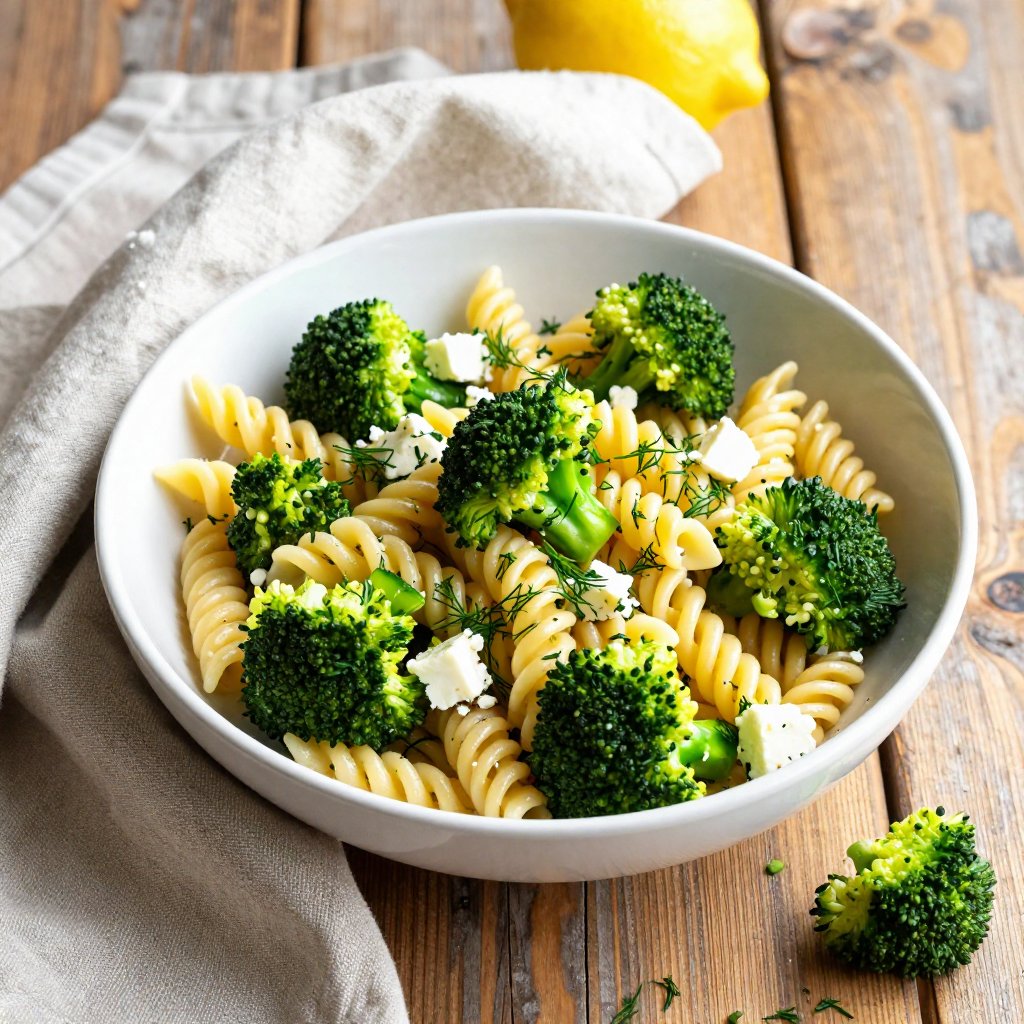
Hello, friend! Avery Collins here, from my cozy Portland kitchen. Today, I’m so excited to share one of my absolute go-to recipes: Lemon Broccoli Pasta Salad. This isn’t just any salad; it’s a vibrant, flavorful dish that’s both incredibly satisfying and genuinely good for you. Think bright lemon, tender broccoli, creamy feta, and perfectly cooked pasta – all singing in harmony. It’s the kind of recipe that makes you feel good from the inside out, and I can’t wait for you to experience the joy of it.
My journey into healthy cooking started out of necessity. I was stressed, overworked, and my body was not happy. Discovering recipes like this one helped me reconnect with food in a way I never thought possible. This salad, in particular, is a testament to the fact that healthy eating can be delicious, easy, and fun. So, let’s dive in!
Why You’ll Love This Lemon Broccoli Pasta Salad
This Lemon Broccoli Pasta Salad isn’t just delicious; it’s a celebration of fresh, simple ingredients. Here’s why I think you’ll absolutely adore it:
Flavor Explosion: The combination of zesty lemon, slightly bitter broccoli, and salty feta is simply divine. The fresh dill adds a lovely herbaceous note that ties everything together.
Easy to Make: This recipe is incredibly straightforward and requires minimal cooking skills. Perfect for a quick lunch, a potluck contribution, or a light dinner.
Healthy and Nutritious: Packed with vitamins, minerals, and fiber, this salad is a nutritional powerhouse. Broccoli, in particular, is a fantastic source of antioxidants.
Versatile: You can easily customize this salad to your liking. Add different vegetables, protein sources, or cheeses – the possibilities are endless!
Meal Prep Friendly: This salad holds up well in the fridge, making it perfect for meal prepping. It actually tastes even better the next day as the flavors meld together.
Gluten-Free Option: Using gluten-free pasta makes this a friendly dish for those with dietary restrictions.
It’s the perfect balance of flavors and textures, making it a satisfying and guilt-free meal. It’s a staple in my kitchen, and I have a feeling it will become one in yours too!
Ingredients You’ll Need
Here’s what you’ll need to create this vibrant salad. Remember, the quality of your ingredients makes a big difference, so try to use the freshest produce you can find.
2 cups Gluten-free pasta: I prefer a short pasta shape like rotini or penne for this salad.
2 cups Broccoli florets (Blanched): Fresh broccoli is a must! Blanching it briefly helps retain its vibrant green color and crisp-tender texture.
1 cup Feta cheese (Crumble for creaminess): Adds a salty, tangy creaminess that perfectly complements the other flavors.
1 tablespoon Lemon juice (Freshly squeezed): Freshly squeezed lemon juice is key for that bright, zesty flavor.
3 tablespoons Olive oil: Use a good quality extra virgin olive oil for the best flavor.
2 tablespoons Fresh dill (Chopped): Adds a fresh, herbaceous note that enhances the overall flavor profile.
to taste Salt: Balances the flavors and enhances the taste of the other ingredients.
to taste Pepper: Adds a touch of spice and depth to the salad.
How to Make Lemon Broccoli Pasta Salad: Step-by-Step
Now, let’s get to the fun part – making the salad! This recipe is so simple that even a beginner cook can nail it. Here’s a step-by-step guide to help you along the way:
Cook the Pasta: Start by cooking your gluten-free pasta according to the package directions. Make sure to cook it al dente (slightly firm to the bite) to prevent it from becoming mushy in the salad. Once cooked, drain the pasta and rinse it with cold water to stop the cooking process. This helps to keep it from sticking together.
Blanch the Broccoli: While the pasta is cooking, prepare the broccoli. Bring a pot of water to a boil. Add the broccoli florets and cook for about 2-3 minutes, until they turn bright green and are slightly tender. Immediately transfer the broccoli to an ice bath (a bowl filled with ice water) to stop the cooking process. This will ensure that the broccoli retains its vibrant color and crisp texture. Drain the broccoli well.
Prepare the Dressing: In a small bowl, whisk together the fresh lemon juice, olive oil, salt, and pepper. Taste and adjust the seasoning as needed. You might want to add a pinch of red pepper flakes for a little kick.
Assemble the Salad: In a large bowl, combine the cooked pasta, blanched broccoli, and crumbled feta cheese. Pour the lemon dressing over the salad and toss gently to coat everything evenly.
Add Fresh Dill: Sprinkle the chopped fresh dill over the salad and toss again. The dill adds a wonderful aroma and flavor that complements the other ingredients beautifully.
Chill and Serve: For the best flavor, cover the salad and refrigerate it for at least 30 minutes before serving. This allows the flavors to meld together. You can also serve it immediately if you’re short on time.
That’s it! Your Lemon Broccoli Pasta Salad is ready to enjoy. It’s the perfect dish for a light lunch, a side at a barbecue, or a healthy dinner. I hope you love it as much as I do!
Pro Tips for the Perfect Salad
Here are a few extra tips to help you make the best Lemon Broccoli Pasta Salad ever:
Don’t Overcook the Pasta: Al dente pasta is key for a good salad. Overcooked pasta will become mushy and unappetizing.
Blanch the Broccoli Properly: Blanching the broccoli briefly is essential for retaining its color and texture. Don’t skip the ice bath!
Use Fresh Lemon Juice: Bottled lemon juice just doesn’t compare to the flavor of fresh lemon juice. It makes a big difference.
Taste and Adjust Seasoning: Don’t be afraid to taste the dressing and adjust the seasoning to your liking. You might want to add more lemon juice, salt, or pepper.
Let it Chill: Chilling the salad for at least 30 minutes allows the flavors to meld together and enhances the overall taste.
Add a Little Zest: For an extra burst of lemon flavor, add a teaspoon of lemon zest to the dressing.
These little tips can take your salad from good to amazing!
Common Mistakes to Avoid
Even though this recipe is simple, here are a few common mistakes to watch out for:
Overcooking the Broccoli: Overcooked broccoli will become mushy and lose its vibrant color. Make sure to blanch it briefly and transfer it to an ice bath immediately.
Using Too Much Dressing: Too much dressing can make the salad soggy. Start with a small amount and add more as needed.
Not Seasoning Properly: Seasoning is key for bringing out the flavors of the other ingredients. Don’t be afraid to add salt and pepper to taste.
Skipping the Chilling Time: Chilling the salad allows the flavors to meld together and enhances the overall taste. Don’t skip this step if you can help it.
Avoiding these mistakes will ensure that your Lemon Broccoli Pasta Salad turns out perfectly every time.
Variations to Try
One of the best things about this salad is how versatile it is. Here are a few variations to try:
Add Protein: Grilled chicken, shrimp, or chickpeas would be delicious additions to this salad.
Add Vegetables: Cherry tomatoes, bell peppers, cucumbers, or red onions would add extra flavor and texture.
Use Different Cheese: If you’re not a fan of feta, try using goat cheese, Parmesan cheese, or mozzarella.
Add Nuts and Seeds: Toasted almonds, pine nuts, or sunflower seeds would add a nice crunch.
Spice it Up: Add a pinch of red pepper flakes to the dressing for a little kick.
Herb Variations: Experiment with different herbs like basil, parsley, or mint.
Feel free to get creative and customize this salad to your liking! It’s all about finding what you enjoy.
How to Store Leftovers
This Lemon Broccoli Pasta Salad stores well in the refrigerator. Here’s how to store it properly:
Airtight Container: Store the salad in an airtight container to prevent it from drying out.
Refrigerate Promptly: Refrigerate the salad as soon as possible after making it.
How Long It Lasts: The salad will last for up to 3-4 days in the refrigerator.
Taste Test: Before serving leftovers, give the salad a taste to make sure it’s still fresh.
The flavors actually meld together even more as it sits in the fridge, so it’s often even better the next day!
Frequently Asked Questions (FAQ)
Here are some common questions about this Lemon Broccoli Pasta Salad:
Can I make this salad ahead of time?: Yes, this salad is perfect for making ahead of time. It actually tastes better the next day as the flavors meld together.
Can I use frozen broccoli?: While fresh broccoli is preferred, you can use frozen broccoli in a pinch. Just make sure to thaw it completely and drain it well before using it.
Can I use regular pasta?: Yes, you can use regular pasta if you’re not gluten-free.
Can I add other vegetables?: Absolutely! Feel free to add any vegetables you like. Cherry tomatoes, bell peppers, and cucumbers are all great additions.
Can I make this salad vegan?: Yes, you can easily make this salad vegan by using vegan feta cheese and ensuring that your pasta is vegan-friendly.
If you have any other questions, feel free to ask in the comments below!
Serving Suggestions
This Lemon Broccoli Pasta Salad is incredibly versatile and can be served in many different ways:
As a Side Dish: Serve it as a side dish at barbecues, picnics, or potlucks.
As a Light Lunch: Enjoy it as a light and refreshing lunch.
As a Healthy Dinner: Pair it with grilled chicken or fish for a complete and healthy dinner.
Meal Prep: Pack it in containers for easy and healthy meal prepping.
No matter how you choose to serve it, this salad is sure to be a hit!
I hope you enjoy this Lemon Broccoli Pasta Salad as much as I do. It’s a simple, healthy, and delicious recipe that’s perfect for any occasion. Happy cooking!
Lemon Broccoli Pasta Salad: A Bright and Healthy Delight
Prep Time 15 minutesminutes
Cook Time 10 minutesminutes
Total Time 25 minutesminutes
Servings 4servings
Calories 350
This Lemon Broccoli Pasta Salad is a refreshing and nutritious dish, perfect for a light lunch or side. The bright lemon flavor complements the broccoli and feta beautifully.
Ingredients
Pasta Salad
2cupsGluten-free pasta
2cupsBroccoli florets(Blanched)
1cupFeta cheese(Crumble for creaminess)
1tablespoonLemon juice(Freshly squeezed)
3tablespoonsOlive oil
2tablespoonsFresh dill(Chopped)
to tasteSalt
to tastePepper
Notes
For an extra burst of flavor, try adding some toasted pine nuts or sun-dried tomatoes.
Hello, friend! It’s Avery here, from my cozy kitchen in Portland. Today, I want to share a recipe that embodies the essence of summer – my Lemon Basil Pasta Salad. This isn’t just a salad; it’s a vibrant celebration of fresh flavors, sunshine in a bowl, and a little bit of self-care all rolled into one. This vegan delight is easy to whip up, bursting with the goodness of fresh herbs and zesty lemon. So, grab your apron, and let’s get cooking!
Why You’ll Love This Lemon Basil Pasta Salad
I’ve always believed that the best recipes are the ones that nourish both the body and the soul. This Lemon Basil Pasta Salad is exactly that. It’s a dish that I turn to when I need something quick, satisfying, and utterly delicious. But why is this specific salad so special?
Flavor Explosion: The bright, zesty lemon, the fragrant basil, and the savory sun-dried tomatoes create a symphony of flavors that dance on your taste buds.
Versatility: This salad is incredibly versatile. It’s perfect as a light lunch, a side dish at a BBQ, or even a potluck contribution.
Easy to Make: With just a few simple steps and readily available ingredients, you can have this salad ready in under 30 minutes.
Vegan & Adaptable: Being a vegan recipe, it caters to a wide range of dietary preferences. And if you’re not vegan, you can easily add cheese or other ingredients to customize it to your liking.
It’s a Crowd-Pleaser: Trust me, this salad is always a hit! Everyone loves the refreshing flavors and the satisfying texture.
This salad is a testament to the fact that healthy eating doesn’t have to be complicated or boring. It’s all about embracing fresh, whole ingredients and finding joy in the process of creating something beautiful and delicious.
Ingredients You’ll Need
Here’s what you’ll need to create this vibrant salad. I always recommend using the freshest ingredients possible for the best flavor. Remember, cooking is an act of love, and the quality of your ingredients reflects that love.
1 pound pasta (rotini, penne, or farfalle)
1/4 cup olive oil
1/4 cup lemon juice (freshly squeezed)
2 cloves garlic, minced
1/2 cup fresh basil, chopped
1/4 cup sun-dried tomatoes, oil-packed, drained and chopped
1/4 cup pine nuts, toasted
1/2 cup cherry tomatoes, halved
1/4 cup black olives, sliced
Salt and pepper to taste
Vegan Parmesan cheese (optional)
How to Make Lemon Basil Pasta Salad: Step-by-Step
Alright, let’s dive into the process of making this delightful salad. Don’t worry if you’re not a seasoned chef; this recipe is incredibly forgiving and easy to follow. Remember, cooking should be fun, so don’t be afraid to experiment and make it your own!
Cook the Pasta: Cook pasta according to package directions. I prefer to cook mine *al dente* – it gives the salad a better texture. Drain and rinse with cold water. This stops the cooking process and keeps the pasta from sticking together. Set aside.
Prepare the Dressing: In a large bowl, whisk together olive oil, lemon juice, and minced garlic. This simple dressing is the heart of the salad, so make sure to use good quality olive oil and freshly squeezed lemon juice for the best flavor.
Combine Ingredients: Add the cooked pasta, basil, sun-dried tomatoes, pine nuts, cherry tomatoes, and black olives to the bowl with the dressing.
Season: Season with salt and pepper to taste. Don’t be shy with the seasoning – it’s what brings all the flavors together.
Toss: Toss well to combine all ingredients, ensuring that every piece of pasta is coated in the delicious dressing.
Chill: Refrigerate for at least 30 minutes to allow flavors to meld. This step is crucial – it allows the salad to develop its full flavor potential.
Serve: Before serving, toss again. Garnish with vegan Parmesan cheese, if desired.
Enjoy!: Serve chilled and enjoy!
And there you have it – a bright and flavorful Lemon Basil Pasta Salad that’s sure to impress! This salad is a wonderful example of how simple ingredients can come together to create something truly special.
Pro Tips for the Perfect Pasta Salad
Here are a few pro tips that I’ve learned over the years to ensure your pasta salad is always a success. These tips can elevate your salad from good to absolutely amazing!
Cook Pasta Al Dente: As mentioned earlier, cooking the pasta *al dente* is crucial for the best texture. Overcooked pasta will become mushy and unappetizing.
Rinse with Cold Water: Rinsing the pasta with cold water not only stops the cooking process but also removes excess starch, preventing the pasta from sticking together.
Use Fresh Ingredients: The fresher the ingredients, the better the flavor. Opt for ripe cherry tomatoes, fragrant basil, and good quality olive oil.
Toast the Pine Nuts: Toasting the pine nuts before adding them to the salad enhances their flavor and adds a delightful crunch.
Let it Chill: Allowing the salad to chill for at least 30 minutes allows the flavors to meld together, creating a more cohesive and delicious dish.
Common Mistakes to Avoid
Even with a simple recipe like this, there are a few common mistakes that people make. Here’s what to watch out for:
Overcooking the Pasta: This is the biggest culprit of a subpar pasta salad. Always cook the pasta *al dente*.
Not Seasoning Enough: Don’t be afraid to season generously with salt and pepper. The seasoning is what brings all the flavors together.
Adding Too Much Dressing: Adding too much dressing can make the salad soggy. Start with a little and add more as needed.
Skipping the Chilling Time: Chilling the salad is essential for the flavors to meld. Don’t skip this step!
Variations & Add-Ins
One of the best things about this salad is how easy it is to customize. Here are a few variations and add-ins to inspire you:
Add Protein: Add grilled chicken, shrimp, or chickpeas for a heartier salad.
Add Cheese: If you’re not vegan, add feta cheese, mozzarella, or Parmesan cheese for a salty and creamy element.
Add Veggies: Add roasted vegetables like zucchini, bell peppers, or eggplant for extra flavor and nutrients.
Spice it Up: Add a pinch of red pepper flakes to the dressing for a little heat.
Use Different Herbs: Experiment with different herbs like mint, parsley, or oregano.
How to Store Leftovers
This salad is best served chilled, and any leftovers can be stored in an airtight container in the refrigerator for up to 3 days. The flavors will continue to meld and deepen over time, making it even more delicious the next day. Keep in mind that the pasta may absorb some of the dressing, so you may want to add a little extra olive oil or lemon juice before serving.
Frequently Asked Questions (FAQ)
Here are some common questions that people ask about making pasta salad:
Can I make this salad ahead of time? Yes, absolutely! In fact, I recommend making it a few hours ahead of time to allow the flavors to meld.
Can I freeze this salad? I don’t recommend freezing pasta salad, as the pasta can become mushy when thawed.
How long does this salad last in the refrigerator? This salad will last for up to 3 days in the refrigerator.
Can I use a different type of pasta? Yes, you can use any type of pasta you like. I recommend using rotini, penne, or farfalle, as they hold the dressing well.
Can I add other vegetables? Of course! Feel free to add any vegetables you like, such as cucumbers, bell peppers, or broccoli.
Serving Suggestions
This Lemon Basil Pasta Salad is incredibly versatile and can be served in a variety of ways. Here are a few suggestions:
As a Side Dish: Serve it alongside grilled chicken, fish, or vegetables.
As a Light Lunch: Enjoy it on its own for a refreshing and satisfying lunch.
At a BBQ or Potluck: Bring it to your next BBQ or potluck – it’s always a crowd-pleaser.
In a Picnic Basket: Pack it in a picnic basket for a delightful outdoor meal.
This salad is best served *at room temperature* or *cold*. It’s *perfect for* a summer day, a quick lunch, or a potluck gathering. *If you* are looking for a refreshing and flavorful dish, *this salad is* a must-try. *It’s* easy to make, packed with fresh ingredients, and sure to impress. *The pasta and* the bright lemon basil dressing are a match made in heaven. With *a quick* preparation and simple ingredients, *you can* enjoy this *basil lemon pasta* salad any time. Just remember that *the pasta* should be cooked *al dente*. *Every bite* is a burst of flavor, and *you’ll* find yourself craving it again and again. Whether served *cold or at room temperature*, this *lemon pasta salad* is a guaranteed hit. And *if you* want to add a little extra something, a sprinkle of *parmesan cheese* (or vegan alternative) is always a welcome addition. The combination of *basil lemon* is simply divine. *You can* also adjust the amount of *lemon juice* to your liking. It’s a great way to use up those fresh herbs from your garden, and *you can* even add a *pinch* of red pepper flakes for a little kick. Don’t forget *a few* drizzles of good quality *olive oil* to bring it all together.
So, there you have it – my Lemon Basil Pasta Salad. I hope you enjoy making and eating it as much as I do. Remember, cooking is an act of self-care, so take your time, savor the process, and enjoy the delicious results!
Lemon Basil Pasta Salad – A Bright & Flavorful Vegan Delight
Prep Time 15 minutesminutes
Cook Time 15 minutesminutes
Total Time 30 minutesminutes
Servings 6servings
Calories 350
A refreshing and flavorful vegan pasta salad perfect for a light lunch or side dish. The bright lemon and basil flavors combine beautifully with the pasta and other fresh ingredients.
Ingredients
Pasta Salad Ingredients
1poundpasta (rotini, penne, or farfalle)
1/4cupolive oil
1/4cuplemon juice (freshly squeezed)
2clovesgarlic, minced
1/2cupfresh basil, chopped
1/4cupsun-dried tomatoes, oil-packed, drained and chopped
1/4cuppine nuts, toasted
1/2cupcherry tomatoes, halved
1/4cupblack olives, sliced
to tasteSalt and pepper
Vegan Parmesan cheese(optional)
Instructions
Cook pasta according to package directions. Drain and rinse with cold water. Set aside.
In a large bowl, whisk together olive oil, lemon juice, and minced garlic.
Add the cooked pasta, basil, sun-dried tomatoes, pine nuts, cherry tomatoes, and black olives to the bowl.
Season with salt and pepper to taste.
Toss well to combine all ingredients.
Refrigerate for at least 30 minutes to allow flavors to meld.
Before serving, toss again. Garnish with vegan Parmesan cheese, if desired.
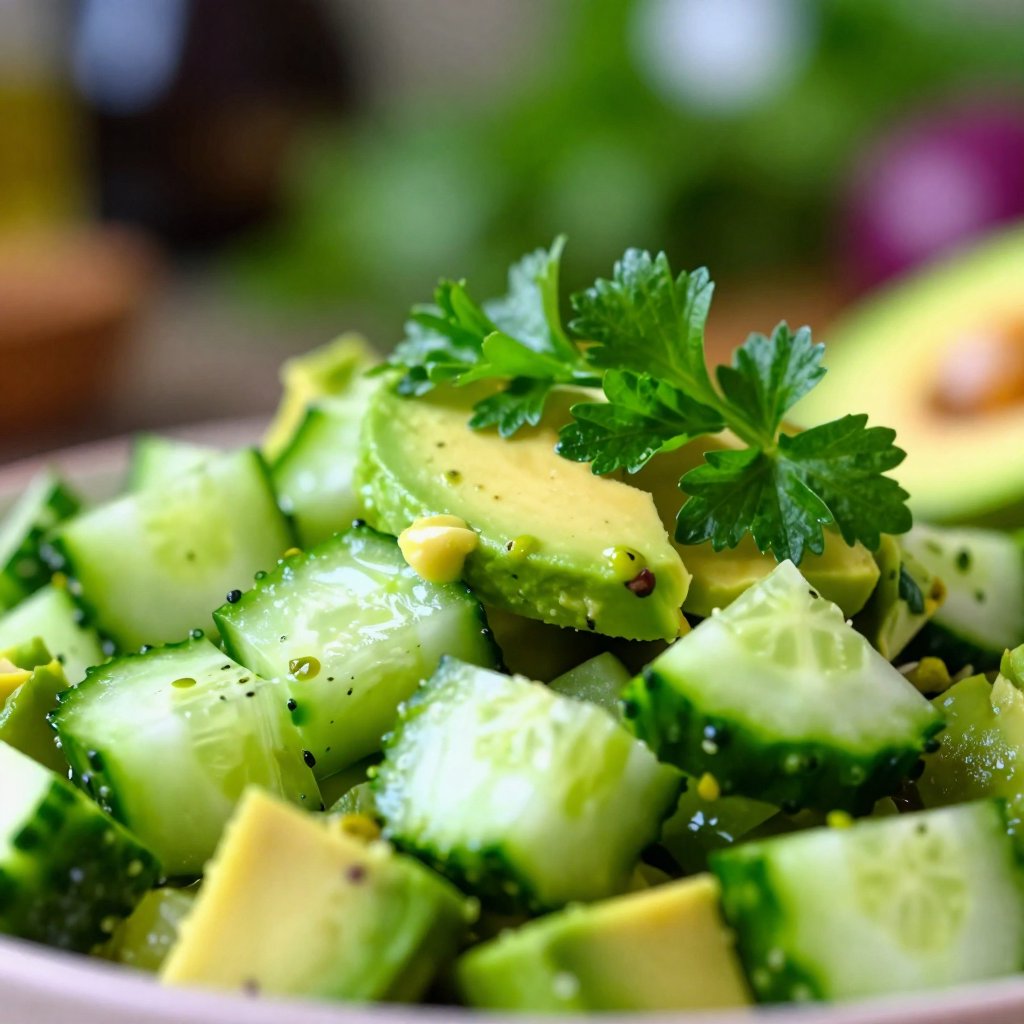
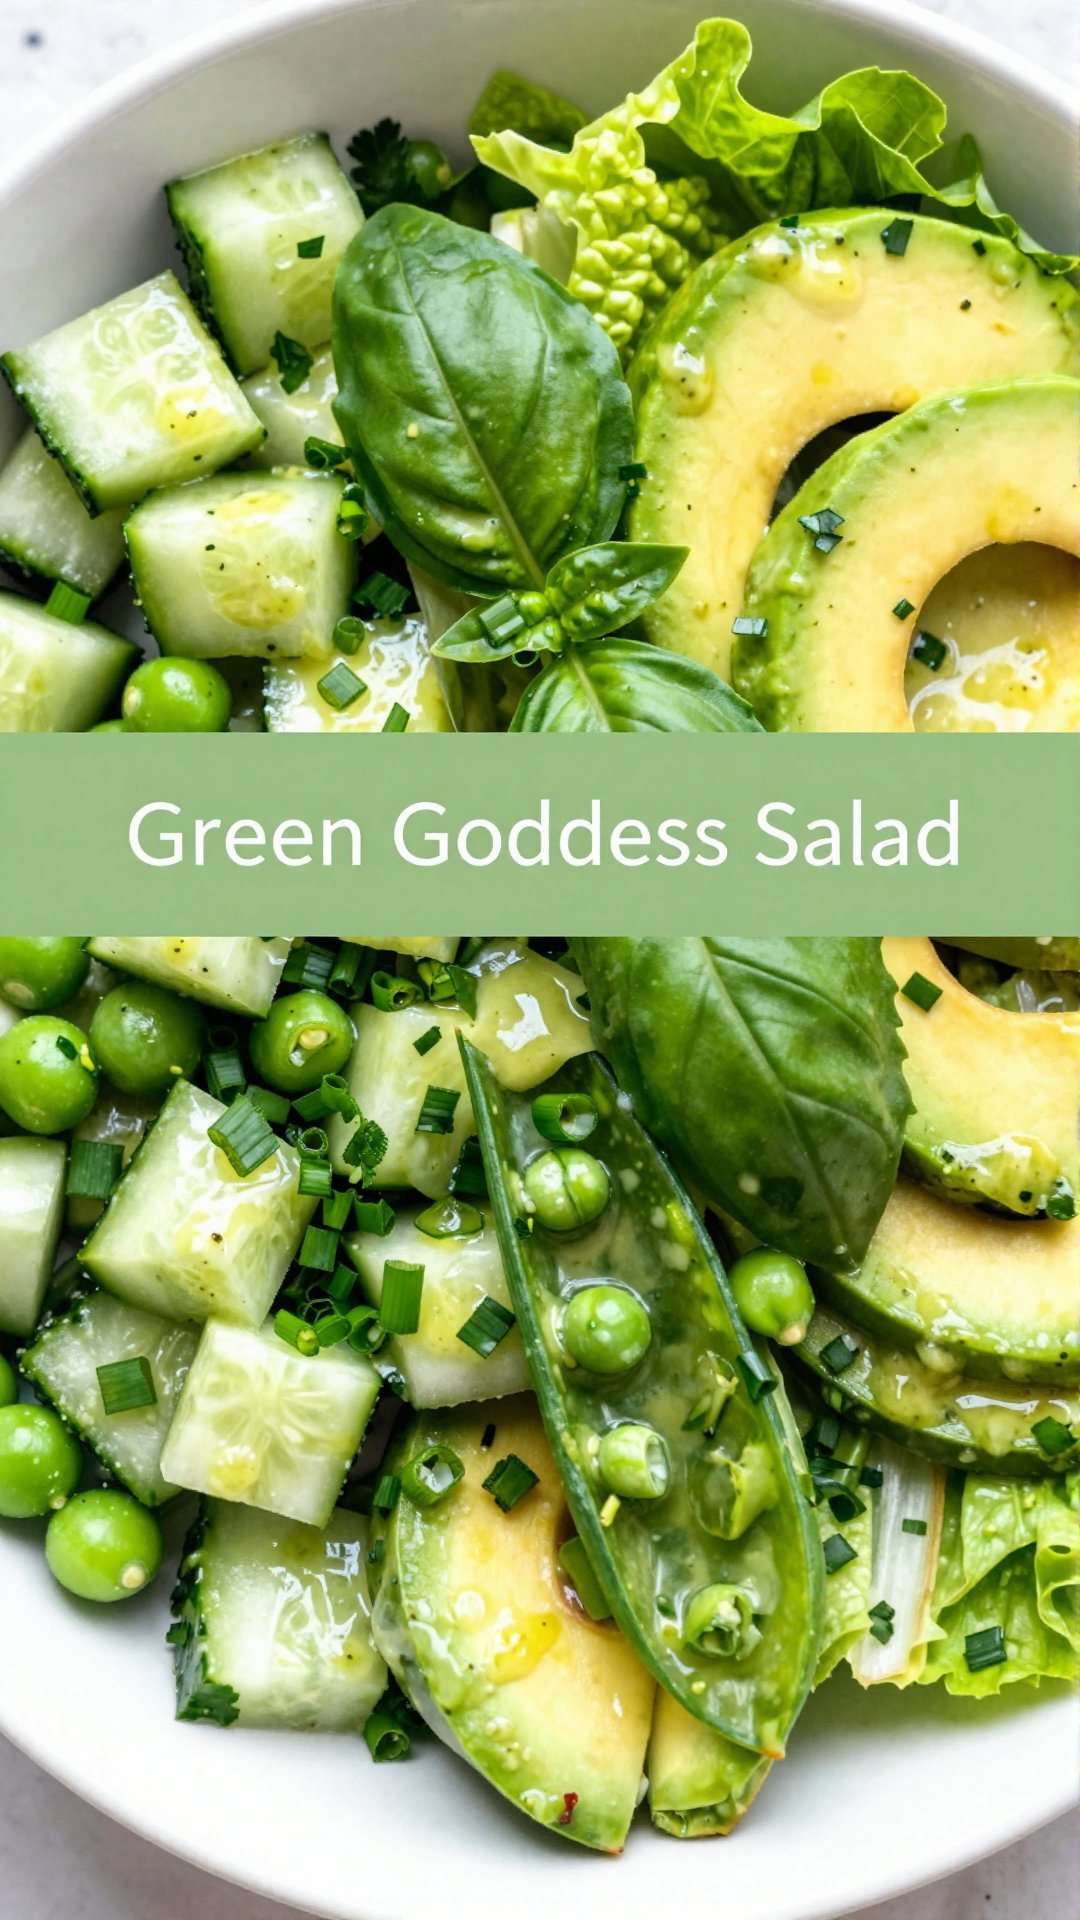
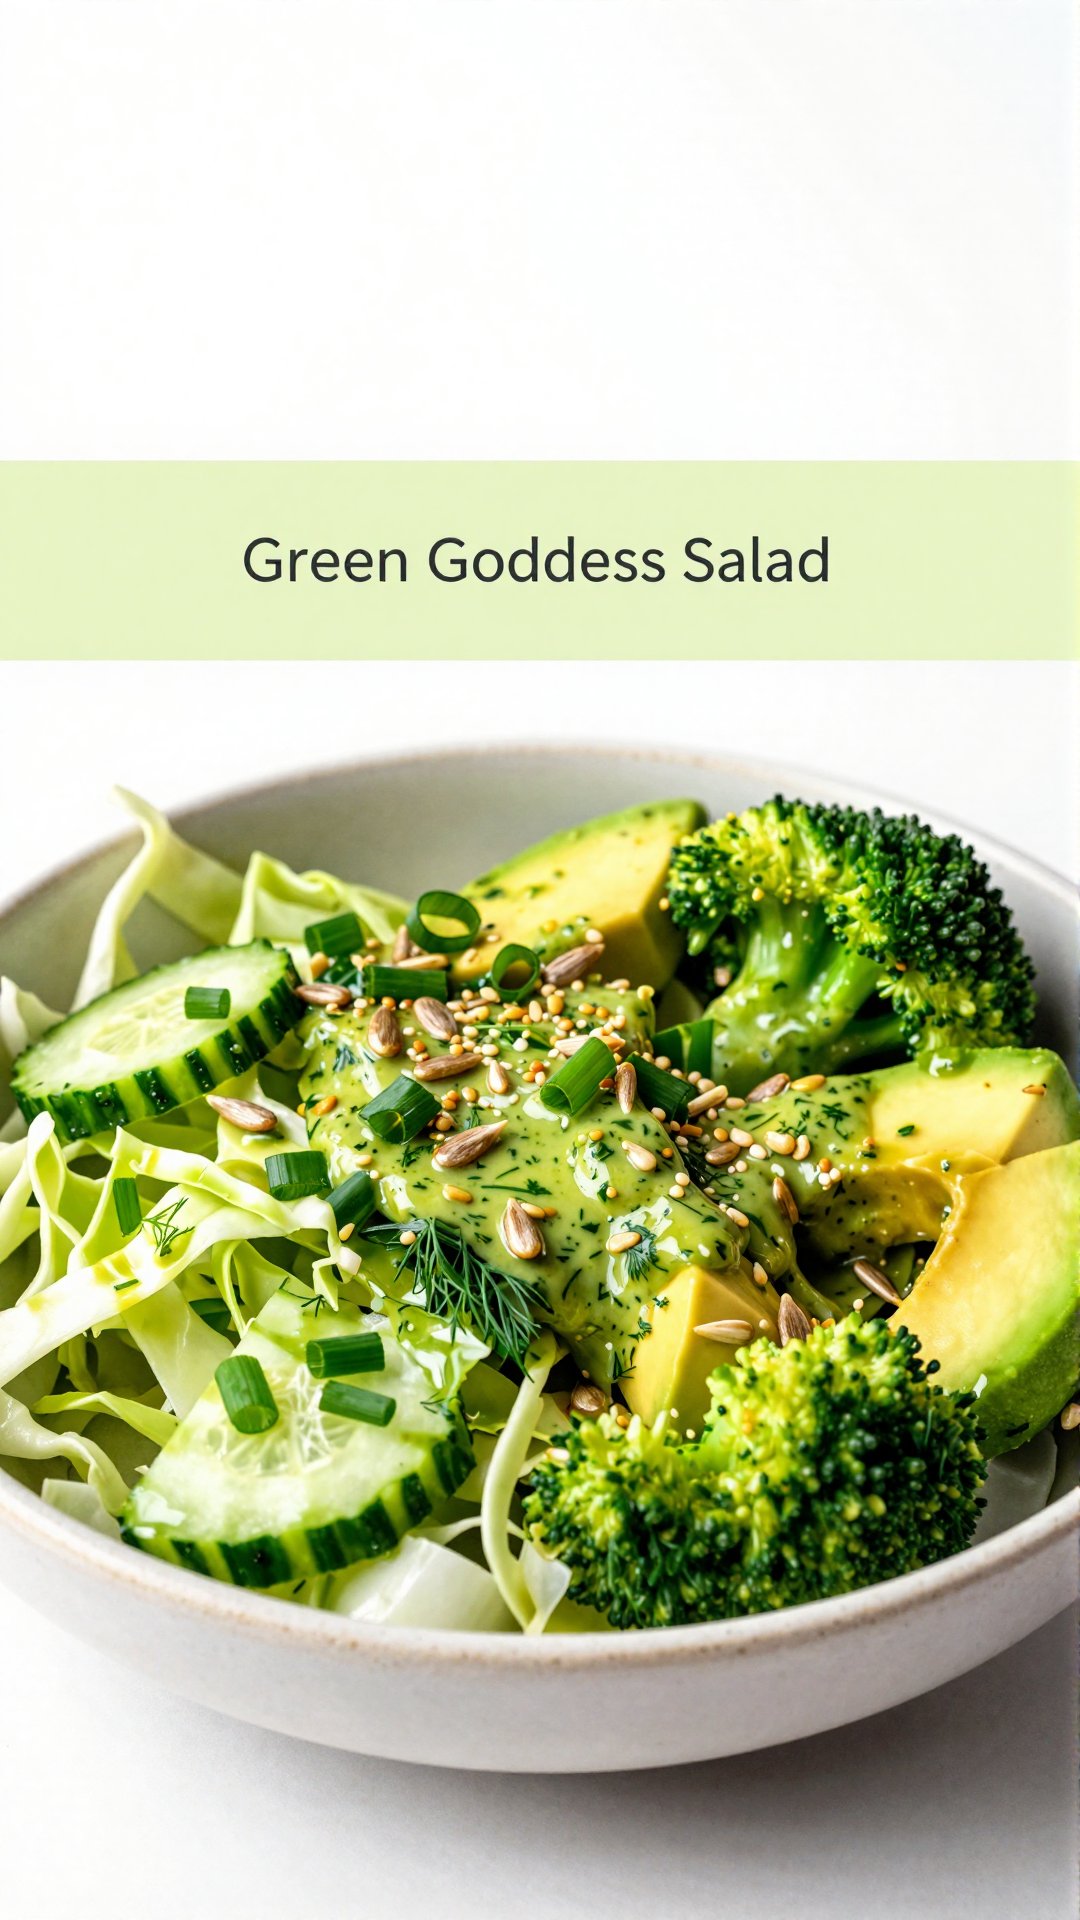
Green Goddess Salad: A Symphony of Freshness in Every Bite
Hello, friend! Avery here, from my little kitchen in Portland. Today, we’re diving into something that makes my heart sing: a Green Goddess Salad. Now, I know what you might be thinking: another salad recipe? But trust me, this isn’t just any salad. This is a vibrant, flavorful celebration of fresh ingredients, and a reminder that healthy eating can be an absolute joy.
This Green Goddess Salad is more than just a meal; it’s an experience. It’s the kind of salad that makes you close your eyes and savor each bite, feeling the vitality of the ingredients nourish you from the inside out. It’s perfect for a light lunch, a refreshing side dish, or even a satisfying dinner with some grilled chicken or tofu added on top. Let’s get started!
Why You’ll Absolutely Adore This Green Goddess Salad
There’s something truly magical about a salad that’s both incredibly healthy and undeniably delicious. This Green Goddess Salad hits that sweet spot perfectly. Here’s why I think you’ll fall in love with it:
Unbelievably Fresh: It’s bursting with crisp cucumber, creamy avocado, crunchy snap peas, and a medley of fresh herbs. The salad is all about embracing the best of what nature has to offer.
The Dressing is the Star: The homemade Green Goddess dressing is where the magic truly happens. It’s creamy, tangy, and packed with flavor from Greek yogurt, lemon juice, garlic, and a secret blend of herbs.
Easy to Customize: Feel free to swap out ingredients based on what you have on hand or what’s in season. This salad is incredibly forgiving and adaptable.
A Nutritional Powerhouse: This salad is packed with vitamins, minerals, and antioxidants, making it a truly nourishing meal.
Quick and Easy to Make: From start to finish, this salad comes together in under 30 minutes, making it perfect for busy weeknights.
Gather Your Greens: The Ingredients You’ll Need
Let’s talk ingredients! The beauty of this salad lies in the quality and freshness of its components. Here’s what you’ll need:
2 cups English cucumber, diced: Adds a refreshing crunch and subtle sweetness.
1 large ripe avocado, diced: Provides creaminess and healthy fats.
2 cups romaine lettuce, chopped: Forms the base of the salad with a crisp, clean flavor.
1 cup sugar snap peas, thinly sliced: Adds a delightful sweetness and satisfying crunch.
4 green onions, thinly sliced: Provides a mild oniony flavor.
¼ cup fresh parsley, roughly chopped: Adds a bright, herbaceous note.
¼ cup fresh chives, chopped: Contributes a delicate onion flavor.
¼ cup fresh basil leaves, chopped: Infuses the salad with a sweet, aromatic flavor.
For the Green Goddess Dressing:
½ cup Greek yogurt: Creates a creamy base and adds a tangy flavor.
¼ cup mayonnaise: Enhances the creaminess and richness of the dressing.
2 tablespoons lemon juice: Adds a bright, citrusy tang.
1 tablespoon white grape juice vinegar: Provides a subtle sweetness and acidity.
1 tablespoon extra-virgin olive oil: Adds richness and helps emulsify the dressing.
1 garlic clove, minced: Provides a pungent, savory flavor.
2 anchovy fillets or 1 teaspoon capers: Adds a salty, umami depth (optional, but highly recommended!).
¼ cup fresh parsley: Adds a fresh, herbaceous flavor.
2 tablespoons fresh tarragon: Contributes a unique, slightly licorice-like flavor.
1 tablespoon fresh chives: Enhances the oniony notes.
Salt and freshly ground black pepper: To taste, for seasoning.
Crafting Your Green Goddess Masterpiece: Step-by-Step Instructions
Ready to bring this salad to life? Here’s how:
Make the Dressing: Combine Greek yogurt, mayonnaise, lemon juice, vinegar, olive oil, juice garlic, anchovies or capers, fresh parsley, tarragon, and chives in a blender or food processor. Blend until completely smooth and creamy. Taste and adjust seasoning as desired. This dressing is divine!
Prep the Salad: Place cucumber, avocado, romaine lettuce, sugar snap peas, green onions, parsley, chives, and basil in a large salad bowl.
Dress and Toss: Drizzle the prepared Green Goddess dressing evenly over the salad ingredients. Gently toss to coat all vegetables, being careful not to mash the avocado pieces.
Serve Immediately: Plate the salad right away while vegetables remain crisp. Garnish with additional fresh herbs if desired.
Avery’s Pro Tips for the Perfect Green Goddess Salad
Over the years, I’ve learned a few tricks that can take this salad from good to absolutely amazing. Here are some of my best tips:
Use the Freshest Ingredients Possible: The better the quality of your ingredients, the better the salad will taste. Seek out locally grown produce whenever possible.
Don’t Overdress the Salad: Add the dressing gradually, tossing gently until the salad is just coated. You don’t want the salad to be swimming in dressing.
Taste and Adjust the Dressing: The beauty of homemade dressing is that you can customize it to your liking. Add more lemon juice for extra tang, more garlic for a bolder flavor, or more herbs for a more herbaceous note.
Chill the Dressing: Making the dressing a few hours ahead of time allows the flavors to meld together, resulting in a more complex and delicious dressing.
Serve Immediately: This salad is best served right away, as the avocado can brown and the lettuce can wilt if it sits for too long.
Common Mistakes to Avoid
We all make mistakes in the kitchen, and that’s okay! Here are a few common pitfalls to watch out for when making this Green Goddess Salad:
Using Underripe or Overripe Avocado: The avocado should be perfectly ripe – soft enough to yield to gentle pressure, but not mushy.
Overblending the Dressing: Be careful not to overblend the dressing, as this can make it too thin. Blend just until smooth and creamy.
Using Dried Herbs: Fresh herbs are essential for the vibrant flavor of this salad. Avoid using dried herbs, as they won’t provide the same level of freshness.
Forgetting to Season: Don’t forget to taste and season the dressing and the salad with salt and pepper. Seasoning is key to bringing out the flavors of the ingredients.
Green Goddess Salad: Variations to Make It Your Own
One of the things I love most about this salad is how versatile it is. Feel free to experiment with different ingredients and flavors to create your own unique version. Here are a few ideas to get you started:
Add Protein: Grilled chicken, shrimp, tofu, or chickpeas would all be delicious additions to this salad.
Swap Out the Greens: Use spinach, kale, or mixed greens instead of romaine lettuce.
Add More Vegetables: Cherry tomatoes, bell peppers, radishes, or shredded carrots would all be great additions.
Make it Vegan: Use vegan mayonnaise and omit the anchovies or capers. You can also add a pinch of sea salt to mimic the salty flavor.
Spice it Up: Add a pinch of red pepper flakes to the dressing for a little heat.
Storage Tips: Keeping Your Salad Fresh
This salad is best enjoyed immediately, but if you have leftovers, here’s how to store them:
Store the Dressing Separately: If you know you’ll have leftovers, store the dressing separately from the salad. This will help prevent the salad from becoming soggy.
Store in an Airtight Container: Store the salad in an airtight container in the refrigerator.
Consume Within 24 Hours: The salad is best consumed within 24 hours, as the avocado will brown and the lettuce will wilt over time.
Frequently Asked Questions (FAQ)
Got questions? I’ve got answers! Here are some of the most common questions I get about this Green Goddess Salad:
Can I make the dressing ahead of time?: Yes, you can make the dressing up to 2 days ahead of time. Store it in an airtight container in the refrigerator.
Can I freeze the dressing?: I don’t recommend freezing the dressing, as the texture may change.
Can I use dried herbs instead of fresh herbs?: Fresh herbs are essential for the vibrant flavor of this salad. I don’t recommend using dried herbs.
Is this salad gluten-free?: Yes, this salad is naturally gluten-free.
Is this salad dairy-free?: To make this salad dairy-free, use a dairy-free yogurt alternative.
Serving Suggestions: Elevating Your Green Goddess Experience
This Green Goddess Salad is delicious on its own, but here are a few ideas for how to serve it:
As a Light Lunch: Enjoy a bowl of this salad for a refreshing and healthy lunch.
As a Side Dish: Serve this salad alongside grilled chicken, fish, or tofu.
In a Wrap: Wrap the salad in a whole-wheat tortilla for a quick and easy meal on the go.
As a Topping: Use this salad as a topping for avocado toast or grilled bread.
And there you have it – my Green Goddess Salad, a recipe that truly nourishes the body and soul. I hope you love making and eating it as much as I do. Happy cooking, friend!
P.S. If you’re looking for another refreshing salad recipe, be sure to check out my potato-cucumber-salad! You might also want to add grilled chicken or chicken or chickpeas up to this salad as a protein.
A refreshing and vibrant Green Goddess Salad featuring crisp cucumber, creamy avocado, and a homemade Green Goddess dressing. This salad is packed with fresh herbs and is perfect as a light lunch or side dish.
Ingredients
Salad Ingredients
2cupsEnglish cucumber(diced)
1largeripe avocado(diced)
2cupsromaine lettuce(chopped)
1cupsugar snap peas(thinly sliced)
4green onions(thinly sliced)
¼cupfresh parsley(roughly chopped)
¼cupfresh chives(chopped)
¼cupfresh basil leaves(chopped)
Green Goddess Dressing
½cupGreek yogurt
¼cupmayonnaise
2tablespoonslemon juice
1tablespoonwhite grape juice vinegar
1tablespoonextra-virgin olive oil
1clovegarlic(minced)
2anchovy filletsanchovy fillets or 1 teaspoon capers
¼cupfresh parsley
2tablespoonsfresh tarragon
1tablespoonfresh chives
Salt and freshly ground black pepper(to taste)
Instructions
Blend dressing ingredients until smooth. Adjust seasoning.
Combine salad ingredients in a bowl.
Drizzle dressing over salad and toss gently.
Plate immediately and garnish with herbs.
Notes
For a vegan option, substitute the Greek yogurt with a plant-based alternative and omit the anchovy fillets.
Hey there, friend! Avery Collins here, from my little kitchen in Portland. I’m so excited to share one of my absolute favorite recipes with you: the Ultimate Green Goddess Salad. This isn’t just another salad; it’s a vibrant, nourishing bowl of goodness that feels like a warm hug on a rainy day (which, let’s be honest, is most days here!). It’s packed with fresh flavors, creamy textures, and a whole lot of love. I’ve been making variations of this salad for years, tweaking it until it reached absolute perfection. I truly believe this will be your new go-to salad recipe. Let’s dive in!
My Journey to the Green Goddess
My relationship with food hasn’t always been rainbows and sunshine. There was a time when takeout menus and processed snacks were my daily companions. It wasn’t until my body staged a full-blown revolt that I realized I needed to change. That’s when I started experimenting in the kitchen, often with disastrous results. But slowly, surely, I learned to listen to my body and to appreciate the incredible power of fresh, whole ingredients. This Green Goddess Salad is a testament to that journey – a celebration of feeling good from the inside out.
Why You’ll Love This Green Goddess Salad
This salad isn’t just about eating your greens; it’s about enjoying them! Here’s why I think you’ll fall in love with it:
Freshness Overload: The combination of crisp cabbage, cool cucumber, and vibrant herbs creates a symphony of flavors that will awaken your taste buds.
Creamy Dreamy Dressing: This isn’t your average vinaigrette. The Green Goddess dressing is rich, tangy, and utterly addictive. It elevates the entire salad to a whole new level.
Versatile and Adaptable: Feel free to swap out ingredients based on what you have on hand. This salad is incredibly forgiving and welcomes creativity.
Meal Prep Hero: This salad holds up surprisingly well, making it perfect for meal prepping. Make a big batch on Sunday and enjoy it throughout the week.
Nourishing and Delicious: Packed with vitamins, minerals, and healthy fats, this salad is as good for your body as it is for your soul.
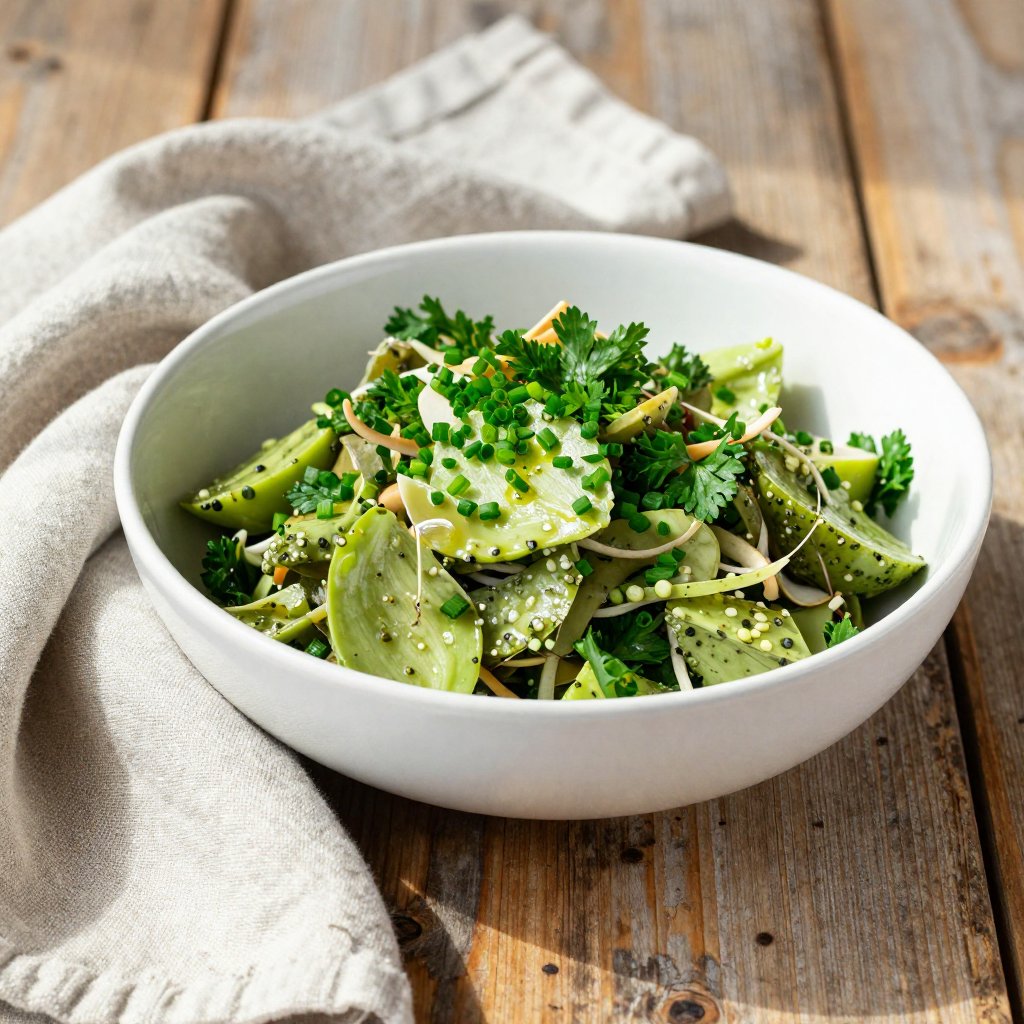
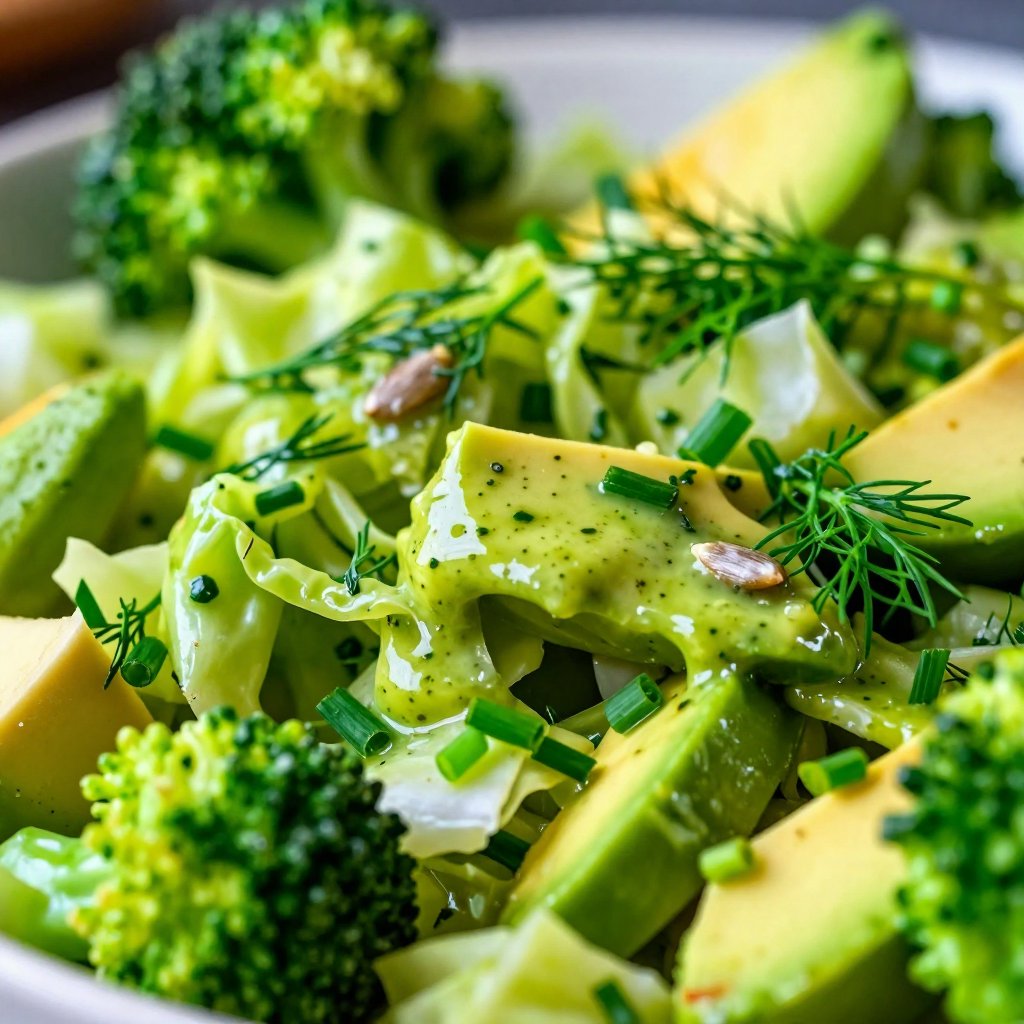
What Makes This Green Goddess Salad So Special?
The magic of this recipe lies in the balance of textures and flavors. The crispness of the cabbage plays perfectly against the creaminess of the avocado and the tanginess of the dressing. And the fresh herbs? They add a burst of brightness that will make you feel like you’re eating sunshine in a bowl. This green goddess salad is more than just a collection of vegetables; it’s a culinary experience.
The Star Ingredients: A Closer Look
Let’s take a moment to appreciate the incredible ingredients that make this salad shine:
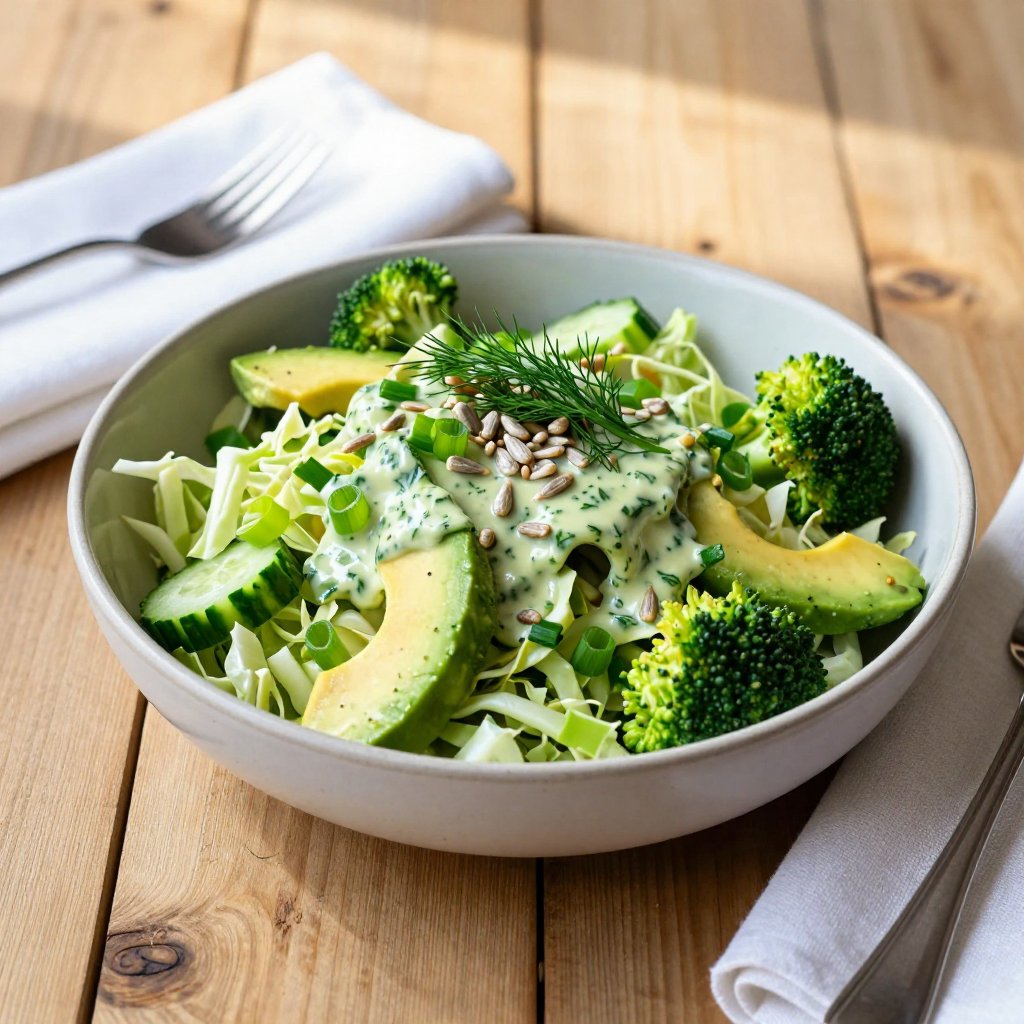
Cabbage: I love using green cabbage for its mild flavor and satisfying crunch. It’s also packed with vitamins and antioxidants.
Cucumber: English cucumbers are my go-to because they have fewer seeds and a thinner skin. They add a refreshing coolness to the salad.
Green Onions: These little guys provide a subtle oniony flavor that doesn’t overpower the other ingredients.
Avocado: The creamy, healthy fats in avocado add richness and depth to the salad.
Broccoli: Finely chopped broccoli adds a nutritional boost and a pleasant texture.
Sunflower Seeds: These add a delightful crunch and a nutty flavor that complements the other ingredients perfectly.
Fresh Herbs: Parsley, dill, and chives are the holy trinity of this Green Goddess dressing. They provide a vibrant, herbaceous flavor that is simply irresistible.
Green Goddess Salad Recipe
Ingredients:
1 cup mayonnaise
¾ cup sour cream
2 teaspoons anchovy paste
1 clove garlic, quartered
1 cup chopped fresh parsley
¼ cup chopped fresh dill
¼ cup chopped chives
2 tablespoons fresh lemon juice
salt to taste
freshly ground black pepper to taste
1 small head green cabbage, cored and finely chopped
1 English cucumber, finely chopped
1 bunch green onions, finely chopped
1 avocado, finely chopped
1 cup finely chopped broccoli
¼ cup sunflower seeds, salted or unsalted
How to Make the Ultimate Green Goddess Salad: Step-by-Step
Ready to get your hands dirty? Here’s how to bring this Green Goddess Salad to life:
Make the Dressing: Add the mayo, sour cream, anchovy paste, garlic, parsley, dill, chives, and lemon juice to a food processor. Pulse until well combined. Season with salt and freshly ground black pepper to taste. This creamy dressing is the heart of the salad.
Prep the Veggies: Add the green cabbage, cucumber, green onions, avocado, broccoli, and sunflower seeds to a large serving bowl.
Dress and Toss: Add the desired amount of dressing and toss to coat. Start with a cup of dressing. Season with salt and freshly ground black pepper to taste.
Pro Tips for the Perfect Green Goddess Salad
Here are a few tricks I’ve learned along the way to ensure your salad is a masterpiece:
Use Fresh Herbs: Dried herbs just won’t cut it for this recipe. Fresh herbs are essential for that vibrant Green Goddess flavor.
Don’t Overdress: Start with a small amount of dressing and add more as needed. You want the vegetables to be coated, not swimming in dressing.
Taste as You Go: Seasoning is key! Taste the dressing and the salad as you go, adjusting the salt, pepper, and lemon juice to your liking.
Chill Before Serving: Letting the salad chill in the fridge for at least 30 minutes allows the flavors to meld together and enhances the overall experience.
Toast the Sunflower Seeds: For an extra layer of flavor, toast the sunflower seeds in a dry skillet over medium heat until golden brown and fragrant.
Common Mistakes to Avoid
Even the most experienced cooks make mistakes. Here are a few common pitfalls to watch out for:
Using Old Herbs: Make sure your herbs are fresh and vibrant. Wilted or discolored herbs will negatively impact the flavor of the dressing.
Over-Processing the Dressing: Be careful not to over-process the dressing. You want it to be smooth and creamy, but not completely pureed.
Adding Too Much Dressing at Once: It’s always better to start with less dressing and add more as needed. You can always add more, but you can’t take it away.
Not Seasoning Properly: Seasoning is crucial for bringing out the flavors of the salad. Don’t be afraid to add a generous pinch of salt and pepper.
Green Goddess Salad Variations: Make It Your Own!
The beauty of this salad is that it’s incredibly versatile. Feel free to experiment with different ingredients and flavors to create your own unique version. If you can dream it, you can add it! Here are a few ideas to get you started:
Add Protein: Grilled chicken, shrimp, or tofu would be delicious additions to this salad.
Swap Out the Veggies: Feel free to use any vegetables you like. Bell peppers, carrots, and radishes would all be great additions.
Add Cheese: Crumbled feta or goat cheese would add a tangy and creamy element to the salad.
Make It Vegan: Substitute the mayonnaise and sour cream with vegan alternatives to make this salad vegan-friendly.
Spice It Up: Add a pinch of red pepper flakes to the dressing for a little kick.
Serving Suggestions: More Than Just a Salad
This Green Goddess Salad is delicious on its own, but it can also be used in a variety of other ways:
As a Side Dish: Serve it alongside grilled chicken, fish, or tofu for a complete and satisfying meal.
In a Wrap or Sandwich: Use it as a filling for wraps or sandwiches. It adds a burst of flavor and freshness.
As a Topping for Toast: Spread it on toast for a quick and easy snack.
With Eggs: Serve it with scrambled or fried eggs for a healthy and delicious breakfast.
Storage Tips: Keeping Your Salad Fresh
This Green Goddess Salad is best enjoyed fresh, but it can be stored in the refrigerator for up to 2 days. Here are a few tips for keeping it fresh:
Store the Dressing Separately: If you’re not planning on eating the entire salad at once, store the dressing separately to prevent the vegetables from getting soggy.
Use an Airtight Container: Store the salad in an airtight container to keep it from drying out.
Add a Paper Towel: Place a paper towel in the container to absorb any excess moisture.
Frequently Asked Questions (FAQ)
Got questions? I’ve got answers!
Can I make this salad ahead of time? Yes, you can chop the vegetables ahead of time and store them in the refrigerator. However, it’s best to dress the salad just before serving to prevent it from getting soggy.
Can I freeze this salad? I don’t recommend freezing this salad, as the vegetables will become mushy when thawed.
How long will the dressing last? The dressing will last for up to 5 days in the refrigerator.
Can I use a different type of mayonnaise? Yes, you can use any type of mayonnaise you like. I prefer to use a good-quality mayonnaise made with olive oil.
What if I don’t like anchovy paste? If you don’t like anchovy paste, you can leave it out. However, it adds a subtle umami flavor that enhances the overall taste of the dressing. You can also substitute it with a teaspoon of Worcestershire sauce.
A Note on Gratitude and Ingredients
As I stand here in my kitchen, surrounded by the aroma of fresh herbs and the vibrant colors of the vegetables, I can’t help but feel a deep sense of gratitude. Gratitude for the farmers who grow these incredible ingredients, for the earth that nourishes them, and for the ability to create something beautiful and nourishing with my own two hands. I encourage you to approach your own cooking with the same sense of gratitude. Take a moment to appreciate the ingredients you’re using and the journey they’ve taken to get to your plate. It will make the experience all the more meaningful.
The Dressing: The Heart of the Green Goddess
Let’s talk more about the dressing. This isn’t just any dressing; it’s a creamy, herbaceous elixir that transforms ordinary vegetables into a culinary masterpiece. The combination of mayonnaise, sour cream, fresh herbs, and lemon juice creates a symphony of flavors that will tantalize your taste buds. The anchovy paste adds a subtle umami flavor that elevates the dressing to a whole new level. Don’t be afraid to experiment with different herbs and spices to create your own signature Green Goddess dressing. This salad is all about celebrating fresh, vibrant flavors.
Beyond the Recipe: A Mindful Approach to Eating
This Green Goddess Salad is more than just a recipe; it’s a reminder to slow down, connect with your food, and nourish your body from the inside out. It’s about finding joy in the simple act of cooking and savoring the flavors of fresh, whole ingredients. I hope this recipe inspires you to embrace a more mindful approach to eating and to create a life that is filled with vitality, balance, and joy. This goddess salad is a great step. Remember, healthy eating isn’t about restriction or deprivation; it’s about abundance and nourishment. So, go ahead and indulge in this Green Goddess Salad. Your body (and your taste buds) will thank you for it!
Potato-Cucumber Salad: A Perfect Pairing
If you’re looking for another refreshing and delicious salad to add to your repertoire, I highly recommend checking out my potato-cucumber-salad. It’s a perfect complement to this Green Goddess Salad and is sure to be a hit at your next gathering.
Final Thoughts: Embrace the Green Goddess Within
So there you have it, my friend! The Ultimate Green Goddess Salad, a recipe that’s near and dear to my heart. I hope you’ll give it a try and that it brings as much joy to your kitchen as it has to mine. Remember, cooking is an act of self-care, a way to nourish your body and soul. Embrace the process, experiment with flavors, and don’t be afraid to make mistakes. The most important thing is to have fun and to create food that makes you feel good. And as always, thank you for joining me on this culinary adventure. Until next time, happy cooking! I believe that salad is a great way to get your nutrients.
A vibrant and refreshing salad featuring a creamy, herb-infused Green Goddess dressing. Packed with fresh vegetables and healthy fats, it's a delicious and nutritious meal.
Ingredients
Dressing
1cupmayonnaise
0.75cupsour cream
2teaspoonsanchovy paste
1clovegarlic(quartered)
1cupchopped fresh parsley
0.25cupchopped fresh dill
0.25cupchopped chives
2tablespoonsfresh lemon juice
to tastesalt
to tastefreshly ground black pepper
Salad
1small headgreen cabbage(cored and finely chopped)
1Englishcucumber(finely chopped)
1bunchgreen onions(finely chopped)
1avocado(finely chopped)
1cupfinely chopped broccoli
0.25cupsunflower seeds(salted or unsalted)
Instructions
Add mayo, sour cream, anchovy paste, garlic, parsley, dill, chives, and lemon juice to a food processor. Pulse until well combined; season with salt and pepper.
Add cabbage, cucumber, green onions, avocado, broccoli, and sunflower seeds to a large bowl.
Add desired amount of dressing and toss to coat. Season with salt and pepper.
Notes
Adjust the amount of dressing to your preference. For a vegan option, substitute vegan mayonnaise and sour cream.


")