Author

Avery Collins

Browsing

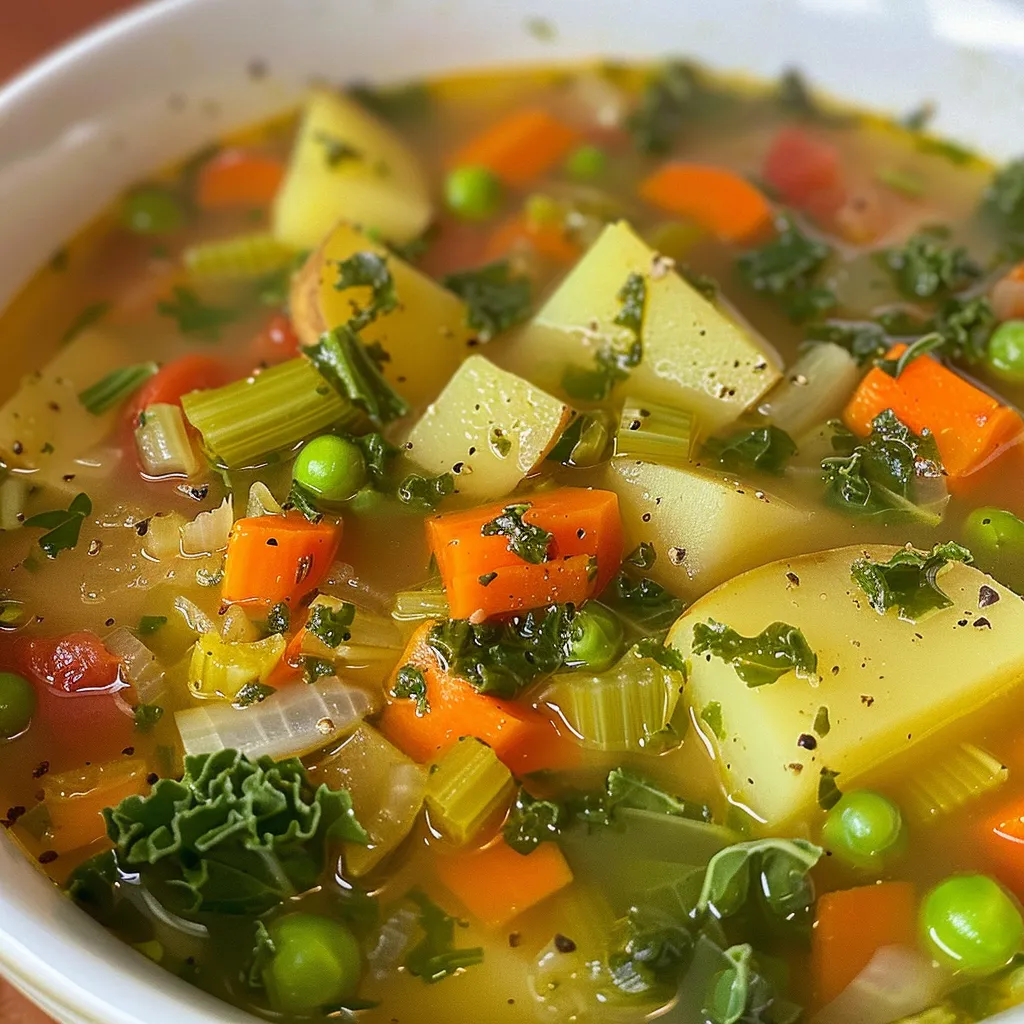
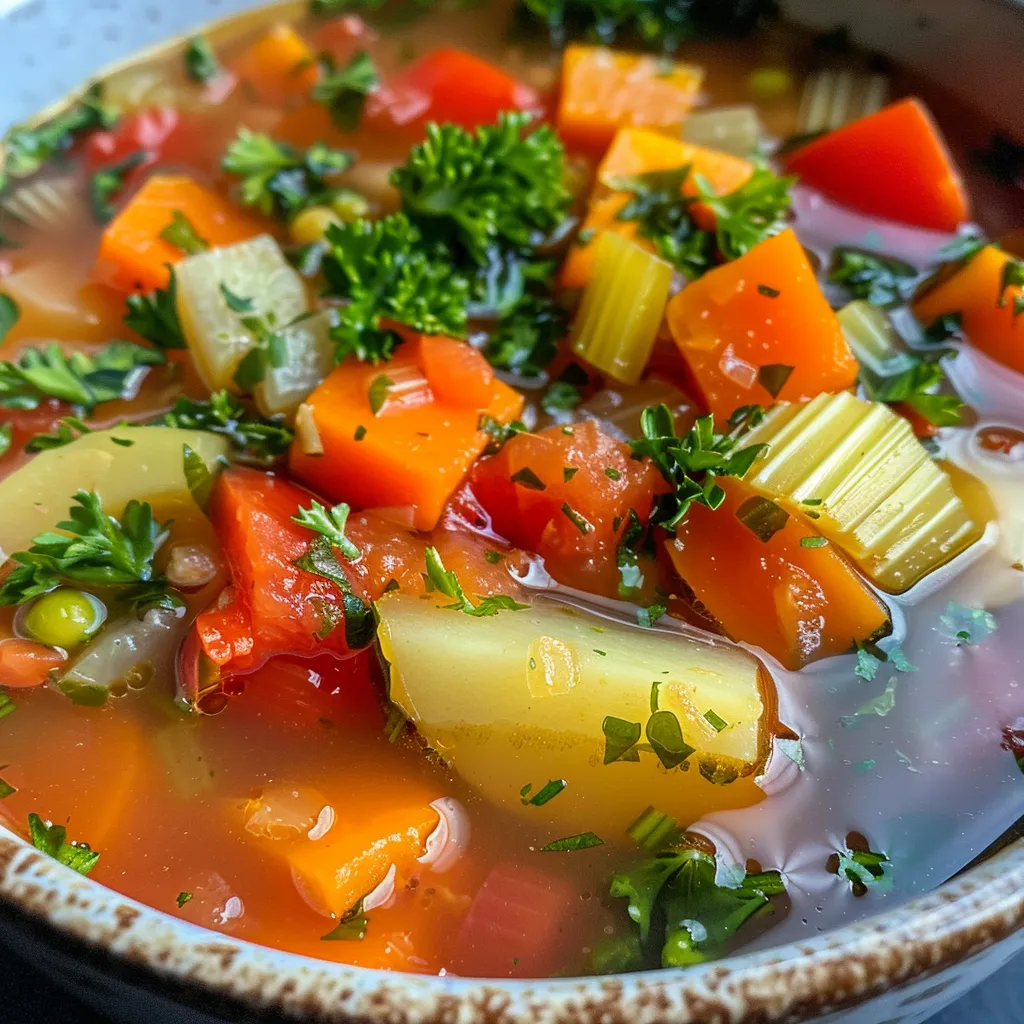
Welcome to the Hearty Vegetable Symphony

Dive into a bowl of my Hearty Vegetable Symphony! This vibrant vegetable soup, brimming with spices and fresh ingredients, invites you to savor every spoonful. Perfect for warming your soul and igniting your culinary adventure! With a blend of earthy flavors and a kick of spice, this soup is more than a meal; it’s an experience. Ready to embrace the thrill of cooking? Let’s get started!

Why You’ll Love This Recipe

  • Flavor Explosion: This soup combines a medley of fresh vegetables with spices that dance on your palate, ensuring every bite is packed with flavor.
  • Health Benefits: Loaded with vegetables, this soup is rich in vitamins, fiber, and antioxidants, making it a nourishing choice for any meal.
  • Easy to Make: With straightforward steps and accessible ingredients, you can whip this up even on your busiest days.
  • Versatile Variations: Customize this recipe to your liking by adding your favorite vegetables or proteins — it’s all about your personal touch!
  • Perfect for Meal Prep: This soup keeps well in the fridge and tastes even better the next day, making it an ideal choice for meal prep enthusiasts.

Ingredients Breakdown

Here’s what you’ll need to create your culinary masterpiece:

  • 3 tablespoons olive oil: A healthy fat that enhances flavor and helps sauté the vegetables.
  • 2 tablespoons ghee or unsalted butter: Adds a rich, nutty flavor to your soup base.
  • 2 leeks (white part only), quartered and sliced thinly: These will provide a mild onion flavor that’s essential in a good soup.
  • 3 carrots, peeled and diced small: Sweet and vibrant, carrots add both color and nutrition.
  • 3 parsnips, peeled and diced small: Their earthy sweetness complements the other vegetables beautifully.
  • 3 celery ribs, diced small: A classic soup vegetable that brings crunch and flavor.
  • 2 small red potatoes, peeled and diced small: They add heartiness and texture to the soup.
  • Salt and black pepper: Essential for seasoning; adjust to your taste.
  • 1 teaspoon dried parsley: A subtle herb that enhances the overall flavor profile.
  • 1 teaspoon Italian seasoning: A blend of herbs that adds warmth and depth.
  • 4 cloves garlic, pressed: Because everything’s better with garlic!
  • 1 (14.5 ounce) can whole tomatoes, drained and diced: Adds acidity and sweetness, enriching the soup’s flavor.
  • 6 cups vegetable or chicken broth: The base of your soup; choose low-sodium for a healthier option.
  • 1 cup peas: Bright and sweet, they add a pop of color and flavor.
  • 1 cup kale, chopped: Leafy greens for added nutrition and texture.
  • 1 tablespoon chopped, fresh parsley: For garnish and a fresh finish.
  • Small squeeze of lemon: Brightens the soup and enhances the flavors.

Pro Tips for the Perfect Soup

Side view of a steaming bowl of vegetable soup garnished with fresh herbs.
  • Prep Ahead: Chop your vegetables ahead of time and store them in the fridge for a quick assembly when it’s time to cook.
  • Build Flavors: Sauté your aromatics (like garlic and leeks) in the oil before adding other ingredients to maximize flavor.
  • Don’t Overcook: Keep a slight crunch in your vegetables for the best texture; they should be tender but not mushy.
  • Season Gradually: Taste and adjust your seasonings as you cook, allowing the flavors to develop.
  • Use Fresh Herbs: Fresh herbs added at the end elevate the dish and add vibrancy.
  • Make it Your Own: Feel free to add proteins like beans or chicken for a heartier option.
  • Adjust Consistency: If you prefer a thicker soup, blend a portion of it before serving.
  • Store Properly: Allow the soup to cool before transferring it to airtight containers for storage.

Common Mistakes and Troubleshooting

Here are some pitfalls to avoid for a flawless vegetable soup:

  • Overcrowding the Pot: Cooking too many vegetables at once can lead to steaming rather than sautéing.
  • Not Seasoning Enough: Under-seasoning can lead to a bland soup; always taste and adjust as you go.
  • Skipping the Broth: Using water instead of broth diminishes flavor; choose a quality broth for the best results.
  • Ignoring Texture: Ensure vegetables are cut uniformly for even cooking; this enhances the overall texture of the soup.

Variations to Spice Things Up

Feel free to experiment with these twists on the classic recipe:

  • Spicy Kick: Add diced jalapeños or a dash of hot sauce for a fiery version.
  • Protein-Packed: Stir in cooked lentils or shredded chicken for added protein.
  • Asian Flair: Incorporate ginger, soy sauce, and sesame oil for an Asian-inspired twist.
  • Herb-Infused: Try adding fresh basil or cilantro for a fresh herbal note.

Storage and Make-Ahead Instructions

This soup is perfect for meal prep! Here’s how to store it:

  • Refrigerator: Store in an airtight container for up to 5 days. The flavors will deepen as it sits!
  • Freezer: Freeze in portions for up to 3 months. Thaw in the fridge overnight before reheating.
  • Reheating: Gently reheat on the stove over medium heat, adding a splash of broth to loosen it up.

FAQs About Your Hearty Vegetable Soup

  • Can I use frozen vegetables? Absolutely! Just toss them in during the last few minutes of cooking.
  • Is this soup gluten-free? Yes, simply ensure your broth is gluten-free.
  • What can I serve with this soup? Pair with crusty bread, a fresh salad, or a hearty sandwich for a complete meal.
  • Can I make this vegetarian? Yes, use vegetable broth and skip any meat additions.
  • How can I thicken my soup? Blend a portion of the soup or add a cornstarch slurry to achieve your desired thickness.
  • What if I don’t like kale? Spinach or Swiss chard are great alternatives that work well here.
  • Can I add pasta or rice? Yes, just remember to adjust the broth amount to account for the added ingredients.
  • How spicy is this soup? It’s mild, but you can easily adjust the heat levels to your liking!

Nutrition Tips and Dietary Adaptations

This Hearty Vegetable Symphony is not just delicious; it’s also nutritious! Here are some ways to adapt it:

  • Low-Carb Option: Replace potatoes with zucchini or cauliflower for a low-carb twist.
  • Vegan-Friendly: Ensure all ingredients are plant-based, especially the broth.
  • Low-Sodium: Use low-sodium broth and skip additional salt to make this heart-healthy.

Equipment Recommendations

To make this soup, you’ll need:

  • Large Soup Pot: Essential for simmering your ingredients together.
  • Cutting Board and Sharp Knife: For chopping your vegetables efficiently.
  • Wooden Spoon: Perfect for stirring and ensuring even cooking.
  • Measuring Cups and Spoons: To accurately measure your ingredients for consistent results.

Serving Suggestions

Bring your soup to life with these serving ideas:

  • Garnish with Fresh Herbs: A sprinkle of fresh parsley or cilantro adds a lovely aroma.
  • Serve with Crusty Bread: Perfect for dipping and soaking up every last drop of flavor.
  • Top with Cheese: A sprinkle of parmesan or feta adds a delightful creaminess.

So there you have it — your guide to creating the ultimate Hearty Vegetable Symphony! With its vibrant flavors, health benefits, and adaptability, this soup is sure to become a favorite in your kitchen. Remember, cooking is an adventure! Embrace the heat, experiment boldly, and enjoy every spoonful of your culinary creation. Now go grab your skillet and let’s make some magic happen!

Vegetable Soup

Prep Time 10 minutes
Cook Time 20 minutes
Total Time 30 minutes
Servings 4 servings
Calories 180
A hearty and nutritious vegetable soup perfect for a cozy meal, packed with fresh flavors and wholesome ingredients.

Ingredients

Oil and Fat

  • 3 tablespoons olive oil
  • 2 tablespoons ghee or unsalted butter

Vegetables

  • 2 leeks leeks (white part only), quartered and sliced thinly
  • 3 carrots carrots, peeled and diced small
  • 3 parsnips parsnips, peeled and diced small
  • 3 celery ribs celery ribs, diced small
  • 2 small red potatoes red potatoes, peeled and diced small

Seasonings

  • Salt Salt
  • Black pepper Black pepper
  • 1 teaspoon dried parsley
  • 1 teaspoon Italian seasoning
  • 4 cloves garlic, pressed through garlic press
  • 1 14.5 ounce can whole tomatoes, drained and seeded, and finely diced
  • 6 cups vegetables broth or chicken broth

Add-ins

  • 1 cup peas
  • 1 cup kale, chopped
  • 1 tablespoon chopped, fresh parsley
  • Small squeeze lemon small squeeze of lemon

Instructions 

  • Gather and prep all ingredients.
  • Heat oil and ghee in a large pot, cook leeks, carrots, parsnips, celery, and potatoes with salt and pepper for 3-4 minutes.
  • Add Italian seasoning, parsley, and garlic; stir to combine.
  • Add tomatoes and broth, bring to a boil, then simmer for 15 minutes until vegetables are tender.
  • Turn off heat, stir in peas, kale, parsley, and lemon; adjust seasoning before serving.

Notes

This soup is versatile and can be customized with your favorite vegetables or herbs.
Calories: 180kcal
Cost: $15
Course: Soup
Cuisine: American
Keyword: vegetables

Nutrition

Calories: 180kcal | Carbohydrates: 30g | Protein: 6g | Fat: 7g | Sodium: 600mg

Why You’ll Love This Dish

Welcome to a culinary journey that marries the comfort of home-cooked meals with a modern twist! This High Protein Honey Garlic Butter Chicken with Mac & Cheese is not just a meal; it’s an experience waiting to unfold in your kitchen. Imagine juicy chicken breasts enveloped in a sweet and savory honey garlic marinade, paired with creamy, cheesy macaroni that dances on your taste buds. It’s a dish that whispers comfort while shouting flavor, making it perfect for family dinners, meal prep, or even a cozy night in.

This recipe is designed for the adventurous cook who appreciates the art of flavor layering. With just a handful of ingredients, you can create a high-protein dish that satisfies both your hunger and your craving for something deliciously indulgent. Let’s dive into the details and ignite your kitchen adventure!

Ingredients

Here’s what you need to whip up this flavorful dish:

  • 2 chicken breasts
  • 1/4 cup honey
  • 3 tablespoons soy sauce
  • 2 tablespoons butter
  • 3 cloves garlic, minced
  • 1 teaspoon ginger, minced
  • 1 cup macaroni pasta
  • 1 cup shredded cheddar cheese
  • 1/2 cup milk
  • Salt and pepper to taste
  • Chopped parsley for garnish

Instructions

Delicious high protein honey garlic butter chicken next to a bowl of rich mac and cheese, beautifully presented.

Now, let’s get cooking! Follow these steps to create a mouthwatering dish:

  1. In a bowl, mix honey, soy sauce, minced garlic, and ginger to create the marinade.
  2. Marinate the chicken breasts in the mixture for at least 30 minutes. This step allows the flavors to penetrate the chicken, ensuring every bite is packed with taste.
  3. While the chicken is marinating, cook the macaroni pasta according to package instructions; drain and set aside. A good al dente is crucial for the perfect mac and cheese!
  4. In a skillet, melt butter over medium heat. Add the marinated chicken, cooking until golden brown and cooked through, about 6-7 minutes per side. The aroma will have your neighbors wondering what deliciousness is happening in your kitchen!
  5. Remove the chicken from the skillet and let it rest for a few minutes before slicing. Resting allows the juices to redistribute, making it even juicier.
  6. In the same skillet, add the cooked macaroni, milk, and shredded cheddar cheese, stirring until the cheese is melted and the mixture is creamy. Season with salt and pepper to taste. If you’re feeling adventurous, add a pinch of cayenne pepper for a little heat!
  7. Serve the sliced honey garlic butter chicken over the mac and cheese, garnished with chopped parsley. The vibrant green of the parsley adds a fresh touch, making the dish as visually appealing as it is delicious.

Substitutions

Don’t have all the ingredients on hand? No problem! Here are some substitutions you can consider:

  • Chicken Breasts: You can use chicken thighs for a richer flavor and juicier texture.
  • Honey: Maple syrup or agave syrup can work in a pinch for a different flavor profile.
  • Cheddar Cheese: Feel free to experiment with other cheeses like Monterey Jack, Gouda, or a spicy pepper jack for an extra kick.
  • Milk: Almond milk or any plant-based milk can substitute if you’re looking for a dairy-free option.

Equipment You’ll Need

Here’s a quick list of kitchen essentials to have on hand:

  • A large mixing bowl for marinating the chicken.
  • A skillet for cooking the chicken and making the mac and cheese.
  • A pot for boiling the macaroni pasta.
  • A wooden spoon or spatula for stirring.
  • A sharp knife for slicing the chicken.

Storage/Freezing

Planning to make this dish ahead of time? Here’s how to store it:

  • Store leftovers in airtight containers in the fridge for up to 4 days. Reheat with a splash of milk to restore creaminess.
  • For longer storage, you can freeze the chicken and mac separately for up to 2 months. Thaw overnight in the fridge before reheating on the stove or in the microwave.

Top Tips for Success

Want to ensure your dish turns out perfectly? Here are my top tips:

  • Marinating the chicken for at least 30 minutes allows the flavors to penetrate deeply, but if you have more time, marinate it overnight for an even richer flavor.
  • Don’t skip the resting time after cooking the chicken; it’s essential for juicy meat.
  • When adding the cheese to the macaroni, do so over low heat to avoid clumping and ensure a smooth, creamy sauce.
  • For an added flavor boost, toss in some sautéed vegetables like spinach or bell peppers to the mac and cheese.

FAQs

Here are some frequently asked questions about this recipe:

  • Can I make this dish ahead of time? Absolutely! It’s perfect for meal prep. Just store the components separately to maintain freshness.
  • Can I use gluten-free pasta? Yes, gluten-free macaroni works wonderfully in this recipe!
  • Is this dish spicy? The base recipe isn’t spicy, but you can add chili flakes or hot sauce to the mac and cheese for a kick.
  • What can I serve with this dish? A side salad or steamed vegetables would complement this dish beautifully.

Troubleshooting

If you run into any issues while cooking, here are some common troubleshooting tips:

  • Mac and cheese too thick? Add a bit more milk while reheating to loosen it up.
  • Chicken not browning? Ensure your skillet is hot enough before adding the chicken; this helps achieve that golden crust.
  • Cheese sauce is clumpy? Stir continuously over low heat and add a splash of milk to help smooth it out.

Conclusion

Your kitchen is about to become your favorite adventure destination with this High Protein Honey Garlic Butter Chicken with Mac & Cheese. The combination of sweet and savory flavors, along with the creamy texture of mac and cheese, brings comfort food to a whole new level. So grab your apron, turn up your favorite tunes, and let the cooking begin! Whether it’s for a family dinner or meal prepping for the week, you’re in for a treat that’s sure to impress. Remember, cooking is all about playing with flavors and having fun – so don’t be afraid to add your own twist to this recipe. Enjoy every bite and get ready to share your culinary triumphs with friends and family!

High Protein Honey Garlic Butter Chicken with Mac & Cheese - Maja's Recipes

Prep Time 10 minutes
Cook Time 20 minutes
Total Time 30 minutes
Servings 4 servings
Calories 650
A deliciously creamy and protein-packed dish combining honey garlic chicken with cheesy macaroni, perfect for a satisfying meal.

Ingredients

Protein

  • 2 pieces chicken breasts
  • 1/4 cup honey
  • 3 tablespoons soy sauce
  • 2 tablespoons butter
  • 3 cloves garlic, minced
  • 1 teaspoon ginger, minced
  • 1 cup macaroni pasta
  • 1 cup shredded cheddar cheese
  • 1/2 cup milk
  • to taste salt and pepper
  • chopped parsley for garnish chopped parsley

Instructions 

  • Mix honey, soy sauce, garlic, and ginger to make marinade.
  • Marinate chicken for 30 minutes, then cook in a skillet with butter until golden and cooked through.
  • Cook macaroni until al dente; drain.
  • Combine cooked pasta, milk, and cheese; stir until creamy. Season with salt and pepper.
  • Slice chicken and serve over mac and cheese, garnished with parsley.

Notes

For extra flavor, add a sprinkle of red pepper flakes or herbs.
Calories: 650kcal
Cost: $15
Course: Main Course
Cuisine: American
Keyword: chicken, Mac and Cheese, protein

Nutrition

Calories: 650kcal | Carbohydrates: 70g | Protein: 45g | Fat: 25g | Sodium: 1500mg

Loved this recipe? Save it to your favorite Pinterest board so you can easily find it later! It’s the perfect way to keep all your sweet ideas in one place. ✨

A plated dish featuring tender chicken glazed in honey garlic sauce alongside a serving of cheesy macaroni.

Why This Recipe Will Ignite Your Passion for Cooking

Let’s talk chicken, shall we? Not just any chicken, but those glorious, succulent Honey Garlic Chicken Thighs that take comfort food to a whole new level. Imagine tender, juicy thighs bathed in a luscious sauce that balances sweet and savory like a perfectly choreographed dance. The aroma wafting through your kitchen will make your neighbors question their dinner choices. This dish is not just a meal; it’s an experience — one that invites everyone to the table with open arms and eager appetites.

As someone who grew up with the vibrant flavors of Texas, I can assure you that cooking should be about more than just following a recipe; it’s about finding joy in the process. These honey garlic chicken thighs exemplify that philosophy, combining simple ingredients with bold flavors to create something unforgettable. So, whether you’re whipping this up for a weeknight dinner or impressing guests at a gathering, get ready for a dish that’s as dynamic as your culinary journey.

Preparation and Cooking Time

Time to roll up those sleeves! Here’s what you need to know about timing:

  • Preparation Time: 10 minutes
  • Cooking Time: 30-35 minutes
  • Total Time: Approximately 45 minutes

Gather Your Ingredients

Succulent chicken thighs glazed with honey and garlic, presented on a rustic plate with a blurred background.

Before we dive into the cooking, let’s ensure you have everything you need on hand. Here’s what you’ll require for this mouthwatering dish:

  • 4 chicken thighs (bone-in, skin-on)
  • 1/4 cup honey
  • 1/4 cup soy sauce
  • 4 cloves garlic (minced)
  • 1 tablespoon olive oil
  • 1 teaspoon ginger (grated)
  • Salt and pepper to taste
  • Chopped green onions (for garnish)

Step-by-Step Instructions

Ready to ignite your kitchen? Let’s get cooking!

  1. Preheat the Oven: Start by preheating your oven to 400°F (200°C). This will ensure a perfectly crispy skin on those chicken thighs.
  2. Mix the Marinade: In a medium-sized bowl, whisk together the honey, soy sauce, minced garlic, olive oil, grated ginger, salt, and pepper. Take a moment to inhale the sweet and savory notes that will soon envelop your chicken.
  3. Coat the Chicken: Place the chicken thighs in a baking dish and pour the honey garlic mixture over them. Ensure every piece is well coated; this is where the magic happens!
  4. Bake: Slide the baking dish into your preheated oven and let those thighs bake for 30-35 minutes. You want the skin to be crispy and the chicken to reach an internal temperature of 165°F (75°C).
  5. Baste for Flavor: Halfway through baking, use a spoon to baste the chicken with the sauce. This extra step adds layers of flavor that will have everyone asking for seconds.
  6. Rest and Garnish: Once cooked, remove the chicken from the oven and let it rest for a few minutes. This resting period allows the juices to redistribute, ensuring every bite is as juicy as the last. Before serving, sprinkle with chopped green onions for a touch of freshness.

How to Serve Your Honey Garlic Chicken Thighs

Presentation is key, my friends! Serve these honey garlic chicken thighs on a beautiful platter, drizzled with the remaining sauce and garnished with those vibrant green onions. Pair them with steamed rice, roasted vegetables, or a fresh salad to create a complete meal that will have everyone raving about your culinary prowess. You might even want to consider making extra sauce for dipping — trust me, it’s that good!

Additional Tips for Perfection

Want to elevate your dish even further? Here are a few tips to ensure your honey garlic chicken thighs turn out perfectly every time:

  • Marinate for Maximum Flavor: If time allows, let the chicken marinate in the honey garlic mixture for a few hours or even overnight. This will deepen the flavor and tenderness.
  • Use Fresh Ingredients: Fresh garlic and ginger will provide the best flavor. Dried herbs and powders can’t replicate that vibrant kick!
  • Experiment with Spice: If you’re feeling adventurous, add a pinch of red pepper flakes to the marinade for a little heat. It’s a fun way to personalize the dish!

Recipe Variations to Try

One of the most beautiful aspects of cooking is the ability to adapt and create. Here are some variations you might consider:

  • Honey Garlic Chicken Breasts: Swap out the thighs for chicken breasts if that’s what you have on hand. Just remember to adjust the cooking time, as breasts may cook faster.
  • Substitute Proteins: Feeling like a twist? Try this marinade with salmon or shrimp for a seafood variation that’s just as delicious.
  • Add Veggies: Toss some chopped bell peppers or broccoli into the baking dish for a one-pan meal that’s colorful and nutritious!

Freezing and Storage Tips

Life can get busy, and leftovers are a beautiful thing. Here’s how to store and freeze your honey garlic chicken thighs:

  • To Store: Place any leftover chicken in an airtight container in the refrigerator for up to 3 days. The flavors will continue to develop, making for a delicious next-day meal!
  • To Freeze: Let the chicken cool completely, then transfer it to a freezer-safe container. It can be kept frozen for up to 3 months. When ready to eat, thaw in the refrigerator overnight and reheat in the oven.

Essential Equipment You’ll Need

Before you dive into this culinary adventure, gather these essential tools to make your cooking experience smoother:

  • Baking dish or oven-safe skillet
  • Mixing bowl
  • Whisk
  • Meat thermometer (for checking chicken doneness)
  • Sharp knife and cutting board

Frequently Asked Questions

Got questions? I’ve got answers! Here are some common queries about this tasty dish:

  • Can I use boneless chicken thighs? Absolutely! Just adjust the cooking time, as boneless thighs may cook faster.
  • Is it necessary to sear the chicken before baking? While searing adds flavor and texture, it’s not necessary. Baking alone will yield delicious results.
  • What can I serve with honey garlic chicken thighs? Pair it with rice, quinoa, steamed vegetables, or a crisp salad for a well-rounded meal.

Troubleshooting Common Issues

If things don’t go as planned, don’t fret! Here are some troubleshooting tips:

  • Chicken is dry: Ensure you’re not overcooking the chicken. Always check the internal temperature at 165°F (75°C).
  • Skin isn’t crispy: If you want extra crispiness, broil it for the last few minutes of cooking. Just keep a close eye on it!
  • Flavor isn’t bold enough: Don’t hesitate to amp up the garlic or add more honey for sweetness. Cooking is all about personal taste!

Bringing It All Together

Cooking is a journey, and every dish tells a story. With these Honey Garlic Chicken Thighs, you’re not just preparing a meal; you’re crafting an experience that brings people together around the table. The blend of sweet honey and rich garlic creates a symphony of flavors that will tantalize your taste buds and keep you coming back for more.

So, gather your ingredients, unleash your inner chef, and embrace the adventure that is cooking. Remember, every meal is an opportunity to experiment, explore, and share the love of food. Don’t forget to snap a photo of your creation and share it with the world — because this dish deserves to be celebrated!

Happy cooking, and may your kitchen always be filled with the warmth of good food and great company!

Honey Garlic Chicken Thighs

Prep Time 10 minutes
Cook Time 35 minutes
Total Time 45 minutes
Servings 4 pieces
Calories 350
Juicy chicken thighs coated in a sweet and savory honey garlic sauce, baked to perfection.

Ingredients

Chicken

  • 4 pieces chicken thighs (bone-in, skin-on)
  • 0.25 cup honey
  • 0.25 cup soy sauce
  • 4 cloves garlic (minced)
  • 1 tablespoon olive oil
  • 1 teaspoon ginger (grated)
  • to taste salt and pepper
  • for garnish chopped green onions

Instructions 

  • Preheat oven to 400°F (200°C).
  • Mix honey, soy sauce, garlic, olive oil, ginger, salt, and pepper.
  • Pour sauce over chicken thighs in a baking dish.
  • Bake for 30-35 minutes, basting halfway.
  • Rest briefly, then garnish with green onions.

Notes

For extra flavor, marinate the chicken in the sauce for 30 minutes before baking.
Calories: 350kcal
Cost: $15
Course: Main Course
Cuisine: American
Keyword: chicken, garlic, honey

Nutrition

Calories: 350kcal | Carbohydrates: 40g | Protein: 25g | Fat: 15g | Sodium: 900mg

Loved this recipe? Save it to your favorite Pinterest board so you can easily find it later! It’s the perfect way to keep all your sweet ideas in one place. ✨

Glazed Honey Garlic Chicken Thighs against a softly lit, cozy backdrop.

Comfort in Every Layer: Discover the Magic of Hearty Chicken Noodle Casserole

Welcome to a world where comfort food meets culinary adventure! My Hearty Chicken Noodle Casserole is not just another dish; it’s a celebration of flavors that will warm your soul and bring your family together. With the perfect blend of creamy goodness, vibrant veggies, and tender chicken, this casserole is a dish that transforms any ordinary meal into a feast of joy. Get ready to embrace the warmth and excitement of cooking!

Why You’ll Love This Recipe

There’s a reason this Hearty Chicken Noodle Casserole has captured hearts and appetites alike. Here are five reasons why this dish will become a staple in your kitchen:

  • Quick and Easy Preparation: With straightforward steps and minimal prep time, you’ll have this casserole in the oven in no time, making it perfect for busy weeknights.
  • Family-Friendly Flavor: This dish is a hit with both kids and adults, blending familiar tastes that everyone loves. It’s an easy way to get the whole family excited about dinner!
  • Versatile Ingredients: Customize the casserole with your favorite veggies or proteins. It’s a fantastic way to use up leftovers and create a dish that’s uniquely yours.
  • Healthy Comfort Food: With a balance of lean protein and vegetables, it’s a guilt-free indulgence that fits into a healthy lifestyle.
  • Make-Ahead Convenience: This casserole can be assembled ahead of time and stored in the fridge or freezer, making it an ideal option for meal prep.

Ingredient Breakdown and Substitutions

Let’s dive deep into the ingredients that make this casserole shine. Here’s what you’ll need, along with some great substitutions if you want to mix things up:

  • 1 can (10.5 ounces) Campbell’s Condensed 98% Fat-Free Cream of Chicken Soup: A creamy base that adds richness without excess calories. You can substitute with homemade cream of chicken soup or any cream soup of your choice.
  • 1/2 cup non-fat milk: This adds creaminess. You can use almond milk or oat milk for a dairy-free option.
  • 2-1/2 cups frozen mixed vegetables: A colorful mix of carrots, green beans, corn, and peas. Fresh veggies or any frozen mix will work perfectly!
  • 2 cups cubed boneless, skinless chicken breasts, cooked: For a quick protein boost, use rotisserie chicken or swap in shredded turkey.
  • 1-1/2 cups medium no-yolk egg noodles, cooked and drained: These noodles are light and fluffy. Feel free to use whole wheat noodles or gluten-free pasta for a healthier alternative.
  • 1/4 cup grated Parmesan cheese: This adds a savory note. You can substitute with nutritional yeast for a vegan option.
  • 1/4 teaspoon ground black pepper: Freshly ground pepper enhances flavor; use white pepper for a milder taste.
  • 1/2 cup reduced-fat shredded Cheddar cheese: The cheesy topping that brings it all together! Try using mozzarella or a dairy-free cheese blend if desired.

Pro Tips for the Perfect Casserole

Want to elevate your casserole game? Here are some expert insights to ensure your dish turns out perfectly every time:

  • Layer Wisely: When assembling, layer the ingredients carefully. This ensures even cooking and flavor distribution.
  • Don’t Overcook Noodles: Cook your egg noodles just until al dente before adding them to the casserole. They’ll continue cooking in the oven.
  • Experiment with Spices: Consider adding herbs like thyme, rosemary, or garlic powder to elevate the flavor profile.
  • Cover with Foil: To prevent over-browning, cover the casserole with aluminum foil during the first half of baking.
  • Rest Before Serving: Allow the casserole to sit for about 5-10 minutes after taking it out of the oven. This helps it set and makes serving easier.
  • Garnish for Presentation: A sprinkle of fresh parsley or green onions adds a pop of color and freshness.
  • Ensure Even Baking: Rotate the casserole halfway through the cooking time for even baking and browning.
  • Use a Thermometer: Ensure the internal temperature reaches 165°F for safe consumption.

Common Mistakes and Troubleshooting

Even the best chefs make mistakes! Here’s how to avoid common pitfalls when making your Hearty Chicken Noodle Casserole:

  • Too Watery? If your casserole turns out soupy, consider using less milk or draining the vegetables before adding them.
  • Dry Casserole? Ensure you use enough sauce and cheese. Adding a bit more cream soup can help retain moisture.
  • Uneven Cooking? Make sure to mix the ingredients thoroughly before baking. This ensures even heat distribution.
  • Bland Flavor? Don’t shy away from seasoning! Taste as you go and adjust with salt, pepper, or herbs to enhance the dish.

Variations to Try

Why not shake things up? Here are four delicious variations of the Hearty Chicken Noodle Casserole that you can try:

  • Savory Southwest Style: Add black beans, corn, and diced tomatoes with green chiles for a zesty twist.
  • Cheesy Broccoli Delight: Mix in steamed broccoli for added nutrition and an extra cheesy flavor by increasing the Cheddar cheese.
  • Italian-Inspired: Swap the chicken for Italian sausage and add marinara sauce along with Italian herbs.
  • Vegetarian Version: Replace chicken with chickpeas or tofu, and use vegetable broth instead of chicken soup for a hearty vegetarian option.

Storage and Make-Ahead Instructions

Make life easier with these storage tips! Here’s how to prepare and store your casserole:

  • Refrigerate: If you plan to eat it within a few days, cover and store it in the fridge for up to 3 days.
  • Freeze: For longer storage, freeze the uncooked casserole for up to 3 months. Just cover it tightly with plastic wrap and aluminum foil.
  • Reheat: To reheat, bake from frozen at 375°F for about 1 hour, or until heated through. If thawed, reduce baking time to 30-40 minutes.

Comprehensive FAQ

Got questions? I’ve got answers! Here are some frequently asked questions about the Hearty Chicken Noodle Casserole:

  • Can I use fresh vegetables instead of frozen? Absolutely! Just be sure to cook them slightly before adding them to the casserole.
  • How can I make this dish gluten-free? Use gluten-free pasta and ensure your soup and cheese are certified gluten-free.
  • Is it possible to double the recipe? Yes! Just make sure to use a larger baking dish and adjust cooking time as needed.
  • Can I use leftover rotisserie chicken? Yes! It’s a fantastic way to use leftovers and will save you prep time.
  • What can I serve with this casserole? A simple green salad or crusty bread pairs wonderfully!
  • Can I freeze leftovers? Yes! Store leftovers in an airtight container for up to 2 months.
  • How spicy is this casserole? It’s mild and family-friendly, but you can add hot sauce or spices to kick up the heat!
  • Can I make this casserole dairy-free? Yes! Use dairy-free cheese and plant-based milk alternatives.

Nutrition Tips and Dietary Adaptations

For those looking to keep it healthy, here are some nutrition tips to consider:

  • Lower Calories: Use low-fat versions of cheese and soup to reduce calories without sacrificing flavor.
  • Increase Fiber: Add more veggies or substitute whole grain noodles to boost fiber content.
  • Protein Boost: Consider adding beans or legumes for additional protein, especially in vegetarian versions.

Equipment Recommendations

Here’s what you’ll need to whip up this casserole:

  • 1-1/2 Quart Baking Dish: Ideal for cooking and serving your casserole.
  • Mixing Bowls: For combining ingredients easily.
  • Measuring Cups and Spoons: Precision is key for the best results!
  • Aluminum Foil: To cover your casserole during baking.

Serving Suggestions

Complete your meal with these serving ideas:

  • Fresh Salad: A side salad with a light vinaigrette balances the richness of the casserole.
  • Crusty Bread: Serve with warm bread for dipping into the creamy casserole.
  • Herb Garnish: Fresh herbs like parsley or chives add brightness and a pop of color.

There you have it! My Hearty Chicken Noodle Casserole is more than just a recipe; it’s a journey into the heart of home cooking. With this guide, you’re equipped to create a dish that not only satisfies hunger but also brings joy to the table. So grab your skillet, add a little fire to your food, and let the cooking adventure begin!

Hearty Chicken Noodle Casserole Recipe

Prep Time 10 minutes
Cook Time 25 minutes
Total Time 35 minutes
Servings 4 servings
Calories 450
A comforting and easy-to-make casserole combining chicken, vegetables, and noodles in a creamy sauce.

Ingredients

Canned Goods

  • 1 can Campbell's Condensed 98% Fat-Free Cream of Chicken Soup
  • 0.5 cup non-fat milk
  • 2.5 cups frozen mixed vegetables (carrots, green beans, corn, peas)
  • 2 cups cubed boneless, skinless chicken breasts, cooked
  • 1.5 cups medium no-yolk egg noodles, cooked and drained
  • 0.25 cup grated Parmesan cheese
  • 0.25 teaspoon ground black pepper
  • 0.5 cup reduced-fat shredded Cheddar cheese

Instructions 

  • Preheat oven to 400°F (200°C). In a baking dish, stir the soup, milk, vegetables, chicken, and noodles.
  • Bake for 25 minutes until vegetables are tender. Stir the mixture and sprinkle with Cheddar cheese.

Notes

You can prepare the chicken in advance for quicker assembly.
Calories: 450kcal
Cost: $15
Course: Main Course
Cuisine: American
Keyword: casserole, chicken, noodles

Nutrition

Calories: 450kcal | Carbohydrates: 50g | Protein: 35g | Fat: 10g | Sodium: 900mg

Unlocking the Power of Tofu Oatmeal: A Flavor Adventure

Welcome to a breakfast experience that’s as bold and vibrant as the Texas sun! This Tofu Oatmeal recipe isn’t just a meal; it’s an adventure waiting to ignite your mornings. Imagine creamy silken tofu blending harmoniously with the tart sweetness of kiwi and tangerine, creating an explosion of flavors in every bite. This dish is perfect for those who crave a balance of comfort and excitement, and it’s packed with nutrients to fuel your day.

In this article, we’ll dive deep into the world of tofu oatmeal, exploring its benefits, ingredient breakdown, and innovative variations that will keep your taste buds dancing. By the end, you’ll be ready to whip up a bowl that not only satisfies your hunger but also invites you to embrace the thrill of cooking with heat and flavor.

Why You’ll Love This Recipe

Before we get cooking, let’s explore why this tofu oatmeal is the perfect choice for your breakfast table:

  • High Protein Boost: With silken tofu, this oatmeal delivers a significant protein punch, making it ideal for muscle recovery and energy throughout the day.
  • Vegan and Gluten-Free: This recipe is suitable for various dietary needs, ensuring everyone can enjoy it without compromise.
  • Nutritious Ingredients: Packed with fiber from oats, vitamins from fruits, and healthy fats from walnuts, this dish supports a balanced diet.
  • Quick and Easy: Ready in under 30 minutes, it fits perfectly into your busy morning routine.
  • Creative Customization: The recipe serves as a canvas for your culinary creativity, allowing you to experiment with flavors and textures!

Ingredient Breakdown

Let’s take a closer look at what makes this dish special. Here’s what you’ll need:

  • 70 g of Jumbo Rolled Oats: These oats provide a hearty base, rich in fiber, keeping you full and satisfied.
  • 500 mL of Water: Essential for cooking the oats to a creamy consistency.
  • 0.5 tsp of Ground Ginger: Adds a warm, spicy kick that complements the sweetness of the fruits.
  • 2 Kiwi Fruits: Their vibrant flavor and texture elevate the dish, providing a refreshing contrast.
  • 220 g of Silken Tofu: The star ingredient that transforms this oatmeal into a creamy delight, packed with protein.
  • 2 Tangerines: For garnishing, their citrusy notes brighten the dish.
  • 20 g of Walnuts: A source of healthy fats and a satisfying crunch.
  • 5 g of Sesame Seeds: These tiny powerhouses add texture and an extra boost of nutrition.

If you’re missing any of these ingredients, don’t fret! Here are some substitutions:

  • Oats: You can use quick oats or even quinoa for a gluten-free option.
  • Silken Tofu: If you prefer a non-soy option, try using mashed banana or avocado for creaminess.
  • Ginger: Fresh ginger or ground cinnamon can substitute for a different flavor profile.
  • Fruits: Feel free to swap the kiwi and tangerines for seasonal fruits like berries or peaches.

Steps to Create Your Tofu Oatmeal

A side view of a creamy bowl of Tofu Oatmeal garnished with walnuts and sesame seeds.

Ready to get cooking? Let’s make this tofu oatmeal together!

  1. Prepare the Oats: In a pot, combine the oats with water and ground ginger. Bring to a boil and then simmer for about 5 minutes, stirring occasionally until the oats reach a creamy consistency.
  2. Blend the Tofu and Kiwi: While the oats are cooking, peel the kiwi and add it along with the silken tofu to a food processor. Blitz until smooth and creamy.
  3. Assemble Your Bowls: Divide the oatmeal among bowls. Top with the tofu cream and garnish with slices of tangerine, chopped walnuts, and a sprinkle of sesame seeds. Enjoy!

Pro Tips for the Perfect Tofu Oatmeal

Here are some expert insights to elevate your tofu oatmeal game:

  • Texture is Key: Ensure you use silken tofu for a creamy texture. Firm tofu can give a grainy feel if not blended thoroughly.
  • Flavor Boost: Experiment with spices like cardamom or nutmeg for a unique twist on flavor.
  • Serving Temperature: Serve the oatmeal warm for the best flavor. Cold tofu cream can be a refreshing contrast!
  • Prep Ahead: You can prepare the tofu cream a day in advance and store it in the fridge for a quick breakfast.
  • Mix it Up: Try adding nut butter or honey for additional flavor and richness.
  • Watch the Water: Adjust the water content based on your desired oatmeal thickness.
  • Garnish Accordingly: Don’t skip the garnishes; they add not just flavor but also a visual appeal to your dish.
  • Mind the Proportions: Adjust the quantity of oats and tofu based on how hearty you want your breakfast to be.

Common Mistakes and Troubleshooting

Even the best chefs make mistakes! Here’s how to avoid common pitfalls:

  • Too Thick?: If your oatmeal turns out too thick, simply stir in a little more water until you reach your desired consistency.
  • Blending Issues: If the tofu doesn’t blend smoothly, add a splash of water to help it along.
  • Overcooked Oats?: If the oats stick to the pot, reduce the heat and stir more frequently.
  • Flavor Flat?: If your oatmeal lacks flavor, don’t hesitate to add a pinch of salt or a drizzle of maple syrup.

Variations to Spice Up Your Oatmeal

Feeling adventurous? Here are some variations to keep your meals exciting:

  • Chocolate Lover’s Delight: Add cocoa powder to the tofu cream for a chocolatey twist.
  • Berry Bliss: Substitute kiwi and tangerine with mixed berries for a sweet-tart combo.
  • Nutty Banana: Replace walnuts with almond slivers and add sliced banana for a tropical vibe.
  • Spicy Kick: Add a dash of cayenne pepper to the oatmeal for a surprising heat that wakes up your taste buds.

Storage and Make-Ahead Instructions

This recipe is perfect for meal prep! Here’s how to store it:

  • Refrigerate: Store leftover oatmeal in an airtight container in the fridge for up to 3 days.
  • Freeze: You can freeze the cooked oatmeal for up to a month. Just thaw and reheat when ready to serve.
  • Tofu Cream Storage: Keep the tofu cream in the fridge for up to 3 days; stir well before using.

Frequently Asked Questions

Got questions about tofu oatmeal? We’ve got answers!

  • Can I make this recipe without oats?: Absolutely! You can substitute oats with quinoa or even rice for a different grain base.
  • Is this oatmeal gluten-free?: Yes, as long as you use certified gluten-free oats!
  • Can I use frozen fruit?: Yes, frozen fruits work perfectly! Just blend them into the tofu cream.
  • How do I adjust the sweetness?: You can add sweeteners like honey, agave, or maple syrup to taste.
  • Can I make this ahead of time?: Yes! The oatmeal can be made the night before and reheated in the morning.
  • What if I don’t like tofu?: You can substitute tofu with Greek yogurt or a non-dairy yogurt for creaminess.
  • How can I make this recipe more filling?: Add chia seeds or flaxseeds for extra fiber and nutrition.
  • Is this recipe suitable for meal prep?: Definitely! It holds up well in the fridge for several days.

Nutritional Tips and Dietary Adaptations

This tofu oatmeal is not just delicious but also packed with nutrition. Here are some dietary adaptations to consider:

  • Low-Calorie Version: Reduce the amount of walnuts or omit them to lower the calorie count.
  • High-Protein Variation: Add a scoop of your favorite protein powder to the oatmeal mix.
  • Fiber Boost: Incorporate chia seeds or ground flaxseed for an extra fiber punch.
  • Nut-Free Option: Omit walnuts and sesame seeds, and consider using pumpkin seeds instead.

Essential Equipment for Your Tofu Oatmeal

To make your cooking experience seamless, here’s what you’ll need:

  • Medium Pot: For cooking the oats.
  • Food Processor: To blend the tofu and fruits into a creamy mixture.
  • Measuring Cups and Spoons: For precise ingredient measurements.
  • Serving Bowls: To beautifully present your scrumptious creation.

Serving Suggestions

Now that you’ve created your masterpiece, here’s how to serve it:

  • Garnish Creatively: Top with fresh fruit, a drizzle of maple syrup, or a sprinkle of your favorite spices.
  • Pair with Drinks: Serve alongside a refreshing green smoothie or a robust cup of coffee.
  • Enjoy with Friends: Share this dish at brunch gatherings to impress your guests with something unique!

Embrace the Adventure of Cooking

As you stand over your bowl of Tofu Oatmeal, remember that cooking is an adventure — a chance to explore flavors, textures, and techniques. With every bite, you’re not just nourishing your body but also igniting your spirit. So grab your skillet, embrace the heat, and let your culinary journey unfold. Remember, food with spice is a story worth telling, and your oatmeal is just the beginning of delicious tales to come!

Tofu Oatmeal

Prep Time 5 minutes
Cook Time 10 minutes
Total Time 15 minutes
Servings 2 servings
Calories 350
A nutritious and delicious breakfast combining creamy tofu with hearty oatmeal and fresh fruit toppings.

Ingredients

Oats and liquids

  • 70 g Jumbo Rolled Oats
  • 500 mL Water
  • 0.5 tsp Ground Ginger

Fruits and toppings

  • 2 pieces Kiwi Fruit (peeled)
  • 2 pieces Tangerines
  • 220 g Silken Tofu (rinsed)
  • 20 g Walnuts (chopped)
  • 5 g Sesame Seeds

Instructions 

  • Combine oats, water, and ginger in a pot, bring to a boil, then simmer for 5 minutes.
  • Blend peeled kiwi and rinsed tofu until smooth in a food processor.
  • Divide oatmeal into bowls, top with tofu cream, and garnish with tangerine slices, walnuts, and sesame seeds.

Notes

For extra flavor, add a drizzle of honey or a sprinkle of cinnamon.
Calories: 350kcal
Cost: $8
Course: Breakfast
Cuisine: Fusion
Keyword: healthy, Oatmeal, Tofu

Nutrition

Calories: 350kcal | Carbohydrates: 55g | Protein: 15g | Fat: 10g | Sodium: 150mg

Why You’ll Love This Dish

If you’re on the hunt for a meal that effortlessly combines health, flavor, and convenience, look no further than this High Protein Chicken Alfredo Lasagna. This dish is not just a feast for the eyes; it’s a powerhouse of nutrients designed to fuel your body while tantalizing your taste buds. Imagine layers of tender chicken, creamy ricotta, and gooey mozzarella enveloped in a rich Alfredo sauce—all packed into a hearty lasagna that feels like a warm hug on a plate. Perfect for meal prep, this recipe makes weeknight dinners a breeze, and it’s kid-friendly, so you can say goodbye to the dinnertime battles. Plus, the protein-packed ingredients ensure that you’re not just filling your belly but also nourishing your body with every delicious bite.

Ingredients You’ll Need

Gathering the right ingredients is the first step toward culinary success. Here’s what you’ll need to create this heavenly dish:

  • 2 cups cooked shredded chicken
  • 12 whole wheat lasagna noodles
  • 2 cups low-fat ricotta cheese
  • 2 cups spinach, chopped
  • 2 cups low-fat mozzarella cheese, shredded
  • 2 cups Alfredo sauce (light or homemade)
  • 1/2 cup grated parmesan cheese
  • 1 teaspoon garlic powder
  • 1 teaspoon Italian seasoning
  • Salt and pepper to taste

Steps to Deliciousness

Satisfying portion of chicken alfredo lasagna, showcasing melted cheese and rich Alfredo sauce.

Now that you have your ingredients, let’s dive into the cooking process. Follow these steps to create your High Protein Chicken Alfredo Lasagna:

  1. Preheat your oven to 375°F (190°C).
  2. In a large mixing bowl, combine the cooked shredded chicken, ricotta cheese, chopped spinach, garlic powder, Italian seasoning, salt, and pepper. Mix until all ingredients are thoroughly blended.
  3. Spread a thin layer of Alfredo sauce on the bottom of a 9×13 inch baking dish. This layer is crucial; it prevents the noodles from sticking and adds flavor.
  4. Layer 4 lasagna noodles over the sauce, followed by half of the chicken mixture, half of the remaining Alfredo sauce, and a third of the mozzarella cheese.
  5. Repeat the layering process with another 4 lasagna noodles, the remaining chicken mixture, another layer of Alfredo sauce, and half of the remaining mozzarella cheese.
  6. Top with the last 4 lasagna noodles, the rest of the Alfredo sauce, and the remaining mozzarella cheese.
  7. Sprinkle the grated Parmesan cheese on top to give it that golden crust when baked.
  8. Cover the baking dish with foil and bake for 25 minutes. This will help cook the noodles and melt the cheese.
  9. Remove the foil and bake for an additional 15-20 minutes, or until the cheese is bubbly and golden.
  10. Let it cool for a few minutes before slicing into portions for meal prep.

Tips for Perfecting Your Lasagna

  • Cook Your Noodles Al Dente: Since the noodles will continue to cook in the oven, make sure they are slightly undercooked for the best texture.
  • Customize Your Greens: Feel free to swap out spinach for kale or add other veggies like zucchini or mushrooms for added nutrients.
  • Make It Ahead: This lasagna can be assembled a day in advance and stored in the fridge until you’re ready to bake it.

Variations to Try

This recipe is versatile, and you can easily tweak it to suit your preferences or dietary restrictions:

  • Swap the Protein: Use ground turkey or beef instead of shredded chicken for a different flavor profile.
  • Go Vegan: Substitute the chicken with lentils or chickpeas, swap ricotta with tofu or cashew cream, and use a dairy-free Alfredo sauce.
  • Experiment with Sauces: If Alfredo isn’t your thing, try a homemade marinara or pesto sauce.

Substitutions You Can Make

Not every kitchen has the same ingredients on hand, and that’s perfectly okay! Here are some substitutions you can make without sacrificing flavor:

  • Whole Wheat Noodles: Gluten-free lasagna noodles work just as well for a gluten-free option.
  • Low-Fat Cheese: If you want a creamier texture, you can use full-fat cheeses instead.
  • Alfredo Sauce: Making your own sauce can elevate the dish—try using Greek yogurt for a healthier twist!

Essential Equipment

Here’s what you’ll need to whip up this delicious lasagna:

  • 9×13 inch baking dish
  • Large mixing bowl
  • Cooking pot for boiling noodles
  • Aluminum foil

Storage and Freezing Tips

This lasagna is perfect for meal prep and can be stored or frozen for later enjoyment:

  • Refrigerator: Store leftovers in an airtight container for up to 4 days.
  • Freezer: Wrap tightly in plastic wrap and aluminum foil for up to 3 months. Just defrost overnight in the fridge before baking.

FAQs: Common Questions Answered

Here are some frequently asked questions that might help you in your cooking journey:

  • Can I use fresh spinach instead of chopped? Yes! Fresh spinach can be used, but ensure to sauté it first to reduce moisture.
  • Is this recipe kid-friendly? Absolutely! It’s cheesy, flavorful, and packed with protein, making it a hit with kids.
  • Can I make this gluten-free? Yes! Just switch to gluten-free lasagna noodles, and you’re all set.

Troubleshooting Common Issues

If you encounter any issues while making your lasagna, here are some solutions:

  • Dry Lasagna: If your lasagna turns out dry, try adding more sauce next time or covering it with foil for longer while baking.
  • Sticking Noodles: Make sure to layer enough sauce on the bottom and between the noodles to prevent sticking.
  • Uneven Baking: If your lasagna isn’t baking evenly, rotate it halfway through the cooking time.

In Conclusion

Your culinary adventure doesn’t have to stop here! This High Protein Chicken Alfredo Lasagna is just the beginning of exploring nutritious and delicious meal prep recipes. With its layers of flavor and wholesome ingredients, this dish is sure to become a staple in your kitchen. Remember, cooking is all about embracing creativity and making it your own. So grab your apron, turn up the heat, and get ready to delight in every bite. Enjoy your cooking journey, and may your meals always be filled with flavor and fun!

HIGH PROTEIN Macro Friendly Chicken Alfredo Lasagna Meal Prep Recipe

Prep Time 15 minutes
Cook Time 40 minutes
Total Time 55 minutes
Servings 6 portions
Calories 550
This high-protein, macro-friendly chicken lasagna is perfect for meal prep, combining lean chicken, whole wheat noodles, and light cheeses for a nutritious and delicious dish.

Ingredients

Protein

  • 2 cups cooked shredded chicken
  • 12 noodles whole wheat lasagna noodles
  • 2 cups low-fat ricotta cheese
  • 2 cups spinach, chopped
  • 2 cups low-fat mozzarella cheese, shredded
  • 2 cups alfredo sauce (light or homemade)
  • 0.5 cup grated parmesan cheese
  • 1 teaspoon garlic powder
  • 1 teaspoon italian seasoning
  • to taste salt and pepper

Instructions 

  • Preheat oven to 375°F (190°C).
  • Mix chicken, ricotta, spinach, garlic powder, Italian seasoning, salt, and pepper.
  • Layer sauce, noodles, chicken mixture, sauce, and cheese in a baking dish; repeat layers.
  • Top with Parmesan, cover with foil, and bake 25 minutes; uncover and bake 15-20 minutes until bubbly.
  • Let cool briefly before slicing for meal prep.

Notes

Using light Alfredo sauce and lean chicken keeps this dish high in protein and lower in fat.
Calories: 550kcal
Cost: $15
Course: Main Course
Cuisine: Italian
Keyword: chicken, High Protein, Lasagna

Nutrition

Calories: 550kcal | Carbohydrates: 60g | Protein: 50g | Fat: 15g | Sodium: 900mg

Loved this recipe? Save it to your favorite Pinterest board so you can easily find it later! It’s the perfect way to keep all your sweet ideas in one place. ✨

Delicious slice of healthy chicken alfredo lasagna with vibrant spinach and golden crust.

Why You’ll Love This Recipe

Ah, the Instant Pot Chicken Breast! If you’ve ever found yourself staring blankly at a pile of chicken breasts in your fridge, unsure of how to transform them into something spectacular, then this is your culinary call to adventure. This recipe is designed for everyone — from the novice home cook to the seasoned professional looking to spice things up. Not only does it yield juicy and tender chicken, but it also packs a punch of flavor that can elevate any meal.

Picture this: succulent chicken, perfectly seasoned, bursting with flavor, and ready to be paired with anything from a fresh salad to creamy mashed potatoes. The Instant Pot takes the guesswork out of cooking chicken, ensuring that you achieve that coveted moistness every time. Plus, it’s quick, easy, and perfect for those busy weeknights when you want to whip up something delicious without spending hours in the kitchen.

Ingredients You’ll Need

To embark on this flavor journey, gather the following ingredients:

  • 1 pound boneless, skinless chicken breasts
  • 1 tablespoon olive oil
  • 1 teaspoon garlic powder
  • 1 teaspoon onion powder
  • 1 teaspoon paprika
  • Salt and pepper to taste
  • 1 cup chicken broth
  • 1 tablespoon lemon juice

Ingredient Notes

Detailed shot of tender chicken breasts cooked in an Instant Pot, highlighting their juicy texture and spices.

Let’s break down these ingredients and explore what makes them essential:

  • Boneless, skinless chicken breasts: This is the star of the show! Boneless and skinless ensures quick cooking and easy slicing.
  • Olive oil: Adds richness and helps develop a beautiful, golden crust when sautéing the chicken.
  • Spices: Garlic powder, onion powder, and paprika create a robust flavor base. Feel free to experiment with your favorite spices — cumin and chili powder would add a delightful kick!
  • Chicken broth: This adds moisture and depth to the dish. Homemade broth is the best, but store-bought works perfectly in a pinch.
  • Lemon juice: This brightens up the flavors and adds a touch of acidity that balances the richness of the chicken.

How to Cook Chicken Breast in the Instant Pot

Now, let’s get down to the glorious business of cooking:

  1. Start by seasoning the chicken breasts generously with garlic powder, onion powder, paprika, salt, and pepper. Don’t be shy; give them a good rub!
  2. Turn on the Instant Pot and select the ‘Sauté’ function. Add the olive oil and let it heat up until shimmering.
  3. Once the oil is hot, add the seasoned chicken breasts to the pot. Brown them for 2-3 minutes on each side until they develop a gorgeous golden color. This step is crucial for building flavor.
  4. Remove the chicken from the pot and set it aside on a plate. Take a moment to appreciate the delicious aroma lingering in the air!
  5. Pour in the chicken broth and lemon juice, scraping the bottom of the pot with a wooden spoon to release any browned bits. These are flavor bombs that will make your dish even better!
  6. Return the chicken to the pot, ensuring it’s nestled nicely in the liquid. Seal the lid tightly.
  7. Select the ‘Manual’ or ‘Pressure Cook’ function and set the timer for 8 minutes. Yes, just 8 minutes for perfect chicken!
  8. Once the cooking time is complete, allow for a natural release for 5 minutes. After that, do a quick release for any remaining pressure. This helps keep the chicken juicy.
  9. Remove the chicken from the pot and let it rest for a few minutes before slicing or shredding. This will help retain the juices!

Recipe Tips

Here are some quick tips to ensure your chicken turns out perfect every time:

  • Don’t Overcrowd the Pot: If you’re making a larger batch, brown the chicken in batches to avoid steaming.
  • Let It Rest: Allowing the chicken to rest after cooking is critical for juiciness. This is the time to prep your sides!
  • Flavor Variations: Feeling adventurous? Add a splash of soy sauce for an Asian flair or some hot sauce for a spicy kick.

Serving Ideas

The versatility of this chicken breast recipe is one of its best features. Here are a few ideas for how to serve it:

  • Over Rice: Serve the chicken sliced over a bed of fluffy rice, drizzled with the flavorful broth.
  • In Tacos: Shred the chicken and use it as a filling for tacos. Top with fresh cilantro, diced onions, and a squeeze of lime.
  • On a Salad: Slice it thinly and toss it on a fresh salad with your favorite greens, avocado, and a zesty dressing.
  • With Vegetables: Pair it with steamed or roasted vegetables for a balanced meal.

Storage Tips

Got leftovers? No problem! Here’s how to store them:

  • Keep the cooked chicken in an airtight container in the fridge for up to 3 days. For added moisture, drizzle a bit of the cooking broth over the chicken before sealing.
  • To freeze, slice or shred the chicken and store it in freezer-safe bags with some broth. It will last up to 3 months.
  • When reheating, do it gently on the stove or in the microwave with a splash of water or broth to ensure it stays juicy.

FAQs

Here are some frequently asked questions about cooking chicken in the Instant Pot:

  • Can I use frozen chicken breasts? Yes! Just increase the cooking time to about 10-12 minutes and allow for a longer natural release.
  • What if I don’t have chicken broth? You can substitute with vegetable broth, or even water, but the flavor may be less rich.
  • Can I use skin-on chicken breasts? Absolutely! Just be mindful that it may take a little longer to cook and the skin will not get crispy in the Instant Pot.

Troubleshooting

If you encounter any issues while cooking, here are some common problems and solutions:

  • Chicken is dry: This usually happens from overcooking. Always stick to the recommended cooking times and allow for resting.
  • Instant Pot says ‘Burn’: This can occur if there are too many browned bits at the bottom. Make sure to scrape well after sautéing and use enough liquid.

Conclusion

Cooking with the Instant Pot not only saves time but also opens the door to a world of flavor possibilities. This Instant Pot Chicken Breast recipe is a testament to that, combining simplicity with a burst of flavor that will leave your taste buds dancing. Whether you’re meal prepping for the week or whipping up a quick dinner, this recipe is bound to become a staple in your kitchen. So go ahead, embrace the heat, grab your ingredients, and get ready to unleash some serious flavor in your kitchen! Happy cooking!

Instant Pot Chicken Breast Recipe - Savory Nothings

Prep Time 10 minutes
Cook Time 8 minutes
Total Time 18 minutes
Servings 4 servings
Calories 220
Juicy and flavorful chicken breasts cooked quickly in the Instant Pot, perfect for a healthy meal.

Ingredients

Protein

  • 1 pound boneless, skinless chicken breasts
  • 1 tablespoon olive oil
  • 1 teaspoon garlic powder
  • 1 teaspoon onion powder
  • 1 teaspoon paprika
  • to taste salt and pepper salt and pepper
  • 1 cup chicken broth
  • 1 tablespoon lemon juice

Instructions 

  • Season chicken with garlic powder, onion powder, paprika, salt, and pepper.
  • Use Sauté mode; add olive oil and brown chicken 2-3 mins per side.
  • Remove chicken; pour in broth and lemon juice, scraping browned bits.
  • Return chicken, seal lid, cook on Manual for 8 mins, then natural release 5 mins.
  • Rest chicken a few minutes before slicing or shredding.

Notes

Use a meat thermometer to ensure chicken reaches 165°F (74°C).
Calories: 220kcal
Cost: $10
Course: Main Course
Cuisine: American
Keyword: chicken

Nutrition

Calories: 220kcal | Carbohydrates: 4g | Protein: 40g | Fat: 5g | Sodium: 300mg

Loved this recipe? Save it to your favorite Pinterest board so you can easily find it later! It’s the perfect way to keep all your sweet ideas in one place. ✨

Eye-level view of perfectly cooked chicken breast, showcasing a golden-brown crust and inviting ambiance.

Unleash the Flavor: The Ultimate Guide to Spaghetti Squash

Welcome to the vibrant world of spaghetti squash, a humble vegetable that, when treated with the right spices and techniques, transforms into a dish bursting with flavor. Whether you’re a seasoned chef or just starting your culinary journey, this guide will not only teach you how to roast spaghetti squash whole but also inspire you to explore its versatile applications. Ready to take your cooking game to the next level? Let’s dive in!

Why You’ll Love This Recipe

Spaghetti squash is more than just a low-carb alternative to pasta; it’s a canvas for your culinary creativity. Here’s why this recipe will become a staple in your kitchen:

  • Health Benefits: Packed with vitamins A and C, fiber, and antioxidants, spaghetti squash is a nutritious addition to any meal.
  • Versatile Base: This squash can be used in various dishes, from hearty casseroles to light salads, making it a flexible ingredient.
  • Simple Preparation: Roasting spaghetti squash whole is straightforward and requires minimal prep time, allowing you to focus on other components of your meal.
  • Great for Meal Prep: Cook a batch at the beginning of the week, and use it in multiple meals to save time.
  • Family-Friendly: With its noodle-like texture, spaghetti squash is a hit with kids and adults alike!

Ingredient Breakdown

To prepare this delightful dish, you’ll need just a few simple ingredients:

  • 1 large spaghetti squash (4-6 lbs.): The star of the show. You can choose organic for a cleaner option.
  • 1 pinch salt: Enhances the natural flavors. Use it when done on “noodles” for the best taste.

Substitutions: If you’re looking to spice things up, consider adding a drizzle of olive oil before roasting or a sprinkle of your favorite spice blend to elevate the flavor.

How to Roast Spaghetti Squash Whole

Side view of a whole spaghetti squash on a wooden cutting board, sliced open to reveal its texture.

Roasting spaghetti squash whole is as simple as it gets. Follow these steps to achieve a perfectly tender squash:

  • Prep the Squash: Using a very sharp knife, insert about 2 inches deep around the squash, creating vents to prevent it from exploding in the oven.
  • Roast: Place the squash on a baking sheet and put it in a preheated oven at 425°F for 60 minutes for a 4 lb squash, or up to 90 minutes for a 6 lb squash.
  • Check for Tenderness: Remove the squash and slice it lengthwise. If it isn’t tender enough, flip it flesh side down and roast for an additional 15 minutes.
  • Scrape the Noodles: Once tender, use a fork to scrape out the “noodles” and serve!

Pro Tips for Perfect Spaghetti Squash

Master the art of cooking spaghetti squash with these expert insights:

  • Choose the Right Squash: Look for a squash that feels heavy for its size with a firm, unblemished skin.
  • Vent Properly: Always vent the skin to avoid explosive surprises in the oven!
  • Adjust Cooking Time: Cooking times may vary based on the size of your squash, so keep an eye on it.
  • Let It Rest: After roasting, let the squash sit for a few minutes before scraping to allow steam to escape.
  • Season Generously: Don’t be shy with the salt and other seasonings; it makes a world of difference.
  • Use a Sharp Fork: For the best “noodle” texture, use a fork with sturdy tines for scraping.
  • Experiment with Flavors: Try different seasonings and sauces to discover your favorite combinations.
  • Store Properly: Keep leftover squash in an airtight container in the fridge for up to five days.

Common Mistakes and Troubleshooting

Even the best chefs make mistakes! Here are common pitfalls and how to avoid them:

  • Squash Not Tender: If the squash isn’t tender after cooking, it likely needs more time. Flip it and roast longer.
  • Dry Noodles: Overcooking can lead to dryness; keep an eye on your squash as it roasts.
  • Too Much Salt: Start with a pinch – you can always add more later!
  • Hard to Scrape: If the squash isn’t easily shredding, it may need more cooking time.

Delicious Variations

Once you’ve mastered the basic recipe, try these exciting variations:

  • Spaghetti Squash Casserole: Layer your noodles with marinara sauce, cheese, and veggies for a comforting meal.
  • Buffalo Chicken Spaghetti Squash: Toss shredded chicken in buffalo sauce and mix with the squash for a spicy kick!
  • Vegan Alfredo: Combine the noodles with a creamy vegan alfredo sauce for a rich and satisfying dish.
  • Tex-Mex Style: Add black beans, corn, and avocado for a fresh, zesty flavor.

Storage and Make-Ahead Instructions

Planning ahead? Here’s how to store and prepare your spaghetti squash:

  • Refrigeration: Store cooked squash in an airtight container for up to five days.
  • Freezing: You can freeze cooked spaghetti squash in freezer bags for up to three months. Just be sure to remove as much air as possible.
  • Make-Ahead Meals: Roast a few squashes at once and use them throughout the week in various dishes.

Comprehensive FAQ

Got questions? We’ve got answers!

  • How do I know when my spaghetti squash is ripe? Look for a squash with a hard skin and a dull finish.
  • Can I microwave spaghetti squash? Yes, but roasting gives the best flavor and texture.
  • How long does it take to roast spaghetti squash? Typically, it takes around 60-90 minutes at 425°F.
  • Can I eat the seeds? Yes! Roast them like pumpkin seeds for a crunchy snack.
  • What sauces go well with spaghetti squash? Marinara, pesto, and alfredo are fantastic options.
  • Is spaghetti squash gluten-free? Absolutely! It’s a great alternative for those avoiding gluten.
  • How do I store leftovers? Keep in an airtight container in the refrigerator.
  • What’s the best way to reheat spaghetti squash? Microwave or quickly sauté in a pan with a bit of oil or butter.

Nutritional Tips and Dietary Adaptations

Spaghetti squash is not only delicious but also nutritious. Here’s how to make the most of it:

  • Low-Calorie Option: This squash is low in calories and high in fiber, making it a perfect base for weight management.
  • For a Vegan Dish: Pair with plant-based sauces and veggies for a satisfying meal.
  • Boost with Protein: Add grilled chicken, shrimp, or beans to enhance protein content.

Equipment Recommendations

To achieve the best results, consider using:

  • Sharp Chef’s Knife: Essential for safely cutting through the tough skin of the squash.
  • Baking Sheet: A sturdy, rimmed sheet is perfect for catching drips while roasting.
  • Oven Mitts: Protect your hands when handling hot items!

Serving Suggestions

Serve your spaghetti squash creatively to impress your guests:

  • As a Base: Use it as a substitute for pasta in your favorite Italian dishes.
  • Stuffed Squash Boats: Fill the halves with your choice of protein and vegetables for a hearty meal.
  • With a Side Salad: Pair with a fresh salad for a balanced meal.

Conclusion

Cooking spaghetti squash whole is a game-changer that opens up a world of culinary possibilities. With its unique texture and ability to absorb flavors, this squash deserves a prominent place in your kitchen. So grab your knife, preheat your oven, and prepare to embark on a flavor-packed adventure that will ignite your passion for cooking. Remember, the only limitation in the kitchen is your imagination. Let’s get cooking!

Spaghetti Squash Whole Recipe

Prep Time 10 minutes
Cook Time 1 hour
Total Time 1 hour 10 minutes
Servings 4 servings
Calories 150
A simple and healthy way to enjoy spaghetti squash as a low-carb alternative to pasta. Perfect for a quick, nutritious meal.

Ingredients

Main

  • 1 large spaghetti squash (4-6 lbs.)
  • 1 pinch salt (use when done on "noodles")

Instructions 

  • Insert about 2" cuts all over the squash to vent.
  • Bake at 425°F for 60 minutes.
  • Slice lengthwise and bake for an additional 15 minutes if needed.
  • Scrape out the noodles with a fork and season with salt.

Notes

Be sure to check tenderness before scraping out the noodles.
Calories: 150kcal
Cost: $15
Course: Main Course
Cuisine: American
Keyword: Spaghetti Squash

Nutrition

Calories: 150kcal | Carbohydrates: 35g | Protein: 4g | Fat: 1g | Sodium: 50mg

Welcome to Your New Breakfast Adventure

Are you ready to transform your mornings with a dish that dances with flavor and green goodness? This Spinach & Cheese Omelette is more than just a meal; it’s an experience that invites you to embrace the art of cooking with boldness. Packed with vibrant greens and creamy cheese, this omelette isn’t just easy to whip up — it’s a celebration of tastes that will awaken your senses. Let’s dive into this culinary journey and discover why this recipe will become a staple in your breakfast rotation!

Why You’ll Love This Recipe

  • Quick and Easy: With just a few basic ingredients and minimal prep time, you can have a delicious breakfast on the table in under 15 minutes.
  • Nutritious and Wholesome: This omelette is loaded with fresh spinach, providing you with essential vitamins and minerals to kickstart your day.
  • Customizable: Feel free to experiment! Swap out ingredients or add your favorite spices to create a unique dish that suits your palate.
  • Perfect for Meal Prep: Make a few omelettes in advance and store them in the fridge for a quick, satisfying breakfast throughout the week.
  • Great for Any Meal: While it shines at breakfast, this dish works wonderfully as a light lunch or dinner option, making it a versatile addition to your recipe collection.

Ingredient Breakdown

For the Spinach & Cheese Omelette, you will need:

  • 2 tbsp extra virgin olive oil: This adds a rich flavor and helps achieve a beautiful golden color.
  • 3 cloves garlic: Minced for a punch of flavor that infuses the entire dish.
  • 1/2 onion: Diced finely to add sweetness and depth to your omelette.
  • 2 cups fresh spinach: Packed with nutrients, it wilts down beautifully, adding color and health benefits.
  • 3 cage-free organic eggs: The star of the show, providing protein and richness to the omelette.
  • 1 slice havarti cheese: Creamy and melty, it adds a luscious texture and flavor that pairs perfectly with spinach.
  • 1 tomato: Freshly sliced, it makes a bright accompaniment that adds a burst of freshness.
  • Pinch sea salt and black pepper: Essential seasonings to elevate the dish.

Possible Substitutions

  • Cheese: Feel free to use your favorite cheese like feta, cheddar, or mozzarella for different flavor profiles.
  • Spinach: Kale or Swiss chard can be great alternatives if you want to mix things up.
  • Olive oil: Butter or a flavored oil can add a rich taste to the cooking process.
  • Garlic and onion: You can skip these if you prefer a milder flavor, or use garlic powder and onion powder instead.

Pro Tips for the Perfect Omelette

A side view of a fluffy omelette filled with spinach and havarti cheese, garnished with tomato slices.
  • Whisk well: Make sure to whisk the eggs thoroughly for a fluffy texture. You want a nice, uniform mixture that’s well combined.
  • Medium heat is key: Cooking on medium heat allows the eggs to set without burning, giving you a perfectly cooked omelette.
  • Don’t overcrowd the pan: Give the ingredients space to cook evenly, ensuring that each bite is full of flavor.
  • Let it rest: After folding, let the omelette rest for a minute before serving. This helps the cheese melt and the flavors meld.
  • Fresh ingredients: Always opt for the freshest spinach and eggs for the best flavor and nutrition.
  • Experiment with seasoning: Feel free to add herbs like basil or chives for an extra layer of flavor.
  • Flip with care: Use a spatula to gently flip the omelette if you prefer a fully cooked middle without runny eggs.
  • Serve immediately: Omelettes are best enjoyed fresh off the skillet when they’re warm and fluffy.

Avoid These Common Mistakes

  • Overcooking: Keep an eye on your omelette to avoid a rubbery texture. It should be just set but still slightly creamy.
  • Using cold ingredients: Room temperature eggs and vegetables cook more evenly and yield a better texture.
  • Neglecting seasoning: Salt enhances the flavor of the eggs and should not be overlooked. Season your eggs before cooking!

Delicious Variations

  • Southwestern Style: Add diced jalapeños, corn, and a sprinkle of cumin for a spicy twist.
  • Mediterranean Delight: Incorporate feta cheese, sun-dried tomatoes, and olives for a Mediterranean flair.
  • Veggie-Packed: Throw in bell peppers, mushrooms, and zucchini for a hearty vegetable omelette.
  • Herbed Omelette: Mix fresh herbs like dill, parsley, and cilantro into the eggs for refreshing flavors.

Storage and Make-Ahead Instructions

This omelette is best enjoyed fresh, but you can make it ahead of time! Here’s how to store it:

  • Refrigeration: Store leftovers in an airtight container in the fridge for up to 3 days.
  • Freezing: For longer storage, you can freeze the omelette. Wrap it tightly in plastic wrap and then in aluminum foil. It will last up to a month.
  • Reheating: Reheat in a microwave or skillet until warmed through. Add a splash of water in the microwave to keep it moist.

FAQ: Your Burning Questions Answered

  • Can I use frozen spinach? Yes! Just make sure to thaw and drain it well before adding it to the omelette.
  • What’s the best way to flip an omelette? Gently slide a spatula under one side and lift, folding it over. Practice makes perfect!
  • Can I add meat to my omelette? Absolutely! Cooked bacon, sausage, or ham can be delicious additions.
  • What if I don’t have a nonstick pan? Just ensure to use plenty of oil or butter to prevent sticking.
  • How do I know when my omelette is done? The edges should be set, and the center should be slightly soft but not runny.
  • Can I use egg whites only? Yes! You can make a lighter version using just egg whites, but the texture will differ.
  • What’s the nutritional value of this omelette? This dish is rich in protein, vitamins A and C, and healthy fats, making it a balanced meal.
  • Can I make this omelette vegan? Yes! Substitute eggs with a mixture of chickpea flour and water or use tofu for a similar texture.

Nutritional Tips and Dietary Adaptations

This Spinach & Cheese Omelette can easily be adapted to fit various dietary needs:

  • Low-Carb: This recipe is naturally low in carbs, perfect for keto diets. Just watch the cheese portions.
  • Gluten-Free: The ingredients are naturally gluten-free, making it safe for those with gluten sensitivities.
  • Dairy-Free: Use dairy-free cheese or nutritional yeast for a cheesy flavor without the dairy.
  • Vegetarian: This recipe is vegetarian-friendly, making it a great option for plant-based diets.

Equipment Recommendations

To make your omelette-making experience seamless, I recommend having the following tools on hand:

  • Nonstick Fry Pan: A good quality nonstick skillet ensures easy flipping and cleanup.
  • Spatula: A flexible spatula is essential for gently lifting and folding your omelette.
  • Whisk: Use a whisk for perfectly mixed eggs.
  • Cutting Board: A sturdy board will help you chop your ingredients with ease.

Serving Suggestions

This versatile omelette can be paired with various sides to create a complete meal. Here are some ideas:

  • Fresh Fruit: Pair with seasonal fruits like berries or sliced oranges for a refreshing touch.
  • Whole Grain Toast: Serve alongside a slice of whole grain or sourdough bread for added texture.
  • Greens Salad: A light salad with vinaigrette complements the richness of the omelette beautifully.
  • Herbed Yogurt: A dollop of herbed yogurt on the side adds creaminess and a flavor pop.

Conclusion: Elevate Your Breakfast Game

Now that you have the keys to crafting a sensational Spinach & Cheese Omelette, it’s time to embrace your culinary creativity. Remember, cooking is not just about following a recipe; it’s about experimenting, learning, and having fun in the kitchen. So grab your skillet, add a little fire to your food, and get ready to serve up a breakfast that’s not just a meal, but a story worth telling. Enjoy every bite, and let the flavors inspire you to explore new horizons in your cooking journey!

Spinach & Cheese Omelette | Easy Breakfast Recipe

Prep Time 5 minutes
Cook Time 10 minutes
Total Time 15 minutes
Servings 1 serving
Calories 250
A quick and nutritious breakfast featuring fresh spinach, cheese, and eggs, perfect for a healthy start to your day.

Ingredients

Oil

  • 2 tbsp extra virgin olive oil

Vegetables

  • 3 cloves garlic
  • 0.5 onion onion
  • 2 cups fresh spinach

Eggs

  • 3 cage-free organic eggs eggs

Dairy

  • 1 slice Havarti cheese
  • 1 tomato tomato

Seasonings

  • pinch sea salt sea salt
  • pinch black pepper black pepper

Instructions 

  • Mince garlic, dice onion, crack eggs into a bowl, season with salt & pepper, and whisk.
  • Heat olive oil in a pan, sauté onions and garlic for 3 minutes.
  • Add spinach, cook until wilted, then season with salt and pepper.
  • Pour egg mixture into the pan, cook for 2 minutes, add cheese, fold, and cook for 30 seconds.
  • Flip omelette, cook another 30 seconds, then serve with sliced tomatoes.

Notes

Use fresh ingredients for best flavor and nutrition.
Calories: 250kcal
Cost: $8
Course: Breakfast
Keyword: Cheese, Eggs, Spinach

Nutrition

Calories: 250kcal | Carbohydrates: 8g | Protein: 15g | Fat: 18g | Sodium: 300mg

Why This Dish is a Game Changer

If you’re on the lookout for a meal that perfectly balances comfort and a kick of excitement, look no further than this Creamy Buffalo Chicken Pasta Bake. It’s not just another casserole; it’s a protein-packed flavor bomb that will have your taste buds singing and your stomach satisfied. Whether you’re navigating a busy weeknight or planning for a cozy gathering, this dish brings a fiery touch to your dinner table without demanding hours in the kitchen. Let’s dive deep into what makes this dish so irresistible!

An Explosion of Flavor

Imagine biting into a creamy and spicy pasta dish that’s as comforting as a warm hug and as invigorating as a shot of espresso. This recipe strikes the perfect balance, with the rich creaminess of cream cheese and Greek yogurt mingling beautifully with the bold, zesty kick of buffalo sauce. It’s a flavor profile that hits all the right notes, making it a standout choice for any occasion.

Recipe

A vibrant, baked pasta dish featuring shredded chicken and a Buffalo sauce, served in a cozy setting.

Description

This creamy buffalo chicken pasta bake is a delightful combination of tender pasta, shredded chicken, and a luscious cheese topping, all infused with the fiery essence of buffalo sauce. It’s a high-protein dish that packs a punch while ensuring you still feel like you’re indulging in a comforting meal.

Ingredients

  • 8 ounces penne pasta
  • 2 cups cooked shredded chicken
  • 1 cup buffalo sauce
  • 1 cup cream cheese, softened
  • 1 cup Greek yogurt
  • 1 cup shredded cheddar cheese
  • 1 cup shredded mozzarella cheese
  • 1/2 cup chopped green onions
  • 1 teaspoon garlic powder
  • 1 teaspoon onion powder
  • Salt and pepper to taste
  • Fresh parsley for garnish (optional)

Instructions

  1. Preheat the oven to 350°F (175°C).
  2. Cook the penne pasta according to package instructions until al dente, then drain.
  3. In a large bowl, mix together the shredded chicken, buffalo sauce, cream cheese, Greek yogurt, garlic powder, onion powder, salt, and pepper until well combined.
  4. Add the cooked pasta and half of the shredded cheddar and mozzarella cheese to the chicken mixture, stirring until everything is evenly coated.
  5. Transfer the mixture to a greased baking dish and spread it out evenly.
  6. Top with the remaining shredded cheddar and mozzarella cheese, and sprinkle with chopped green onions.
  7. Bake in the preheated oven for 25-30 minutes, or until the cheese is bubbly and golden.
  8. Remove from the oven, garnish with fresh parsley if desired, and let cool for a few minutes before serving.

Why This Recipe Works

What sets this dish apart from other high-protein recipes is its ability to deliver on both flavor and nutrition without compromise. Here’s why you’ll want to keep it in your rotation:

  • High Protein Punch: Lean chicken and Greek yogurt provide a substantial amount of protein, making this dish not only filling but also muscle-friendly.
  • Comfort Food with a Twist: It’s a delightful blend of creamy and spicy that feels indulgent yet is packed with health benefits.
  • Quick and Easy: Prep and bake this dish in under an hour, making it perfect for those busy weeknights.

Tips for Success

To ensure your Creamy Buffalo Chicken Pasta Bake turns out perfectly every time, keep these tips in mind:

  • Cook Your Pasta Al Dente: This helps keep the pasta firm and prevents it from becoming mushy during baking.
  • Use Rotisserie Chicken: For an even quicker preparation, consider using store-bought rotisserie chicken. It saves time and adds incredible flavor.
  • Customize Your Heat Level: Adjust the amount of buffalo sauce to suit your spice tolerance. If you want a milder version, reduce the sauce or use a mild variant.

Variations to Try

Get creative with your pasta bake! Here are a few variations to consider:

  • Vegetarian Twist: Swap the chicken for roasted vegetables like bell peppers, zucchini, or mushrooms to create a hearty vegetarian version.
  • Cheesy Extravaganza: Add extra layers of different cheeses like pepper jack or gouda for a unique flavor profile.
  • Whole Wheat Pasta: Use whole wheat penne for added fiber and a healthier option.

Smart Substitutions

Need to adjust the recipe? Here are some smart swaps:

  • Greek Yogurt: Can be substituted with sour cream for a creamier texture.
  • Buffalo Sauce: Try using barbecue sauce for a sweet and smoky flavor.
  • Cheese Options: Any melting cheese works—think Monterey Jack or even a dairy-free cheese for a lactose-free version.

Equipment You’ll Need

To whip up this delicious bake, you’ll need the following kitchen equipment:

  • Large pot for boiling pasta
  • Colander for draining pasta
  • Large mixing bowl
  • Baking dish (9×13 inches recommended)
  • Oven mitts
  • Serving spoon

Storage and Freezing

Got leftovers? This dish stores beautifully! Here’s how to keep it fresh:

  • Refrigerator: Store in an airtight container for up to 3-4 days.
  • Freezer: This pasta bake freezes well. Allow it to cool completely, then transfer to a freezer-safe container for up to 3 months. Reheat in the oven directly from frozen, allowing extra time for baking.

FAQs

Got questions? I’ve got answers! Here are some frequently asked questions about this dish:

  • Can I make this dish ahead of time? Absolutely! You can prepare it in advance and store it in the fridge until you’re ready to bake.
  • What side dishes go well with this pasta bake? A fresh green salad or some roasted vegetables are perfect accompaniments to balance the richness of the dish.
  • How do I know when it’s done? It’s ready when the cheese is bubbly and golden brown on top, and the edges are slightly crispy.

Troubleshooting Common Issues

If you encounter any issues, here’s how to troubleshoot:

  • Too Dry: If your pasta bake turns out dry, it could be due to overbaking. Keep an eye on it and remove it as soon as the cheese is melted and golden.
  • Not Spicy Enough: If you want more heat, consider drizzling extra buffalo sauce on top before serving or mixing in some diced jalapeños.

Final Thoughts

This Creamy Buffalo Chicken Pasta Bake is more than just a meal; it’s an experience. It invites you to embrace the flavors of bold spices and creamy comfort, reminding us all that cooking can be both fun and fulfilling. So the next time you’re in the mood for something that ignites your taste buds and satisfies your hunger, whip up this dish and enjoy the explosion of flavors. Don’t forget to share it with friends and family—after all, good food is best enjoyed with those we love! Happy cooking!

Creamy Buffalo Chicken Pasta Bake | High Protein Dinner Recipes for Busy Nights

Prep Time 10 minutes
Cook Time 30 minutes
Total Time 40 minutes
Servings 4 servings
Calories 650
This creamy buffalo chicken pasta bake is a quick, high-protein dinner perfect for busy nights. It combines spicy buffalo sauce with cheesy goodness for a satisfying meal.

Ingredients

Pasta

  • 8 ounces penne pasta
  • 2 cups cooked shredded chicken
  • 1 cup buffalo sauce
  • 1 cup cream cheese, softened
  • 1 cup greek yogurt
  • 1 cup shredded cheddar cheese
  • 1 cup shredded mozzarella cheese
  • 1/2 cup chopped green onions
  • 1 teaspoon garlic powder
  • 1 teaspoon onion powder
  • to taste salt and pepper

Garnish

  • fresh parsley (optional)

Instructions 

  • Preheat oven to 350°F (175°C). Cook pasta until al dente, then drain.
  • Mix shredded chicken, buffalo sauce, cream cheese, Greek yogurt, garlic powder, onion powder, salt, and pepper until combined.
  • Add cooked pasta and half the cheeses to the mixture, stirring to coat.
  • Transfer to a greased baking dish, top with remaining cheese and green onions, then bake for 25-30 minutes until bubbly and golden.
  • Garnish with parsley if desired, let cool briefly, then serve.

Notes

For extra flavor, add a dash of hot sauce or serve with celery sticks.
Calories: 650kcal
Cost: $15
Course: Dinner
Keyword: Buffalo, chicken, pasta

Nutrition

Calories: 650kcal | Carbohydrates: 70g | Protein: 50g | Fat: 30g | Sodium: 1200mg

Loved this recipe? Save it to your favorite Pinterest board so you can easily find it later! It’s the perfect way to keep all your sweet ideas in one place. ✨

Delicious creamy pasta bake with layers of cheese and a golden crust, garnished with parsley.